Django DevOps实践指南
1. 学习目标
- 掌握Django项目的CI/CD流程
- 学习使用GitHub Actions实现自动化部署
- 理解测试自动化和代码质量监控
- 掌握生产环境的部署和监控
2. 核心知识点
| 模块 | 重要程度 | 掌握要求 |
|---|---|---|
| CI/CD基础概念 | ⭐⭐⭐⭐⭐ | 深入理解 |
| GitHub Actions | ⭐⭐⭐⭐⭐ | 熟练使用 |
| 自动化测试 | ⭐⭐⭐⭐ | 掌握配置 |
| 代码质量检查 | ⭐⭐⭐⭐ | 理解并应用 |
| 自动化部署 | ⭐⭐⭐⭐⭐ | 熟练掌握 |
3. CI/CD配置示例
3.1 GitHub Actions工作流配置
yaml
# .github/workflows/django.yml

name: Django CI/CD

on:
  push:
    branches: [ main ]
  pull_request:
    branches: [ main ]

jobs:
  test:
    runs-on: ubuntu-latest
    services:
      postgres:
        image: postgres:13
        env:
          POSTGRES_USER: postgres
          POSTGRES_PASSWORD: postgres
          POSTGRES_DB: github_actions
        ports:
          - 5432:5432
        options: >-
          --health-cmd pg_isready
          --health-interval 10s
          --health-timeout 5s
          --health-retries 5

    steps:
    - uses: actions/checkout@v2

    - name: Set up Python
      uses: actions/setup-python@v2
      with:
        python-version: '3.9'

    - name: Install Dependencies
      run: |
        python -m pip install --upgrade pip
        pip install -r requirements.txt

    - name: Run Tests
      env:
        DATABASE_URL: postgresql://postgres:postgres@localhost:5432/github_actions
      run: |
        python manage.py test

    - name: Run Linting
      run: |
        pip install flake8
        flake8 .

    - name: Run Coverage
      run: |
        pip install coverage
        coverage run manage.py test
        coverage report

  deploy:
    needs: test
    runs-on: ubuntu-latest
    if: github.ref == 'refs/heads/main'

    steps:
    - uses: actions/checkout@v2

    - name: Deploy to Production
      uses: appleboy/ssh-action@master
      with:
        host: ${{ secrets.SERVER_HOST }}
        username: ${{ secrets.SERVER_USER }}
        key: ${{ secrets.SSH_PRIVATE_KEY }}
        script: |
          cd /var/www/myproject
          git pull origin main
          source venv/bin/activate
          pip install -r requirements.txt
          python manage.py migrate
          python manage.py collectstatic --noinput
          sudo systemctl restart gunicorn
3.2 自动化测试配置
python
# myproject/settings_test.py

from .settings import *

DATABASES = {
    'default': {
        'ENGINE': 'django.db.backends.postgresql',
        'NAME': 'github_actions',
        'USER': 'postgres',
        'PASSWORD': 'postgres',
        'HOST': 'localhost',
        'PORT': '5432',
    }
}

EMAIL_BACKEND = 'django.core.mail.backends.locmem.EmailBackend'
3.3 代码质量检查配置
ini
# setup.cfg

[flake8]
max-line-length = 120
exclude = .git,*/migrations/*,venv
ignore = E501,W503

[coverage:run]
source = .
omit =
    */tests/*
    */migrations/*
    venv/*
    manage.py

[coverage:report]
fail_under = 80
show_missing = True
4. 部署脚本
4.1 生产环境部署脚本
bash
#!/bin/bash
# deploy.sh

set -e

# 1. 更新代码
git pull origin main

# 2. 激活虚拟环境
source venv/bin/activate

# 3. 安装依赖
pip install -r requirements.txt

# 4. 收集静态文件
python manage.py collectstatic --noinput

# 5. 执行数据库迁移
python manage.py migrate --noinput

# 6. 重启Gunicorn
sudo systemctl restart gunicorn

# 7. 重启Nginx
sudo systemctl restart nginx

# 8. 清理缓存
rm -rf /tmp/django_cache/*

echo "部署完成!"
4.2 Gunicorn配置
python
# gunicorn.conf.py

import multiprocessing

bind = "unix:/run/gunicorn.sock"
workers = multiprocessing.cpu_count() * 2 + 1
threads = 2
worker_class = "gthread"
worker_connections = 1000
timeout = 30
keepalive = 2

errorlog = "/var/log/gunicorn/error.log"
accesslog = "/var/log/gunicorn/access.log"
loglevel = "info"

daemon = False
pidfile = "/run/gunicorn/pid"
user = "www-data"
group = "www-data"

reload = False
max_requests = 2000
max_requests_jitter = 400

capture_output = True
enable_stdio_inheritance = True
5. 监控配置
5.1 Prometheus配置
yaml
# prometheus.yml

global:
  scrape_interval: 15s
  evaluation_interval: 15s

scrape_configs:
  - job_name: 'django'
    static_configs:
      - targets: ['localhost:8000']
    metrics_path: '/metrics'
5.2 Django应用监控
python
# monitoring.py
from prometheus_client import Counter, Histogram
from django.conf import settings
# 请求计数器
REQUEST_COUNT = Counter(
'django_http_requests_total',
'Total HTTP requests count',
['method', 'endpoint', 'status']
)
# 请求延迟直方图
REQUEST_LATENCY = Histogram(
'django_http_request_duration_seconds',
'HTTP request latency',
['method', 'endpoint']
)
class PrometheusMiddleware:
def __init__(self, get_response):
self.get_response = get_response
def __call__(self, request):
if request.path == '/metrics':
return self.get_response(request)
method = request.method
path = request.path
with REQUEST_LATENCY.labels(method=method, endpoint=path).time():
response = self.get_response(request)
REQUEST_COUNT.labels(
method=method,
endpoint=path,
status=response.status_code
).inc()
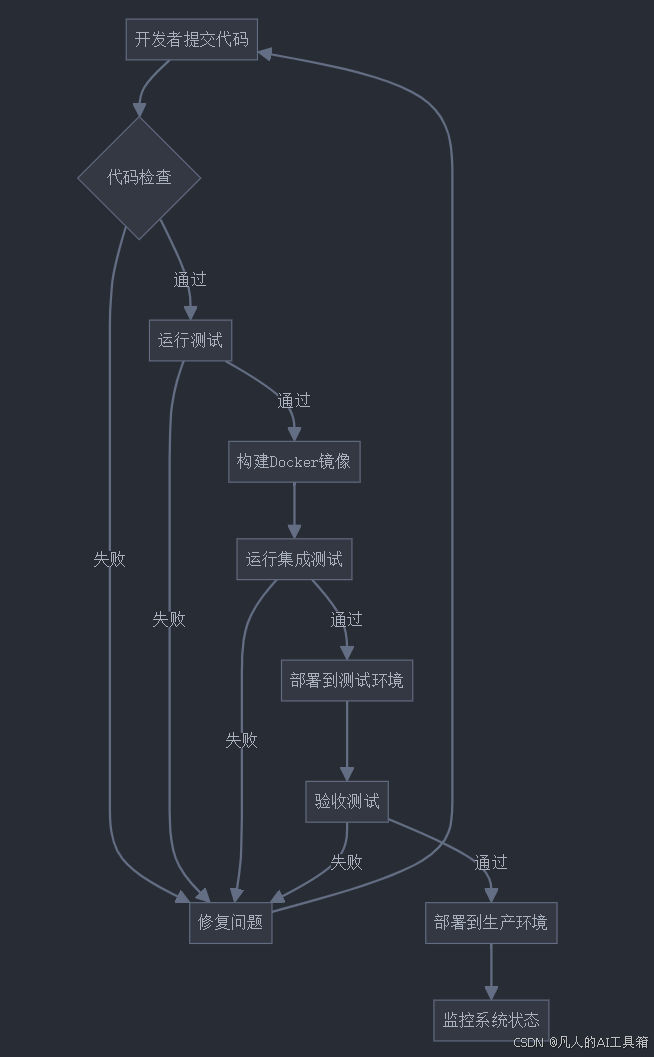
return response6. 流程图
7. 最佳实践建议
7.1 安全措施
python
# security.py

from django.conf import settings
from django.http import HttpResponseForbidden

class SecurityMiddleware:
    def __init__(self, get_response):
        self.get_response = get_response

    def __call__(self, request):
        # 检查IP白名单
        if settings.IP_WHITELIST and request.META.get('REMOTE_ADDR') not in settings.IP_WHITELIST:
            return HttpResponseForbidden()

        # 添加安全头
        response = self.get_response(request)
        response['X-Content-Type-Options'] = 'nosniff'
        response['X-Frame-Options'] = 'DENY'
        response['X-XSS-Protection'] = '1; mode=block'

        return response
7.2 备份策略
python
# backup.py

import os
import datetime
import subprocess

def backup_database():
    date = datetime.datetime.now().strftime('%Y%m%d_%H%M%S')
    filename = f'backup_{date}.sql'

    # 数据库备份
    subprocess.run([
        'pg_dump',
        '-U', os.getenv('DB_USER'),
        '-h', os.getenv('DB_HOST'),
        os.getenv('DB_NAME'),
        '-f', f'/backups/{filename}'
    ])

    # 压缩备份文件
    subprocess.run(['gzip', f'/backups/{filename}'])

    # 上传到S3
    subprocess.run([
        'aws', 's3', 'cp',
        f'/backups/{filename}.gz',
        f's3://{os.getenv("BACKUP_BUCKET")}/databases/'
    ])
8. 性能优化
8.1 缓存配置
python
# settings.py

CACHES = {
    'default': {
        'BACKEND': 'django.core.cache.backends.redis.RedisCache',
        'LOCATION': 'redis://127.0.0.1:6379/1',
        'OPTIONS': {
            'CLIENT_CLASS': 'django_redis.client.DefaultClient',
            'PARSER_CLASS': 'redis.connection.HiredisParser',
            'CONNECTION_POOL_CLASS': 'redis.connection.BlockingConnectionPool',
            'CONNECTION_POOL_CLASS_KWARGS': {
                'max_connections': 50,
                'timeout': 20,
            }
        }
    }
}

# 缓存会话
SESSION_ENGINE = "django.contrib.sessions.backends.cache"
SESSION_CACHE_ALIAS = "default"
8.2 数据库优化
python
# settings.py

DATABASES = {
    'default': {
        'ENGINE': 'django.db.backends.postgresql',
        'NAME': os.getenv('DB_NAME'),
        'USER': os.getenv('DB_USER'),
        'PASSWORD': os.getenv('DB_PASSWORD'),
        'HOST': os.getenv('DB_HOST'),
        'PORT': os.getenv('DB_PORT', '5432'),
        'CONN_MAX_AGE': 60,
        'OPTIONS': {
            'connect_timeout': 10,
            'statement_timeout': 30000,
        }
    }
}
配置完成后,你的Django项目就具备了完整的DevOps支持,包括自动化测试、部署和监控。记住要根据实际项目需求调整这些配置。定期检查和更新这些配置也是保持系统健康的重要部分。
怎么样今天的内容还满意吗?再次感谢朋友们的观看,关注GZH:凡人的AI工具箱,回复666,送您价值199的AI大礼包。最后,祝您早日实现财务自由,还请给个赞,谢谢!