1. XGBoost特点
XGBoost 算法就能利用大量的数据和复杂的规则,做出非常准确的预测。在疾病风险 、特征选择、金融等数据分析和预测中表现突出。
2. XGBoost特点
优点:
- 预测准确性高:XGBoost 采用了梯度提升框架,通过不断迭代训练多棵决策树,并将它们的结果进行组合,能够捕捉到数据中复杂的非线性关系,从而实现很高的预测精度,在许多数据挖掘和机器学习竞赛中表现卓越。
- 训练速度快:该算法在训练过程中进行了大量的优化,例如采用了并行计算技术,能在多个 CPU 核心上同时进行计算,大大提高了训练速度,可快速处理大规模数据集。
- 可处理多种数据类型:对数据类型的适应性强,既能处理数值型数据,也能处理类别型数据。对于类别型数据,XGBoost 可自动进行处理和转换,无需复杂的预处理。
- 鲁棒性强:具有较好的抗噪能力,对数据中的噪声和异常值有一定的容忍度,不易受到个别异常数据的影响,能保持较为稳定的预测性能。
- 可解释性较好:与一些复杂的深度学习模型相比,XGBoost 的决策过程相对容易理解。通过查看决策树的结构和特征的重要性,可以一定程度上解释模型为什么做出这样的预测,为模型的应用和优化提供了便利。
缺点:
- 参数调整复杂:XGBoost 有较多的参数,如学习率、树的数量、树的深度等,这些参数对模型的性能影响较大,且相互之间存在一定的关联。要找到一组最优的参数组合,需要花费大量的时间和精力进行调参,对使用者的经验要求较高。
- 对大规模数据内存要求高:虽然 XGBoost 在处理大规模数据时表现出色,但随着数据量的不断增加,尤其是在处理超高维数据时,其内存消耗也会相应增大,可能需要较高的硬件配置来支持,否则会出现内存不足的问题,限制了其在一些资源有限环境下的应用。
- 可能过拟合:在某些情况下,如果数据量较小或者模型复杂度设置不合理,XGBoost 容易出现过拟合现象,即模型在训练数据上表现很好,但在新的测试数据上表现较差,泛化能力下降。这就需要使用者在训练过程中采取一些正则化方法或交叉验证等手段来防止过拟合。
- 对数据分布变化敏感:XGBoost 是基于给定的训练数据进行模型训练的,如果测试数据的分布与训练数据的分布存在较大差异,模型的预测性能可能会受到明显影响,导致预测结果不准确。
3. XGBoost 基本框架
pyhton
# 安装基础库
pip install xgboost
pip install scikit-learn
python代码:
python
import xgboost as xgb
from sklearn.model_selection import train_test_split
from sklearn.metrics import accuracy_score
from sklearn.datasets import make_classification
from sklearn.datasets import load_breast_cancer

# 生成有20个特征的1000个样本数据
X, y = make_classification(n_samples=1000, n_features=20, random_state=42)

# X为特征矩阵,y为标签(目标变量)
print(X)
print(y)

# 划分80%训练集和20%测试集
X_train, X_test, y_train, y_test = train_test_split(X, y, test_size=0.2, random_state=42)

# 定义 XGBoost 分类器
clf = xgb.XGBClassifier(
    objective='binary:logistic', # 目标函数
    eval_metric='logloss', # 评估指标
    learning_rate=0.1, # 学习率
    max_depth=3, # 树的最大深度
    n_estimators=100 # 树的数量
)

# 训练模型
clf.fit(X_train, y_train)

# 预测
y_pred = clf.predict(X_test)

# 计算准确率
accuracy = accuracy_score(y_test, y_pred)
print(f"Accuracy: {accuracy:.4f}")
# Accuracy: 0.8950
4. 使用 XGBoost 算法进行特征选择
4.1 基于特征重要性的特征选择
XGBoost 提供了一种内置的特征重要性评估机制,可以通过get_booster().get_score(importance_type='weight') 或 get_booster().get_score(importance_type='gain') 来获取不同类型的特征重要性分数。
weight 类型的重要性是基于特征在树中被用作分割点的次数。使用次数越多,该特征被认为越重要。importance = clf.get_booster().get_score(importance_type='weight') 会返回一个字典,其中键是特征的索引,值是该特征在树中作为分割点的次数。
gain 类型的重要性是基于特征用于分割时带来的平均增益。增益越大,特征越重要。importance_gain = clf.get_booster().get_score(importance_type='gain') 同样返回一个字典,键是特征索引,值是平均增益。
python
import xgboost as xgb
from sklearn.datasets import load_breast_cancer
from sklearn.model_selection import train_test_split

# 加载乳腺癌数据集
data = load_breast_cancer()
# 特征列表
list_features = data.feature_names
X = data.data
y = data.target
print(X)

# 划分训练集和测试集
X_train, X_test, y_train, y_test = train_test_split(X, y, test_size=0.2, random_state=42)

# 定义 XGBoost 分类器
clf = xgb.XGBClassifier(
    objective='binary:logistic',
    eval_metric='logloss',
    learning_rate=0.1,
    max_depth=3,
    n_estimators=100
)

# 训练模型
clf.fit(X_train, y_train)

# 获取特征重要性分数
importance = clf.get_booster().get_score(importance_type='weight')

# 打印特征重要性分数
print(importance)

# 或者使用 gain 类型的重要性分数
importance_gain = clf.get_booster().get_score(importance_type='gain')
print(importance_gain)

# 按重要性排序并选择前 k 个重要特征
k = 10
sorted_importance = sorted(importance.items(), key=lambda x: x[1], reverse=True)[:k]
selected_features_index = [item[0][1:] for item in sorted_importance]
selected_features = [list_features[int(index)] for index in selected_features_index]

# 前10重要特征列表索引
print(f"Selected top {k} features index: {selected_features_index}\n")

# 全部特征列表
print(f"Features list: {list_features}\n")

# 前10重要特征列表名称
print(f"Selected top {k} features: {selected_features}\n")

# Selected top 10 features: ['worst texture', 'area error', 'mean texture', 'worst concave points', 'mean concave points', 'worst area', 'worst concavity', 'worst radius', 'compactness error', 'mean smoothness']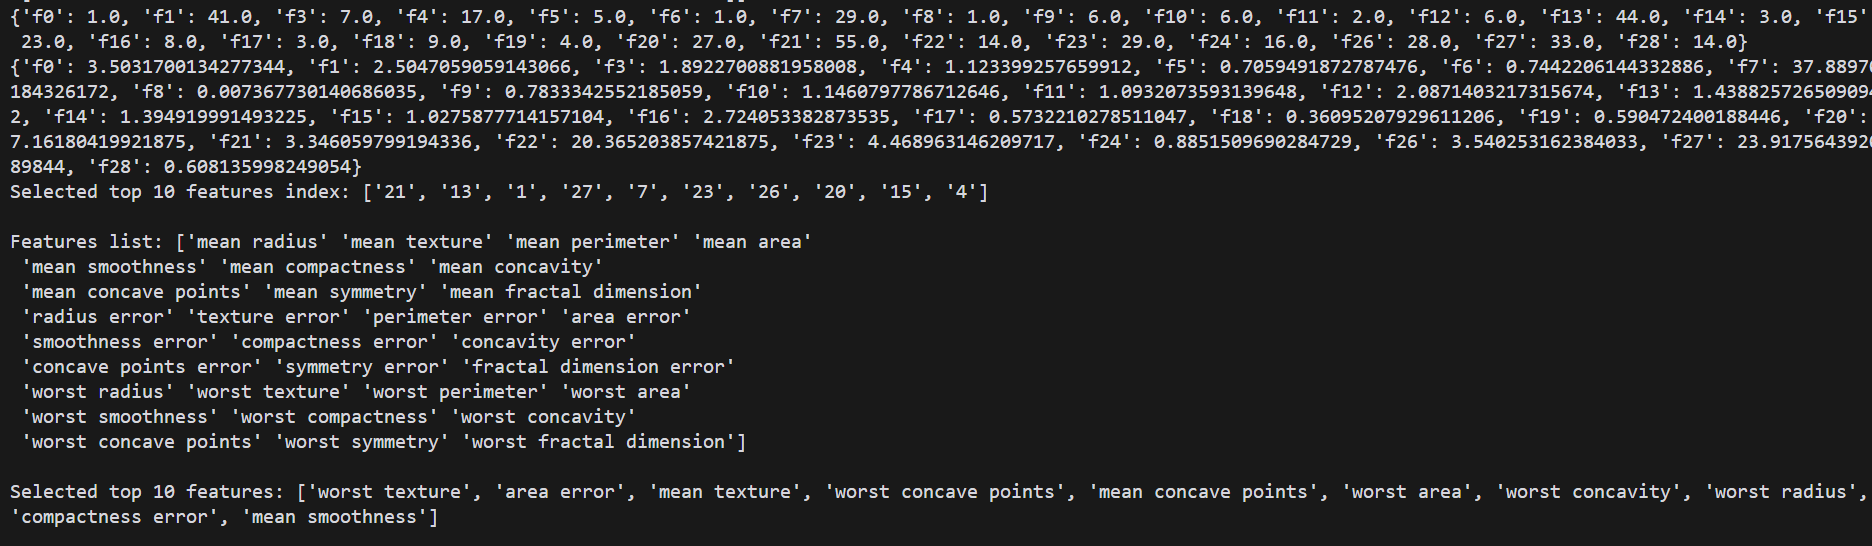
4.2 使用内置的特征选择器
XGBoost 提供了内置的特征选择器 xgb.XGBRFClassifier,在训练过程中会自动进行特征选择。
python
# 使用内置的特征选择器
clf_selector = xgb.XGBRFClassifier(
    objective='binary:logistic',
    eval_metric='logloss',
    learning_rate=0.1,
    max_depth=3,
    n_estimators=100,
    colsample_bynode=0.3  # 每次分裂时随机采样的特征比例
)


# 训练模型
clf_selector.fit(X_train, y_train)

# 输出自动选择的特征
print(f"Selected features by XGBRFClassifier: {clf_selector.get_booster().feature_names}")
5. 自定义数据集
可用于诸如糖尿病风险预测、癌症风险预测等自定义数据集。
python
import pandas as pd
import numpy as np
import xgboost as xgb
from sklearn.model_selection import train_test_split
from sklearn.metrics import accuracy_score

# 读取数据集
data = pd.read_csv('data.csv', sep='\t')

# 最后一列是目标变量,其余列是特征
X = data.iloc[:, :-1]
y = data.iloc[:, -1]

# 分割为训练集和测试集
X_train, X_test, y_train, y_test = train_test_split(X, y, test_size=0.2, random_state=42)

# 创建 XGBoost 分类器
clf = xgb.XGBClassifier(
    objective='binary:logistic',  # 二分类问题
    eval_metric='logloss',  # 评估指标
    learning_rate=0.1,  # 学习率
    max_depth=3,  # 树的最大深度
    n_estimators=100  # 树的数量
)

# 训练分类器
clf.fit(X_train, y_train)

# 进行预测
y_pred = clf.predict(X_test)

# 计算准确率
accuracy = accuracy_score(y_test, y_pred)
print(f"Accuracy: {accuracy:.4f}")

#################################
# 为了进一步优化性能,可以使用 XGBoost 的 DMatrix 数据结构,它是 XGBoost 特有的数据结构,能更高效地处理数据。
#################################

# 将数据转换为 DMatrix 格式
dtrain = xgb.DMatrix(X_train, label=y_train)
dtest = xgb.DMatrix(X_test, label=y_test)

# 定义参数
params = {
    'objective': 'binary:logistic',
    'eval_metric': 'logloss',
    'learning_rate': 0.1,
    'max_depth': 3,
    'n_estimators': 100
}

# 训练模型
model = xgb.train(
    params,
    dtrain,
    num_boost_round=100,  # 迭代次数
    evals=[(dtrain, 'train'), (dtest, 'test')],  # 评估数据集
    early_stopping_rounds=10  # 提前停止轮数
)

# 预测
y_pred = model.predict(dtest)

# 将概率转换为类别标签
y_pred_labels = np.where(y_pred > 0.5, 1, 0)

# 计算准确率
accuracy = accuracy_score(y_test, y_pred_labels)
print(f"Accuracy: {accuracy:.4f}")

# 可以查看哪些特征对模型的预测最为重要,这有助于理解模型的行为。
# 查看特征重要性
xgb.plot_importance(clf)

# 获取特征重要性得分
importance = clf.get_booster().get_score(importance_type='weight')
print(importance)

# 保存模型
clf.save_model('xgb_model.model')
使用训练的模型对新数据进行风险预测:
确保 X_new 的特征顺序、类型和预处理与训练数据一致。
python
import xgboost as xgb

# 从文件加载模型
loaded_model = xgb.Booster()
loaded_model.load_model('xgb_model.model')

# 加载的模型包装为 XGBClassifier 对象
loaded_clf = xgb.XGBClassifier()
loaded_clf._Booster = loaded_model

# 新的输入数据X_new, 与特征数量保存一致
# 例如 [10, 20, 0.1] 为一个样本的三个特征
# 例如 [[[10, 20, 0.1], [10, 20, 0.1]]] 为2个样本的三个特征

# 也可为dataframe格式
# X_new = pd.DataFrame({
#    'feature1': [1, 4, 7],
#    'feature2': [2, 5, 8],
#    'feature3': [2, 5, 8],
# })

X_new =...

# 预测结果
y_pred = loaded_clf.predict(xgb.DMatrix(X_new))

print(y_pred)