一、props
props 是使用频率最高的一种通信方式,常用于:父 ↔ 子
- 若父传子: 属性值是非函数;
- 若子传父: 属性值是函数。
- Props : 指的是传递给子组件的属性。子组件通过
props接收数据。 - 单向数据流 : 数据通过
props从父组件流向子组件,子组件不能直接修改props(这是一个原则,确保了数据流的一致性)。所有变化应通过父组件中的数据传递。
javascript
// Father.vue

<template>
    <div class="father">
        <h2>父组件</h2>
        <h3>汽车:{

  {car}}</h3>
        <h3 v-show="toy">子给的玩具:{

  {toy}}</h3>
        <Child :car="car" :sendToy="getToy"></Child>
    </div>
</template>

<script setup lang='ts'>
    import Child from './Child.vue'
    import {ref} from 'vue'

    const car = ref('奔驰')
    const toy = ref('')
    const getToy = (value:string)=> {
        console.log('父',value);
        toy.value = value;
    }
</script>

<style>

</style>
javascript
// Child.vue

<template>
    <div class="child">
        <h2>子组件</h2>
        <h2>父给的车:{

  {props.car}}</h2>
        <button @click="props.sendToy(toy)">把玩具给父亲</button>
    </div>
</template>

<script setup lang='ts'>
import { ref } from 'vue'

const toy = ref('奥特曼')
// 声明接收父组件
const props = defineProps(['car', 'sendToy'])
</script>

<style>

</style>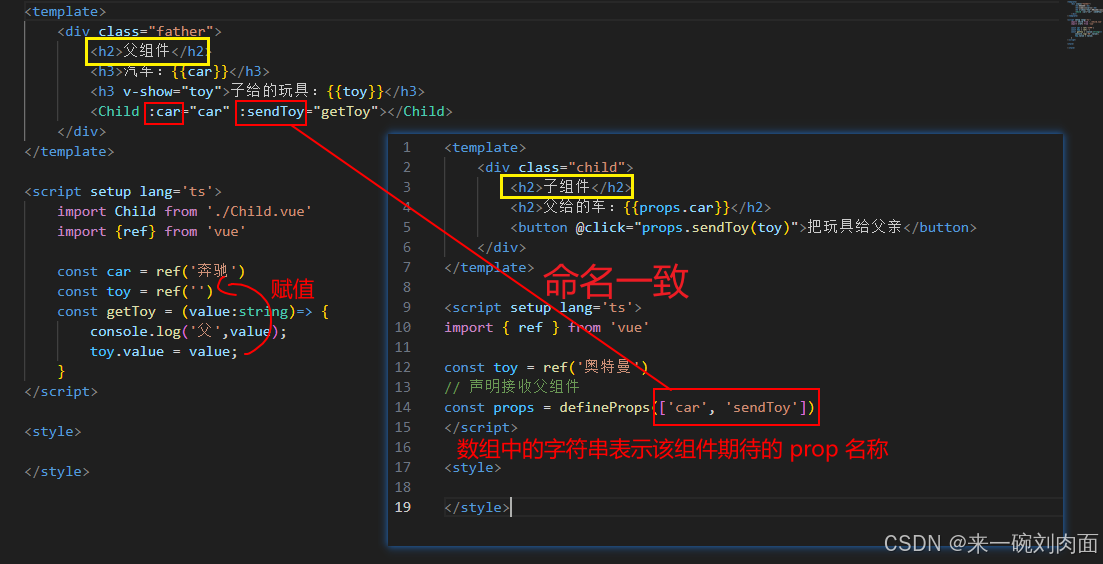
二、emit 自定义事件
javascript
// Father.vue

<template>
    <div class="father">
        <h1>父组件</h1>
        <h5 v-show="toy">子组件给的玩具:{

  { toy }}</h5>
        <!-- 给子组件 Child 绑定事件  -->
        <Child @send-toy="getToy"></Child>
    </div>
</template>

<script setup lang='ts'>
import Child from './Child.vue'
import {ref} from 'vue'

const toy = ref('')

// 用于保存传递过来的玩具
const getToy = (value:string,str:string) => {

    console.log('来了来了',value);

    toy.value = str;

}
</script>

<style>

</style>
javascript
// Child.vue

<template>
    <div class="child">
        <h1>子组件</h1>
        <h5>玩具:{

  {toy}}</h5>
        <button @click="emit('send-toy','子组件传递的',toy)">给父亲</button>
    </div>
</template>

<script setup lang='ts'>
import { ref } from 'vue'

const toy = ref('奥特曼')
// 声明事件
const emit = defineEmits(['send-toy'])


</script>

<style>

</style>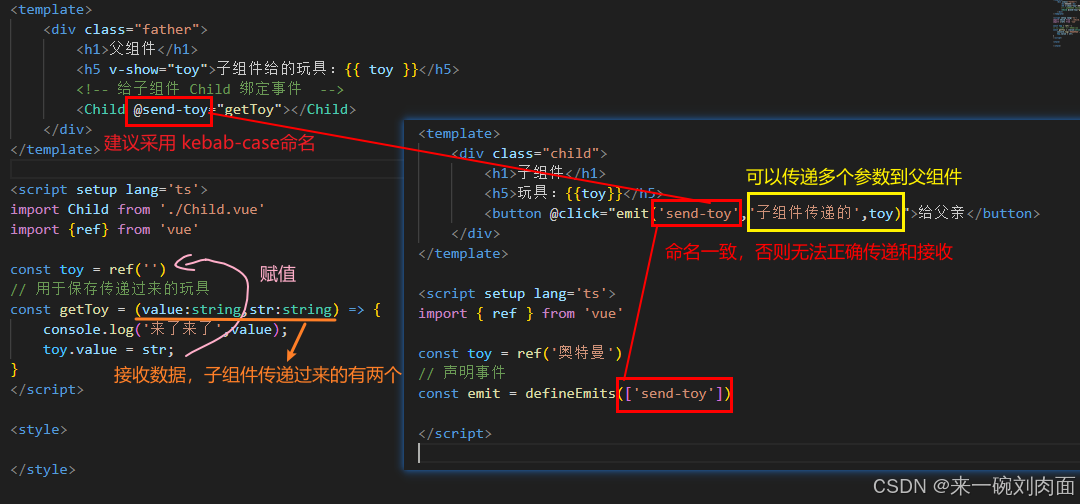
三、mitt
在 Vue 3 中,mitt 是一个小型的事件发射器库,常用于在组件之间进行非父子关系的数据传递或事件通信。使用 **mitt**可以简化事件的发布和订阅,使得不同组件之间的交流更加方便。
mitt 是一个轻量级的事件总线,允许在多个组件之间进行事件传递。只需创建一个 mitt 实例,然后在需要的组件中注册事件监听器和触发事件。
安装 mitt:
javascript
pnpm install mitt
// 或者
npm install mitt
(一)创建 mitt 实例:
在 Vue 3 中,可以创建一个 mitt 实例,通常在 src 目录下的一个单独文件中进行管理,比如可以创建一个 emitter.ts 或 mitt.ts 文件:
javascript
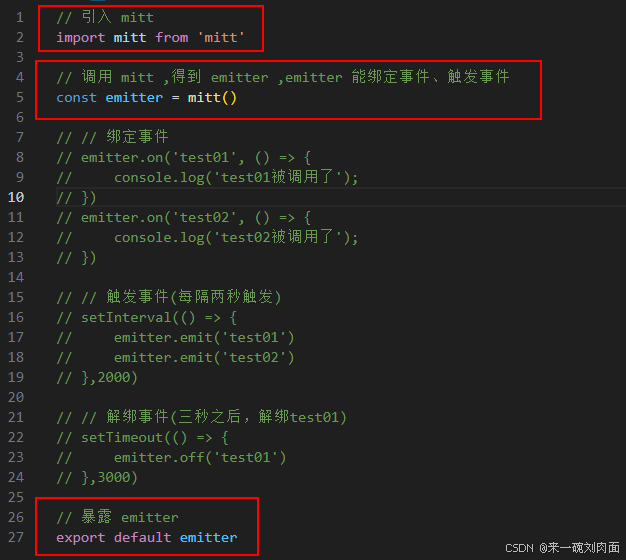
// 引入 mitt
import mitt from 'mitt'

// 调用 mitt ,得到 emitter ,emitter 能绑定事件、触发事件
const emitter = mitt()

// // 绑定事件
// emitter.on('test01', () => {
//     console.log('test01被调用了');
// })
// emitter.on('test02', () => {
//     console.log('test02被调用了');
// })

// // 触发事件(每隔两秒触发)
// setInterval(() => {
//     emitter.emit('test01')
//     emitter.emit('test02')
// },2000)

// // 解绑事件(三秒之后,解绑test01)
// setTimeout(() => {
//     emitter.off('test01')
// },3000)

// 暴露 emitter
export default emitter
(二)在组件中使用 mitt :
可以在不同的组件中引入这个**mitt** 实例,进行事件的注册和触发。
javascript
// Father.vue

<template>
    <div class="father">
        <h1>父组件</h1>
        <Child01></Child01>
        <Child2></Child2>
    </div>
</template>

<script setup lang='ts'>
import Child01 from './Child01.vue';
import Child2 from './Child2.vue'
</script>

<style>

</style>
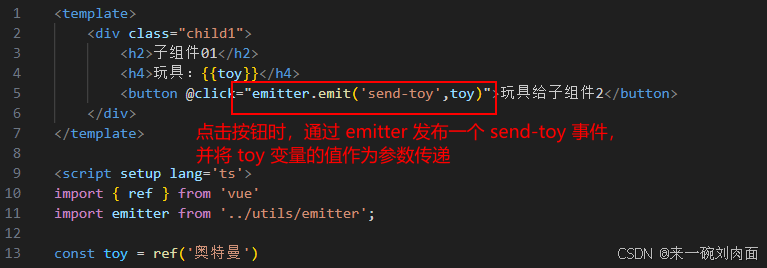
javascript
// Child01.vue

<template>
    <div class="child1">
        <h2>子组件01</h2>
        <h4>玩具:{

  {toy}}</h4>
        <button @click="emitter.emit('send-toy',toy)">玩具给子组件2</button>
    </div>
</template>

<script setup lang='ts'>
import { ref } from 'vue'
import emitter from '../utils/emitter';

const toy = ref('奥特曼')

</script>

<style>

</style>
javascript
<template>
    <div class="child2">
        <h2>子组件2</h2>
        <h4>电脑:{

  { computer }}</h4>
        <h4>子组件1给的玩具:{

  { toy }}</h4>
    </div>
</template>

<script setup lang='ts'>

import { ref,onUnmounted} from 'vue'
import emitter from '../utils/emitter';

const computer = ref('联想')
const toy = ref('')
// 子组件2 接收数据
// 给 emitter 绑定 send-toy 事件
emitter.on('send-toy', (value:any) => {
    console.log('send-toy', value);
    toy.value = value;

})

// 卸载的时候
onUnmounted(() => {
    // 在组件卸载时,解绑这个 send-toy 事件
    emitter.off('send-toy')
})
</script>

<style>

</style>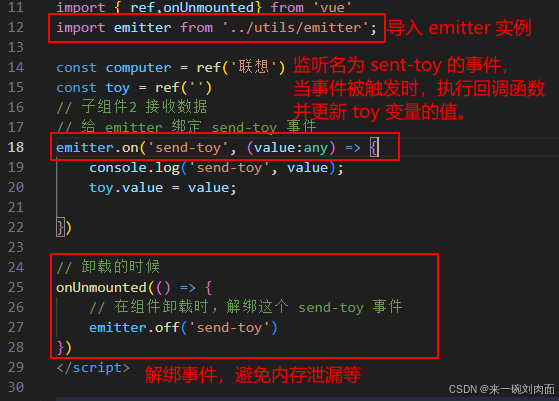
四、v - model
父传子,子传父都可
javascript
// Father.vue

<template>
    <h1>父组件</h1>
    <!-- v-model 用在html标签上 -->
    <!-- <input type="text" v-model="username"> -->
    <!-- 同上一行代码一致(底层原理) -->
    <!-- <input type="text" :value="username" @input="username=(<HTMLInputElement>$event.target).value" > -->

    <!-- v-model 用在组件标签上 -->
    <LIU v-model="username"/>
    <!-- 基本原理 -->
    <!-- <LIU
        :modelValue="username"
        @update:modelValue="username = $event"
    /> -->

    <!-- 修改 modelValue 这里的ming 就是重命名,这样可以传递多个参数-->
    <!-- <LIU v-model:ming="username"></LIU> -->
</template>

<script setup lang='ts'>
import {ref} from 'vue'
import LIU from './LIU.vue'

const username = ref('zhangsan')
</script>

<style>

</style>
javascript
// LIU.vue

<template>
    <input
        type="text"
        :value="modelValue"
        @input="emit('update:modelValue',(<HTMLInputElement>$event.target).value)"
    >
</template>

<script setup lang='ts'>
defineProps(['modelValue'])
const emit = defineEmits(['update:modelValue'])
</script>

<style scoped>
    input{
        border: 2px solid skyblue;
        background-image: linear-gradient(45deg,red,yellow,green);
    }
</style>
五、$attrs
$attrs 用于实现当前组件的父组件 ,向当前组件的子组件通信 (祖 ↔ 孙)
具体说明:$attrs 是一个对象,包含所有父组件传入的标签属性。
注意:$attrs4 会自动排除 props 中声明的属性(可以认为声明过的 props 被子组件自己"消费"了)
在 Vue 3 中,$attrs 是一个非常有用的特性,它包含了组件的所有"非 props"属性和事件。这对创建泛用组件(如包装器组件或高阶组件)非常有帮助,允许将未声明的属性自动传递给子组件。
使用场景
- 创建包装组件,允许将原始组件的属性直接传递下去。
- 处理动态属性的情况,而不必逐个声明 props。
- 结合**
v-bind="$attrs"** 自动绑定属性。
javascript
// Father.vue

<template>
    <h1>父组件</h1>
    <h4>a:{

  { a }},</h4>
    <h4>b:{

  { b }},</h4>
    <h4>c:{

  { c }}</h4>
    <!-- v-bind="{x:100,y:200} 相当于 :x="100" :y="200" -->
    <Child :a="a" :b="b" :c="c" v-bind="{x:100,y:200}" :updateA='updateA'></Child>

</template>

<script setup lang='ts'>
import { ref } from 'vue';
import Child from './Child.vue';

const a = ref(1)
const b = ref(2)
const c = ref(3)

// 接收 孙组件 传递过来的值
const updateA = (value:number) => {
    a.value += value;
}
</script>

<style>

</style>
javascript
// Child.vue

<template>
    <h1>子组件</h1>
    <!-- <h4>a:{

  { a }}</h4> -->
    <!-- props 没有接收,则可以使用 $attrs 来接收剩下的 -->
    <h4>其他:{

  {$attrs}}</h4>
    <!-- 传递给 孙组件 (子组件传递给子组件的子组件)-->
    <GrandChild v-bind="$attrs"></GrandChild>
</template>

<script setup lang='ts'>
// import { ref } from 'vue';
import GrandChild from './GrandChild.vue';
// 只接受一个参数 a
// defineProps(['a'])
</script>

<style>

</style>
javascript
// GrandChild.vue

<template>
    <h1>孙组件</h1>
    <h4>a:{

  { a }}</h4>
    <h4>c:{

  { c }}</h4>
    <h4>b:{

  { b }}</h4>
    <h4>x:{

  { x }}</h4>
    <h4>y:{

  { y }}</h4>
    <button @click="updateA(2)">点击父组件a改变</button>
</template>

<script setup lang='ts'>
defineProps(['a', 'b', 'c', 'x', 'y', 'updateA'])

</script>

<style>

</style>- 访问
$attrs:$attrs是一个对象,其中的键是传递的属性名,值是传递的属性值。 - 在子组件中使用
v-bind="$attrs"将所有未声明的属性传递给一个子组件。 - 不再需要手动声明每个 prop,让组件更加灵活和易于使用。
六、refs 、parent
$refs 是一个对象,包含了注册为 ref 的所有 DOM 元素和子组件的引用。通过 $refs,可以直接访问这些元素或组件的实例,以便进行操作。
**$refs **使用场景
- 直接操作 DOM 元素(例如聚焦输入框、滚动到某个元素等)。
- 访问子组件的方法和属性。
$parent 用于访问当前组件的父组件实例。通过 $parent,可以获取父组件的属性、方法和状态。
**$parent **使用场景
- 在子组件中需要访问或修改父组件的数据时。
- 当父组件中定义的方法需要在子组件中进行调用。
$refs : 父传子,值为对象,包含所有被 ref 属性标识的 DOM 元素或组件实例。
$parent : 子传父,值为对象,当前组件的父组件实例对象。
javascript
// Father.vue

<template>
    <h1>父组件</h1>
    <h5>房子:{

  {house}}</h5>
    <button @click="changeToy">修改子组件1的玩具</button>
    <button @click="changeComputer">修改子组件1的电脑</button>
    <!-- $refs 包含所有的子组件对象实例 -->
    <button @click="getAllChild($refs)">让所有子组件的书籍增加</button>
    <Child1 ref="one"></Child1>
    <Child2 ref="two"></Child2>
</template>

<script setup lang='ts'>
import { ref } from 'vue';
import Child1 from './Child1.vue';
import Child2 from './Child2.vue';

const house = ref(4)
// 每个子组件单独声明
const one = ref()
const two = ref()

const changeToy = () => {
    console.log(one.value);
    one.value.toy = '8520';
    two.value.computer = '惠普'
}
const changeComputer = () => {
    console.log(two.value);
    two.value.computer = '惠普'
}
//
const getAllChild = (refs:any) => {
    console.log(refs);
    for (const key in refs) {
        refs[key].book += 3;
    }
}
defineExpose({house})
</script>

<style>

</style>
javascript
// Child1.vue

<template>
    <h1>子组件1</h1>
    <h5>玩具:{

  {toy}}</h5>
    <h5>书籍:{

  {book}}本</h5>
    <button @click="minusHouse($parent)">房子减少</button>
</template>

<script setup lang='ts'>
import { ref } from 'vue';

const toy = ref('奥特曼')
const book = ref(3)

const minusHouse = (parent:any) => {
    console.log(parent);
    parent.house -= 1;

}

// 宏函数 把数据交给外部 这样父组件就可以直接操作组件的数据了
defineExpose({toy,book})
</script>

<style>

</style>
javascript
// Child2.vue

<template>
    <h1>子组件2</h1>
    <h5>电脑:{

  {computer}}</h5>
    <h5>书籍:{

  {book}}本</h5>
</template>

<script setup lang='ts'>
import { ref } from 'vue';


const computer = ref('联想')
const book = ref(6)

// 把数据交给外部 这样父组件就可以直接操作组件的数据了
defineExpose({computer,book})
</script>

<style>

</style>
七、provie & inject
在 Vue 3 中,provide 和 inject 是用于跨组件传递数据的机制,无须通过 props 或事件进行逐层传递。这在需要在组件树中的多个层级之间共享数据时非常有用,特别是在复杂的应用程序中。
-
provide: 用于定义一个数据源,通常在父组件中使用。通过provide,父组件可以将一些数据或对象提供给其后代组件。 -
inject: 用于在子组件中获取从父组件提供的数据。可以在子组件中访问provide声明的数据。
使用场景
- 在多个组件中共享状态(例如用户身份认证信息、主题设置等)。
- 避免在组件间通过 props 和 events 逐层传递数据,减少代码复杂性。
javascript
// Father.vue

<template>
    <h1>父组件</h1>
    <h5>金子:{

  {money}}</h5>
    <h5>车子:{

  {car.brand}},{

  { car.price }}</h5>
    <Child></Child>
</template>

<script setup lang='ts'>
import { reactive, ref,provide } from 'vue';
import Child from './Child.vue'

const money = ref(200)
const car = reactive({
    brand: '奔驰',
    price:100,
})

const updateMoney= (value:number)=> {
    money.value -= value
}

// 向后代(子,孙都可)提供数据 provide(名字,值)
// provide('qian', money)
// provide('che',car)
provide('moneyContext',{money,updateMoney})
provide('car',car)
</script>

<style>

</style>
javascript
// Child.vue

<template>
    <h1>子组件</h1>
    <GrandChild></GrandChild>
</template>

<script setup lang='ts'>
import GrandChild from './GrandChild.vue';
</script>

<style>

</style>
使用 provide 来提供一个响应式对象(如 ref 或 reactive),子组件通过 inject 获取的对象会自动保持响应式。这意味着,在父组件中更新数据值,子组件会实时反映这些改变。
javascript
// GrandChild.vue

<template>
    <h1>孙组件</h1>
    <h5>前:{

  {money}}</h5>
    <h5>车:{

  {car.brand}},{

  { car.price }}</h5>
    <!-- 孙 传 祖 -->
    <button @click="updateMoney(2)">花费money</button>
</template>

<script setup lang='ts'>
import { inject } from 'vue';

// inject() 接收数据
const {money,updateMoney} = inject('moneyContext',{money:0,updateMoney:(param:number)=>{}})
const car = inject('car',{brand:'未知',price:0})
</script>

<style>

</style>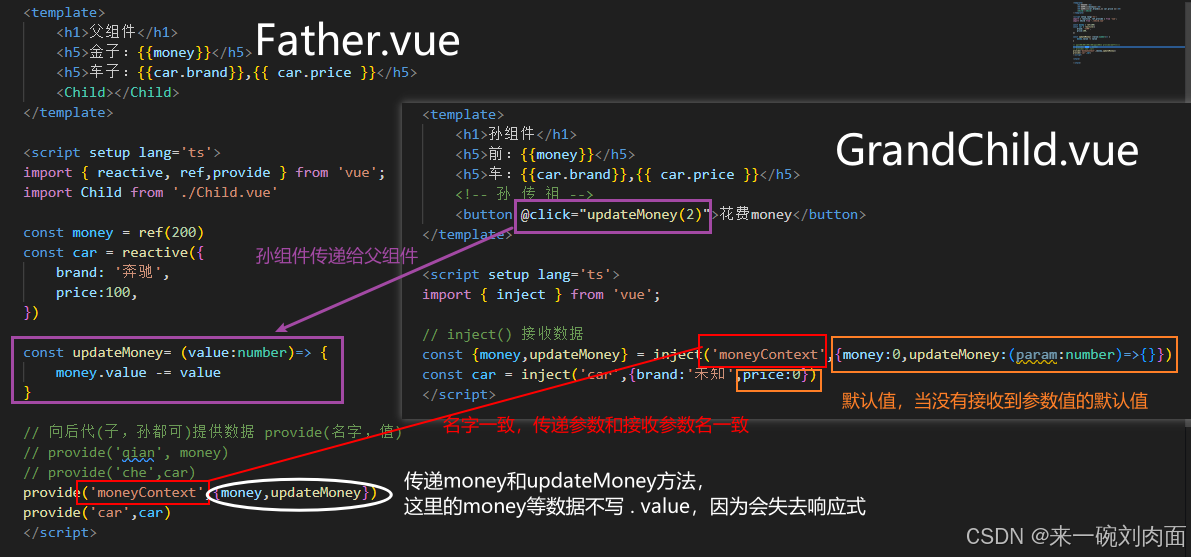
- 键的唯一性: 提供和注入的数据使用字符串作为键,因此,请确保所用的字符串是唯一的,避免冲突。
- 层级限制 :
inject只会查找最近的provide,而不会跨越多个层级。 - 响应性 : 如果注入的是一个非响应式的数据,子组件将不会自动更新。确保使用
ref或reactive以保持响应性。
八、pinia
参考之前的
九、slot
(一)默认插槽
javascript
// Father.vue

<template>
    <div class="father">
        <h1>父组件</h1>
        <div class="content">
            <!-- 组件写双标签 利用插槽  子组件使用 <slot>标签即可 -->
            <Category title="热门游戏列表" >
                <ul>
                    <li v-for="g in games" :key="g.id">{

  { g.name }}</li>
                </ul>
            </Category>
            <Category title="今日美食推荐" >
                <img :src="imgUrl" alt="">
            </Category>
            <Category title="今日影视推荐" >
                <video :src="videoUrl" controls></video>
            </Category>
        </div>
    </div>
</template>

<script setup lang='ts'>
import { reactive, ref } from 'vue';
import Category from './Category.vue';

const games = reactive([
    {id:'01',name:'王者'},
    {id:'02',name:'和平'},
    {id:'03',name:'联盟'},
    {id:'04',name:'求生'},
])
const imgUrl = ref('https://z1.ax1x.com/2023/11/19/piNxLo4.jpg')
const videoUrl = ref('http://clips.vorwaerts-gmbh.de/big_buck_bunny.mp4')
</script>

<style scoped>
    .father{
        background-color: antiquewhite;
        padding: 10px;
        border-radius: 10px;
    }
    .content {
        display: flex;
        justify-content: space-evenly;
    }
    img,video{
        width: 100%;
    }
</style>
javascript
// Category.vue 子组件

<template>
    <div class="category">
        <h2>{

  {title}}</h2>
        <!--  默认插槽 -->
        <slot>默认内容</slot>
    </div>
</template>

<script setup lang='ts'>
defineProps(['title'])
</script>

<style scoped>
    .category{
        background-color: skyblue;
        border-radius: 10px;
        box-shadow: 0 0 10px;
        padding: 10px;
        width: 200px;
        height: 300px;
    }
    h2 {
       background-color: orange;
       text-align: center;
       font-size: 20px;
       font-weight: 800;
    }
</style>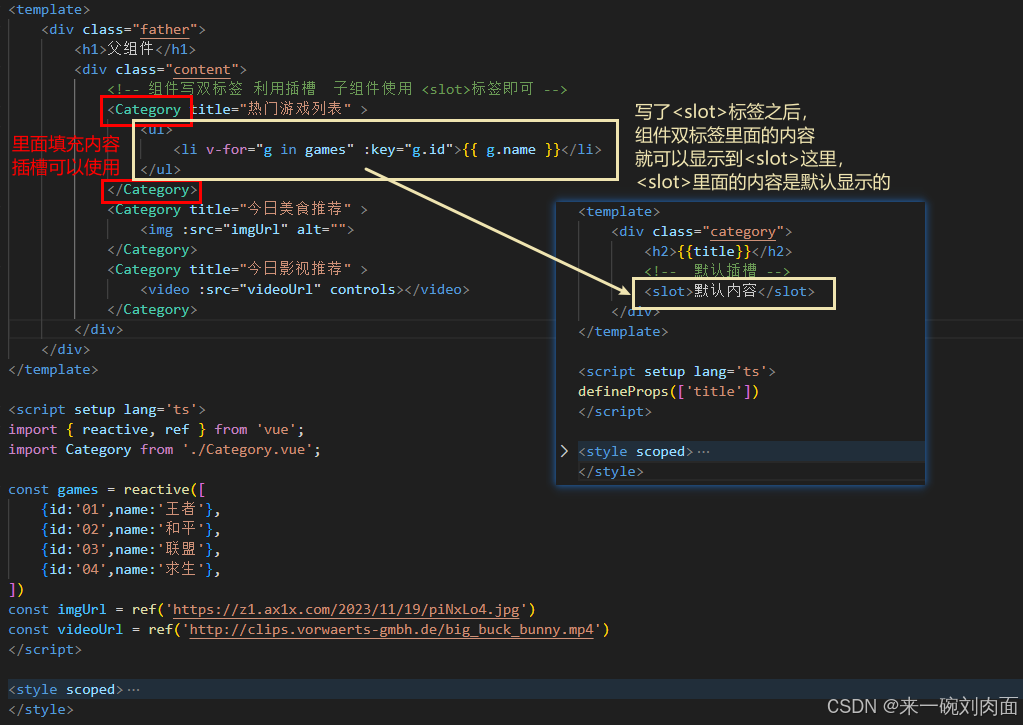
默认插槽一般只写一个<slot>即可!!!!!!!!!!!!
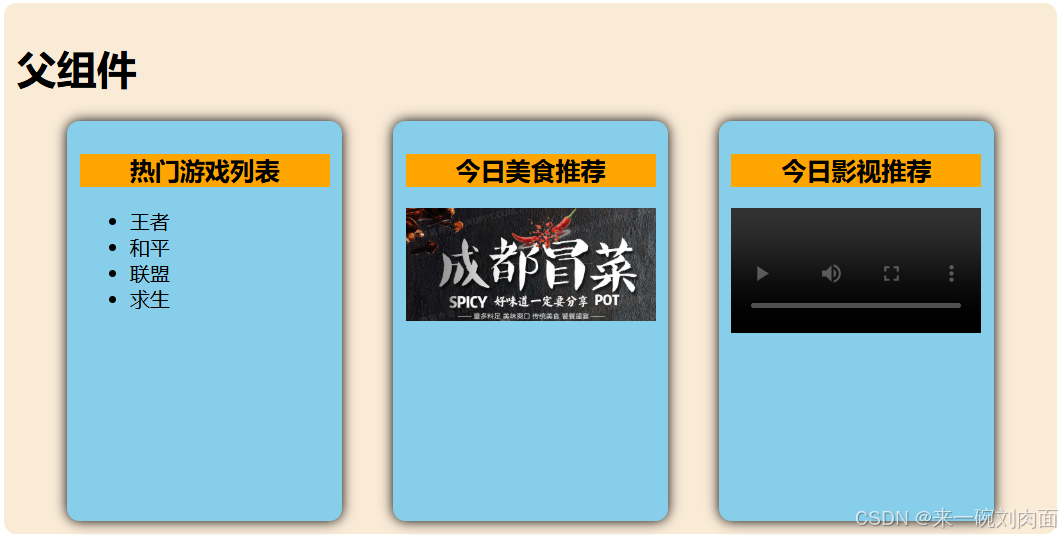
(二)具名插槽
javascript
// Father.vue

<template>
    <div class="father">
        <h1>父组件</h1>
        <div class="content">
            <!-- 组件写双标签 利用插槽  子组件使用 <slot>标签即可 -->
            <Category >
                <template v-slot:two>
                    <ul>
                        <li v-for="g in games" :key="g.id">{

  { g.name }}</li>
                    </ul>
                </template>
                <template v-slot:one>
                    <h2>热门游戏列表</h2>
                </template>
            </Category>
            <Category>
                <template v-slot:two>
                     <img :src="imgUrl" alt="">
                </template>
                <template v-slot:one>
                    <h2>今日美食推荐</h2>
                </template>
            </Category>
            <Category>
                <template #two>
                    <video :src="videoUrl" controls></video>
                </template>
                <template #one>
                    <h2>今日影视推荐</h2>
                </template>
            </Category>
        </div>
    </div>
</template>

<script setup lang='ts'>
import { reactive, ref } from 'vue';
import Category from './Category.vue';

const games = reactive([
    {id:'01',name:'王者'},
    {id:'02',name:'和平'},
    {id:'03',name:'联盟'},
    {id:'04',name:'求生'},
])
const imgUrl = ref('https://z1.ax1x.com/2023/11/19/piNxLo4.jpg')
const videoUrl = ref('http://clips.vorwaerts-gmbh.de/big_buck_bunny.mp4')
</script>

<style scoped>
    .father{
        background-color: antiquewhite;
        padding: 10px;
        border-radius: 10px;
    }
    .content {
        display: flex;
        justify-content: space-evenly;
    }
    img,video{
        width: 100%;
    }
     h2 {
       background-color: orange;
       text-align: center;
       font-size: 20px;
       font-weight: 800;
    }
</style>
javascript
// Category.vue  子组件
<template>
    <div class="category">
        <h2>{

  {title}}</h2>
        <!--  具名插槽 -->
        <slot name="one">默认内容1</slot>
        <slot name="two">默认内容2</slot>
    </div>
</template>

<script setup lang='ts'>
defineProps(['title'])
</script>

<style scoped>
    .category{
        background-color: skyblue;
        border-radius: 10px;
        box-shadow: 0 0 10px;
        padding: 10px;
        width: 200px;
        height: 300px;
    }
    h2 {
       background-color: orange;
       text-align: center;
       font-size: 20px;
       font-weight: 800;
    }
</style>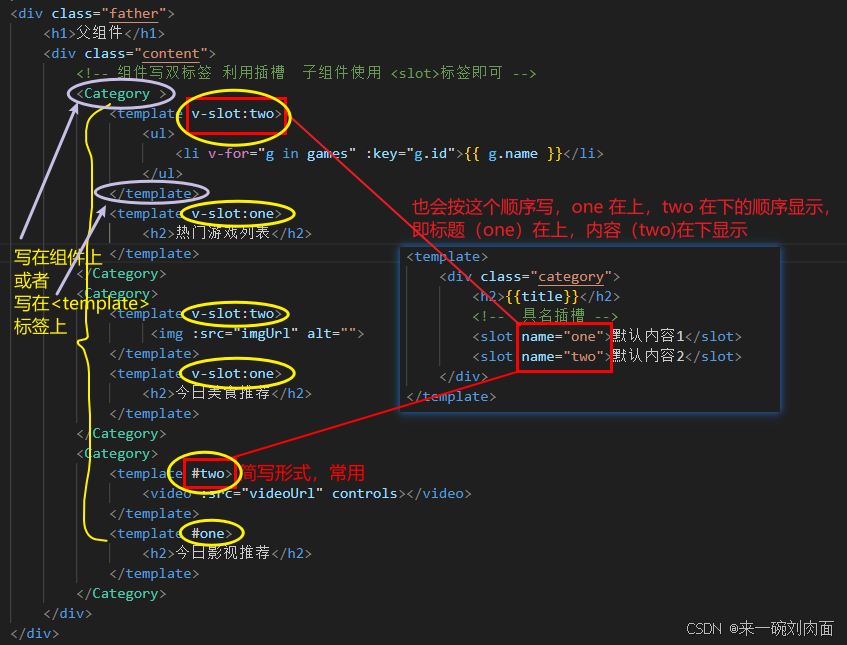
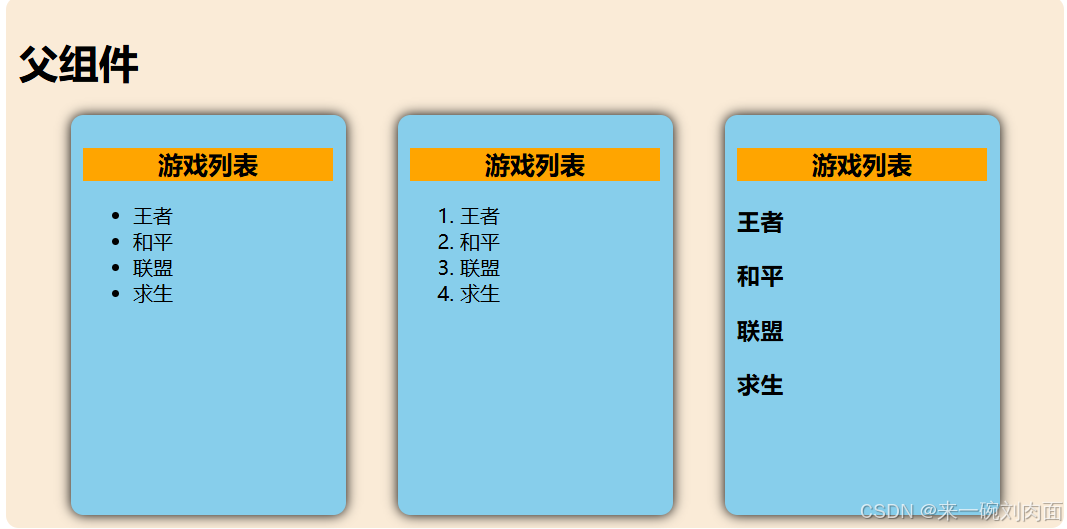
(三)作用域插槽
**数据在子组件(子组件维护各数据),但根据数据生成的结构,却由父组件决定。**即可使用作用域插槽。
javascript
// Father.vue

<template>
    <div class="father">
        <h1>父组件</h1>
        <div class="content">
            <Game>
                <!-- 这里的 params 是接收子组件传递过来的打包后的对象 -->
                <template v-slot:thisGame="params">
                    <!-- <span>{

  { params }}</span> -->
                    <ul>
                        <li v-for="g in params.game" :key="g.id">
                            {

  { g.name }}
                        </li>
                    </ul>
                </template>
            </Game>
            <Game>
                <template v-slot:thisGame="params">
                    <ol>
                        <li v-for="g in params.game" :key="g.id">
                            {

  { g.name }}
                        </li>
                    </ol>
                </template>
            </Game>
            <Game>
                <!-- 将 game 解构 -->
                <template v-slot:thisGame="{game}">
                        <h3 v-for="p in game" :key="p.id">
                            {

  { p.name }}
                        </h3>
                </template>
            </Game>
        </div>
    </div>
</template>

<script setup lang='ts'>
import Game from './Game.vue';
</script>

<style scoped>
    .father{
        background-color: antiquewhite;
        padding: 10px;
        border-radius: 10px;
    }
    .content {
        display: flex;
        justify-content: space-evenly;
    }
    img,video{
        width: 100%;
    }
     h2 {
       background-color: orange;
       text-align: center;
       font-size: 20px;
       font-weight: 800;
    }
</style>
javascript
// Game.vue

<template>
    <div class="game">
        <h2>游戏列表</h2>
        <!-- 将这些参数打包成一个对象传递过去 -->
        <slot name="thisGame" :game="games" x="五哈" y="嘿嘿"></slot>
    </div>
</template>

<script setup lang='ts'>
import { reactive } from 'vue';

const games = reactive([
    {id:'01',name:'王者'},
    {id:'02',name:'和平'},
    {id:'03',name:'联盟'},
    {id:'04',name:'求生'},
])
</script>

<style scoped>
    .game{
        background-color: skyblue;
        border-radius: 10px;
        box-shadow: 0 0 10px;
        padding: 10px;
        width: 200px;
        height: 300px;
    }
    h2 {
       background-color: orange;
       text-align: center;
       font-size: 20px;
       font-weight: 800;
    }
</style>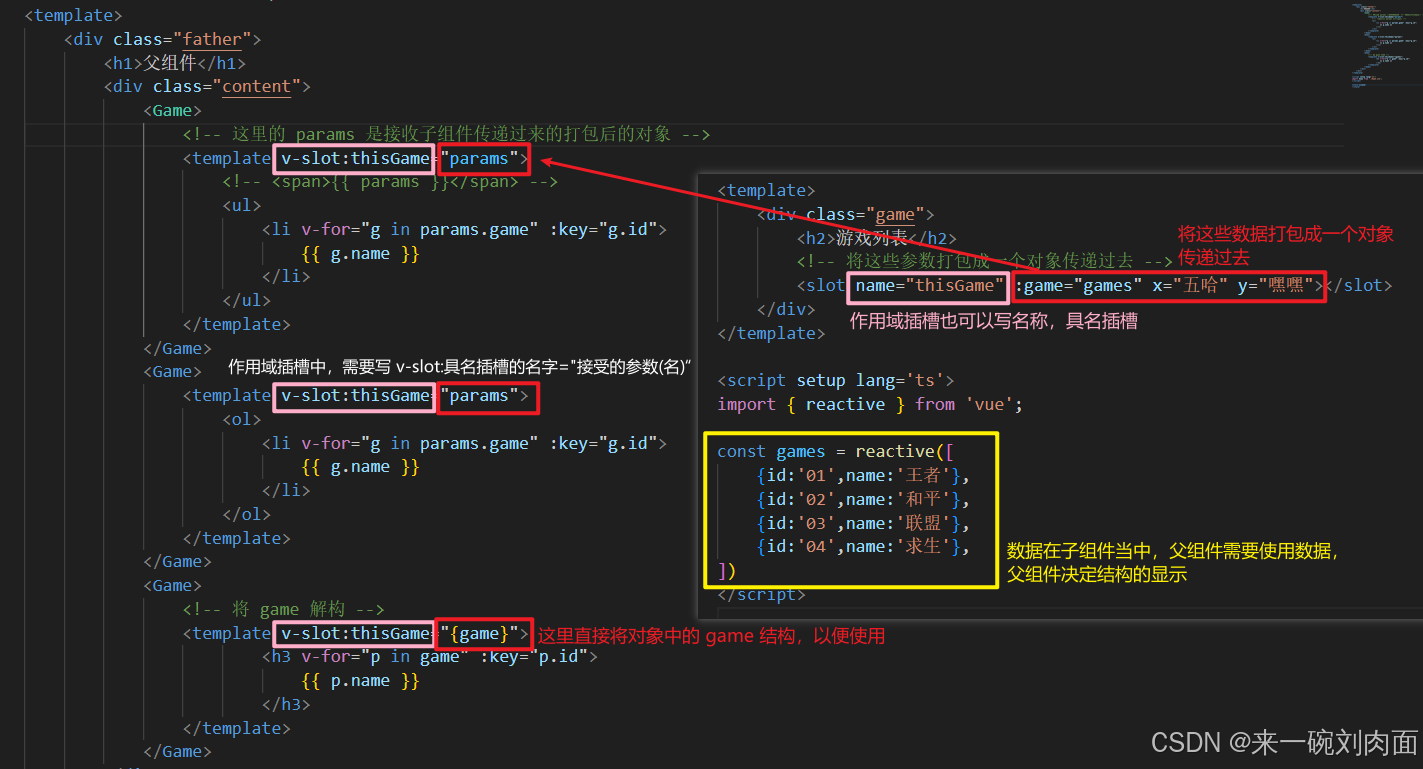
Vue 3中的组件通信方式,可以根据实际场景和需要来选择合适的通信方式,提高编程效率。