Linux驱动开发实战(五):Qt应用程序点RGB灯(保姆级快速入门!)
文章目录
- Linux驱动开发实战(五):Qt应用程序点RGB灯(保姆级快速入门!)
- 前言
- 实验环境
- 实验原理
- C语言应用转到QT应用
- 实验步骤
- 总结
前言
在上一篇文章中设备树点RGB灯,我们介绍了如何通过设备树驱动来控制RGB LED,并使用简单的echo命令向设备文件写入字符来操作LED。本文将进一步探讨如何通过Qt图形界面应用程序来实现同样的功能,为用户提供一个直观、友好的操作界面。
实验环境
- 开发板:野火开发板Imx6ull pro
- 系统:嵌入式Linux
- 开发工具:Qt5
- 编程语言:C++
实验原理
本实验的核心原理与前一篇文章相同,即通过向/dev/rgb_led设备文件写入不同的值来控制RGB LED的不同颜色:
- 写入'1':点亮红色LED
- 写入'2':点亮绿色LED
- 写入'4':点亮蓝色LED
- 写入'0':关闭所有LED
不同之处在于,这次我们使用Qt框架开发了一个图形界面应用,通过按钮点击事件来触发这些操作,而不是直接在命令行中使用echo命令。
C语言应用转到QT应用
下面是C语言编写的程序
c
#include <stdio.h>
#include <stdlib.h>
#include <unistd.h>
int main() {

    printf("Program started\n");
    // 循环执行命令
    while (1) {
        // 执行第一个命令: echo '1' > /dev/rgb_led

        printf("Executing command 1\n");

        int ret = system("sudo sh -c \"echo '1' > /dev/rgb_led\"");
        if (ret == -1) {
            perror("Error executing command 1");
            return 1;
        }
        printf("Command 1 executed successfully\n");

        sleep(1); // 等待1秒
        // 执行第二个命令: echo '2' > /dev/rgb_led
        printf("Executing command 2\n");
        ret = system("sudo sh -c \"echo '2' > /dev/rgb_led\"");
        if (ret == -1) {
            perror("Error executing command 2");
            return 1;
        }
        printf("Command 2 executed successfully\n");
        sleep(1); // 等待1秒
        // 执行第三个命令: echo '4' > /dev/rgb_led
        printf("Executing command 3\n");
        ret = system("sudo sh -c \"echo '4' > /dev/rgb_led\"");
        if (ret == -1) {
            perror("Error executing command 3");
            return 1;
        }
        printf("Command 3 executed successfully\n");
        sleep(1); // 等待1秒
    }
    return 0;
}
直接使用交叉编译器编译:
c
arm-linux-gnueabihf-gcc RGB.c -o RGB在开发板上输入命令
c
sudo ./RGB即可执行
RGB灯在开发板上就会每隔一秒换一个颜色亮起
那QT程序应该怎么写呢?
实验步骤
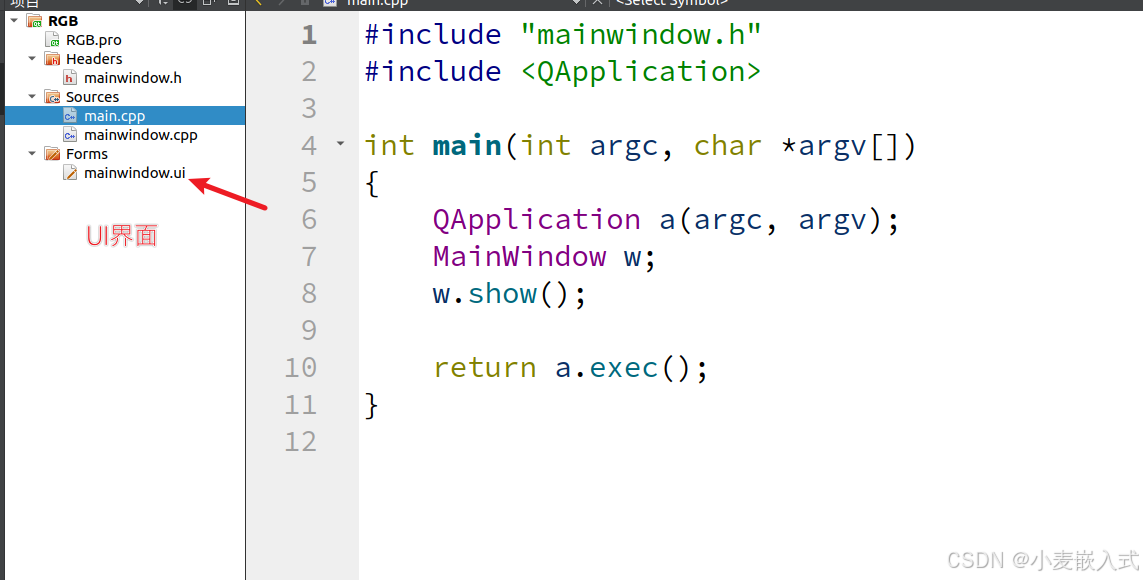
1. 创建Qt项目
首先,我们使用Qt Creator创建一个新的Qt Widgets Application项目,命名为RGB。


2. 设计用户界面
在Qt Designer中,我们设计了一个简单的界面,包含三个按钮,分别用于控制红、绿、蓝三种颜色的LED。


每个按键右击选择转到槽即可创建事件点击函数
3. 实现MainWindow类
mainwindow.h
首先,我们需要在头文件中声明我们的类和方法:
cpp
#ifndef MAINWINDOW_H
#define MAINWINDOW_H

#include <QMainWindow>

namespace Ui {
class MainWindow;
}

class MainWindow : public QMainWindow
{
    Q_OBJECT

public:
    explicit MainWindow(QWidget *parent = nullptr);
    ~MainWindow();

private slots:
    void on_pushButton_clicked();
    void on_pushButton_2_clicked();
    void on_pushButton_3_clicked();

private:
    Ui::MainWindow *ui;
    bool executeCommand(const QString &cmd);  // Add this line
};

#endif // MAINWINDOW_H
mainwindow.cpp
然后,在实现文件中编写具体功能:
cpp
#include "mainwindow.h"
#include "ui_mainwindow.h"
#include <QProcess>
#include <QDebug>

MainWindow::MainWindow(QWidget *parent) :
    QMainWindow(parent),
    ui(new Ui::MainWindow)
{
    ui->setupUi(this);

    // 设置按钮标签和样式
    ui->pushButton->setText("红色LED");
    ui->pushButton->setStyleSheet("background-color: #ff8080; min-height: 60px; font-size: 14px;");

    ui->pushButton_2->setText("绿色LED");
    ui->pushButton_2->setStyleSheet("background-color: #80ff80; min-height: 60px; font-size: 14px;");

    ui->pushButton_3->setText("蓝色LED");
    ui->pushButton_3->setStyleSheet("background-color: #8080ff; min-height: 60px; font-size: 14px;");
}

MainWindow::~MainWindow()
{
    // 应用关闭时关闭LED
    executeCommand("echo '0' > /dev/rgb_led");
    delete ui;
}

bool MainWindow::executeCommand(const QString &cmd)
{
    QProcess process;
    QString fullCommand = "sudo sh -c \"" + cmd + "\"";

    qDebug() << "执行命令: " << fullCommand;

    process.start("bash", QStringList() << "-c" << fullCommand);
    process.waitForFinished();

    int exitCode = process.exitCode();
    if (exitCode != 0) {
        qDebug() << "命令执行失败,退出码: " << exitCode;
        qDebug() << "错误信息: " << process.readAllStandardError();
        return false;
    }

    return true;
}

void MainWindow::on_pushButton_clicked()
{
    // 控制红色LED
    if (executeCommand("echo '1' > /dev/rgb_led")) {
        qDebug() << "红色LED已点亮";
    }
}

void MainWindow::on_pushButton_2_clicked()
{
    // 控制绿色LED
    if (executeCommand("echo '2' > /dev/rgb_led")) {
        qDebug() << "绿色LED已点亮";
    }
}

void MainWindow::on_pushButton_3_clicked()
{
    // 控制蓝色LED
    if (executeCommand("echo '4' > /dev/rgb_led")) {
        qDebug() << "蓝色LED已点亮";
    }
}
编译与调试过程
先在PC端运行


如果没问题的话即可利用交叉编译编译成可执行程序
构建可执行程序
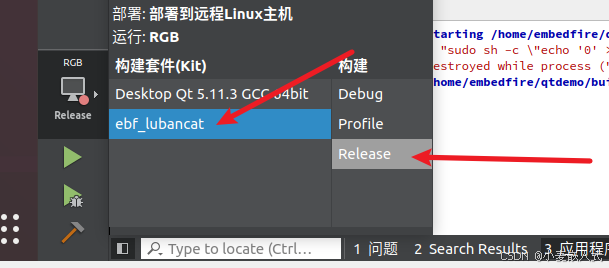
然后点击锤子
构建
在编译过程中,我曾遇到了一个错误:
bash
/home/embedfire/qtdemo/RGB/mainwindow.cpp:29: error: use of undeclared identifier 'executeCommand'这个错误是由于在mainwindow.h文件中没有声明executeCommand函数而导致的。解决方法是在mainwindow.h的MainWindow类中添加私有方法声明:
cpp
private:
    bool executeCommand(const QString &cmd);
修复后,项目成功编译并运行。
移植QT应用
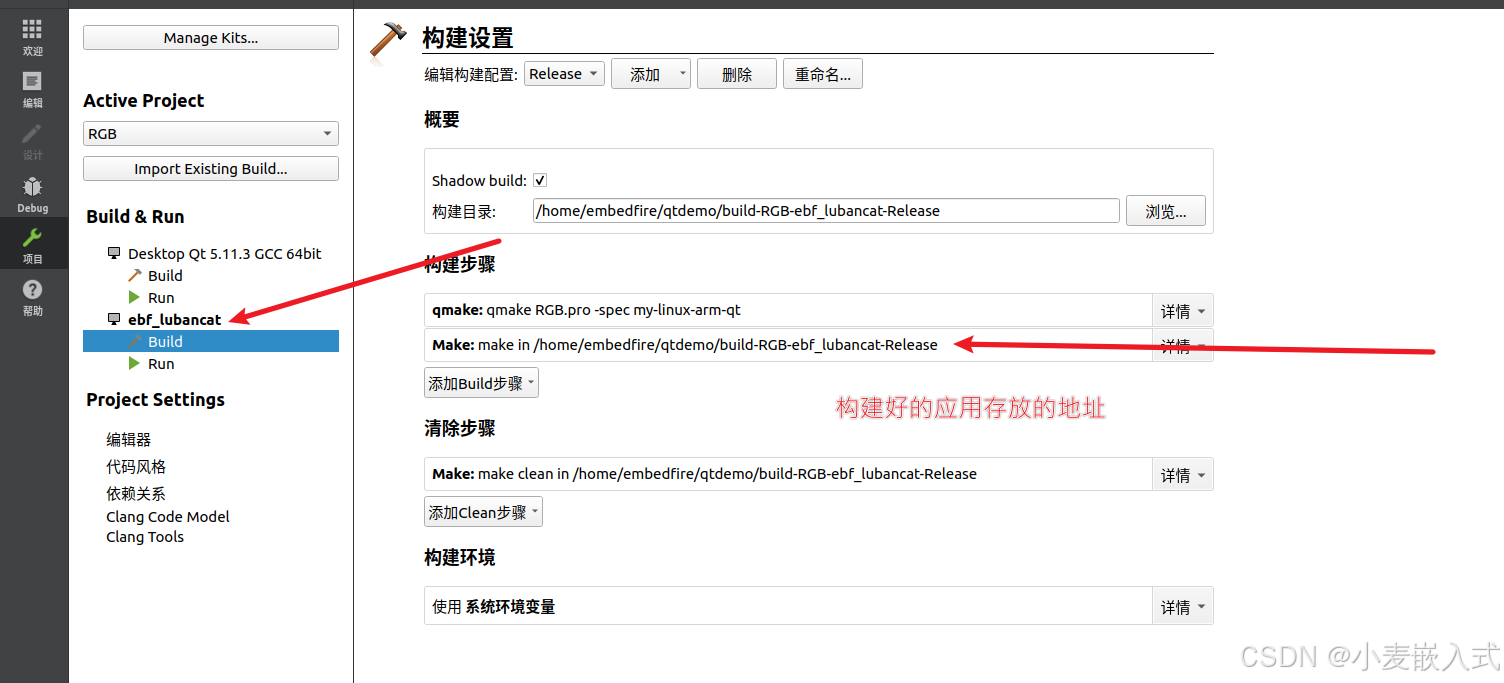
构建好的应用在这里

开发板输入命令
bash
sudo mount -t nfs 192.168.247.118:/home/embedfire/workdir /mnt把它通过nfs传到开发板
bash
sudo cp RGB /usr/local/qt-app/RGB放到qt-app目录下
运行QT应用
加载驱动
驱动在上一章节已经写好了设备树点RGB灯
bash
sudo insmod dts_led.ko
运行命令
bash
sudo /usr/local/qt-app/run_myapp.sh /usr/local/qt-app/RGB


成功点灯
总结
本文介绍了如何使用Qt框架开发一个RGB LED控制应用,实现了通过图形界面控制硬件设备的功能。相比于命令行操作,图形界面应用提供了更好的用户体验和更丰富的功能可能性。