Step1. 环境配置
安装 uv
shell
curl -LsSf https://astral.sh/uv/install.sh | shQuestion: 什么是 uv 呢和 conda 比有什么区别?
Answer: 一个用 Rust 编写的超快速 (100x) Python 包管理器和环境管理工具,由 Astral 开发。定位为 pip 和 venv 的替代品,专注于速度、简单性和现代 Python 工作流。
创建项目目录
shell
uv init mcp_server_test
shell
cd mcp_server_test创建虚拟环境并激活
shell
uv venv
source .venv/bin/activate
安装依赖包
shell
uv add "mcp[cli]" httpx requestsStep2. 实现 MCP Server
创建 weather.py
python
import requests
from mcp.server.fastmcp import FastMCP


# 初始化 MCP 服务器
mcp = FastMCP("WeatherServer")

HEWEATHER_API_KEY = "你的 key"  # ← 填入你的和风天气Key 去https://dev.qweather.com/这里申请

def get_city_id(city_name: str) -> str:
    """根据中文城市名获取和风天气 location ID"""
    url = "https://geoapi.qweather.com/v2/city/lookup"
    params = {
        "location": city_name,
        "key": HEWEATHER_API_KEY
    }
    response = requests.get(url, params=params)
    data = response.json()
    if data.get("code") == "200" and data.get("location"):
        print(data)
        return data["location"][0]["id"]
    else:
        raise ValueError(f"找不到城市: {city_name},错误信息: {data}")


def get_weather(city_name: str) -> str:
    """根据城市中文名返回当前天气中文描述"""
    try:
        location_id = get_city_id(city_name)
        url = "https://devapi.qweather.com/v7/weather/now"
        params = {
            "location": location_id,
            "key": HEWEATHER_API_KEY
        }
        response = requests.get(url, params=params)
        data = response.json()
        if data.get("code") != "200":
            return f"天气查询失败:{data.get('code')}"
        now = data["now"]
        return (
            f"🌍 城市: {city_name}\n"
            f"🌤 天气: {now['text']}\n"
            f"🌡 温度: {now['temp']}°C\n"
            f"💧 湿度: {now['humidity']}%\n"
            f"🌬 风速: {now['windSpeed']} m/s\n"
        )
    except Exception as e:
        return f"查询出错:{str(e)}"

@mcp.tool('query_weather', '查询城市天气')
def query_weather(city: str) -> str:
    """
        输入指定城市的中文名称,返回当前天气查询结果。
        :param city: 城市名称
        :return: 格式化后的天气信息
        """
    return get_weather(city)


if __name__ == "__main__":
    # 以标准 I/O 方式运行 MCP 服务器
    mcp.run(transport='stdio')
Step3. 测试 MCP Server
运行测试
shell
mcp dev weather.py看到下面输出就启动成功了
text
mcp dev weather.py
Starting MCP inspector...
Proxy server listening on port 3000

🔍 MCP Inspector is up and running at http://localhost:5173 🚀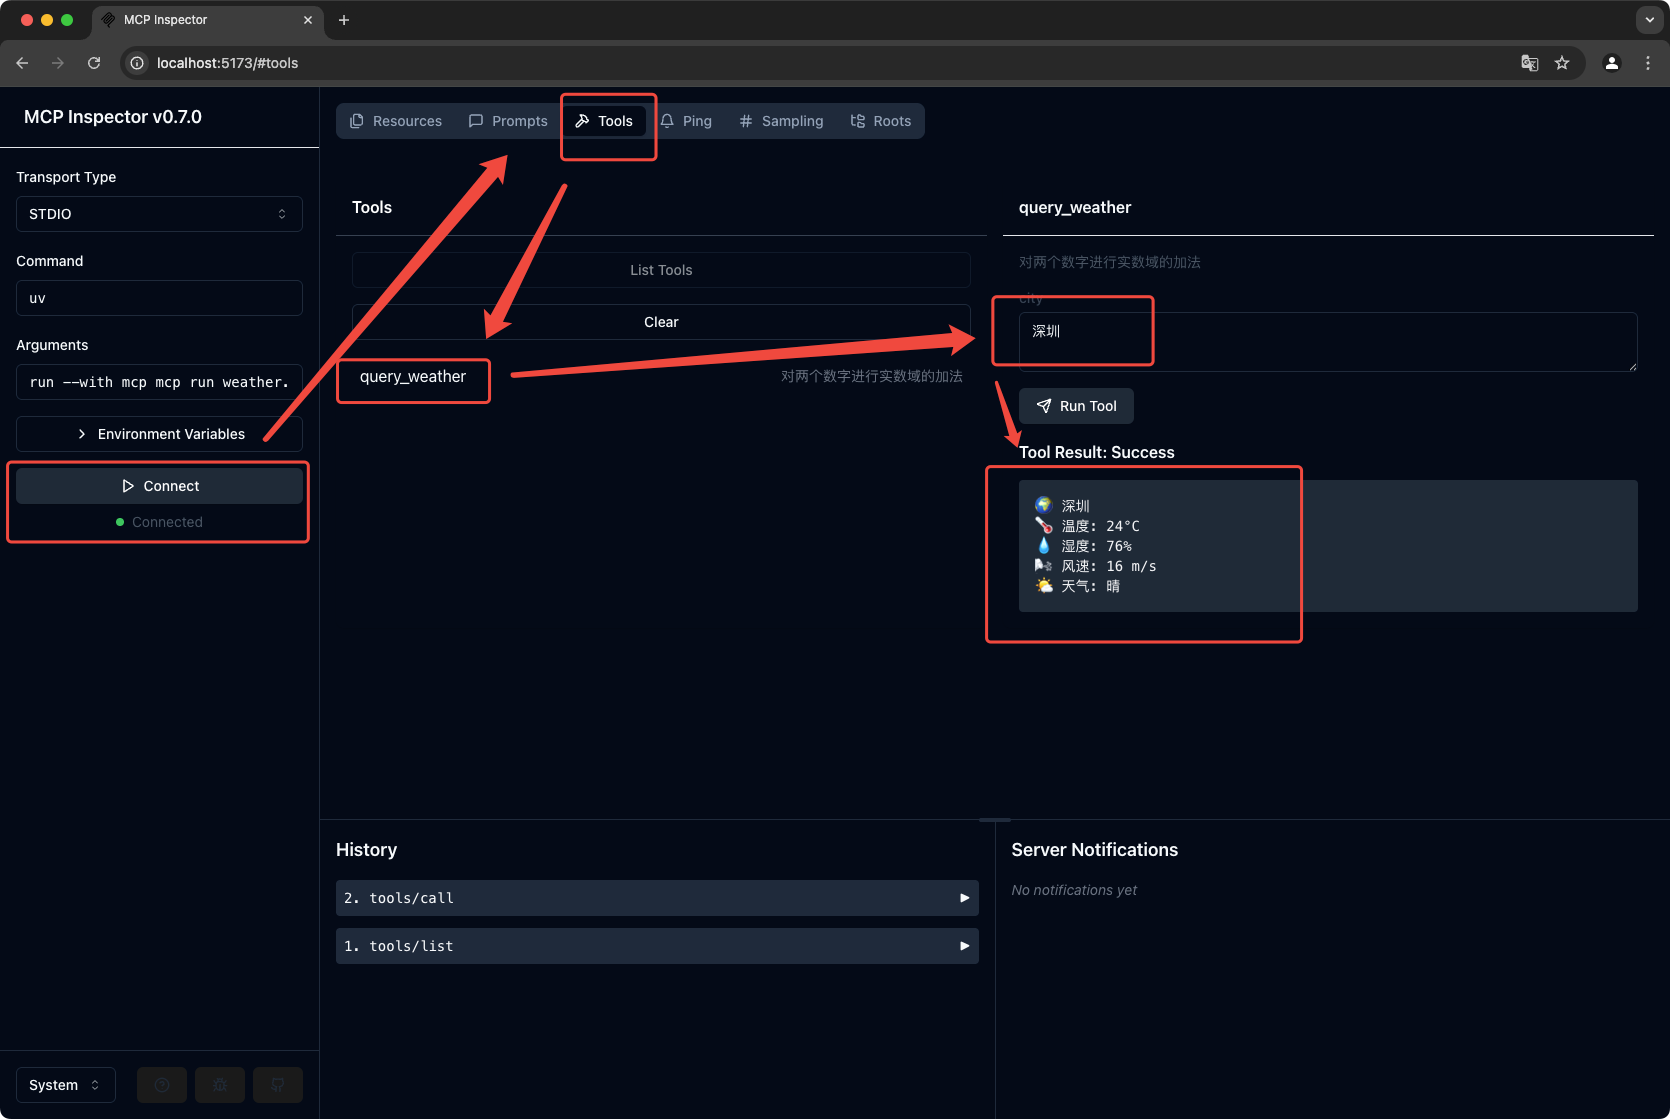
Step4. 修改MCP Server 做成 SSE 服务
python
import mcp.types as types
import requests
import uvicorn
from mcp.server.lowlevel import Server
from mcp.server.sse import SseServerTransport
from starlette.applications import Starlette
from starlette.routing import Mount, Route

# ================================
# 1) 你的和风天气API Key
# ================================
HEWEATHER_API_KEY = ""  # ← 填入你的和风天气Key(例如 "abc123xxxxxx")


# ================================
# 2) 查询天气核心逻辑
# ================================
def get_city_id(city_name: str) -> str:
    """根据中文城市名获取和风天气 location ID"""
    url = "https://geoapi.qweather.com/v2/city/lookup"
    params = {
        "location": city_name,
        "key": HEWEATHER_API_KEY
    }
    response = requests.get(url, params=params)
    data = response.json()
    if data.get("code") == "200" and data.get("location"):
        # 如果成功找到城市
        return data["location"][0]["id"]
    else:
        raise ValueError(f"找不到城市: {city_name},错误信息: {data}")


def get_weather(city_name: str) -> str:
    """根据城市中文名返回当前天气(中文描述、温度、湿度、风速)"""
    try:
        location_id = get_city_id(city_name)
        url = "https://devapi.qweather.com/v7/weather/now"
        params = {
            "location": location_id,
            "key": HEWEATHER_API_KEY
        }
        response = requests.get(url, params=params)
        data = response.json()
        if data.get("code") != "200":
            return f"天气查询失败:{data.get('code')}"

        now = data["now"]
        return (
            f"🌍 城市: {city_name}\n"
            f"🌤 天气: {now['text']}\n"
            f"🌡 温度: {now['temp']}°C\n"
            f"💧 湿度: {now['humidity']}%\n"
            f"🌬 风速: {now['windSpeed']} m/s\n"
        )
    except Exception as e:
        return f"查询出错:{str(e)}"


# ================================
# 3) MCP Server 定义
# ================================
app = Server("mcp-weather")

# (A) 工具调用处理器:根据工具名称选择执行逻辑
@app.call_tool()
async def call_tool_handler(
    name: str, arguments: dict
) -> list[types.TextContent | types.ImageContent | types.EmbeddedResource]:
    """
    MCP 工具调用处理器
    """
    if name == "query_weather":
        if "city" not in arguments:
            raise ValueError("Missing required argument 'city'")
        # 调用上面封装好的 get_weather
        weather_info = get_weather(arguments["city"])
        return [types.TextContent(type="text", text=weather_info)]
    else:
        raise ValueError(f"Unsupported tool name: {name}")


# (B) 工具列表:告知 MCP 端都有哪些可调用的工具
@app.list_tools()
async def list_tools() -> list[types.Tool]:
    """
    定义可用的 MCP 工具列表
    """
    return [
        types.Tool(
            name="query_weather",
            description="查询指定城市天气信息(基于和风天气API)",
            inputSchema={
                "type": "object",
                "required": ["city"],
                "properties": {
                    "city": {
                        "type": "string",
                        "description": "要查询的城市名(中文)"
                    }
                },
            },
        ),
    ]


# ================================
# 4) SSE + Starlette 路由
# ================================
sse = SseServerTransport("/messages/")

async def handle_sse(request):
    """处理 /sse 路由的 SSE 连接,并将其接入 MCP Server。"""
    async with sse.connect_sse(
        request.scope, request.receive, request._send
    ) as streams:
        # 运行 MCP 应用,处理输入输出
        await app.run(
            streams[0], streams[1], app.create_initialization_options()
        )

starlette_app = Starlette(
    debug=True,
    routes=[
        Route("/sse", endpoint=handle_sse),
        Mount("/messages/", app=sse.handle_post_message),
    ],
)


# ================================
# 5) 启动服务器
# ================================
if __name__ == "__main__":
    uvicorn.run(starlette_app, host="127.0.0.1", port=8081)
Step5. 配置 Cherry Studio
安装 Cherry Studio
text
https://cherry-ai.com/配置模型 api
text
https://api.baystoneai.com/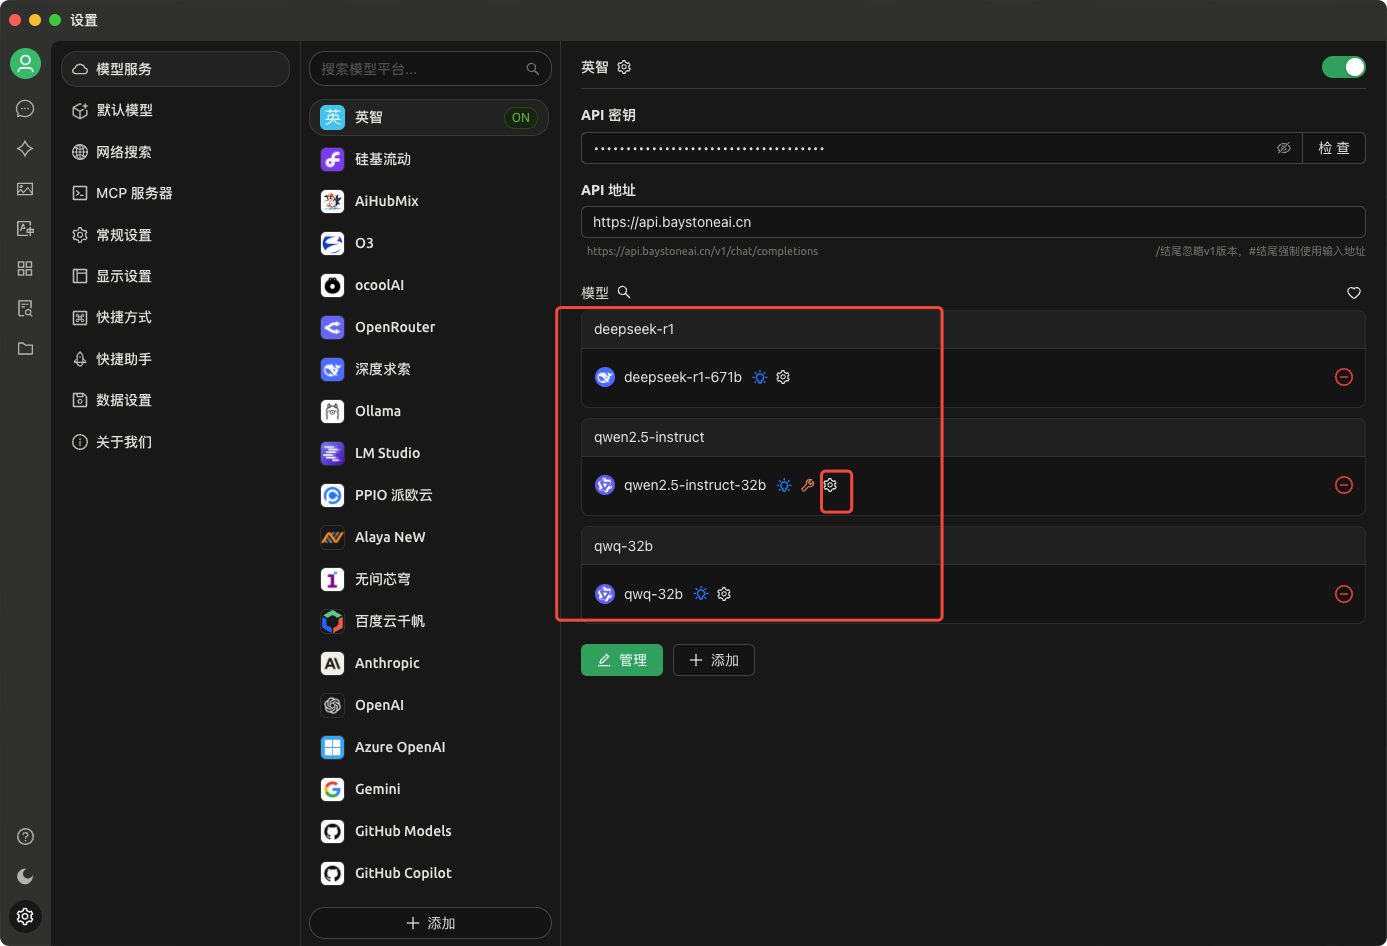
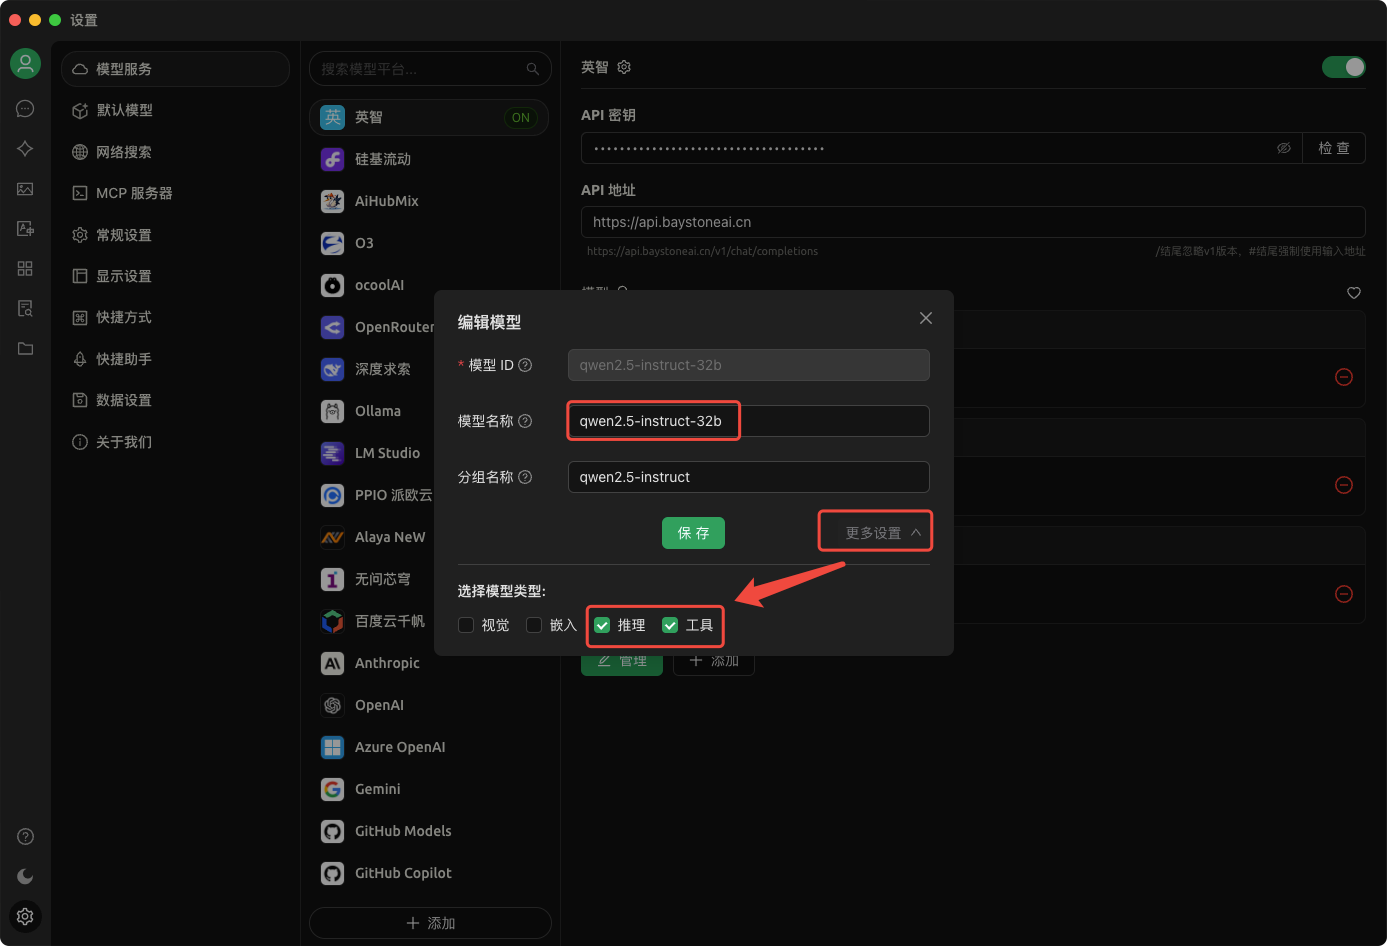
这里需要选择 工具 推理 这两项
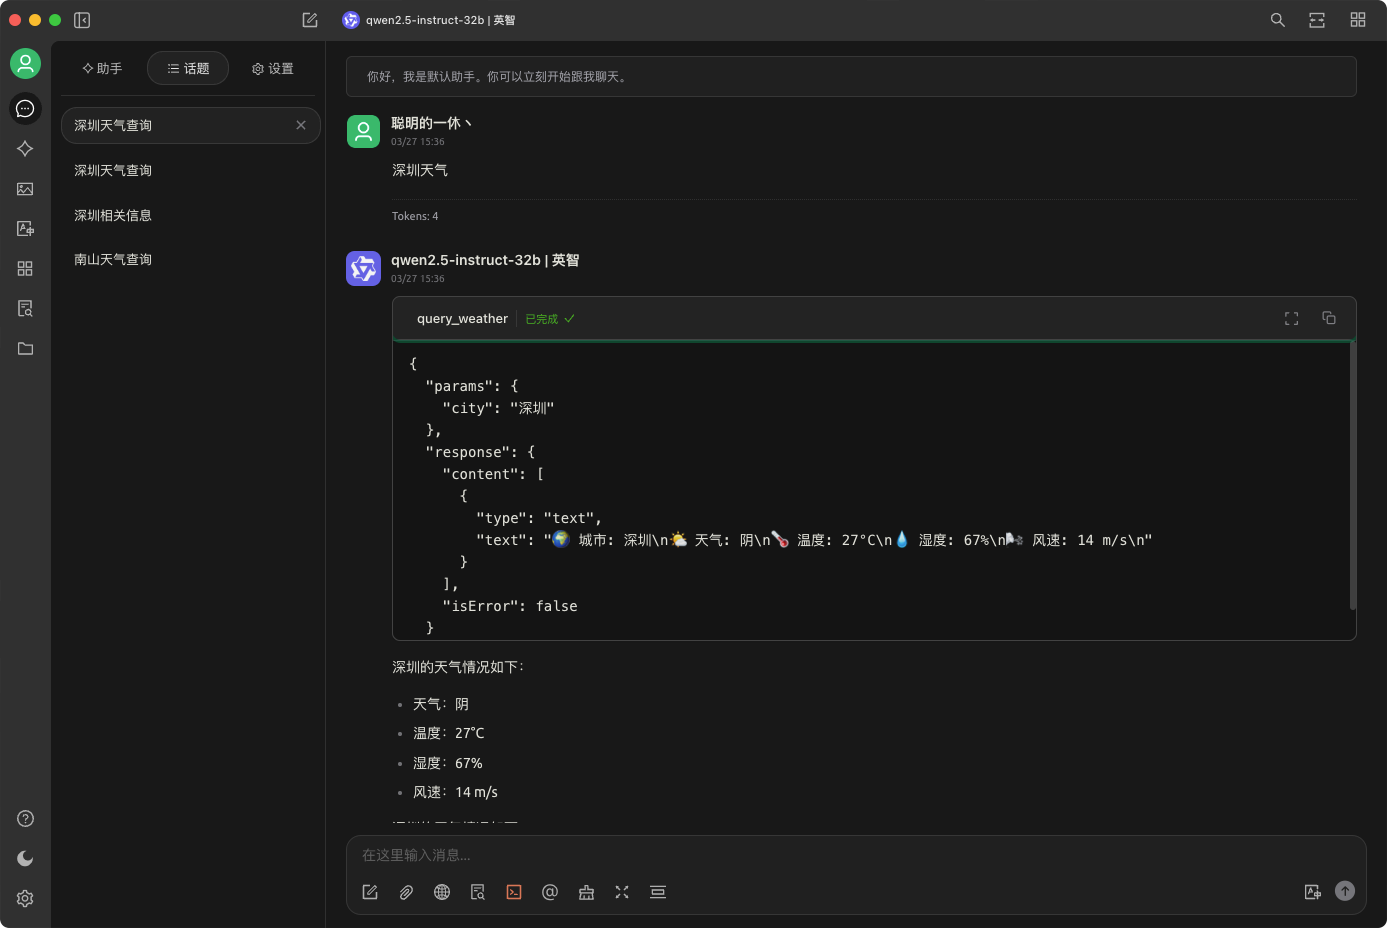
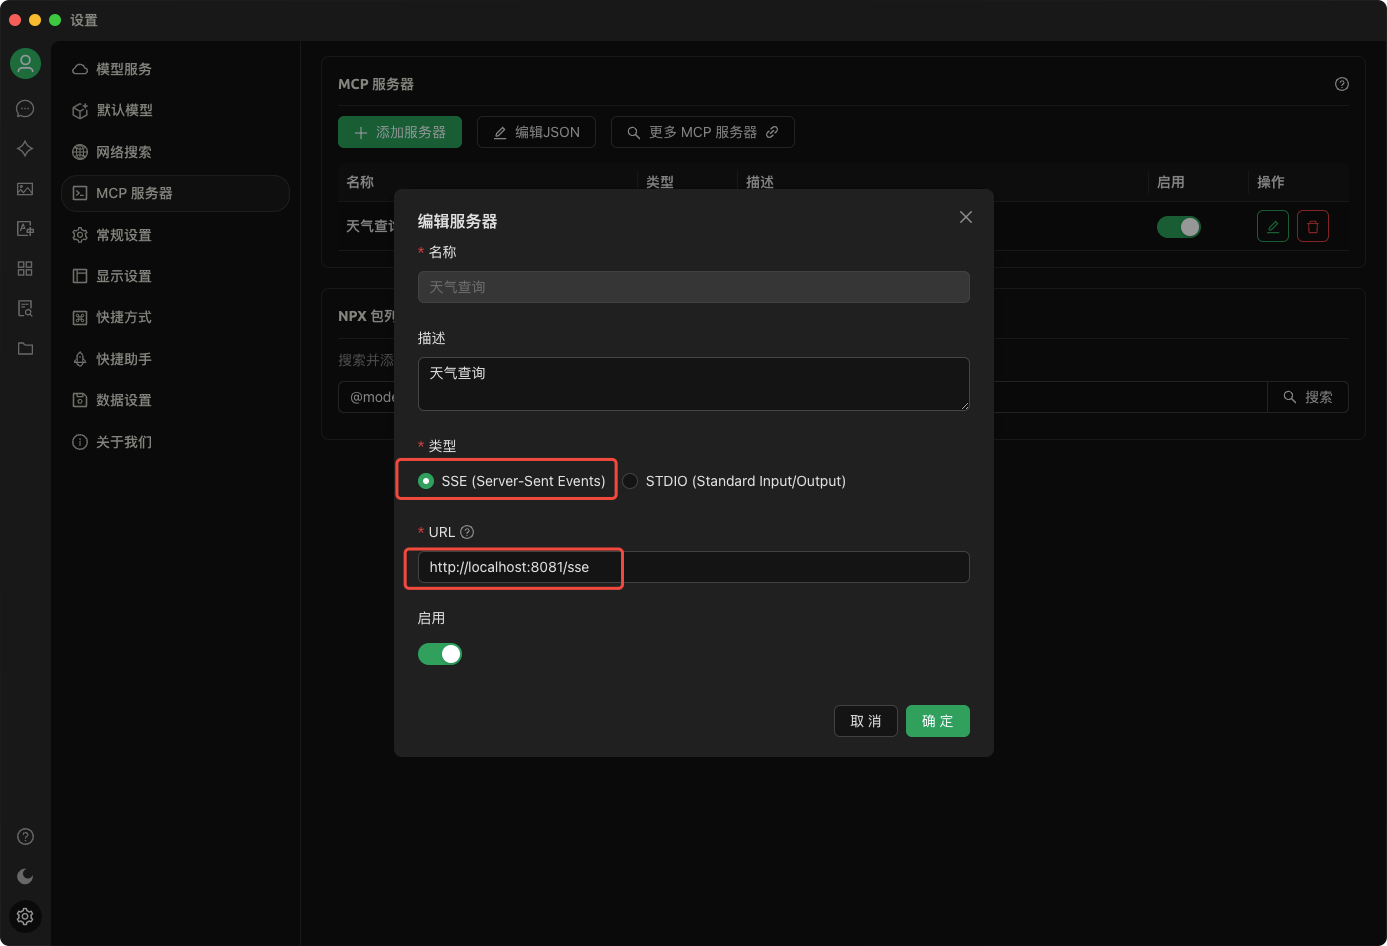
然后是在这里选择你的 MCP 服务
接下来就可以对话啦,让我们看看测试效果