前言
本专栏是关于iced库的部件的介绍,iced库是基于rust的GUI库,可以创建基于rust的窗口程序。
关于iced
本专栏是关于iced库的部件的介绍,iced库是基于rust的GUI库,可以创建基于rust的窗口程序
iced是跨平台的GUI框架,基于rust语言,它的架构受到Elm的启发。
发文平台
稀土掘金
概述
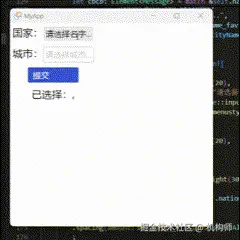
本文是专栏的第二篇,主要介绍iced的复合输入框部件:combo_box。
1、combo_box构建
rust
pub struct ComboBox<
    'a,
    T,
    Message,
    Theme = crate::Theme,
    Renderer = crate::Renderer,
> where
    Theme: Catalog,
    Renderer: text::Renderer,
{
    state: &'a State<T>,
    text_input: TextInput<'a, TextInputEvent, Theme, Renderer>,
    font: Option<Renderer::Font>,
    selection: text_input::Value,
    on_selected: Box<dyn Fn(T) -> Message>,
    on_option_hovered: Option<Box<dyn Fn(T) -> Message>>,
    on_open: Option<Message>,
    on_close: Option<Message>,
    on_input: Option<Box<dyn Fn(String) -> Message>>,
    menu_class: <Theme as menu::Catalog>::Class<'a>,
    padding: Padding,
    size: Option<f32>,
}实例创建combo_box使用ComboBox::new。
rust
pub fn combo_box<'a, T, Message, Theme, Renderer>(
    state: &'a combo_box::State<T>,
    placeholder: &str,
    selection: Option<&T>,
    on_selected: impl Fn(T) -> Message + 'static,
) -> ComboBox<'a, T, Message, Theme, Renderer>
where
    T: std::fmt::Display + Clone,
    Theme: combo_box::Catalog + 'a,
    Renderer: core::text::Renderer,
{
    ComboBox::new(state, placeholder, selection, on_selected)
}
2、实际应用
需要先导入combo_box:
rust
use iced::widget::{button, column, combo_box, image, text,row};我们可以这样添加一个combo_box:
rust
combo_box(&self.nationname, "请选择名字...", self.nationname_fav.as_ref(), Message::NationName).width(100)如上,self.nationname是State ,self.nationname是selection ,Message::NationName是on_selected。 以上对应参数需要提前创建:
rust
#[derive(Debug, Clone)]
struct MyApp {
    username:combo_box::State<UserName>,
    username_fav:Option<UserName>,
    cn_cityname:combo_box::State<CNCityName>,
    cn_cityname_fav:Option<CNCityName>,
    us_cityname:combo_box::State<USCityName>,
    us_cityname_fav:Option<USCityName>,
    nationname:combo_box::State<NationName>,
    nationname_fav:Option<NationName>,
    nationname_select:String,
    cityname_select:String,
    itemselect:ItemSelect,
    someornone:Option<Message>,
}
#[derive(Debug, Clone)]
struct ItemSelect{
    nation:String,
    city:String,
    zone:String,
}
#[derive(Debug, Clone)]
enum Message {
    UserName(UserName),
    CnCityName(CNCityName),
    UsCityName(USCityName),
    NationName(NationName),
    Submit,
    Null,
}其中的CNCityName 、USCityName 、NationName是提前定义好的枚举,我们在另一个文件里定义这些数据,然后导入调用即可。
comboboxitem.rs
rust
use std::fmt::Display;
//
#[derive(Debug, Clone)]
pub enum UserName {
Zhou,
Li,
Wang,
}
//国家名称
#[derive(Debug, Clone)]
pub enum NationName{
China,
America,
}
impl NationName{
pub const ALL: &'static [NationName] = &[
NationName::China,
NationName::America,
];
pub fn display(&self) -> String {
match self {
NationName::China => "中国".to_string(),
NationName::America => "美国".to_string(),
}
}
}
impl Display for NationName{
fn fmt(&self, f: &mut std::fmt::Formatter<'_>) -> std::fmt::Result {
match self {
NationName::China => write!(f, "中国"),
NationName::America => write!(f, "美国"),
}
}
}
//中国城市名称
#[derive(Debug, Clone)]
pub enum CNCityName {
Beijing,
Shanghai,
Guangzhou,
Shenzhen,
Chengdu,
Wuhan,
Changsha,
Hangzhou,
Nanjing,
}
impl CNCityName {
pub const ALL: &'static [CNCityName] = &[
CNCityName::Beijing,
CNCityName::Shanghai,
CNCityName::Guangzhou,
CNCityName::Shenzhen,
CNCityName::Chengdu,
CNCityName::Wuhan,
CNCityName::Changsha,
CNCityName::Hangzhou,
CNCityName::Nanjing,
];
pub fn display(&self) -> String {
match self {
CNCityName::Beijing => "北京".to_string(),
CNCityName::Shanghai => "上海".to_string(),
CNCityName::Guangzhou => "广州".to_string(),
CNCityName::Shenzhen => "深圳".to_string(),
CNCityName::Chengdu => "成都".to_string(),
CNCityName::Wuhan => "武汉".to_string(),
CNCityName::Changsha => "长沙".to_string(),
CNCityName::Hangzhou => "杭州".to_string(),
CNCityName::Nanjing => "南京".to_string(),
}
}
}
//美国城市名称
#[derive(Debug, Clone)]
pub enum USCityName {
NewYork,
LosAngeles,
Chicago,
Houston,
Phoenix,
Philadelphia,
SanAntonio,
SanDiego,
Dallas,
}
impl USCityName {
pub const ALL: &'static [USCityName] = &[
USCityName::NewYork,
USCityName::LosAngeles,
USCityName::Chicago,
USCityName::Houston,
USCityName::Phoenix,
USCityName::Philadelphia,
USCityName::SanAntonio,
USCityName::SanDiego,
USCityName::Dallas,
];
pub fn display(&self) -> String {
match self {
USCityName::NewYork => "纽约".to_string(),
USCityName::LosAngeles => "洛杉矶".to_string(),
USCityName::Chicago => "芝加哥".to_string(),
USCityName::Houston => "休斯顿".to_string(),
USCityName::Phoenix => "菲尼克斯".to_string(),
USCityName::Philadelphia => "费城".to_string(),
USCityName::SanAntonio => "圣安东尼奥".to_string(),
USCityName::SanDiego => "圣地亚哥".to_string(),
USCityName::Dallas => "达拉斯".to_string(),
}
}
}
pub fn enum_to_vec<T: Clone + 'static>(variants: &[T]) -> Vec<T> {
variants.to_vec()
}
impl Display for CNCityName{
fn fmt(&self, f: &mut std::fmt::Formatter<'_>) -> std::fmt::Result {
match self {
CNCityName::Beijing => write!(f, "北京"),
CNCityName::Shanghai => write!(f, "上海"),
CNCityName::Guangzhou => write!(f, "广州"),
CNCityName::Shenzhen => write!(f, "深圳"),
CNCityName::Chengdu => write!(f, "成都"),
CNCityName::Wuhan => write!(f, "武汉"),
CNCityName::Changsha => write!(f, "长沙"),
CNCityName::Hangzhou => write!(f, "杭州"),
CNCityName::Nanjing => write!(f, "南京"),
}
}
}
impl Display for USCityName{
fn fmt(&self, f: &mut std::fmt::Formatter<'_>) -> std::fmt::Result {
match self {
USCityName::NewYork => write!(f, "纽约"),
USCityName::LosAngeles => write!(f, "洛杉矶"),
USCityName::Chicago => write!(f, "芝加哥"),
USCityName::Houston => write!(f, "休斯顿"),
USCityName::Phoenix => write!(f, "菲尼克斯"),
USCityName::Philadelphia => write!(f, "费城"),
USCityName::SanAntonio => write!(f, "圣安东尼奥"),
USCityName::SanDiego => write!(f, "圣地亚哥"),
USCityName::Dallas => write!(f, "达拉斯"),
}
}
}
impl Display for UserName {
fn fmt(&self, f: &mut std::fmt::Formatter<'_>) -> std::fmt::Result {
match self {
UserName::Zhou => write!(f, "Zhou"),
UserName::Li => write!(f, "Li"),
UserName::Wang => write!(f, "Wang"),
}
}
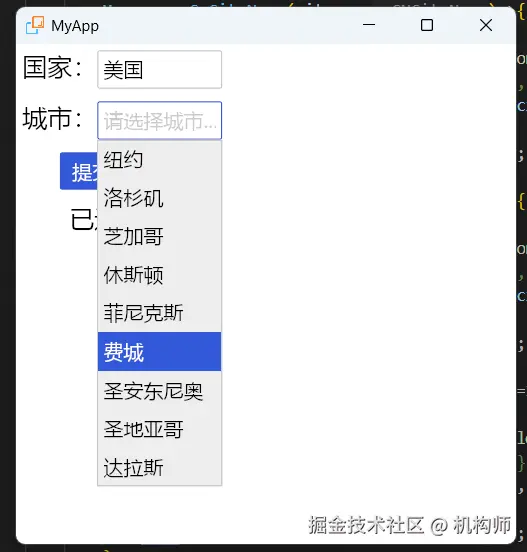
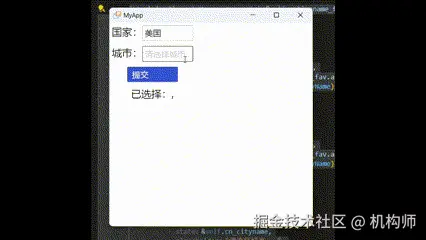
}此例中,我们希望根据选择的国家不同,呈现不同的城市的选择。 先看下UI界面:
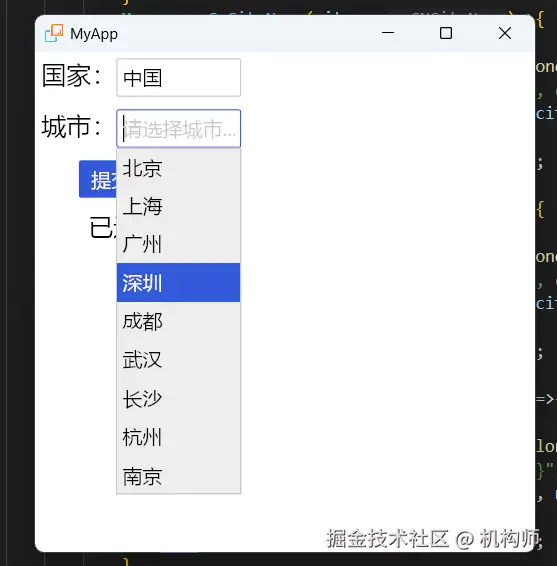
能够实现根据不同国家显示不同城市的关键,在于view函数中的逻辑判断:
rust
let cbcb: Element<Message> = match &self.nationname_fav {
            Some(nation) => {
                match nation {
                    NationName::China => {
                        combo_box(
                            &self.cn_cityname,
                            "请选择城市...",
                            self.cn_cityname_fav.as_ref(),
                            Message::CnCityName)
                            .width(100).into()
                    },
                    NationName::America => {
                        combo_box(
                            &self.us_cityname,
                            "请选择城市...",
                            self.us_cityname_fav.as_ref(),
                            Message::UsCityName)
                            .width(100).into()
                    },
                }
            },
            None => {
                combo_box(
                    &self.cn_cityname,
                    "请选择城市...",
                    self.cn_cityname_fav.as_ref(),
                    Message::CnCityName).width(100).into()
            },
        };
如上,我们定义了一个cbcb变量,其类型是要渲染的Element,具体来说,就是根据国家的变量的值不同,返回一个不同的值的combo_box。
本例中,我们的代码是直接写在view函数中的,事实上,也可以将代码封装一下,利用函数来返回,比如数据量不止国家与城市,设计到具体的区、县、乡、村等选择,如果都写在view函数中,可能会显得很臃肿,此时我们就可以将这些代码写到独立模块里,然后在主函数中调用即可。
看下实际演示:
3、combo_box自定义样式
combo_box是一个复合元素,你可以看成是text_input与menu的组合。因此,要设置combo_box的样式,实际上就是设置input与menu的样式。 combo_box的源码中的样式定义就是这样的:
官方源码
rust
/// Sets the style of the input of the [`ComboBox`].
    #[must_use]
    pub fn input_style(
        mut self,
        style: impl Fn(&Theme, text_input::Status) -> text_input::Style + 'a,
    ) -> Self
    where
        <Theme as text_input::Catalog>::Class<'a>:
            From<text_input::StyleFn<'a, Theme>>,
    {
        self.text_input = self.text_input.style(style);
        self
    }

    /// Sets the style of the menu of the [`ComboBox`].
    #[must_use]
    pub fn menu_style(
        mut self,
        style: impl Fn(&Theme) -> menu::Style + 'a,
    ) -> Self
    where
        <Theme as menu::Catalog>::Class<'a>: From<menu::StyleFn<'a, Theme>>,
    {
        self.menu_class = (Box::new(style) as menu::StyleFn<'a, Theme>).into();
        self
}由于combo_box的样式涉及两个,我们可以定义一个结构体MyCBBStyle,然后为其实现两个样式函数:
rust
struct MyCBBStyle;
impl MyCBBStyle {
    fn inputstyle(t:&iced::Theme,s:iced::widget::text_input::Status) -> iced::widget::text_input::Style {
        match s{
            iced::widget::text_input::Status::Active =>{
                iced::widget::text_input::Style {
                    background: iced::Background::Color(color!(0xEEE9E9)),//#EEE9E9FF
                    border:iced::Border { color: color!(0xffffff), width: 1.0, radius: {1.0;4}.into() },
                    icon:color!(0xffffff),
                    placeholder:color!(0x000000),
                    value:color!(0x000000),
                    selection:color!(0xff0000),
                }
            }
            iced::widget::text_input::Status::Focused =>{
                iced::widget::text_input::Style {
                    background: iced::Background::Color(color!(0xEEE9E9)),//#EEE9E9FF
                    border:iced::Border { color: color!(0xffffff), width: 1.0, radius: {1.0;4}.into() },
                    icon:color!(0xffffff),
                    placeholder:color!(0x000000),
                    value:color!(0x000000),
                    selection:color!(0xff0000),
                }
            }
            iced::widget::text_input::Status::Hovered =>{
                iced::widget::text_input::Style {
                    background: iced::Background::Color(color!(0xEEE9E9)),//#EEE9E9FF
                    border:iced::Border { color: color!(0xffffff), width: 1.0, radius: {1.0;4}.into() },
                    icon:color!(0xffffff),
                    placeholder:color!(0x000000),
                    value:color!(0x000000),
                    selection:color!(0xff0000),
                }
            }
            iced::widget::text_input::Status::Disabled =>{
                iced::widget::text_input::Style {
                    background: iced::Background::Color(color!(0xEEE9E9)),//#EEE9E9FF
                    border:iced::Border { color: color!(0xffffff), width: 1.0, radius: {1.0;4}.into() },
                    icon:color!(0xffffff),
                    placeholder:color!(0x000000),
                    value:color!(0x000000),
                    selection:color!(0xff0000),
                }
            }
        }

    }
    fn menustyle(t:&iced::Theme) -> iced::widget::overlay::menu::Style {
        iced::widget::overlay::menu::Style{
            background:iced::Background::Color(color!(0xEEE9E9)),
            border:iced::Border { color: color!(0xffffff), width: 1.0, radius: {1.0;4}.into() },
            text_color:color!(0x000000),
            selected_text_color:color!(0xff00ff),
            selected_background:iced::Background::Color(color!(0xEEE9E9)),
        }
    }
}
如上,然后我们分别调用样式:
rust
combo_box(&self.nationname, "请选择名字...", self.nationname_fav.as_ref(), Message::NationName).width(100)
                .input_style(|t,s|{MyCBBStyle::inputstyle(t,s)})
                .menu_style(|t|{MyCBBStyle::menustyle(t)}),
来看一下效果演示: