刚接触AimRT的小伙伴可能会疑惑,这个Channel和RPC(后面讲的)到底是什么呢?
但是当我们接触了之后,就会发现,其本质类似ROS的Topic通信!(其本质基于发布订阅模型)
接下来这里我们回顾一下ROS的Topic;
一、ROS中的Topic通信
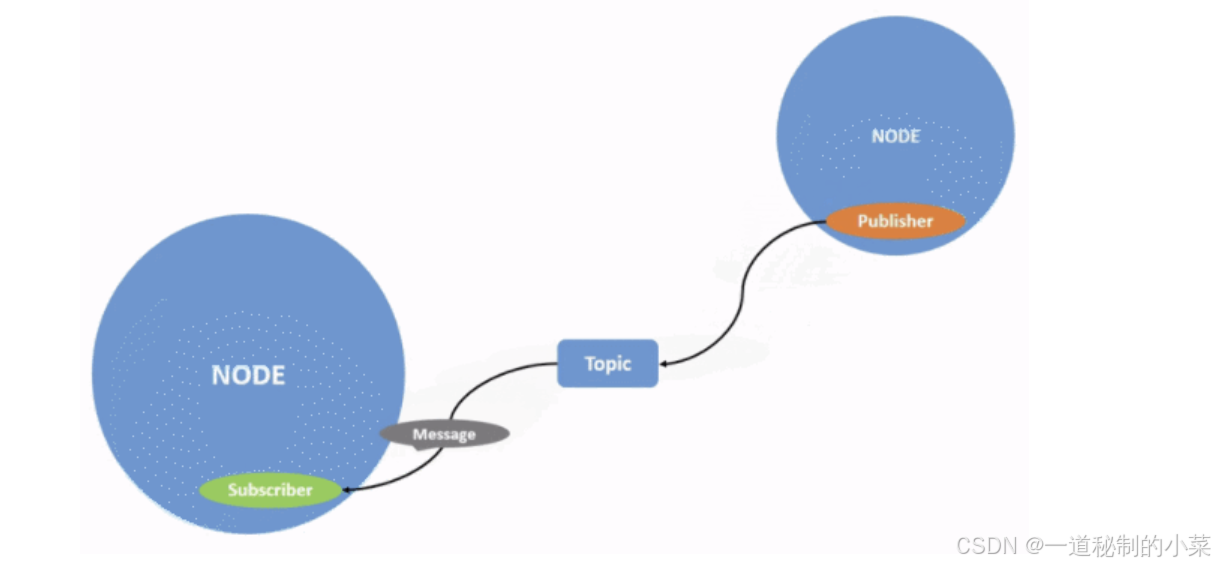
话题通信是一种以发布订阅的方式实现不同节点之间数据传输的通信模型。数据发布对象称为发布方,数据订阅对象称之为订阅方,发布方和订阅方通过话题相关联,发布方将消息发布在话题上,订阅方则从该话题订阅消息,消息的流向是单向的。
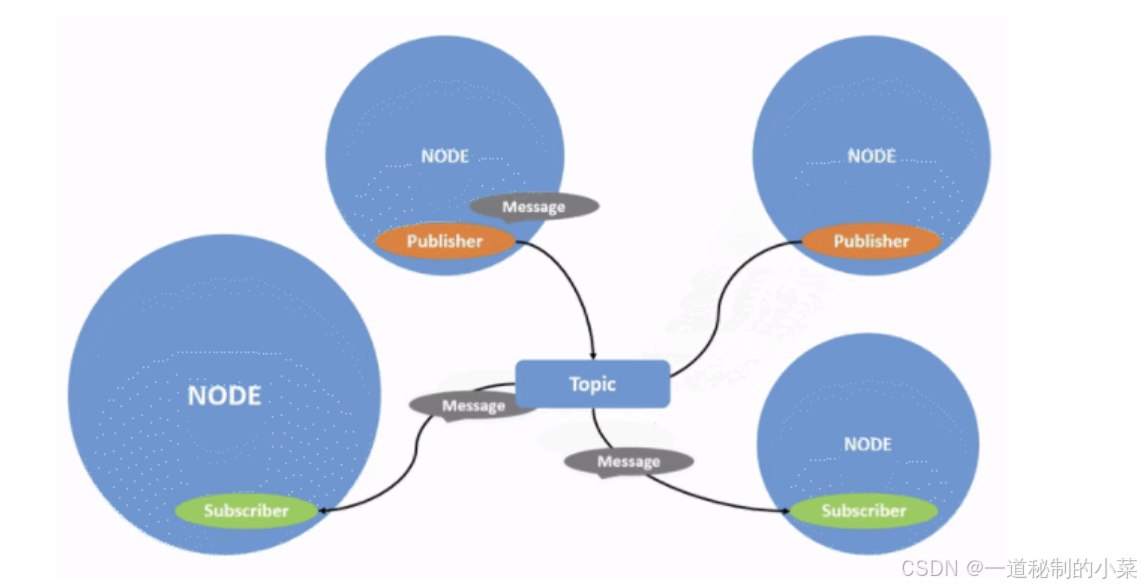
话题通信的发布方与订阅方是一种多对多的关系,也即,同一话题下可以存在多个发布方,也可以存在多个订阅方,这意味着数据会出现交叉传输的情况,当然如果没有订阅方,数据传输也会出现丢失的情况。
ROS中的话题通信用的地方非常多,对一些传统的传感器,例如雷达、相机、GPS等信息的采集,在ROS中通常可以通过节点发布采集到的数据;
二、Channel通信
目前AimRT也开发了一套基于发布-订阅的消息传递机制,其功能和ROS中的Topic等价,有关具体的AimRT的channel大家可以参考下面的链接:
AimRT 中的基本概念 --- AimRT v0.10.0 documentation
在 AimRT 中,Channel 由接口层和后端两部分组成,两者相互解耦。
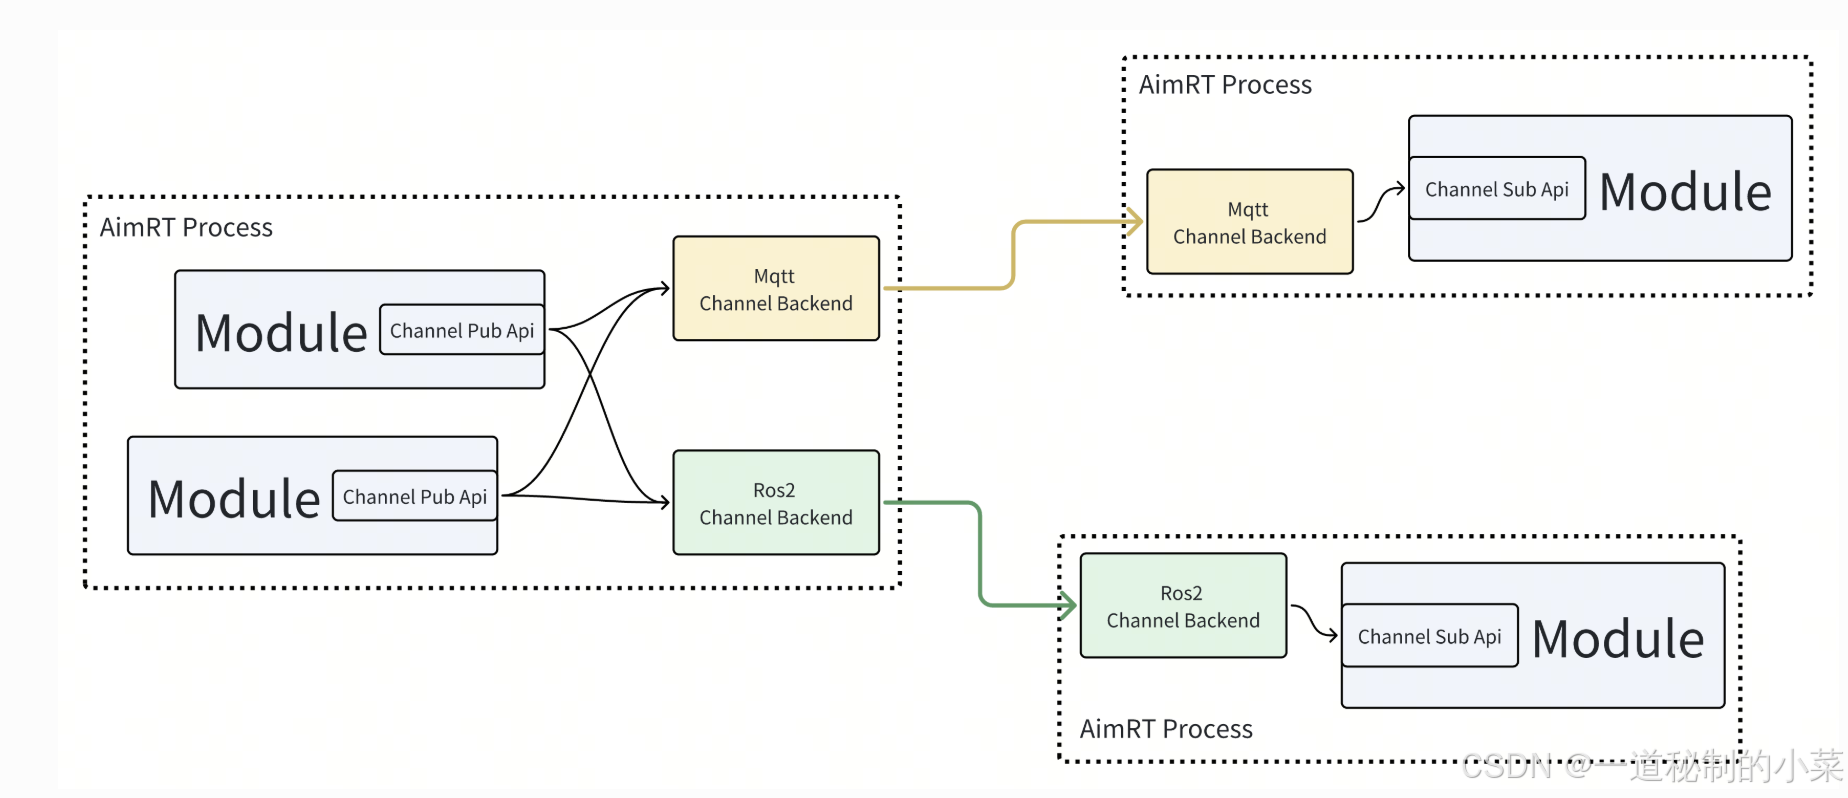
**接口层:**我认为这里大家可以类比网络的应用层和网络层等,这里的接口层主要是进行:用户书写代码,确定Channel的名字,确定发布者和接收者的Protocol;
**后端:**这里是实际上Channel的传输,在我们写的程序当中,我们可以通过配置文件设置后端使用得到协议;AimRT 官方提供了一些 Channel 后端,例如 mqtt、ros2 等,使用者也可以自行开发新的 Channel 后端。
protocol
Protocol表示的是两个module之间通信的接口层的协议,目前支持以下两种:
- Protobuf
- ROS2 msg/srv
除此之外,AimRT 的 Channel 通讯方式(后端)支持底层多种协议实现(http、mqtt、tcp、ROS2等),因此在 Channel 通讯时, AimRT 可以无缝兼容 ROS2;
接下来我们分别以基于Protobuf和基于ROS2 msg/srv两种消息接口的形式进行发布者和订阅者的相关操作;
三、基于Protobuf消息的发布者与订阅者
编写.proto文件
关于Protobuf的相关基本语法,大家可以参考我之前发的博客;
Protubuf入门 --- 01基本语法与编译使用-CSDN博客
下面给出一个简单的示例消息:
syntax = "proto3";

package aimrt.protocols.example;

message ExampleEventMsg {
  string msg = 1;
  int32 num = 2;
}
然后我们可以将其编译为对应的.cc文件和.h文件:
bash
protoc --cpp_out=. event.proto此时会生成对应的event.pb.h头文件;
接下来我们编写发布者module模块代码;
.proto文件的编译(话题通信的框架下)
对于正常情况下.proto文件的编译,大家可以参考我的之前写的博客;
这里AimRT对于protobuf的编译提供了下面的编译指令,即我们可以在CMakeLists.txt进行相关文件的配置:
add_protobuf_gencode_target_for_proto_path:为某个路径下的.proto文件生成 C++ 代码,参数如下:
-
TARGET_NAME:生成的 CMake Target 名称;
-
PROTO_PATH:协议存放目录;
-
GENCODE_PATH:生成的桩代码存放路径;
-
DEP_PROTO_TARGETS:依赖的 Proto CMake Target;
-
OPTIONS:传递给 protoc 的其他参数;
例如下面的例子:
bash
add_protobuf_gencode_target_for_proto_path(
  TARGET_NAME example_pb_gencode
  PROTO_PATH ${CMAKE_CURRENT_SOURCE_DIR}
  GENCODE_PATH ${CMAKE_CURRENT_BINARY_DIR})
然后当我们调用这个编译的.proto生成的.h的文件的时候,此时还需要在CMakeLists.txt里面添加以下指令:
bash
target_link_libraries(my_lib PUBLIC example_pb_gencode)此时即可正常使用!
publisher_module.h
cpp
#pragma once

#include <atomic>
#include <future>

#include "aimrt_module_cpp_interface/module_base.h"

namespace aimrt::examples::cpp::pb_chn::normal_publisher_module {

class NormalPublisherModule : public aimrt::ModuleBase {
 public:
  NormalPublisherModule() = default;
  ~NormalPublisherModule() override = default;

  ModuleInfo Info() const override {
    return ModuleInfo{.name = "NormalPublisherModule"};
  }

  bool Initialize(aimrt::CoreRef core) override;

  bool Start() override;

  void Shutdown() override;

 private:
  auto GetLogger() { return core_.GetLogger(); }

  void MainLoop();

 private:
  aimrt::CoreRef core_;
  aimrt::executor::ExecutorRef executor_;

  std::atomic_bool run_flag_ = false;
  std::promise<void> stop_sig_;

  std::string topic_name_ = "test_topic";
  double channel_frq_ = 0.5;
  aimrt::channel::PublisherRef publisher_;
};

}
接下来我们依次对上面的代码模块进行分析:
- 主要的模块(初始化、开始和结束)与我们之前进行的模块一样;
- 除此之外,还有一个executor,这里是用于发送者将任务投递到执行器,然后执行器可以发送对应的任务;
- run_flag:用来标识模块是否在运行;
- stop_sig_n:当发送任务循环结束时,此时会给发送对应的信号给关闭模块,shutdown收到后此时就对模块进行关闭;
- 除此之外,这里还定义了话题名、发布者和发布的频率;
publisher_module.cc
cpp
#include "normal_publisher_module/normal_publisher_module.h"
#include "aimrt_module_protobuf_interface/channel/protobuf_channel.h"
#include "aimrt_module_protobuf_interface/util/protobuf_tools.h"

#include "yaml-cpp/yaml.h"

#include "event.pb.h"

namespace aimrt::examples::cpp::pb_chn::normal_publisher_module {

bool NormalPublisherModule::Initialize(aimrt::CoreRef core) {
  core_ = core;

  try {
    // Read cfg
    auto file_path = core_.GetConfigurator().GetConfigFilePath();
    if (!file_path.empty()) {
      YAML::Node cfg_node = YAML::LoadFile(std::string(file_path));
      topic_name_ = cfg_node["topic_name"].as<std::string>();
      channel_frq_ = cfg_node["channel_frq"].as<double>();
    }

    // Get executor handle
    executor_ = core_.GetExecutorManager().GetExecutor("work_thread_pool");
    AIMRT_CHECK_ERROR_THROW(executor_ && executor_.SupportTimerSchedule(),
                            "Get executor 'work_thread_pool' failed.");

    // Register publish type
    publisher_ = core_.GetChannelHandle().GetPublisher(topic_name_);
    AIMRT_CHECK_ERROR_THROW(publisher_, "Get publisher for topic '{}' failed.", topic_name_);

    bool ret = aimrt::channel::RegisterPublishType<aimrt::protocols::example::ExampleEventMsg>(publisher_);
    AIMRT_CHECK_ERROR_THROW(ret, "Register publish type failed.");

  } catch (const std::exception& e) {
    AIMRT_ERROR("Init failed, {}", e.what());
    return false;
  }

  AIMRT_INFO("Init succeeded.");

  return true;
}

bool NormalPublisherModule::Start() {
  try {
    run_flag_ = true;
    executor_.Execute(std::bind(&NormalPublisherModule::MainLoop, this));
  } catch (const std::exception& e) {
    AIMRT_ERROR("Start failed, {}", e.what());
    return false;
  }

  AIMRT_INFO("Start succeeded.");
  return true;
}

void NormalPublisherModule::Shutdown() {
  try {
    if (run_flag_) {
      run_flag_ = false;
      stop_sig_.get_future().wait();
    }
  } catch (const std::exception& e) {
    AIMRT_ERROR("Shutdown failed, {}", e.what());
    return;
  }

  AIMRT_INFO("Shutdown succeeded.");
}

// Main loop
void NormalPublisherModule::MainLoop() {
  try {
    AIMRT_INFO("Start MainLoop.");

    aimrt::channel::PublisherProxy<aimrt::protocols::example::ExampleEventMsg> publisher_proxy(publisher_);

    uint32_t count = 0;
    while (run_flag_) {
      std::this_thread::sleep_for(std::chrono::milliseconds(static_cast<uint32_t>(1000 / channel_frq_)));

      count++;
      AIMRT_INFO("Loop count : {} -------------------------", count);

      // publish event
      aimrt::protocols::example::ExampleEventMsg msg;
      msg.set_msg("count: " + std::to_string(count));
      msg.set_num(count);

      AIMRT_INFO("Publish new pb event, data: {}", aimrt::Pb2CompactJson(msg));
      publisher_proxy.Publish(msg);
    }

    AIMRT_INFO("Exit MainLoop.");
  } catch (const std::exception& e) {
    AIMRT_ERROR("Exit MainLoop with exception, {}", e.what());
  }

  stop_sig_.set_value();
}

}
接下来我们对上面的模块进行挨个分析:
cpp
#include "normal_publisher_module/normal_publisher_module.h"
#include "aimrt_module_protobuf_interface/channel/protobuf_channel.h"
#include "aimrt_module_protobuf_interface/util/protobuf_tools.h"

#include "yaml-cpp/yaml.h"

#include "event.pb.h"
当我们使用protobuf作为channel的接口层的通信协议时,此时就需要包含:
cpp
#include "aimrt_module_protobuf_interface/channel/protobuf_channel.h"而当我们需要将二进制的protobuf文件转化为其他可读类型的数据时,此时就需要包含下面这个头文件:
cpp
#include "aimrt_module_protobuf_interface/util/protobuf_tools.h"当我们调用我们编写.proto文件的C++代码,这里调用:
cpp
#include "event.pb.h"接下来我们再看初始化模块:
cpp
bool NormalPublisherModule::Initialize(aimrt::CoreRef core) {
  core_ = core;

  try {
    // Read cfg
    auto file_path = core_.GetConfigurator().GetConfigFilePath();
    if (!file_path.empty()) {
      YAML::Node cfg_node = YAML::LoadFile(std::string(file_path));
      topic_name_ = cfg_node["topic_name"].as<std::string>();
      channel_frq_ = cfg_node["channel_frq"].as<double>();
    }

    // Get executor handle
    executor_ = core_.GetExecutorManager().GetExecutor("work_thread_pool");
    AIMRT_CHECK_ERROR_THROW(executor_ && executor_.SupportTimerSchedule(),
                            "Get executor 'work_thread_pool' failed.");

    // Register publish type
    publisher_ = core_.GetChannelHandle().GetPublisher(topic_name_);
    AIMRT_CHECK_ERROR_THROW(publisher_, "Get publisher for topic '{}' failed.", topic_name_);

    bool ret = aimrt::channel::RegisterPublishType<aimrt::protocols::example::ExampleEventMsg>(publisher_);
    AIMRT_CHECK_ERROR_THROW(ret, "Register publish type failed.");

  } catch (const std::exception& e) {
    AIMRT_ERROR("Init failed, {}", e.what());
    return false;
  }
这里分别读取配置文件,然后获取到执行器句柄;接下来还有注册发布者模块;
接下来我们重点讲解一下发布者注册模块:详细可以参考下面的链接:
Channel --- AimRT v0.10.0 documentation
cpp
namespace aimrt::channel {

class ChannelHandleRef {
 public:
  PublisherRef GetPublisher(std::string_view topic) const;

  SubscriberRef GetSubscriber(std::string_view topic) const;

  void MergeSubscribeContextToPublishContext(
    const ContextRef subscribe_ctx_ref, ContextRef publish_ctx_ref) const;
};

} // namespace aimrt::channel- 这里我们还是通过核心句柄获取到Channel管理模块的句柄,然后通过管理模块句柄可以创建对应的发布者或订阅者;
- 通过AimRT的官方文档,这里我们可以知道:获取发布者/订阅者可以发生在初始化/开始阶段,上面我们实现的是在初始化阶段;
接下来是开始模块:
cpp
bool NormalPublisherModule::Start() {
  try {
    run_flag_ = true;
    executor_.Execute(std::bind(&NormalPublisherModule::MainLoop, this));
  } catch (const std::exception& e) {
    AIMRT_ERROR("Start failed, {}", e.what());
    return false;
  }

  AIMRT_INFO("Start succeeded.");
  return true;
}
问题:这里我们执行器中的MainLoop函数不与this指针进行绑定可以吗?
不可以!对于非静态的成员函数,必须通过实例化的对象来进行调用!所以这里必须对MainLoop进行绑定!
接下来我们我们看Start代码的整体结构:
- 这里的MainLoop函数里面存放了关于发布消息的任务,然后将任务放到执行器中,让执行器执行;
- run_flag表示模块的运行状态;
接下来我们跳过shutdown模块,先看MainLoop模块:
cpp
void NormalPublisherModule::MainLoop() {
  try {
    AIMRT_INFO("Start MainLoop.");

    aimrt::channel::PublisherProxy<aimrt::protocols::example::ExampleEventMsg> publisher_proxy(publisher_);

    uint32_t count = 0;
    while (run_flag_) {
      std::this_thread::sleep_for(std::chrono::milliseconds(static_cast<uint32_t>(1000 / channel_frq_)));

      count++;
      AIMRT_INFO("Loop count : {} -------------------------", count);

      // publish event
      aimrt::protocols::example::ExampleEventMsg msg;
      msg.set_msg("count: " + std::to_string(count));
      msg.set_num(count);

      AIMRT_INFO("Publish new pb event, data: {}", aimrt::Pb2CompactJson(msg));
      publisher_proxy.Publish(msg);
    }

    AIMRT_INFO("Exit MainLoop.");
  } catch (const std::exception& e) {
    AIMRT_ERROR("Exit MainLoop with exception, {}", e.what());
  }
问题:当我们获取到发布者句柄,那么此时我们该如何发布消息呢?
在AimRT中,为了发布消息,提供了两种风格的接口来进行发布:
- 函数风格接口:
cpp
namespace aimrt::channel {

template <typename MsgType>
bool RegisterPublishType(PublisherRef publisher);

template <typename MsgType>
void Publish(PublisherRef publisher, aimrt::channel::ContextRef ctx_ref, const MsgType& msg);

template <typename MsgType>
void Publish(PublisherRef publisher, const MsgType& msg);

}
这里需要注意的是:函数模板实例化的时候传入的是消息的类型;
- Proxy类风格接口:
cpp
namespace aimrt::channel {

template <typename MsgType>
class PublisherProxy {
 public:
  explicit PublisherProxy(PublisherRef publisher);

  // Context
  std::shared_ptr<Context> NewContextSharedPtr(ContextRef ctx_ref = ContextRef()) const;
  void SetDefaultContextSharedPtr(const std::shared_ptr<Context>& ctx_ptr);
  std::shared_ptr<Context> GetDefaultContextSharedPtr() const;

  // Register type
  static bool RegisterPublishType(PublisherRef publisher);
  bool RegisterPublishType() const;

  // Publish
  void Publish(ContextRef ctx_ref, const MsgType& msg) const;
  void Publish(const MsgType& msg) const;
};

}
两种接口方法都提供了注册Publish的方法和发送消息的方法,这里需要注意的是:
对于 RegisterPublishType 这种方法:
- 只能在Initialize阶段注册;
- 不允许在一个PublisherRef中重复注册同一种类型;
- 如果注册失败,会返回 false;
对于 Publish 这种方法:
- 只能在Start阶段之后发布数据;
- 有两种Publish接口,其中一种多一个 Context 参数,用于向后端、下游传递一些额外信息;
- 在调用Publish接口时,开发者应保证传入的 Context 和 Msg 在Publish接口返回之前都不会发生变化,否则行为是未定义的;
因此此时我们再看上面的MainLoop函数就能看懂了:
这里发布信息采用的是Proxy类风格的接口,先初始化了一个类对象;
cpp
aimrt::channel::PublisherProxy<aimrt::protocols::example::ExampleEventMsg> publisher_proxy(publisher_);接下来设置发布消息的频率:
cpp
std::this_thread::sleep_for(std::chrono::milliseconds(static_cast<uint32_t>(1000 / channel_frq_)));接下来根据我们在event.proto设置的文件,设置对应的值:
cpp
      aimrt::protocols::example::ExampleEventMsg msg;
      msg.set_msg("count: " + std::to_string(count));
      msg.set_num(count);
接下来由于proto发布的消息是二进制,我们无法读懂,这里我们给其转化为json可视化,然后将对应的msg发送出去即可;
cpp
      AIMRT_INFO("Publish new pb event, data: {}", aimrt::Pb2CompactJson(msg));
      publisher_proxy.Publish(msg);
接下来当MainLoop循环结束后,此时我们发送对应的信号:
cpp
stop_sig_.set_value();接下来我们看shutdown模块:
cpp
void NormalPublisherModule::Shutdown() {
  try {
    if (run_flag_) {
      run_flag_ = false;
      stop_sig_.get_future().wait();
    }
  } catch (const std::exception& e) {
    AIMRT_ERROR("Shutdown failed, {}", e.what());
    return;
  }

  AIMRT_INFO("Shutdown succeeded.");
}
当信号发送后,此时shutdown会收到对应的信号,然后成功关闭!
接下来我们看subscriber相关的module代码:
subscriber_module.h
订阅者的相关代码结构与发布者相比更简单一点,下面是对应示例的头文件代码:
cpp
#pragma once

#include "aimrt_module_cpp_interface/module_base.h"

#include "event.pb.h"

namespace aimrt::examples::cpp::pb_chn::normal_subscriber_module {

class NormalSubscriberModule : public aimrt::ModuleBase {
 public:
  NormalSubscriberModule() = default;
  ~NormalSubscriberModule() override = default;

  ModuleInfo Info() const override {
    return ModuleInfo{.name = "NormalSubscriberModule"};
  }

  bool Initialize(aimrt::CoreRef core) override;

  bool Start() override;

  void Shutdown() override;

 private:
  auto GetLogger() { return core_.GetLogger(); }

  void EventHandle(aimrt::channel::ContextRef ctx,
                   const std::shared_ptr<const aimrt::protocols::example::ExampleEventMsg>& data);

 private:
  aimrt::CoreRef core_;

  std::string topic_name_ = "test_topic";
  aimrt::channel::SubscriberRef subscriber_;
};

}这里相比于其他的模块,框架大致都一样,但是有几个是是订阅者特有的:
-
void EventHandle:这个函数作为回调函数,用于处理订阅后的信息;
-
分别定义订阅者相关的成员变量;
subscriber_module.cc
接下来我们分析整个订阅者实现的框架:
cpp
#include "normal_subscriber_module/normal_subscriber_module.h"
#include "aimrt_module_protobuf_interface/channel/protobuf_channel.h"
#include "aimrt_module_protobuf_interface/util/protobuf_tools.h"

#include "yaml-cpp/yaml.h"

namespace aimrt::examples::cpp::pb_chn::normal_subscriber_module {

bool NormalSubscriberModule::Initialize(aimrt::CoreRef core) {
  core_ = core;

  try {
    // Read cfg
    auto file_path = core_.GetConfigurator().GetConfigFilePath();
    if (!file_path.empty()) {
      YAML::Node cfg_node = YAML::LoadFile(std::string(file_path));
      topic_name_ = cfg_node["topic_name"].as<std::string>();
    }

    // Subscribe
    subscriber_ = core_.GetChannelHandle().GetSubscriber(topic_name_);
    AIMRT_CHECK_ERROR_THROW(subscriber_, "Get subscriber for topic '{}' failed.", topic_name_);

    bool ret = aimrt::channel::Subscribe<aimrt::protocols::example::ExampleEventMsg>(
        subscriber_,
        std::bind(&NormalSubscriberModule::EventHandle, this, std::placeholders::_1, std::placeholders::_2));
    AIMRT_CHECK_ERROR_THROW(ret, "Subscribe failed.");

  } catch (const std::exception& e) {
    AIMRT_ERROR("Init failed, {}", e.what());
    return false;
  }

  AIMRT_INFO("Init succeeded.");

  return true;
}

bool NormalSubscriberModule::Start() { return true; }

void NormalSubscriberModule::Shutdown() {}

void NormalSubscriberModule::EventHandle(
    aimrt::channel::ContextRef ctx,
    const std::shared_ptr<const aimrt::protocols::example::ExampleEventMsg>& data) {
  AIMRT_INFO("Receive new pb event, ctx: {}, data: {}", ctx.ToString(), aimrt::Pb2CompactJson(*data));
}

}
要看懂上面的代码,这里我们要引入一个新的模块:context;
Context
- 当我们在使用Publish的时候,可以通过Context向后端传入一些特定的消息(对于发布者);
- 当我们使用Subscribe的时候,可以通过ContextRef后端传入一些特定的消息(对于订阅者);
cpp
namespace aimrt::channel {

class Context {
 public:
  bool CheckUsed() const;
  void SetUsed();
  void Reset();

  aimrt_channel_context_type_t GetType() const;

  std::string_view GetMetaValue(std::string_view key) const;
  void SetMetaValue(std::string_view key, std::string_view val);
  std::vector<std::string_view> GetMetaKeys() const;

  std::string ToString() const;
};

class ContextRef {
 public:
  ContextRef(const Context& ctx);
  ContextRef(const Context* ctx_ptr);
  ContextRef(const std::shared_ptr<Context>& ctx_ptr);
  explicit ContextRef(const aimrt_channel_context_base_t* base_ptr);

  bool CheckUsed() const;
  void SetUsed();
  void Reset();

  aimrt_channel_context_type_t GetType() const;

  std::string_view GetMetaValue(std::string_view key) const;
  void SetMetaValue(std::string_view key, std::string_view val);
  std::vector<std::string_view> GetMetaKeys() const;

  std::string ToString() const;
};

}
上面是AimRT提供的关于一些Context和ContextRef提供的一些相关的接口,这里我们需要注意以下几点:
- Channel ctx 分为 Publish 端和 Subscribe 端两种类型,在构造时确定,无法修改,分别用于 Publish 和 Subscribe 场景;
- 可以使用SetMetaValue、GetMetaValue方法来设置、获取 ctx 中的 Key-Val 值,使用GetMetaKeys来获取当前所有的 Key 值;
在 Publish 端,Context主要是用于在调用Publish方法时传入一些特殊的信息给 AimRT 框架和 Channel 后端,其使用时需要注意以下几点:
- 开发者可以直接构造一个Context类型实例,并自行负责其生命周期;
- 只能给Publish方法传入 Publish 类型的 ctx;
- 每个 Context 只能用于一次 Publish 过程,在传递给Publish方法后,状态即会被置为Used,如果未经Reset就用于下一次 Publish,消息将不会被正确发布;
在 Subscribe 端,开发者可以选择在回调处理函数中接收ContextRef类型的参数,其使用时需要注意以下几点:
- 传递给回调处理函数的 ctx 生命周期由 AimRT 框架管理,与 Msg 的生命周期一致;
- 传递给回调处理函数的 ctx 是 Subscribe 类型的,并且是Used状态;
所以这里我们先看信息处理的回调函数:void NormalSubscriberModule::EventHandle
cpp
void NormalSubscriberModule::EventHandle(
    aimrt::channel::ContextRef ctx,
    const std::shared_ptr<const aimrt::protocols::example::ExampleEventMsg>& data)
  {
    AIMRT_INFO("Receive new pb event, ctx: {}, data: {}", ctx.ToString(), aimrt::Pb2CompactJson(*data));
}- 此时回调函数有两个参数:ctx负责的是传入后端的配置,data是传入的对应的消息;
接下来我们再看初始化模块:
cpp
bool NormalSubscriberModule::Initialize(aimrt::CoreRef core) {
  core_ = core;

  try {
    // Read cfg
    auto file_path = core_.GetConfigurator().GetConfigFilePath();
    if (!file_path.empty()) {
      YAML::Node cfg_node = YAML::LoadFile(std::string(file_path));
      topic_name_ = cfg_node["topic_name"].as<std::string>();
    }

    // Subscribe
    subscriber_ = core_.GetChannelHandle().GetSubscriber(topic_name_);
    AIMRT_CHECK_ERROR_THROW(subscriber_, "Get subscriber for topic '{}' failed.", topic_name_);

    bool ret = aimrt::channel::Subscribe<aimrt::protocols::example::ExampleEventMsg>(
        subscriber_,
        std::bind(&NormalSubscriberModule::EventHandle, this, std::placeholders::_1, std::placeholders::_2));
    AIMRT_CHECK_ERROR_THROW(ret, "Subscribe failed.");

  } catch (const std::exception& e) {
    AIMRT_ERROR("Init failed, {}", e.what());
    return false;
  }

  AIMRT_INFO("Init succeeded.");

  return true;
}
首先依然是获取配置文件,然后获取到订阅者的句柄;
问题:当我们获取到订阅者的句柄的时候,怎么订阅对应的消息?
与发布接口一样,AimRT 提供了函数风格 和Proxy风格 两种风格类型的接口来订阅一个消息,同时还提供了智能指针形式 和协程形式两种回调函数:
- 函数风格接口:
cpp
template <MsgType>
bool Subscribe(
    SubscriberRef subscriber,
    std::function<void(ContextRef, const std::shared_ptr<const MsgType>&)>&& callback);

// Callback accept a pointer as a parameter
template <MsgType>
bool Subscribe(
    SubscriberRef subscriber,
    std::function<void(const std::shared_ptr<const MsgType>&)>&& callback);

// Coroutine callback, accept a CTX and a const reference to message as parameters
template <MsgType>
bool SubscribeCo(
    SubscriberRef subscriber,
    std::function<co::Task<void>(ContextRef, const MsgType&)>&& callback);

// Coroutine callback, accept a const reference to message as a parameter
template <MsgType>
bool SubscribeCo(
    SubscriberRef subscriber,
    std::function<co::Task<void>(const MsgType&)>&& callback);
上面两种是基于智能指针形式的回调函数、下面两种是基于协程接口的回调函数;
- Proxy 类风格接口
cpp
namespace aimrt::channel {

template <typename MsgType>
class SubscriberProxy {
 public:
  explicit SubscriberProxy(SubscriberRef subscriber);

  // Callback accept a CTX and a smart pointer as parameters
  bool Subscribe(
      std::function<void(ContextRef, const std::shared_ptr<const MsgType>&)>&& callback) const;

  // Callback accept a pointer as a parameter
  bool Subscribe(
      std::function<void(const std::shared_ptr<const MsgType>&)>&& callback) const;

  // Coroutine callback, accept a CTX and a const reference to message as parameters
  bool SubscribeCo(
      std::function<co::Task<void>(ContextRef, const MsgType&)>&& callback) const;

  // Coroutine callback, accept a const reference to message as a parameter
  bool SubscribeCo(std::function<co::Task<void>(const MsgType&)>&& callback) const;
};

}
其实这两种接口的功能大致是一样的,但是使用这些接口的时候,我们需要注意以下:
- 只能在Initialize阶段调用订阅接口;
- 不允许在一个SubscriberRef中重复订阅同一种类型;
- 如果订阅失败,会返回 false;
Context 和 Msg 的生命周期:
- 对于接收智能指针形式 Msg 的回调,Context 和 Msg 的生命周期将持续到 Msg 的智能指针引用计数归零析构时;
- 对于协程形式的回调,Context 和 Msg 的生命周期将持续到协程退出为止;
所以在上面初始化的时候,当我们获取到订阅者的句柄的时候,此时就可以通过接口函数类型,对消息进行订阅!
参数分别为订阅者的句柄和回调函数!
CMake链接相关库
当我们使用protobuf作为channel的接口层的通信协议的时候,我们编译对应的cmake需要链接以下的库:
bash
target_link_libraries(${PROJECT_NAME} PUBLIC
    aimrt::runtime::core
    aimrt::interface::aimrt_module_cpp_interface
    yaml-cpp::yaml-cpp
    aimrt::interface::aimrt_module_protobuf_interface # protobuf接口消息所需包含的接口
    aimrt::protocols::example_pb_gencode # protobuf生成的消息的target
)
其中:
- **aimrt::interface::aimrt_module_protobuf_interface:**是AimRT中channel的接口库;
- aimrt::protocols::example_pb_gencode: 是protobuf消息类型的库;
这里订阅者和发布者两者链接的库是一样的!
四、 基于ROS2 msg消息的发布者与订阅者
ROS2消息接口的使用和上面的Protobuf几乎一样,因此下面我们不会详细讲解每一步,会挑出一些不同点进行讲解:
编写.msg文件
这里我们编译了两个msg文件:
RosTestMsg:
bash
int64       num
byte[]      data
RosTestData test_msg2
上面的msg分别包含两个内置类型和一个自定义类型:
- 这里每个int64占8个字节;
- byte\[\]是一个数组,该数组中每个元素占1个字节;
- 除此之外,还包含了一个自定义类型;(可以看出ROS2的msg是支持自定义类型的);
自定义的数据类型的格式如下所示:
RosTestData:
bash
int32   num
float32 num2
char    data
该自定义类型分别包含三个内置类型;
接下来,可以通过ROS2提供的CMake编译指令,将上面的消息编译成对应的C++代码:
bash
rosidl_generate_interfaces(${CUR_PACKAGE_NAME}
  "msg/RosTestMsg.msg"
  "msg/RosTestData.msg"
)
publisher_module.h
cpp
namespace aimrt::examples::cpp::ros2_chn::normal_publisher_module {

class NormalPublisherModule : public aimrt::ModuleBase {
 public:
  NormalPublisherModule() = default;
  ~NormalPublisherModule() override = default;

  ModuleInfo Info() const override {
    return ModuleInfo{.name = "NormalPublisherModule"};
  }

  bool Initialize(aimrt::CoreRef core) override;

  bool Start() override;

  void Shutdown() override;

 private:
  auto GetLogger() { return core_.GetLogger(); }

  void MainLoop();

 private:
  aimrt::CoreRef core_;
  aimrt::executor::ExecutorRef executor_;

  std::atomic_bool run_flag_ = false;
  std::promise<void> stop_sig_;

  std::string topic_name_ = "test_topic";
  double channel_frq_;
  aimrt::channel::PublisherRef publisher_;
};

}
这些接口文件与使用Protobuf通信的接口是一样的,所以这里我们不再对其进行解释;
publisher_module.cc
cpp
#include "normal_publisher_module/normal_publisher_module.h"
#include "aimrt_module_ros2_interface/channel/ros2_channel.h"

#include "yaml-cpp/yaml.h"

#include "example_ros2/msg/ros_test_msg.hpp"

namespace aimrt::examples::cpp::ros2_chn::normal_publisher_module {

bool NormalPublisherModule::Initialize(aimrt::CoreRef core) {
  core_ = core;

  try {
    // Read cfg
    auto file_path = core_.GetConfigurator().GetConfigFilePath();
    if (!file_path.empty()) {
      YAML::Node cfg_node = YAML::LoadFile(std::string(file_path));
      topic_name_ = cfg_node["topic_name"].as<std::string>();
      channel_frq_ = cfg_node["channel_frq"].as<double>();
    }

    // Get executor handle
    executor_ = core_.GetExecutorManager().GetExecutor("work_thread_pool");
    AIMRT_CHECK_ERROR_THROW(executor_ && executor_.SupportTimerSchedule(),
                            "Get executor 'work_thread_pool' failed.");

    // Register publish type
    publisher_ = core_.GetChannelHandle().GetPublisher(topic_name_);
    AIMRT_CHECK_ERROR_THROW(publisher_, "Get publisher for topic '{}' failed.", topic_name_);

    bool ret = aimrt::channel::RegisterPublishType<example_ros2::msg::RosTestMsg>(publisher_);
    AIMRT_CHECK_ERROR_THROW(ret, "Register publishType failed.");

  } catch (const std::exception& e) {
    AIMRT_ERROR("Init failed, {}", e.what());
    return false;
  }

  AIMRT_INFO("Init succeeded.");

  return true;
}

bool NormalPublisherModule::Start() {
  try {
    run_flag_ = true;
    executor_.Execute(std::bind(&NormalPublisherModule::MainLoop, this));
  } catch (const std::exception& e) {
    AIMRT_ERROR("Start failed, {}", e.what());
    return false;
  }

  AIMRT_INFO("Start succeeded.");
  return true;
}

void NormalPublisherModule::Shutdown() {
  try {
    if (run_flag_) {
      run_flag_ = false;
      stop_sig_.get_future().wait();
    }
  } catch (const std::exception& e) {
    AIMRT_ERROR("Shutdown failed, {}", e.what());
    return;
  }

  AIMRT_INFO("Shutdown succeeded.");
}

// Main loop
void NormalPublisherModule::MainLoop() {
  try {
    AIMRT_INFO("Start MainLoop.");

    aimrt::channel::PublisherProxy<example_ros2::msg::RosTestMsg> publisher_proxy(publisher_);

    uint32_t count = 0;
    while (run_flag_) {
      std::this_thread::sleep_for(std::chrono::milliseconds(static_cast<uint32_t>(1000 / channel_frq_)));

      count++;
      AIMRT_INFO("loop count : {} -------------------------", count);

      // publish ros event
      example_ros2::msg::RosTestMsg msg;
      msg.data = {1, 2, 3, 4};
      msg.num = count + 1000;

      AIMRT_INFO("Publish new ros event, data:\n{}", example_ros2::msg::to_yaml(msg));
      publisher_proxy.Publish(msg);
    }

    AIMRT_INFO("Exit MainLoop.");
  } catch (const std::exception& e) {
    AIMRT_ERROR("Exit MainLoop with exception, {}", e.what());
  }

  stop_sig_.set_value();
}

}
主函数的代码逻辑跟上面的使用protobuf使用的通信逻辑框架是一样的,只是这里采用的是ROS2的msg消息;
cpp
      // publish ros event
      example_ros2::msg::RosTestMsg msg;
      msg.data = {1, 2, 3, 4};
      msg.num = count + 1000;
所以这里初始化ROS2信息,然后设置对应的信息,其他的代码逻辑都和上面的一致;
订阅者的代码逻辑框架和上面的也基本一致,所以这里我们不再过多介绍;
五、使用protobuf和ROS2msg进行channel通信的区别
1. 编译时开启的选项不同
在编译时Protobuf Channel时需要开启如下两个 AimRT 的 cmake 选项:
- -DAIMRT_BUILD_EXAMPLES=ON(aimrt 预定义msg)
- -DAIMRT_BUILD_WITH_PROTOBUF=ON
但是在使用ROS2 Channel时,需要开启如下两个 AimRT 的 cmake 选项:
- -DAIMRT_BUILD_ROS2_PLUGIN=ON
- -DAIMRT_BUILD_WITH_ROS2=ON
2. CMakeList 链接的库不同
- 使用 Protobuf Channel 需要链接:aimrt::interface::aimrt_module_protobuf_interface
bash
target_link_libraries(${PROJECT_NAME}
    aimrt::runtime::core
    aimrt::interface::aimrt_module_cpp_interface
    yaml-cpp::yaml-cpp
    aimrt::interface::aimrt_module_protobuf_interface # protobuf接口消息所需包含的接口
    aimrt::protocols::example_pb_gencode # 消息类型的pb类型库
)- 使用 ROS2 Channel 需要链接:aimrt::interface::aimrt_module_ros2_interface
cpp
# 查找ROS Msg包
find_package(std_msgs REQUIRED)

#链接
target_link_libraries(${PROJECT_NAME}
    aimrt::runtime::core
    aimrt::interface::aimrt_module_cpp_interface
    yaml-cpp::yaml-cpp
    aimrt::interface::aimrt_module_ros2_interface # 发布ROS2消息所需包含的接口
    std_msgs::std_msgs__rosidl_generator_cpp #消息类型的ROS库 这里我们使用std::msg
    std_msgs::std_msgs__rosidl_typesupport_cpp
    std_msgs::std_msgs__rosidl_typesupport_fastrtps_cpp
    std_msgs::std_msgs__rosidl_typesupport_introspection_cpp
)
需要注意的是,这里我们使用ROS2 的**std_msgs**作为通讯协议。由于 ROS2 封装了一套自己的CMake语法,因此如果想要使用 target_link_libraries 链接ROS2的消息类型时,需要链接如下四个 ROS2 CMake 库:
cpp
    [消息包名]::[消息包名]__rosidl_generator_cpp #消息类型的ROS库
    [消息包名]::[消息包名]__rosidl_typesupport_cpp
    [消息包名]::[消息包名]__rosidl_typesupport_fastrtps_cpp
    [消息包名]::[消息包名]__rosidl_typesupport_introspection_cpp
3. 导入接口头文件不同
Protobuf消息类型的发布者与订阅者需要导入:
cpp
#include "aimrt_module_protobuf_interface/channel/protobuf_channelROS2消息类型的发布者与订阅者需要导入:
cpp
#include "aimrt_module_ros2_interface/channel/ros2_channel.h"4 注册的消息类型不同
- 使用Protobuf Channel时,在注册与回调函数要写对应的Protobuf消息类型:
cpp
aimrt::protocols::example::ExampleEventMsg- 使用ROS2 Channel时,在注册与回调函数要写对应的ROS2消息类型:
cpp
std_msgs::msg::String通过上面的讲解,我们目前对channel就有了一个清晰的认识;