文章目录
- [SpringCloud Alibaba:](#SpringCloud Alibaba:)
-
- 依赖版本补充
- Seata处理分布式事务(AT模式)
-
- AT模式介绍
- Seata-AT模式使用
-
- Seata(2.0.0)下载、配置和启动
- Seata案例实战
-
- 前置代码
- [添加全局注解 @GlobalTransactional](#添加全局注解 @GlobalTransactional)
SpringCloud Alibaba:
官方学习文档(中文): https://spring-cloud-alibaba-group.github.io/github-pages/2022/zh-cn/2022.0.0.0-RC2.html
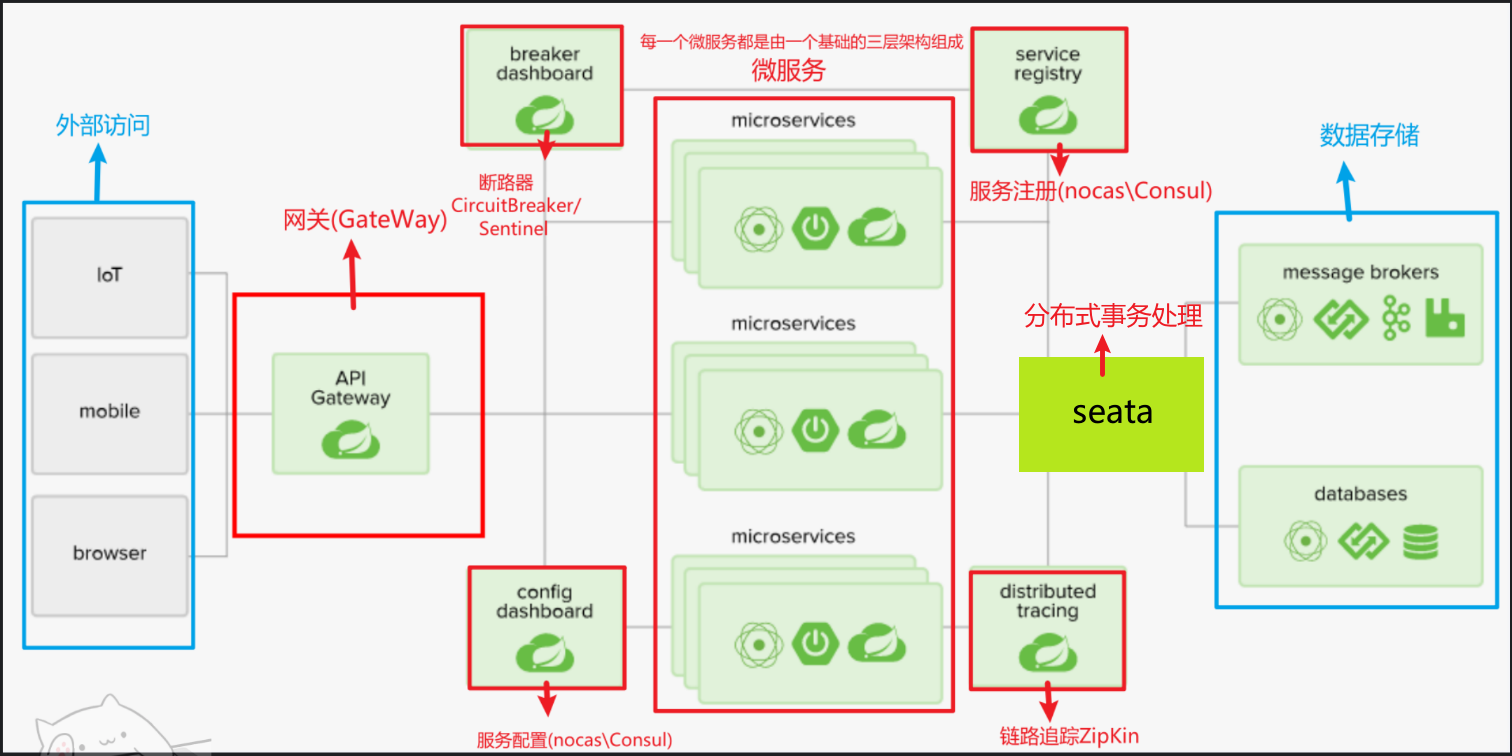
微服务的中间件介绍与使用
微服务架构体系图:
依赖版本补充
下面所有代码中的依赖版本如下:
xml<properties> <maven.compiler.source>17</maven.compiler.source> <maven.compiler.target>17</maven.compiler.target> <project.build.sourceEncoding>UTF-8</project.build.sourceEncoding> <hutool.version>5.8.22</hutool.version> <lombok.version>1.18.26</lombok.version> <druid.version>1.1.20</druid.version> <mybatis.springboot.version>3.0.2</mybatis.springboot.version> <mysql.version>8.0.11</mysql.version> <swagger3.version>2.2.0</swagger3.version> <mapper.version>4.2.3</mapper.version> <fastjson2.version>2.0.40</fastjson2.version> <persistence-api.version>1.0.2</persistence-api.version> <spring.boot.test.version>3.1.5</spring.boot.test.version> <spring.boot.version>3.2.0</spring.boot.version> <spring.cloud.version>2023.0.0</spring.cloud.version> <spring.cloud.alibaba.version>2023.0.0.0-RC1</spring.cloud.alibaba.version> <knife4j-openapi3.version>4.4.0</knife4j-openapi3.version> </properties>
Seata处理分布式事务(AT模式)
Seata ,是一款开源的分布式事务 解决方案,其中有四种模式来去实现分布式事务:
- AT(Auto Transaction) :基于两阶段提交(2PC )的自动模式,通过代理数据源自动记录事务前后的数据快照(UNDO_LOG ),实现自动回滚。无代码侵入,适合大部分业务场景。
- TCC(Try-Confirm-Cancel):需手动编写 Try(资源预留)、Confirm(提交)、Cancel(回滚)三个接口,适用于对一致性要求极高或业务逻辑复杂的场景(如资金交易)。
- Saga:长事务解决方案,通过状态机编排服务调用链,每个步骤提供正向操作和补偿操作,适合跨多个服务的长时间事务(如电商订单流程)。
- XA:基于数据库的 XA 协议实现强一致性,依赖数据库自身的事务能力,适合传统 XA 兼容场景。
其作用就是在应对一个服务请求中存在多个数据库的操作时,为了确保数据的 一致性 会对此进行分布式事务处理,
当某一个操作报错或者超时时就进行回滚 ,若是程序运行正常便直接提交。避免了对数据库不一致的问题,
这里只以AT模式 作为演示,要是想了解其他的模式可以去查看官网
AT模式介绍
在开始介绍之前先声明一下,seata的AT模式使用起来并不难,甚至只需要添加一个注释即可,
但是在面试中seata的AT模式会问一些关于概念性的东西所以这里详细的介绍一下,
若是你只想要知道如何使用直接向下看到Seata-AT模式使用
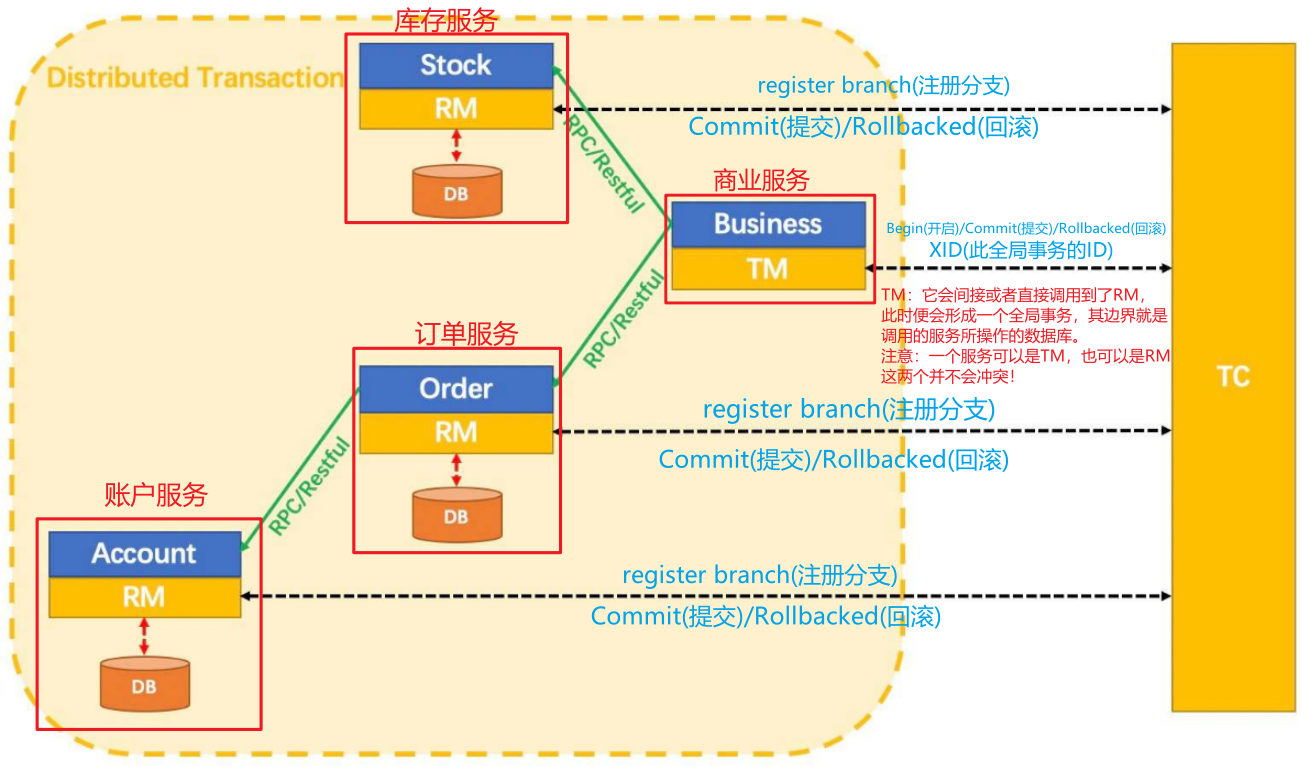
核心组件介绍
在Seata中四种模式下都会有的三个 核心组件 (TC、TM、RM):
- TC(Transaction Coordinator事务协调器):
负责全局事务的 提交 和 回滚,- TM(Transaction Manage事务管理):
定义事务的边界(如@GlobalTransactional),事务的发起者。(如何实现管理:会对此事务进行生成一个 XID,用来区分全局事务和定义边界)- RM(Resource Manage资源管理):
资源管理器,管理分支事务,与 TC 通信上报状态并执行指令。(如何实现管理:会对每一个分支生成一个branchId)
架构图展示来自官网:
AT的工作流程:两阶段提交(2PC)
在 AT模式 下事务的提交/回滚,是由两个阶段完成的:
- 第一阶段:
对数据的插入和更新等操作分别记录数据在 操作前(beforeImage) 和 操作后(afterImage) 的数据,
并将branchId、XID、undoItems{beforeImage{rows、tableName}、afterImage{rows、tableName}}插入到 UNDO_LOG 表中对下一阶段做准备,
同时将业务数据也进行提交。
- 第二阶段:
对TC下的分支提供的消息进行判断是要Commit(提交) 还是 Rollbacked(回滚) ,
- Commit(提交):提交第一阶段的 操作后(afterImage) 的数据进行 Commit(提交) ,然后在将 UNDO_LOG 中的数据进行删除
- Rollbacked(回滚):开启一个事务进行数据(本地数据库与UNDO_LOG的afterImage)的比较,
- 一致:说明数据未被其他事务修改,允许回滚。
- 不一致:说明数据已被其他事务修改(脏写),回滚失败,需人工介入处理。
这一部分是个人参考官网的理解进行概述可能会有一些表达并不到位,大家可以到官网进行参考
Seata-AT模式使用
Seata(2.0.0)下载、配置和启动
- 下载地址:Seata的官网,找到Seata(2.0.0)的版本,下载资源
seata-server-2.0.0.zip,即可- Seata的配置:要想使用Seata模式的话还要进行Seata的专属库的创建,
sql-- -------------------------------- The script used when storeMode is 'db' -------------------------------- -- the table to store GlobalSession data CREATE DATABASE seata; USE seata; CREATE TABLE IF NOT EXISTS `global_table` ( `xid` VARCHAR(128) NOT NULL, `transaction_id` BIGINT, `status` TINYINT NOT NULL, `application_id` VARCHAR(32), `transaction_service_group` VARCHAR(32), `transaction_name` VARCHAR(128), `timeout` INT, `begin_time` BIGINT, `application_data` VARCHAR(2000), `gmt_create` DATETIME, `gmt_modified` DATETIME, PRIMARY KEY (`xid`), KEY `idx_status_gmt_modified` (`status` , `gmt_modified`), KEY `idx_transaction_id` (`transaction_id`) ) ENGINE = InnoDB DEFAULT CHARSET = utf8mb4; -- the table to store BranchSession data CREATE TABLE IF NOT EXISTS `branch_table` ( `branch_id` BIGINT NOT NULL, `xid` VARCHAR(128) NOT NULL, `transaction_id` BIGINT, `resource_group_id` VARCHAR(32), `resource_id` VARCHAR(256), `branch_type` VARCHAR(8), `status` TINYINT, `client_id` VARCHAR(64), `application_data` VARCHAR(2000), `gmt_create` DATETIME(6), `gmt_modified` DATETIME(6), PRIMARY KEY (`branch_id`), KEY `idx_xid` (`xid`) ) ENGINE = InnoDB DEFAULT CHARSET = utf8mb4; -- the table to store lock data CREATE TABLE IF NOT EXISTS `lock_table` ( `row_key` VARCHAR(128) NOT NULL, `xid` VARCHAR(128), `transaction_id` BIGINT, `branch_id` BIGINT NOT NULL, `resource_id` VARCHAR(256), `table_name` VARCHAR(32), `pk` VARCHAR(36), `status` TINYINT NOT NULL DEFAULT '0' COMMENT '0:locked ,1:rollbacking', `gmt_create` DATETIME, `gmt_modified` DATETIME, PRIMARY KEY (`row_key`), KEY `idx_status` (`status`), KEY `idx_branch_id` (`branch_id`), KEY `idx_xid` (`xid`) ) ENGINE = InnoDB DEFAULT CHARSET = utf8mb4; CREATE TABLE IF NOT EXISTS `distributed_lock` ( `lock_key` CHAR(20) NOT NULL, `lock_value` VARCHAR(20) NOT NULL, `expire` BIGINT, primary key (`lock_key`) ) ENGINE = InnoDB DEFAULT CHARSET = utf8mb4; INSERT INTO `distributed_lock` (lock_key, lock_value, expire) VALUES ('AsyncCommitting', ' ', 0); INSERT INTO `distributed_lock` (lock_key, lock_value, expire) VALUES ('RetryCommitting', ' ', 0); INSERT INTO `distributed_lock` (lock_key, lock_value, expire) VALUES ('RetryRollbacking', ' ', 0); INSERT INTO `distributed_lock` (lock_key, lock_value, expire) VALUES ('TxTimeoutCheck', ' ', 0);来源地址:seata库,
- 修改Seata的
seata/conf/application.yml配置文件(注意:!!!这里最好先备份一下此配置文件,预防配置出错!!!)
yml# Copyright 1999-2019 Seata.io Group. # Licensed under the Apache License, Version 2.0 (the "License"); # you may not use this file except in compliance with the License. # You may obtain a copy of the License at # http://www.apache.org/licenses/LICENSE-2.0 # Unless required by applicable law or agreed to in writing, software # distributed under the License is distributed on an "AS IS" BASIS, # WITHOUT WARRANTIES OR CONDITIONS OF ANY KIND, either express or implied. # See the License for the specific language governing permissions and # limitations under the License. server: port: 7091 spring: application: name: seata-server logging: config: classpath:logback-spring.xml file: path: ${log.home:${user.home}/logs/seata} extend: logstash-appender: destination: 127.0.0.1:4560 kafka-appender: bootstrap-servers: 127.0.0.1:9092 topic: logback_to_logstash console: user: username: seata password: seata #------------新增的内容--------------- seata: config: type: nacos nacos: #nacos的配置 server-addr: 127.0.0.1:8848 namespace: group: SEATA_GROUP #后续自己在nacos里面新建,不想新建SEATA_GROUP,就写DEFAULT_GROUP username: nacos password: nacos registry: type: nacos nacos: #服务注册 application: seata-server server-addr: 127.0.0.1:8848 group: SEATA_GROUP #后续自己在nacos里面新建,不想新建SEATA_GROUP,就写DEFAULT_GROUP namespace: cluster: default username: nacos password: nacos store: mode: db db: datasource: druid db-type: mysql driver-class-name: com.mysql.cj.jdbc.Driver url: jdbc:mysql://localhost:3306/seata?characterEncoding=utf8&useSSL=false&serverTimezone=GMT%2B8&rewriteBatchedStatements=true&allowPublicKeyRetrieval=true user: root #写自己的数据库的用户名 password: yourPassword #数据库密码 min-conn: 10 max-conn: 100 #--------这几张表就是上面创建的Seata专属库中的表----------- global-table: global_table branch-table: branch_table lock-table: lock_table distributed-lock-table: distributed_lock #-------------------------------------------------- query-limit: 1000 max-wait: 5000 #-------------------------- # server: # service-port: 8091 #If not configured, the default is '${server.port} + 1000' security: secretKey: SeataSecretKey0c382ef121d778043159209298fd40bf3850a017 tokenValidityInMilliseconds: 1800000 ignore: urls: /,/**/*.css,/**/*.js,/**/*.html,/**/*.map,/**/*.svg,/**/*.png,/**/*.jpeg,/**/*.ico,/api/v1/auth/login,/metadata/v1/**
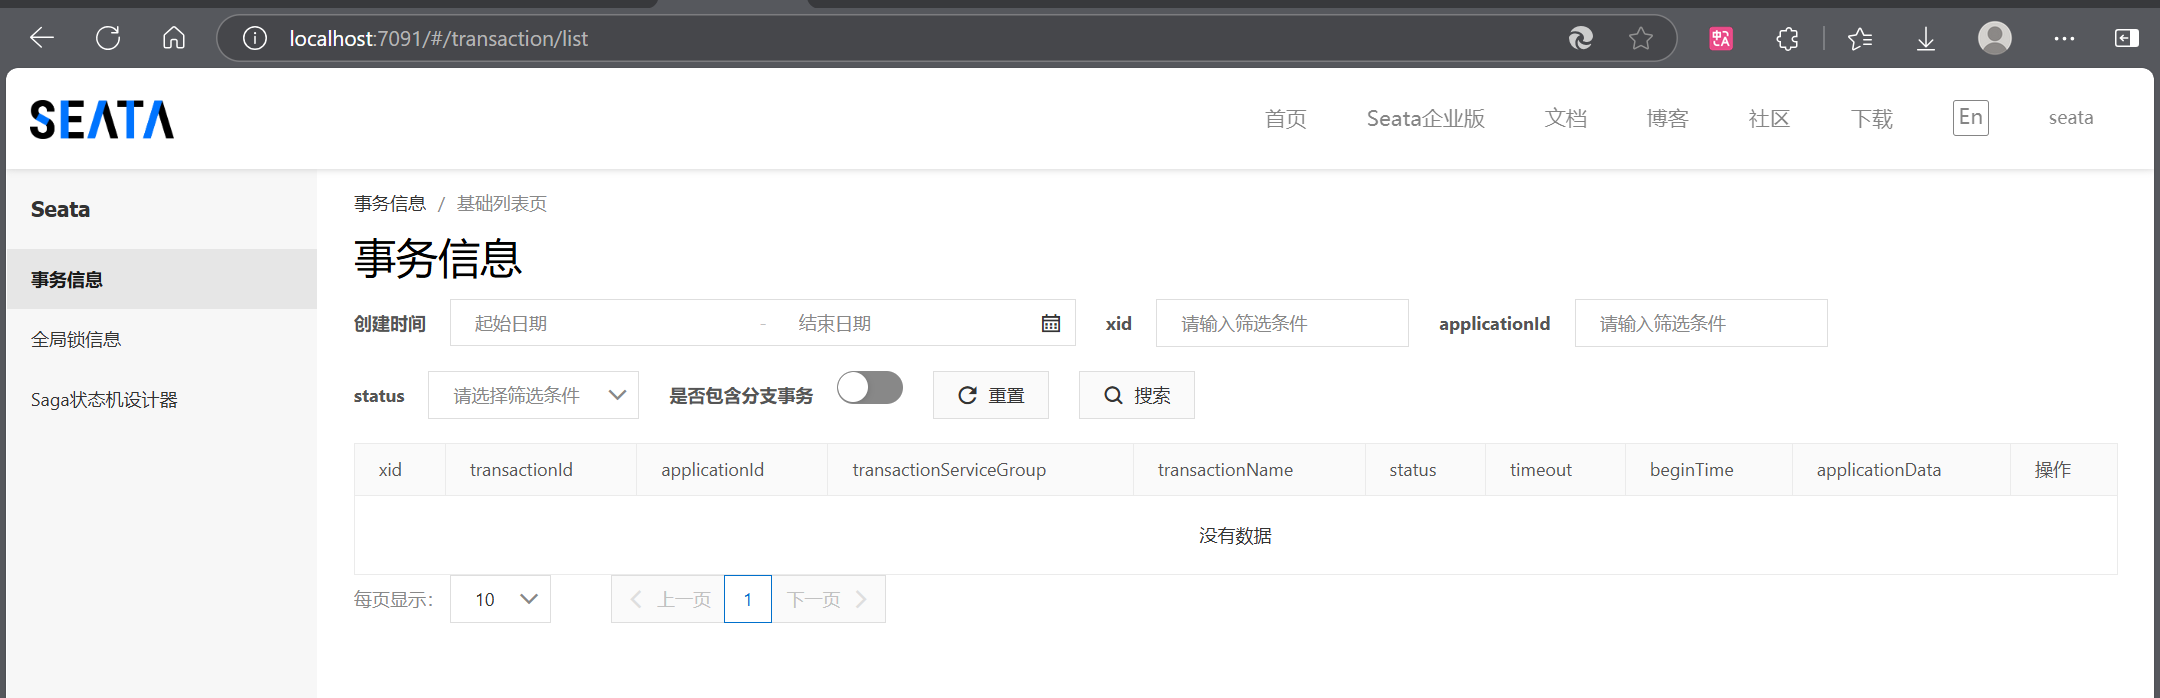
- 启动Seata:到
seata\bin\目录下运行seata-server.bat- 测试:访问默认网址http://localhost:7091/,账号密码默认:Seata
Seata案例实战
前置代码
- sql准备:
建seata order库+建t order表+undo log表
sqlCREATE DATABASE seata_order; USE seata_order; CREATE TABLE t_order( `id` BIGINT(11) NOT NULL AUTO_INCREMENT PRIMARY KEY, `user_id` BIGINT(11) DEFAULT NULL COMMENT '用户id', `product_id` BIGINT(11)DEFAULT NULL COMMENT '产品id', `count` INT(11) DEFAULT NULL COMMENT '数量', `money` DECIMAL(11,0) DEFAULT NULL COMMENT '金额', `status` INT(1) DEFAULT NULL COMMENT '订单状态: 0:创建中; 1:已完结' )ENGINE=INNODB AUTO_INCREMENT=1 DEFAULT CHARSET=utf8; SELECT * FROM t_order; -- for AT mode you must to init this sql for you business database. the seata server not need it. CREATE TABLE IF NOT EXISTS `undo_log` ( `branch_id` BIGINT NOT NULL COMMENT 'branch transaction id', `xid` VARCHAR(128) NOT NULL COMMENT 'global transaction id', `context` VARCHAR(128) NOT NULL COMMENT 'undo_log context,such as serialization', `rollback_info` LONGBLOB NOT NULL COMMENT 'rollback info', `log_status` INT(11) NOT NULL COMMENT '0:normal status,1:defense status', `log_created` DATETIME(6) NOT NULL COMMENT 'create datetime', `log_modified` DATETIME(6) NOT NULL COMMENT 'modify datetime', UNIQUE KEY `ux_undo_log` (`xid`, `branch_id`) ) ENGINE = InnoDB AUTO_INCREMENT = 1 DEFAULT CHARSET = utf8mb4 COMMENT ='AT transaction mode undo table'; ALTER TABLE `undo_log` ADD INDEX `ix_log_created` (`log_created`);建seata storage库+建t storage 表+undo log表
sqlCREATE DATABASE seata_storage; USE seata_storage; CREATE TABLE t_storage( `id` BIGINT(11) NOT NULL AUTO_INCREMENT PRIMARY KEY, `product_id` BIGINT(11) DEFAULT NULL COMMENT '产品id', `total` INT(11) DEFAULT NULL COMMENT '总库存', `used` INT(11) DEFAULT NULL COMMENT '已用库存', `residue` INT(11) DEFAULT NULL COMMENT '剩余库存' )ENGINE=INNODB AUTO_INCREMENT=1 DEFAULT CHARSET=utf8; INSERT INTO t_storage(`id`,`product_id`,`total`,`used`,`residue`)VALUES('1','1','100','0','100'); SELECT * FROM t_storage; -- for AT mode you must to init this sql for you business database. the seata server not need it. CREATE TABLE IF NOT EXISTS `undo_log` ( `branch_id` BIGINT NOT NULL COMMENT 'branch transaction id', `xid` VARCHAR(128) NOT NULL COMMENT 'global transaction id', `context` VARCHAR(128) NOT NULL COMMENT 'undo_log context,such as serialization', `rollback_info` LONGBLOB NOT NULL COMMENT 'rollback info', `log_status` INT(11) NOT NULL COMMENT '0:normal status,1:defense status', `log_created` DATETIME(6) NOT NULL COMMENT 'create datetime', `log_modified` DATETIME(6) NOT NULL COMMENT 'modify datetime', UNIQUE KEY `ux_undo_log` (`xid`, `branch_id`) ) ENGINE = InnoDB AUTO_INCREMENT = 1 DEFAULT CHARSET = utf8mb4 COMMENT ='AT transaction mode undo table'; ALTER TABLE `undo_log` ADD INDEX `ix_log_created` (`log_created`);自建seata account库+建t account 表+undo log表
sqlcreate database seata_account; use seata_account; CREATE TABLE t_account( `id` BIGINT(11) NOT NULL AUTO_INCREMENT PRIMARY KEY COMMENT 'id', `user_id` BIGINT(11) DEFAULT NULL COMMENT '用户id', `total` DECIMAL(10,0) DEFAULT NULL COMMENT '总额度', `used` DECIMAL(10,0) DEFAULT NULL COMMENT '已用余额', `residue` DECIMAL(10,0) DEFAULT '0' COMMENT '剩余可用额度' )ENGINE=INNODB AUTO_INCREMENT=2 DEFAULT CHARSET=utf8; INSERT INTO t_account(`id`,`user_id`,`total`,`used`,`residue`)VALUES('1','1','1000','0','1000'); SELECT * FROM t_account; -- for AT mode you must to init this sql for you business database. the seata server not need it. CREATE TABLE IF NOT EXISTS `undo_log` ( `branch_id` BIGINT NOT NULL COMMENT 'branch transaction id', `xid` VARCHAR(128) NOT NULL COMMENT 'global transaction id', `context` VARCHAR(128) NOT NULL COMMENT 'undo_log context,such as serialization', `rollback_info` LONGBLOB NOT NULL COMMENT 'rollback info', `log_status` INT(11) NOT NULL COMMENT '0:normal status,1:defense status', `log_created` DATETIME(6) NOT NULL COMMENT 'create datetime', `log_modified` DATETIME(6) NOT NULL COMMENT 'modify datetime', UNIQUE KEY `ux_undo_log` (`xid`, `branch_id`) ) ENGINE = InnoDB AUTO_INCREMENT = 1 DEFAULT CHARSET = utf8mb4 COMMENT ='AT transaction mode undo table'; ALTER TABLE `undo_log` ADD INDEX `ix_log_created` (`log_created`);
- 添加两个Openfeign的接口:
账户对外暴漏的接口
java@FeignClient(value = "seata-account-service") public interface SeataAccountFeignApi { //扣减账户余额 @PostMapping("/account/decrease") ResultData decrease(@RequestParam("userId") Long userId, @RequestParam("money") Long money); }库存对外暴漏的接口
java@FeignClient(value = "seata-storage-service") public interface SeataStorageFeignApi { // 扣减库存 @PostMapping(value = "/storage/decrease") ResultData decrease(@RequestParam("productId") Long productId, @RequestParam("count") Integer count); }
- 订单服务的创建
pom依赖导入
html
 <dependencies>
        <!-- nacos -->
        <dependency>
            <groupId>com.alibaba.cloud</groupId>
            <artifactId>spring-cloud-starter-alibaba-nacos-discovery</artifactId>
        </dependency>
        <!--alibaba-seata-->
        <dependency>
            <groupId>com.alibaba.cloud</groupId>
            <artifactId>spring-cloud-starter-alibaba-seata</artifactId>
        </dependency>
        <!--openfeign-->
        <dependency>
            <groupId>org.springframework.cloud</groupId>
            <artifactId>spring-cloud-starter-openfeign</artifactId>
        </dependency>
        <!--loadbalancer-->
        <dependency>
            <groupId>org.springframework.cloud</groupId>
            <artifactId>spring-cloud-starter-loadbalancer</artifactId>
        </dependency>
        <!--cloud-api-commons-->
        <dependency>
            <groupId>com.chyb.cloud</groupId>
            <artifactId>cloud-api-commons</artifactId>
            <version>1.0-SNAPSHOT</version>
        </dependency>
        <!--web + actuator-->
        <dependency>
            <groupId>org.springframework.boot</groupId>
            <artifactId>spring-boot-starter-web</artifactId>
        </dependency>
        <dependency>
            <groupId>org.springframework.boot</groupId>
            <artifactId>spring-boot-starter-actuator</artifactId>
        </dependency>
        <!--SpringBoot集成druid连接池-->
        <dependency>
            <groupId>com.alibaba</groupId>
            <artifactId>druid-spring-boot-starter</artifactId>
        </dependency>
        <!-- Swagger3 调用方式 http://你的主机IP地址:5555/swagger-ui/index.html -->
        <dependency>
            <groupId>org.springdoc</groupId>
            <artifactId>springdoc-openapi-starter-webmvc-ui</artifactId>
        </dependency>
        <!--mybatis和springboot整合-->
        <dependency>
            <groupId>org.mybatis.spring.boot</groupId>
            <artifactId>mybatis-spring-boot-starter</artifactId>
        </dependency>
        <!--MyBatisPlus:这里大家可以不引入我只是为了做一个MyBatisPlus的测试就导入此依赖了-->
        <dependency>
            <groupId>com.baomidou</groupId>
            <artifactId>mybatis-plus</artifactId>
            <version>3.5.11</version>
        </dependency>
        <!--Mysql数据库驱动8 -->
        <dependency>
            <groupId>mysql</groupId>
            <artifactId>mysql-connector-java</artifactId>
        </dependency>
        <!--persistence-->
        <dependency>
            <groupId>javax.persistence</groupId>
            <artifactId>persistence-api</artifactId>
        </dependency>
        <!--通用Mapper4-->
        <dependency>
            <groupId>tk.mybatis</groupId>
            <artifactId>mapper</artifactId>
        </dependency>
        <!--hutool-->
        <dependency>
            <groupId>cn.hutool</groupId>
            <artifactId>hutool-all</artifactId>
        </dependency>
        <!-- fastjson2 -->
        <dependency>
            <groupId>com.alibaba.fastjson2</groupId>
            <artifactId>fastjson2</artifactId>
        </dependency>
        <!--lombok-->
        <dependency>
            <groupId>org.projectlombok</groupId>
            <artifactId>lombok</artifactId>
            <version>1.18.28</version>
            <scope>provided</scope>
        </dependency>
        <!--test-->
        <dependency>
            <groupId>org.springframework.boot</groupId>
            <artifactId>spring-boot-starter-test</artifactId>
            <scope>test</scope>
        </dependency>
    </dependencies>

    <build>
        <plugins>
            <plugin>
                <groupId>org.springframework.boot</groupId>
                <artifactId>spring-boot-maven-plugin</artifactId>
            </plugin>
        </plugins>
    </build>
yml配置文件启动类
yml
server:
  port: 2001
spring:
  application:
    name: seata-order-service
  cloud:
    nacos:
      discovery:
        server-addr: localhost:8848         #Nacos服务注册中心地址
  # ==========applicationName + druid-mysql8 driver===================
  datasource:
    type: com.alibaba.druid.pool.DruidDataSource
    driver-class-name: com.mysql.cj.jdbc.Driver
    url: jdbc:mysql://localhost:3306/seata_order?characterEncoding=utf8&useSSL=false&serverTimezone=GMT%2B8&rewriteBatchedStatements=true&allowPublicKeyRetrieval=true
    username: root
    password: 123456
# ========================mybatis===================
mybatis:
  mapper-locations: classpath:mapper/*.xml
  type-aliases-package: com.chyb.cloud.entities
  configuration:
    map-underscore-to-camel-case: true
# ========================seata===================
seata:
  registry:
    type: nacos
    nacos:
      server-addr: 127.0.0.1:8848
      namespace: ""
      group: SEATA_GROUP
      application: seata-server
  tx-service-group: default_tx_group # 事务组,由它获得TC服务的集群名称
  service:
    vgroup-mapping: # 点击源码分析
      default_tx_group: default # 事务组与TC服务集群的映射关系
  data-source-proxy-mode: AT
logging:
  level:
    io:
      seata: info
java
@SpringBootApplication
@EnableDiscoveryClient/*服务注册*/
@EnableFeignClients/*openfeign*/
@MapperScan("com.chyb.cloud.mapper")
public class SeataOrderMainApp2001 {
    public static void main(String[] args) {
        SpringApplication.run(SeataOrderMainApp2001.class, args);
    }

}
业务代码:
java
@RestController
@RequestMapping("/order")
public class OrderController {
    @Resource
    private OrderService orderService;
    @GetMapping("/create")
    public ResultData create(Order order){
        orderService.create(order);
        return ResultData.success("订单创建成功!");
    }
}
java
@Slf4j
@Service
public class OrderServiceImpl implements OrderService
{
    @Resource
    private OrderMapper orderMapper;
    @Resource//订单微服务通过OpenFeign去调用库存微服务
    private SeataStorageFeignApi storageFeignApi;
    @Resource//订单微服务通过OpenFeign去调用账户微服务
    private SeataAccountFeignApi accountFeignApi;


    @Override
//    @GlobalTransactional(name = "chyb-create-order",rollbackFor = Exception.class) //AT
    public void create(Order order) {

        //xid检查
        String xid = RootContext.getXID();

        //1. 新建订单
        log.info("==================>开始新建订单"+"\t"+"xid_order:" +xid);
        //订单状态status:0:创建中;1:已完结
        order.setStatus(0);
        int result = orderMapper.insertSelective(order);

        //插入订单成功后获得插入mysql的实体对象
        Order orderFromDB = null;
        if(result > 0)
        {
            orderFromDB = orderMapper.selectOne(order);
            //orderFromDB = orderMapper.selectByPrimaryKey(order.getId());
            log.info("-------> 新建订单成功,orderFromDB info: "+orderFromDB);
            System.out.println();
            //2. 扣减库存
            log.info("-------> 订单微服务开始调用Storage库存,做扣减count");
            storageFeignApi.decrease(orderFromDB.getProductId(), orderFromDB.getCount());
            log.info("-------> 订单微服务结束调用Storage库存,做扣减完成");
            System.out.println();
            //3. 扣减账号余额
            log.info("-------> 订单微服务开始调用Account账号,做扣减money");
            accountFeignApi.decrease(orderFromDB.getUserId(), orderFromDB.getMoney());
            log.info("-------> 订单微服务结束调用Account账号,做扣减完成");
            System.out.println();
            //4. 修改订单状态
            //订单状态status:0:创建中;1:已完结
            log.info("-------> 修改订单状态");
            orderFromDB.setStatus(1);

            Example whereCondition=new Example(Order.class);
            Example.Criteria criteria=whereCondition.createCriteria();
            criteria.andEqualTo("userId",orderFromDB.getUserId());
            criteria.andEqualTo("status",0);

            int updateResult = orderMapper.updateByExampleSelective(orderFromDB, whereCondition);

            log.info("-------> 修改订单状态完成"+"\t"+updateResult);
            log.info("-------> orderFromDB info: "+orderFromDB);
        }
        System.out.println();
        log.info("==================>结束新建订单"+"\t"+"xid_order:" +xid);

    }
}
java
import com.chyb.cloud.entities.Order;
import tk.mybatis.mapper.common.Mapper;
public interface OrderMapper extends Mapper<Order> {
}
- 账户服务和库存服务
这两个就直接写业务逻辑,其他的如实体类大家就自己创建
java
/*库存*/
@Service
@Slf4j
public class StorageServiceImpl implements StorageService {
    @Autowired
    private StorageMapper storageMapper;
    @Override
    public void decrease(Long productId, Integer count) {
        log.info("------->storage-service中扣减库存开始");
        /*这里为了方便我直接使用了MyBatisPlus*/
        LambdaUpdateWrapper<Storage> updateWrapper = new LambdaUpdateWrapper<>();
        updateWrapper
                /*条件*/
                .eq(Storage::getProductId, productId)
                /*字段自增*/
                .setIncrBy(Storage::getUsed, count)
                /*字段自减*/
                .setDecrBy(Storage::getResidue, count);
        int update = storageMapper.update(updateWrapper);

        log.info("------->storage-service中扣减库存结束");
    }
}
java
/*账户*/
@Service
@Slf4j
public class AccountServiceImpl implements AccountService {
     @Autowired
     private AccountMapper accountMapper;
     @Override
     public void decrease(Long userId, Long money) {

          log.info("------->account-service中扣减账户余额开始");
          LambdaUpdateWrapper<Account> updateWrapper = new LambdaUpdateWrapper<>();
          updateWrapper.eq(Account::getUserId, userId).setIncrBy(Account::getUsed, money).setDecrBy(Account::getTotal, money);
          accountMapper.update(updateWrapper);
//        myTimeOut();
//        int a = 10 / 0;
     }
     /**
      * 模拟超时异常,全局事务回滚
      */
     private static void myTimeOut() {
          try {
               TimeUnit.SECONDS.sleep(65);
          } catch (InterruptedException e) {
               e.printStackTrace();
          }
     }
}运行测试是否可以运行若是可以便是若是是在不行可以直接使用gitee将代码克隆下来网址为:https://gitee.com/banhuayue/springCloud-Alibaba-code.git
对应运行的代码是:2001、2002、2003,其中cloud-api-commons是Openfeign对外暴漏的API接口的demo
添加全局注解 @GlobalTransactional
订单service中的方法上添加一个此注解
@GlobalTransactional,接口
javascript
 // 属性解释name是查看Seata后台的transactionName,rollbackFor为指定AT模式(默认是AT模式)
 @GlobalTransactional(name = "chyb-create-order",rollbackFor = Exception.class)
开启超时方法
myTimeOut测试:
启动三个服务访问订单的Swagger测试接口order-controller
这里就不展示效果了 (。・_・。)ノ懒~~~ ,大家可以在超时之前查看:三个服务的数据库、还有对应的UNDO_LOG表、Seata的后台全局信息和事务信息
上述大部分代码以上传到gitee:https://gitee.com/banhuayue/springCloud-Alibaba-code.git