QFramework
QFramework简介
QFramework是一套渐进式、快速开发框架,适用于任何类型的游戏及应用项目,它包含一套开发架构和大量的工具集
QFramework的特性
-
简洁性:QFramework 强调代码的简洁性和易用性,让开发者能够快速上手,减少学习成本。
-
模块化设计:该框架采用了模块化的架构设计,方便开发者根据项目需求自由组合和扩展功能模块。
-
事件驱动:支持事件驱动编程模型,便于实现不同游戏对象之间的通信和交互。
-
数据绑定:提供了数据绑定的支持,可以轻松实现UI与逻辑代码的数据同步。
-
资源管理:内置了资源加载和释放机制,帮助开发者更高效地管理游戏中的各种资源。
-
MVC/MVVM架构支持:支持传统的MVC(Model-View-Controller)架构模式,有助于更好地组织和分离代码。
-
热更新支持:对于需要进行热更新的游戏,QFramework 提供了相应的支持,使得代码或资源的在线更新变得更加容易。
-
丰富的工具集:包含了一系列实用工具,如调试工具、配置管理等,进一步提升了开发效率。
-
社区支持:拥有活跃的社区支持,开发者可以在遇到问题时寻求帮助或者分享自己的经验。
QFramework架构
QFramework架构是一套简单、强大、易上手的系统设计架构
这套架构基于MVC架构模式,可 分层,CQRS支持,事件驱动,IOS模块化,领域驱动设计(DDD)支持,符合SOLID原则,并且源码不到1000行
架构图
QFramework的MVC
QFramework基于MVC的开发模式
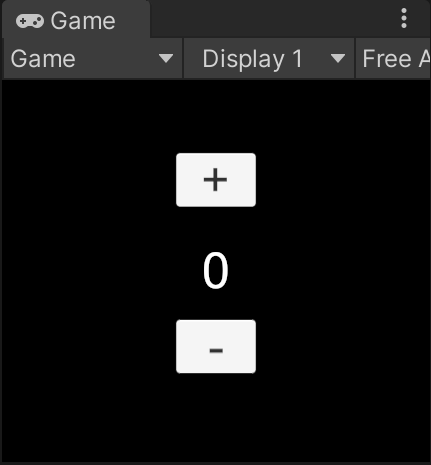
我们可以通过一个案例来学习MVC模式:计数器应用
cs
using System.Collections;
using System.Collections.Generic;
using UnityEngine;
using UnityEngine.UI;

namespace QFramework.Example
{
    //Contaroller
    public class CounterAppController : MonoBehaviour
    {
        //View
        public Button BtnAdd;
        public Button BtnSub;
        public Text CounterText;
        //Model
        public int Count = 0;
        private void Start()
        {
            BtnAdd.onClick.AddListener(() =>
            {
                //交互逻辑
                Count++;
                //表现逻辑
                updateview();
            });
            BtnSub.onClick.AddListener(() => {
                //交互逻辑
                Count--;
                //表现逻辑
                updateview();
            });
            //表现逻辑
            updateview();
        }
        void updateview()
        {
            CounterText.text = Count.ToString();
        }
    }
}
但是这还没有导入QFramework
代码很简单 这是一个非常简易的MVC的实现,但是我们要用发展的眼光看待问题,如果在未来需要做一个需要大量逻辑代码,那么count可能会在多个Controller中使用,甚至需要针对count这个数据写一些其他逻辑,比如增加多个分数,或者需要存储count等,那目前cout只属于CounterAppController,显然在未来是不够用的。那么就需要count成员变量变成一个共享的数据,最快的做法是把count变量变成静态变量或者单例,这样写起来虽然很快,但在后期维护的时候会产生一些问题
然而,QFramework架构提供了Model的概念
首先导入QFramework框架https://gitee.com/liangxiegame/QFramework/blob/master/QFramework.cs
导入QFramework的方式:复制QFramework.cs的代码到Unity工程中即可
导入后,我们将CounterAppController的代码改成:
//CounterModel
cs
namespace QFramework.Example
{
   public class CounterModel : AbstractModel
    {
        public int Count = 0;
        protected override void OnInit()
        {
            Count = 0;
        }
    }
}
//CounterApp
cs
namespace QFramework.Example
{
    //Architecture:用于管理模块,或者说是Architecture提供了一整套架构的解决方案,而模块管理和提供Mvc只是功能的一部分
   public class CounterApp : Architecture<CounterApp>
    {
       protected override void Init()
       {
            this.RegisterModel(new CounterModel());
        }
    }
}
//CounterAppController
cs
using System.Collections;
using System.Collections.Generic;
using UnityEngine;
using UnityEngine.UI;

namespace QFramework.Example
{
    public class CounterAppController : MonoBehaviour,IController
    {
        public Button BtnAdd;
        public Button BtnSub;
        public Text CounterText;

        private CounterModel mModel;

        private void Start()
        {
            mModel = this.GetModel<CounterModel>();

            BtnAdd.onClick.AddListener(() =>
            {
                //交互逻辑
                mModel.Count++;
                //表现逻辑
                updateview();
            });
            BtnSub.onClick.AddListener(() => {
                //交互逻辑
                mModel.Count--;
                //表现逻辑
                updateview();
            });
            //表现逻辑
            updateview();
        }
        void updateview()
        {
            CounterText.text = mModel.Count.ToString();
        }
        public IArchitecture GetArchitecture()
        {
            return CounterApp.Interface;
        }
    }
}
注意:需要共享的数据放在Model里,不需要共享的能不放就不放 Model的引入是为了解决数据共享的问题,而不是说但只是为了让数据和表现分离
数据共享分为两种:空间上的共享和时间上的共享
空间上的共享非常简单,就是多个点的代码需要访问Model里的数据
时间上的共享就是存储功能,将上一次关闭App之前的数据存储到一个文件里,这次打开时获得上次关闭App之前的数据
虽然以上代码引入了Model,但是这套代码随着项目规模的发展还是有很多的问题,其中的Controller会越来越臃肿
什么是交互逻辑和表现逻辑
交互逻辑:就是从用户输入开始到数据变更的逻辑 顺序是View->Controller->Model
表现逻辑:就是数据变更到在界面显示的逻辑 顺序是Model->Controller->View
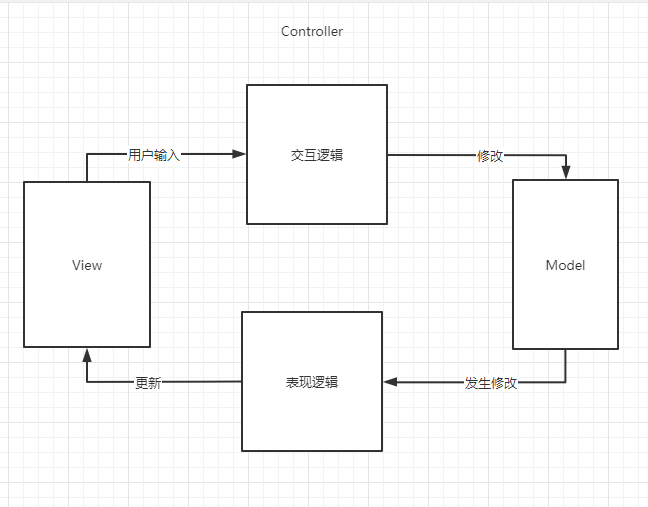
View、Controller和Model的交互逻辑和表现逻辑形成了一个闭环,构成了完整的MVC闭环
引入Command
Controller本身之所以臃肿,是因为,她负责了两种职责,即改变Model数据的交互逻辑,以及Model数据变更之后更新到界面的表现逻辑
而在一个有一定规模的项目中,表现逻辑和交互逻辑非常多,而一个controller很容易就做到上千行代码,而大部分的MVC方案,解决Controller臃肿用的是引入Command的方式,即引入命令模式,通过命令来分担Controller的交互逻辑的职责
将Command引入代码中:
创建IncreaseCountCommand.cs文件:
cs
namespace QFramework.Example
{
    public class IncreaseCountCommand : AbstractCommand
    {
        protected override void OnExecute()
        {
            this.GetModel<CounterModel>().Count++;
        }
    }
}
创建DecreaseCountCommand.cs文件:
cs
namespace QFramework.Example
{
    public class DecreaseCountCommand : AbstractCommand
    {
        protected override void OnExecute()
        {
            this.GetModel<CounterModel>().Count--;
        }
    }
}
修改CounterAppController.cs文件:
cs
using System.Collections;
using System.Collections.Generic;
using UnityEngine;
using UnityEngine.UI;

namespace QFramework.Example
{
    public class CounterAppController : MonoBehaviour,IController
    {
        public Button BtnAdd;
        public Button BtnSub;
        public Text CounterText;

        private CounterModel mModel;

        private void Start()
        {
            mModel = this.GetModel<CounterModel>();

            BtnAdd.onClick.AddListener(() =>
            {
                //交互逻辑
                this.SendCommand<IncreaseCountCommand>();
                //表现逻辑
                updateview();
            });
            BtnSub.onClick.AddListener(() => {
                //交互逻辑
                this.SendCommand<DecreaseCountCommand>();
                //表现逻辑
                updateview();
            });
            //表现逻辑
            updateview();
        }
        void updateview()
        {
            CounterText.text = mModel.Count.ToString();
        }
        public IArchitecture GetArchitecture()
        {
            return CounterApp.Interface;
        }
    }
}
通过引入Command,帮助分担了Controller的交互逻辑。使得Controller成为一个薄薄一层,在需要修改Model的时候 ,Controller只要调用一句简单的Command即可
Command的作用
- Command可以复用,Command也可以调用Command
- Commad可以比较方便实现撤销功能
- 如果遵循一定规范,可以实现使用Command跑自动化测试
- Command可以指定Command可以制定Command队列,也可以让Command按照特定的方式执行
- 一个Command也可以封装成一个Http或者Tcp里的一次数据请求
- Command可以实现Command中间件模式等等
Command的优点
Command最明显的好处就是就算代码再乱,也只是一个Command对象里乱,而不会影响其他对象,将方法封装成命令对象,可以实现对命令对象的组织、排序、延时等操作
引入Event
以上引入Command后,帮助Controller分担了一部分的交互逻辑,但是表现逻辑的代码目前看起来不是很智能。不如说在每次调用逻辑之后,表现逻辑都需要手动调用一次UpdateView方法
在一个项目中表现逻辑的调用次数很多。因为只要修改了数据,对应的就要把数据的变化在界面上表现出来。所以可以引入一个事件机制来解决这个问题
这个事件机制的使用其实是和Command一起使用的,通过Command修改数据,当数据发生修改后发送对应的数据变更事件,这个是简化版本的CQRS原则,即读写分离原则。引入这项原则会很容易实现事件驱动、数据驱动架构
首先定义数据变更事件CountChangedEvent.cs
cs
namespace QFramework.Example
{
    public struct CountChangedEvent
    {

    }
}
然后在IncreaseCountCommand、DecreaseCountCommand引入Event事件
cs
//DecreaseCountCommand
namespace QFramework.Example
{
    public class DecreaseCountCommand : AbstractCommand
    {
        protected override void OnExecute()
        {
            this.GetModel<CounterModel>().Count--;
            this.SendEvent<CountChangedEvent>();

        }
    }
}


//IncreaseCountCommand
namespace QFramework.Example
{
    public class IncreaseCountCommand : AbstractCommand
    {
        protected override void OnExecute()
        {
            this.GetModel<CounterModel>().Count++;
            this.SendEvent<CountChangedEvent>();
        }
    }
}
最后在CounterAppController中编写表现逻辑部分代码
cs
using System.Collections;
using System.Collections.Generic;
using UnityEngine;
using UnityEngine.UI;

namespace QFramework.Example
{
    public class CounterAppController : MonoBehaviour,IController
    {
        public Button BtnAdd;
        public Button BtnSub;
        public Text CounterText;

        private CounterModel mModel;

        private void Start()
        {
            mModel = this.GetModel<CounterModel>();

            BtnAdd.onClick.AddListener(() =>
            {
                //交互逻辑
                this.SendCommand<IncreaseCountCommand>();
            });
            BtnSub.onClick.AddListener(() => {
                //交互逻辑
                this.SendCommand<DecreaseCountCommand>();
            });
            //表现逻辑
            this.RegisterEvent<CountChangedEvent>(e =>
            {
                updateview();

            }).UnRegisterWhenGameObjectDestroyed(gameObject);

            updateview();
        }
        void updateview()
        {
            CounterText.text = mModel.Count.ToString();
        }
        public IArchitecture GetArchitecture()
        {
            return CounterApp.Interface;
        }
    }
}
通过事件方式,将表现逻辑更新进行解耦,就是说我们并不要主动调用表现逻辑,而是定义好表现逻辑后,然后在数据变更的同时发送对应的事件,表现逻辑只需要订阅这个事件并定义好对应执行的逻辑即可。这样不论任何角色发生了数据变更,同时需要负责发送事件
引入Utility
在学Utility之前,先来用之前学习的内容来支持CounterApp的数据存储功能
使用PlayerPrefs
cs
using UnityEngine;

namespace QFramework.Example
{
   public class CounterModel : AbstractModel
    {
        public int mCount = 0;
        public int Count{
            get{ return mCount; }
            set
            {
                if (mCount!=value)
                {
                    mCount = value;
                    PlayerPrefs.SetInt(nameof(Count),value);
                }
            }
        }
        protected override void OnInit()
        {
            Count = PlayerPrefs.GetInt(nameof(Count),0);
        }
    }
}
当然我们现在存储少量的数据是非常可行的,但如果需要存储大量数据的时候,Model层就会有大量的存储、加载相关的代码,还有如果以后不想使用PlayerPrefs时,需要修改的时候,就会造成大量修改工作量
在QFramework中提供了一个Utility层,专门用来解决上述问题,使用方法非常简单
首先创建Storage类,定义Utility层
cs
using UnityEngine;

namespace QFramework.Example
{
    public class Storage:IUtility
    {
        public void SaveInt(string key,int value)
        {
            PlayerPrefs.SetInt(key, value);
        }
        public int LoadInt(string key, int value) {
            return PlayerPrefs.GetInt(key, value);
        }
    }
}
在CounterApp中注册Model
cs
namespace QFramework.Example
{
   public class CounterApp : Architecture<CounterApp>
    {
       protected override void Init()
       {
            this.RegisterUtility(new Storage());
            this.RegisterModel(new CounterModel());
        }
    }
}
在CounterModel中编写要存储数据的代码
cs
using UnityEngine;

namespace QFramework.Example
{
   public class CounterModel : AbstractModel
    {
        public int mCount = 0;
        private Storage storage;
        public int Count{
            get{ return mCount; }
            set
            {
                if (mCount!=value)
                {
                    mCount = value;
                    storage.SaveInt(nameof(Count), value);
                }
            }
        }
        protected override void OnInit()
        {
            storage = this.GetUtility<Storage>();
            Count = storage.LoadInt(nameof(Count),0);
        }
    }
}
这样的话,如果我们想要修改PlayerPrefs为其他存储函数时只需要对Storage.cs进行相应的修改即可
引入System
我们设置一个功能,及策划提出了一个成就达成的功能,当Count点击到10的时候,触发一个点击达人成就,点击到20的时候,触发一个点击专家的成就
让我们编写相关的代码
cs
using UnityEngine;
namespace QFramework.Example
{
    public class IncreaseCountCommand : AbstractCommand
    {
        protected override void OnExecute()
        {
            var couterModel = this.GetModel<CounterModel>();
            couterModel.Count++;
            this.SendEvent<CountChangedEvent>();
            if (couterModel.Count == 10)
            {
                Debug.Log(couterModel.Count + "点击达人成就完成");
            }else if (couterModel.Count==20)
            {
                Debug.Log(couterModel.Count + "点击专家成就完成");
            }
        }
    }
}
ok,这个功能完成了,但策划又说,希望再增加一个点击到-10时,触发一个点击菜鸟成就,并且点击达人成就和点击专家成就太容易达成了,需要改成1000和2000次时,就需要我们去修改两处的代码,结果在造成了多处修改,这说明代码有问题
那么针对以上的问题QFramework提供了一个System对象
首先创建AchievementSystem.cs类
cs
using UnityEngine;
namespace QFramework.Example
{
    public class AchievementSystem:AbstractSystem
    {
        protected override void OnInit()
        {
            var model = this.GetModel<CounterModel>();
            this.RegisterEvent<CountChangedEvent>(e =>
            {
                if (model.Count == 10)
                {
                    Debug.Log("点击达人成就达成");
                }else if (model.Count == 20)
                {
                    Debug.Log("点击专家成就达成");
                }else if (model.Count == -10)
                {
                    Debug.Log("点击菜鸟成就达成");
                }
            });
        }
    }
}
然后在CounterApp里注册AchievementSystem
cs
namespace QFramework.Example
{
public class CounterApp : Architecture<CounterApp>
{
protected override void Init()
{
this.RegisterSystem(new AchievementSystem());
this.RegisterUtility(new Storage());
this.RegisterModel(new CounterModel());
}
}
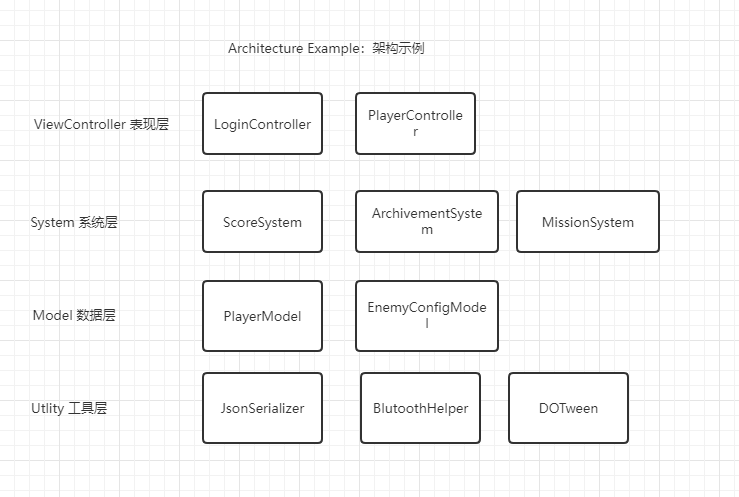
}QFramework的四个层级
- 表现层:IController
- 系统层:ISystem
- 数据层:IModel
- 工具层:IUtility
除了四个层级,还接触了为Controller的交互逻辑减负的Command和为表现逻辑减负的Event
BindableProperty 优化事件
BindableProperty是包含数据+数据变更事件的一个对象
BindableProperty的基本使用
cs
namespace QFramework.Example
{
   public class CounterModel : AbstractModel
    {
        public BindableProperty<int> Count = new BindableProperty<int>(0);

        protected override void OnInit()
        {
            var storage = this.GetUtility<Storage>();
            Count.Value = storage.LoadInt(nameof(Count),0);
            Count.Register(count =>
            {
                storage.SaveInt(nameof(Count), count);
            });
        }
    }
}


using System.Collections;
using System.Collections.Generic;
using UnityEngine;
using UnityEngine.UI;

namespace QFramework.Example
{
    public class CounterAppController : MonoBehaviour,IController
    {
        public Button BtnAdd;
        public Button BtnSub;
        public Text CounterText;

        private CounterModel mModel;

        private void Start()
        {
            mModel = this.GetModel<CounterModel>();

            BtnAdd.onClick.AddListener(() =>
            {
                //交互逻辑
                this.SendCommand<IncreaseCountCommand>();
            });
            BtnSub.onClick.AddListener(() => {
                //交互逻辑
                this.SendCommand<DecreaseCountCommand>();
            });
            //表现逻辑
            mModel.Count.RegisterWithInitValue(count =>
            {
                updateview();
            }).UnRegisterWhenGameObjectDestroyed(gameObject);

        }
        void updateview()
        {
            CounterText.text = mModel.Count.ToString();
        }
        public IArchitecture GetArchitecture()
        {
            return CounterApp.Interface;
        }
    }
}

using UnityEngine;
namespace QFramework.Example
{
    public class AchievementSystem:AbstractSystem
    {
        protected override void OnInit()
        {
            var model = this.GetModel<CounterModel>();
            model.Count.Register(count =>
            {
                if (count == 10)
                {
                    Debug.Log("点击达人成就达成");
                }
                else if (count == 20)
                {
                    Debug.Log("点击专家成就达成");
                }
                else if (count == -10)
                {
                    Debug.Log("点击菜鸟成就达成");
                }
            });
        }
    }
}
BindableProperty 除了提供 Register 这个 API 之外,还提供了 RegisterWithInitValue API,意思是 注册时 先把当前值返回过来
BindableProperty是一个独立的工具,可以脱离QFramework框架使用,也就是说不用非要用QFramework的MVC才能用BindableProperty,而是可以在自己的项目中随意使用
一般情况下,像主角的金币、分数等数据非常适合用 BindableProperty 的方式实现。