文章目录
- [1 问题描述](#1 问题描述)
- [2 解决问题过程](#2 解决问题过程)
- [3 问题总结](#3 问题总结)
1 问题描述
在编写我的系列博客:【ZYNQ Linux移植】6-搭建日常开发的环境 时,尝试在 ZYNQ MP上搭建开发用的镜像,尝试把比特文件和设备树文件从 BOOT.BIN 剥离 (只包含 fsblelf 、pmufw.elf 、bl31.elf、u-boot.elf 基本不需要变动的部分),以 Petalinux 生成的 boot.scr 为模版进行修改,试图在 u-boot 加载设备树文件和比特文件(包括手动加载)启动Linux会失败,报错 Bad Linux ARM64 Image magic!
修改后的 boot.scr 内容如下:
# This is a boot script for U-Boot
# Generate boot.scr:
# mkimage -c none -A arm -T script -d boot.cmd.default boot.scr
#
################


for boot_target in ${boot_targets};
do
	if test "${boot_target}" = "jtag" ; then
		booti 0x00200000 0x04000000 0x00100000
		exit;
	fi
	if test "${boot_target}" = "mmc0" || test "${boot_target}" = "mmc1" ; then
		if test -e ${devtype} ${devnum}:${distro_bootpart} /image.ub; then
			fatload ${devtype} ${devnum}:${distro_bootpart} 0x10000000 image.ub;
			bootm 0x10000000;
			exit;
        fi
		if test -e ${devtype} ${devnum}:${distro_bootpart} /Image; then
			fatload ${devtype} ${devnum}:${distro_bootpart} 0x00200000 Image;;
		fi
		if test -e ${devtype} ${devnum}:${distro_bootpart} /system-top.dtb; then
			fatload ${devtype} ${devnum}:${distro_bootpart} 0x00100000 system-top.dtb;
		fi
		if test -e ${devtype} ${devnum}:${distro_bootpart} /rootfs.cpio.gz.u-boot; then
			fatload ${devtype} ${devnum}:${distro_bootpart} 0x04000000 rootfs.cpio.gz.u-boot;
			booti 0x00200000 0x04000000 0x00100000
			exit;
		fi
		if test -e ${devtype} ${devnum}:${distro_bootpart} /system.bit; then
			fatload ${devtype} ${devnum}:${distro_bootpart} 0x02000000 system.bit;
			fpga loadb 0 ${fileaddr} ${filesize}
		fi
		booti 0x00200000 - 0x00100000
		exit;
	fi
	if test "${boot_target}" = "xspi0" || test "${boot_target}" = "qspi" || test "${boot_target}" = "qspi0"; then
		sf probe 0 0 0;
		if test "image.ub" = "image.ub"; then
			sf read 0x10000000 0xF00000 0x6400000;
			bootm 0x10000000;
			exit;
		fi
		if test "image.ub" = "Image"; then
			sf read 0x00200000 0xF00000 0x1D00000;
			sf read 0x04000000 0x4000000 0x4000000
			booti 0x00200000 0x04000000 0x00100000
			exit;
		fi
		exit;
	fi
	if test "${boot_target}" = "nand" || test "${boot_target}" = "nand0"; then
		nand info
		if test "image.ub" = "image.ub"; then
			nand read 0x10000000 0x4100000 0x6400000;
			bootm 0x10000000;
			exit;
		fi
		if test "image.ub" = "Image"; then
			nand read 0x00200000 0x4100000 0x3200000;
			nand read 0x04000000 0x7800000  0x3200000;
			booti 0x00200000 0x04000000 0x00100000
			exit;
		fi
	fi
done
本身是在 Petalinux 生成的 boot.scr 的基础上加入了判断如果有 bit 文件,就加载 bit 文件:
if test -e ${devtype} ${devnum}:${distro_bootpart} /system.bit; then
    fatload ${devtype} ${devnum}:${distro_bootpart} 0x02000000 system.bit;
    fpga loadb 0 ${fileaddr} ${filesize}
fi
但实际测试发现这样启动最后会报错:Bad Linux ARM64 Image magic!
2 解决问题过程
尝试在 u-boot 命令行把 boot.scr 的有效内容手动输入:
fatload mmc 1:1 0x00200000 Image;
fatload mmc 1:1 0x00100000 system-top.dtb;
fatload mmc 1:1 0x02000000 system.bit;
fpga loadb 0 ${fileaddr} ${filesize}
booti 0x00200000 - 0x00100000
可以正常启动系统。
矛头直至 boot.scr 本身,由于之前是设置 boot_cmd 为直接运行 boot.scr,再尝试手动输入,也会报错。且全套使用 Petalinux,把比特文件和设备树都打包到 BOOT.BIN,也可以启动。这就基本确定是 boot.scr 的问题了。
boot.scr 本身是 u-boot 下的一个脚本文件。那怎么对其进行调试呢,最简单的,使用万能打印大法,在可能有问题的地方添加打印信息,通过打印内容来判断问题所在。于是,修改 boot.scr 进行测试:
# This is a boot script for U-Boot
# Generate boot.scr:
# mkimage -c none -A arm -T script -d boot.cmd.default boot.scr
#
################


for boot_target in ${boot_targets};
do
	if test "${boot_target}" = "jtag" ; then
		echo "point0";
		booti 0x00200000 0x04000000 0x00100000
		exit;
	fi
	if test "${boot_target}" = "mmc0" || test "${boot_target}" = "mmc1" ; then
	echo "point1";
		if test -e ${devtype} ${devnum}:${distro_bootpart} /image.ub; then
			echo "point2";
			printenv devtype;
			printenv devnum;
			printenv distro_bootpart;
			fatload ${devtype} ${devnum}:${distro_bootpart} 0x10000000 image.ub;
			bootm 0x10000000;
			exit;
                fi
		if test -e ${devtype} ${devnum}:${distro_bootpart} /Image; then
			echo "point3";
			printenv devtype;
			printenv devnum;
			printenv distro_bootpart;
			fatload ${devtype} ${devnum}:${distro_bootpart} 0x00200000 Image;
		fi
		if test -e ${devtype} ${devnum}:${distro_bootpart} /system-top.dtb; then
			echo "point4";
			printenv devtype;
			printenv devnum;
			printenv distro_bootpart;
			fatload ${devtype} ${devnum}:${distro_bootpart} 0x00100000 system-top.dtb;
		fi
		if test -e ${devtype} ${devnum}:${distro_bootpart} /rootfs.cpio.gz.u-boot; then
			echo "point5";
			printenv devtype;
			printenv devnum;
			printenv distro_bootpart;
			fatload ${devtype} ${devnum}:${distro_bootpart} 0x04000000 rootfs.cpio.gz.u-boot;
			booti 0x00200000 0x04000000 0x00100000
			exit;
		fi
		if test -e ${devtype} ${devnum}:${distro_bootpart} /system.bit; then
			echo "point6";
			printenv devtype;
			printenv devnum;
			printenv distro_bootpart;
			fatload ${devtype} ${devnum}:${distro_bootpart} 0x02000000 system.bit;
			fpga loadb 0 ${fileaddr} ${filesize}
		fi
		booti 0x00200000 - 0x00100000
		exit;
	fi
	if test "${boot_target}" = "xspi0" || test "${boot_target}" = "qspi" || test "${boot_target}" = "qspi0"; then
		sf probe 0 0 0;
		if test "image.ub" = "image.ub"; then
			sf read 0x10000000 0xF00000 0x6400000;
			bootm 0x10000000;
			exit;
		fi
		if test "image.ub" = "Image"; then
			sf read 0x00200000 0xF00000 0x1D00000;
			sf read 0x04000000 0x4000000 0x4000000
			booti 0x00200000 0x04000000 0x00100000
			exit;
		fi
		exit;
	fi
	if test "${boot_target}" = "nand" || test "${boot_target}" = "nand0"; then
		nand info
		if test "image.ub" = "image.ub"; then
			nand read 0x10000000 0x4100000 0x6400000;
			bootm 0x10000000;
			exit;
		fi
		if test "image.ub" = "Image"; then
			nand read 0x00200000 0x4100000 0x3200000;
			nand read 0x04000000 0x7800000  0x3200000;
			booti 0x00200000 0x04000000 0x00100000
			exit;
		fi
	fi
done
根据调试信息看:
JTAG: Trying to boot script at 0x20000000
## Executing script at 20000000
Wrong image format for "source" command
JTAG: SCRIPT FAILED: continuing...
switch to partitions #0, OK
mmc0(part 0) is current device
** No partition table - mmc 0 **
switch to partitions #0, OK
mmc1 is current device
Scanning mmc 1:1...
Found U-Boot script /boot.scr
2817 bytes read in 15 ms (182.6 KiB/s)
## Executing script at 20000000
point0
Bad Linux ARM64 Image magic!
SCRIPT FAILED: continuing...
** Unable to read file / **
SF: Detected n25q256ax1 with page size 256 Bytes, erase size 64 KiB, total 32 MiB
device 0 offset 0x80000, size 0x1f80000
SF: 33030144 bytes @ 0x80000 Read: OK
QSPI: Trying to boot script at 0x20000000
## Executing script at 20000000
Wrong image format for "source" command
QSPI: SCRIPT FAILED: continuing...
根据打印信息,发现在 run distro_bootcmd 时,在转换到用 mmc 1:1 启动时,找到了 boot.scr,但由于大循环是从 boot_targets 按顺序取的,而其值默认为:
boot_targets=jtag mmc0 mmc1 qspi0 nand0 usb0 usb1 scsi0 pxe dhcp由于 jtag 排在前面,所以在尝试按照默认的地址: 0x00200000(内核)、0x04000000(initramfs)、0x00100000(设备树)加载时导致魔数校验失败。
所以直接的,有两种解决方法。
一是修改 boot_targets 环境变量,改为:
env set boot_targets "mmc0 mmc1 jtag qspi0 nand0 usb0 usb1 scsi0 pxe dhcp"相当于把 jtag 的启动优先级往后排了,但还是可以从 jtag 启动。
二是在 boot.scr 中直接把关于 jtag 的部分删除掉,但这样就没法从 jtag 启动了。
后来想想感觉不对啊,为什么这个脚本源于 Petalinux,但使用 Petalinux 的三件套(boot.scr 、BOOT.BIN、image.ub)可以正常启动呢?既然 boot.scr 本身就是从 Petalinux 参考过来的,为了探索问题的原因,还是得回到 Petalinux。
先在 FAT 分区放入 Petalinux 的三件套,然后在启动阶段提前看回车,打断 Linux 系统的启动,我们尝试把 boot_targets 打印出来,看一下,结果如下:
boot_targets=mmc1 jtag mmc0 mmc1 qspi0 nand0 usb0 usb1 scsi0 pxe dhcp好家伙,原来 Petalinux 也就是把这个环境变量改了,因为在 Petalinux 的设置中,我设置了使用 mmc1 启动,所以它自己就直接在 boot_targets 最前面加了 mm1 ,甚至都不是像我们上面一样,把 mmc1 提前,后面直接没管,相当于如果用 qspi 启动,在次前会两次尝试从 mmc1启动。大家也可以像 Petalinux 这样修改环境变量:
env set boot_targets "mmc1 jtag mmc0 mmc1 qspi0 nand0 usb0 usb1 scsi0 pxe dhcp"另外,既然都直到是 u-boot 环境变量的问题,那么能不能直接通过设备树给 u-boot 传递相关环境变量的值呢?比如:
/ {
	chosen {
		bootargs = "console=ttyPS0,115200 earlycon root=/dev/mmcblk1p2 rw rootwait";
		bootcmd = "run distro_bootcmd";
		boot_targets = "mmc0 mmc1 jtag qspi0 nand0 usb0 usb1 scsi0 pxe dhcp";
		stdout-path = "serial0:115200n8";
	};
};答案是使用设备树传递环境变量的值肯定是可以的,但是注意!!!如果是生成 BOOT.bin 时不把设备树包含进去,必须要在 u-boot 下修改再保存进 flash,而不能依靠设备树给 u-boot 传递 boot_cmd 和 boot_targets 环境变量的值 ,因为我们的模式是使用 boot.scr 加载设备,如果我们不提前修改 boot_cmd,就不会自动运行 boot.scr,而由于上面出错在加载设备树前,所以必须提前设置好 boot_targets,不然还会从 jtag 开始尝试启动。
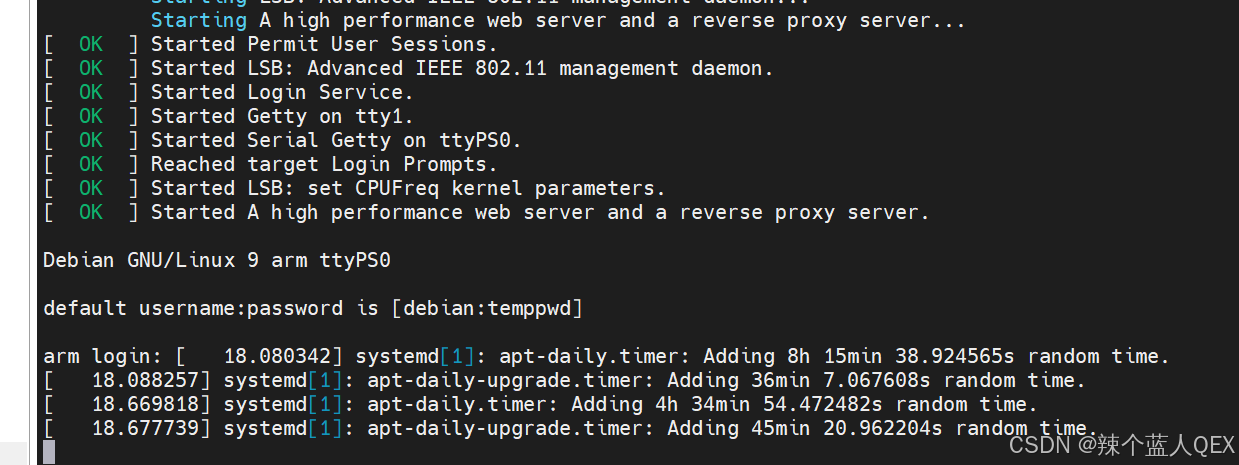
所有都设置好,就可以正常直接上电就启动系统了,我这里用的是 Debain:
3 问题总结
问题出现的根本原因在于自己在移植 u-boot 时,没有对 bootcmd 、boot_targets 进行正确的设置,然后就套用了 Petalinux 的 boot.scr 尝试进行启动,在切换到 mmc1:1 (SD 卡 FAT 分区)后,仍然按照默认的 boot_targets 顺序进行尝试,首先尝试 jtag 启动,然后因为对应内存位置没有镜像,从而启动失败。
对应的,只需要修改 u-boot 中 bootcmd 、boot_targets 两个环境变量的值,再保存到 Flash 做一次性修改即可。