搭建c/c++by win11+vscode
前面试过了ubuntu+vscode,macos+vscode,win11+visual studio搭建,本来以为win11+vscode是手到擒来的,没想到颇有些周折。可能解决方案也并不完美,先记录下来,以后有改进再来修改。
- 安装vscode https://code.visualstudio.com/ (安装时勾选 "添加到 PATH")
- 下载并安装 MSYS2,官网:https://www.msys2.org/,下载 msys2-x86_64-xxxx.exe(64位版本)并安装,默认安装路径:C:\msys64。
- 开始菜单运行MSYS2 UCRT64终端
- pacman -Syu // 更新客户端
- 运行完成后会提示关闭客户端,重新打开:
- pacman -Su //更新
- 安装 MinGW-w64 GCC(G++)
MSYS2 提供了多个版本的 GCC:
UCRT64(推荐,兼容性更好)
MINGW64(传统 MinGW-w64)
CLANG64(LLVM Clang 版本)
方法 1:安装 UCRT64 版本的 GCC(推荐)
pacman -S --needed base-devel mingw-w64-ucrt-x86_64-toolchain
按回车选择默认安装(全部包)。
方法 2:安装 MINGW64 版本的 GCC(传统 MinGW-w64)
pacman -S --needed base-devel mingw-w64-x86_64-toolchain
方法 3:安装 CLANG64 版本的 GCC(LLVM Clang)
pacman -S --needed base-devel mingw-w64-clang-x86_64-toolchain
- 将 MinGW-w64 添加到系统环境变量
安装完成后,GCC 的可执行文件(gcc、g++、gdb)位于:
UCRT64: C:\msys64\ucrt64\bin
MINGW64: C:\msys64\mingw64\bin
CLANG64: C:\msys64\clang64\bin
添加环境变量
打开系统环境变量设置:
Win + S 搜索 "编辑系统环境变量" → "环境变量"。
修改 PATH:
在 "系统变量" 中找到 Path,点击 "编辑" → "新建"。
添加你的 MinGW-w64 的 bin 目录(例如 C:\msys64\ucrt64\bin)。
- 配置 VS Code 使用 MSYS2 的 GCC
在 VS Code 中打开命令面板(Ctrl+Shift+P),输入 C/C++: Edit Configurations (UI)。
设置:
Compiler path: C:\msys64\ucrt64\bin\g++.exe(根据你的安装路径调整)。
IntelliSense mode: gcc-x64。
修改 tasks.json(编译配置)
按 Ctrl+Shift+P → Tasks: Configure Task → C/C++: g++.exe build active file,修改 args:
{
"version": "2.0.0",
"tasks": [
{
"type": "cppbuild",
"label": "C/C++: g++.exe build active file",
"command": "C:\msys64\ucrt64\bin\g++.exe",
"args": [
"-fdiagnostics-color=always",
"-g",
" f i l e " , " − o " , " {file}", "-o", " file","−o","{fileDirname}\KaTeX parse error: Expected '}', got 'EOF' at end of input: ... "cwd": "{fileDirname}"
},
"problemMatcher": "$gcc",
"group": {
"kind": "build",
"isDefault": true
},
"detail": "Generated task by VS Code"
}
]
}
修改 launch.json(调试配置)
按 Ctrl+Shift+D → create a launch.json file → C++ (GDB/LLDB),修改:
{
"version": "0.2.0",
"configurations": [
{
"name": "g++.exe - Build and debug active file",
"type": "cppdbg",
"request": "launch",
"program": "${fileDirname}\ f i l e B a s e n a m e N o E x t e n s i o n . e x e " , " a r g s " : , " s t o p A t E n t r y " : f a l s e , " c w d " : " {fileBasenameNoExtension}.exe", "args": \[\], "stopAtEntry": false, "cwd": " fileBasenameNoExtension.exe","args":\[\],"stopAtEntry":false,"cwd":"{fileDirname}",
"environment": \[\],
"externalConsole": false,
"MIMode": "gdb",
"miDebuggerPath": "C:\msys64\ucrt64\bin\gdb.exe",
"setupCommands": [
{
"description": "Enable pretty-printing for gdb",
"text": "-enable-pretty-printing",
"ignoreFailures": true
}
],
"preLaunchTask": "C/C++: g++.exe build active file"
}
]
}
编译运行:
按 Ctrl+Shift+B 编译。
按 F5 调试运行。
总结:以上是配置c++文件,如果是c文件,修改json中的g++为gcc即可。
遇到的问题及解决:
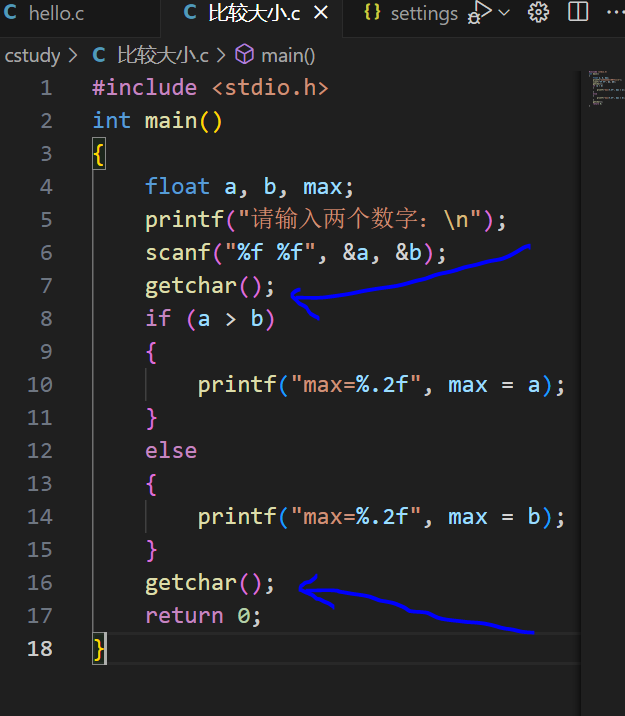
1、调用外部终端输出: "externalConsole": false,
这个false改为true后,运行和调试终端会闪退,我的解决是加入getchar()语句。scanf函数语句要加,return 0处也要加。
2、程序中包含中文运行输出乱码:
这是因为vscode编码为utf-8,windows终端编码默认为GBK,我的解决方案是:
- win+R,输入intl.cpl打开区域设置
- 进入 管理--更改系统区域设置
- 勾选BETA版:使用UNICODE UTF-8提供全球语言支持,重启电脑生效。
- 此方案的缺点是部分旧版程序可能出现乱码。
另一解决方案 - 安装使用 Windows Terminal(管理员身份运行powershell 输入 wsreset -i)
- 修改 VS Code 的全局设置(settings.json):
- {
"terminal.external.windowsExec": "wt.exe",
"terminal.integrated.profiles.windows": {
"PowerShell": {
"source": "PowerShell",
"args": "-NoExit", "-Command", "chcp 65001"
}
}
}