必须使用 TextIteratorStreamer:这是 Transformers 库唯一支持的方式。
有本地api 和 商用api
如果是本地API
# Cell 2: 导入库和初始化 FastAPI 应用
import fastapi
import uvicorn
import torch
import asyncio
import nest_asyncio
import json
import requests
import websockets
from threading import Thread
from pydantic import BaseModel
from transformers import AutoModelForCausalLM, AutoTokenizer, TextIteratorStreamer, AutoConfig

# 应用 nest_asyncio 以允许在 Jupyter 环境中运行 asyncio 事件循环
nest_asyncio.apply()

# 初始化 FastAPI 应用
app = fastapi.FastAPI(title="Qwen2-0.5B-Instruct 服务")

# 定义模型名称
MODEL_NAME = "Qwen/Qwen2-0.5B-Instruct"

import torch
print(f"PyTorch version: {torch.__version__}")
is_cuda_available = torch.cuda.is_available()
print(f"CUDA available: {is_cuda_available}")
if is_cuda_available:
    print(f"Number of GPUs: {torch.cuda.device_count()}")
    print(f"GPU Name: {torch.cuda.get_device_name(0)}") # 获取第一个 GPU 的名字
    print(f"PyTorch CUDA version: {torch.version.cuda}") # PyTorch 编译时使用的 CUDA 版本
else:
    print("CUDA is not available. PyTorch will run on CPU.")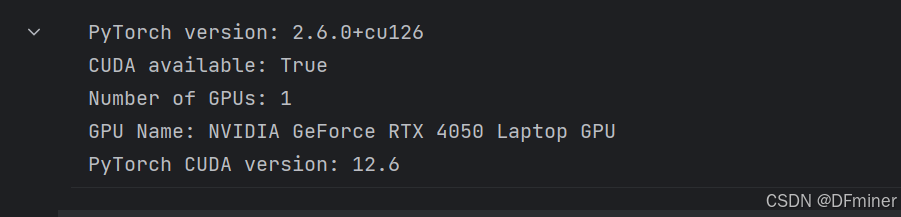
# Cell 3 修改后的代码 (移除 device_map)

print("正在加载分词器...")
tokenizer = AutoTokenizer.from_pretrained(MODEL_NAME, trust_remote_code=True)
print("分词器加载完成。")

print("正在加载模型...")
device = "cuda" if torch.cuda.is_available() else "cpu"
print(f"使用设备: {device}")
torch_dtype = torch.bfloat16 if torch.cuda.is_available() and torch.cuda.is_bf16_supported() else torch.float32
print(f"使用精度: {torch_dtype}")

# 加载模型,不使用 device_map,直接 .to(device)
try:
    # 1. 加载配置
    config = AutoConfig.from_pretrained(MODEL_NAME, trust_remote_code=True)
    # 2. 显式禁用 SWA
    config.use_sliding_window = False
    print("尝试显式禁用 Sliding Window Attention。")

    # 3. 加载模型时传入修改后的 config
    model = AutoModelForCausalLM.from_pretrained(
        MODEL_NAME,
        config=config, # <--- 传入修改后的配置
        torch_dtype=torch_dtype,
        trust_remote_code=True
    ).to(device).eval()
    print(f"模型已加载到 {device}。")
    model_device = device
except Exception as e: # 保留异常处理以防万一
     print(f"模型加载失败: {e}")
     # 可以选择在这里退出或抛出异常
     raise e # 或者 import sys; sys.exit()

# 如果 Tokenizer 没有 pad_token,通常需要设置一个
if tokenizer.pad_token is None:
    print("Tokenizer 没有 pad_token,将其设置为 eos_token。")
    tokenizer.pad_token = tokenizer.eos_token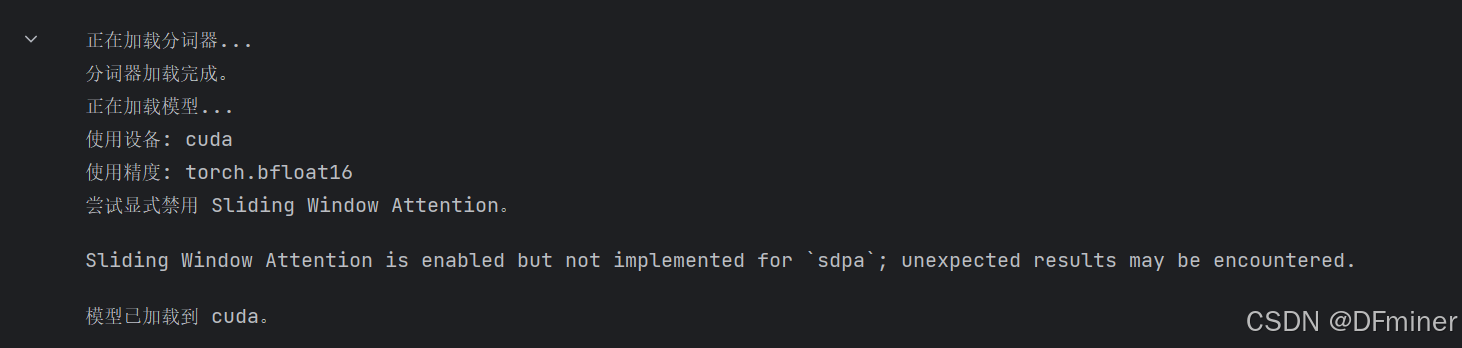
# Cell 4: 定义 HTTP 请求体
class GenerationRequest(BaseModel):
    prompt: str
    max_new_tokens: int = 512 # 稍微增加默认值
    temperature: float = 0.7
    top_p: float = 0.9
    # 可以添加更多生成参数,例如 repetition_penalty

# Cell 5: 定义 HTTP POST 接口 (/generate)
@app.post("/generate")
async def generate_text(request: GenerationRequest):
    print(f"收到 HTTP 请求: prompt='{request.prompt[:50]}...', max_new_tokens={request.max_new_tokens}")
    try:
        # 使用 chat 模板处理输入,这通常是 Instruct/Chat 模型的推荐方式
        messages = [{"role": "user", "content": request.prompt}]
        text = tokenizer.apply_chat_template(
            messages,
            tokenize=False,
            add_generation_prompt=True # 重要:添加引导模型开始生成的提示
        )

        # 对模板化后的文本进行分词
        model_inputs = tokenizer([text], return_tensors="pt").to(model_device) # 确保输入在模型所在的设备上

        # 生成文本
        generated_ids = model.generate(
            model_inputs.input_ids,
            attention_mask=model_inputs.attention_mask, # 传递 attention_mask
            max_new_tokens=request.max_new_tokens,
            temperature=request.temperature,
            top_p=request.top_p,
            pad_token_id=tokenizer.pad_token_id, # 使用 tokenizer 的 pad_token_id
            eos_token_id=tokenizer.eos_token_id # 使用 tokenizer 的 eos_token_id
        )

        # 解码生成的 token ids
        # 需要去除输入部分,只返回新生成的内容
        # generated_ids 包含输入的 ids,所以需要切片
        response_ids = generated_ids[:, model_inputs.input_ids.shape[-1]:]
        response_text = tokenizer.decode(response_ids[0], skip_special_tokens=True)

        print(f"HTTP 响应生成: '{response_text[:100]}...'")
        return {"response": response_text}
    except Exception as e:
        print(f"HTTP 请求处理出错: {e}")
        raise fastapi.HTTPException(status_code=500, detail=str(e))

# Cell 6: 定义 WebSocket 接口 (/ws-generate)
@app.websocket("/ws-generate")
async def websocket_generator(websocket: fastapi.WebSocket):
    await websocket.accept()
    print("WebSocket 连接已接受。")
    try:
        # 接收 JSON 请求
        request_data = await websocket.receive_json()
        prompt = request_data["prompt"]
        max_new_tokens = request_data.get("max_new_tokens", 512)
        temperature = request_data.get("temperature", 0.7)
        top_p = request_data.get("top_p", 0.9)
        print(f"收到 WebSocket 请求: prompt='{prompt[:50]}...', max_new_tokens={max_new_tokens}")

        # 同样使用 chat 模板
        messages = [{"role": "user", "content": prompt}]
        text = tokenizer.apply_chat_template(
            messages,
            tokenize=False,
            add_generation_prompt=True
        )
        model_inputs = tokenizer([text], return_tensors="pt").to(model_device)

        # 初始化 streamer
        # skip_prompt=True 会跳过解码输入 prompt 部分,但对于 chat template 可能不完美
        # 我们会在循环中手动处理,所以这里可以设置为 False 或省略
        streamer = TextIteratorStreamer(tokenizer, skip_special_tokens=True) # skip_special_tokens=True 避免输出 <|im_end|> 等

        # 配置生成参数
        generation_kwargs = dict(
            input_ids=model_inputs.input_ids,
            attention_mask=model_inputs.attention_mask,
            max_new_tokens=max_new_tokens,
            temperature=temperature,
            top_p=top_p,
            pad_token_id=tokenizer.pad_token_id,
            eos_token_id=tokenizer.eos_token_id,
            streamer=streamer
        )

        # 在单独的线程中运行生成,以避免阻塞 WebSocket 的异步事件循环
        thread = Thread(target=model.generate, kwargs=generation_kwargs)
        thread.start()
        print("生成线程已启动。")

        # 流式发送结果
        generated_text = ""
        for new_token in streamer:
            print(f"Server sending token: '{new_token}'")  # Add this line for server-side logging
            generated_text += new_token
            await websocket.send_text(new_token)

        # 等待生成线程结束
        thread.join()
        print("生成线程已结束。")

        # 发送完成信号
        await websocket.send_json({"status": "COMPLETED"})
        print("WebSocket 发送 COMPLETED 状态。")

    except websockets.exceptions.ConnectionClosedOK:
        print("WebSocket 连接正常关闭。")
    except Exception as e:
        print(f"WebSocket 处理出错: {e}")
        try:
            # 尝试发送错误信息给客户端
            await websocket.send_json({"error": str(e), "status": "ERROR"})
        except Exception as send_error:
            print(f"发送 WebSocket 错误信息失败: {send_error}")
    finally:
        # 确保连接关闭
        await websocket.close()
        print("WebSocket 连接已关闭。")

# Cell 7: 启动 FastAPI 服务器 (在一个单独的线程中)

# 检查是否已经有服务器在运行(防止重复启动)
server_running = False
if 'server_thread' in globals() and server_thread.is_alive():
    print("服务器似乎已在运行。")
    server_running = True

if not server_running:
    print("启动 FastAPI 服务器...")
    # 配置 Uvicorn
    config = uvicorn.Config(app, host="0.0.0.0", port=8000, log_level="info")
    server = uvicorn.Server(config)

    # 在一个单独的线程中运行服务器
    # 注意:在某些环境中(如标准 Python 脚本),直接 asyncio.run(server.serve()) 更好
    # 但在 Jupyter/IPython 中,事件循环可能已在运行,用线程是常见做法
    def run_server():
        # 需要为新线程设置新的事件循环
        loop = asyncio.new_event_loop()
        asyncio.set_event_loop(loop)
        loop.run_until_complete(server.serve())

    server_thread = Thread(target=run_server)
    server_thread.start()
    print("服务器线程已启动。访问 http://localhost:8000/docs 查看 API 文档。")
    # 等待一小段时间确保服务器启动
    await asyncio.sleep(5)
else:
    print("跳过服务器启动步骤。")
# Cell 8: 测试 HTTP 接口

def test_http():
    print("\n--- 开始 HTTP 测试 ---")
    api_url = "http://localhost:8000/generate"
    payload = {
        "prompt": "请给我的新开的咖啡店起三个有创意的名字",
        "max_new_tokens": 100
    }
    try:
        response = requests.post(api_url, json=payload)
        response.raise_for_status() # 检查 HTTP 错误 (如 4xx, 5xx)
        result = response.json()
        print("HTTP 请求成功!")
        print("服务器响应:")
        print(result.get("response", "没有收到 response 字段"))
    except requests.exceptions.RequestException as e:
        print(f"HTTP 请求失败: {e}")
    except json.JSONDecodeError:
        print("无法解析服务器响应为 JSON:")
        print(response.text)
    print("--- HTTP 测试结束 ---\n")

# 执行 HTTP 测试
test_http()
# Cell 9: 测试 WebSocket 接口
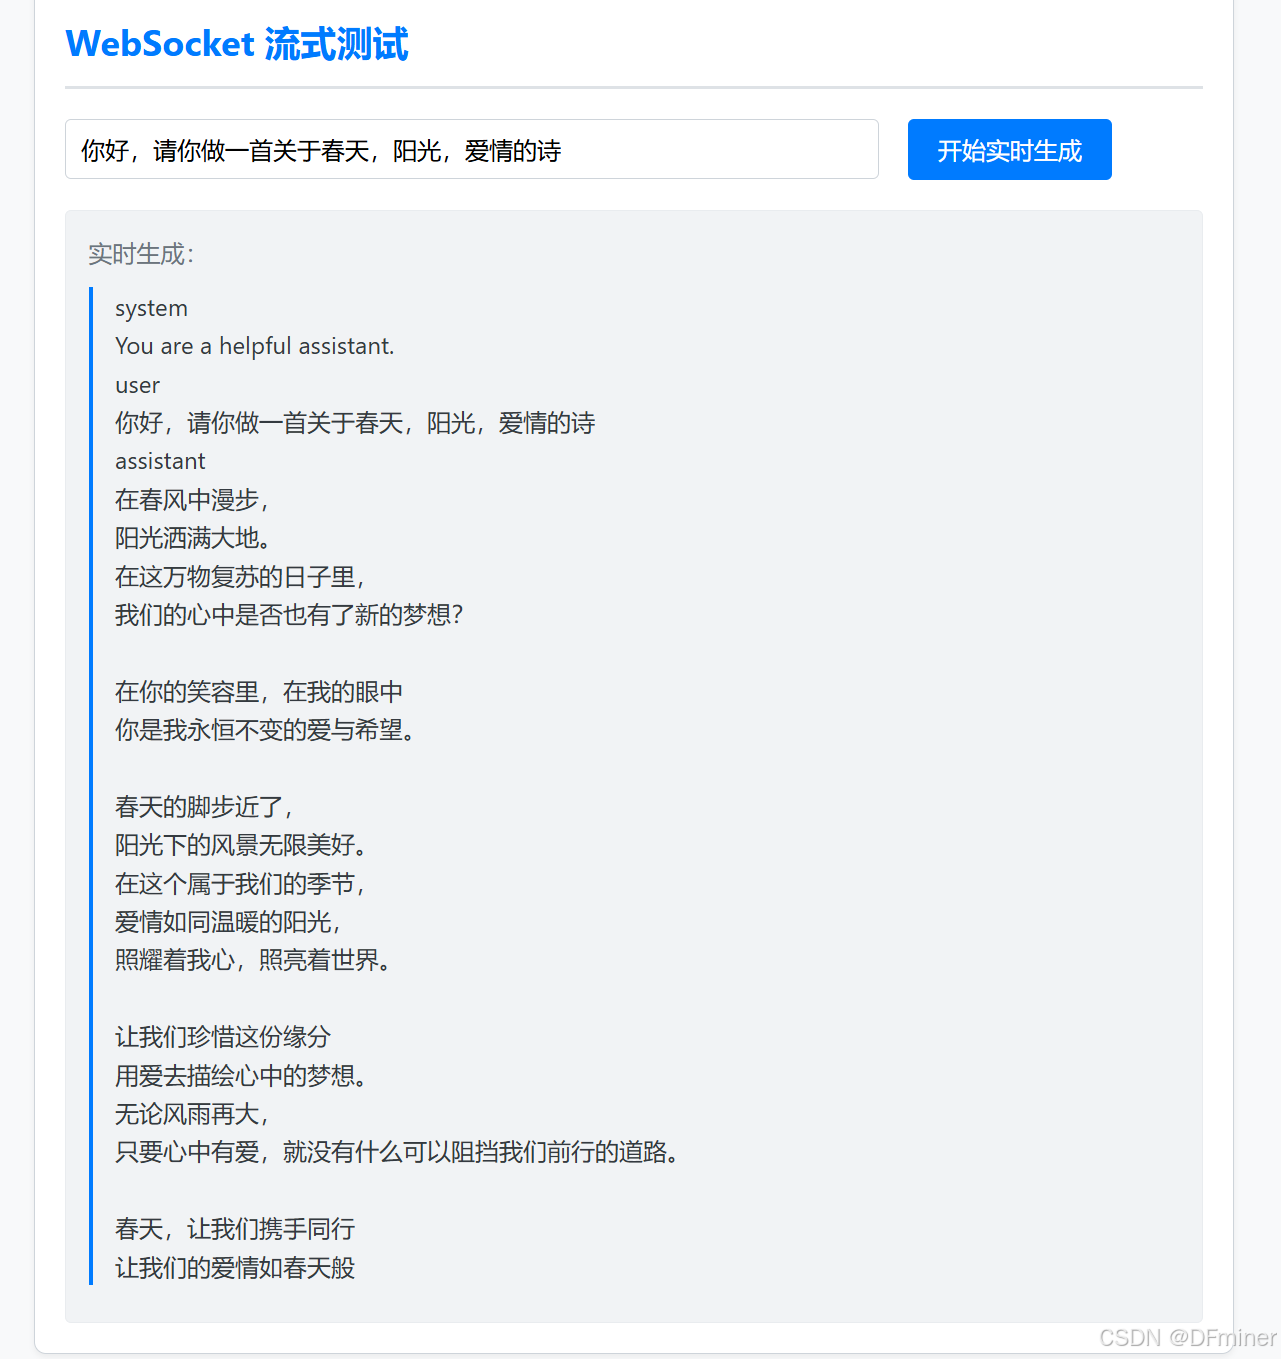
async def test_websocket():
print("\n--- 开始 WebSocket 测试 ---")
uri = "ws://localhost:8000/ws-generate"
payload = {
"prompt": "写一首关于春天的七言绝句",
"max_new_tokens": 80,
"temperature": 0.8
}
try:
async with websockets.connect(uri) as websocket:
print(f"WebSocket 已连接到 {uri}")
# 发送请求
await websocket.send(json.dumps(payload))
print("请求已发送。等待服务器响应...")
print("\n实时生成结果:")
full_response = ""
while True:
message = await websocket.recv()
# 尝试解析 JSON (用于接收状态消息)
try:
data = json.loads(message)
if isinstance(data, dict):
if data.get("status") == "COMPLETED":
print("\n\n生成完成 (收到 COMPLETED 状态)!")
break
elif data.get("status") == "ERROR":
print(f"\n\n服务器报告错误: {data.get('error')}")
break
else:
# 如果是其他 JSON 结构,打印出来
print(f"\n收到未知 JSON: {data}")
# 可以选择在这里 break 或 continue
except json.JSONDecodeError:
# 如果不是 JSON,那就是文本片段
print(message, end="", flush=True) # 修改这里,添加 flush=True
full_response += message
# print(f"\n完整响应:\n{full_response}") # 如果需要打印完整结果
except websockets.exceptions.ConnectionClosedOK:
print("\nWebSocket 连接正常关闭。")
except websockets.exceptions.InvalidURI:
print(f"WebSocket URI 无效: {uri}")
except ConnectionRefusedError:
print(f"无法连接到 WebSocket 服务器 {uri}。请确保服务器正在运行。")
except Exception as e:
print(f"\nWebSocket 测试期间发生错误: {e}")
print("--- WebSocket 测试结束 ---\n")
# 执行 WebSocket 测试 (需要在异步上下文中运行)
# asyncio.run(test_websocket()) # 在 .py 文件中这样运行
# 在 Jupyter 中,如果顶层 await 可用 (IPython 7.0+),可以直接 await
# 否则,需要获取或创建事件循环
try:
loop = asyncio.get_running_loop()
await test_websocket()
except RuntimeError: # No running event loop
print("未找到运行中的事件循环,尝试使用 asyncio.run()")
asyncio.run(test_websocket())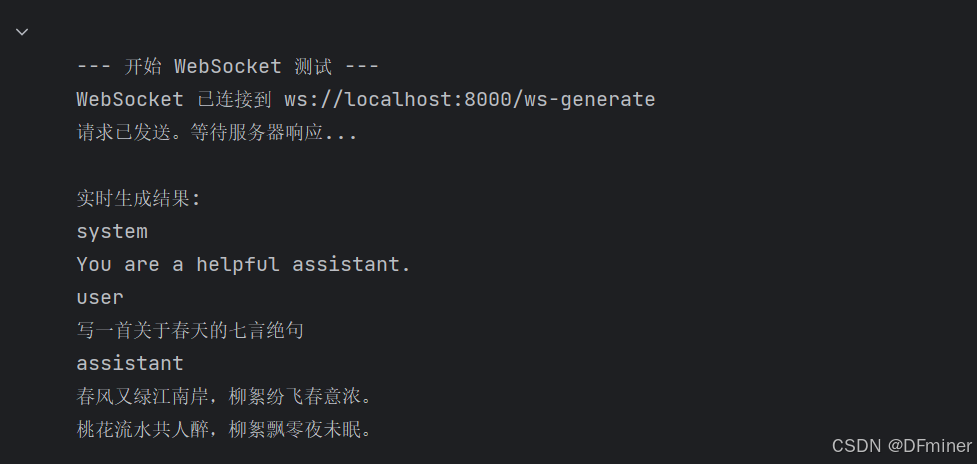
# Cell 10: HTTP 接口压力测试
import asyncio
import requests
import time
async def send_request(url, payload):
try:
start_time = time.time()
response = await asyncio.to_thread(requests.post, url, json=payload)
end_time = time.time()
response.raise_for_status()
result = response.json()
latency = end_time - start_time
return True, latency, result.get("response", "")
except requests.exceptions.RequestException as e:
return False, None, str(e)
async def load_test(url, payload, num_requests, concurrency):
tasks = []
latencies = []
successful_requests = 0
failed_requests = 0
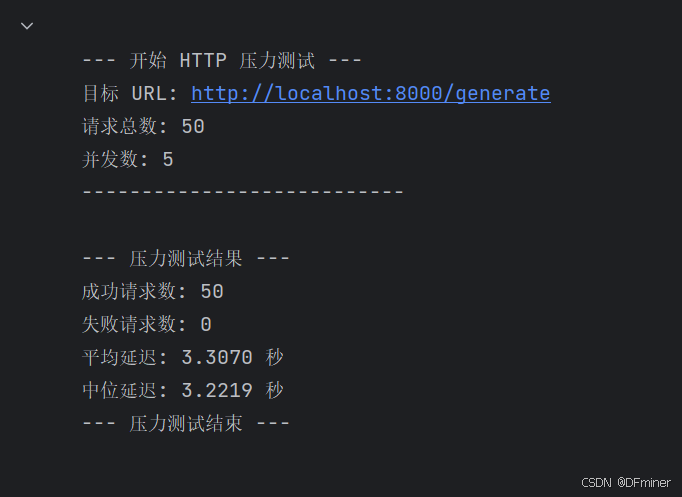
print(f"\n--- 开始 HTTP 压力测试 ---")
print(f"目标 URL: {url}")
print(f"请求总数: {num_requests}")
print(f"并发数: {concurrency}")
print("---------------------------\n")
for i in range(num_requests):
task = asyncio.create_task(send_request(url, payload))
tasks.append(task)
if len(tasks) >= concurrency:
results = await asyncio.gather(*tasks)
for success, latency, response_text in results:
if success:
successful_requests += 1
if latency is not None:
latencies.append(latency)
else:
failed_requests += 1
print(f"请求失败: {response_text}")
tasks = []
if tasks:
results = await asyncio.gather(*tasks)
for success, latency, response_text in results:
if success:
successful_requests += 1
if latency is not None:
latencies.append(latency)
else:
failed_requests += 1
print(f"请求失败: {response_text}")
print("\n--- 压力测试结果 ---")
print(f"成功请求数: {successful_requests}")
print(f"失败请求数: {failed_requests}")
if latencies:
average_latency = sum(latencies) / len(latencies)
print(f"平均延迟: {average_latency:.4f} 秒")
latencies.sort()
median_latency = latencies[len(latencies) // 2]
print(f"中位延迟: {median_latency:.4f} 秒")
else:
print("没有成功的请求来计算延迟。")
print("--- 压力测试结束 ---\n")
# 设置压力测试参数
http_url = "http://localhost:8000/generate"
test_payload = {
"prompt": "简单问候",
"max_new_tokens": 50
}
number_of_requests = 50 # 你可以根据需要调整这个数字
concurrent_requests = 5 # 你可以根据你的 system 和 server 性能调整这个数字
# 运行压力测试
asyncio.run(load_test(http_url, test_payload, number_of_requests, concurrent_requests))