导航控制器和导航工具栏
导航控制器
- UINAvigationController与UIViewController的关系
UIViewController是什么?
- 它是一个普通的视图控制器,负责管理一个页面
UINavigationController是什么?
- 它是一个容器控制器,专门用来管理一组UIviewController的堆栈结构
UINavigationController是iOS中用于管理一系列视图控制器(UIViewController)的容器控制器
它提供了:
- 层级导航:类似于网页中的前进、后退
- 导航栏:顶部的标题区域,包含返回按钮、标题、右边的按钮
- push/pop动画
他们之间的关系?
- UINavigationController是一个特殊的UIViewController,内部维护了一个控制器栈
- 在创建一个UIViewController子类的时候,系统会自动声明一个只读的UINavigationController属性
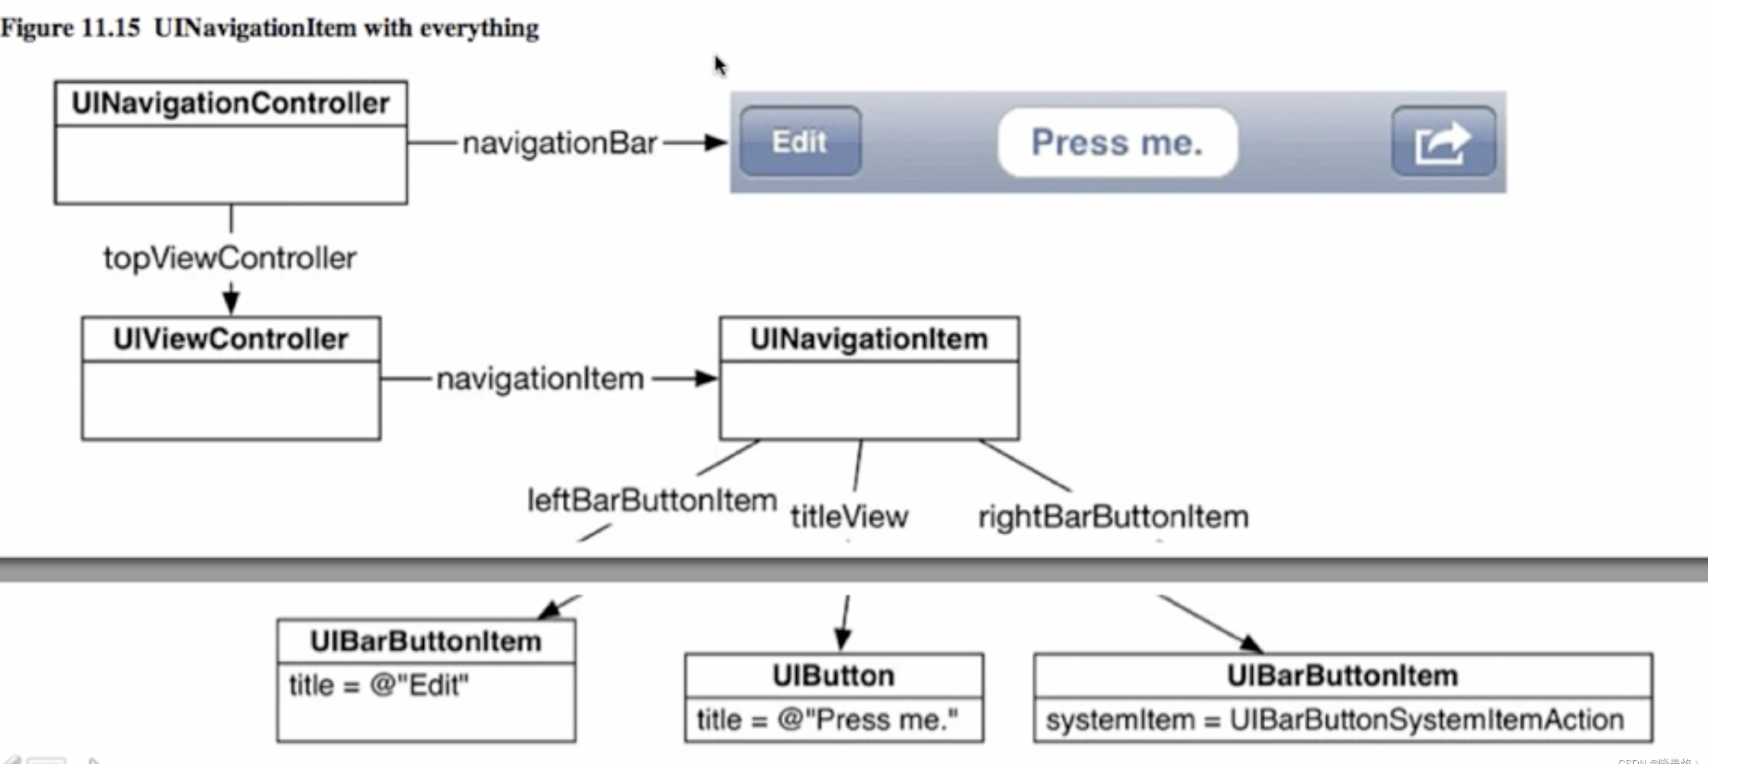
导航控制器:UINavigationController
导航栏:navigationBar
导航栏引入项:UINavigationItem
导航栈:viewControllers
在导航控制器中也控制一个视图控制器,每个视图控制器中对应一个导航引入项,导航引入项就是显示在导航栏上的内容,包括leftBarButton(导航栏左侧按钮)、titleView(导航栏中间标题)、rightBarButton(导航栏右侧按钮)
继承关系:NSObject -> UIrespounder -> UIViewController -> UINavigationController
-
管理多个视图的控制器(UIViewController)的栈式导航
-
提供默认的返回按钮(Back Button )和导航栏 (UINavigationBar)
-
初始化并设置根视图控制器
objectivec
//创建视图控制器
VCRoot* rootVC = [[VCRoot alloc] init];
//将视图控制器赋给导航控制器
UINavigationController* nav = [[UINavigationController alloc] initWithRootViewController:rootVC];
//将导航控制器设为窗口的根视图控制器
self.window.rootViewController = nav;- push操作
objectivec
// 在当前控制器中创建下一级控制器(例如:VCSecond)
VCSecond *secondVC = [[VCSecond alloc] init];
// 设置跳转时的过渡动画(默认 YES)
[self.navigationController pushViewController:secondVC animated:YES];- pop操作
popViewControllerAnimated::返回上一级(当前控制器出栈)
objectivec
[self.navigationController popViewControllerAnimated:YES]; 2. popToRootViewControllerAnimated::直接返回根控制器(栈中所有中间控制器出栈)
objectivec
[self.navigationController popToRootViewControllerAnimated:YES]; 3. popToViewController:animated::返回指定的控制器(需传入控制器实例)
objectivec
VCRoot *rootVC = [self.navigationController.viewControllers firstObject];
[self.navigationController popToViewController:rootVC animated:YES];
VCRoot:
objectivec
#import <UIKit/UIKit.h>

NS_ASSUME_NONNULL_BEGIN

@interface VCRoot : UIViewController

@end

NS_ASSUME_NONNULL_END
objectivec
#import "VCRoot.h"
#import "VCSecond.h"
@interface VCRoot ()

@end

@implementation VCRoot

- (void)viewDidLoad {
    /*
     barStyle:导航栏风格颜色
     barTintColor:导航栏颜色
     tintColor:导航栏风格颜色
     toolbarItems:工具栏元素数组
     UIBarItemFlexibleSpace:自动调整按钮距离
     */
    [super viewDidLoad];
    // Do any additional setup after loading the view.
    self.view.backgroundColor = [UIColor yellowColor];
    /*
    设置导航栏文字内容
     */
    self.title = @"根视图";

    // 创建外观配置
    UINavigationBarAppearance *appearance = [[UINavigationBarAppearance alloc] init];

    // 设置背景图片
    UIImage *bgImage = [UIImage imageNamed:@"photo04.jpg"];
    appearance.backgroundImage = bgImage;

    // 隐藏阴影线
    //appearance.shadowImage = [UIImage new];
    //appearance.shadowColor = nil;

    // 应用外观配置
    self.navigationController.navigationBar.standardAppearance = appearance;
    self.navigationController.navigationBar.scrollEdgeAppearance = appearance;

    //appearance.backgroundColor = [UIColor yellowColor];
    //appearance.shadowImage = [UIImage new];
    //appearance.shadowColor = nil;


    /*
    设置导航元素项的标题,它和上一条的区别是
    如果没有设置navigationItem的title,为nil,系统会自动使用self.title作为标题
    如果两个都为nil则没有标题
     */
    self.navigationItem.title = @"title";
    UIBarButtonItem* leftbutton = [[UIBarButtonItem alloc] initWithTitle:@"左侧" style:UIBarButtonItemStyleDone target:self action:@selector(pressleft)];
    self.navigationItem.leftBarButtonItem = leftbutton;
    /*
    UIBarButtonItem* rightbutton = [[UIBarButtonItem alloc] initWithTitle:@"右侧" style:UIBarButtonItemStyleDone target:self action:@selector(pressright)];
     */
    UIBarButtonItem* rightbutton = [[UIBarButtonItem alloc] initWithTitle:@"进入下一级" style:UIBarButtonItemStyleDone target:self action:@selector(pressright)];
    self.navigationItem.rightBarButtonItem = rightbutton;

    UIImageView* imageview = [[UIImageView alloc] init];
    imageview.frame = [[UIScreen mainScreen] bounds];
    imageview.alpha = 1;
    imageview.image = [UIImage imageNamed:@"photo02.jpg"];
    [self.view insertSubview:imageview atIndex:0];

    UILabel* label = [[UILabel alloc] init];
    label.frame = CGRectMake(10, 10, 50, 40);
    label.text = @"test";
    label.textAlignment = NSTextAlignmentCenter;
    label.textColor = [UIColor blueColor];
    UIBarButtonItem* item3 = [[UIBarButtonItem alloc] initWithCustomView:label];
    NSArray* arrayofbutton = [NSArray arrayWithObjects:rightbutton,item3, nil];
    self.navigationItem.rightBarButtonItems = arrayofbutton;


    //隐藏导航栏的两个方法
    self.navigationController.navigationBar.hidden = NO;//继承与UIView
    self.navigationController.navigationBarHidden = NO;//属性

}

- (void)pressleft {
    NSLog(@"leftbutton is pressed");
}

- (void)pressright {
    NSLog(@"rightbutton is pressed");
}
在SceneDelegate中创建根视图与导航控制器
objectivec
#import "SceneDelegate.h"
#import "VCRoot.h"
@interface SceneDelegate ()

@end

@implementation SceneDelegate


- (void)scene:(UIScene *)scene willConnectToSession:(UISceneSession *)session options:(UISceneConnectionOptions *)connectionOptions {
    // Use this method to optionally configure and attach the UIWindow `window` to the provided UIWindowScene `scene`.
    // If using a storyboard, the `window` property will automatically be initialized and attached to the scene.
    // This delegate does not imply the connecting scene or session are new (see `application:configurationForConnectingSceneSession` instead).
    self.window.frame = [UIScreen mainScreen].bounds;
    VCRoot* root = [[VCRoot alloc] init];
    UINavigationController* nav = [[UINavigationController alloc] initWithRootViewController:root];
    self.window.rootViewController = nav;
    [self.window makeKeyAndVisible];

}


- (void)sceneDidDisconnect:(UIScene *)scene {
    // Called as the scene is being released by the system.
    // This occurs shortly after the scene enters the background, or when its session is discarded.
    // Release any resources associated with this scene that can be re-created the next time the scene connects.
    // The scene may re-connect later, as its session was not necessarily discarded (see `application:didDiscardSceneSessions` instead).
}


- (void)sceneDidBecomeActive:(UIScene *)scene {
    // Called when the scene has moved from an inactive state to an active state.
    // Use this method to restart any tasks that were paused (or not yet started) when the scene was inactive.
}


- (void)sceneWillResignActive:(UIScene *)scene {
    // Called when the scene will move from an active state to an inactive state.
    // This may occur due to temporary interruptions (ex. an incoming phone call).
}


- (void)sceneWillEnterForeground:(UIScene *)scene {
    // Called as the scene transitions from the background to the foreground.
    // Use this method to undo the changes made on entering the background.
}


- (void)sceneDidEnterBackground:(UIScene *)scene {
    // Called as the scene transitions from the foreground to the background.
    // Use this method to save data, release shared resources, and store enough scene-specific state information
    // to restore the scene back to its current state.
}

@end
导航控制器切换
- navigationBar:导航栏对象
- navigationItem:导航元素项对象
- translucent:导航栏透明度
- pushViewController:推入视图控制器
- popViewController:弹出视图控制器
根视图:
objectivec
#import "VCRoot.h"
#import "VCSecond.h"
@interface VCRoot ()

@end

@implementation VCRoot

- (void)viewDidLoad {
    /*
     barStyle:导航栏风格颜色
     barTintColor:导航栏颜色
     tintColor:导航栏风格颜色
     toolbarItems:工具栏元素数组
     UIBarItemFlexibleSpace:自动调整按钮距离
     */
    [super viewDidLoad];
    // Do any additional setup after loading the view.
    self.view.backgroundColor = [UIColor yellowColor];
    /*
    设置导航栏文字内容
     */
    self.title = @"根视图";

    // 创建外观配置
    UINavigationBarAppearance *appearance = [[UINavigationBarAppearance alloc] init];

    // 设置背景图片
    UIImage *bgImage = [UIImage imageNamed:@"photo04.jpg"];
    appearance.backgroundImage = bgImage;

    // 隐藏阴影线
    //appearance.shadowImage = [UIImage new];
    //appearance.shadowColor = nil;

    // 应用外观配置
    self.navigationController.navigationBar.standardAppearance = appearance;
    self.navigationController.navigationBar.scrollEdgeAppearance = appearance;

    //appearance.backgroundColor = [UIColor yellowColor];
    //appearance.shadowImage = [UIImage new];
    //appearance.shadowColor = nil;


    /*
    设置导航元素项的标题,它和上一条的区别是
    如果没有设置navigationItem的title,为nil,系统会自动使用self.title作为标题
    如果两个都为nil则没有标题
     */
    self.navigationItem.title = @"title";
    UIBarButtonItem* leftbutton = [[UIBarButtonItem alloc] initWithTitle:@"左侧" style:UIBarButtonItemStyleDone target:self action:@selector(pressleft)];
    self.navigationItem.leftBarButtonItem = leftbutton;
    /*
    UIBarButtonItem* rightbutton = [[UIBarButtonItem alloc] initWithTitle:@"右侧" style:UIBarButtonItemStyleDone target:self action:@selector(pressright)];
     */
    UIBarButtonItem* rightbutton = [[UIBarButtonItem alloc] initWithTitle:@"进入下一级" style:UIBarButtonItemStyleDone target:self action:@selector(pressright)];
    self.navigationItem.rightBarButtonItem = rightbutton;

    UIImageView* imageview = [[UIImageView alloc] init];
    imageview.frame = [[UIScreen mainScreen] bounds];
    imageview.alpha = 1;
    imageview.image = [UIImage imageNamed:@"photo02.jpg"];
    [self.view insertSubview:imageview atIndex:0];

    UILabel* label = [[UILabel alloc] init];
    label.frame = CGRectMake(10, 10, 50, 40);
    label.text = @"test";
    label.textAlignment = NSTextAlignmentCenter;
    label.textColor = [UIColor blueColor];
    UIBarButtonItem* item3 = [[UIBarButtonItem alloc] initWithCustomView:label];
    NSArray* arrayofbutton = [NSArray arrayWithObjects:rightbutton,item3, nil];
    self.navigationItem.rightBarButtonItems = arrayofbutton;


    //隐藏导航栏的两个方法
    self.navigationController.navigationBar.hidden = NO;//继承与UIView
    self.navigationController.navigationBarHidden = NO;//属性
}


- (void)pressleft {
    NSLog(@"leftbutton is pressed");
}

- (void)pressright {
    VCSecond* vc2 = [[VCSecond alloc] init];
    [self.navigationController pushViewController:vc2 animated: YES];
}

/*
#pragma mark - Navigation

// In a storyboard-based application, you will often want to do a little preparation before navigation
- (void)prepareForSegue:(UIStoryboardSegue *)segue sender:(id)sender {
    // Get the new view controller using [segue destinationViewController].
    // Pass the selected object to the new view controller.
}
*/

@end
第二个视图
objectivec
#import "VCSecond.h"
#import "VCThird.h"
@interface VCSecond ()
@end
@implementation VCSecond
- (void)viewDidLoad {
[super viewDidLoad];
UIImageView* imageView = [[UIImageView alloc] init];
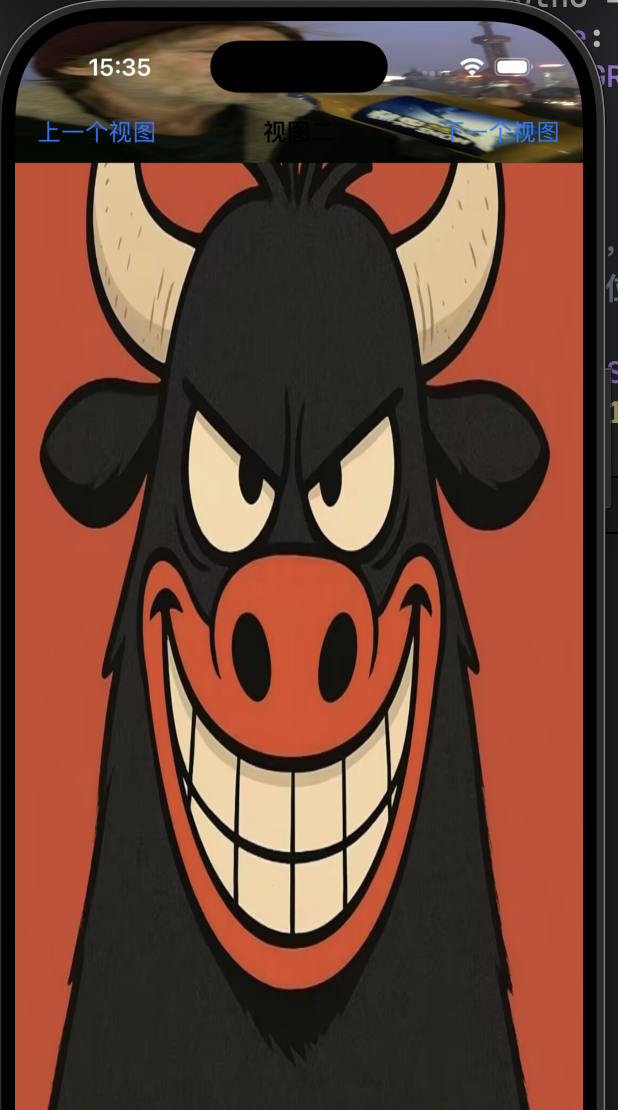
imageView.image = [UIImage imageNamed:@"photo01.jpg"];
imageView.frame = [[UIScreen mainScreen] bounds];
[self.view insertSubview:imageView atIndex:0];
// Do any additional setup after loading the view.
//默认透明度为yes:可透明的
self.navigationController.navigationBar.translucent = YES;
//设置导航控制栏风格,默认为Default
self.navigationController.navigationBar.barStyle = UIBarStyleDefault;
self.title = @"视图二";
self.navigationItem.rightBarButtonItem = [[UIBarButtonItem alloc] initWithTitle:@"下一个视图" style:UIBarButtonItemStylePlain target:self action:@selector(pressright)];
self.navigationItem.leftBarButtonItem = [[UIBarButtonItem alloc] initWithTitle:@"上一个视图" style:UIBarButtonItemStylePlain target:self action:@selector(pressleft)];
}
- (void)pressright {
VCThird* vc3 = [[VCThird alloc] init];
[self.navigationController pushViewController:vc3 animated:YES];
}
- (void)pressleft {
[self.navigationController popViewControllerAnimated:YES];
}
/*
#pragma mark - Navigation
// In a storyboard-based application, you will often want to do a little preparation before navigation
- (void)prepareForSegue:(UIStoryboardSegue *)segue sender:(id)sender {
// Get the new view controller using [segue destinationViewController].
// Pass the selected object to the new view controller.
}
*/
@end第三个视图
objectivec
#import "VCThird.h"
#import "VCRoot.h"
#import "VCSecond.h"
@interface VCThird ()

@end

@implementation VCThird

- (void)viewDidLoad {
    [super viewDidLoad];
    UIImageView* imageview = [UIImageView new];
    imageview.frame = [[UIScreen mainScreen] bounds];
    imageview.image = [UIImage imageNamed:@"photo05.jpg"];
    [self.view insertSubview:imageview atIndex:0];
    // Do any additional setup after loading the view.
    self.navigationItem.title = @"视图三";
    self.navigationItem.leftBarButtonItem = [[UIBarButtonItem alloc] initWithTitle:@"上一级页面" style:UIBarButtonItemStylePlain target:self action:@selector(pressleft)];
    self.navigationItem.rightBarButtonItem = [[UIBarButtonItem alloc] initWithTitle:@"回到主页面" style:UIBarButtonItemStylePlain target:self action:@selector(pressright)];

}

- (void)pressleft {
    [self.navigationController popViewControllerAnimated:YES];
}

- (void)pressright {
    [self.navigationController popToRootViewControllerAnimated:YES];
}
/*
#pragma mark - Navigation

// In a storyboard-based application, you will often want to do a little preparation before navigation
- (void)prepareForSegue:(UIStoryboardSegue *)segue sender:(id)sender {
    // Get the new view controller using [segue destinationViewController].
    // Pass the selected object to the new view controller.
}
*/

@end
SceneDelegate.m:
objectivec
#import "SceneDelegate.h"
#import "VCRoot.h"
@interface SceneDelegate ()

@end

@implementation SceneDelegate


- (void)scene:(UIScene *)scene willConnectToSession:(UISceneSession *)session options:(UISceneConnectionOptions *)connectionOptions {
    // Use this method to optionally configure and attach the UIWindow `window` to the provided UIWindowScene `scene`.
    // If using a storyboard, the `window` property will automatically be initialized and attached to the scene.
    // This delegate does not imply the connecting scene or session are new (see `application:configurationForConnectingSceneSession` instead).
    self.window.frame = [UIScreen mainScreen].bounds;
    VCRoot* root = [[VCRoot alloc] init];
    UINavigationController* nav = [[UINavigationController alloc] initWithRootViewController:root];
    self.window.rootViewController = nav;
    [self.window makeKeyAndVisible];

}


- (void)sceneDidDisconnect:(UIScene *)scene {
    // Called as the scene is being released by the system.
    // This occurs shortly after the scene enters the background, or when its session is discarded.
    // Release any resources associated with this scene that can be re-created the next time the scene connects.
    // The scene may re-connect later, as its session was not necessarily discarded (see `application:didDiscardSceneSessions` instead).
}


- (void)sceneDidBecomeActive:(UIScene *)scene {
    // Called when the scene has moved from an inactive state to an active state.
    // Use this method to restart any tasks that were paused (or not yet started) when the scene was inactive.
}


- (void)sceneWillResignActive:(UIScene *)scene {
    // Called when the scene will move from an active state to an inactive state.
    // This may occur due to temporary interruptions (ex. an incoming phone call).
}


- (void)sceneWillEnterForeground:(UIScene *)scene {
    // Called as the scene transitions from the background to the foreground.
    // Use this method to undo the changes made on entering the background.
}


- (void)sceneDidEnterBackground:(UIScene *)scene {
    // Called as the scene transitions from the foreground to the background.
    // Use this method to save data, release shared resources, and store enough scene-specific state information
    // to restore the scene back to its current state.
}


@end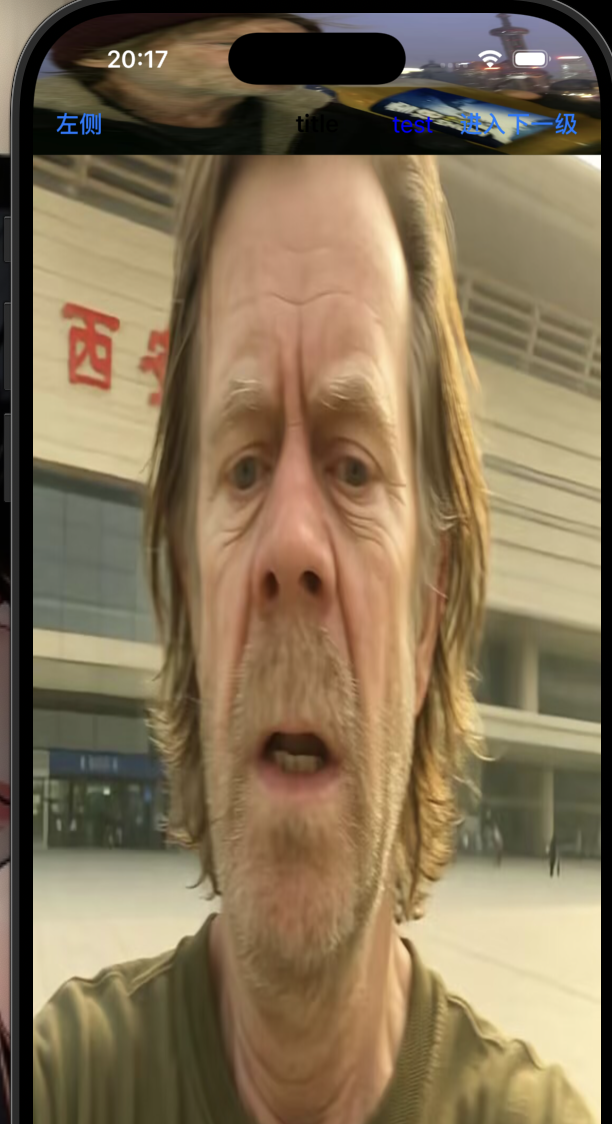
导航工具栏:
在OC中,设置导航栏的风格颜色等样式,只要通过UINavigationBar的属性或UINavigationBarAppearance来实现
- barStyle:导航栏风格
- barTintColor:导航栏颜色
- tintColor:导航栏风格颜色
- toolBarItems:工具栏元素数组
- UIBarItemFlexibleSpace:自动调整距离按钮
- 设置导航栏背景颜色(通过barTintColor)
objective-c
// 方式 1:直接修改当前导航栏(推荐在视图控制器中使用)
self.navigationController.navigationBar.barTintColor = [UIColor yellowColor];

// 方式 2:全局设置(所有导航栏生效,推荐在 AppDelegate 中使用)
[[UINavigationBar appearance] setBarTintColor:[UIColor yellowColor]];- 设置导航栏标题样式(通过titleTextAttributes配置颜色、字体等)
objectivec
// 方式 1:修改当前导航栏
NSDictionary *titleAttrs = @{
    NSForegroundColorAttributeName: [UIColor whiteColor],  // 标题颜色
    NSFontAttributeName: [UIFont boldSystemFontOfSize:18]  // 标题字体
};
[self.navigationController.navigationBar setTitleTextAttributes:titleAttrs];

// 方式 2:全局设置
[[UINavigationBar appearance] setTitleTextAttributes:titleAttrs];- 设置导航栏按钮颜色(通过tintColor统一控制导航栏按钮的颜色
objectivec
// 方式 1:修改当前导航栏
self.navigationController.navigationBar.tintColor = [UIColor blueColor];

// 方式 2:全局设置
[[UINavigationBar appearance] setTintColor:[UIColor blueColor]];- 隐藏导航栏底部阴影线(默认存在一条分割线)
objectivec
// 方式 1:使用 shadowImage
[self.navigationController.navigationBar setBackgroundImage:[UIImage new] forBarMetrics:UIBarMetricsDefault];
[self.navigationController.navigationBar setShadowImage:[UIImage new]];

// 方式 2:iOS 13+ 推荐用 UINavigationBarAppearance
if (@available(iOS 13.0, *)) {
    UINavigationBarAppearance *appearance = [[UINavigationBarAppearance alloc] init];
    appearance.shadowColor = nil;  // 隐藏阴影线
    self.navigationController.navigationBar.standardAppearance = appearance;
}- UINavigationBarAppearance可更细粒度控制导航栏样式,支持标准状态和滚动状态的差异化设置
- 全局设置(AppleDelegate中)
objectivec
- (BOOL)application:(UIApplication *)application didFinishLaunchingWithOptions:(NSDictionary *)launchOptions {
    if (@available(iOS 13.0, *)) {
        UINavigationBarAppearance *appearance = [[UINavigationBarAppearance alloc] init];

        // 1. 设置背景
        appearance.backgroundColor = [UIColor yellowColor];  // 背景色

        // 2. 设置标题
        appearance.titleTextAttributes = @{

        };

        // 3. 隐藏阴影线
        appearance.shadowColor = nil;

        // 4. 应用到所有导航栏
        UINavigationBar *navBar = [UINavigationBar appearance];
        navBar.standardAppearance = appearance;         // 标准状态
        navBar.scrollEdgeAppearance = appearance;       // 滚动到顶部时的状态
    }
    return YES;
}- 局部配置
objectivec
- (void)viewDidLoad {
    [super viewDidLoad];
    if (@available(iOS 13.0, *)) {
        UINavigationBarAppearance *appearance = [[UINavigationBarAppearance alloc] init];
        appearance.backgroundColor = [UIColor orangeColor];
        appearance.titleTextAttributes = @{
            NSForegroundColorAttributeName: [UIColor blackColor]
        };

        // 应用到当前导航栏
        self.navigationController.navigationBar.standardAppearance = appearance;
        self.navigationController.navigationBar.scrollEdgeAppearance = appearance;
    }
}- 自定义配置
objectivec
// 在 viewDidLoad 中
UIView *customTitleView = [[UIView alloc] initWithFrame:CGRectMake(0, 0, 120, 30)];

// 添加标题文字
UILabel *titleLabel = [[UILabel alloc] initWithFrame:customTitleView.bounds];
titleLabel.text = @"Custom Title";
titleLabel.font = [UIFont boldSystemFontOfSize:17];
titleLabel.textAlignment = NSTextAlignmentCenter;
[customTitleView addSubview:titleLabel];

// 添加标题图片
UIImageView *titleImageView = [[UIImageView alloc] initWithFrame:CGRectMake(0, 0, 20, 20)];
titleImageView.image = [UIImage imageNamed:@"logo"];
[customTitleView addSubview:titleImageView];

// 设置到导航栏
self.navigationItem.titleView = customTitleView;-
常见问题:
- 导航栏颜色不生效:检查是否开启了半透明效果,需要关闭
- 如何让导航栏延伸到状态栏?
objectivec
 // 在视图控制器中
  self.edgesForExtendedLayout = UIRectEdgeTop;  // 视图延伸到导航栏下方
  self.extendedLayoutIncludesOpaqueBars = YES;  // 包含不透明的导航栏
self.edgesForExtendedLayout = UIRectEdgeTop;
- 控制视图控制器的根视图可以延伸到屏幕的哪些边缘
- 默认是全部,如果导航栏是半透明的,会看到视图与导航栏重合
self.extendedLayoutIncludesOpaqueBars = YES;
- 决定延伸布局是否包含不透明的导航栏与工具栏
- 默认NO:如果导航栏不透明,根视图会从导航栏底部开始布局
objectivec
#import "VCRoot.h"
#import "SecondVC.h"

@interface VCRoot ()

@end

@implementation VCRoot

- (void)viewDidLoad {
    [super viewDidLoad];

    self.view.backgroundColor = [UIColor orangeColor];

    self.title = @"根视图";

    UIBarButtonItem *btn = [[UIBarButtonItem alloc] initWithTitle: @"右侧按钮" style: UIBarButtonItemStylePlain target: self action: nil];

    self.navigationItem.rightBarButtonItem = btn;

    //UIBarAppearance是iOS13后推出的一个对相应空间设置外观样式的类,可以统一配置NavigationBar、TabBar、ToolBar等的外观样式
    //UINavigationBarAppearance可以设置导航栏对象的外观样式
    //创建一个UINavigationBarAppearance对象
    UINavigationBarAppearance *appearance = [[UINavigationBarAppearance alloc] init];
    //设置该对象的背景颜色
    appearance.backgroundColor = [UIColor blueColor];
    //创建该对象的阴影图像
    appearance.shadowImage = [[UIImage alloc] init];
    //设置该对象的阴影颜色
    appearance.shadowColor = nil;

    //设置导航栏按钮的颜色
    self.navigationController.navigationBar.tintColor = [UIColor purpleColor];

    //设置普通样式导航栏
    self.navigationController.navigationBar.standardAppearance = appearance;
    //设置滚动样式导航栏
    self.navigationController.navigationBar.scrollEdgeAppearance = appearance;

    //隐藏导航栏的两个方法
    //1、下面这一条的hidden是继承于UIView的
    self.navigationController.navigationBar.hidden = NO;
    //2、下面这一条的navigationBarHidden是一个属性
    self.navigationController.navigationBarHidden = NO;

    //显示工具栏对象
    //隐藏工具栏,默认为YES:即隐藏;NO:不隐藏
    self.navigationController.toolbarHidden = NO;
    //设置工具栏是否透明,默认为YES:半透明
    self.navigationController.toolbar.translucent = NO;


    UIBarButtonItem *btn1 = [[UIBarButtonItem alloc] initWithTitle: @"left" style: UIBarButtonItemStylePlain target: nil action: nil];
    UIBarButtonItem *btn2 = [[UIBarButtonItem alloc] initWithTitle: @"right" style: UIBarButtonItemStylePlain target: self action: @selector(pressBack)];

    //设置一个自定义类型的button,使用图片创建
    UIButton *btnC = [UIButton buttonWithType: UIButtonTypeCustom];
    [btnC setImage: [UIImage imageNamed: @"btnC.jpg"] forState: UIControlStateNormal];
    btnC.frame = CGRectMake(0, 0, 60, 60);

    UIBarButtonItem *btn3 = [[UIBarButtonItem alloc] initWithCustomView: btnC];

    //设置一个占位按钮,放到数组中可以用来分隔开各按钮
    //设置宽度固定的占位按钮,注:此处方法名为UIBarButtonSystemItemFixedSpace(FixedSpace!!!!!)
    UIBarButtonItem *btnF1 = [[UIBarButtonItem alloc] initWithBarButtonSystemItem: UIBarButtonSystemItemFixedSpace target: nil action: nil];
    btnF1.width = 110;

    //设置自动计算宽度的占位按钮,注:此处方法名为UIBarButtonSystemItemFlexibleSpace (FlexibleSpace!!!!!)
    UIBarButtonItem *btnF2 = [[UIBarButtonItem alloc] initWithBarButtonSystemItem: UIBarButtonSystemItemFlexibleSpace target: nil action: nil];

    NSArray *arrayBtn = [NSArray arrayWithObjects: btn1, btnF2, btn3, btnF2, btn2, nil];

    self.toolbarItems = arrayBtn;


}

- (void)pressBack {
    SecondVC *vc = [[SecondVC alloc] init];
    [self.navigationController pushViewController: vc animated: YES];
}

/*
#pragma mark - Navigation
// In a storyboard-based application, you will often want to do a little preparation before navigation
- (void)prepareForSegue:(UIStoryboardSegue *)segue sender:(id)sender {
    // Get the new view controller using [segue destinationViewController].
    // Pass the selected object to the new view controller.
}
*/

@end
分栏控制器
分栏控制器是一种常用的容器视图控制器,分栏控制器可以包含多个子视图控制器,并通过底部的分栏菜单UIBar
进行切换
- 在sceneDelegate中创建子视图控制器,同时创建分栏控制器对象,将子视图控制器添加到分栏控制器中
objectivec
#import "SceneDelegate.h"
#import "VCFirst.h"
#import "VCSecond.h"
#import "VCThird.h"
#import "VCFourth.h"
#import "VCFifth.h"
#import "VCSixth.h"
@interface SceneDelegate ()
@end
@implementation SceneDelegate
- (void)scene:(UIScene *)scene willConnectToSession:(UISceneSession *)session options:(UISceneConnectionOptions *)connectionOptions {
//创建三个视图控制器并更改背景颜色和标题
VCFirst* vc01 = [VCFirst new];
vc01.view.backgroundColor = [UIColor brownColor];
vc01.title = @"视图1";
VCSecond* vc02 = [VCSecond new];
vc02.view.backgroundColor = [UIColor orangeColor];
vc02.title = @"试图2";
VCThird* vc03 = [VCThird new];
vc03.view.backgroundColor = [UIColor yellowColor];
vc03.title = @"视图3";
VCFourth* vc04 = [VCFourth new];
vc04.view.backgroundColor = [UIColor greenColor];
vc04.title = @"视图4";
VCFifth* vc05 = [VCFifth new];
vc05.view.backgroundColor = [UIColor grayColor];
vc05.title = @"视图5";
VCSixth* vc06 = [VCSixth new];
vc06.view.backgroundColor = [UIColor purpleColor];
vc06.title = @"视图6";
//创建分栏控制器对象
UITabBarController* tbc = [UITabBarController new];
//创建一个分栏控制器数组对象,并将所有需要被分栏控制器管理的对象添加进数组
//分栏控制器的按钮的位置就取决于在数组中的存放位置
NSArray* arrvc = [NSArray arrayWithObjects:vc01, vc02, vc03, nil];
//将分栏控制器管理数组赋值
tbc.viewControllers = arrvc;
//将分栏控制器作为根视图控制哦
self.window.rootViewController = tbc;
//设置选中的视图控制器的索引
//通过所以索引来确定打开程序的时候显示得是哪一个视图控制器
tbc.selectedIndex = 2;
if (tbc.selectedViewController == vc03) {
NSLog(@"选中的是下标为2的视图控制器");
}
//设置分栏控制器透明度
tbc.tabBar.translucent = NO;
//设置分栏控制器背景颜色
tbc.tabBar.backgroundColor = [UIColor whiteColor];
//设置分栏控制器工具栏的按钮选择时的颜色
tbc.tabBar.tintColor = [UIColor redColor];
//注意不要忘记设置代理
tbc.delegate = self;
}
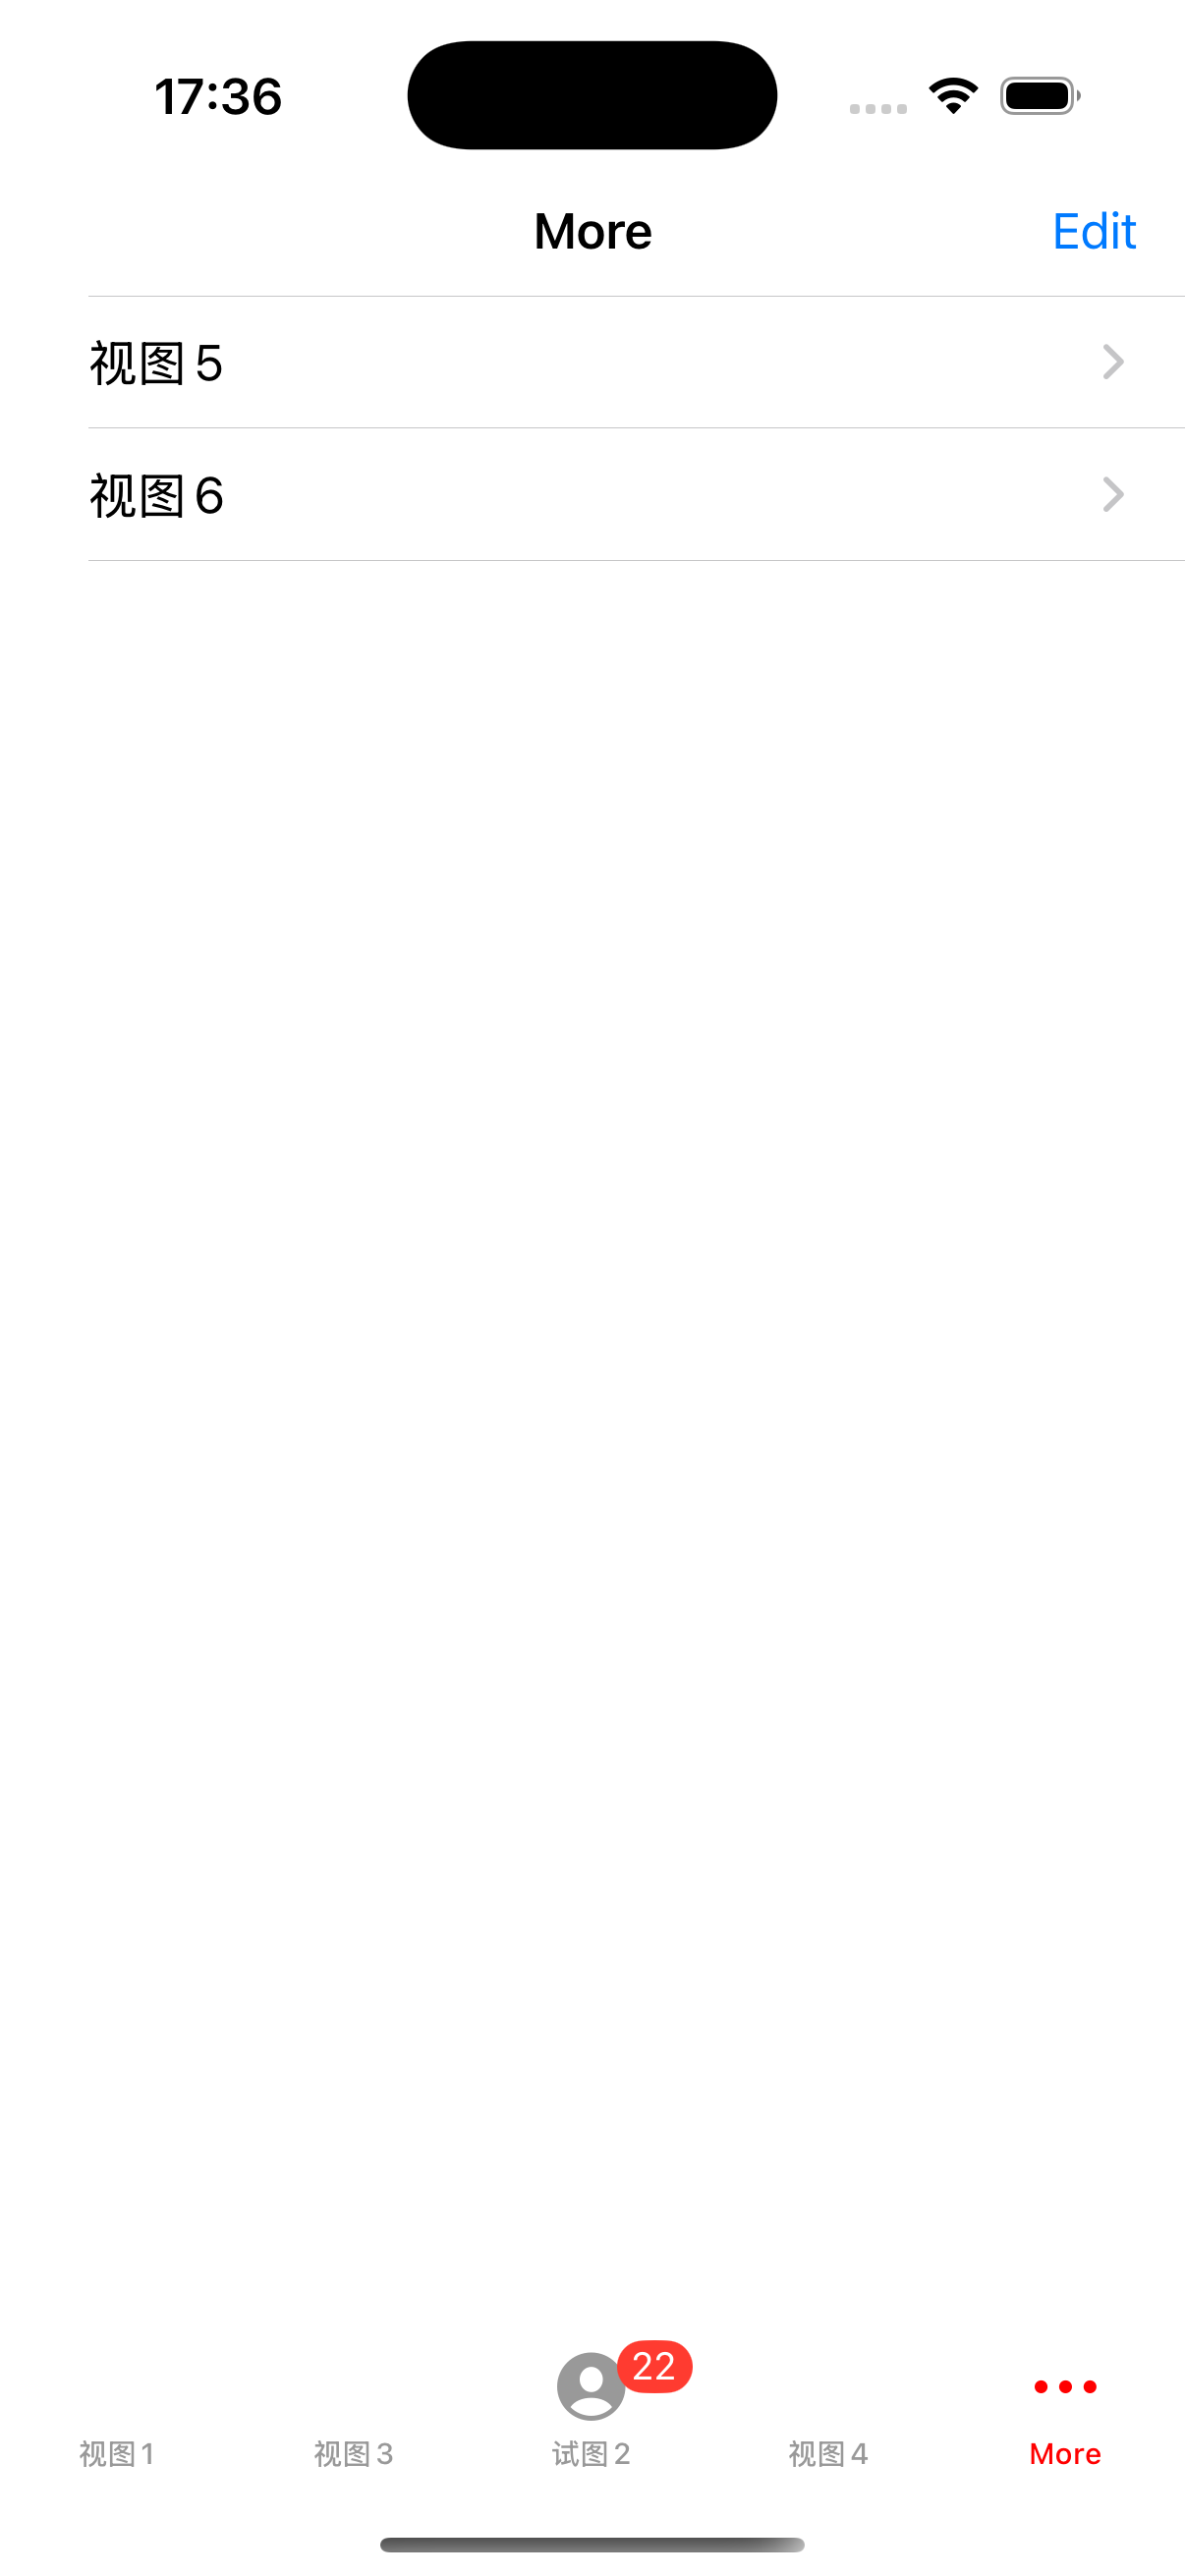
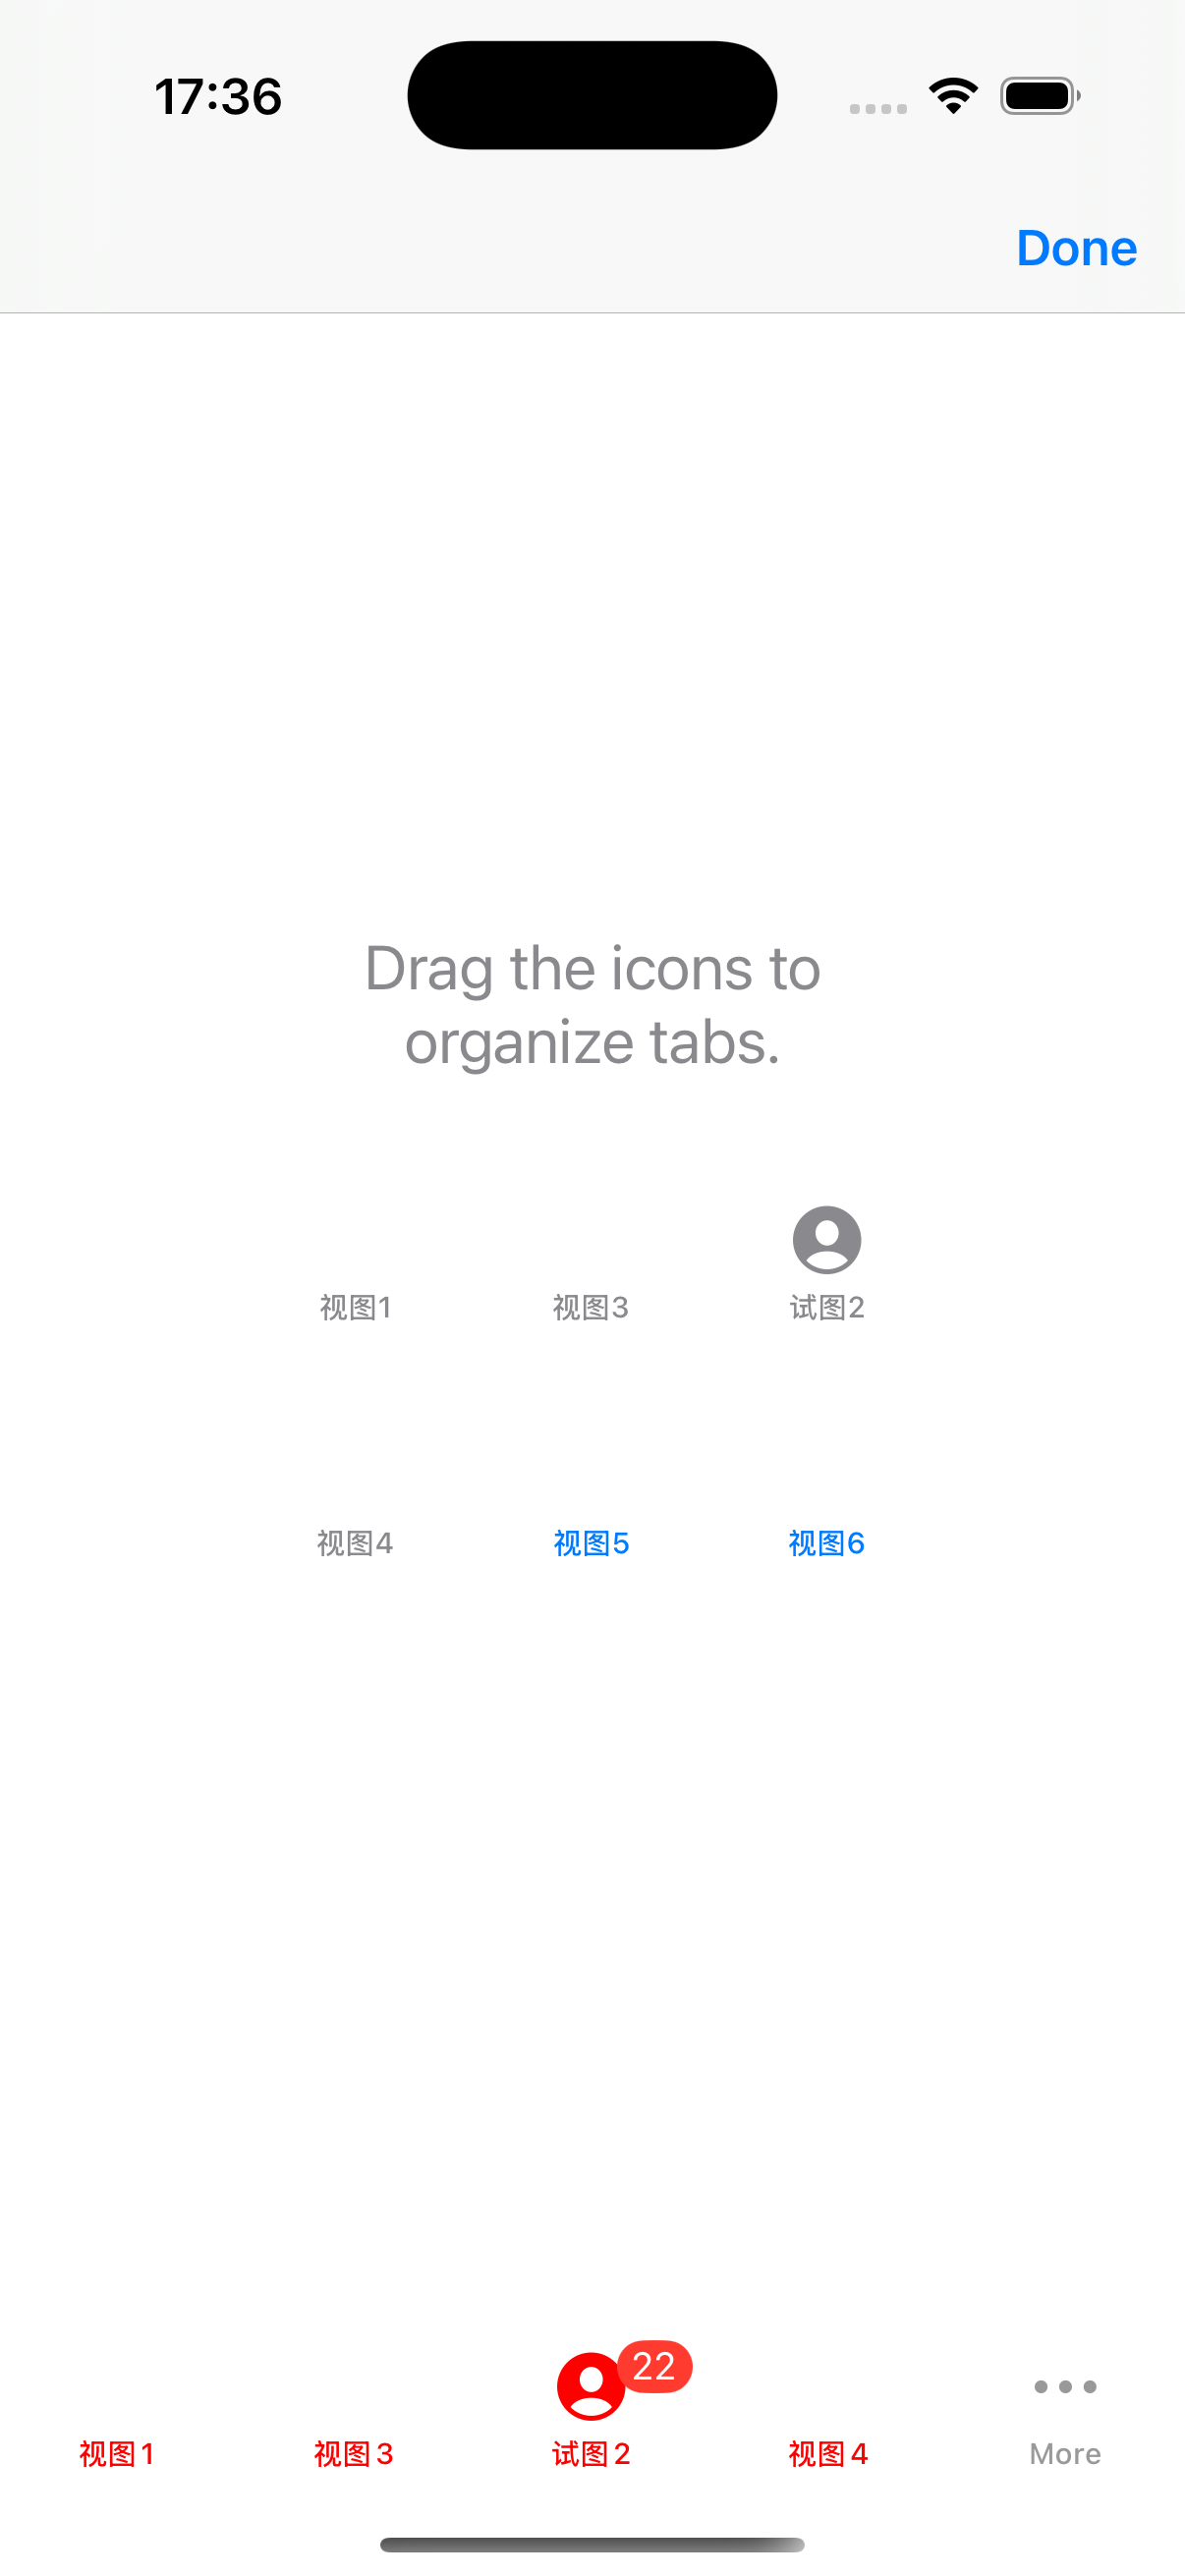
//以下是协议中函数的用法,其中"编辑"是指在分栏控制器中的more中通过拖动更改和交换显示和折叠的视图控制器的操作
//即将开始编辑前会调用此协议函数
- (void)tabBarController:(UITabBarController *)tabBarController willBeginCustomizingViewControllers:(NSArray<__kindof UIViewController *> *)viewControllers {
NSLog(@"编辑前");
}
//即将结束前调用该协议函数
- (void)tabBarController:(UITabBarController *)tabBarController willEndCustomizingViewControllers:(NSArray<__kindof UIViewController *> *)viewControllers changed:(BOOL)changed {
NSLog(@"即将结束前");
}
//已经结束编辑时调用该协议函数
- (void)tabBarController:(UITabBarController *)tabBarController didEndCustomizingViewControllers:(NSArray<__kindof UIViewController *> *)viewControllers changed:(BOOL)changed {
NSLog(@"%@", viewControllers);
if (changed == YES) {
NSLog(@"顺序发生改变");
}
NSLog(@"已经结束编辑");
}
//选中控制器对象时调用该协议函数
- (void)tabBarController:(UITabBarController *)tabBarController didSelectViewController:(UIViewController *)viewController {
// if (tabBarController.viewControllers[tabBarController.selectedIndex] == viewController) {
// NSLog(@"选中的视图索引与当前传入的视图索引相同");
// }
NSLog(@"选中控制器对象");
}
- (void)sceneDidDisconnect:(UIScene *)scene {
// Called as the scene is being released by the system.
// This occurs shortly after the scene enters the background, or when its session is discarded.
// Release any resources associated with this scene that can be re-created the next time the scene connects.
// The scene may re-connect later, as its session was not necessarily discarded (see `application:didDiscardSceneSessions` instead).
}
- (void)sceneDidBecomeActive:(UIScene *)scene {
// Called when the scene has moved from an inactive state to an active state.
// Use this method to restart any tasks that were paused (or not yet started) when the scene was inactive.
}
- (void)sceneWillResignActive:(UIScene *)scene {
// Called when the scene will move from an active state to an inactive state.
// This may occur due to temporary interruptions (ex. an incoming phone call).
}
- (void)sceneWillEnterForeground:(UIScene *)scene {
// Called as the scene transitions from the background to the foreground.
// Use this method to undo the changes made on entering the background.
}
- (void)sceneDidEnterBackground:(UIScene *)scene {
// Called as the scene transitions from the foreground to the background.
// Use this method to save data, release shared resources, and store enough scene-specific state information
// to restore the scene back to its current state.
}
@endVCfirst.m文件中
objectivec
#import "VCFirst.h"

@interface VCFirst ()

@end

@implementation VCFirst

- (void)viewDidLoad {
    [super viewDidLoad];
    //创建一个分栏按钮对象,传入三个参数
    //第一个参数表示标题文字内容
    //第二个参数表示显示图片
    //第三个参数表示对象的标记值
    UITabBarItem *tabBarItem = [[UITabBarItem alloc] initWithTitle: @"发现" image: nil tag: 101];

    self.tabBarItem = tabBarItem;
}

/*
#pragma mark - Navigation

// In a storyboard-based application, you will often want to do a little preparation before navigation
- (void)prepareForSegue:(UIStoryboardSegue *)segue sender:(id)sender {
    // Get the new view controller using [segue destinationViewController].
    // Pass the selected object to the new view controller.
}
*/

@end
VCSecond.m
objectivec
#import "VCSecond.h"

@interface VCSecond ()

@end

@implementation VCSecond

- (void)viewDidLoad {
    [super viewDidLoad];
    //根据系统风格设置分栏控制器按钮,传入两个参数
    //第一个参数指分栏控制器的按钮风格,第二个参数是分栏控件对象的标签值
    UITabBarItem *tabBarItem = [[UITabBarItem alloc] initWithTabBarSystemItem: UITabBarSystemItemContacts tag: 103];

    //为分栏按钮设置提示的标记值信息,是系统的,无法变更
    //按钮右上角显示的提示信息
    //通常用来提示未读的信息
    tabBarItem.badgeValue = @"22";

    self.tabBarItem = tabBarItem;
}

/*
#pragma mark - Navigation

// In a storyboard-based application, you will often want to do a little preparation before navigation
- (void)prepareForSegue:(UIStoryboardSegue *)segue sender:(id)sender {
    // Get the new view controller using [segue destinationViewController].
    // Pass the selected object to the new view controller.
}
*/

@end
VCThird.m
objectivec
#import "VCThird.h"

@interface VCThird ()

@end

@implementation VCThird

- (void)viewDidLoad {
    [super viewDidLoad];
    // Do any additional setup after loading the view.
}

/*
#pragma mark - Navigation

// In a storyboard-based application, you will often want to do a little preparation before navigation
- (void)prepareForSegue:(UIStoryboardSegue *)segue sender:(id)sender {
    // Get the new view controller using [segue destinationViewController].
    // Pass the selected object to the new view controller.
}
*/

@end
VCForth.m
objectivec
#import "VCFourth.h"

@interface VCFourth ()

@end

@implementation VCFourth

- (void)viewDidLoad {
    [super viewDidLoad];
    // Do any additional setup after loading the view.
}

/*
#pragma mark - Navigation

// In a storyboard-based application, you will often want to do a little preparation before navigation
- (void)prepareForSegue:(UIStoryboardSegue *)segue sender:(id)sender {
    // Get the new view controller using [segue destinationViewController].
    // Pass the selected object to the new view controller.
}
*/

@end
VCFifth.m
objectivec
#import "VCFifth.h"

@interface VCFifth ()

@end

@implementation VCFifth

- (void)viewDidLoad {
    [super viewDidLoad];
    // Do any additional setup after loading the view.
}

/*
#pragma mark - Navigation

// In a storyboard-based application, you will often want to do a little preparation before navigation
- (void)prepareForSegue:(UIStoryboardSegue *)segue sender:(id)sender {
    // Get the new view controller using [segue destinationViewController].
    // Pass the selected object to the new view controller.
}
*/

@end
VCSixth.m
objectivec
#import "VCSixth.h"

@interface VCSixth ()

@end

@implementation VCSixth

- (void)viewDidLoad {
    [super viewDidLoad];
    // Do any additional setup after loading the view.
}

/*
#pragma mark - Navigation

// In a storyboard-based application, you will often want to do a little preparation before navigation
- (void)prepareForSegue:(UIStoryboardSegue *)segue sender:(id)sender {
    // Get the new view controller using [segue destinationViewController].
    // Pass the selected object to the new view controller.
}
*/

@end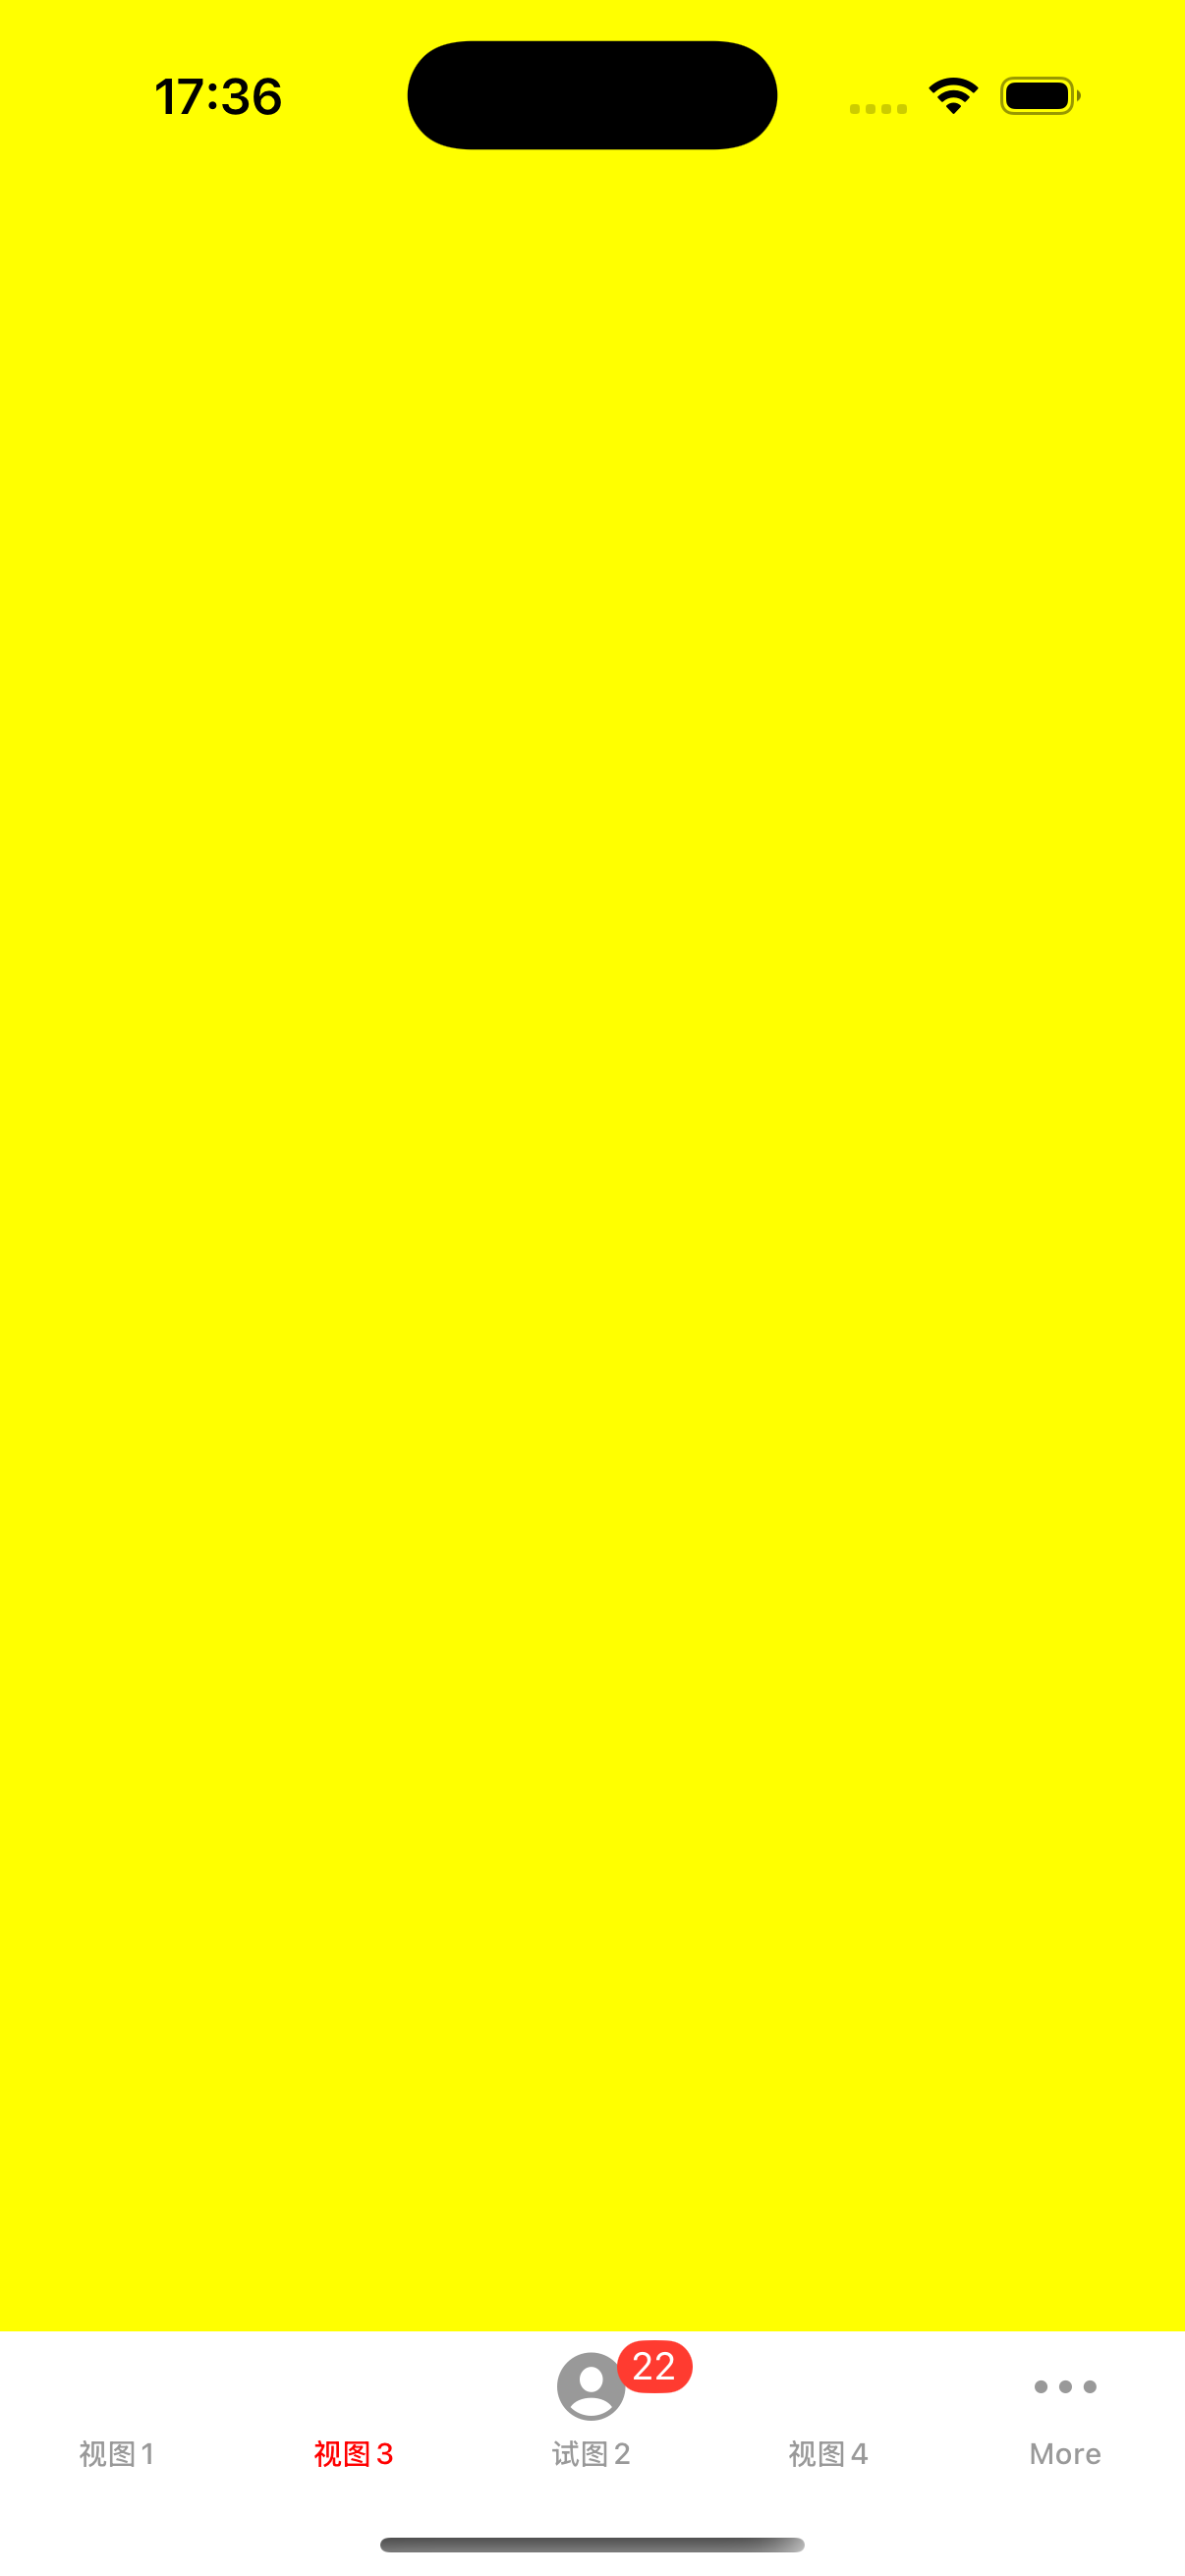
分栏控制器协议部分的内容
< UITabBarControllerDelegate>
objectivec
//以下是协议中函数的用法,其中"编辑"是指在分栏控制器中的more中通过拖动更改和交换显示和折叠的视图控制器的操作
//即将开始编辑前会调用此协议函数
- (void)tabBarController:(UITabBarController *)tabBarController willBeginCustomizingViewControllers:(NSArray<__kindof UIViewController *> *)viewControllers {
    NSLog(@"编辑前");
}

//即将结束前调用该协议函数
- (void)tabBarController:(UITabBarController *)tabBarController willEndCustomizingViewControllers:(NSArray<__kindof UIViewController *> *)viewControllers changed:(BOOL)changed {
    NSLog(@"即将结束前");
}

//已经结束编辑时调用该协议函数
- (void)tabBarController:(UITabBarController *)tabBarController didEndCustomizingViewControllers:(NSArray<__kindof UIViewController *> *)viewControllers changed:(BOOL)changed {
    NSLog(@"%@", viewControllers);
    if (changed == YES) {
        NSLog(@"顺序发生改变");
    }
    NSLog(@"已经结束编辑");
}

//选中控制器对象时调用该协议函数
- (void)tabBarController:(UITabBarController *)tabBarController didSelectViewController:(UIViewController *)viewController {
//    if (tabBarController.viewControllers[tabBarController.selectedIndex] == viewController) {
//        NSLog(@"选中的视图索引与当前传入的视图索引相同");
//    }
    NSLog(@"选中控制器对象");
}
UITabelView
UITabelView是UI组件中 非常重要的一个组件,在实际开发中有非常重要的作用,这里只做简单介绍,后面笔者会单独总结一下这部分的内容
在创建UITabelView这个组件的时候,首先需要继承UITabelViewDelegate,UITabelViewSource
同时需要设置两个代理:tabelView.delegate、tabelView.dataSource
在协议中必须要实现三个协议函数
- -(NSInteger) tableView:(UITableView *)tableView numberOfRowsInSection:(NSInteger)section(获取每组元素的个数)
- numberOfSectionsInTableView(设置数据视图的组数)
- tableView: cellForRowAtIndexPath:(创建单元格对象函数)
objectivec
//
//  SceneDelegate.m
//  UITableView
//
//  Created by xiaoli pop on 2025/6/4.
//

#import "SceneDelegate.h"
#import "ViewController.h"
@interface SceneDelegate ()

@end

@implementation SceneDelegate


- (void)scene:(UIScene *)scene willConnectToSession:(UISceneSession *)session options:(UISceneConnectionOptions *)connectionOptions {
    self.window.frame = [[UIScreen mainScreen] bounds];
    ViewController* vc = [ViewController new];
    UINavigationController* nav = [[UINavigationController alloc] initWithRootViewController:vc];
    self.window.rootViewController = nav;
    [self.window makeKeyAndVisible];
}


- (void)sceneDidDisconnect:(UIScene *)scene {
    // Called as the scene is being released by the system.
    // This occurs shortly after the scene enters the background, or when its session is discarded.
    // Release any resources associated with this scene that can be re-created the next time the scene connects.
    // The scene may re-connect later, as its session was not necessarily discarded (see `application:didDiscardSceneSessions` instead).
}


- (void)sceneDidBecomeActive:(UIScene *)scene {
    // Called when the scene has moved from an inactive state to an active state.
    // Use this method to restart any tasks that were paused (or not yet started) when the scene was inactive.
}


- (void)sceneWillResignActive:(UIScene *)scene {
    // Called when the scene will move from an active state to an inactive state.
    // This may occur due to temporary interruptions (ex. an incoming phone call).
}


- (void)sceneWillEnterForeground:(UIScene *)scene {
    // Called as the scene transitions from the background to the foreground.
    // Use this method to undo the changes made on entering the background.
}


- (void)sceneDidEnterBackground:(UIScene *)scene {
    // Called as the scene transitions from the foreground to the background.
    // Use this method to save data, release shared resources, and store enough scene-specific state information
    // to restore the scene back to its current state.
}


@end
objc
//
//  ViewController.m
//  UITableView
//
//  Created by xiaoli pop on 2025/6/4.
//

#import "ViewController.h"

@interface ViewController ()

@end

@implementation ViewController

- (void)viewDidLoad {
    [super viewDidLoad];
    //创建数据视图,传入两个参数
    //参数一:数据视图的位置
    //参数二:数据视图的风格-UITableViewStylePlain:普通风格 、 UITableViewStyleGrouped:分组风格
    self.tableview = [[UITableView alloc] initWithFrame:self.view.bounds style:UITableViewStyleGrouped];
    //自动调整子视图大小
    self.tableview.autoresizingMask = UIViewAutoresizingFlexibleHeight | UIViewAutoresizingFlexibleWidth;
    //创建数据视图的代理对象
    self.tableview.delegate = self;
    //设置数据视图的代理源对象
    self.tableview.dataSource = self;
    //数据视图的头部视图的设定
    self.tableview.tableHeaderView = nil;
    //数据视图的尾部视图的设定
    self.tableview.tableFooterView = nil;
    [self.view addSubview:self.tableview];
    //创建一个可变数组
    self.arrayData = [[NSMutableArray alloc] init];

    for (int i = 'A'; i <= 'Z'; i++) {
        //定义小数组
        NSMutableArray* arraySmall = [[NSMutableArray alloc] init];
        for (int j = 1; j <= 5; j++) {
            NSString* str = [NSString stringWithFormat:@"%c%d",i,j];
            [arraySmall addObject:str];
        }
        //这里就相当于一个二维数组
        [self.arrayData addObject:arraySmall];
    }
    //当数据的数据源发生变化时,更新数据视图,重新加载数据
    [self.tableview reloadData];

}

- (void)creatButton {
    self.isEdit = NO;
    self.buttonOfEdit = [[UIBarButtonItem alloc] initWithTitle:@"编辑" style:UIBarButtonItemStylePlain target:self action:@selector(pressEdit)];
    self.buttonOfFinish = [[UIBarButtonItem alloc] initWithTitle:@"完成" style:UIBarButtonItemStylePlain target:self action:@selector(pressFinish)];
    self.buttonOfDelete = [[UIBarButtonItem alloc] initWithTitle:@"删除" style:UIBarButtonItemStylePlain target:self action:@selector(pressDelete)];
    self.navigationItem.rightBarButtonItem = self.buttonOfEdit;

}
- (void)pressEdit {
    self.isEdit = YES;
    self.navigationItem.rightBarButtonItem = self.buttonOfFinish;
    [self.tableview setEditing:YES];
    self.navigationItem.leftBarButtonItem = self.buttonOfDelete;
}

- (void)pressFinish {
    self.isEdit = NO;
    self.navigationItem.rightBarButtonItem = self.buttonOfEdit;
    [self.tableview setEditing:NO];
    self.navigationItem.leftBarButtonItem = nil;
}


/*
 参数讲解:
 参数一:触发事件的表格视图对象
 参数二:用户对这个单元格执行的编辑类型
 参数三:表示当前单元格的位置,包含两个信息:section(第几组)、row(第几行)
 */
- (void)tableView:(UITableView *)tableView commitEditingStyle:(UITableViewCellEditingStyle)editingStyle
                                        forRowAtIndexPath:(NSIndexPath *)indexPath {

    if (editingStyle == UITableViewCellEditingStyleDelete) {
        // 1. 先删除数据源中的数据
        [self.arrayData[indexPath.section] removeObjectAtIndex:indexPath.row];

        // 2. 更新表格视图(动画删除这一行)
        [tableView deleteRowsAtIndexPaths:@[indexPath] withRowAnimation:UITableViewRowAnimationAutomatic];

    }
}

//- (void)tableView:(UITableView *)tableView commitEditingStyle:(UITableViewCellEditingStyle)editingStyle forRowAtIndexPath:(NSIndexPath *)indexPath {
//    if (editingStyle == UITableViewCellEditingStyleInsert) {
//        // 1. 创建一个新的数据项(你可以替换成你自己的默认值)
//        NSString *newItem = @"新添加的内容";
//
//        // 2. 往数据源中插入(在指定 section 的对应位置)
//        [self.arrayData[indexPath.section] insertObject:newItem atIndex:indexPath.row];
//
//        // 3. 更新表格界面(带动画插入新行)
//        [tableView insertRowsAtIndexPaths:@[indexPath] withRowAnimation:UITableViewRowAnimationAutomatic];
//    }
//}

/*
 告诉表格视图每一行在处于编辑状态时,应该支持什么操作
 UITableViewCellEditingStyleDelete
 UITableViewCellEditingStyleInsert
 UITableViewCellEditingStyleNone
 */
- (UITableViewCellEditingStyle)tableView:(UITableView *)tableView editingStyleForRowAtIndexPath:(NSIndexPath *)indexPath {
    return UITableViewCellEditingStyleDelete ;
}

- (void)tableView:(UITableView *)tableView didSelectRowAtIndexPath:(NSIndexPath *)indexPath {
    NSLog(@"选中单元格!%lu %lu", indexPath.section, indexPath.row);
}

- (void)tableView:(UITableView *)tableView didDeselectRowAtIndexPath:(NSIndexPath *)indexPath {
    NSLog(@"取消 选中单元格!%lu %lu", indexPath.section, indexPath.row);
}
//或取每组元素的个数(行数)
//必须要实现的协议函数
//程序在显示数据视图时会调用此函数
//p1:数据视图对象本身
//p2: 那一组需要的行数
- (NSInteger)tableView:(UITableView *)tableView numberOfRowsInSection:(NSInteger)section {
    NSInteger num = [[self.arrayData objectAtIndex:section] count];
    return num;
}
//设定数据视图的组数,默认返回1
- (NSInteger)numberOfSectionsInTableView:(UITableView *)tableView {
    return  self.arrayData.count;
}

//创建单元格函数对象
//参数一:调用函数的对象
//参数二:单元格的索引,就是上面的行数与组数
/*
 //单元格文字赋值
 cell.textLabel.text = [_arrayData[indexPath.section] objectAtIndex:indexPath.row];
 //设置子文字标题
 cell.detailTextLabel.text = @"子标题";
 //设置图片
 NSString* str = [NSString stringWithFormat:@"photo0%ld.jpg",indexPath.row];
 cell.imageView = [[UIImageView alloc] initWithImage:[UIImage imageNamed:str]];
 */
- (UITableViewCell *)tableView:(UITableView *)tableView cellForRowAtIndexPath:(NSIndexPath *)indexPath {
    NSString* cellstr = @"cell";
    //尝试获得可复用的单元格,如果得不到就返回空
    /*
     当滚动表格时,屏幕上的单元格会离开屏幕,已经滚出屏幕的单元格不会被立刻销毁,而是存入复用迟中,当需要显示新的cell时,系统会从复用池中获取一个单元格重新使用,而不是重新创建
     */
    UITableViewCell* cell = [self.tableview dequeueReusableCellWithIdentifier:cellstr];
    if (!cell) {
        //创建一个单元格对象
        //参数一:单元格样式
        //参数二:单元格的复用标记
        cell = [[UITableViewCell alloc] initWithStyle:UITableViewCellStyleDefault reuseIdentifier:cellstr];
    }

    //NSString* str = [NSString stringWithFormat:@"第%ld组,第%ld行",indexPath.section,indexPath.row];
    //单元格内容赋值
    cell.textLabel.text = self.arrayData[indexPath.section][indexPath.row];
    //调用创建功能按钮方法
    [self creatButton];
    return cell;
}

- (CGFloat)tableView:(UITableView *)tableView heightForRowAtIndexPath:(NSIndexPath *)indexPath {
    return 100;
}

- (NSString *)tableView:(UITableView *)tableView titleForHeaderInSection:(NSInteger)section {
    return @"头部标题";
}

- (NSString *)tableView:(UITableView *)tableView titleForFooterInSection:(NSInteger)section {
    return @"尾部标题";
}

- (CGFloat)tableView:(UITableView *)tableView heightForHeaderInSection:(NSInteger)section {
    return 40;
}

- (CGFloat)tableView:(UITableView *)tableView heightForFooterInSection:(NSInteger)section {
    return 40;
}

@end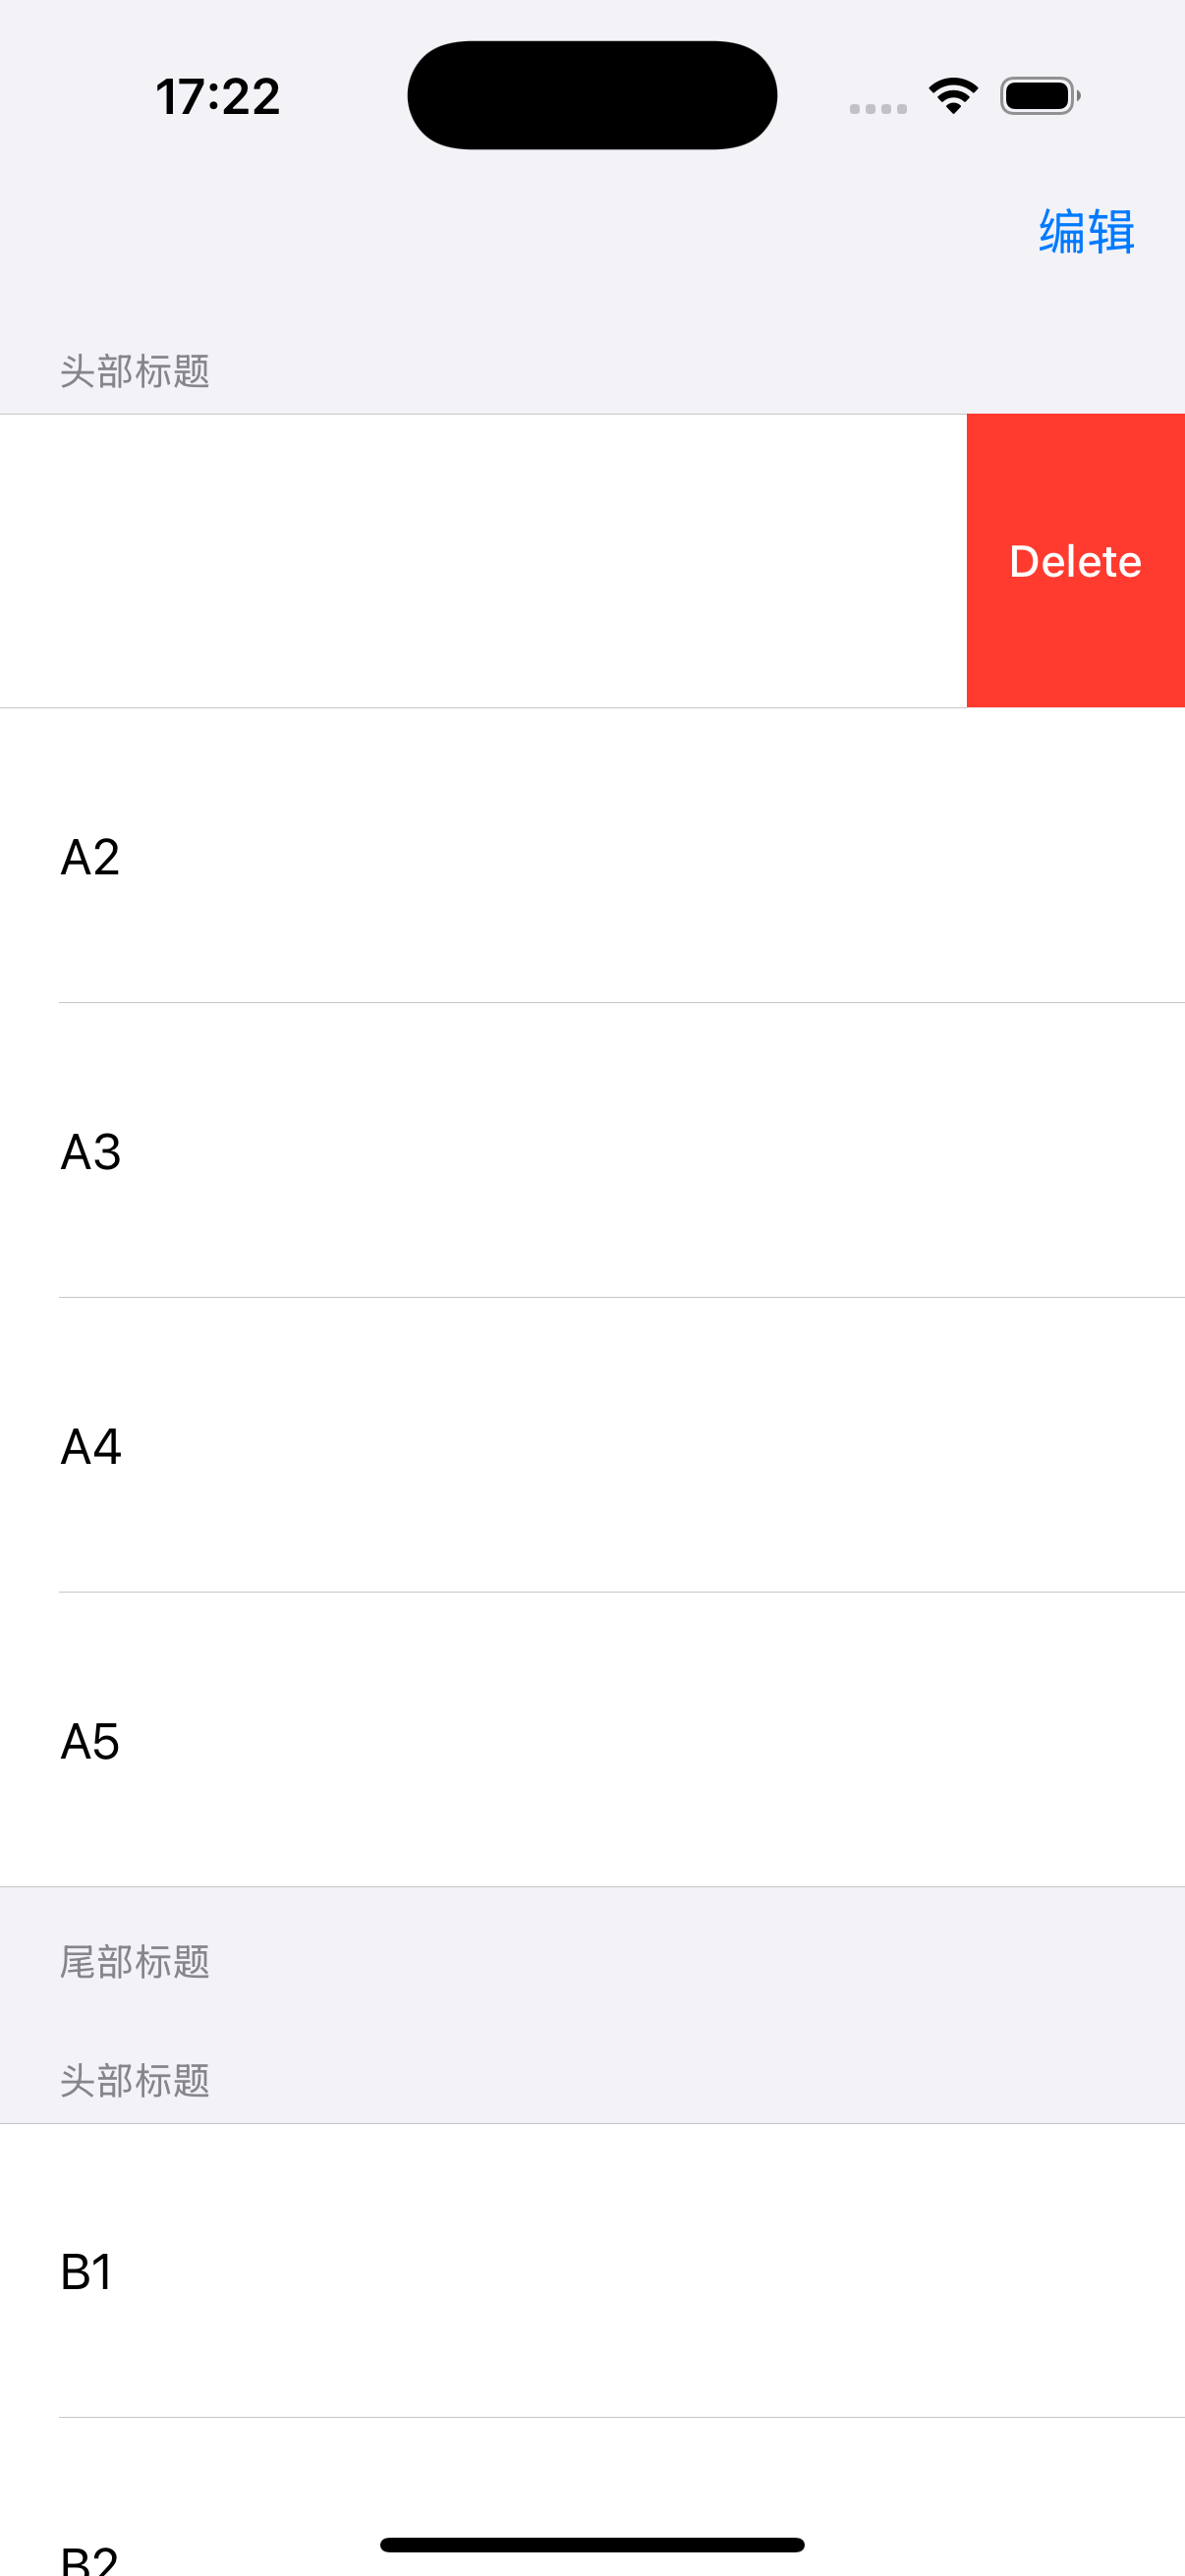
照片墙案例
userInteractionEnable属性介绍:
userInteractionEnabled是UIView的一个重要属性,用于控制用户是否能与该视图及其子视图进行交互(如点击、滑动、手势等)。在照片墙案,若需要对图片进行点击查看、缩放、删除等操作,必须将相关视图的该属性设为 YES(默认值也是 YES,但某些场景下可能被意外修改)。
这个属性是属于UIView的,是BOOL类型的,决定UIView是否接受有关touch和keyBoard的相关操作,然后UIView就可以通过相应的一些方法来处理。
其次我们需要创建一个手势识别器UITapGestureRecognizer
objectivec
//给每个控件添加手势
UITapGestureRecognizer* tap = [[UITapGestureRecognizer alloc] initWithTarget:self action:@selector(press:)];//创建一个手势识别器,并且添加相应的方法
tap.numberOfTapsRequired = 1;//设置触摸次数
tap.numberOfTouchesRequired = 1;//设置触摸点个数
[iView addGestureRecognizer:tap];//添加手势识别器到view中
//触摸后实现方法函数
- (void) press:(UITapGestureRecognizer*) tap {
  //强制转换类型
    UIImageView* imageView = (UIImageView*) tap.view;
    //创建即将推出的视图控制器
    ShowImage* imageShow = [[ShowImage alloc] init];
    //点击的图像视图赋值
    imageShow.imageTag = imageView.tag;
    imageShow.image = imageView.image;
    //将控制器推出
    [self.navigationController pushViewController:imageShow animated:YES];
}
在SceneDelegate文件中,设置导航控制器
objectivec
#import "SceneDelegate.h"
#import "VCRoot.h"
#import "VCImageShow.h"
@interface SceneDelegate ()

@end

@implementation SceneDelegate


- (void)scene:(UIScene *)scene willConnectToSession:(UISceneSession *)session options:(UISceneConnectionOptions *)connectionOptions {
    //导航控制器照片结构

    UINavigationController* nav = [[UINavigationController alloc] initWithRootViewController:[VCRoot new]];
    self.window.rootViewController = nav;
    [self.window makeKeyAndVisible];
}


- (void)sceneDidDisconnect:(UIScene *)scene {
    // Called as the scene is being released by the system.
    // This occurs shortly after the scene enters the background, or when its session is discarded.
    // Release any resources associated with this scene that can be re-created the next time the scene connects.
    // The scene may re-connect later, as its session was not necessarily discarded (see `application:didDiscardSceneSessions` instead).
}


- (void)sceneDidBecomeActive:(UIScene *)scene {
    // Called when the scene has moved from an inactive state to an active state.
    // Use this method to restart any tasks that were paused (or not yet started) when the scene was inactive.
}


- (void)sceneWillResignActive:(UIScene *)scene {
    // Called when the scene will move from an active state to an inactive state.
    // This may occur due to temporary interruptions (ex. an incoming phone call).
}


- (void)sceneWillEnterForeground:(UIScene *)scene {
    // Called as the scene transitions from the background to the foreground.
    // Use this method to undo the changes made on entering the background.
}


- (void)sceneDidEnterBackground:(UIScene *)scene {
    // Called as the scene transitions from the foreground to the background.
    // Use this method to save data, release shared resources, and store enough scene-specific state information
    // to restore the scene back to its current state.
}


@end
在VCRoot中设置照片墙
objectivec
#import "VCRoot.h"
#import "VCImageShow.h"
@interface VCRoot ()

@end

@implementation VCRoot

- (void)viewDidLoad {
    [super viewDidLoad];
    self.title = @"照片墙";
    self.view.backgroundColor = [UIColor whiteColor];
    self.navigationController.navigationBar.translucent = YES;
    self.navigationController.navigationBar.barTintColor = [UIColor yellowColor];
    //创建一个滚动视图并设置位置和画布大小
    UIScrollView* sv = [UIScrollView new];
    sv.frame = CGRectMake(5, 10, 394, 852);
    sv.contentSize = CGSizeMake(394, 852 * 1.5);
    sv.showsVerticalScrollIndicator = NO;
    //打开交互事件
    sv.userInteractionEnabled = YES;

    //利用循环给根视图上添加照片对象
    for (int i = 0; i < 9; i++) {
        UIImage* image = [UIImage imageNamed:[NSString stringWithFormat:@"photo0%d.jpg",i + 1]];
        UIImageView* view = [[UIImageView alloc] initWithImage:image];
        view.frame = CGRectMake(10 + (i % 3) * 125, (i / 3) * 165, 110, 150);
        [sv addSubview:view];
        view.userInteractionEnabled = YES;
        //创建点击手势
        UITapGestureRecognizer* tap = [[UITapGestureRecognizer alloc] initWithTarget:self action:@selector(pressTap:)];
        //单次点击
        tap.numberOfTapsRequired = 1;
        //单个手指
        tap.numberOfTouchesRequired = 1;
        [view addGestureRecognizer:tap];
        view.tag = 101 + i;
    }
    [self.view addSubview: sv];
}

//方法3:
- (void)pressTap:(UITapGestureRecognizer* )tap {
    UIImageView* imageView = (UIImageView*)tap.view;
    VCImageShow* imageshow = [VCImageShow new];
    imageshow.imageTag = imageView.tag;
    [self.navigationController pushViewController:imageshow animated:YES];

}


//方法2:
//- (void)pressTap:(UITapGestureRecognizer* )tap {
//    UIImageView* imageView = (UIImageView*)tap.view;
//    //创建显示视图控制器
//    VCImageShow* imageshow = [[VCImageShow alloc] init];
//    //点击的图像视图赋值
//    //imageshow.imageView = imageView;//不可行
//    imageshow.image = imageView.image;
//    //将视图控制器推出
//    [self.navigationController pushViewController:imageshow animated:YES];
//
//
//}
/*
#pragma mark - Navigation

// In a storyboard-based application, you will often want to do a little preparation before navigation
- (void)prepareForSegue:(UIStoryboardSegue *)segue sender:(id)sender {
    // Get the new view controller using [segue destinationViewController].
    // Pass the selected object to the new view controller.
}
*/

@end
接下来需要解决如何将被点击的视图传入到展示图片的页面,这里要注意,不可以直接传视图对象,因为一个人视图对象只能有一个根视图,当我们把视图添加到新的父视图上时,会从原来的父亲视图删除掉
objectivec
//
//  VCImageShow.m
//  PhotoWall
//
//  Created by xiaoli pop on 2025/6/3.
//

#import "VCImageShow.h"

@interface VCImageShow ()

@end

@implementation VCImageShow

- (void)viewDidLoad {
    [super viewDidLoad];
    self.title = @"图片展示";
    self.imageView = [[UIImageView alloc] init];
    self.imageView.frame = [[UIScreen mainScreen] bounds];
    //方法2:
    //self.imageView.image = self.image;
    //方法3:
    self.imageView.image = [UIImage imageNamed:[NSString stringWithFormat:@"photo0%lu.jpg",(unsigned long)(self.imageTag - 100) ]];
    /*
     一个视图对象只能有一个根视图
     当我们把视图添加到新的父视图上时
     会从原来的父亲视图删除掉
     */
    [self.view addSubview:self.imageView];

}

/*
#pragma mark - Navigation

// In a storyboard-based application, you will often want to do a little preparation before navigation
- (void)prepareForSegue:(UIStoryboardSegue *)segue sender:(id)sender {
    // Get the new view controller using [segue destinationViewController].
    // Pass the selected object to the new view controller.
}
*/

@end- 实现效果
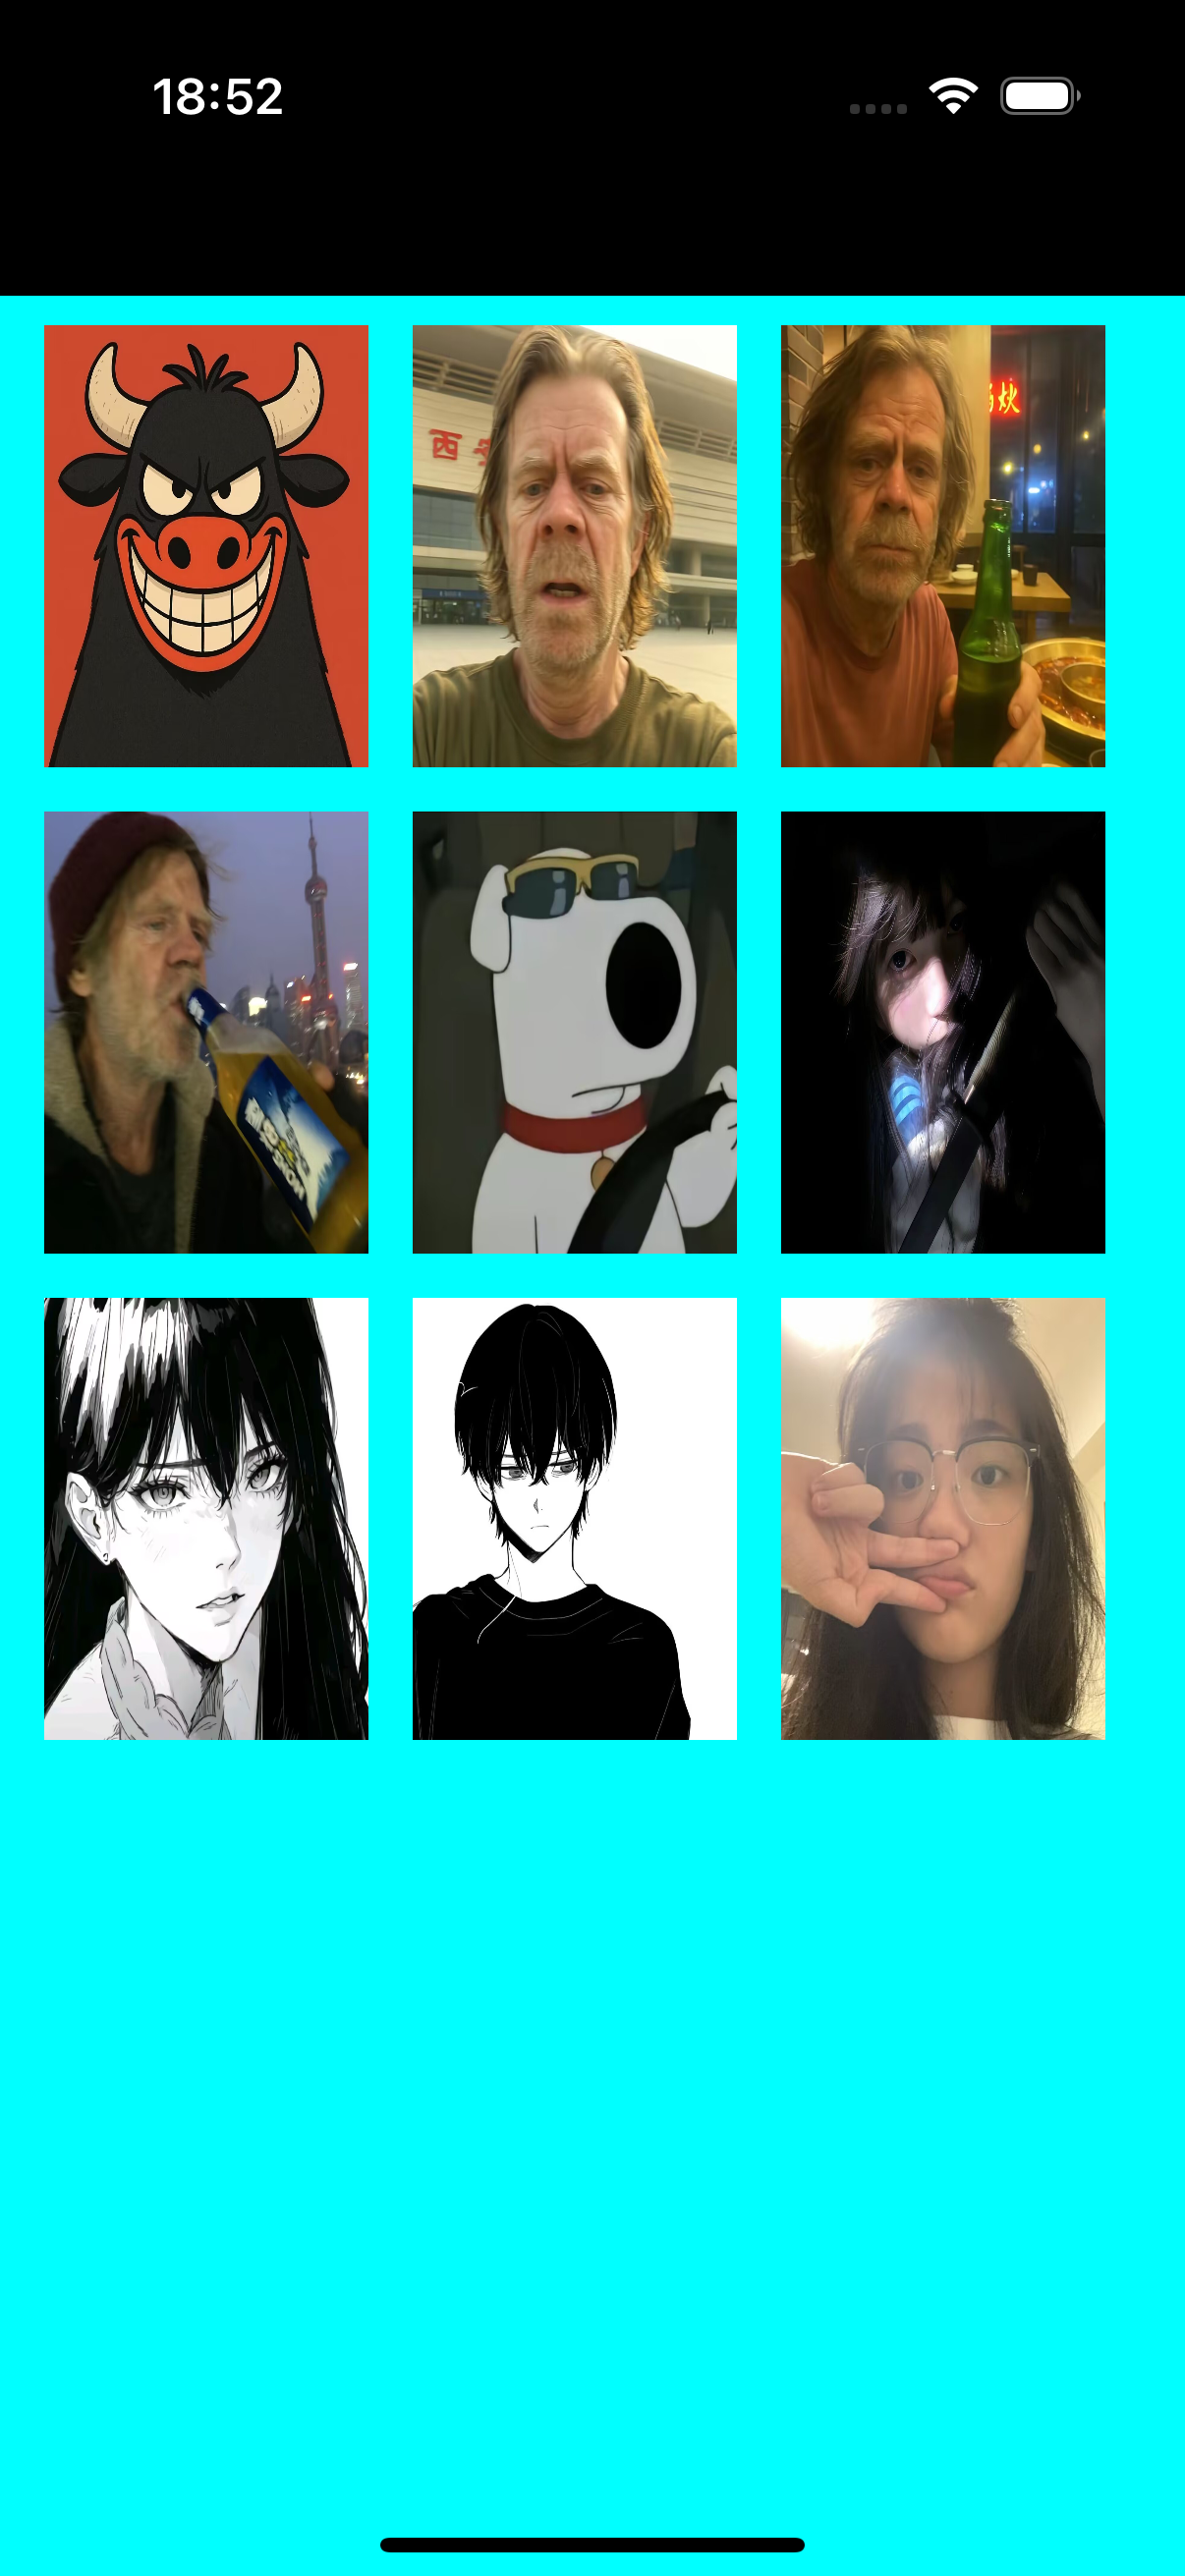
点击图片就会跳转一个新页面,内容就是选中的图片