前言
在之前的系列文章中,我们已经搭建了基本的硬件平台和软件架构,但有一个问题一直困扰着我:当做好一个差不多的机器人带到新环境时,如何让它连接到新环境的WiFi网络呢?
传统的做法可能需要连接键盘鼠标,显示器,然后进行可视化界面操作,这在实际应用中非常不便。于是我就想着用.NET技术解决这个痛点,实现一个优雅的WiFi配网方案。然后结合显示屏和一些语音交互做成一个不错的树莓派可爱的机箱之类的,类似我之前的做的这种外形的小机器人。
话不多说,让我们开始讲解实现过程吧。

问题解答
Q: 为什么选择.NET来做树莓派开发?
A: .NET的跨平台能力已经非常成熟,支持ARM64架构,性能优异,开发效率高。最关键的是,我们可以用熟悉的C#语言来控制硬件,这对.NET开发者来说简直不要太爽!
Q: WiFi配网的核心原理是什么?
A: 简单来说就是让设备先创建一个AP热点,然后使用.NET开发一个web服务,用户连接后通过Web界面输入目标WiFi信息,设备获取配置后切换到Station模式连接目标网络。
名词解释
- AP模式(Access Point):设备作为WiFi热点,允许其他设备连接
- Station模式:设备作为WiFi客户端,连接到其他WiFi网络
- NetworkManager:Linux系统的网络管理服务
- Liquid模板:轻量级模板引擎,用于生成动态HTML页面
准备工作
在开始编码之前,我们需要准备以下环境:
硬件要求
- 树莓派5(推荐4GB内存版本)(或者树莓派Zero 2W)
- MicroSD卡(16GB以上,Class 10)
- 显示屏(用于显示QR码,可选)
- 稳定的电源适配器
软件环境
- Raspberry Pi OS(64位版本)
- .NET 8 SDK (或者最新的.NET 9 SDK)
- NetworkManager服务
树莓派没有网络的时候开机效果如下:
手机连接到创建的RaspberryPi5-WiFiSetup热点,并扫码就能进入网络配置页面。

核心技术实现
1. 项目结构设计
项目采用了清晰的分层架构:
ApWifi.App/
├── Program.cs              # 程序入口
├── NetworkManager.cs       # 网络管理核心
├── Utils.cs               # 工具类
├── LocalizationService.cs # 国际化服务
├── Templates/             # 页面模板
│   └── wifi_form.liquid
2. 网络管理器实现
NetworkManager.cs是整个方案的核心,封装了命令行调用,负责AP模式切换和WiFi连接:
主要使用ProcessStartInfo类执行命令行指令,进行操作。
using System;
using System.Diagnostics;
using System.Threading.Tasks;
using System.IO;
using Fluid;

namespace ApWifi.App
{
    public class NetworkManager
    {
        private readonly DeviceConfig _config;
        private readonly string _interface;

        public NetworkManager(DeviceConfig config)
        {
            _config = config ?? throw new ArgumentNullException(nameof(config));
            _interface = _config.ApConfig.Interface;
        }

        /// <summary>
        /// 异步执行nmcli命令
        /// </summary>
        private async Task<CommandResult> RunNmcliCommandAsync(string arguments, int timeoutSeconds = 30)
        {
            if (!OperatingSystem.IsLinux())
            {
                Console.WriteLine("非Linux系统,跳过nmcli命令执行");
                return new CommandResult { Success = false, Output = "非Linux系统" };
            }

            try
            {
                // 构建完整的命令,包含sudo
                var fullCommand = $"sudo nmcli {arguments}";

                var psi = new ProcessStartInfo
                {
                    FileName = "/bin/bash",
                    Arguments = $"-c \"{fullCommand.Replace("\"", "\\\"")}\"",
                    RedirectStandardOutput = true,
                    RedirectStandardError = true,
                    UseShellExecute = false,
                    CreateNoWindow = true
                };

                using var process = new Process { StartInfo = psi };
                process.Start();

                var outputTask = process.StandardOutput.ReadToEndAsync();
                var errorTask = process.StandardError.ReadToEndAsync();

                var completed = await Task.WhenAny(
                    Task.WhenAll(outputTask, errorTask),
                    Task.Delay(TimeSpan.FromSeconds(timeoutSeconds))
                );

                if (completed.Id == Task.WhenAll(outputTask, errorTask).Id)
                {
                    await process.WaitForExitAsync();
                    var output = await outputTask;
                    var error = await errorTask;

                    var result = new CommandResult
                    {
                        Success = process.ExitCode == 0,
                        Output = output,
                        Error = error,
                        ExitCode = process.ExitCode
                    };

                    if (!result.Success && !string.IsNullOrEmpty(error))
                    {
                        Console.WriteLine($"nmcli命令执行失败: {error}");
                    }

                    return result;
                }
                else
                {
                    // 超时处理
                    try
                    {
                        process.Kill();
                    }
                    catch { }

                    return new CommandResult
                    {
                        Success = false,
                        Output = "",
                        Error = $"命令执行超时({timeoutSeconds}秒)",
                        ExitCode = -1
                    };
                }
            }
            catch (Exception ex)
            {
                Console.WriteLine($"执行nmcli命令时出错: {ex.Message}");
                return new CommandResult
                {
                    Success = false,
                    Output = "",
                    Error = ex.Message,
                    ExitCode = -1
                };
            }
        }

        /// <summary>
        /// 启动WiFi热点 (仅使用 nmcli)
        /// </summary>
        public async Task<bool> StartHotspotAsync(string ssid, string password)
        {
            // 直接调用 nmcli 方式
            return await StartHotspotWithNmcliAsync(ssid, password);
        }

        /// <summary>
        /// 连接到WiFi网络
        /// </summary>
        public async Task<bool> ConnectToWifiAsync(string ssid, string password)
        {
            Console.WriteLine($"正在连接到WiFi: {ssid}");

            // 使用正确的nmcli参数,添加引号处理特殊字符
            var connectCmd = $"device wifi connect \"{ssid}\" password \"{password}\" ifname {_interface}";
            var result = await RunNmcliCommandAsync(connectCmd);

            if (result.Success)
            {
                Console.WriteLine($"WiFi连接成功: {ssid}");
                Console.WriteLine(result.Output);
            }
            else
            {
                Console.WriteLine($"WiFi连接失败: {result.Error}");
            }

            return result.Success;
        }


        /// <summary>
        /// 使用nmcli启动WiFi热点
        /// </summary>
        public async Task<bool> StartHotspotWithNmcliAsync(string ssid, string password)
        {
            Console.WriteLine($"正在使用nmcli启动WiFi热点: {ssid}");
            Console.WriteLine($"使用配置的IP地址: {_config.ApConfig.Ip}");
            Console.WriteLine($"使用配置的DHCP范围: {_config.ApConfig.DhcpStart} - {_config.ApConfig.DhcpEnd}");

            try
            {
                // 停止任何可能正在运行的热点
                await StopHotspotAsync();

                // 确保设备被NetworkManager管理
                await SetDeviceManagedAsync(true);

                // 删除可能存在的相同名称的连接
                var deleteCmd = $"connection delete {ssid}";
                await RunNmcliCommandAsync(deleteCmd);

                // 创建新的热点连接
                var createHotspotCmd = $"device wifi hotspot ifname {_interface} con-name {ssid} ssid \"{ssid}\" password \"{password}\"";
                var result = await RunNmcliCommandAsync(createHotspotCmd);

                if (!result.Success)
                {
                    Console.WriteLine($"创建WiFi热点失败: {result.Error}");
                    return false;
                }

                // 设置IP地址和掩码(使用配置文件中的IP)
                var ipCmd = $"connection modify {ssid} ipv4.addresses {_config.ApConfig.Ip}/24";
                var ipResult = await RunNmcliCommandAsync(ipCmd);
                if (!ipResult.Success)
                {
                    Console.WriteLine($"设置IP地址失败: {ipResult.Error}");
                }

                // 设置为手动IP模式
                var methodCmd = $"connection modify {ssid} ipv4.method manual";
                var methodResult = await RunNmcliCommandAsync(methodCmd);
                if (!methodResult.Success)
                {
                    Console.WriteLine($"设置IP模式失败: {methodResult.Error}");
                }

                // 启用DHCP服务器(使用配置文件中的DHCP范围)
                var dhcpCmd = $"connection modify {ssid} ipv4.dhcp-range \"{_config.ApConfig.DhcpStart},{_config.ApConfig.DhcpEnd}\"";
                var dhcpResult = await RunNmcliCommandAsync(dhcpCmd);
                if (!dhcpResult.Success)
                {
                    Console.WriteLine($"设置DHCP范围失败: {dhcpResult.Error}");
                }

                // 重新应用配置
                var upCmd = $"connection up {ssid}";
                var upResult = await RunNmcliCommandAsync(upCmd);

                if (!upResult.Success)
                {
                    Console.WriteLine($"启动WiFi热点失败: {upResult.Error}");
                    return false;
                }

                Console.WriteLine($"WiFi热点启动成功: {ssid}");
                Console.WriteLine($"热点IP: {_config.ApConfig.Ip}");
                return true;
            }
            catch (Exception ex)
            {
                Console.WriteLine($"启动WiFi热点时出错: {ex.Message}");
                return false;
            }
        }

        /// <summary>
        /// 使用nmcli关闭WiFi热点
        /// </summary>
        public async Task<bool> StopHotspotWithNmcliAsync(string ssid)
        {
            Console.WriteLine($"正在关闭nmcli WiFi热点: {ssid}");

            try
            {
                // 关闭连接
                var downCmd = $"connection down {ssid}";
                await RunNmcliCommandAsync(downCmd);

                // 删除连接
                var deleteCmd = $"connection delete {ssid}";
                var result = await RunNmcliCommandAsync(deleteCmd);

                if (!result.Success)
                {
                    Console.WriteLine($"关闭WiFi热点失败: {result.Error}");
                    return false;
                }

                Console.WriteLine("WiFi热点已关闭");
                return true;
            }
            catch (Exception ex)
            {
                Console.WriteLine($"关闭WiFi热点时出错: {ex.Message}");
                return false;
            }
        }


    }

    public class CommandResult
    {
        public bool Success { get; set; }
        public string Output { get; set; } = "";
        public string Error { get; set; } = "";
        public int ExitCode { get; set; }
    }
}
3. Web界面实现
使用Liquid模板引擎创建用户友好的配网界面(wifi_form.liquid):
app.MapGet("/", async (HttpRequest req) =>
{
// 获取语言参数
var langParam = req.Query["lang"].FirstOrDefault();
if (!string.IsNullOrEmpty(langParam))
{
localizationService.SetLanguage(langParam);
}
var template = await File.ReadAllTextAsync("Templates/wifi_form.liquid");
var parser = new FluidParser();
// 配置Fluid模型绑定,允许访问LanguageItem的属性
TemplateOptions.Default.MemberAccessStrategy.Register<LanguageItem>();
if (!parser.TryParse(template, out var fluidTemplate, out var error))
{
return Results.Content($"模板解析错误: {error}", "text/plain");
}
var context = new TemplateContext();
context.SetValue("ssid", "");
context.SetValue("pwd", "");
context.SetValue("strings", localizationService.GetAllStrings());
context.SetValue("currentLanguage", localizationService.GetCurrentLanguage());
// 准备语言列表
var languages = localizationService.GetAvailableLanguages()
.Select(lang => new LanguageItem { Code = lang, Name = localizationService.GetLanguageDisplayName(lang) })
.ToList();
context.SetValue("languages", languages);
var html = await fluidTemplate.RenderAsync(context);
return Results.Content(html, "text/html");
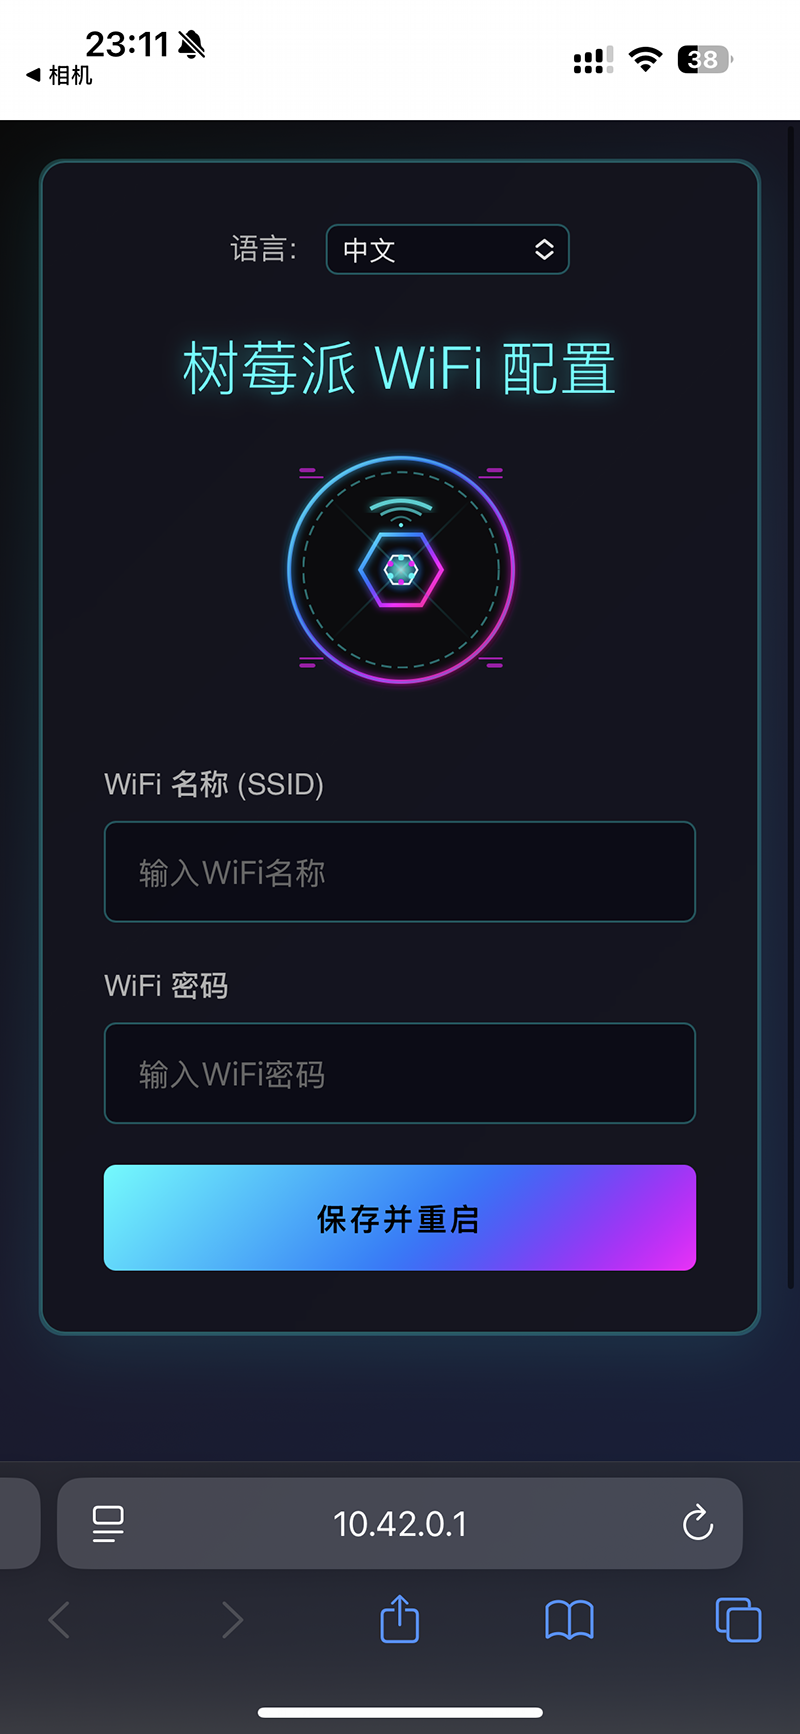
});当web服务启动后,访问二维码链接,就可以到达配置页面,界面样式使用大模型生成的是不是很好看,界面也支持多语言。
4. 二维码生成逻辑
使用ZXing.Net结合图形渲染库SkiaSharp和ImageSharp进行二维码的生成,并通过.NET IOT库操作SPI进行图片数据传输,之前的文档有说过,这里就不展开了。
 /// <summary>
 /// 创建包含二维码和IP地址文本的图像,适配指定尺寸的屏幕
 /// </summary>
 /// <param name="url">二维码URL</param>
 /// <param name="ipAddress">IP地址文本</param>
 /// <param name="width">目标图像宽度</param>
 /// <param name="height">目标图像高度</param>
 /// <returns>包含二维码和文本的图像</returns>
 public static Image<Bgra32> CreateQrCodeWithTextImage(string url, string ipAddress, int width, int height)
 {
     // 创建目标图像
     var image = new Image<Bgra32>(width, height);

     // 计算二维码大小 - 留出空间给文本
     int textAreaHeight = Math.Min(30, height / 10); // 文本区域高度
     int qrSize = Math.Min(width - 20, height - textAreaHeight - 20); // 二维码大小,留边距

     // 生成二维码
     var qrCodeImage = GenerateQrCodeImage(url, qrSize);

     // 计算二维码位置(居中上部)
     int qrX = (width - qrSize) / 2;
     int qrY = 10; // 顶部边距

     // 填充白色背景
     image.Mutate(ctx => ctx.Fill(Color.White));

     // 将二维码复制到目标图像上
     for (int y = 0; y < qrCodeImage.Height && (qrY + y) < height; y++)
     {
         for (int x = 0; x < qrCodeImage.Width && (qrX + x) < width; x++)
         {
             var pixel = qrCodeImage[x, y];
             if (qrX + x >= 0 && qrY + y >= 0)
             {
                 image[qrX + x, qrY + y] = pixel;
             }
         }
     }
       // 使用SkiaSharp绘制文本(作为后备方案)
     try
     {
         using var bitmap = new SKBitmap(width, height);
         using var canvas = new SKCanvas(bitmap);

         // 将ImageSharp图像转换为SKBitmap
         for (int y = 0; y < height; y++)
         {
             for (int x = 0; x < width; x++)
             {
                 var pixel = image[x, y];
                 bitmap.SetPixel(x, y, new SKColor(pixel.R, pixel.G, pixel.B, pixel.A));
             }
         }

         // 绘制IP地址文本
         using var font = new SKFont(SKTypeface.Default, Math.Min(16, textAreaHeight - 4));
         using var paint = new SKPaint
         {
             Color = SKColors.Black,
             IsAntialias = true
         };

         int textY = qrY + qrSize + textAreaHeight / 2 + (int)(font.Size / 2);
         canvas.DrawText(ipAddress, width / 2, textY, SKTextAlign.Center, font, paint);

         // 将结果转回ImageSharp
         for (int y = 0; y < height; y++)
         {
             for (int x = 0; x < width; x++)
             {
                 var color = bitmap.GetPixel(x, y);
                 image[x, y] = new Bgra32(color.Red, color.Green, color.Blue, color.Alpha);
             }
         }
     }
     catch (Exception ex)
     {
         Console.WriteLine($"警告:无法绘制IP地址文本: {ex.Message}");
     }

     qrCodeImage.Dispose();
     return image;
 }
部署与测试
1. 项目编译
# 克隆项目
git clone https://github.com/maker-community/PiWiFiAP.git
cd PiWiFiAP/ApWifi.App

# 安装依赖
dotnet restore

# 编译项目
dotnet publish -c Release -r linux-arm64 --self-contained false
2. 程序自动重启的系统配置
创建用于自动启动的systemd服务文件:
sudo nano /etc/systemd/system/apwifi-app.service根据自己系统的目录进行脚本修改
[Unit]
#The # is a comment line
#Documentation https://www.freedesktop.org/software/systemd/man/systemd.service.html

#Place short description here
Description=.NET IoT  applications running on Raspberry Pi OS

#This will not start execution of this file until the network connection is made
#It can be replaced with other parameters of your choosing
After=network.target

[Service]
#Default: Startup type
Type=Simple

#Set working directory to the application directory
WorkingDirectory=/home/gil/ApWifi

#Edit this with your file name. In this example the app executable is in the /home/pi/myiotappfolder
#The file we are running and made executable is <myiotapp>
#ExecStart runs this executable script
ExecStart=/home/gil/.dotnet/dotnet /home/gil/ApWifi/ApWifi.App.dll

#Optional: Saves the output and error log of the terminal to a .log file in a directory of your choosing.
StandardOutput=file:/home/gil/ApWifi/apwifi-app.log
StandardError=file:/home/gil/ApWifi/apwifi-app-error.log

#Optional: To cleanly end the file on stop use this command. This sends a terminal interrupt command on the executable script
KillSignal=SIGINT

#Automatically restart on kill
Restart=always

[Install]
WantedBy=multi-user.target
查看服务状态:
sudo systemctl status apwifi-app.service启用服务:
sudo systemctl enable apwifi.service
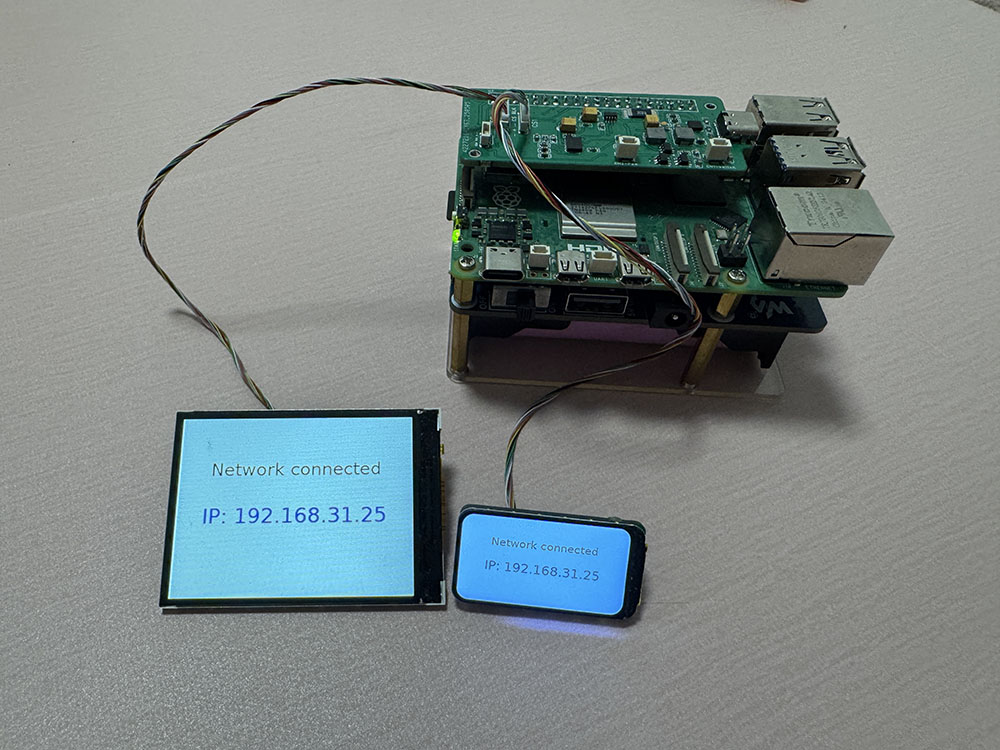
sudo systemctl start apwifi.service联网正常之后的效果直接显示设备的IP,便于我们通过SSH进行连接,执行后续的操作。
总结
通过这次实践,我成功地用.NET技术实现了一个初步能用的WiFi配网方案。后期也可以拓展很多的功能,这个可以根据自己的需要进行改进。
希望这篇文章能给大家在.NET嵌入式开发方面带来一些启发。如果有问题欢迎在评论区讨论,让我们一起探索.NET在IoT领域的更多可能性!
这个小功能的代码,其实我用大模型写了大部分,现在的大模型能力越来越强对于我们程序员来说,如果你知道技术方案,但是没有时间查看文档和调试代码,通过明确的提示词,是可以让大模型生成很不错的代码的,也算是提高了我们的效率,当然代码也记得好好检查,不然有bug也会让人很恼火的。
项目地址
- GitHub仓库 : https://github.com/maker-community/PiWiFiAP
- 技术博客 : 绿荫阿广 - 博客园