大家好,我是双越老师,前百度 滴滴 资深软件工程师,博客总流量 500w ,我的代表作品有:
- wangEditor 开源 Web 富文本编辑器,GitHub 18k star
- 划水AI Node 全栈 AIGC 知识库,AI 智能写作,多人协同编辑
- 前端面试派 一站式准备前端面试:写简历,刷题,面试技巧。开源免费
我最近整理了一些 AI Agent 开发相关资料,有兴趣的同学可加入讨论
开始
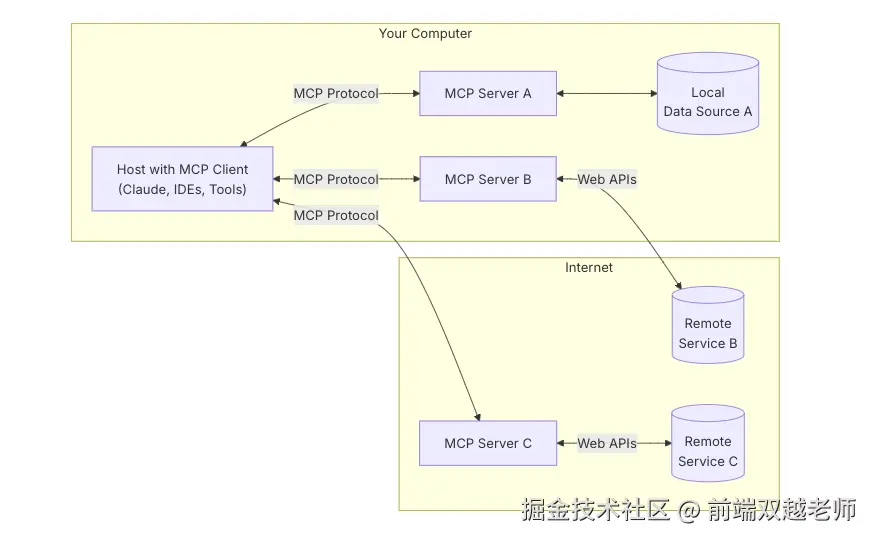
MCP 即 Model Context Protocol 是 AI 大模型对接第三方能力的一个协议,前段时间比较火爆,文章满天飞。最近热度是降低了一些(这很正常)但它却一直在被继续广泛应用。
前段时间我写过一篇文章 编程常用的 MCP Server,用自然语言写代码 你可以据此了解一下 MCP 在开发中的使用场景,以及如何与 LLM 结合使用。
这次将继续探索如何开发 MCP Server 和 Client ,记录开发过程和遇到的问题,文章最后有源码连接。
开发 MCP Server
参考 文档 创建一个 Node 开发环境,然后创建文件 src/index.ts,这一步比较简单。
创建 server
使用 new McpServer 初始化 server ,定义名称 weather 和版本,未来可扩展 resources 和 tools
ts
import { McpServer } from "@modelcontextprotocol/sdk/server/mcp.js";

// Create server instance
const server = new McpServer({
  name: "weather",
  version: "1.0.0",
  capabilities: {
    resources: {},
    tools: {},
  },
});
创建 tool get_alerts
使用 server.tool 创建一个 tool ,需要传入 4 个参数:名称 name, 描述 description, 参数 params, 函数 fn
ts
import { z } from 'zod'

// Register weather tools
server.tool(
  'get_alerts',
  'Get weather alerts for a state',
  {
    state: z
      .string()
      .length(2)
      .describe(
        'Two-letter state code, e.g., "CA" for California, "NY" for New York'
      ),
  },
  async ({ state }) => {
    // TODO...
  }
)
下面是函数的具体实现。1. 接收到 state 参数; 2. ajax 获取 api.weather.gov 天气数据; 3. 格式化以后返回。
PS. 如有函数和 type 没有定义,可以在文档中找到,这些都不影响代码阅读理解。
ts
const NWS_API_BASE = 'https://api.weather.gov'
const USER_AGENT = 'weather-app/1.0'

  async ({ state }) => {
    const stateCode = state.toUpperCase()
    const alertsUrl = `${NWS_API_BASE}/alerts?area=${stateCode}`
    const alertsData = await makeNWSRequest<AlertsResponse>(
      alertsUrl,
      USER_AGENT
    )
    if (!alertsData) {
      return {
        content: [
          {
            type: 'text',
            text: 'Failed to retrieve alerts data',
          },
        ],
      }
    }
    const features = alertsData.features || []
    if (features.length === 0) {
      return {
        content: [
          {
            type: 'text',
            text: `No active alerts for ${stateCode}`,
          },
        ],
      }
    }
    const formattedAlerts = features.map(formatAlert)
    const alertsText = `Active alerts for ${stateCode}:\n\n${formattedAlerts.join(
      '\n'
    )}`

    return {
      content: [
        {
          type: 'text',
          text: alertsText,
        },
      ],
    }
  }
创建 tool get_forecast
同理,再创建一个 tool get_forecast ,它需要接收两个参数 latitude 和 longitude,然后通过 api.weather.gov 获取天气预报信息。
ts
server.tool(
  'get_forecast',
  'Get weather forecast for a location',
  {
    latitude: z.number().min(-90).max(90).describe('Latitude of the location'),
    longitude: z
      .number()
      .min(-180)
      .max(180)
      .describe('Longitude of the location'),
  },
  async ({ latitude, longitude }) => {
    // Get grid point data
    const pointsUrl = `${NWS_API_BASE}/points/${latitude.toFixed(
      4
    )},${longitude.toFixed(4)}`
    const pointsData = await makeNWSRequest<PointsResponse>(
      pointsUrl,
      USER_AGENT
    )
    if (!pointsData) {
      return {
        content: [
          {
            type: 'text',
            text: `Failed to retrieve grid point data for coordinates: ${latitude}, ${longitude}. This location may not be supported by the NWS API (only US locations are supported).`,
          },
        ],
      }
    }
    const forecastUrl = pointsData.properties?.forecast
    if (!forecastUrl) {
      return {
        content: [
          {
            type: 'text',
            text: 'Failed to get forecast URL from grid point data',
          },
        ],
      }
    }
    // Get forecast data
    const forecastData = await makeNWSRequest<ForecastResponse>(
      forecastUrl,
      USER_AGENT
    )
    if (!forecastData) {
      return {
        content: [
          {
            type: 'text',
            text: 'Failed to retrieve forecast data',
          },
        ],
      }
    }
    const periods = forecastData.properties?.periods || []
    if (periods.length === 0) {
      return {
        content: [
          {
            type: 'text',
            text: 'No forecast periods available',
          },
        ],
      }
    }
    // Format forecast periods
    const formattedForecast = periods.map((period: ForecastPeriod) =>
      [
        `${period.name || 'Unknown'}:`,
        `Temperature: ${period.temperature || 'Unknown'}°${
          period.temperatureUnit || 'F'
        }`,
        `Wind: ${period.windSpeed || 'Unknown'} ${period.windDirection || ''}`,
        `${period.shortForecast || 'No forecast available'}`,
        '---',
      ].join('\n')
    )
    const forecastText = `Forecast for ${latitude}, ${longitude}:\n\n${formattedForecast.join(
      '\n'
    )}`
    return {
      content: [
        {
          type: 'text',
          text: forecastText,
        },
      ],
    }
  }
运行 server
使用 server.connect(transport) 启动 server
ts
import { StdioServerTransport } from '@modelcontextprotocol/sdk/server/stdio.js'

async function main() {
  const transport = new StdioServerTransport()
  await server.connect(transport)
  console.log('Weather MCP Server running on stdio')
}

main().catch((error) => {
  console.error('Fatal error in main():', error)
  process.exit(1)
})
在控制台执行 npm run build 构建项目,构建出来的代码在 build/index.js ,然后本地执行看是否报错?
sh
node build/index.js在 claude-desktop 测试,MCP 连接失败
如果代码能正常启动,我们可以用 Claude-desktop (或其他 app ,如 Cursor Tare)进行配置和测试。
先安装 Claude-desktop 然后按文档提示,编辑它的配置文件
sh
code ~/Library/Application\ Support/Claude/claude_desktop_config.json配置格式如下
json
{
  "mcpServers": {
    "weather": {
      "command": "node",
      "args": ["/ABSOLUTE/PATH/TO/PARENT/FOLDER/weather/build/index.js"]
    }
  }
}
但是我配置完以后,重启 claude 它提示我报错了,MCP server 连接失败
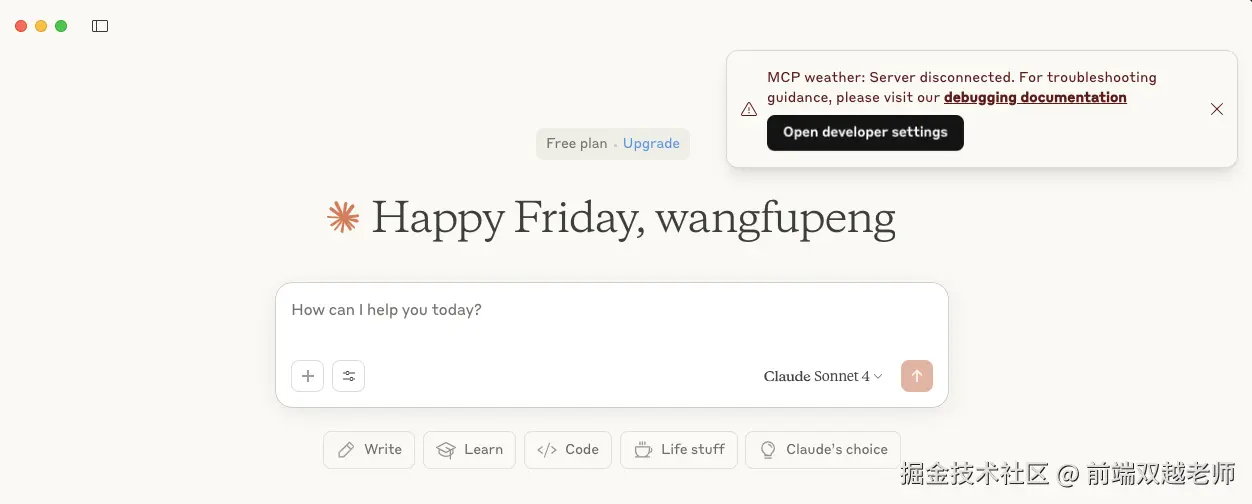
点击"Open developer settings"按钮可以看到 weather failed ,什么原因呢?
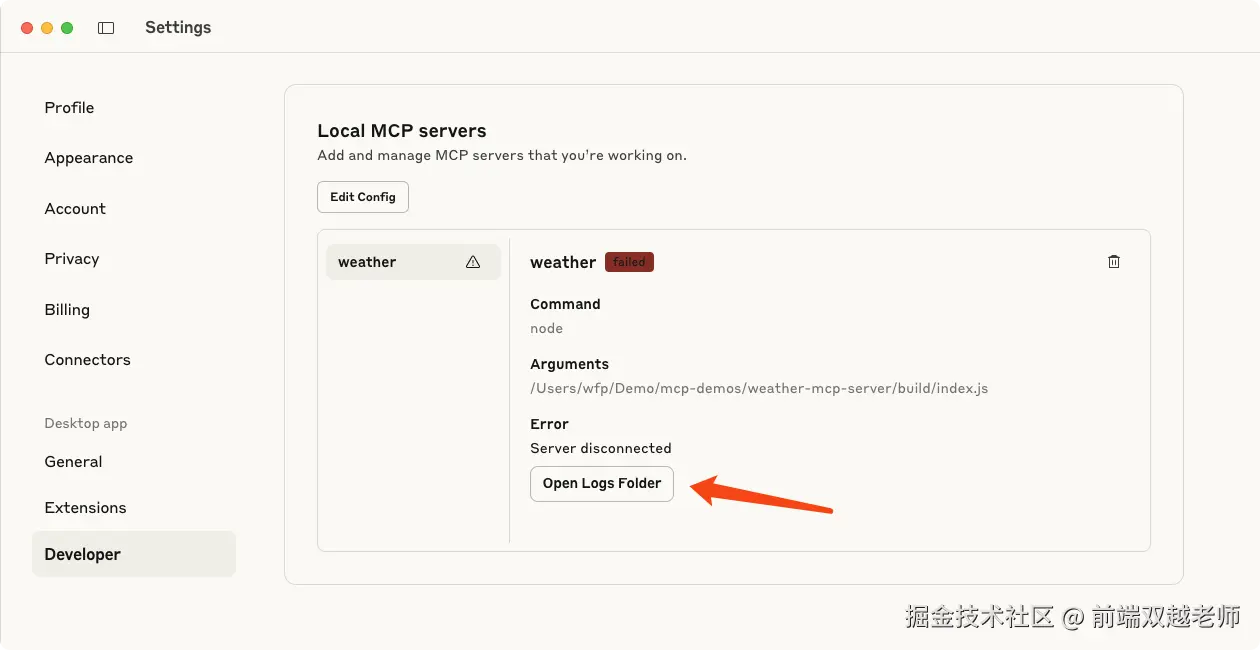
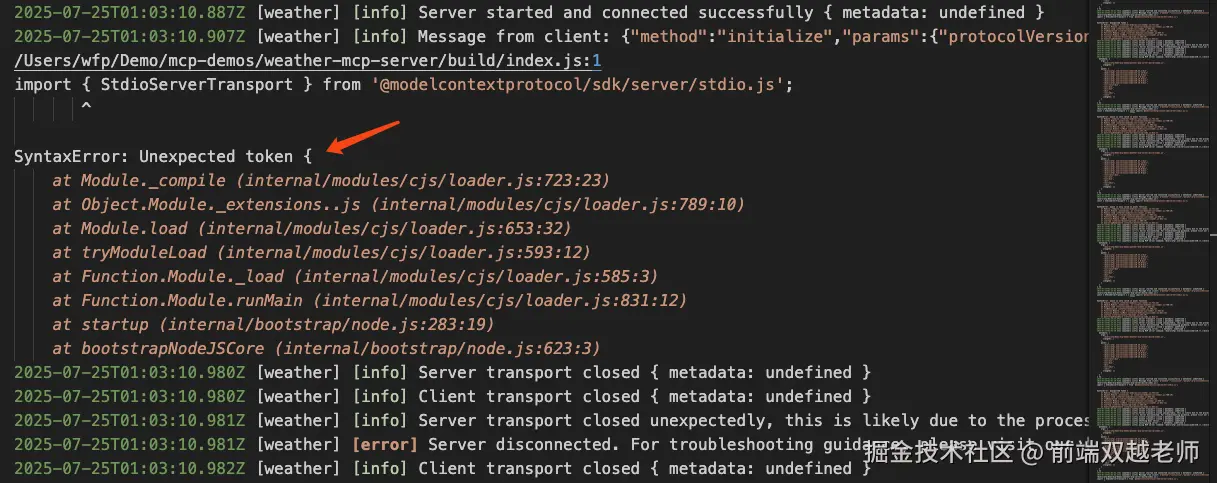
点击上图的 "Open Logs Folder" 可以看到日志文件,其中有 weather 的日志
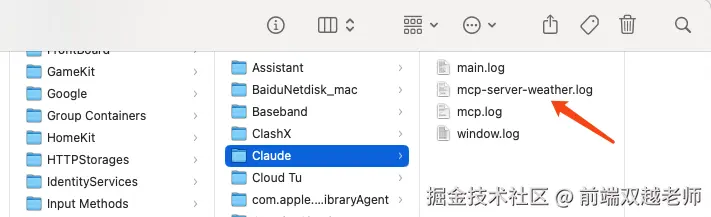
打开这个日志可以看到详细的报错信息 Unexpected token { 语法不识别,像是 nodejs 版本的问题?
尝试解决问题
执行 where node 发现我电脑里确实装了 2 个版本的 nodejs ,时间久了我都忘了

现在控制台执行 node 是 v20 版本 nvm 安装的,我猜测 claude-desktop 应该是直接使用了系统安装的 v15 版本了。
于是我修改配置文件,把 command 换成 node v20 版本的路径,其他保持不变
json
{
  "mcpServers": {
    "weather": {
      "command": "/Users/wfp/.nvm/versions/node/v20.10.0/bin/node",
      "args": ["/ABSOLUTE/PATH/TO/PARENT/FOLDER/weather/build/index.js"]
    }
  }
}
再重启 claude-desktop ,之前的报错没有了。但又报其他错误了...
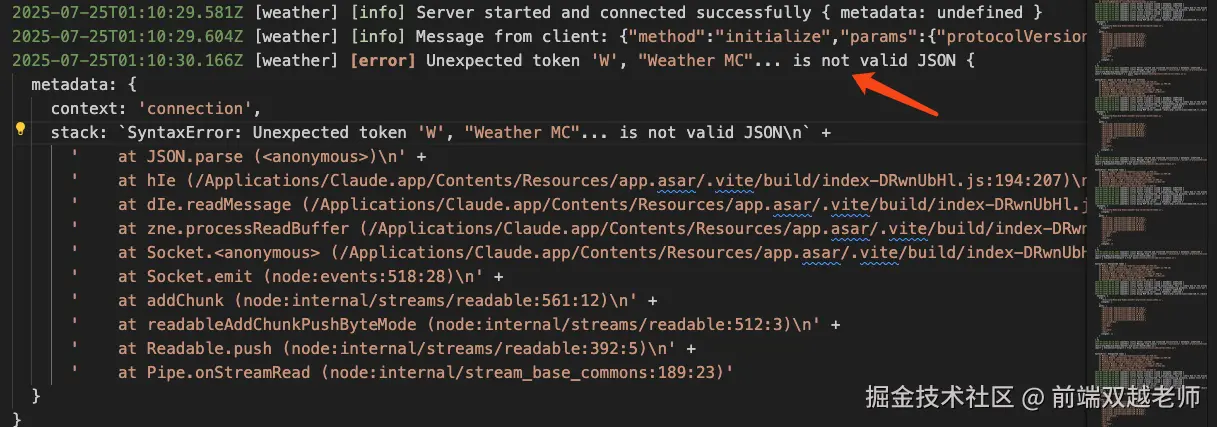
这个报错没看懂,W 就不是合法的 JSON 格式吗?
根据错误提示 Weather MC 这个字符串片段,顺藤摸瓜,找到 main 函数里面有这个字符串,再详细对比文档,这里文档写的是 console.error 而不是 console.log ,我先改过来。
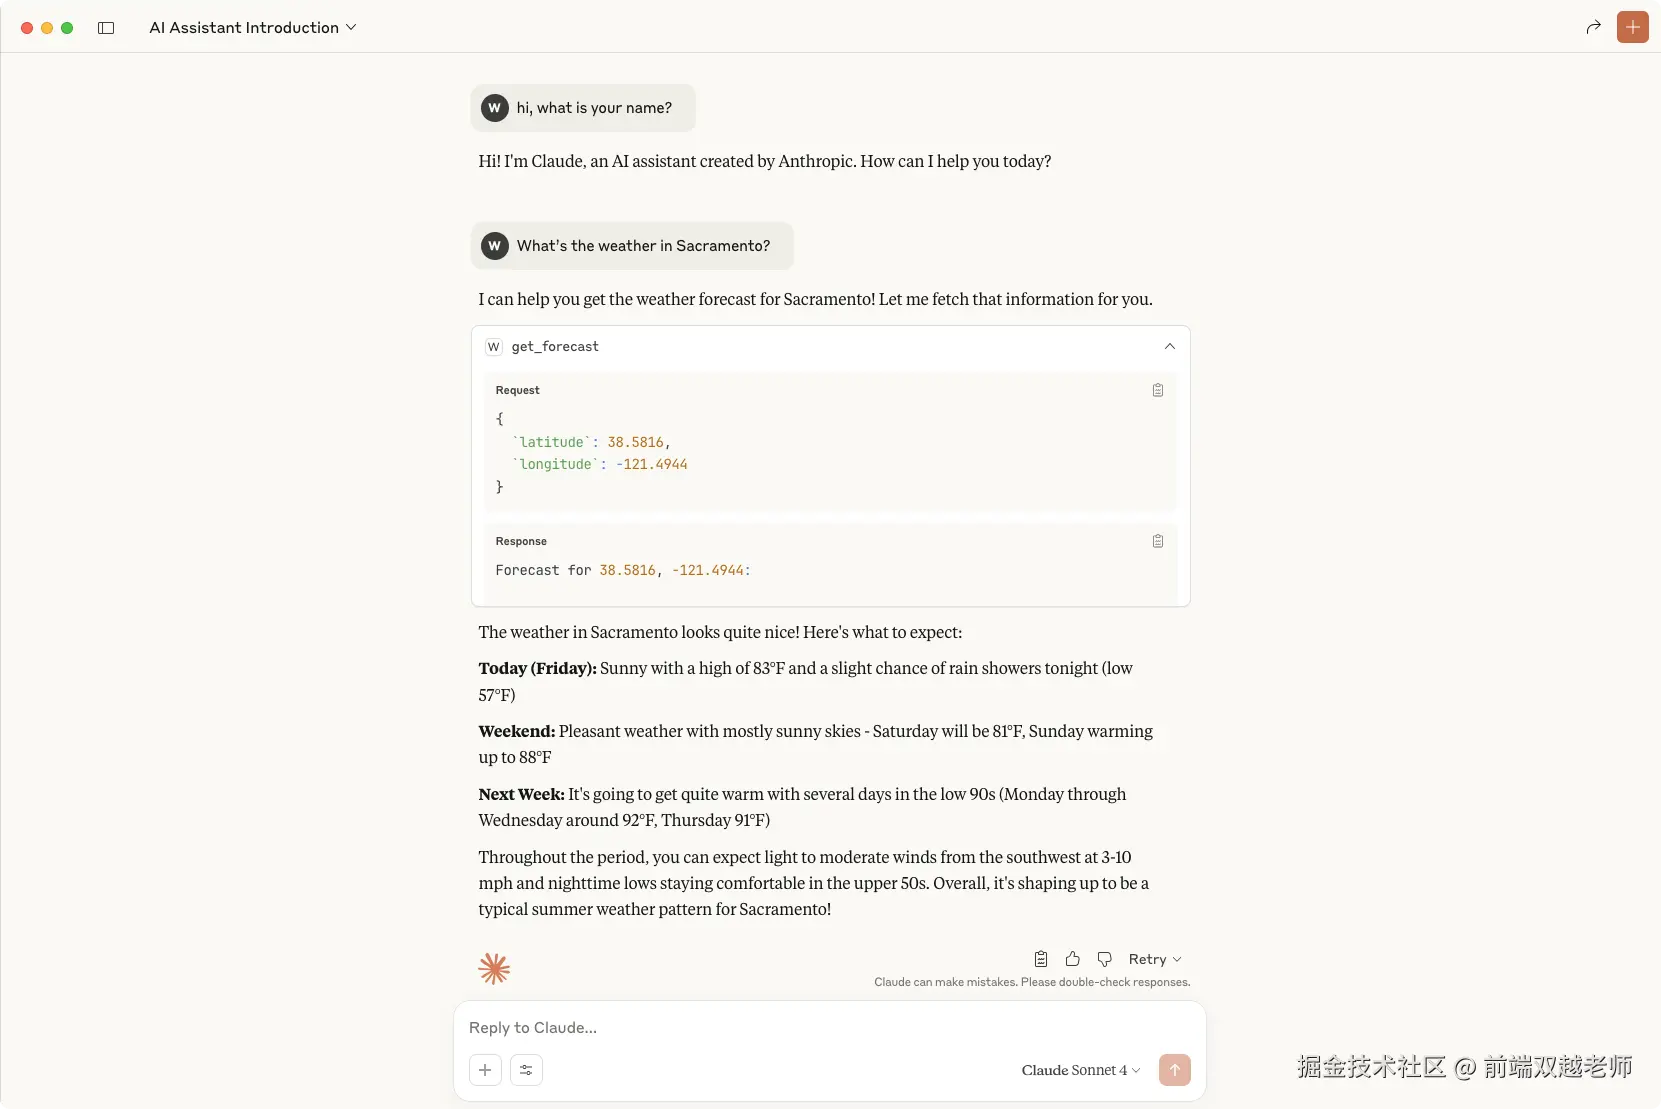
重新执行 npm run bulid 构建,然后重启 claude-desktop ,这次可以了,点击 weather 可以看到两个 tool
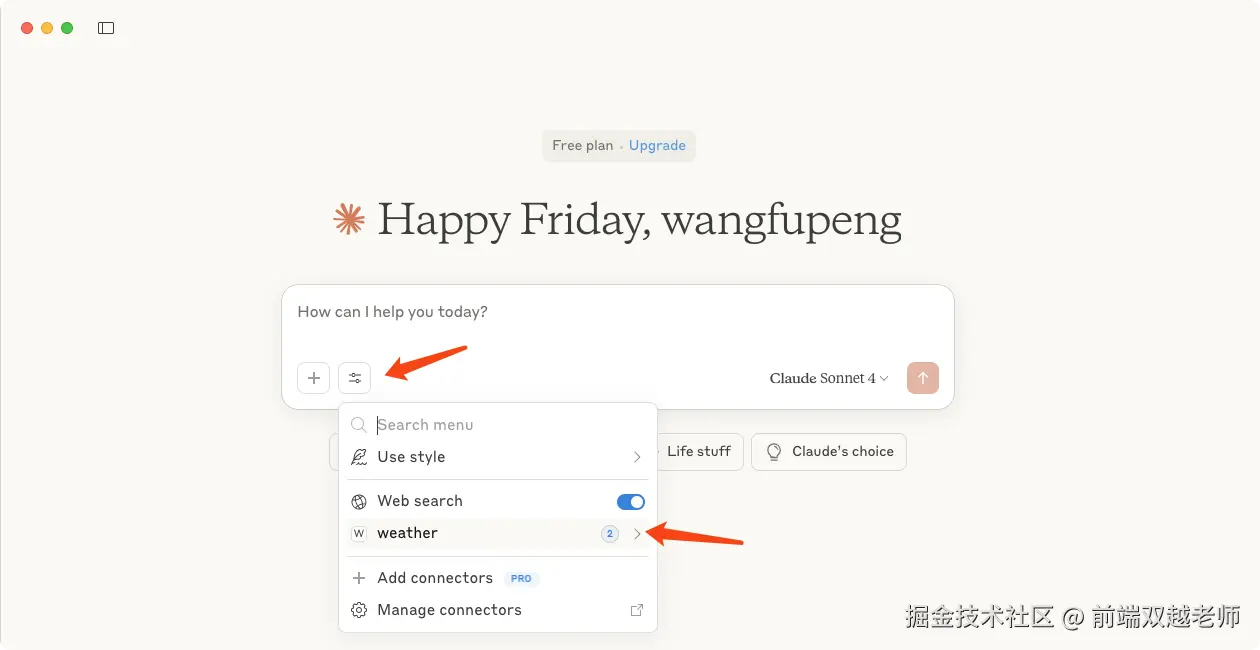
输入 What's the weather in Sacramento? 测试,它可以调用 get_forecast tool 并返回结果
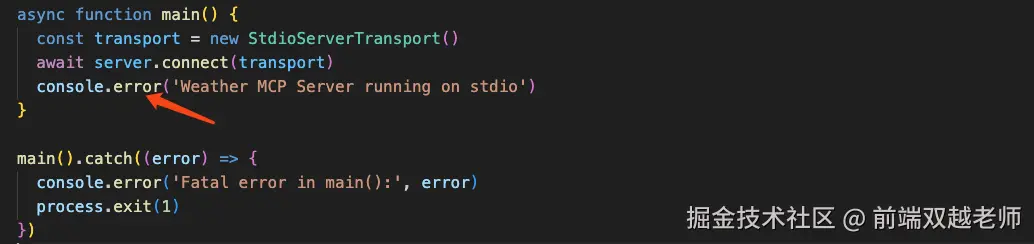
再看代码,其中 StdioServerTransport 是标准输入输出 stdio 的转换,在 nodejs 中 console.log 就是标准输出。
ts
  const transport = new StdioServerTransport()
  await server.connect(transport)
  console.error('Weather MCP Server running on stdio')
所以如果用 console.log 会把这段字符串输出给 claude-desktop 作为 JSON 去解析,就报错了。而使用 console.error 就不会把结果输出。
当然,这个方式肯定不是最终方案,否则代码可读性太差了,这个我继续探索。
开发 MCP Client
继续开发 MCP Client ,最后要和刚开发的 server 连起来。
参考文档 新建一个 nodejs 环境,并创建文件 index.ts 。这个比较简单就不写了。
Claude API 连接失败
文档中使用的是 Anthropic 即 Claude API ,我申请了 API key 然后测试,请求失败,报错 403 PermissionDeniedError: Request not allowed
可能是因为我没有付费,就没法使用 API 。但像 Claude OpenAI 对国内本来就禁用,所以没法使用就先不用了,换 Deepseek 试试吧。
使用 Deepseek
先创建 .env 文件,在其中写入你的 Deepseek API key
env
DEEPSEEK_API_KEY=sk-xxxx然后在 index.ts 写如下测试代码,运行看是否能打印出正确结果?
ts
import OpenAI from 'openai'
import dotenv from 'dotenv'
dotenv.config()

const DEEPSEEK_API_KEY = process.env.DEEPSEEK_API_KEY

const llm = new OpenAI({
  baseURL: 'https://api.deepseek.com',
  apiKey: DEEPSEEK_API_KEY,
})

const response = await this.llm.chat.completions.create({
  messages: [{ role: 'user', content: 'hi, how are you' }],
  model: 'deepseek-chat',
  tools: this.tools,
})

console.log(response.choices[0].message.content)
如果有问题,可参考 Deepseek API 文档去修改和调试 api-docs.deepseek.com/
创建 MCPClient class
创建 class ,并初始化 mcp llm transport tools ,后面会继续扩展方法,赋值属性。
ts
import { Client } from '@modelcontextprotocol/sdk/client/index.js'
import { StdioClientTransport } from '@modelcontextprotocol/sdk/client/stdio.js'

class MCPClient {
  private mcp: Client
  private llm: OpenAI
  private transport: StdioClientTransport | null = null
  private tools = []

  constructor() {
    this.llm = new OpenAI({
      baseURL: 'https://api.deepseek.com',
      apiKey: DEEPSEEK_API_KEY,
    })
    this.mcp = new Client({ name: 'mcp-client-cli', version: '1.0.0' })
  }

  // other methods, TODO...
}
连接 MCP Server
为上面的 class 扩展一个方法 connectToServer 代码如下
ts
  async connectToServer(serverScriptPath: string) {
    try {
      const isJs = serverScriptPath.endsWith('.js')
      const isPy = serverScriptPath.endsWith('.py')
      if (!isJs && !isPy) {
        throw new Error('Server script must be a .js or .py file')
      }
      const command = isPy
        ? process.platform === 'win32'
          ? 'python'
          : 'python3'
        : process.execPath
      this.transport = new StdioClientTransport({
        command,
        args: [serverScriptPath],
      })
      await this.mcp.connect(this.transport) // Connect to the MCP server
      const toolsResult = await this.mcp.listTools()
      // @ts-ignore
      this.tools = toolsResult.tools.map((tool) => {
        // return {
        //   name: tool.name,
        //   description: tool.description,
        //   input_schema: tool.inputSchema,
        // }

        // deepseek tools 格式不一样:1. 需要 type ; 2. 参数用 parameters
        return {
          type: 'function',
          function: {
            name: tool.name,
            description: tool.description,
            parameters: tool.inputSchema,
          },
        }
      })
      console.log(
        'Connected to server with tools:',
        this.tools.map(({ function: { name } }) => name)
      )
      // console.log('tools: ', JSON.stringify(this.tools, null, 2))
    } catch (e) {
      console.log('Failed to connect to MCP server: ', e)
      throw e
    }
  }
注意,MCP 官网文档中,赋值 this.tools 是这样的格式 { name, description, input_schema }
ts
      this.tools = toolsResult.tools.map((tool) => {
        return {
          name: tool.name,
          description: tool.description,
          input_schema: tool.inputSchema,
        }
      })
而使用 Deepseek 时 tools 格式是不一样的,可参考文档,它外层多了 type 和 function 两个属性,内部的参数使用 properties
python
tools = [
    {
        "type": "function",
        "function": {
            "name": "get_weather",
            "description": "Get weather of an location, the user shoud supply a location first",
            "parameters": {
                "type": "object",
                "properties": {
                    "location": {
                        "type": "string",
                        "description": "The city and state, e.g. San Francisco, CA",
                    }
                },
                "required": ["location"]
            },
        }
    },
]
所以,我们的代码中赋值 this.tools 需要参考 Deepseek tools 格式进行修改,代码如下
ts
      this.tools = toolsResult.tools.map((tool) => {
        // return {
        //   name: tool.name,
        //   description: tool.description,
        //   input_schema: tool.inputSchema,
        // }

        // deepseek tools 格式不一样:1. 需要 type function ; 2. 参数用 parameters
        return {
          type: 'function',
          function: {
            name: tool.name,
            description: tool.description,
            parameters: tool.inputSchema,
          },
        }
      })
执行查询
在 class 中继续添加函数 processQuery ,在这里将执行 llm 查询和 MCP server 查询,主要流程是
- 根据用户输入,并携带 tools , 调用 AI 接口
- AI 返回结果,可能会返回 tool_call 即要求去调用 MCP server tool (如 weather
get_forecast) - 调用 MCP server tool 返回结果,如天气信息
- 拿 tool 返回的结果,作为 messages 继续调用 AI 接口 (因为 tool 返回结果可能是一堆 JSON 人不易读)
- AI 返回结果,显示给用户
所以这个流程整体是比较麻烦的,需要来回几次调用,尤其是 tools 多的情况下,需要循环并行调用。耗费时间,还耗费你的 token
ts
  async processQuery(query: string) {
    // console.log('processQuery... ', query)

    const messages = [
      {
        role: 'user',
        content: query,
      },
    ]
    const response = await this.llm.chat.completions.create({
      // @ts-ignore
      messages,
      model: 'deepseek-chat',
      tools: this.tools,
    })
    // console.log('llm call end...')

    const finalText = []

    for (const choice of response.choices) {
      // console.log('choice: ', choice)
      if (choice.message.content) {
        finalText.push(choice.message.content)
      }
      if (choice.message.tool_calls && choice.message.tool_calls.length > 0) {
        for (const toolCall of choice.message.tool_calls) {
          const toolName = toolCall.function.name
          const toolArgs = JSON.parse(toolCall.function.arguments)

          const toolCallInfo = `[Calling tool ${toolName} with args ${JSON.stringify(
            toolArgs
          )}]`
          console.log('toolCallInfo: ', toolCallInfo)
          finalText.push(toolCallInfo)

          // Call the tool with the arguments
          const result = await this.mcp.callTool({
            name: toolName,
            arguments: toolArgs,
          })
          // console.log('Tool call result: ', result)

          messages.push({
            role: 'user',
            content: result.content as string,
          })

          // call llm again with the result of the tool call
          const toolResponse = await this.llm.chat.completions.create({
            // @ts-ignore
            messages,
            model: 'deepseek-chat',
            // no tools here, as we already called the tool
          })
          if (toolResponse.choices.length > 0) {
            const toolChoice = toolResponse.choices[0]
            if (toolChoice.message.content) {
              // console.log(
              //   'Tool response content.... ',
              //   toolChoice.message.content
              // )
              finalText.push(toolChoice.message.content)
            }
          }
        }
      }
    }

    return finalText.join('\n')
  }
这里需要注意,使用 Deepseek API 时返回格式和 Claude API 不一样,可以参考下面的注视
yaml
    // deepseek API 返回格式
    for (const choice of response.choices) {
      // 回复文本 { message: { content: 'xxx', role: 'assistant' } }
      // 回复 tool_call { message: { content: '', role: 'assistant', tool_calls: [ [Object] ] } }

      /** tool_calls 内部格式如下:
       [
          {
            index: 0,
            id: 'call_0_3e990a6f-3f90-4136-97f5-57865cf31df7',
            type: 'function',
            function: { name: 'get_forecast', arguments: '{"latitude":37.7749,"longitude":-122.4194}' }
          }
       ]
       */

      console.log('choice: ', choice)
    }
用户交互
在 class 中继续增加两个方法 chatLoop 和 cleanup。可以让用户在控制台输入内容,方便交互。
ts
import readline from 'readline/promises'

  async chatLoop() {
    const rl = readline.createInterface({
      input: process.stdin,
      output: process.stdout,
    })

    try {
      console.log('\nMCP Client Started!')
      console.log("Type your queries or 'quit' to exit.")

      while (true) {
        const message = await rl.question('\nQuery: ')
        if (message.toLowerCase() === 'quit') {
          break
        }
        const response = await this.processQuery(message)
        console.log('\n' + response)
      }
    } finally {
      rl.close()
    }
  }

  async cleanup() {
    await this.mcp.close()
  }
启动 MCP Client
在 class 之外定义 main 方法,初始化实例并连接到 MCP 服务器,开始和用户交互。
ts
async function main() {
  if (process.argv.length < 3) {
    console.log('Usage: node build/index.ts <path_to_server_script>')
    return
  }
  const mcpClient = new MCPClient()
  try {
    await mcpClient.connectToServer(process.argv[2]) // 第二个参数 MCP server 路径
    await mcpClient.chatLoop()
  } finally {
    await mcpClient.cleanup()
    process.exit(0)
  }
}
main()
执行 npm run build 构建出代码在 build/index.js ,然后执行
sh
## 第二个参数是 MPC server 路径
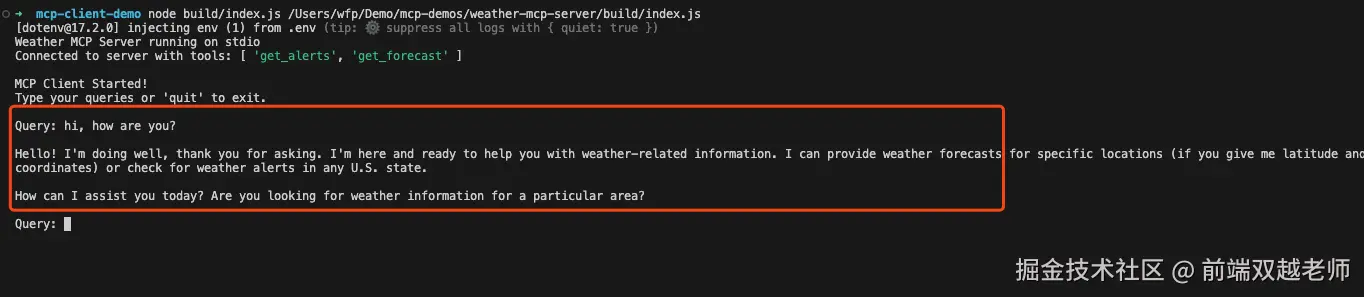
node build/index.js /ABSOLUTE/PATH/TO/PARENT/FOLDER/weather/build/index.js启动以后可以看到控制台显示了 MCP server 已经运行,且 Client 得到了两个 tools get_alerts get_forecast 。此时等待用户输入。

测试 MCP Client 和 Server
输入一个普通的问题 how are you 可以很快得到 AI 的回复
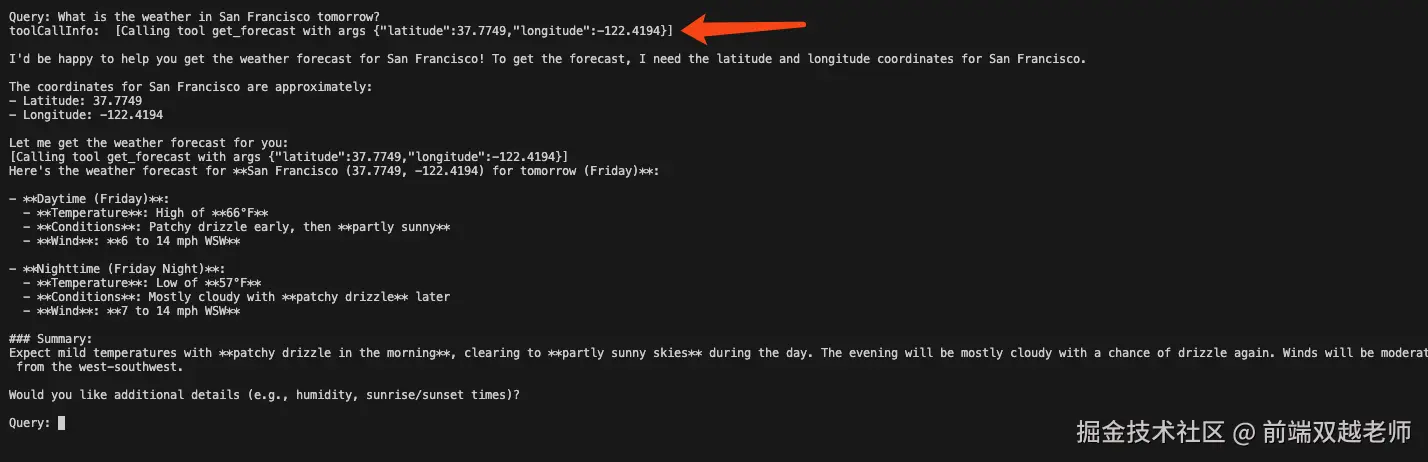
继续输入一个关于天气的问题 What is the weather in San Francisco tomorrow?
它要求去调用 MCP server tool get_forecast 并且它计算出了 San Francisco 的经纬度坐标,因为在定义 get_forecast 时需要的参数就是 latitude 和 longitude 。忘记的回上文查代码。
vbnet
toolCallInfo: [Calling tool get_forecast with args {"latitude":37.7749,"longitude":-122.4194}]经过 MCP server tool 查询,再经过 AI 重新处理信息,最终返回人类可读的信息。
最后
大家可以看到 AI 调用 MCP server 是非常麻烦的一个过程,而且你需要把所有 tools 都携带,所以如果滥用 MCP 会大量消耗 token 且降低 AI 查询效率。这个问题目前还没有太好的解决方法,我会继续关注。
我最近整理了一些 AI Agent 开发相关资料,有兴趣的同学可加入讨论