1.简介
SpringBoot 项目初始化时就有 NoSQL 选项 Spring Data Elasticsearch(Access+Driver) 此时 pom 文件里引入的依赖是 spring-boot-starter-data-elasticsearch 它的版本受到 springboot 版本的限制,不能自由选择对应的 ES 版本。
 还有另一个选择就是 Jest,以下是 官网 的介绍:
  简单说就是:ES 有 Java API 但是没有 Http Rest interface,Jest 就是它的 HTTP Client。
2.依赖
xml
<!-- https://mvnrepository.com/artifact/io.searchbox/jest -->
<dependency>
	<groupId>io.searchbox</groupId>
	<artifactId>jest</artifactId>
	<version>6.3.1</version>
</dependency>
3.配置
yaml
spring:
  elasticsearch:
    jest:
      uris: http://localhost:9200
4.使用
(1)创建客户端【官网代码】
java
// Construct a new Jest client according to configuration via factory
 JestClientFactory factory = new JestClientFactory();
 factory.setHttpClientConfig(new HttpClientConfig
                        .Builder("http://localhost:9200")
                        .multiThreaded(true)
			//Per default this implementation will create no more than 2 concurrent connections per given route
			.defaultMaxTotalConnectionPerRoute(<YOUR_DESIRED_LEVEL_OF_CONCURRENCY_PER_ROUTE>)
			// and no more 20 connections in total
			.maxTotalConnection(<YOUR_DESIRED_LEVEL_OF_CONCURRENCY_TOTAL>)
                        .build());
 JestClient client = factory.getObject();
(2)直接注入【配置文件进行参数配置】
java
    @Autowired
    JestClient jestClient;
5.测试源码
(1)创建索引
java
@SpringBootTest
class EsJestApplicationTests {
    @Autowired
    JestClient jestClient;
    @Test
    void createIndex() {
        // 创建对象
        User user = User.builder().id(1001).name("1号用户").age(22).build();
        // 创建索引
        Index index = new Index.Builder(user).index("user").type("name").build();
        // 执行创建方法
        try {
            jestClient.execute(index);
        } catch (IOException e) {
            e.printStackTrace();
        }
    }
}
创建成功: 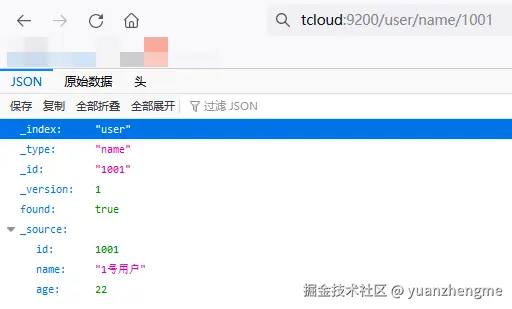 (2)查询索引【注入等代码不再贴出 只贴出方法】
java
    @Test
    void queryIndex(){
        // 查询语句【可以在HiJson工具里编辑】
        String queryJson = "{\n" +
                "    \"query\": {\n" +
                "        \"match\": {\n" +
                "            \"name\": \"1号\"\n" +
                "        }\n" +
                "    }\n" +
                "}";
        // 创建查询
        Search search = new Search.Builder(queryJson).addIndex("user").addType("name").build();
        // 执行查询方法
        try {
            SearchResult result = jestClient.execute(search);
            System.out.println(result.toString());
        } catch (IOException e) {
            e.printStackTrace();
        }
    }
输出结果【这里简单换个行 避免格式化后占较大篇幅】:
java
Result:
{"took":47,"timed_out":false,
"_shards":{"total":5,"successful":5,"skipped":0,"failed":0},
"hits":{"total":1,"max_score":0.5753642,
"hits":[
{"_index":"user","_type":"name","_id":"1001","_score":0.5753642,
"_source":{"id":1001,"name":"1号用户","age":22}
}]}},
isSucceeded: true,
response code: 200,
error message: null
(3)更新索引【特别注意:更新语句官网给出的无法使用】
java
    @Test
    void updateIndex() {
        // 更新语句【可以在HiJson工具里编辑】
        String script = "{\n" +
                "    \"script\": {\n" +
                "        \"inline\": \"ctx._source.name += params.nameInfo\",\n" +
                "        \"params\": {\n" +
                "            \"new_nameInfo\": \"(懂事长)\"\n" +
                "        }\n" +
                "    }\n" +
                "}";
        // 创建更新
        Update update = new Update.Builder(script).index("user").type("name").id("1001").build();
        // 执行更新方法
        try {
            DocumentResult result = jestClient.execute(update);
            System.out.println(result.toString());
        } catch (IOException e) {
            e.printStackTrace();
        }
    }
输出结果:
java
Result: {"_index":"user","_type":"name","_id":"1001","_version":3,"result":"updated",
"_shards":{"total":2,"successful":1,"failed":0},"_seq_no":2,"_primary_term":1},
isSucceeded: true,
response code: 200,
error message: null
页面查看:  (4)删除索引
java
    @Test
    void deleteIndex() {
        // 创建删除
        Delete delete = new Delete.Builder("1001").index("user").type("name").build();
        // 执行删除方法
        try {
            DocumentResult result = jestClient.execute(delete);
            System.out.println(result);
        } catch (IOException e) {
            e.printStackTrace();
        }
    }
输出结果:
java
Result: {"_index":"user","_type":"name","_id":"1001","_version":4,"result":"deleted",
"_shards":{"total":2,"successful":1,"failed":0},"_seq_no":3,"_primary_term":1},
isSucceeded: true,
response code: 200,
error message: null
6.小小的总结
本文介绍了在SpringBoot项目中集成Jest客户端操作ElasticSearch的方法。相比Spring Data Elasticsearch受限的版本依赖,Jest作为ES的HTTP Rest客户端提供了更灵活的版本选择。文章详细说明了Jest的依赖配置、参数设置方式,并通过测试案例演示了索引的增删改查操作。其中特别指出更新操作时官网示例不可用,需要调整脚本语法。测试结果展示了各操作的成功响应信息,包括创建索引、条件查询、数据更新和删除索引等功能实现,为开发者提供了完整的Jest客户端使用参考。
使用 Jest 的灵活性明显要比 Java api 要高,我们可以将增删改查的创建过程进行封装,输入参数获取解析后的结果。