前言
本文主要介绍IOC(控制反转)容器与DI(依赖注入)的Typescript实现,如何解决多应用实例下的隔离问题。
如果一个应用极度复杂(多模块/多实例/多事件/多交互/多流程),那么使用DDD设计模式+事件驱动,可能是最优解,而该设计底层必须要实现IOC容器。而web端业务常常会出现多应用实例场景,比如页面上有两个Tab页签或弹窗,其内部分别是两个独立的完整应用。这就必须要求实现IOC容器的隔离。
IOC容器隔离的两种实现思路
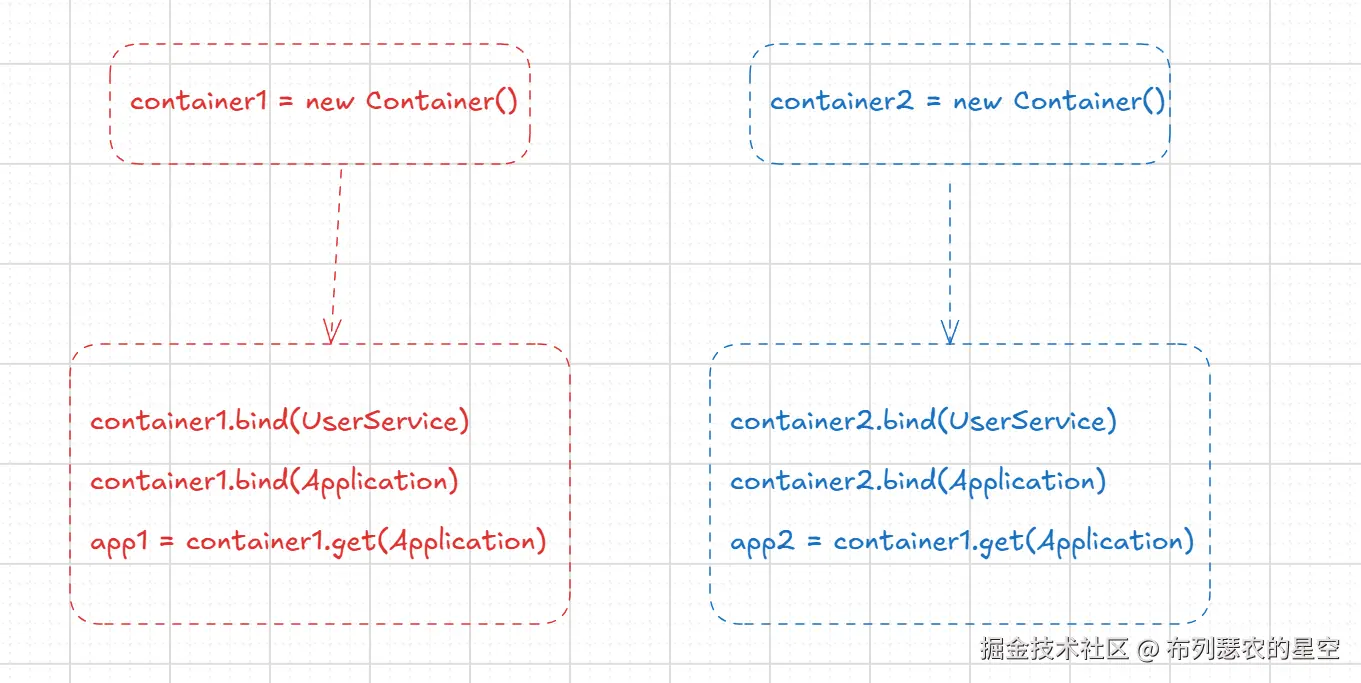
容器隔离的核心问题是,如何在构造实例时,将该实例放入对应的IOC容器。对应的思路有两种:
- 先在全局创建不同容器,再通过该容器注册应用内的类

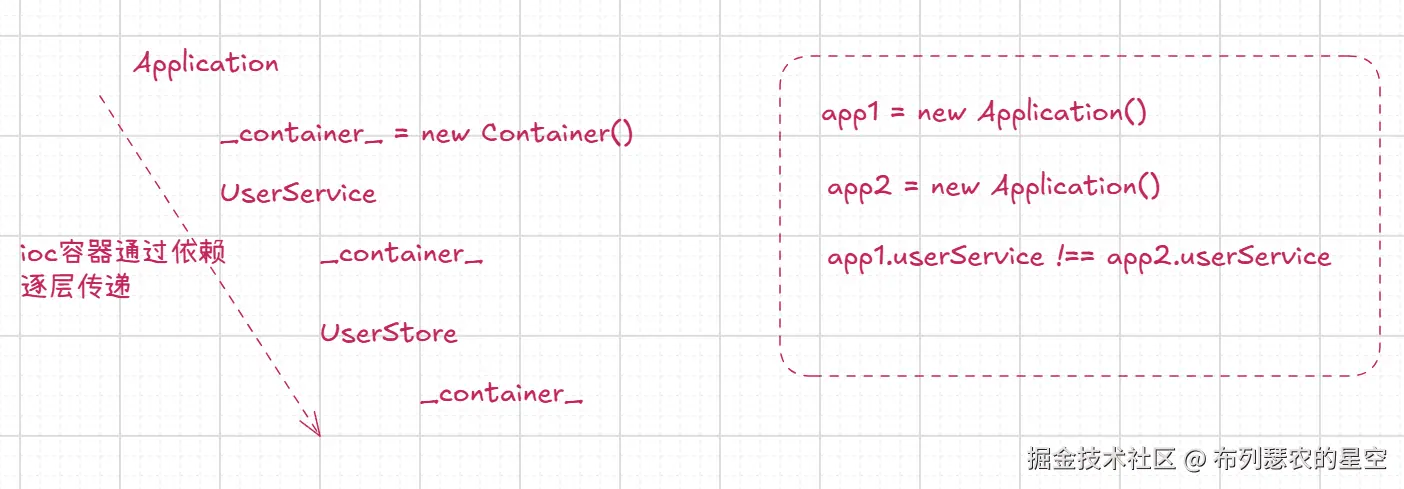
- 创建不同应用时,对该应用创建不同容器,逐层构造注入的依赖实例的同时,也对该实例注入容器。

方案1的实现可以参考社区优秀开源方案:inversify。不过方案2更符合直觉,本文也主要介绍方案2的实现。
单例/多例与IOC容器隔离
IOC容器隔离,也就是两个应用之间各自创建自己的实例对象,这些对象共处同一IOC容器中,但仍然要保持全局对象的单例性。同时应用内也需要支持某些class是多例的。
比如下面例子中,DB对象全局唯一,而Store对象在应用内多例,EventBus与TaskService/UserService应用内单例,
typescript
@Scoped(Scope.Global)
@Injectable()
class DB {
  constructor() {
    console.log("db");
  }
}

@Scoped(Scope.Transient)
@Injectable()
class Store {
  constructor() {
    console.log("store");
  }
}
@Scoped(Scope.Singleton)
@Injectable()
class EventBus {
  constructor() {
    console.log("event bus");
  }
  emit() {
    console.log("emit");
  }
}
@Injectable()
class TaskService {
  @Inject() store!: Store;
  @Inject() eventBus!: EventBus;
  constructor() {
    console.log("task service");
  }
  save() {
    console.log("save Task");
  }
}
@Injectable()
class UserService {
  @Inject() store!: Store;
  @Inject() eventBus!: EventBus;
  constructor() {
    console.log("user service");
  }
  save() {
    console.log("save user ");
  }
}
最终要实现的依赖注入方式和预期效果如下:
typescript
@App()
class Application {
  @Inject() userService!: UserService;
  @Inject() taskService!: TaskService;
  @Context() context!: IoCContainer;
  @Inject() db!: DB;
  constructor() {}
}
const app1 = new Application();
const app2 = new Application();

console.log(
  app1.db === app2.db, //true,全局单例
  app1.context instanceof IoCContainer, //true 注入context
  app1 === app2, //false 应用间实例隔离
  app1.context === app2.context, //false 应用上下文隔离
  app1.userService === app2.userService, // false应用隔离
  app1.taskService === app2.taskService, // false应用隔离
  Reflect.get(app1.taskService, CONTEXT_KEY) &&
    Reflect.get(app1.taskService, CONTEXT_KEY) ===
      Reflect.get(app1.userService, CONTEXT_KEY), //true 同应用上下文
  app1.userService.eventBus === app2.userService.eventBus, //false 应用单例
  app1.userService.eventBus === app1.taskService.eventBus, //true 应用单例
  app1.userService.store === app1.taskService.store //false 多例
);
App注解实现
App注解最重要的任务是,创建IOC容器并挂到实例上。
typescript
const CONTEXT_KEY = Symbol("CONTEXT");
export function App() {
  return function <T extends { new (...args: any[]): {} }>(constructor: T) {
    // 创建一个继承自原类的新类
    return class extends constructor {
      constructor(...args: any[]) {
        super(...args);
        const context = new IoCContainer();
        (this as any)[CONTEXT_KEY] = context;
        Reflect.defineProperty(this, CONTEXT_KEY, {
          value: context,
          writable: false,
          enumerable: false,
        });
      }
    };
  };
}
该属性默认隐藏,不过可以使用@Context注解显示声明需要使用该属性
typescript
function Context(): PropertyDecorator {
  return (target: any, propertyKey: string | symbol) => {
    Object.defineProperty(target, propertyKey, {
      get() {
        return this[CONTEXT_KEY];
      },
      enumerable: true,
      configurable: false,
    });
  };
}
IOCContainer实现
createInstance方法会解析inject注解,创建对应实例。
该实现关键点在89行,创建实例的时候将容器自身注入到该实例内,以实现容器的逐层传递。
typescript
export class IoCContainer {
  static classRegistry = new Map<string, Constructor>();
  static registClass(key: string, value: Constructor) {
    this.classRegistry.set(key, value);
  }
  static instances = new Map<string, any>();
  static resolve<T extends Object>(
    ctor: Constructor<T>,
    ...args: ConstructorParameters<Constructor<T>>
  ): T {
   //此处省略
  }
  static createInstance<T extends Object>(
    ctor: Constructor<T>,
    ...args: ConstructorParameters<Constructor<T>>
  ): T {

    const scope: Scope = Reflect.getMetadata(SCOPE_METADATA_KEY, ctor);
    if (scope !== Scope.Global) {
      console.warn("IOC 全局对象声明异常");
    }
    //参考实例上的createInstance,此处实现省略
  }
  private instances = new Map<string, any>(); // 每个容器有自己的实例存储

  resolve<T extends Object>(
    ctor: Constructor<T>,
    ...args: ConstructorParameters<Constructor<T>>
  ): T {
    const scope: Scope =
      Reflect.getMetadata(SCOPE_METADATA_KEY, ctor) || Scope.Singleton;

    switch (scope) {
      case Scope.Global: {
        if (!IoCContainer.instances.has(ctor.name)) {
          IoCContainer.instances.set(
            ctor.name,
            IoCContainer.createInstance(ctor, ...args)
          );
        }
        return IoCContainer.instances.get(ctor.name);
      }
      case Scope.Singleton: {
        if (!this.instances.has(ctor.name)) {
          this.instances.set(ctor.name, this.createInstance(ctor, ...args));
        }
        return this.instances.get(ctor.name);
      }
      case Scope.Transient:
      default: {
        return this.createInstance(ctor, ...args);
      }
    }
  }

  private createInstance<T extends Object>(
    ctor: Constructor<T>,
    ...args: ConstructorParameters<Constructor<T>>
  ): T {

    const instance = new ctor(...args);
    const propMetadata =
      Reflect.getMetadata(INJECT_METADATA_KEY, ctor.prototype) || [];
    for (const { propertyKey, token } of propMetadata) {
    //处理inject注解,此处需要先校验该依赖是否标记了injectable,这里省略
      const dependency = this.resolve(token);
      Reflect.defineProperty(instance, propertyKey, {
        value: dependency,
        writable: false,
      });
    }
    //这里注入ioc容器
    Reflect.defineProperty(instance, CONTEXT_KEY, {
      value: this,
      writable: false,
    });
    return instance;
  }
}
Injectable和Inject实现
Injectable仅作标记,Inject在所属实例运行时,会通过getter按需引用或创建依赖对象。由于类装饰器顺序在属性装饰器之前,此处无法在创建实例的同时,创建依赖实例,只能通过getter按需创建。
typescript
// @Injectable 装饰器(可选,与 @Scope 结合使用)
function Injectable() {
  return function <T>(target: Constructor<T>) {
    Reflect.defineMetadata(INJECTABLE_METADATA_KEY, true, target);
    IoCContainer.registClass(target.name, target);
  };
}

// Inject 装饰器:通过属性的类型自动注入实例
function Inject(): PropertyDecorator {
  return (target: any, propertyKey: string | symbol) => {
    // 获取属性的类型 (通过 reflect-metadata 提供的元数据)
    const type = Reflect.getMetadata("design:type", target, propertyKey);

    if (!type) {
      throw new Error(`IOC 无法解析 ${String(propertyKey)}`);
    }

    const getter = function (this: { [CONTEXT_KEY]: IoCContainer }) {
      if (!this[CONTEXT_KEY]) {
        console.error("未注入app context", this);
      }
      return (this[CONTEXT_KEY] || IoCContainer)?.resolve(type);
    }; // 使用类名作为标识符
    Reflect.defineProperty(target, propertyKey, {
      get: getter,
      enumerable: true,
      configurable: true,
    });
  };
}