Docker swarm
如何实现 Service 伸缩(续)
默认配置下 manager node 也是 worker node,所以 swarm-manager 上也运行了副本。如果不希望在 manager 上运行 service,可以执行如下命令:
bash
[root@swarm-manager ~]# docker node update --availability drain swarm-manager
swarm-manager
[root@swarm-manager ~]# docker node ls
ID                            HOSTNAME        STATUS    AVAILABILITY   MANAGER STATUS   ENGINE VERSION
t2wuubtvlwx0qngw3qi6kp6zc *   swarm-manager   Ready     Drain          Leader           26.1.3
m8w1ijonr4jrp006rg5o7fgft     swarm-worker1   Ready     Active                          26.1.3
qiw3ydp7o20a65rlfare0g0a8     swarm-worker2   Ready     Active                          26.1.3

# Drain 表示 swarm-manager 已经不负责运行 service
bash
[root@swarm-manager ~]# docker service ps web_server
scale down,减少副本数
bash
[root@swarm-manager ~]# docker service scale web_server=3
web_server scaled to 3
overall progress: 3 out of 3 tasks
1/3:
2/3: running   [==================================================>]
3/3:
verify: Service web_server converged
[root@swarm-manager ~]# docker service ls
ID             NAME         MODE         REPLICAS   IMAGE          PORTS
jmtb8n27v4u1   web_server   replicated   3/3        httpd:latest
[root@swarm-manager ~]# docker service ps web_server
web_server.4 和 web_server.5 这两个副本已经被删除了。
Swarm 如何实现 Failover
故障迁移
测试 swarm 的 failover 特性,关闭 swarm-worker1
bash
[root@swarm-worker1 ~]# shutdown nowSwarm 会检测到 swarm-worker1 的故障,并标记为 Down。
bash
[root@swarm-manager ~]# docker node ls
ID                            HOSTNAME        STATUS    AVAILABILITY   MANAGER STATUS   ENGINE VERSION
t2wuubtvlwx0qngw3qi6kp6zc *   swarm-manager   Ready     Drain          Leader           26.1.3
m8w1ijonr4jrp006rg5o7fgft     swarm-worker1   Down      Active                          26.1.3
qiw3ydp7o20a65rlfare0g0a8     swarm-worker2   Ready     Active                          26.1.3
Swarm 会将 swarm-worker1 上的副本调度到其他可用节点。我们可以通过 docker service ps 观察 这个 failover 过程。
bash
[root@swarm-manager ~]# docker service ps web_server
可以看到, web_server.2 已经从 swarm-worker1 迁移到了 swarm-worker2,之前运行在故障节点 swarm-worker1 上的副本状态被标记为 Shutdown 。
如何访问 Service
重新部署web_server
bash
[root@swarm-manager ~]# docker service rm web_server
web_server
[root@swarm-manager ~]# docker node ls
ID                            HOSTNAME        STATUS    AVAILABILITY   MANAGER STATUS   ENGINE VERSION
t2wuubtvlwx0qngw3qi6kp6zc *   swarm-manager   Ready     Drain          Leader           26.1.3
m8w1ijonr4jrp006rg5o7fgft     swarm-worker1   Ready     Active                          26.1.3
qiw3ydp7o20a65rlfare0g0a8     swarm-worker2   Ready     Active                          26.1.3
[root@swarm-manager ~]# docker service create --name web_server --replicas=2 httpd
cxu3lbxvh42nok2nncpg3om37
overall progress: 2 out of 2 tasks
1/2: running   [==================================================>]
2/2: running   [==================================================>]
verify: Service cxu3lbxvh42nok2nncpg3om37 converged

[root@swarm-manager ~]# docker service ps web_server
bash
# worker1的网络配置
[root@swarm-worker1 ~]# docker ps
CONTAINER ID   IMAGE          COMMAND              CREATED         STATUS         PORTS     NAMES
14d5448d32cf   httpd:latest   "httpd-foreground"   8 minutes ago   Up 8 minutes   80/tcp    web_server.1.cxy5klqd2n4bhrbc1t0a3n9yj

# 查看容器ip
[root@swarm-worker1 ~]# docker inspect web_server.1.cxy5klqd2n4bhrbc1t0a3n9yj
......
"Networks": {
                "bridge": {
                    "IPAMConfig": null,
                    "Links": null,
                    "Aliases": null,
                    "MacAddress": "02:42:ac:11:00:02",
                    "NetworkID": "ef4f7982d0c5cc5a89cda53204ce6018ad44da9f797a250ff7889d3a54101939",
                    "EndpointID": "bff65265ec804677b5675a2f4c9673f137ff56112f85010f673c8902578709c0",
                    "Gateway": "172.17.0.1",
                    "IPAddress": "172.17.0.2",
......
容器 IP 为 172.17.0.2 ,实际上连接的是 Docker 默认 bridge 网络。
bash
# 可以直接在 swarm-worker1 上访问容器的 http 服务。
[root@swarm-worker1 ~]# curl 172.17.0.2
<html><body><h1>It works!</h1></body></html>
但这样的访问也仅仅是容器层面的访问,服务并没有暴露给外部网络,只能在 Docker 主机上访问。换句 话说,当前配置下,我们无法访问 service web_server。
从外部访问 service
bash
# 要将 service 暴露到外部,方法其实很简单,执行下面的命令:
[root@swarm-manager ~]# docker service update --publish-add 8080:80 web_server
web_server
overall progress: 2 out of 2 tasks
1/2: running   [==================================================>]
2/2: running   [==================================================>]
verify: Service web_server converged


# 如果是新建 service,可以直接用使用 --publish 参数
[root@swarm-manager ~]#  docker service create --name web_server --publish 8080:80 --replicas=2 httpd
测试访问
容器在 80 端口上监听 http 请求, --publish-add 8080:80 将容器的 80 映射到主机的 8080 端口,这 样外部网络就能访问到 service 了。
bash
[root@swarm-manager ~]# curl http://192.168.108.30:8080
<html><body><h1>It works!</h1></body></html>
[root@swarm-manager ~]# curl http://192.168.108.31:8080
<html><body><h1>It works!</h1></body></html>
[root@swarm-manager ~]# curl http://192.168.108.32:8080
<html><body><h1>It works!</h1></body></html>
容器管理工具Containerd
Containerd介绍
Containerd 架构
架构图
Containerd 为嵌入 Kubernetes 而设计,是工业级容器运行时,不直接供开发人员和终端用户使用,避免与 Docker 竞争。实际上,它已实现多数容器管理功能,如容器生命周期管理、镜像传输和管理、存储与网络管理等。
Containerd 采用标准 C/S 架构:
- 服务端通过 GRPC 协议提供稳定 API。
- 客户端通过调用服务端 API 进行高级操作。
为实现解耦,Containerd 将不同职责分给不同组件,每个组件相当于子系统,连接子系统的组件称为模块。
Containerd 两大子系统: - Bundle:包含配置、元数据和根文件系统数据,可理解为容器的文件系统,该子系统允许用户从镜像中提取和打包 Bundles。
- Runtime:用于执行 Bundles,如创建容器。
每个子系统的行为由一个或多个模块协作完成(架构图中 Core 部分),每种类型的模块以插件形式集成,且插件间相互依赖。例如,长虚线方框表示 Service Plugin、Metadata Plugin 等类型插件,Service Plugin 依赖 Metadata Plugin、GC Plugin 和 Runtime Plugin;小方框表示细分插件,如 Metadata Plugin 依赖 Containers Plugin、Content Plugin 等。
常用插件
- Content Plugin:提供对镜像中可寻址内容的访问,所有不可变内容存储于此。
- Snapshot Plugin:管理容器镜像的文件系统快照,镜像的每个 layer 会被解压为文件系统快照,类似 Docker 中的 graphdriver。
- Metrics:暴露各个组件的监控指标。
架构缩略图
Containerd 分为三大块:Storage、Metadata 和 Runtime。
与其它容器运行时工具性能对比
使用 bucketbench 对 Docker、crio 和 Containerd 进行性能测试,测试启动、停止和删除容器所耗时间。结果显示,Containerd 在各方面表现良好,总体性能优于 Docker 和 crio。
Containerd安装
方法一:yum安装
安装工具
bash
[root@localhost ~]# yum install -y yum-utils device-mapper-persistent-data lvm2 vim 安装Containerd
bash
# 获取阿里云YUM源
[root@localhost yum.repos.d]# yum-config-manager --add-repo https://mirrors.aliyun.com/docker-ce/linux/centos/docker-ce.repo
Adding repo from: https://mirrors.aliyun.com/docker-ce/linux/centos/docker-ce.repo

[root@localhost yum.repos.d]# yum clean all
13 files removed
[root@localhost yum.repos.d]# yum makecache

# 查看YUM源中Containerd软件
[root@localhost yum.repos.d]# yum list | grep containerd
containerd.io.x86_64                                   1.6.32-3.1.el8                                        docker-ce-stable

# 安装Containerd.io软件,即可安装Containerd
[root@localhost ~]# yum -y install containerd.io

# 检查是否安装
[root@localhost ~]# rpm -qa | grep containerd
containerd.io-1.6.32-3.1.el8.x86_64

# 设置containerd服务启动及开机自启动
[root@localhost ~]# systemctl enable containerd --now
Created symlink /etc/systemd/system/multi-user.target.wants/containerd.service → /usr/lib/systemd/system/containerd.service.
[root@localhost ~]# systemctl status containerd

# 验证
[root@localhost ~]# ctr version
Client:
  Version:  1.6.32
  Revision: 8b3b7ca2e5ce38e8f31a34f35b2b68ceb8470d89
  Go version: go1.21.10

Server:
  Version:  1.6.32
  Revision: 8b3b7ca2e5ce38e8f31a34f35b2b68ceb8470d89
  UUID: 435c778f-f1d1-44c8-bc8b-dab5019d6ccf
方法二:二进制安装
Containerd有两种安装包:
- 第一种是containerd-xxx,这种包用于单机测试没问题,不包含runC,需要提前安装。
- 第二种是cri-containerd-cni-xxxx,包含runc和k8s里的所需要的相关文件。k8s集群里需要用到此 包。虽然包含runC,但是依赖系统中的seccomp(安全计算模式,是一种限制容器调用系统资源的 模式。)
安装 Containerd
bash
# 下载安装包
wget https://github.com/containerd/containerd/releases/download/v1.6.32/cricontainerd-cni-1.6.32-linux-amd64.tar.gz

有现成的直接拖拽就可以
bash
# 安装containerd
[root@localhost ~]# mkdir containerd
[root@localhost ~]# tar xf cri-containerd-cni-1.6.32-linux-amd64.tar.gz -C containerd/
[root@localhost ~]# cd containerd/
[root@localhost containerd]# ls
cri-containerd.DEPRECATED.txt  etc  opt  usr
[root@localhost containerd]#

[root@localhost containerd]# tree
.
├── cri-containerd.DEPRECATED.txt
├── etc
│   ├── cni
│   │   └── net.d
│   │       └── 10-containerd-net.conflist
│   ├── crictl.yaml
│   └── systemd
│       └── system
│           └── containerd.service
├── opt
│   ├── cni
│   │   └── bin
│   │       ├── bandwidth
│   │       ├── bridge
│   │       ├── dhcp
│   │       ├── firewall
│   │       ├── host-device
│   │       ├── host-local
│   │       ├── ipvlan
│   │       ├── loopback
│   │       ├── macvlan
│   │       ├── portmap
│   │       ├── ptp
│   │       ├── sbr
│   │       ├── static
│   │       ├── tuning
│   │       ├── vlan
│   │       └── vrf
│   └── containerd
│       └── cluster
│           ├── gce
│           │   ├── cloud-init
│           │   │   ├── master.yaml
│           │   │   └── node.yaml
│           │   ├── cni.template
│           │   ├── configure.sh
│           │   └── env
│           └── version
└── usr
    └── local
        ├── bin
        │   ├── containerd
        │   ├── containerd-shim
        │   ├── containerd-shim-runc-v1
        │   ├── containerd-shim-runc-v2
        │   ├── containerd-stress
        │   ├── crictl
        │   ├── critest
        │   ├── ctd-decoder
        │   └── ctr
        └── sbin
            └── runc

16 directories, 36 files

#查看containerd.service文件,了解containerd文件安装位置
[root@localhost containerd]# cat etc/systemd/system/containerd.service
# Copyright The containerd Authors.
#
# Licensed under the Apache License, Version 2.0 (the "License");
# you may not use this file except in compliance with the License.
# You may obtain a copy of the License at
#
#     http://www.apache.org/licenses/LICENSE-2.0
#
# Unless required by applicable law or agreed to in writing, software
# distributed under the License is distributed on an "AS IS" BASIS,
# WITHOUT WARRANTIES OR CONDITIONS OF ANY KIND, either express or implied.
# See the License for the specific language governing permissions and
# limitations under the License.

[Unit]
Description=containerd container runtime
Documentation=https://containerd.io
After=network.target local-fs.target

[Service]
ExecStartPre=-/sbin/modprobe overlay
ExecStart=/usr/local/bin/containerd  # #查看此位置,把containerd二进制文件放置于此处即可完成安装。

Type=notify
Delegate=yes
KillMode=process
Restart=always
RestartSec=5
# Having non-zero Limit*s causes performance problems due to accounting overhead
# in the kernel. We recommend using cgroups to do container-local accounting.
LimitNPROC=infinity
LimitCORE=infinity
LimitNOFILE=infinity
# Comment TasksMax if your systemd version does not supports it.
# Only systemd 226 and above support this version.
TasksMax=infinity
OOMScoreAdjust=-999

[Install]
WantedBy=multi-user.target

# 复制containerd运行时文件至系统
[root@localhost containerd]# cp usr/local/bin/* /usr/local/bin

#添加containerd.service文件至系统
[root@localhost containerd]# cp etc/systemd/system/containerd.service /usr/lib/systemd/system/containerd.service

# 生成containerd模块配置文件,可以自定义一下配置,如有私有镜像仓库等,按需配置
[root@localhost containerd]# mkdir /etc/containerd
[root@localhost containerd]# containerd config default > /etc/containerd/config.toml
[root@localhost containerd]# cat /etc/containerd/config.toml

# 启动containerd并验证
[root@localhost containerd]# systemctl enable containerd --now
Created symlink /etc/systemd/system/multi-user.target.wants/containerd.service → /usr/lib/systemd/system/containerd.service.
[root@localhost containerd]# systemctl status containerd

[root@localhost containerd]# ctr version
Client:
  Version:  v1.6.32
  Revision: 8b3b7ca2e5ce38e8f31a34f35b2b68ceb8470d89
  Go version: go1.21.10

Server:
  Version:  v1.6.32
  Revision: 8b3b7ca2e5ce38e8f31a34f35b2b68ceb8470d89
  UUID: 424df75e-b805-4e24-9893-b3341d4c1f78
安装runC
由于二进制包中提供的runC默认需要系统中安装seccomp支持,需要单独安装,且不同版本runC对 seccomp版本要求一致,所以建议单独下载runC 二进制包进行安装,里面包含了seccomp模块支持 下载地址:https://github.com/opencontainers/runc/releases
bash
# 使用wget下载runc
[root@localhost ~]# wget https://github.com/opencontainers/runc/releases/download/v1.3.0/runc.amd64

# 安装runc
[root@localhost ~]# mv runc.amd64 /usr/sbin/runc

# 为runc添加可执行权限
[root@localhost ~]# chmod +x /usr/sbin/runc

# 使用runc命令验证是否安装成功
[root@localhost ~]# runc -v
runc version 1.3.0
commit: v1.3.0-0-g4ca628d1
spec: 1.2.1
go: go1.23.8
libseccomp: 2.5.6
Containerd容器镜像管理
查看镜像
bash
[root@localhost ~]# ctr images list
REF TYPE DIGEST SIZE PLATFORMS LABELS
[root@localhost ~]# ctr images ls
REF TYPE DIGEST SIZE PLATFORMS LABELS
下载镜像
containerd支持oci标准的镜像,所以可以直接使用docker官方或dockerfile构建的镜像
bash
[root@localhost ~]# ctr images pull 054b8ac70e8010d90f2ac00ef29e6580.mirror.swr.myhuaweicloud.com/library/nginx:latest

[root@localhost ~]# ctr image ls
REF                                                                                TYPE                                    DIGEST                                                                  SIZE     PLATFORMS                                                                                                               LABELS
054b8ac70e8010d90f2ac00ef29e6580.mirror.swr.myhuaweicloud.com/library/nginx:latest application/vnd.oci.image.index.v1+json sha256:d5f28ef21aabddd098f3dbc21fe5b7a7d7a184720bc07da0b6c9b9820e97f25e 69.0 MiB linux/386,linux/amd64,linux/arm/v5,linux/arm/v7,linux/arm64/v8,linux/mips64le,linux/ppc64le,linux/s390x,unknown/unknown -
镜像挂载
bash
[root@localhost ~]# ctr images mount 054b8ac70e8010d90f2ac00ef29e6580.mirror.swr.myhuaweicloud.com/library/nginx:latest /mnt
sha256:6d03e4aefb16ea9e0d73cacb9a9fcb8f7fb3a806c41606600cab179aa381550f
/mnt

[root@localhost ~]# ls /mnt
bin   docker-entrypoint.d   home   media  proc  sbin  tmp
boot  docker-entrypoint.sh  lib    mnt    root  srv   usr
dev   etc                   lib64  opt    run   sys   var

[root@localhost ~]# umount /mnt
[root@localhost ~]# ls /mnt
hgfs
镜像导出
bash
[root@localhost ~]# ctr i export --platform linux/amd64 nginx.img 054b8ac70e8010d90f2ac00ef29e6580.mirror.swr.myhuaweicloud.com/library/nginx:latest
[root@localhost ~]# ls
anaconda-ks.cfg  containerd  cri-containerd-cni-1.6.32-linux-amd64.tar.gz  nginx.img
镜像删除
bash
[root@localhost ~]# ctr image rm 054b8ac70e8010d90f2ac00ef29e6580.mirror.swr.myhuaweicloud.com/library/nginx:latest
054b8ac70e8010d90f2ac00ef29e6580.mirror.swr.myhuaweicloud.com/library/nginx:latest
[root@localhost ~]# ctr images ls
REF TYPE DIGEST SIZE PLATFORMS LABELS
镜像导入
bash
[root@localhost ~]# ctr images import --platform linux/amd64 nginx.img
unpacking 054b8ac70e8010d90f2ac00ef29e6580.mirror.swr.myhuaweicloud.com/library/nginx:latest (sha256:d5f28ef21aabddd098f3dbc21fe5b7a7d7a184720bc07da0b6c9b9820e97f25e)...done
[root@localhost ~]# ctr images ls
REF                                                                                TYPE                                    DIGEST                                                                  SIZE     PLATFORMS                                                                                                               LABELS
054b8ac70e8010d90f2ac00ef29e6580.mirror.swr.myhuaweicloud.com/library/nginx:latest application/vnd.oci.image.index.v1+json sha256:d5f28ef21aabddd098f3dbc21fe5b7a7d7a184720bc07da0b6c9b9820e97f25e 69.0 MiB linux/386,linux/amd64,linux/arm/v5,linux/arm/v7,linux/arm64/v8,linux/mips64le,linux/ppc64le,linux/s390x,unknown/unknown -
修改镜像tag
bash
[root@localhost ~]# ctr images tag 054b8ac70e8010d90f2ac00ef29e6580.mirror.swr.myhuaweicloud.com/library/nginx:latest nginx:latest
nginx:latest
[root@localhost ~]# ctr image ls
REF                                                                                TYPE                                    DIGEST                                                                  SIZE     PLATFORMS                                                                                                               LABELS
054b8ac70e8010d90f2ac00ef29e6580.mirror.swr.myhuaweicloud.com/library/nginx:latest application/vnd.oci.image.index.v1+json sha256:d5f28ef21aabddd098f3dbc21fe5b7a7d7a184720bc07da0b6c9b9820e97f25e 69.0 MiB linux/386,linux/amd64,linux/arm/v5,linux/arm/v7,linux/arm64/v8,linux/mips64le,linux/ppc64le,linux/s390x,unknown/unknown -
nginx:latest                                                                       application/vnd.oci.image.index.v1+json sha256:d5f28ef21aabddd098f3dbc21fe5b7a7d7a184720bc07da0b6c9b9820e97f25e 69.0 MiB linux/386,linux/amd64,linux/arm/v5,linux/arm/v7,linux/arm64/v8,linux/mips64le,linux/ppc64le,linux/s390x,unknown/unknown -
Containerd容器管理
bash
# 查看容器(container表示静态容器,可用c缩写代表container)
[root@localhost ~]# ctr container ls
CONTAINER    IMAGE    RUNTIME
[root@localhost ~]# ctr c ls
CONTAINER    IMAGE    RUNTIME

# 查看任务(task表示容器里跑的进程, 可用t缩写代表task)
[root@localhost ~]# ctr t ls
TASK    PID    STATUS
[root@localhost ~]# ctr task ls
TASK    PID    STATUS

# 创建静态容器
[root@localhost ~]# ctr container create nginx:latest nginx1
[root@localhost ~]# ctr c ls
CONTAINER    IMAGE           RUNTIME
nginx1       nginx:latest    io.containerd.runc.v2

[root@localhost ~]# ctr container info nginx1

# 静态容器启动为动态容器
[root@localhost ~]# ctr task start -d nginx1
[root@localhost ~]# ctr t ls
TASK      PID     STATUS
nginx1    1956    RUNNING
[root@localhost ~]# ps aux | grep 1956
root        1956  0.2  0.1  11476  7368 ?        Ss   14:13   0:00 nginx: master process nginx -g daemon off;
root        2009  0.0  0.0  12216  1096 pts/0    S+   14:13   0:00 grep --color=auto 1956

# 进入容器操作
[root@localhost ~]# ctr task exec --exec-id $RANDOM -t nginx1 /bin/sh
# ip a
/bin/sh: 1: ip: not found
# ls
bin   docker-entrypoint.d   home   media  proc  sbin  tmp
boot  docker-entrypoint.sh  lib    mnt    root  srv   usr
dev   etc                   lib64  opt    run   sys   var

# 直接运行一个动态容器
[root@localhost ~]# ctr run -d --net-host nginx:latest nginx2
[root@localhost ~]# ctr tasks ls
TASK      PID     STATUS
nginx1    1956    RUNNING
nginx2    2077    RUNNING

# 暂停容器
[root@localhost ~]# ctr tasks pause nginx2
[root@localhost ~]# ctr t ls
TASK      PID     STATUS
nginx1    1956    RUNNING
nginx2    2077    PAUSED

# 恢复容器
[root@localhost ~]# ctr t resume nginx2
[root@localhost ~]# ctr t ls
TASK      PID     STATUS
nginx2    2077    RUNNING
nginx1    1956    RUNNING

# 停止容器
[root@localhost ~]# ctr t kill nginx2
[root@localhost ~]# ctr t ls
TASK      PID     STATUS
nginx1    1956    RUNNING
nginx2    2077    STOPPED

# 删除容器
# 删除容器前要先停止容器再进行删除操作
[root@localhost ~]# ctr t delete nginx2
[root@localhost ~]# ctr t ls
TASK      PID     STATUS
nginx1    1956    RUNNING
## 查看静态容器,确认其还存在于系统中
[root@localhost ~]# ctr c ls
CONTAINER    IMAGE           RUNTIME
nginx1       nginx:latest    io.containerd.runc.v2
nginx2       nginx:latest    io.containerd.runc.v2
[root@localhost ~]# ctr c delete nginx2
[root@localhost ~]# ctr c ls
CONTAINER    IMAGE           RUNTIME
nginx1       nginx:latest    io.containerd.runc.v2

# ctr t delete → 停止并清理 "运行中的进程"
# ctr c delete → 彻底删除 "容器配置信息"
Containerd NameSpace管理
bash
# 列出已有namespace
[root@localhost ~]# ctr namespace ls
NAME    LABELS
default

# 创建namespace
[root@localhost ~]# ctr namespace create myns
[root@localhost ~]# ctr namespace create testns
[root@localhost ~]# ctr namespace ls
NAME    LABELS
default
myns
testns

# 删除namespace
[root@localhost ~]# ctr namespace rm testns
testns
[root@localhost ~]# ctr namespace ls
NAME    LABELS
default
myns

# 查看指定namespace中镜像
[root@localhost ~]# ctr -n myns images ls
REF TYPE DIGEST SIZE PLATFORMS LABELS
# 空的

# 查看指定namespace中是否有用户进程在运行
[root@localhost ~]# ctr -n myns tasks ls
TASK    PID    STATUS

# 在指定namespace中下载容器镜像
[root@localhost ~]# ctr -n myns images pull 054b8ac70e8010d90f2ac00ef29e6580.mirror.swr.myhuaweicloud.com/library/nginx:latest

[root@localhost ~]# ctr -n myns images ls
REF                                                                                TYPE                                    DIGEST                                                                  SIZE     PLATFORMS                                                                                                               LABELS
054b8ac70e8010d90f2ac00ef29e6580.mirror.swr.myhuaweicloud.com/library/nginx:latest application/vnd.oci.image.index.v1+json sha256:d5f28ef21aabddd098f3dbc21fe5b7a7d7a184720bc07da0b6c9b9820e97f25e 69.0 MiB linux/386,linux/amd64,linux/arm/v5,linux/arm/v7,linux/arm64/v8,linux/mips64le,linux/ppc64le,linux/s390x,unknown/unknown -

# 在指定namespace中创建静态容器
[root@localhost ~]# ctr -n myns container create 054b8ac70e8010d90f2ac00ef29e6580.mirror.swr.myhuaweicloud.com/library/nginx:latest mynginx


# 查看在指定namespace中创建的容器
[root@localhost ~]# ctr -n myns container ls
CONTAINER    IMAGE                                                                                 RUNTIME
mynginx      054b8ac70e8010d90f2ac00ef29e6580.mirror.swr.myhuaweicloud.com/library/nginx:latest    io.containerd.runc.v2

[root@localhost ~]# ctr -n myns task start -d mynginx
[root@localhost ~]# ctr -n myns task ls
TASK       PID     STATUS
mynginx    2429    RUNNING

# 在 myns 命名空间中启动了一个名为 mynginx 的任务,并且该任务当前处于 RUNNING 状态(PID 为 2429)
nerdctl 实践
nerdctl 安装
使用 nerdctl 管理containerd,命令语法与 docker 一致
bash
# 下载并安装
[root@localhost ~]# wget https://github.com/containerd/nerdctl/releases/download/v1.4.0/nerdctl-1.4.0-linux-amd64.tar.gz
有现成的直接拖进来
[root@localhost ~]# tar -xf nerdctl-1.4.0-linux-amd64.tar.gz -C /usr/bin/

# 配置nerdctl命令自动补全
[root@localhost ~]# nerdctl completion bash > /etc/bash_completion.d/nerdctl
[root@localhost ~]# source /etc/bash_completion.d/nerdctl

# 下载nerdctl所需要的cni插件
[root@localhost ~]# wget https://github.com/containernetworking/plugins/releases/download/v1.3.0/cniplugins-linux-amd64-v1.3.0.tgz
有现成的直接拖进来
[root@localhost ~]# mkdir -p /opt/cni/bin
[root@localhost ~]# tar -xf cni-plugins-linux-amd64-v1.3.0.tgz -C /opt/cni/bin


[root@localhost ~]# yum install -y bash-completion
[root@localhost ~]# bash
配置镜像加速
bash
#编辑containerd的配置文件config.toml,如果不存在,需要手动生成,方法 containerd config default > /etc/containerd/config.toml,在配置文件中搜索关键字"config_path",在其下面添加镜像加速参数
[root@localhost ~]# vim /etc/containerd/config.toml
    [plugins."io.containerd.grpc.v1.cri".registry]
      onfig_path = "/etc/containerd/certs.d"
[root@localhost ~]# mkdir -p /etc/containerd/certs.d/docker.io
[root@localhost ~]# vim /etc/containerd/certs.d/docker.io/hosts.toml
server = "https://054b8ac70e8010d90f2ac00ef29e6580.mirror.swr.myhuaweicloud.com"
[host."https://054b8ac70e8010d90f2ac00ef29e6580.mirror.swr.myhuaweicloud.com"]
 capabilities = ["pull", "resolve"]

#重启containerd服务生效
[root@localhost ~]# systemctl restart containerd
nerdctl 管理镜像
ls
bash
[root@localhost ~]# nerdctl image ls
REPOSITORY                                                                     TAG       IMAGE ID        CREATED              PLATFORM       SIZE         BLOB SIZE
054b8ac70e8010d90f2ac00ef29e6580.mirror.swr.myhuaweicloud.com/library/nginx    latest    d5f28ef21aab    About an hour ago    linux/amd64    194.5 MiB    69.0 MiB
nginx                                                                          latest    d5f28ef21aab    About an hour ago    linux/amd64    194.5 MiB    69.0 MiB

[root@localhost ~]# nerdctl images
REPOSITORY                                                                     TAG       IMAGE ID        CREATED              PLATFORM       SIZE         BLOB SIZE
054b8ac70e8010d90f2ac00ef29e6580.mirror.swr.myhuaweicloud.com/library/nginx    latest    d5f28ef21aab    About an hour ago    linux/amd64    194.5 MiB    69.0 MiB
nginx                                                                          latest    d5f28ef21aab    About an hour ago    linux/amd64    194.5 MiB    69.0 MiB
pull
bash
[root@localhost ~]# nerdctl image pull busybox

[root@localhost ~]# nerdctl pull httpd

[root@localhost ~]# nerdctl image ls
REPOSITORY                                                                     TAG       IMAGE ID        CREATED               PLATFORM       SIZE         BLOB SIZE
054b8ac70e8010d90f2ac00ef29e6580.mirror.swr.myhuaweicloud.com/library/nginx    latest    d5f28ef21aab    About an hour ago     linux/amd64    194.5 MiB    69.0 MiB
busybox                                                                        latest    ab33eacc8251    About a minute ago    linux/amd64    4.3 MiB      2.1 MiB
httpd                                                                          latest    027c678f36d3    39 seconds ago        linux/amd64    121.0 MiB    43.1 MiB
nginx                                                                          latest    d5f28ef21aab    About an hour ago     linux/amd64    194.5 MiB    69.0 MiB
rm
bash
[root@localhost ~]# nerdctl image rm httpd
Untagged: docker.io/library/httpd:latest@sha256:027c678f36d3cd3dd2b44ad1e963e81be66f9eba065381c1126d3019fffeb01a
Deleted: sha256:daf557c4f08e0cb77b2af2a08d8bca4f333cf408d88191911715e6f393eca215
Deleted: sha256:d694d07f5d65d415315bff8edb757d3339a1eb9a701c22ca14bc4948c0934a7d
Deleted: sha256:5f70bf18a086007016e948b04aed3b82103a36bea41755b6cddfaf10ace3c6ef
Deleted: sha256:09c56534a3469b43d9a4c11d4bc6792a3d0cd15f4d86db79c30c441aa91ddf33
Deleted: sha256:664c74752319cdf4c16832e0959ed64cb048e8cf9156431e817c4837a4c37e1f
Deleted: sha256:4ed3261aa08cd0153410bc1096ccbb8179de180818a6b7a9c177407f7d6603c6

[root@localhost ~]# nerdctl images
tag
bash
[root@localhost ~]# nerdctl tag busybox busybox_containerd
[root@localhost ~]# nerdctl images
save
将本地镜像导出为文件
bash
[root@localhost ~]# nerdctl save busybox -o busybox.tar

[root@localhost ~]# nerdctl image rm busybox
Untagged: docker.io/library/busybox:latest@sha256:ab33eacc8251e3807b85bb6dba570e4698c3998eca6f0fc2ccb60575a563ea74
Deleted: sha256:80e840de630d08a6a1e0ee30e7c8378cf1ed6a424315d7e437f54780aee6bf5a

[root@localhost ~]# nerdctl images
load
导入tar文件中镜像
bash
[root@localhost ~]# nerdctl load -i busybox.tar
unpacking docker.io/library/busybox:latest (sha256:ab33eacc8251e3807b85bb6dba570e4698c3998eca6f0fc2ccb60575a563ea74)...
Loaded image: busybox:latest

[root@localhost ~]# nerdctl images
history
查看镜像构建时的历史命令层次结构
bash
[root@localhost ~]# nerdctl image history busybox
SNAPSHOT                                                                   CREATED          CREATED BY                           SIZE       COMMENT
sha256:80e840de630d08a6a1e0ee30e7c8378cf1ed6a424315d7e437f54780aee6bf5a    11 months ago    BusyBox 1.37.0 (glibc), Debian 13    4.3 MiB
inspect
查看镜像详细信息
bash
[root@localhost ~]# nerdctl image inspect busybox
[
    {
        "Id": "sha256:0ed463b26daee791b094dc3fff25edb3e79f153d37d274e5c2936923c38dac2b",
        "RepoTags": [
            "busybox:latest"
        ],
        "RepoDigests": [
            "busybox@sha256:ab33eacc8251e3807b85bb6dba570e4698c3998eca6f0fc2ccb60575a563ea74"
        ],
        "Comment": "",
        "Created": "2024-09-26T21:31:42Z",
        "Author": "",
        "Config": {
            "AttachStdin": false,
            "Env": [
                "PATH=/usr/local/sbin:/usr/local/bin:/usr/sbin:/usr/bin:/sbin:/bin"
            ],
            "Cmd": [
                "sh"
            ]
        },
        "Architecture": "amd64",
        "Os": "linux",
        "Size": 4493312,
        "RootFS": {
            "Type": "layers",
            "Layers": [
                "sha256:80e840de630d08a6a1e0ee30e7c8378cf1ed6a424315d7e437f54780aee6bf5a"
            ]
        },
        "Metadata": {
            "LastTagTime": "0001-01-01T00:00:00Z"
        }
    }
]
prune
删除所有未使用的镜像。
bash
[root@localhost ~]# nerdctl image prune --all --force
Deleted Images:
Untagged: 054b8ac70e8010d90f2ac00ef29e6580.mirror.swr.myhuaweicloud.com/library/nginx:latest
deleted: sha256:36f5f951f60a9fa1d51878e76fc16ba7b752f4d464a21b758a8ac88f0992c488
deleted: sha256:c855abf10cdcf792853d61ec842e41c85cb82a5cb926c86217a7fa632dfc56c4
deleted: sha256:8e7d6b51107830934d3dcdcf0883f193250d22b3d0dc7a2d7d57e4403d1a3489
deleted: sha256:50da593f622278859c89ed290484a8cafa3ddb1fef0090530fff63c9de06845f
deleted: sha256:72fa904a482c9806187aeb804837f58f54da8aeb564f0ce4ef01426e08f68a01
deleted: sha256:7d95a4a72e110d4fe6bab4059f2d2968058c8006d0f3976ea7065186acc49fbd
deleted: sha256:3ce214e9ebc59367731dc352744c8392822aceddcee0a3806537dfd9fa984268
Untagged: docker.io/library/busybox:latest
deleted: sha256:80e840de630d08a6a1e0ee30e7c8378cf1ed6a424315d7e437f54780aee6bf5a
Untagged: docker.io/library/busybox_containerd:latest
deleted: sha256:80e840de630d08a6a1e0ee30e7c8378cf1ed6a424315d7e437f54780aee6bf5a

[root@localhost ~]#
[root@localhost ~]# nerdctl image ls
REPOSITORY    TAG       IMAGE ID        CREATED        PLATFORM       SIZE         BLOB SIZE
nginx         latest    d5f28ef21aab    2 hours ago    linux/amd64    194.5 MiB    69.0 MiB
nerdctl 管理容器
ls
bash
[root@localhost ~]# nerdctl container ls
CONTAINER ID    IMAGE           COMMAND                   CREATED              STATUS    PORTS    NAMES
nginx1          nginx:latest    "/docker-entrypoint...."    About an hour ago    Up
[root@localhost ~]# nerdctl ps
CONTAINER ID    IMAGE           COMMAND                   CREATED              STATUS    PORTS    NAMES
nginx1          nginx:latest    "/docker-entrypoint...."    About an hour ago    Up
[root@localhost ~]# nerdctl container ls -a
CONTAINER ID    IMAGE           COMMAND                   CREATED              STATUS    PORTS    NAMES
nginx1          nginx:latest    "/docker-entrypoint...."    About an hour ago    Up
run
创建并运行容器
bash
[root@localhost ~]# nerdctl container run -it ubuntu
或
[root@localhost ~]# nerdctl run -it ubuntu
root@62060a71c452:/# exit

[root@localhost ~]# nerdctl container ls
CONTAINER ID    IMAGE           COMMAND                   CREATED              STATUS    PORTS    NAMES
nginx1          nginx:latest    "/docker-entrypoint...."    About an hour ago    Up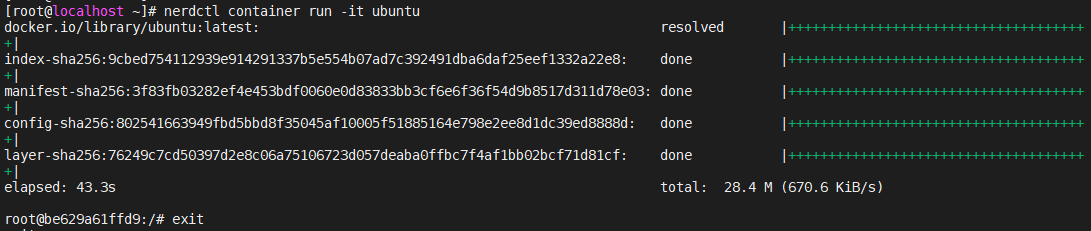
rm
bash
[root@localhost ~]# nerdctl container rm 62
62
[root@localhost ~]# nerdctl container ls -a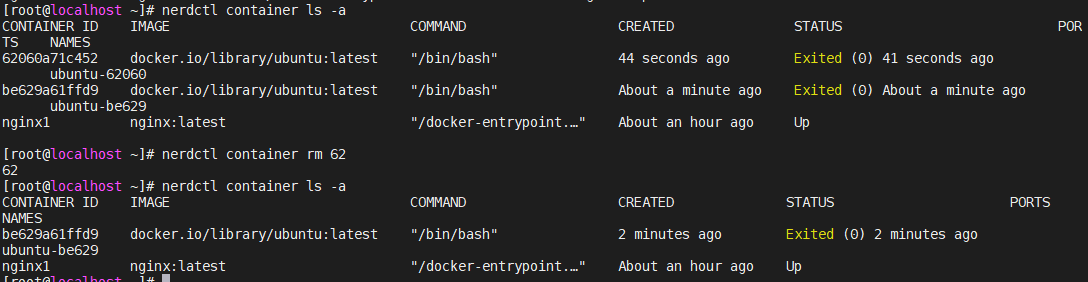
prune
删除所有未运行的容器
bash
[root@localhost ~]# nerdctl container run ubuntu
[root@localhost ~]# nerdctl container run ubuntu
[root@localhost ~]# nerdctl container run ubuntu
[root@localhost ~]# nerdctl container ls -a

[root@localhost ~]# nerdctl container prune --force
Deleted Containers:
4f3007ec8029910e7583727faf8c3ba3cdfa6310e89c42a8a8c168163f460c39
9c880a79d596460144d78b1b1d1aef19f0ec3557d352def0f55dbc6f3963d73b
be629a61ffd9dff7b5b870bc8d6344b4d1f9e2ff31e9f03b7bfa4e641887cd63
d13182198c9ab2a45f3fba048ea7dd9a6631f4ffd001b57d189e802c5f54a738
[root@localhost ~]# nerdctl container ls -a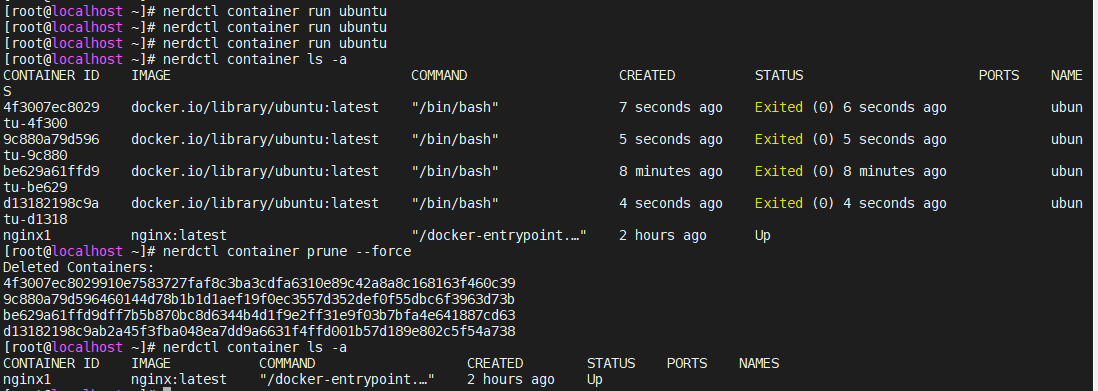
rename
重命名容器
bash
[root@localhost ~]# nerdctl container run --name ubuntu-1 ubuntu
[root@localhost ~]# nerdctl container ls -a

[root@localhost ~]# nerdctl container rename ubuntu-1 ubuntu
[root@localhost ~]# nerdctl container ls -a

[root@localhost ~]# nerdctl container rm ubuntu
ubuntu
[root@localhost ~]# nerdctl container ls -a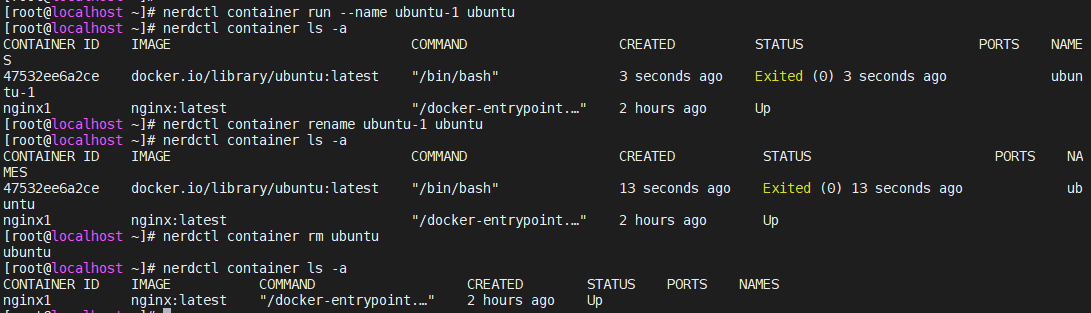
stop 和 start
停止和启动容器
bash
[root@localhost ~]# nerdctl container run -d --name nginx1 nginx

[root@localhost ~]# nerdctl container ls --format "{{.Names}} {{.Status}}"
nginx1 Up
 Up
[root@localhost ~]# nerdctl container ls -a

[root@localhost ~]# nerdctl container stop 50f16e4fae1a
50f16e4fae1a

[root@localhost ~]# nerdctl container ls --format "{{.Names}} {{.Status}}" -a
nginx1 Exited (0) 10 seconds ago
 Up

[root@localhost ~]# nerdctl container start 50f16e4fae1a
50f16e4fae1a
[root@localhost ~]# nerdctl container ls --format "{{.Names}} {{.Status}}"
nginx1 Up
 Up
restart
重启容器
bash
[root@localhost ~]# nerdctl container restart 50
50f16e4fae1a
pause 和 unpause
挂起和取消挂起容器
bash
[root@localhost ~]# nerdctl container pause 50f16e4fae1a
50f16e4fae1a
[root@localhost ~]# nerdctl container ls --format "{{.Names}} {{.Status}}" -a
nginx1 Paused
 Up
[root@localhost ~]# nerdctl container unpause 50f16e4fae1a
50f16e4fae1a
[root@localhost ~]# nerdctl container ls --format "{{.Names}} {{.Status}}" -a
nginx1 Up
 Up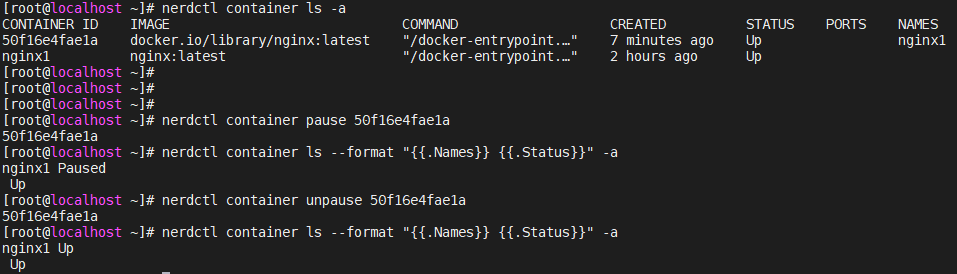
kill
给容器发信号,默认发KILL信号
bash
[root@localhost ~]# nerdctl container kill 50f16e4fae1a
50f16e4fae1a29ee43fed12025cf2e9d16de9f27fb21cbb3c0709f71070bfeed

[root@localhost ~]# nerdctl container ls -a --format "{{.Names}} {{.Status}}"
nginx1 Exited (137) 12 seconds ago
 Up
exec
在运行的容器内部执行命令
bash
[root@localhost ~]# nerdctl container start 50f16e4fae1a
50f16e4fae1a
[root@localhost ~]# nerdctl container exec -it 50f16e4fae1a bash
root@50f16e4fae1a:/# ls
bin   dev                  docker-entrypoint.sh  home  lib64  mnt  proc  run   srv  tmp  var
boot  docker-entrypoint.d  etc                   lib   media  opt  root  sbin  sys  usr
root@50f16e4fae1a:/# exit
exit
cp
将宿主机文件复制给容器
bash
[root@localhost ~]# nerdctl container cp /etc/hostname 50f16e4fae1a:
[root@localhost ~]# nerdctl container exec 50f16e4fae1a ls hostname
hostname
inspect
查看容器详细信息
bash
[root@localhost ~]# nerdctl container inspect 50f16e4fae1a
[
    {
        "Id": "50f16e4fae1a29ee43fed12025cf2e9d16de9f27fb21cbb3c0709f71070bfeed",
        "Created": "2025-09-11T07:46:16.858460709Z",
        "Path": "/docker-entrypoint.sh",
        "Args": [
            "nginx",
            "-g",
            "daemon off;"
        ],
        "State": {
            "Status": "running",
            "Running": true,
            "Paused": false,
            "Restarting": false,
            "Pid": 5778,
            "ExitCode": 0,
            "Error": "",
            "FinishedAt": "0001-01-01T00:00:00Z"
        },
        "Image": "docker.io/library/nginx:latest",
        "ResolvConfPath": "/var/lib/nerdctl/1935db59/containers/default/50f16e4fae1a29ee43fed12025cf2e9d16de9f27fb21cbb3c0709f71070bfeed/resolv.conf",
        "HostnamePath": "/var/lib/nerdctl/1935db59/containers/default/50f16e4fae1a29ee43fed12025cf2e9d16de9f27fb21cbb3c0709f71070bfeed/hostname",
        "LogPath": "/var/lib/nerdctl/1935db59/containers/default/50f16e4fae1a29ee43fed12025cf2e9d16de9f27fb21cbb3c0709f71070bfeed/50f16e4fae1a29ee43fed12025cf2e9d16de9f27fb21cbb3c0709f71070bfeed-json.log",
        "Name": "nginx1",
        "RestartCount": 0,
        "Driver": "overlayfs",
        "Platform": "linux",
        "AppArmorProfile": "",
        "Mounts": null,
        "Config": {
            "Hostname": "50f16e4fae1a",
            "AttachStdin": false,
            "Labels": {
                "containerd.io/restart.explicitly-stopped": "false",
                "io.containerd.image.config.stop-signal": "SIGQUIT",
                "nerdctl/extraHosts": "null",
                "nerdctl/hostname": "50f16e4fae1a",
                "nerdctl/log-uri": "binary:///usr/bin/nerdctl?_NERDCTL_INTERNAL_LOGGING=%2Fvar%2Flib%2Fnerdctl%2F1935db59",
                "nerdctl/name": "nginx1",
                "nerdctl/namespace": "default",
                "nerdctl/networks": "[\"bridge\"]",
                "nerdctl/platform": "linux/amd64",
                "nerdctl/state-dir": "/var/lib/nerdctl/1935db59/containers/default/50f16e4fae1a29ee43fed12025cf2e9d16de9f27fb21cbb3c0709f71070bfeed"
            }
        },
        "NetworkSettings": {
            "GlobalIPv6Address": "",
            "GlobalIPv6PrefixLen": 0,
            "IPAddress": "10.4.0.11",
            "IPPrefixLen": 24,
            "MacAddress": "da:8c:04:e9:1d:39",
            "Networks": {
                "unknown-eth0": {
                    "IPAddress": "10.4.0.11",
                    "IPPrefixLen": 24,
                    "GlobalIPv6Address": "",
                    "GlobalIPv6PrefixLen": 0,
                    "MacAddress": "da:8c:04:e9:1d:39"
                }
            }
        }
    }
]
logs
显示容器console终端内容
bash
[root@localhost ~]# nerdctl container logs 50f16e4fae1a
/docker-entrypoint.sh: /docker-entrypoint.d/ is not empty, will attempt to perform configuration
/docker-entrypoint.sh: Looking for shell scripts in /docker-entrypoint.d/
/docker-entrypoint.sh: Launching /docker-entrypoint.d/10-listen-on-ipv6-by-default.sh
10-listen-on-ipv6-by-default.sh: info: IPv6 listen already enabled
/docker-entrypoint.sh: Sourcing /docker-entrypoint.d/15-local-resolvers.envsh
/docker-entrypoint.sh: Launching /docker-entrypoint.d/20-envsubst-on-templates.sh
/docker-entrypoint.sh: Launching /docker-entrypoint.d/30-tune-worker-processes.sh
/docker-entrypoint.sh: Configuration complete; ready for start up
2025/09/11 07:55:52 [notice] 1#1: using the "epoll" event method
2025/09/11 07:55:52 [notice] 1#1: nginx/1.29.1
2025/09/11 07:55:52 [notice] 1#1: built by gcc 12.2.0 (Debian 12.2.0-14+deb12u1)
2025/09/11 07:55:52 [notice] 1#1: OS: Linux 4.18.0-553.6.1.el8.x86_64
2025/09/11 07:55:52 [notice] 1#1: getrlimit(RLIMIT_NOFILE): 1024:1024
2025/09/11 07:55:52 [notice] 1#1: start worker processes
2025/09/11 07:55:52 [notice] 1#1: start worker process 22
2025/09/11 07:55:52 [notice] 1#1: start worker process 23
2025/09/11 07:55:52 [notice] 1#1: start worker process 24
2025/09/11 07:55:52 [notice] 1#1: start worker process 25
port
显示宿主机和容器之间端口映射关系
bash
[root@localhost ~]# nerdctl container run --name nginx -d -p 8080:80 nginx
aa30235e74dd215e60b77dca49ecb8dde06b9c07d5e682324de851d27b78758d

[root@localhost ~]# nerdctl container ls -a
[root@localhost ~]# nerdctl container port aa30235e74dd
commit
将容器提交为镜像
bash
[root@localhost ~]# nerdctl commit aa30235e74dd nginx_containerd
sha256:2b569b93e67b64df563f33c7538f832c98474cd1f47af0c32cd8b6cc13f981c9
[root@localhost ~]# nerdctl images
nerdctl 管理网络
Containerd 中的网络与Docker类似,所有网络接口默认都是虚拟接口。
当使用nerdctl创建容器时,nerdctl命令会创建一个名称为bridge的Linux网桥(其上有一个nerdctl0内 部接口),利用了Linux虚拟网络技术,在本地主机和容器内分别创建一个虚拟接口,并让它们彼此连通 (这样的一对接口叫做vethpair)。Containerd 默认指定了nerdctl0接口的IP地址和子网掩码,让主机 和容器之间可以通过网桥相互通信。
示例
bash
[root@localhost ~]# nerdctl run -d busybox -- sleep infinity
[root@localhost ~]# nerdctl container ls

[root@localhost ~]# nerdctl exec busybox-81f8a -- ip a
1: lo: <LOOPBACK,UP,LOWER_UP> mtu 65536 qdisc noqueue qlen 1000
    link/loopback 00:00:00:00:00:00 brd 00:00:00:00:00:00
    inet 127.0.0.1/8 scope host lo
       valid_lft forever preferred_lft forever
    inet6 ::1/128 scope host
       valid_lft forever preferred_lft forever
2: eth0@if15: <BROADCAST,MULTICAST,UP,LOWER_UP,M-DOWN> mtu 1500 qdisc noqueue
    link/ether 72:33:46:46:03:cb brd ff:ff:ff:ff:ff:ff
    inet 10.4.0.13/24 brd 10.4.0.255 scope global eth0
       valid_lft forever preferred_lft forever
    inet6 fe80::7033:46ff:fe46:3cb/64 scope link
       valid_lft forever preferred_lft forever

# 容器内看到的网卡名: 2: eth0@if15 ,@if5代表对端是15号网卡。
bash
[root@localhost ~]# ip a
1: lo: <LOOPBACK,UP,LOWER_UP> mtu 65536 qdisc noqueue state UNKNOWN group default qlen 1000
    link/loopback 00:00:00:00:00:00 brd 00:00:00:00:00:00
    inet 127.0.0.1/8 scope host lo
       valid_lft forever preferred_lft forever
    inet6 ::1/128 scope host
       valid_lft forever preferred_lft forever
2: ens160: <BROADCAST,MULTICAST,UP,LOWER_UP> mtu 1500 qdisc mq state UP group default qlen 1000
    link/ether 00:0c:29:93:2a:f6 brd ff:ff:ff:ff:ff:ff
    altname enp3s0
    inet 192.168.108.132/24 brd 192.168.108.255 scope global dynamic noprefixroute ens160
       valid_lft 1227sec preferred_lft 1227sec
    inet6 fe80::20c:29ff:fe93:2af6/64 scope link noprefixroute
       valid_lft forever preferred_lft forever
3: nerdctl0: <BROADCAST,MULTICAST,UP,LOWER_UP> mtu 1500 qdisc noqueue state UP group default qlen 1000
    link/ether ee:67:ec:67:b0:6a brd ff:ff:ff:ff:ff:ff
    inet 10.4.0.1/24 brd 10.4.0.255 scope global nerdctl0
       valid_lft forever preferred_lft forever
    inet6 fe80::ec67:ecff:fe67:b06a/64 scope link
       valid_lft forever preferred_lft forever
13: vethc714eaa3@if2: <BROADCAST,MULTICAST,UP,LOWER_UP> mtu 1500 qdisc noqueue master nerdctl0 state UP group default
    link/ether 8a:b0:d0:81:fe:86 brd ff:ff:ff:ff:ff:ff link-netnsid 0
    inet6 fe80::88b0:d0ff:fe81:fe86/64 scope link
       valid_lft forever preferred_lft forever
14: vethc16955fc@if2: <BROADCAST,MULTICAST,UP,LOWER_UP> mtu 1500 qdisc noqueue master nerdctl0 state UP group default
    link/ether d6:f7:64:16:a5:c0 brd ff:ff:ff:ff:ff:ff link-netnsid 1
    inet6 fe80::d4f7:64ff:fe16:a5c0/64 scope link
       valid_lft forever preferred_lft forever
15: vethb4f82774@if2: <BROADCAST,MULTICAST,UP,LOWER_UP> mtu 1500 qdisc noqueue master nerdctl0 state UP group default
    link/ether e6:67:37:50:67:30 brd ff:ff:ff:ff:ff:ff link-netnsid 2
    inet6 fe80::e467:37ff:fe50:6730/64 scope link
       valid_lft forever preferred_lft forever

# 对应容器主机的网卡: 15: veth790d9140@if2 , @if2 代表对端容器内对应2号网卡。
bash
[root@localhost ~]# nerdctl network ls
NETWORK ID      NAME      FILE
17f29b073143    bridge    /etc/cni/net.d/nerdctl-bridge.conflist
                host
                none

[root@localhost ~]# nerdctl network inspect bridge
[
    {
        "Name": "bridge",
        "Id": "17f29b073143d8cd97b5bbe492bdeffec1c5fee55cc1fe2112c8b9335f8b6121",
        "IPAM": {
            "Config": [
                {
                    "Subnet": "10.4.0.0/24",
                    "Gateway": "10.4.0.1"
                }
            ]
        },
        "Labels": {
            "nerdctl/default-network": "true"
        }
    }
]

# 主机中nerdctl0就是容器的网关
[root@localhost ~]# ip addr show nerdctl0
3: nerdctl0: <BROADCAST,MULTICAST,UP,LOWER_UP> mtu 1500 qdisc noqueue state UP group default qlen 1000
    link/ether ee:67:ec:67:b0:6a brd ff:ff:ff:ff:ff:ff
    inet 10.4.0.1/24 brd 10.4.0.255 scope global nerdctl0
       valid_lft forever preferred_lft forever
    inet6 fe80::ec67:ecff:fe67:b06a/64 scope link
       valid_lft forever preferred_lft forever

# 目前 Containerd 网桥是Linux网桥,用户可以使用 brctl show 命令查看网桥和端口连接信息。
# 要使用brctl show命令要先配置yum源
# 然后yum install -y bridge-utils就可以使用了
[root@localhost ~]# vim /etc/yum.repos.d/cloud.repo
[root@localhost ~]# cat /etc/yum.repos.d/cloud.repo
[centos-openstack-victoria]
name=CentOS 8 - OpenStack victoria
baseurl=https://mirrors.aliyun.com/centos-vault/8-stream/cloud/x86_64/openstack-victoria/
enabled=1
gpgcheck=0

[root@localhost ~]# yum clean all
13 files removed
[root@localhost ~]# yum makecache
CentOS 8 - OpenStack victoria                                                                          1.2 MB/s | 3.3 MB     00:02
CentOS Stream 8 - BaseOS                                                                               2.1 MB/s |  10 MB     00:05
CentOS Stream 8 - AppStream                                                                            1.9 MB/s |  29 MB     00:15
Last metadata expiration check: 0:00:01 ago on Thu 11 Sep 2025 04:34:06 PM CST.
Metadata cache created.
[root@localhost ~]# yum install -y bridge-utils


[root@localhost ~]# brctl show
bridge name     bridge id               STP enabled     interfaces
nerdctl0                8000.ee67ec67b06a       no              vethb4f82774
                                                        vethc16955fc
                                                        vethc714eaa3