目录
[1. 环境介绍:](#1. 环境介绍:)
[2. 安装Anaconda](#2. 安装Anaconda)
[2.1 下载anaconda的安装包](#2.1 下载anaconda的安装包)
[2.2 解决安装出现的bug](#2.2 解决安装出现的bug)
[2.3 安装anaconda](#2.3 安装anaconda)
[2.4 点击Enter(回车键)](#2.4 点击Enter(回车键))
[2.5 输入 yes](#2.5 输入 yes)
[2.6 继续点击 Enter](#2.6 继续点击 Enter)
[2.7 输入 yes,添加环境变量](#2.7 输入 yes,添加环境变量)
[2.8 完成安装以及检测是否安装成功](#2.8 完成安装以及检测是否安装成功)
[3. 安装OpenCV](#3. 安装OpenCV)
[3.1 离线包安装或者在线安装都行,这样介绍在线安装。](#3.1 离线包安装或者在线安装都行,这样介绍在线安装。)
[3.2 验证使用OpenCV报错解决](#3.2 验证使用OpenCV报错解决)
[3.3 测试OpenCV成功](#3.3 测试OpenCV成功)
[4. 配置jupyter](#4. 配置jupyter)
[4.1 生成配置文件](#4.1 生成配置文件)
4.3.打开/root/.jupyter/jupyter_notebook_config.py文件,配置固定端口、入口ip、工作目录等
[6. 配置阿里云防火墙,使外网通过链接可以访问jupyter](#6. 配置阿里云防火墙,使外网通过链接可以访问jupyter)
[7 运行和终止jupyter](#7 运行和终止jupyter)
[7.1. 运行jupyter](#7.1. 运行jupyter)
[7.2. 关闭后台的jupyter进程](#7.2. 关闭后台的jupyter进程)
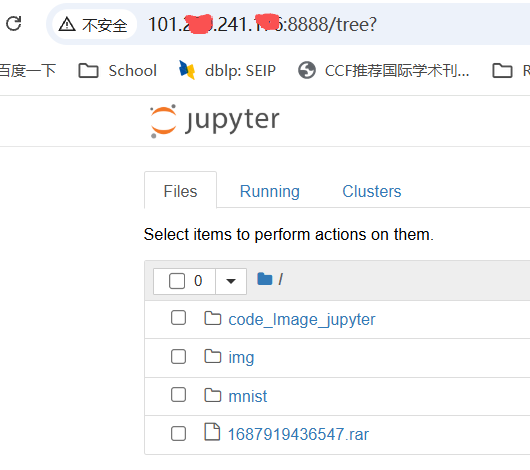
8.浏览器地址栏输入阿里云公网ip和jupyter端口,使用jupyter
1. 环境介绍:
操作系统:阿里云ECS的64位CentOS 7.9
Anaconda:Anaconda3-5.3.1-Linux-x86_64.sh
https://mirrors.tuna.tsinghua.edu.cn/anaconda/archive/
OpenCV:4.1.0
2. 安装Anaconda
2.1 下载anaconda的安装包
这里我们需要在官网上查找自己需要的版本,地址链接在下面:
https://repo.anaconda.com/archive/
https://mirrors.tuna.tsinghua.edu.cn/anaconda/archive/
Anaconda3-5.3.1-Linux-x86_64.sh
离线下载到本地电脑,再上传ECS可以
或者直接使用wget命令下载到ECS,如下命令:
wget https://repo.anaconda.com/archive/Anaconda3-5.3.1-Linux-x86_64.sh
2.2 解决安装出现的bug
当我们输入1.1的那一条命令时,有些人可能会出现下面这样的错误:
bash: wget: command not found
当然这也是我自己出现的错误,具体解决办法如下: centos系统,需要执行以下命令:
work@ixxxx$ sudo yum install wget
sudo password for work:
Loaded plugins: fastestmirror Loading mirror speeds from cached hostfile Package wget-1.14-18.el7_6.1.x86_64 already installed and latest version Nothing to do
2.3 安装anaconda
接下来我们需要首先赋权再执行安装程序,依次输入下面两句命令:
chmod +x Anaconda3-5.3.1-Linux-x86_64.sh
./Anaconda3-5.3.1-Linux-x86_64.sh
然后出现下面图所示:

2.4 点击Enter(回车键)
此时显示Anaconda的信息,并且会出现More,继续按Enter,直到如下图所示:

2.5 输入 yes
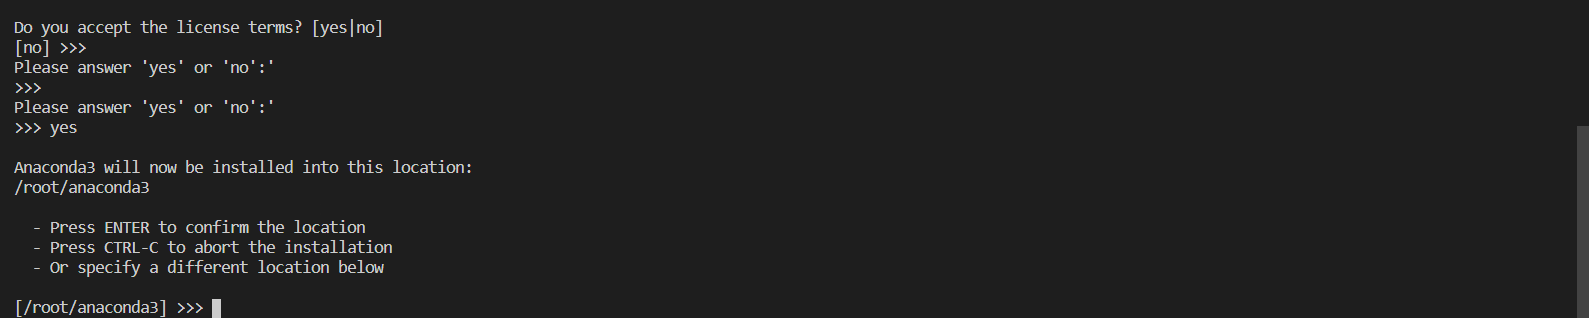
2.6 继续点击 Enter
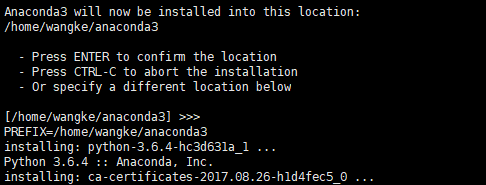
2.7 输入 yes,添加环境变量
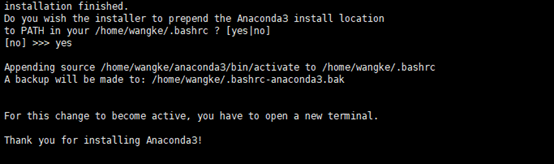
这里需要注意点的就是如果你直接跳过这部设置环境变量的话:
no >>>
那你需要自己到这个文件夹设置你安装Anaconda路径(比如上面显示我的是)
/home/work/.bashrc
单击进去,在最后一行添加:
export PATH=/home/anaconda3/bin:$PATH
需要把之前的那句话给注释掉如下所示:
export PATH=/usr/local/nvidia/bin:/usr/local/cuda/bin:/usr/local/sbin:/usr/sbin:/sbin:PATH export PATH=/root/anaconda3/bin:PATH
这里只是个示例,具体的还是要看你们自己安装的路径。
然后保存更改,输入下面这句指令:
source ~/.bashrc
2.8 完成安装以及检测是否安装成功
打开新的终端后,进入自己的文件夹目录下,输入anaconda -V(注意a要小写,V要大写),conda -V ,显示版本信息,若显示则表示安装成功。
work@iZ2zee9xchiraox27ezl71Z old$ conda -V
conda 4.5.11
3. 安装OpenCV
3.1 离线包安装或者在线安装都行,这样介绍在线安装。
安装指定版本(OpenCV-4.1.0.25)的命令如下:
pip install opencv-python==4.1.0.25 -i https://pypi.doubanio.com/simple
安装包的时候制定豆瓣源,下载包的速度会加快。
3.2 验证使用OpenCV报错解决
bash
[work@iZ2zee9xchiraox27ezl71Z root]$ python
Python 3.7.0 (default, Jun 28 2018, 13:15:42)
[GCC 7.2.0] :: Anaconda, Inc. on linux
Type "help", "copyright", "credits" or "license" for more information.
>>> import cv2
Traceback (most recent call last):
  File "<stdin>", line 1, in <module>
  File "/home/work/anaconda3/lib/python3.7/site-packages/cv2/__init__.py", line 3, in <module>
    from .cv2 import *
ImportError: libXext.so.6: cannot open shared object file: No such file or directory
>>> exit()
ImportError: libXext.so.6: cannot open shared object file: No such file or directory
解决办法:
yum install libXrender
bash
[root@iZ2zee9xchiraox27ezl71Z ~]# yum install libXrender
Loaded plugins: fastestmirror
Loading mirror speeds from cached hostfile
Resolving Dependencies
--> Running transaction check
---> Package libXrender.x86_64 0:0.9.10-1.el7 will be installed
--> Finished Dependency Resolution

Dependencies Resolved

======================================================================================================================================================================================================================================
 Package                                                  Arch                                                 Version                                                       Repository                                          Size
======================================================================================================================================================================================================================================
Installing:
 libXrender                                               x86_64                                               0.9.10-1.el7                                                  base                                                26 k

Transaction Summary
======================================================================================================================================================================================================================================
Install  1 Package

Total download size: 26 k
Installed size: 46 k
Is this ok [y/d/N]: y
Downloading packages:
libXrender-0.9.10-1.el7.x86_64.rpm                                                                                                                                                                             |  26 kB  00:00:00
Running transaction check
Running transaction test
Transaction test succeeded
Running transaction
  Installing : libXrender-0.9.10-1.el7.x86_64                                                                                                                                                                                     1/1
  Verifying  : libXrender-0.9.10-1.el7.x86_64                                                                                                                                                                                     1/1

Installed:
  libXrender.x86_64 0:0.9.10-1.el7

Complete!
[root@iZ2zee9xchiraox27ezl71Z ~]# yum install libXext
Loaded plugins: fastestmirror
Loading mirror speeds from cached hostfile
Resolving Dependencies
--> Running transaction check
---> Package libXext.x86_64 0:1.3.3-3.el7 will be installed
--> Finished Dependency Resolution

Dependencies Resolved

======================================================================================================================================================================================================================================
 Package                                                Arch                                                  Version                                                       Repository                                           Size
======================================================================================================================================================================================================================================
Installing:
 libXext                                                x86_64                                                1.3.3-3.el7                                                   base                                                 39 k

Transaction Summary
======================================================================================================================================================================================================================================
Install  1 Package

Total download size: 39 k
Installed size: 85 k
Is this ok [y/d/N]: y
Downloading packages:
libXext-1.3.3-3.el7.x86_64.rpm                                                                                                                                                                                 |  39 kB  00:00:00
Running transaction check
Running transaction test
Transaction test succeeded
Running transaction
  Installing : libXext-1.3.3-3.el7.x86_64                                                                                                                                                                                         1/1
  Verifying  : libXext-1.3.3-3.el7.x86_64                                                                                                                                                                                         1/1

Installed:
  libXext.x86_64 0:1.3.3-3.el7

Complete!
其他报错类似处理:
yum install ksh -y
yum install libXext.so.6 -y
yum install libXtst.so.6 --y
yum install libXt.so.6 -y
yum install libGLU.so.1 --setopt=protected_multilib=false
yum install libelf.so.1 -y
yum install libXrender.so.1 -y
yum install openmotif -y
yum install libXp.so.6 -y
yum install libXrandr.so.2 --y
yum install *xorg* -y
yum install libXp -y
yum install ld-linux.so.2 -y
yum install libstdc++.so.5 -y
yum install -y xterm
3.3 测试OpenCV成功
bash
[root@iZ2zee9xchiraox27ezl71Z ~]# su work
[work@iZ2zee9xchiraox27ezl71Z root]$ python
Python 3.7.0 (default, Jun 28 2018, 13:15:42)
[GCC 7.2.0] :: Anaconda, Inc. on linux
Type "help", "copyright", "credits" or "license" for more information.
>>> import cv2
>>> cv2.__version__
'4.1.0'
>>>
4. 配置jupyter
完成前面的环境搭建后,我们对jupyter进行一些配置,使得我们使用的更加方便
4.1 生成配置文件
jupyter notebook --generate-config --allow-root
这里一般会返回文件生成在了那个位置,一般的话是配置文件是在/home/work/.jupyter/jupyter_notebook_config.py
bash
[work@iZ2z old]$ ll /home/work/.jupyter/jupyter_notebook_config.py
-rw-rw-r-- 1 work work 28724 Sep 22 00:13 /home/work/.jupyter/jupyter_notebook_config.py
4.2.生成密钥
在配置配置文件时需要t填写秘钥等信息
python
[work@iZ2zee9xchiraox27ezl71Z ~]$ ipython
Python 3.7.0 (default, Jun 28 2018, 13:15:42)
Type 'copyright', 'credits' or 'license' for more information
IPython 6.5.0 -- An enhanced Interactive Python. Type '?' for help.

In [1]: from notebook.auth import passwd

In [2]: passwd()
Enter password:
Verify password:
Out[2]: 'sha1:897c838f5c82:2876d5327d1030077a0d72dc856a24c74526b9e5'

In [3]:exit()
4.3.打开/root/.jupyter/jupyter_notebook_config.py文件,配置固定端口、入口ip、工作目录等
bash
(jupyter) [root@rion jupyter]# vim /root/.jupyter/jupyter_notebook_config.py

### 在文件底部加入下面的配置信息,并自主修改 ###
# 接收任何ip地址
c.NotebookApp.ip = '0.0.0.0'
# 对外提供访问的端口,端口自定义
c.NotebookApp.port = 12345
# 启动不打开浏览器
c.NotebookApp.open_browser = False
# 设置jupyter启动后默认文件夹
c.NotebookApp.notebook_dir = u'/home/work/project/jupyter_dir'    # 需要自己创建
# 允许root用户执行
c.NotebookApp.allow_root = True
6. 配置阿里云防火墙,使外网通过链接可以访问jupyter
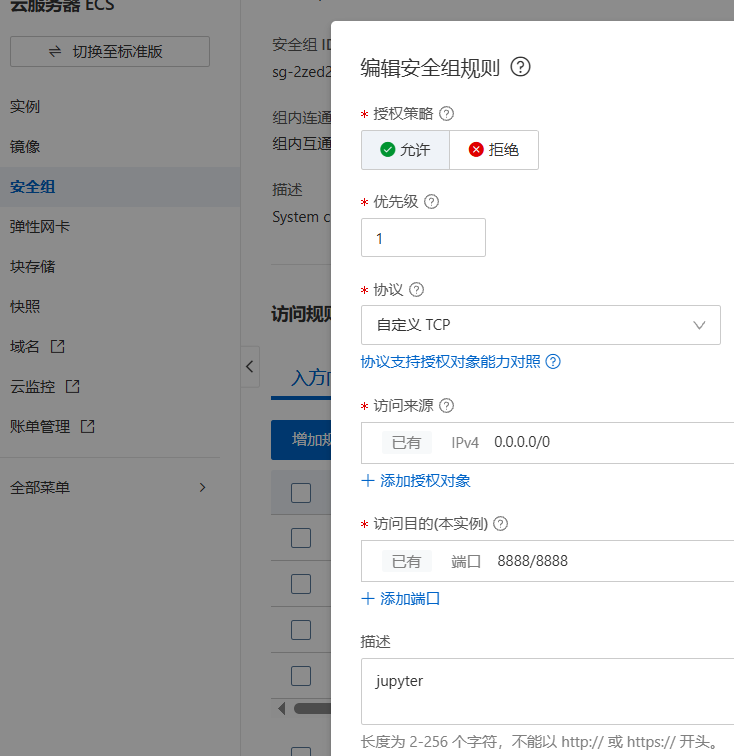
进入阿里云控制台,找到【安全】-- 【防火墙】,点击添加规则,配置我们在配置文件中定义好的端口。
7 运行和终止jupyter
7.1. 运行jupyter
bash
[work@iZ2zee9xchiraox27ezl71Z ~]$ nohup nice  jupyter notebook >20250922_jupyter.res &
[1] 10969
[work@iZ2zee9xchiraox27ezl71Z ~]$ nohup: ignoring input and redirecting stderr to stdout

[work@iZ2zee9xchiraox27ezl71Z ~]$ jobs
[1]+  Running                 nohup nice jupyter notebook > 20250922_jupyter.res &
[work@iZ2zee9xchiraox27ezl71Z ~]$ tail -f 20250922_jupyter.res
[I 17:30:18.784 NotebookApp] Serving notebooks from local directory: /home/work/project
[I 17:30:18.784 NotebookApp] The Jupyter Notebook is running at:
终端jupyter
jupyter notebook
后台运行jupyter
nohup jupyter notebook --allow-root > jupyter.log 2>&1 &
7.2. 关闭后台的jupyter进程
查询后台进程
ps -aux | grep jupyter
ps -ef : 查看本机所有的进程;
grep xxxx代表过滤找到条件xxxx的进程
杀掉后台进程
kill -9 PID # pid就是进程号
8.浏览器地址栏输入阿里云公网ip和jupyter端口,使用jupyter