T32开发笔记之固件烧写
文章目录
- T32开发笔记之固件烧写
- 前言
- 一、TF卡烧写:
- 二、TFTP网络烧写:
-
- [1、SPI NOR 烧写:](#1、SPI NOR 烧写:)
- [2、SPI NAND烧写:](#2、SPI NAND烧写:)
- 三、USB烧写:
-
- 1、安装驱动:
- [2、烧写SPI NOR:](#2、烧写SPI NOR:)
- 总结
前言
T32作为北京君正新一代SOC芯片,尤其适合低功耗的物联网摄像机应用。
1、4K(2160P)@25fps,支持原生双摄/三摄。
2、1T@int8 算力,全新架构,算子算法丰富。
3、 全新 Tiziano-v4.0 ISP,星光夜视画质全面提升。
4、 Hera-v1.2 视频编码,码率更加极限,支持智能编码。
5、 100ms 级快速启动,Atlas(AOV)普惠升级。
6、 同一套硬件软件覆盖各种应用品类
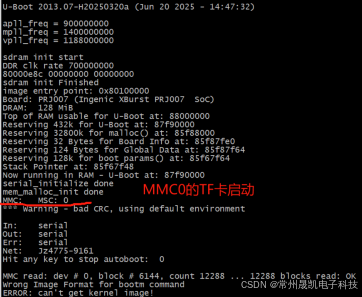
一、TF卡烧写:
1、制作启动卡:
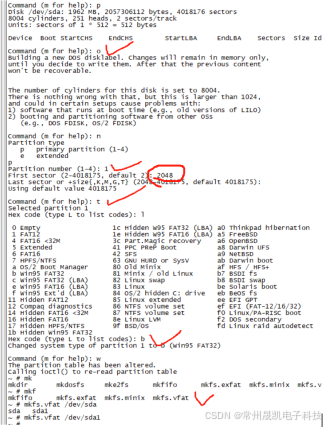

然后,拷贝固件到分区。需要用32G/16G的SD卡,容量小的在写入BOOT后,无法挂载分区了。
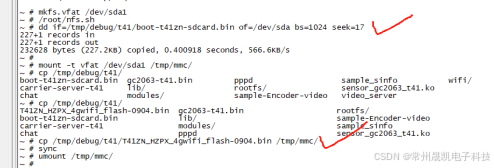
TF卡启动的bin:
dd if=/tmp/debug/t32/u-boot-with-spl.bin of=/dev/sda bs=1024 seek=17
2、烧写SPI固件:
烧写boot:
mw.b 0x80600000 0xff 0x1000000;fatls mmc 0
fatload mmc 0 0x80600000 u-boot-with-spl.bin
sf0 probe;sf0 erase 0x0000 0x40000;sf0 write 0x80600000 0x0000 0x40000
烧写内核:(SDK)
mw.b 0x80600000 0xff 0x1000000;fatls mmc 0;fatload mmc 0 0x80600000 uImage
sf0 probe;sf0 erase 0x40000 0x280000;sf0 write 0x80600000 0x40000 0x280000
烧写文件系统:(SDK)
mw.b 0x80600000 0xff 0x1000000;fatls mmc 0;fatload mmc 0 0x80600000 rootfs.sqfs
sf0 probe;sf0 erase 0x2C0000 0x200000;sf0 write 0x80600000 0x2C0000 0x200000
烧写整个FLASH:
mw.b 0x80600000 0xff 0x1000000;fatls mmc 0
fatload mmc 0 0x80600000 zrt_prj007vn_gc2063.bin
sf0 probe;sf0 erase 0x0 0x1000000;sf0 write 0x80600000 0x0 0x1000000
二、TFTP网络烧写:
1、SPI NOR 烧写:
setenv bootargs 'console=ttyS1,115200n8 mem=64M@0x0 rmem=64M@0x4000000 init=/linuxrc rootfstype=squashfs root=/dev/mtdblock2 rw mtdparts=sfc0_nor:256k(boot),2560k(kernel),2048k(root),-(appfs)'
实际用的,带AI部分:(不需要留NNA的内存部分了)
setenv bootargs 'console=ttyS1,115200n8 mem=64M@0x0 rmem=64M@0x4000000 init=/linuxrc rootfstype=squashfs root=/dev/mtdblock2 rw mtdparts=sfc0_nor:256k(boot),2560k(kernel),9M(rootfs),3M(app_fs),1M(config),256K(SK_PARAM),-(ext_fs)'
setenv bootcmd 'sf probe;sf read 0x80600000 0x40000 0x300000;bootm 0x80600000'
setenv serverip 192.168.1.98;setenv ipaddr 192.168.1.10;setenv gatewayip 192.168.1.1;setenv netmask 255.255.0.0;sa
#烧写uboot
mw.b 0x80600000 ff 300000;tftpboot 0x80600000 u-boot-with-spl.bin
sf probe 0;sf erase 0x0 0x40000;sf write 0x80600000 0x0 0x40000
#烧写内核
mw.b 0x80600000 ff 300000;tftpboot 0x80600000 uImage
sf probe 0;sf erase 0x40000 0x240000;sf write 0x80600000 0x40000 0x240000
#烧写根文件系统
setenv serverip 192.168.1.98;setenv ipaddr 192.168.1.10;setenv gatewayip 192.168.1.1;setenv netmask 255.255.0.0
mw.b 0x80600000 ff c00000;tftpboot 0x80600000 rootfs_uclib_squashfs.img
sf probe 0;sf erase 0x2c0000 0x00900000;sf write 0x80600000 0x2c0000 0x00900000
2、SPI NAND烧写:
// IVSP的:
set bootargs 'console=ttyS1,115200n8 mem=64M@0x0 rmem=64M@0x4000000 init=/linuxrc ubi.mtd=2 root=ubi0:ubifs rootflags=sync rootfstype=ubifs rw mtdparts=sfc0_nand:1M(uboot),3M(kernel),96M(root),-(appfs)'
set bootcmd 'nand read 0x80600000 0x100000 0x300000;bootm 0x80600000'
烧写BOOT分区:
mw.b 0x80600000 ff c00000;tftpboot 0x80600000 u-boot-with-spl.bin
nand erase 0x000000 0x100000;nand write 0x80600000 0x000000 0x100000
烧写内核:
mw.b 0x80600000 ff 0x400000;tftpboot 0x80600000 uImage
nand erase 0x100000 0x300000;nand write 0x80600000 0x100000 0x300000
rootfs:96MB:
mw.b 0x80600000 ff 0x4000000;tftpboot 0x80600000 rootfs_t32zn_2k_128k_96M.ubifs
nand erase 0x400000 0x6000000;nand write 0x80600000 0x400000 0x2000000
三、USB烧写:
1、安装驱动:
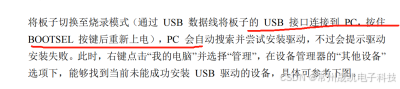
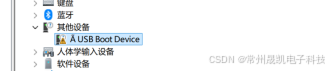
安装驱动:
不要插入TF卡,打开USB软件点击"开始"按钮,长按boot按键,再上电,然后松手,就进入烧写模式了。
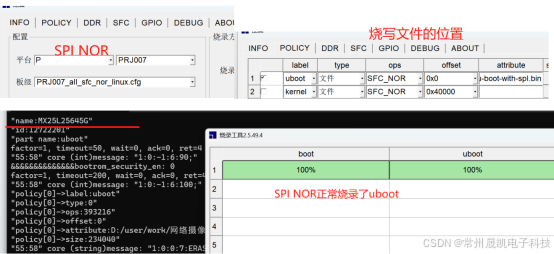
2、烧写SPI NOR:
总结
以上就是T32芯片的固件烧写烧写过程,后续还会有系列文章,敬请期待.