文章目录
-
-
- [2.9 mv 指令](#2.9 mv 指令)
- [2.10 cat 指令](#2.10 cat 指令)
- [2.11 more 指令](#2.11 more 指令)
- [2.12 less 指令](#2.12 less 指令)
- [2.13 head 指令](#2.13 head 指令)
- [2.14 tail 指令](#2.14 tail 指令)
- [2.15 date 指令](#2.15 date 指令)
- [2.16 cal 指令](#2.16 cal 指令)
- [2.17 find 指令](#2.17 find 指令)
- [2.18 which 指令](#2.18 which 指令)
- [2.19 alias 指令](#2.19 alias 指令)
- [2.20 grep 指令](#2.20 grep 指令)
- [2.21 zip/unzip 指令](#2.21 zip/unzip 指令)
-
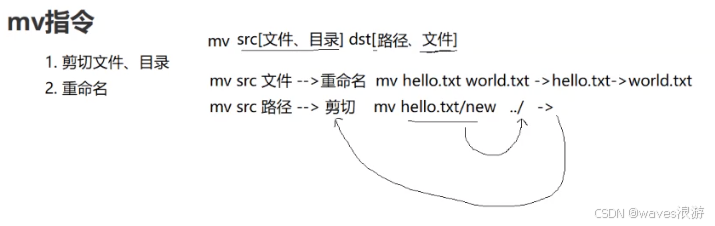
2.9 mv 指令
mv命令是move的缩写,可以用来移动文件或者将文件改名(move (rename) files,经常用来备份文件或者目录
语法: mv 选项 源文件或目录 目标文件或目录
功能:
- 视mv命令中第二个参数类型的不同(是目标文件还是目标目录),mv命令将文件重命名或将其移至一个新的目录中。
- 当第二个参数类型是文件时,mv命令完成文件重命名,此时,源文件只能有一个(也可以是源目录名),它将所给的源文件或目录重命名为给定的目标文件名。
- 当第二个参数是已存在的目录名称时,源文件或目录参数可以有多个,mv命令将各参数指定的源文件均移至目标目录中。
c
[root@VM-4-3-centos lesson3]# ll
total 8
drwxr-xr-x 3 root root 4096 Feb  9 14:04 dir
-rw-r--r-- 1 root root    0 Feb  9 13:59 name.txt
drwxr-xr-x 3 root root 4096 Feb  9 14:04 new
-rw-r--r-- 1 root root    0 Feb  9 13:58 test.txt
[root@VM-4-3-centos lesson3]# mv dir mydir
[root@VM-4-3-centos lesson3]# ll
total 8
drwxr-xr-x 3 root root 4096 Feb  9 14:04 mydir
-rw-r--r-- 1 root root    0 Feb  9 13:59 name.txt
drwxr-xr-x 3 root root 4096 Feb  9 14:04 new
-rw-r--r-- 1 root root    0 Feb  9 13:58 test.txt
[root@VM-4-3-centos lesson3]# tree mydir/
mydir/
|-- dir
`-- hello.txt

1 directory, 1 file
[root@VM-4-3-centos lesson3]# mv new ../
[root@VM-4-3-centos lesson3]# ll
total 4
drwxr-xr-x 3 root root 4096 Feb  9 14:04 mydir
-rw-r--r-- 1 root root    0 Feb  9 13:59 name.txt
-rw-r--r-- 1 root root    0 Feb  9 13:58 test.txt
[root@VM-4-3-centos lesson3]# ls ../
dir  empty  lesson2  lesson3  mytest  new  newdir
[root@VM-4-3-centos lesson3]# tree ../new
../new
|-- dir
`-- hello.txt

1 directory, 1 file
c
[root@VM-4-3-centos lesson3]# ll
total 4
drwxr-xr-x 3 root root 4096 Feb 9 14:04 mydir
-rw-r--r-- 1 root root 0 Feb 9 13:59 name.txt
-rw-r--r-- 1 root root 0 Feb 9 13:58 test.txt
[root@VM-4-3-centos lesson3]# mv name.txt ../hello.txt
[root@VM-4-3-centos lesson3]# ll
total 4
drwxr-xr-x 3 root root 4096 Feb 9 14:04 mydir
-rw-r--r-- 1 root root 0 Feb 9 13:58 test.txt
[root@VM-4-3-centos lesson3]# ll ../hello.txt
-rw-r--r-- 1 root root 0 Feb 9 13:59 ../hello.txt
[root@VM-4-3-centos lesson3]# ll ..
total 8
-rw-r--r-- 1 root root 0 Feb 9 13:59 hello.txt
drwxr-xr-x 3 root root 4096 Jan 30 20:29 lesson2
drwxr-xr-x 3 root root 4096 Feb 9 14:32 lesson3
[root@VM-4-3-centos lesson3]# ll
total 4
drwxr-xr-x 3 root root 4096 Feb 9 14:04 mydir
-rw-r--r-- 1 root root 0 Feb 9 13:58 test.txt
[root@VM-4-3-centos lesson3]# mv mydir ../new
[root@VM-4-3-centos lesson3]# ll
total 0
-rw-r--r-- 1 root root 0 Feb 9 13:58 test.txt
[root@VM-4-3-centos lesson3]# ll ../
total 12
-rw-r--r-- 1 root root 0 Feb 9 13:59 hello.txt
drwxr-xr-x 3 root root 4096 Jan 30 20:29 lesson2
drwxr-xr-x 2 root root 4096 Feb 9 14:33 lesson3
drwxr-xr-x 3 root root 4096 Feb 9 14:04 new
[root@VM-4-3-centos lesson3]# ll
total 0
-rw-r--r-- 1 root root 0 Feb 9 13:58 test.txt
[root@VM-4-3-centos lesson3]# cd ..
[root@VM-4-3-centos 112]# ls
hello.txt lesson2 lesson3 new
[root@VM-4-3-centos 112]# ll
total 12
-rw-r--r-- 1 root root 0 Feb 9 13:59 hello.txt
drwxr-xr-x 3 root root 4096 Jan 30 20:29 lesson2
drwxr-xr-x 2 root root 4096 Feb 9 14:33 lesson3
drwxr-xr-x 3 root root 4096 Feb 9 14:04 new
[root@VM-4-3-centos 112]# mv hello.txt lesson3
[root@VM-4-3-centos 112]# mv new lesson3
[root@VM-4-3-centos 112]# ll
total 8
drwxr-xr-x 3 root root 4096 Jan 30 20:29 lesson2
drwxr-xr-x 3 root root 4096 Feb 9 14:36 lesson3
[root@VM-4-3-centos 112]# cd lesson3
[root@VM-4-3-centos lesson3]# ll
total 4
-rw-r--r-- 1 root root 0 Feb 9 13:59 hello.txt
drwxr-xr-x 3 root root 4096 Feb 9 14:04 new
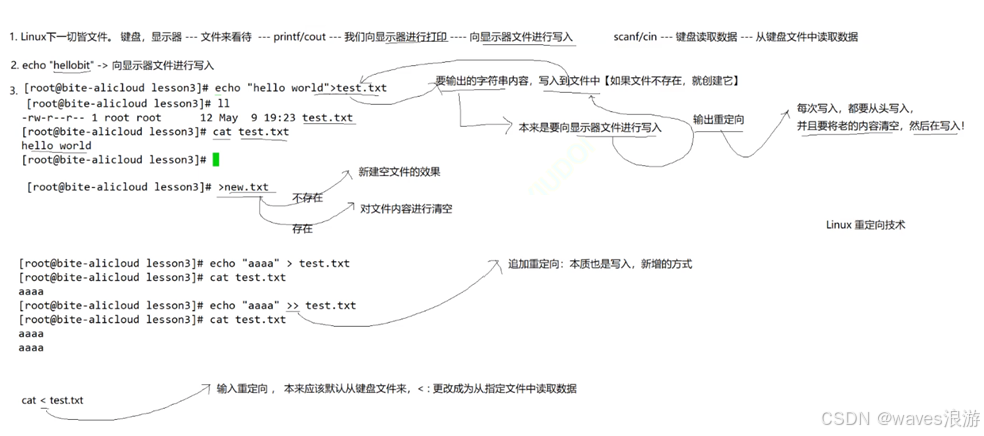
-rw-r--r-- 1 root root 0 Feb 9 13:58 test.txt2.10 cat 指令
语法: cat 选项 文件
功能: 查看目标文件的内容
常用选项:
- -b 对非空输出行编号
- -n 对输出的所有行编号
- -s 不输出多行空行

c
[root@VM-4-3-centos lesson3]# ll
total 4
-rw-r--r-- 1 root root    0 Feb  9 13:59 hello.txt
drwxr-xr-x 3 root root 4096 Feb  9 14:04 new
-rw-r--r-- 1 root root    0 Feb  9 13:58 test.txt
[root@VM-4-3-centos lesson3]# nano hello.txt
[root@VM-4-3-centos lesson3]# ll
total 8
-rw-r--r-- 1 root root   60 Feb  9 14:39 hello.txt
drwxr-xr-x 3 root root 4096 Feb  9 14:04 new
-rw-r--r-- 1 root root    0 Feb  9 13:58 test.txt
[root@VM-4-3-centos lesson3]# cat hello.txt
aaaaaaaaa
bbbbbbbbbbbbb
ccccccc
dddddddd
eeeeeeeee
ffffffff
[root@VM-4-3-centos lesson3]# cat new
cat: new: Is a directory
[root@VM-4-3-centos lesson3]# cat -n hello.txt
     1	aaaaaaaaa
     2	bbbbbbbbbbbbb
     3	ccccccc
     4	dddddddd
     5	eeeeeeeee
     6	ffffffff
[root@VM-4-3-centos lesson3]# nano hello.txt
[root@VM-4-3-centos lesson3]# cat hello.txt
aaaaaaaaa
bbbbbbbbbbbbb
ccccccc

dddddddd

eeeeeeeee


ffffffff
[root@VM-4-3-centos lesson3]# cat -n hello.txt
     1	aaaaaaaaa
     2	bbbbbbbbbbbbb
     3	ccccccc
     4
     5	dddddddd
     6
     7	eeeeeeeee
     8
     9
    10	ffffffff
[root@VM-4-3-centos lesson3]# cat -b hello.txt
     1	aaaaaaaaa
     2	bbbbbbbbbbbbb
     3	ccccccc

     4	dddddddd

     5	eeeeeeeee


     6	ffffffff
[root@VM-4-3-centos lesson3]# cat -s hello.txt
aaaaaaaaa
bbbbbbbbbbbbb
ccccccc

dddddddd

eeeeeeeee

ffffffff
[root@VM-4-3-centos lesson3]# cat -s -n hello.txt
     1	aaaaaaaaa
     2	bbbbbbbbbbbbb
     3	ccccccc
     4
     5	dddddddd
     6
     7	eeeeeeeee
     8
     9	ffffffff
[root@VM-4-3-centos lesson3]# cat -n hello.txt
     1	aaaaaaaaa
     2	bbbbbbbbbbbbb
     3	ccccccc
     4
     5	dddddddd
     6
     7	eeeeeeeee
     8
     9
    10	ffffffff
[root@VM-4-3-centos lesson3]# tac hello.txt
ffffffff


eeeeeeeee

dddddddd

ccccccc
bbbbbbbbbbbbb
aaaaaaaaa
2.11 more 指令
先做一个补充知识点:
c
[root@VM-4-3-centos lesson3]# ll
total 1176
-rw-r--r-- 1 root root      64 Feb  9 14:42 hello.txt
-rw-r--r-- 1 root root 1188895 Feb  9 15:04 log.txt
drwxr-xr-x 3 root root    4096 Feb  9 14:04 new
-rw-r--r-- 1 root root       0 Feb  9 21:49 new.txt
-rw-r--r-- 1 root root      12 Feb  9 21:45 test.txt
[root@VM-4-3-centos lesson3]# cat test.txt
hello world
[root@VM-4-3-centos lesson3]# echo "aaaaaaaaaaaaaaa"
aaaaaaaaaaaaaaa
[root@VM-4-3-centos lesson3]# echo "aaaaaaaaaaaaaaa" > test.txt
[root@VM-4-3-centos lesson3]# ll
total 1176
-rw-r--r-- 1 root root      64 Feb  9 14:42 hello.txt
-rw-r--r-- 1 root root 1188895 Feb  9 15:04 log.txt
drwxr-xr-x 3 root root    4096 Feb  9 14:04 new
-rw-r--r-- 1 root root       0 Feb  9 21:49 new.txt
-rw-r--r-- 1 root root      16 Feb  9 21:54 test.txt
[root@VM-4-3-centos lesson3]# cat test.txt
aaaaaaaaaaaaaaa
[root@VM-4-3-centos lesson3]# echo "bbbb" > test.txt
[root@VM-4-3-centos lesson3]# cat test.txt
bbbb
[root@VM-4-3-centos lesson3]# >test.txt
[root@VM-4-3-centos lesson3]# ll
total 1172
-rw-r--r-- 1 root root      64 Feb  9 14:42 hello.txt
-rw-r--r-- 1 root root 1188895 Feb  9 15:04 log.txt
drwxr-xr-x 3 root root    4096 Feb  9 14:04 new
-rw-r--r-- 1 root root       0 Feb  9 21:49 new.txt
-rw-r--r-- 1 root root       0 Feb  9 21:58 test.txt
[root@VM-4-3-centos lesson3]# cat test.txt
语法: more 选项
功能: more命令,功能类似 cat
常用选项:
- 按回车键向下翻
- q 退出 more
c
[root@VM-4-3-centos lesson3]# ll
total 0
[root@VM-4-3-centos lesson3]# cnt=1; while [ $cnt -le 10 ]; do echo "hello $cnt"; let cnt++; done
hello 1
hello 2
hello 3
hello 4
hello 5
hello 6
hello 7
hello 8
hello 9
hello 10
[root@VM-4-3-centos lesson3]# cnt=1; while [ $cnt -le 10 ]; do echo "hello $cnt"; let cnt++; done > log.txt
[root@VM-4-3-centos lesson3]# ll
total 4
-rw-r--r-- 1 root root 81 Feb  9 22:30 log.txt
[root@VM-4-3-centos lesson3]# cat log.txt
hello 1
hello 2
hello 3
hello 4
hello 5
hello 6
hello 7
hello 8
hello 9
hello 10
[root@VM-4-3-centos lesson3]# cnt=1; while [ $cnt -le 10000 ]; do echo "hello $cnt"; let cnt++; done > log.txt
[root@VM-4-3-centos lesson3]# ll
total 108
-rw-r--r-- 1 root root 108894 Feb  9 22:31 log.txt
[root@VM-4-3-centos lesson3]# more log.txt
2.12 less 指令
- less 工具也是对文件或其它输出进行分页显示的工具,应该说是linux正统查看文件内容的工具,功能极其强大
- less 的用法比起 more 更加的有弹性,在 more 的时候,我们并没有办法向前面翻, 只能往后面看
- 但若使用了 less 时,就可以使用 pageup pagedown 等按键的功能来往前往后翻看文件,更容易用来查看一个文件的内容
- 除此之外,在 less 里头可以拥有更多的搜索功能,不止可以向下搜,也可以向上搜
语法: less 参数 文件
功能: less与more类似,但使用 less 可以随意浏览文件,而 more 仅能向前移动,却不能向后移动,而且 less 在查看之前不会加载整个文件。
常用选项:
- /字符串:向下搜索"字符串"的功能
- ?字符串:向上搜索"字符串"的功能
- n:重复前一个搜索(与 / 或 ? 有关)
- N:反向重复前一个搜索(与 / 或 ? 有关)
- q:quit
c
[root@VM-4-3-centos lesson3]# less log.txt2.13 head 指令
head 与 tail 就像它的名字一样的浅显易懂,它是用来显示开头或结尾某个数量的文字区块,head 用来显示档案的开头至标准输出中,而 tail 想当然就是看档案的结尾。
语法: head 参数... 文件...
功能: head 用来显示档案的开头至标准输出中,默认head命令打印其相应文件的开头10行。
选项:
- -n<行数> 显示的行数
c
[root@VM-4-3-centos lesson3]# head log.txt
hello 1
hello 2
hello 3
hello 4
hello 5
hello 6
hello 7
hello 8
hello 9
hello 10
[root@VM-4-3-centos lesson3]# head -n5 log.txt
hello 1
hello 2
hello 3
hello 4
hello 5
[root@VM-4-3-centos lesson3]# head -5 log.txt
hello 1
hello 2
hello 3
hello 4
hello 5
2.14 tail 指令
tail 命令从指定点开始将文件写到标准输出。使用 tail 命令的 -f 选项可以方便的查阅正在改变的日志文件,tail -f filename 会把 filename 里最尾部的内容显示在屏幕上,并且不断刷新,使你看到最新的文件内容。
语法: tail 必要参数 文件
功能: 用于显示指定文件末尾内容,不指定文件时,作为输入信息进行处理。常用于查看日志文件。
选项:
- -n<行数> 显示行数
- -f 循环读取
c
[root@VM-4-3-centos lesson3]# tail log.txt
hello 9991
hello 9992
hello 9993
hello 9994
hello 9995
hello 9996
hello 9997
hello 9998
hello 9999
hello 10000
[root@VM-4-3-centos lesson3]# tail -5 log.txt
hello 9996
hello 9997
hello 9998
hello 9999
hello 10000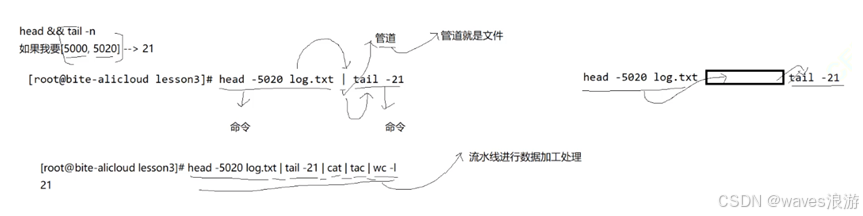
2.15 date 指令
指定格式显示时间: date +%Y:%m:%d
用法: date OPTION... +FORMAT
- 在显示方面,使用者可以设定欲显示的格式,格式设定为一个加号后接数个标记,其中常用的标记列表如下:
- %H : 小时(00...23)
- %M : 分钟(00...59)
- %S : 秒(00...61)
- %X : 相当于 %H:%M:%S
- %d : 日 (01...31)
- %m : 月份 (01...12)
- %Y : 完整年份 (0000...9999)
- %F : 相当于 %Y-%m-%d
- 在设定时间方面:
- date -s //设置当前时间,只有root权限才能设置,其他只能查看
- date -s 20080523 //设置成20080523,这样会把具体时间设置成空00:00:00
- date -s 01:01:01 //设置具体时间,不会对日期做更改
- date -s "01:01:01 2008-05-23″ //这样可以设置全部时间
- date -s "01:01:01 20080523″ //这样可以设置全部时间
- date -s "2008-05-23 01:01:01″ //这样可以设置全部时间
- date -s "20080523 01:01:01″ //这样可以设置全部时间
- 时间戳
- 时间->时间戳:date +%s
- 时间戳->时间:date -d @1508749502
- Unix时间戳(英文为Unix epoch, Unix time, POSIX time 或 Unix timestamp)是从1970年1月1日(UTC/GMT的午夜)开始所经过的秒数,不考虑闰秒
c
[root@VM-4-3-centos lesson3]# date
Mon Feb 10 21:44:29 CST 2025
[root@VM-4-3-centos lesson3]# date +%Y
2025
[root@VM-4-3-centos lesson3]# date +%Y:
2025:
[root@VM-4-3-centos lesson3]# date +%Y-
2025-
[root@VM-4-3-centos lesson3]# date +%Y/
2025/
[root@VM-4-3-centos lesson3]# date +%Y-%m
2025-02
[root@VM-4-3-centos lesson3]# date +%Y-%m:
2025-02:
[root@VM-4-3-centos lesson3]# date +%Y-%m-
2025-02-
[root@VM-4-3-centos lesson3]# date +%Y-%m/
2025-02/
[root@VM-4-3-centos lesson3]# date +%Y-%m-%d
2025-02-10
[root@VM-4-3-centos lesson3]# date +%Y-%m-%d/
2025-02-10/
[root@VM-4-3-centos lesson3]# date +%Y-%m-%d/%H
2025-02-10/21
[root@VM-4-3-centos lesson3]# date +%Y-%m-%d/%H:%M:
2025-02-10/21:49:
[root@VM-4-3-centos lesson3]# date +%Y-%m-%d/%H:%M:%S
2025-02-10/21:50:10
[root@VM-4-3-centos lesson3]# date +%Y-%m-%d\ %H:%M:%S
2025-02-10 21:51:11
2.16 cal 指令
cal命令可以用来显示公历(阳历)日历。公历是现在国际通用的历法,又称格列历,通称阳历。"阳历"又名"太阳历",系以地球绕行太阳一周为一年,为西方各国所通用,故又名"西历"。
命令格式: cal 参数 年份
功能: 用于查看日历等时间信息,如只有一个参数,则表示年份(1-9999),如有两个参数,则表示月份和年份
常用选项:
- -3 显示系统前一个月,当前月,下一个月的月历
c
[root@VM-4-3-centos lesson3]# cal
    February 2025
Su Mo Tu We Th Fr Sa
                   1
 2  3  4  5  6  7  8
 9 10 11 12 13 14 15
16 17 18 19 20 21 22
23 24 25 26 27 28

[root@VM-4-3-centos lesson3]# cal 2025
                               2025

       January               February                 March
Su Mo Tu We Th Fr Sa   Su Mo Tu We Th Fr Sa   Su Mo Tu We Th Fr Sa
          1  2  3  4                      1                      1
 5  6  7  8  9 10 11    2  3  4  5  6  7  8    2  3  4  5  6  7  8
12 13 14 15 16 17 18    9 10 11 12 13 14 15    9 10 11 12 13 14 15
19 20 21 22 23 24 25   16 17 18 19 20 21 22   16 17 18 19 20 21 22
26 27 28 29 30 31      23 24 25 26 27 28      23 24 25 26 27 28 29
                                              30 31
        April                   May                   June
Su Mo Tu We Th Fr Sa   Su Mo Tu We Th Fr Sa   Su Mo Tu We Th Fr Sa
       1  2  3  4  5                1  2  3    1  2  3  4  5  6  7
 6  7  8  9 10 11 12    4  5  6  7  8  9 10    8  9 10 11 12 13 14
13 14 15 16 17 18 19   11 12 13 14 15 16 17   15 16 17 18 19 20 21
20 21 22 23 24 25 26   18 19 20 21 22 23 24   22 23 24 25 26 27 28
27 28 29 30            25 26 27 28 29 30 31   29 30

        July                  August                September
Su Mo Tu We Th Fr Sa   Su Mo Tu We Th Fr Sa   Su Mo Tu We Th Fr Sa
       1  2  3  4  5                   1  2       1  2  3  4  5  6
 6  7  8  9 10 11 12    3  4  5  6  7  8  9    7  8  9 10 11 12 13
13 14 15 16 17 18 19   10 11 12 13 14 15 16   14 15 16 17 18 19 20
20 21 22 23 24 25 26   17 18 19 20 21 22 23   21 22 23 24 25 26 27
27 28 29 30 31         24 25 26 27 28 29 30   28 29 30
                       31
       October               November               December
Su Mo Tu We Th Fr Sa   Su Mo Tu We Th Fr Sa   Su Mo Tu We Th Fr Sa
          1  2  3  4                      1       1  2  3  4  5  6
 5  6  7  8  9 10 11    2  3  4  5  6  7  8    7  8  9 10 11 12 13
12 13 14 15 16 17 18    9 10 11 12 13 14 15   14 15 16 17 18 19 20
19 20 21 22 23 24 25   16 17 18 19 20 21 22   21 22 23 24 25 26 27
26 27 28 29 30 31      23 24 25 26 27 28 29   28 29 30 31
                       30

[root@VM-4-3-centos lesson3]# cal -3
    January 2025          February 2025          March 2025
Su Mo Tu We Th Fr Sa  Su Mo Tu We Th Fr Sa  Su Mo Tu We Th Fr Sa
          1  2  3  4                     1                     1
 5  6  7  8  9 10 11   2  3  4  5  6  7  8   2  3  4  5  6  7  8
12 13 14 15 16 17 18   9 10 11 12 13 14 15   9 10 11 12 13 14 15
19 20 21 22 23 24 25  16 17 18 19 20 21 22  16 17 18 19 20 21 22
26 27 28 29 30 31     23 24 25 26 27 28     23 24 25 26 27 28 29
                                            30 31
2.17 find 指令
- Linux下find命令在目录结构中搜索文件,并执行指定的操作。
- Linux下find命令提供了相当多的查找条件,功能很强大。由于find具有强大的功能,所以它的选项也很多,其中大部分选项都值得我们花时间来了解一下。
- 即使系统中含有网络文件系统( NFS),find命令在该文件系统中同样有效,只要你具有相应的权限。
- 在运行一个非常消耗资源的find命令时,很多人都倾向于把它放在后台执行,因为遍历一个大的文件系统可能会花费很长的时间(这里是指30G字节以上的文件系统)。
语法: find pathname -options
功能: 用于在文件树中查找文件,并作出相应的处理(可能访问磁盘)
常用选项:
- -name 按照文件名查找文件
- 其他选项需要再查,这个命令其实比较复杂
c
[root@VM-4-3-centos lesson3]# tree /root
/root
`-- 112
    |-- lesson2
    |   |-- hello.c
    |   |-- mytest
    |   `-- test.c
    `-- lesson3
        |-- log.txt
        `-- temp.txt

3 directories, 5 files
[root@VM-4-3-centos lesson3]# find /root/112 -name test.c
/root/112/lesson2/test.c
[root@VM-4-3-centos lesson3]# find /root/112 -name test.c -o -name log.txt
/root/112/lesson3/log.txt
/root/112/lesson2/test.c
[root@VM-4-3-centos lesson3]# find /root/112 -name test.c -o -name log.txt -o -name temp.txt
/root/112/lesson3/temp.txt
/root/112/lesson3/log.txt
/root/112/lesson2/test.c
2.18 which 指令
功能: 搜索系统指定的命令
c
[root@VM-4-3-centos lesson3]# which touch
/usr/bin/touch
[root@VM-4-3-centos lesson3]# which mkdir
/usr/bin/mkdir
[root@VM-4-3-centos lesson3]# which whoami
/usr/bin/whoami
[root@VM-4-3-centos lesson3]# which rm
alias rm='rm -i'
	/usr/bin/rm
[root@VM-4-3-centos lesson3]# which ls
alias ls='ls --color=auto'
	/usr/bin/ls
[root@VM-4-3-centos lesson3]# which find
/usr/bin/find
[root@VM-4-3-centos lesson3]# which grep
alias grep='grep --color=auto'
	/usr/bin/grep
[root@VM-4-3-centos lesson3]# which tail
/usr/bin/tail
c
[root@VM-4-3-centos lesson3]# ll
total 164
-rw-r--r-- 1 root root 108894 Feb 9 22:31 log.txt
-rw-r--r-- 1 root root 54113 Feb 10 20:26 temp.txt
[root@VM-4-3-centos lesson3]# ls
log.txt temp.txt
[root@VM-4-3-centos lesson3]# pwd
/root/112/lesson3
[root@VM-4-3-centos lesson3]# ls /bin/ls
/bin/ls
[root@VM-4-3-centos lesson3]# ls /bin/pwd
/bin/pwd
[root@VM-4-3-centos lesson3]# /bin/ls
log.txt temp.txt
[root@VM-4-3-centos lesson3]# /bin/pwd
/root/112/lesson3
[root@VM-4-3-centos lesson3]# ls
log.txt temp.txt
[root@VM-4-3-centos lesson3]# pwd
/root/112/lesson3
[root@VM-4-3-centos lesson3]# touch mycmd.c
[root@VM-4-3-centos lesson3]# ll
total 164
-rw-r--r-- 1 root root 108894 Feb 9 22:31 log.txt
-rw-r--r-- 1 root root 0 Feb 11 00:07 mycmd.c
-rw-r--r-- 1 root root 54113 Feb 10 20:26 temp.txt
[root@VM-4-3-centos lesson3]# nano mycmd.c
[root@VM-4-3-centos lesson3]# cat mycmd.c
#include <stdio.h>
int main()
{
printf("helloworld,I am a command!\n");
return 0;
}
[root@VM-4-3-centos lesson3]# ll
total 168
-rw-r--r-- 1 root root 108894 Feb 9 22:31 log.txt
-rw-r--r-- 1 root root 93 Feb 11 00:09 mycmd.c
-rw-r--r-- 1 root root 54113 Feb 10 20:26 temp.txt
[root@VM-4-3-centos lesson3]# gcc mycmd.c -o mycmd
[root@VM-4-3-centos lesson3]# ll
total 180
-rw-r--r-- 1 root root 108894 Feb 9 22:31 log.txt
-rwxr-xr-x 1 root root 8360 Feb 11 00:10 mycmd
-rw-r--r-- 1 root root 93 Feb 11 00:09 mycmd.c
-rw-r--r-- 1 root root 54113 Feb 10 20:26 temp.txt
[root@VM-4-3-centos lesson3]# ./mycmd
helloworld,I am a command!
[root@VM-4-3-centos lesson3]# mycmd
-bash: mycmd: command not found
[root@VM-4-3-centos lesson3]# cp mycmd /bin
[root@VM-4-3-centos lesson3]# rm mycmd
rm: remove regular file 'mycmd'? y
[root@VM-4-3-centos lesson3]# ll
total 168
-rw-r--r-- 1 root root 108894 Feb 9 22:31 log.txt
-rw-r--r-- 1 root root 93 Feb 11 00:09 mycmd.c
-rw-r--r-- 1 root root 54113 Feb 10 20:26 temp.txt
[root@VM-4-3-centos lesson3]# ls /bin/mycmd
/bin/mycmd
[root@VM-4-3-centos lesson3]# ls
log.txt mycmd.c temp.txt
[root@VM-4-3-centos lesson3]# mycmd
helloworld,I am a command!
[root@VM-4-3-centos lesson3]# ll
total 168
-rw-r--r-- 1 root root 108894 Feb 9 22:31 log.txt
-rw-r--r-- 1 root root 93 Feb 11 00:09 mycmd.c
-rw-r--r-- 1 root root 54113 Feb 10 20:26 temp.txt
[root@VM-4-3-centos lesson3]# gcc mycmd.c -o mycmd
[root@VM-4-3-centos lesson3]# ll
total 180
-rw-r--r-- 1 root root 108894 Feb 9 22:31 log.txt
-rwxr-xr-x 1 root root 8360 Feb 11 00:18 mycmd
-rw-r--r-- 1 root root 93 Feb 11 00:09 mycmd.c
-rw-r--r-- 1 root root 54113 Feb 10 20:26 temp.txt
[root@VM-4-3-centos lesson3]# rm /bin/mycmd
rm: remove regular file '/bin/mycmd'? y
[root@VM-4-3-centos lesson3]# mycmd
-bash: /usr/bin/mycmd: No such file or directory
[root@VM-4-3-centos lesson3]# ./mycmd
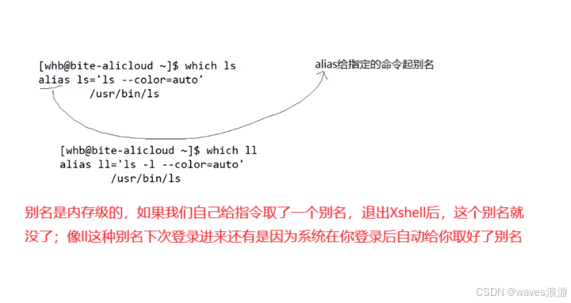
helloworld,I am a command!2.19 alias 指令
功能: 设置命令的别名

2.20 grep 指令
语法: grep 选项 搜寻字符串 文件
功能: 在文件中搜索字符串,将找到的行打印出来
常用选项:
- -i :忽略大小写的不同,所以大小写视为相同
- -n :顺便输出行号
- -v :反向选择,亦即显示出没有 '搜寻字符串' 内容的那一行
c
[root@VM-4-3-centos lesson3]# ll
total 172
drwxr-xr-x 2 root root   4096 Feb 11 00:27 dir
-rw-r--r-- 1 root root 108894 Feb  9 22:31 log.txt
-rw-r--r-- 1 root root     93 Feb 11 00:09 mycmd.c
[root@VM-4-3-centos lesson3]# grep '9999' log.txt
hello 9999
[root@VM-4-3-centos lesson3]# grep '999' log.txt
hello 999
hello 1999
hello 2999
hello 3999
hello 4999
hello 5999
hello 6999
hello 7999
hello 8999
hello 9990
hello 9991
hello 9992
hello 9993
hello 9994
hello 9995
hello 9996
hello 9997
hello 9998
hello 9999
[root@VM-4-3-centos lesson3]# echo "hello bit" >> test.txt
[root@VM-4-3-centos lesson3]# cat test.txt
hello bit
[root@VM-4-3-centos lesson3]# echo "hello Bit" >> test.txt
[root@VM-4-3-centos lesson3]# echo "hello BIt" >> test.txt
[root@VM-4-3-centos lesson3]# echo "helLo BIt" >> test.txt
[root@VM-4-3-centos lesson3]# echo "helLo BIT" >> test.txt
[root@VM-4-3-centos lesson3]# cat test.txt
hello bit
hello Bit
hello BIt
helLo BIt
helLo BIT
[root@VM-4-3-centos lesson3]# grep 'bit' test.txt
hello bit
[root@VM-4-3-centos lesson3]# echo "aaaaaaaaaaaaa" >> test.txt
[root@VM-4-3-centos lesson3]# echo "bbbbbbbbbbbb" >> test.txt
[root@VM-4-3-centos lesson3]# ll
total 120
drwxr-xr-x 2 root root   4096 Feb 11 00:27 dir
-rw-r--r-- 1 root root 108894 Feb  9 22:31 log.txt
-rw-r--r-- 1 root root     93 Feb 11 00:09 mycmd.c
-rw-r--r-- 1 root root     77 Feb 11 17:27 test.txt
[root@VM-4-3-centos lesson3]# cat test.txt
hello bit
hello Bit
hello BIt
helLo BIt
helLo BIT
aaaaaaaaaaaaa
bbbbbbbbbbbb
[root@VM-4-3-centos lesson3]# grep 'bit' test.txt
hello bit
[root@VM-4-3-centos lesson3]# grep -i 'bit' test.txt
hello bit
hello Bit
hello BIt
helLo BIt
helLo BIT
[root@VM-4-3-centos lesson3]# grep -v 'bit' test.txt
hello Bit
hello BIt
helLo BIt
helLo BIT
aaaaaaaaaaaaa
bbbbbbbbbbbb
[root@VM-4-3-centos lesson3]# grep -i -v 'bit' test.txt
aaaaaaaaaaaaa
bbbbbbbbbbbb
[root@VM-4-3-centos lesson3]# grep -iv 'bit' test.txt
aaaaaaaaaaaaa
bbbbbbbbbbbb
[root@VM-4-3-centos lesson3]# grep -ivn 'bit' test.txt
6:aaaaaaaaaaaaa
7:bbbbbbbbbbbb
[root@VM-4-3-centos lesson3]# cat -n test.txt
     1	hello bit
     2	hello Bit
     3	hello BIt
     4	helLo BIt
     5	helLo BIT
     6	aaaaaaaaaaaaa
     7	bbbbbbbbbbbb
[root@VM-4-3-centos lesson3]# grep 'bit' test.txt
hello bit
[root@VM-4-3-centos lesson3]# grep -n 'bit' test.txt
1:hello bit
[root@VM-4-3-centos lesson3]# grep -vn 'bit' test.txt
2:hello Bit
3:hello BIt
4:helLo BIt
5:helLo BIT
6:aaaaaaaaaaaaa
7:bbbbbbbbbbbb
在未来,我们可以使用grep来进行进程查找:
c
[root@VM-4-3-centos lesson3]# ps -axj | grep mysqld2.21 zip/unzip 指令
语法: zip 压缩文件.zip 目录或文件
功能: 将目录或文件压缩成zip格式
常用选项:
- -r :递归处理,将指定目录下的所有文件和子目录一并处理
- -d :解压到指定目录下

如果没有安装过 zip/unzip 指令,可以输入以下指令进行安装:
c
yum install -y zip unzip
c
[root@VM-4-3-centos 112]# ll
total 8
drwxr-xr-x 3 root root 4096 Jan 30 20:29 lesson2
drwxr-xr-x 3 root root 4096 Feb 11 17:24 lesson3
[root@VM-4-3-centos 112]# zip lesson3.zip lesson3
  adding: lesson3/ (stored 0%)
[root@VM-4-3-centos 112]# ll
total 12
drwxr-xr-x 3 root root 4096 Jan 30 20:29 lesson2
drwxr-xr-x 3 root root 4096 Feb 11 17:24 lesson3
-rw-r--r-- 1 root root  166 Feb 12 16:27 lesson3.zip
[root@VM-4-3-centos 112]# mkdir otherpeople
[root@VM-4-3-centos 112]# ll
total 16
drwxr-xr-x 3 root root 4096 Jan 30 20:29 lesson2
drwxr-xr-x 3 root root 4096 Feb 11 17:24 lesson3
-rw-r--r-- 1 root root  166 Feb 12 16:27 lesson3.zip
drwxr-xr-x 2 root root 4096 Feb 12 16:28 otherpeople
[root@VM-4-3-centos 112]# cd otherpeople/
[root@VM-4-3-centos otherpeople]# ll
total 0
[root@VM-4-3-centos otherpeople]# mv ../lesson3.zip .
[root@VM-4-3-centos otherpeople]# ll
total 4
-rw-r--r-- 1 root root 166 Feb 12 16:27 lesson3.zip
[root@VM-4-3-centos otherpeople]# pwd
/root/112/otherpeople
[root@VM-4-3-centos otherpeople]# unzip lesson3.zip
Archive:  lesson3.zip
   creating: lesson3/
[root@VM-4-3-centos otherpeople]# ll
total 8
drwxr-xr-x 2 root root 4096 Feb 11 17:24 lesson3
-rw-r--r-- 1 root root  166 Feb 12 16:27 lesson3.zip
[root@VM-4-3-centos otherpeople]# tree lesson3
lesson3

0 directories, 0 files
[root@VM-4-3-centos otherpeople]# rm * -rf
[root@VM-4-3-centos otherpeople]# ll
total 0
[root@VM-4-3-centos otherpeople]# cd ..
[root@VM-4-3-centos 112]# ll
total 12
drwxr-xr-x 3 root root 4096 Jan 30 20:29 lesson2
drwxr-xr-x 3 root root 4096 Feb 11 17:24 lesson3
drwxr-xr-x 2 root root 4096 Feb 12 16:31 otherpeople
[root@VM-4-3-centos 112]# zip -r lesson3.zip lesson3
  adding: lesson3/ (stored 0%)
  adding: lesson3/test.txt (deflated 58%)
  adding: lesson3/dir/ (stored 0%)
  adding: lesson3/log.txt (deflated 78%)
  adding: lesson3/mycmd.c (deflated 4%)
[root@VM-4-3-centos 112]# ll
total 36
drwxr-xr-x 3 root root  4096 Jan 30 20:29 lesson2
drwxr-xr-x 3 root root  4096 Feb 11 17:24 lesson3
-rw-r--r-- 1 root root 24439 Feb 12 16:33 lesson3.zip
drwxr-xr-x 2 root root  4096 Feb 12 16:31 otherpeople
[root@VM-4-3-centos 112]# cd otherpeople/
[root@VM-4-3-centos otherpeople]# ll
total 0
[root@VM-4-3-centos otherpeople]# mv ../lesson3.zip .
[root@VM-4-3-centos otherpeople]# ll
total 24
-rw-r--r-- 1 root root 24439 Feb 12 16:33 lesson3.zip
[root@VM-4-3-centos otherpeople]# unzip lesson3.zip
Archive:  lesson3.zip
   creating: lesson3/
  inflating: lesson3/test.txt
   creating: lesson3/dir/
  inflating: lesson3/log.txt
  inflating: lesson3/mycmd.c
[root@VM-4-3-centos otherpeople]# ll
total 28
drwxr-xr-x 3 root root  4096 Feb 11 17:24 lesson3
-rw-r--r-- 1 root root 24439 Feb 12 16:33 lesson3.zip
[root@VM-4-3-centos otherpeople]# tree lesson3
lesson3
|-- dir
|-- log.txt
|-- mycmd.c
`-- test.txt

1 directory, 3 files
[root@VM-4-3-centos otherpeople]# cat lesson3/log.txt
//这里会显示这个大文件里的所有内容 10000行
c
[root@VM-4-3-centos 112]# ll
total 12
drwxr-xr-x 3 root root 4096 Jan 30 20:29 lesson2
drwxr-xr-x 3 root root 4096 Feb 11 17:24 lesson3
drwxr-xr-x 2 root root 4096 Feb 12 16:37 otherpeople
[root@VM-4-3-centos 112]# zip -r lesson3.zip lesson3
  adding: lesson3/ (stored 0%)
  adding: lesson3/test.txt (deflated 58%)
  adding: lesson3/dir/ (stored 0%)
  adding: lesson3/log.txt (deflated 78%)
  adding: lesson3/mycmd.c (deflated 4%)
[root@VM-4-3-centos 112]# ll
total 36
drwxr-xr-x 3 root root  4096 Jan 30 20:29 lesson2
drwxr-xr-x 3 root root  4096 Feb 11 17:24 lesson3
-rw-r--r-- 1 root root 24439 Feb 12 16:40 lesson3.zip
drwxr-xr-x 2 root root  4096 Feb 12 16:37 otherpeople
[root@VM-4-3-centos 112]# tree otherpeople/
otherpeople/

0 directories, 0 files
[root@VM-4-3-centos 112]# unzip lesson3.zip -d ./otherpeople/
Archive:  lesson3.zip
   creating: ./otherpeople/lesson3/
  inflating: ./otherpeople/lesson3/test.txt
   creating: ./otherpeople/lesson3/dir/
  inflating: ./otherpeople/lesson3/log.txt
  inflating: ./otherpeople/lesson3/mycmd.c
[root@VM-4-3-centos 112]# ll
total 36
drwxr-xr-x 3 root root  4096 Jan 30 20:29 lesson2
drwxr-xr-x 3 root root  4096 Feb 11 17:24 lesson3
-rw-r--r-- 1 root root 24439 Feb 12 16:40 lesson3.zip
drwxr-xr-x 3 root root  4096 Feb 12 16:41 otherpeople
[root@VM-4-3-centos 112]# tree otherpeople/
otherpeople/
`-- lesson3
    |-- dir
    |-- log.txt
    |-- mycmd.c
    `-- test.txt

2 directories, 3 files
c
// sz 可以让云服务器和Windows之间互相传递消息
sz lesson4.zip