声明,本文为探索和学习记录,仅代表个人观点,webgpu相关已测试、但EMCC只是引用官方文档、并未实验
Emscripten Test Suite --- Emscripten 4.0.15-git (dev) documentation
Hello WebGPU 🟢 - Learn WebGPU for C++ documentation
配置环境
尝试vulkan,失败
找到官网的这个SDK下载的网址,然后点击WINDOWS的徽标,在弹出的这个下载框里面选择你的这个电脑架构去下载最新的SDK installer即可
非常遗憾,最终我的电脑硬件并不支持vo Ken,于是找到了一个更加好用的跨平台gpu加速库,也就是web gpu native
尝试web gpu dawn(依旧失败)
这里给出一个非常优秀的教程链接
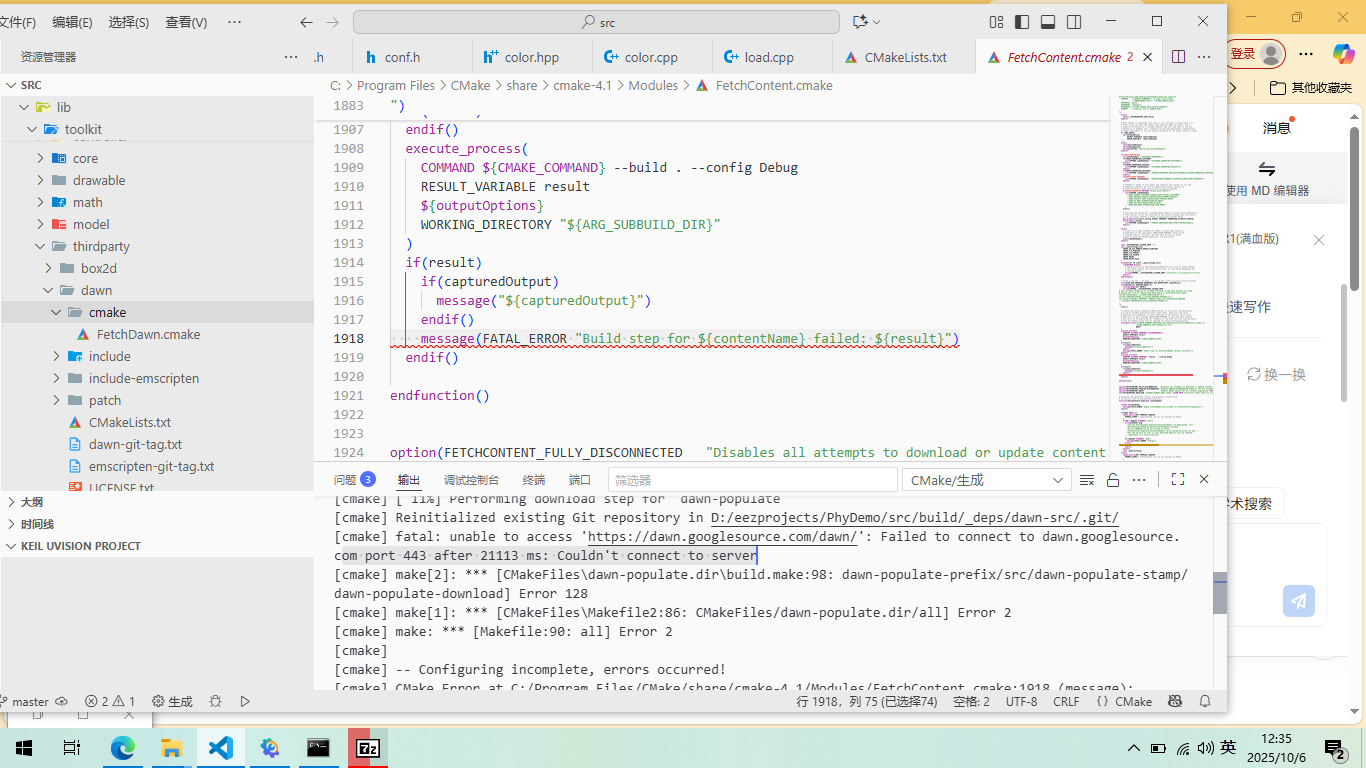
按照这个教程,默认的配置来进行的话,最终会在这个cmake的fetch这一步,因网络无法连接而失败,最终使用steam加加找到dawn的github主页进行尝试
step1: download source
解压到 dawn-main\src
step2: write cmake script
set(WEBGPU_DIR ${PROJECT_SOURCE_DIR}/lib/toolkit/thirdparty/dawn)
add_subdirectory(${WEBGPU_DIR})
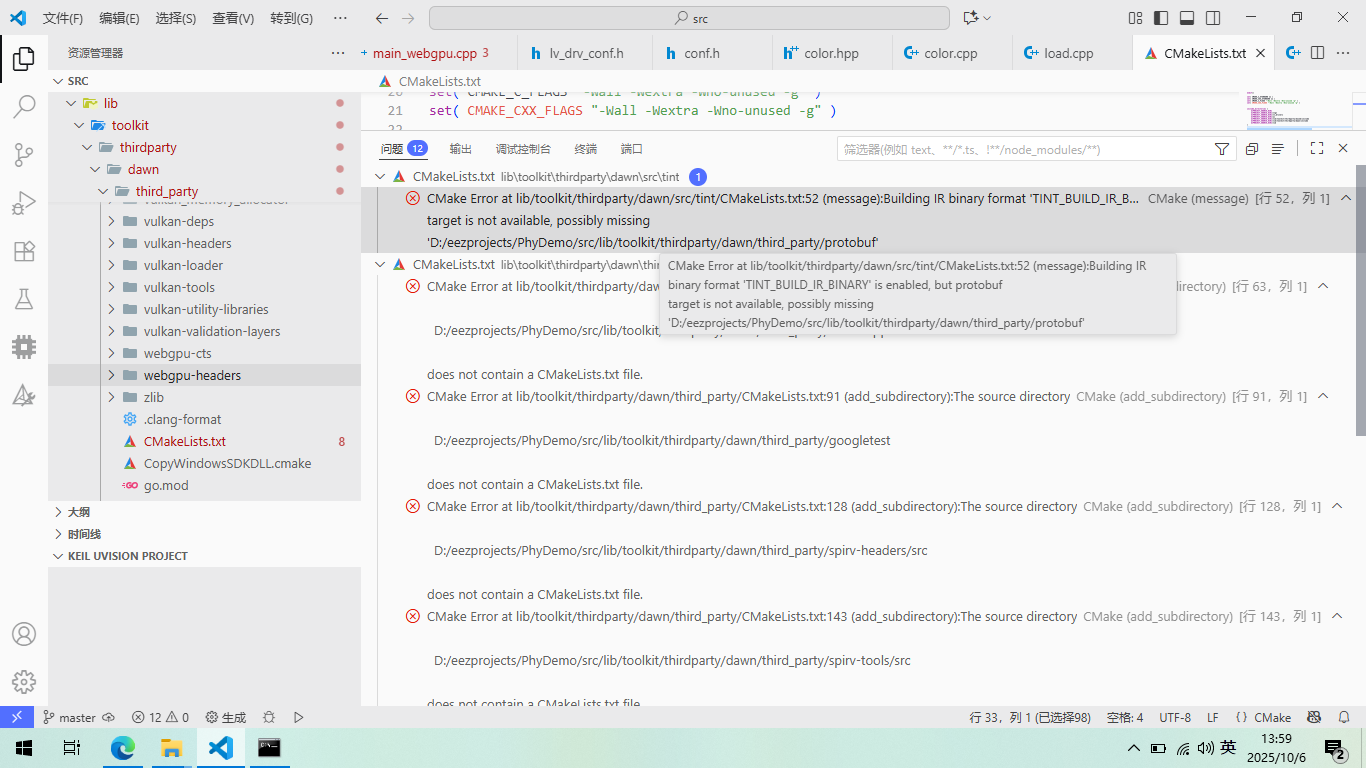
结果框框报错啊,显示有1 mol的依赖项没装。。。。。
step3:resolve dependence
不断地cmake,看看缺了那些依赖,需要的就去GitHub上面下载,放在。。。/dawn/thirdparty/XXX下面,如果/dawn/thirdparty/XXX下面有src,就放在src下面!
Download and install --- Emscripten 4.0.15-git (dev) documentation
protocolbuffers/protobuf: Protocol Buffers - Google's data interchange format
google/googletest: GoogleTest - Google Testing and Mocking Framework
https://codeload.github.com/abseil/abseil-cpp/zip/refs/heads/master
https://github.com/KhronosGroup/SPIRV-Tools.git
.....
有一些巨难下载,只能去gitee
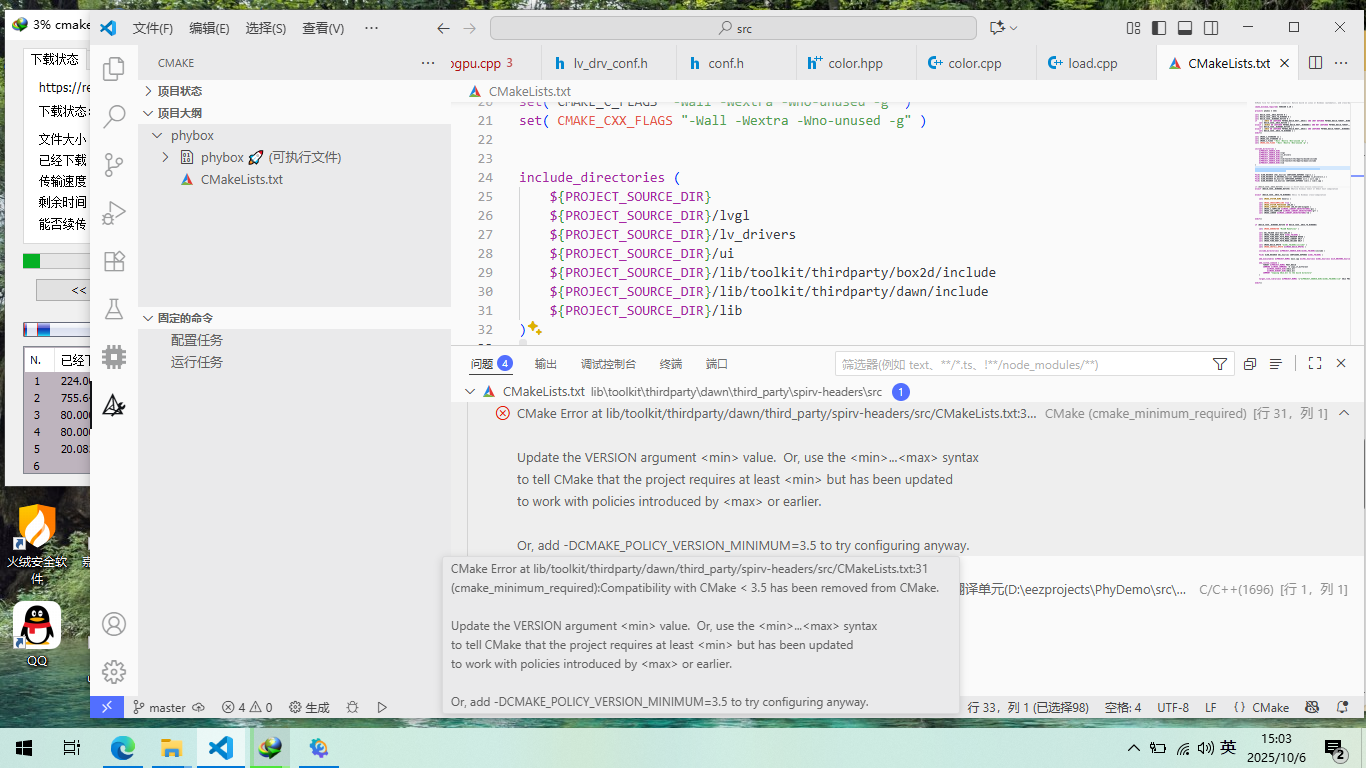
wtf?又报错?!原来是cmake版本太低,这又是一个巨难下载的东西,steam++ 联合IDM才下载下来,此处贴上资源链接
最坑最坑的是里面有一个库,叫做这个Partition allocator,它是包含在了这个Chromium这个库底下啊,如果你直接这个下载这个库的话,它会有两个多g,然后呢,我们get up即使用VPN去下载速度也只有30k,这边下载了五个小时,只下载了300M最终写了一个python脚本,使用这个生产者消费者模型去调git HUB的API,然后才爬取了我需要的part it allocator里面
step4:gen code
接下来,我们去构建使用这个官方给的测试用例依旧不能够正常运行,提示就没有webgpu这个库,然后经过查找了一番资料呢,发现webgpu这个头文件是不会自动出现的,也就是说我们要调用这个generator下的一个脚本来生成
python D:\eezprojects\PhyDemo\src\lib\toolkit\thirdparty\dawn\generator\dawn_json_generator.py
--dawn-json d:\eezprojects\PhyDemo\src\lib\toolkit\thirdparty\dawn\src\dawn\dawn.json
--targets webgpu_headers,webgpu_cpp
--template-dir d:\eezprojects\PhyDemo\src\lib\toolkit\thirdparty\dawn\generator\templates
--output-dir d:\eezprojects\PhyDemo\src\lib\toolkit\thirdparty\dawn\include\dawn
各参数说明
- python + 脚本路径:
调用 Python 解释器执行 Dawn 提供的代码生成脚本 dawn_json_generator.py ,该脚本位于你项目中 Dawn 源码的 generator 目录下(即 D:\eezprojects\PhyDemo\src\lib\toolkit\thirdparty\dawn\generator\dawn_json_generator.py )。
- --dawn-json :
指定 WebGPU 接口定义的源 JSON 文件 dawn.json ,该文件是 Dawn 对 WebGPU 标准的描述文件,位于 dawn\src\dawn\ 目录下(即 d:\eezprojects\PhyDemo\src\lib\toolkit\thirdparty\dawn\src\dawn\dawn.json )。
- --targets :
声明要生成的目标文件类型,这里指定了 webgpu_headers (WebGPU 头文件,如 webgpu.h )和 webgpu_cpp (WebGPU C++ 实现文件)。
- --template-dir :
指定代码生成所使用的模板目录,模板文件定义了生成代码的结构和格式,位于 dawn\generator\templates 目录下(即 d:\eezprojects\PhyDemo\src\lib\toolkit\thirdparty\dawn\generator\templates )。
- --output-dir :
指定生成文件的输出目录,生成的 webgpu.h 等文件会被输出到该目录下(即 d:\eezprojects\PhyDemo\src\lib\toolkit\thirdparty\dawn\include\dawn
step5:link library
折腾了两天啊,终于可以成功编译了,但是呢,编译的时候又报错了,最终呢,就是web gpu点h里面的一些东西,它是找不到定义的,然后这时候通过查找资料,我们需要在link library里面去链接它的库,但是呢,当我们写上link library web gpu native之后,它并没有找见native这个库嗯于是乎呢,又是各种各样的改c make list最终还是没有成功鉴于这个dawn的构建实在过于复杂,最终放弃选择使用web gpu的方式进行尝试
我会把最终尝试的一个dawn的一个结果放在我的这个开源文件当中,如果有足够的耐心并且感兴趣的话,可以尝试一下这种配置方式
尝试webgpu native(成功)
https://github.com/eliemichel/WebGPU-distribution/archive/refs/tags/wgpu-v0.19.4.1.zip
step1:下载、写Cmake
可以参考我写的cmake那片文章。
#CMake file for different scenarios: Native build on Linux or Windows (automatic), and cross-build from Unix to Windows (by defining build-host as Unix and build-target as Windows)

cmake_minimum_required( VERSION 3.10 )

project( phybox C CXX)

# 显式指定 C 和 C++ 编译器
set(CMAKE_C_COMPILER "D:/mingw64/bin/gcc.exe")
set(CMAKE_CXX_COMPILER "D:/mingw64/bin/g++.exe")

# 可选:禁用编译器 ABI 检测(进一步减少检测步骤)
set(CMAKE_C_COMPILER_WORKS TRUE)
set(CMAKE_CXX_COMPILER_WORKS TRUE)


# Add include directories for each thirdparty library's include and src folders
file(GLOB LIB_DIRS RELATIVE ${PROJECT_SOURCE_DIR} "lib/*")
foreach(lib ${LIB_DIRS})
    if(IS_DIRECTORY "${PROJECT_SOURCE_DIR}/${lib}/include")
        include_directories("${PROJECT_SOURCE_DIR}/${lib}/include")
    endif()
    if(IS_DIRECTORY "${PROJECT_SOURCE_DIR}/${lib}/src")
        include_directories("${PROJECT_SOURCE_DIR}/${lib}/src")
    endif()
    if(IS_DIRECTORY "${PROJECT_SOURCE_DIR}/${lib}")
        include_directories("${PROJECT_SOURCE_DIR}/${lib}")
    endif()
endforeach()

add_subdirectory(${PROJECT_SOURCE_DIR}/lib/lv_toolkit)
include_directories("${PROJECT_SOURCE_DIR}/ui")
include_directories("${PROJECT_SOURCE_DIR}")
include_directories("${PROJECT_SOURCE_DIR}/lib")

file( GLOB_RECURSE PHYBOX_SRCS
    ${PROJECT_SOURCE_DIR}/event/*.c
    ${PROJECT_SOURCE_DIR}/event/*.cpp

    ${PROJECT_SOURCE_DIR}/ui/**/*.c
    ${PROJECT_SOURCE_DIR}/ui/**/*.cpp


    ${PROJECT_SOURCE_DIR}/ui/*.c
    ${PROJECT_SOURCE_DIR}/ui/*.cpp
)

message("*********************************************************************")
foreach(src_file ${PHYBOX_SRCS})
    get_filename_component(src_bs ${src_file} NAME)
    message(${src_bs})
    if (${src_bs} STREQUAL "load.cpp")
        message("``````````````````````````````````````````got it")
    endif()
endforeach()

# file( GLOB_RECURSE PHYBOX_SRCS CONFIGURE_DEPENDS ${PROJECT_SOURCE_DIR}/main.cpp)


add_executable( ${PROJECT_NAME} main.cpp ${PHYBOX_SRCS})


target_link_libraries(phybox toolkit )

add_custom_command (
    TARGET ${PROJECT_NAME} POST_BUILD
    COMMAND ${CMAKE_COMMAND} -E copy_if_different
        ${CMAKE_SOURCE_DIR}/SDL2.dll
        ${CMAKE_BINARY_DIR}/SDL2.dll
    COMMENT "Copying SDL2.dll to the build directory"
)


cmake_minimum_required(VERSION 3.15)
project(toolkit LANGUAGES C CXX)

# ==================================================
# 核心逻辑与使用注意事项
# ==================================================
# 1. 核心逻辑
#   - 构建 toolkit 静态库,整合自身源码与 src/thirdparty 下的所有依赖(如 LVGL、SDL2、box2d 等)
#   - 批量处理第三方依赖:自动包含依赖根目录及 include 子目录,自带 CMakeLists.txt 的依赖通过 add_subdirectory 引入
#   - 显式为 LVGL、LV Drivers 传递 SDL2 头文件路径(解决子模块跨依赖头文件找不到问题)
#   - 链接第三方库并暴露 toolkit 自身头文件,支持外部项目引用
# 2. 使用注意事项
#   - 第三方依赖需放在 src/thirdparty 目录下,建议按"库名"创建独立子目录(如 src/thirdparty/sdl2)
#   - 若依赖自带 CMakeLists.txt(如 LVGL),需确保其内部已正确定义目标(如 lvgl、lv_drivers)
#   - SDL2 相关路径需手动匹配实际存放位置:头文件默认预期在 src/thirdparty/sdl2/include,库文件在 thirdparty/sdl2/lib
#   - 编译测试需通过 -DBUILD_TOOLKIT_TESTS=ON 启用,需确保 test 目录下有独立 CMakeLists.txt
#   - 若新增第三方依赖,无需手动添加路径,放入 src/thirdparty 后会被批量处理(自带 include 目录优先)

# 启用C++17标准(强制生效,如需调整版本可修改数字,如11、14、20)
set(CMAKE_CXX_STANDARD 17)
set(CMAKE_CXX_STANDARD_REQUIRED ON)

# ========== 1. 编译 toolkit 自身源码 ==========
# 递归收集 src 目录下所有 .cpp 文件(覆盖 core、drawable 等所有模块源码)
file(GLOB_RECURSE TOOLKIT_SRCS
    ${CMAKE_CURRENT_SOURCE_DIR}/src/**/*.cpp
    ${CMAKE_CURRENT_SOURCE_DIR}/src/**/*.c
    ${CMAKE_CURRENT_SOURCE_DIR}/src/*.cpp
    ${CMAKE_CURRENT_SOURCE_DIR}/src/*.c


    ${CMAKE_CURRENT_SOURCE_DIR}/example/**/*.cpp
    ${CMAKE_CURRENT_SOURCE_DIR}/example/**/*.c
)

# 生成 toolkit 静态库(STATIC 表示静态链接库,供外部项目通过 target_link_libraries 链接)
add_library(toolkit STATIC ${TOOLKIT_SRCS})
message("srcs")
foreach(src_file ${TOOLKIT_SRCS})
    get_filename_component(src_bs ${src_file} NAME)
    message(${src_bs})
    if (${src_bs} STREQUAL "drawable.cpp")
        message("``````````````````````````````````````````got it")
    endif()
endforeach()

# ========== 2. 批量引入 src/thirdparty 下的第三方依赖 ==========
# 1. 手动指定 SDL2 头文件路径(优先确保 SDL2 路径被识别,解决子模块依赖问题)
target_include_directories(toolkit PUBLIC "${CMAKE_CURRENT_SOURCE_DIR}/src/thirdparty/sdl2/include")
# 2. 添加 thirdparty 根目录到头文件搜索路径(供所有依赖模块基础引用)
target_include_directories(toolkit PUBLIC "${CMAKE_CURRENT_SOURCE_DIR}/src/thirdparty")

# 遍历 src/thirdparty 下所有子目录(每个子目录视为一个独立依赖库)
file(GLOB THIRDPARTY_DIRS "${CMAKE_CURRENT_SOURCE_DIR}/src/thirdparty/*")
foreach(DEP_DIR ${THIRDPARTY_DIRS})
    # 添依赖库根目录到头文件路径(适配无 include 子目录的依赖)
    target_include_directories(toolkit PUBLIC "${DEP_DIR}")
    # 若依赖库存在 include 子目录,自动添加该目录(适配标准目录结构的依赖)
    if (EXISTS "${DEP_DIR}/include")
        target_include_directories(toolkit PUBLIC "${DEP_DIR}/include")
    else()
        message("Warning: 依赖目录 ${DEP_DIR} 下未找到 include 子目录,可能导致头文件引用异常")
    endif()

    # 若依赖库自带 CMakeLists.txt,自动通过 add_subdirectory 引入编译(如 LVGL、box2d 等)
    if(EXISTS "${DEP_DIR}/CMakeLists.txt")
        add_subdirectory(${DEP_DIR})
    else()
        message("Warning: 依赖目录 ${DEP_DIR} 下未找到 CMakeLists.txt,需手动确认该依赖是否已提前编译")
    endif()
endforeach()

# 显式为 LVGL、LV Drivers 传递 SDL2 头文件路径(解决子模块跨依赖问题:如 LV Drivers 调用 SDL2 时找不到头文件)
target_include_directories(lvgl PUBLIC "${CMAKE_CURRENT_SOURCE_DIR}/src/thirdparty/sdl2/include")
target_include_directories(lv_drivers PUBLIC "${CMAKE_CURRENT_SOURCE_DIR}/src/thirdparty/sdl2/include")

# ========== 3. 配置全局头文件路径 ==========
# 通过 include_directories 添加全局头文件搜索路径(作用于当前项目所有后续目标)
include_directories(
    ${CMAKE_CURRENT_SOURCE_DIR}/include  # toolkit 公共头文件目录(供外部项目引用)
    ${CMAKE_CURRENT_SOURCE_DIR}/src      # toolkit 源码目录(供内部模块相互引用)
)

# ========== 4. 链接第三方依赖库 ==========
# 为 toolkit 链接第三方库(需确保依赖已通过 add_subdirectory 引入或提前编译完成)
target_link_libraries(toolkit
    PRIVATE -L"${CMAKE_CURRENT_SOURCE_DIR}/src/thirdparty/sdl2/lib" SDL2  # SDL2 库:-L 指定库文件路径,后接库名
    PRIVATE box2d                                                   # 示例:链接 box2d 物理引擎库(需确保已引入)
    PRIVATE gtest                                                   # 示例:链接 googletest 测试框架(按需启用)
    PRIVATE webgpu                                                  # 示例:链接 webgpu 图形库(按需启用)
)

# ========== 5. 暴露 toolkit 头文件路径(供外部项目引用) ==========
target_include_directories(toolkit
    PUBLIC ${CMAKE_CURRENT_SOURCE_DIR}/include  # 对外暴露的公共头文件目录(外部项目需包含的路径)
    PRIVATE ${CMAKE_CURRENT_SOURCE_DIR}/src     # 仅 toolkit 内部使用的源码目录(不对外暴露)
)

# ========== 6. 可选:编译 toolkit 测试模块 ==========
# 定义编译选项,控制是否构建测试(默认关闭,启用命令:cmake -DBUILD_TOOLKIT_TESTS=ON ..)
option(BUILD_TOOLKIT_TESTS "是否编译 toolkit 的测试模块" OFF)
if(BUILD_TOOLKIT_TESTS)
    add_subdirectory(test)  # 引入 test 目录的编译配置(需确保 test 目录有 CMakeLists.txt)
endif()
step2:检验安装
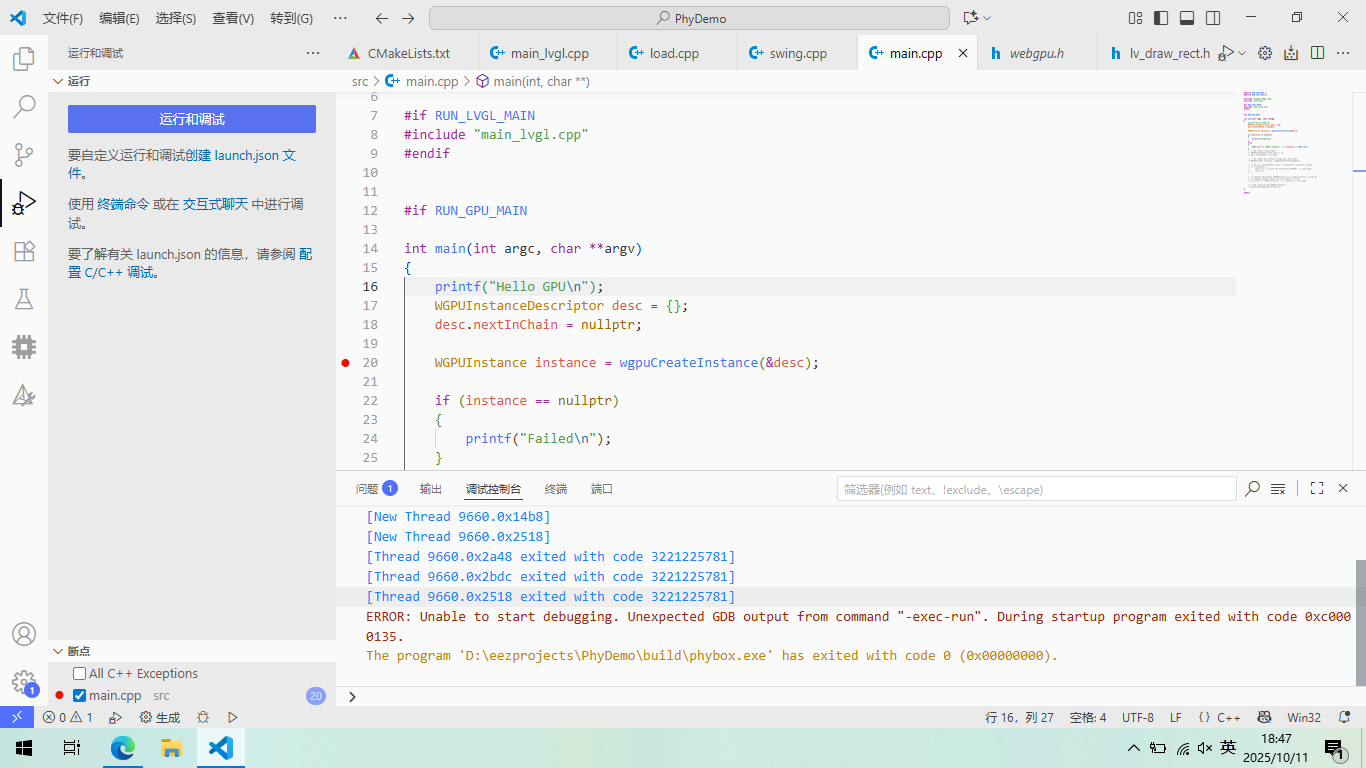
printf("Hello GPU\n");
WGPUInstanceDescriptor desc = {};
desc.nextInChain = nullptr;
WGPUInstance instance = wgpuCreateInstance(&desc);
if (instance == nullptr)
{
printf("Failed\n");
}
else
{
std::cout << "WGPU instance: " << instance << std::endl;
}
奇怪的是这段代码连printf都出不来!
更奇怪的是删掉CreateInstance后成功print:
printf("Hello GPU\n");
WGPUInstanceDescriptor desc = {};
desc.nextInChain = nullptr;
WGPUInstance instance = nullptr;// = wgpuCreateInstance(&desc);
if (instance == nullptr)
{
printf("Failed\n");
}
else
{
std::cout << "WGPU instance: " << instance << std::endl;
}
Hello GPU
Failed
发现独显爆红,于是装驱动
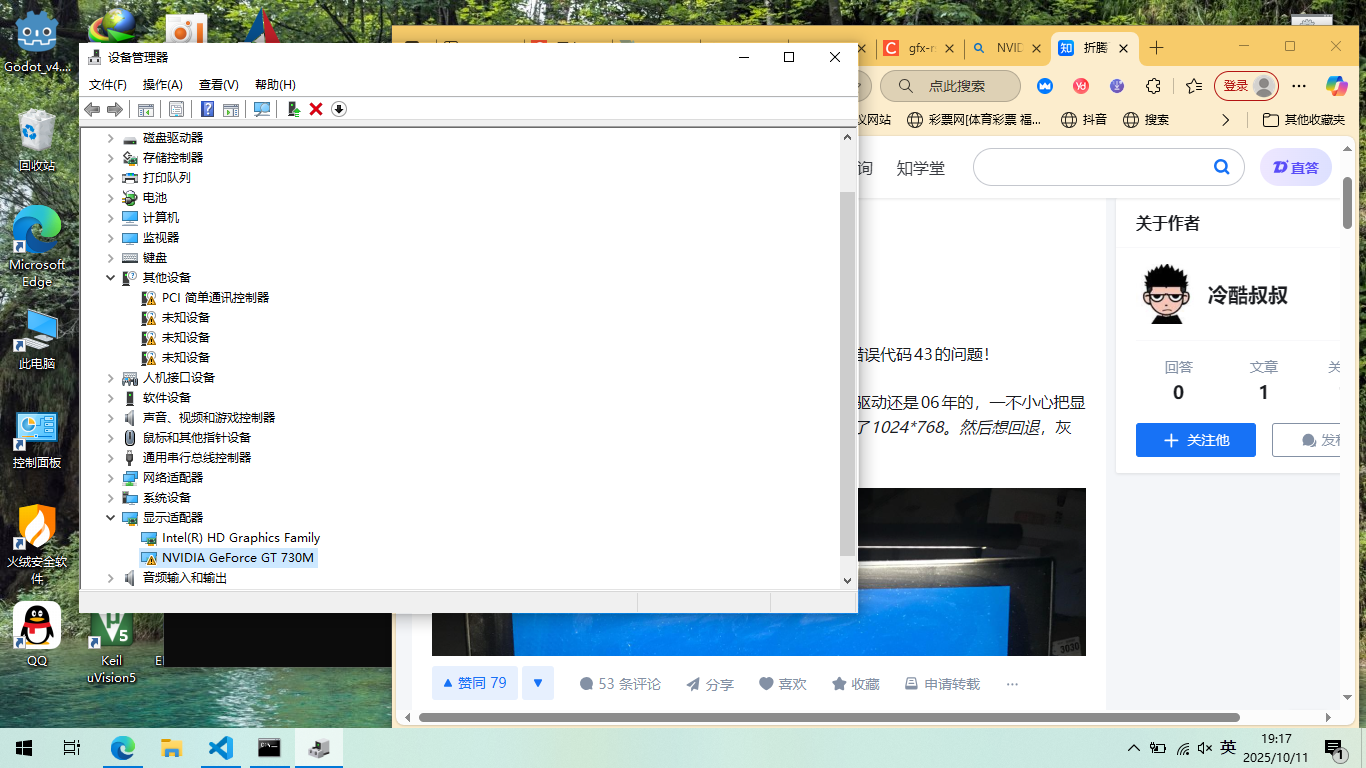
NVIDIA RTX Driver Release 580 R580 U4 (581.42) | Windows 11
继续失败,提示不支持,于是用DDU卸载原有显卡
Display Driver Uninstaller (DDU) download version 18.1.3.5
毁了。。。这下彻底识别不到了。。。
step4:尝试软件渲染
(c) Microsoft Corporation。保留所有权利。
C:\Users\15269>dxdiag
C:\Users\15269>dxdiag
C:\Users\15269>set WGPU_BACKEND=gl
C:\Users\15269>set WGPU_ADAPTER=software
C:\Users\15269>set WGPU_LOG=trace
C:\Users\15269>D:\eezprojects\PhyDemo\build\phybox.exe
C:\Users\15269>D:\eezprojects\PhyDemo\build\phybox.exe
Hello GPU
WGPU instance: 0x1c18d9a45b0
C:\Users\15269>
OHHHHHHHHHHHHHHHHHHHHHHHH!
于是设置环境变量,这样就不用每次都配置了
step5:最终可运行测试
#define RUN_GPU_MAIN 1
#define RUN_LVGL_MAIN 0

#include "webgpu/webgpu.hpp"
#include <iostream>

#if RUN_LVGL_MAIN
#include "main_lvgl.cpp"
#endif


#if RUN_GPU_MAIN

int main(int argc, char **argv)
{
    // We create a descriptor
    WGPUInstanceDescriptor desc = {};
    desc.nextInChain = nullptr;

    // We create the instance using this descriptor
    WGPUInstance instance = wgpuCreateInstance(&desc);

    // We can check whether there is actually an instance created
    if (!instance) {
        std::cerr << "Could not initialize WebGPU!" << std::endl;
        return 1;
    }

    // Display the object (WGPUInstance is a simple pointer, it may be
    // copied around without worrying about its size).
    std::cout << "WGPU instance: " << instance << std::endl;

    // We clean up the WebGPU instance
    wgpuInstanceRelease(instance);
}

#endif
搭建EMSdk环境
去到dawn thirdparty emsdk,执行:
emsdk.bat install latest
发现下载巨慢
https://storage.googleapis.com/webassembly/emscripten-releases-builds/deps/node-v22.16.0-win-x64.zip
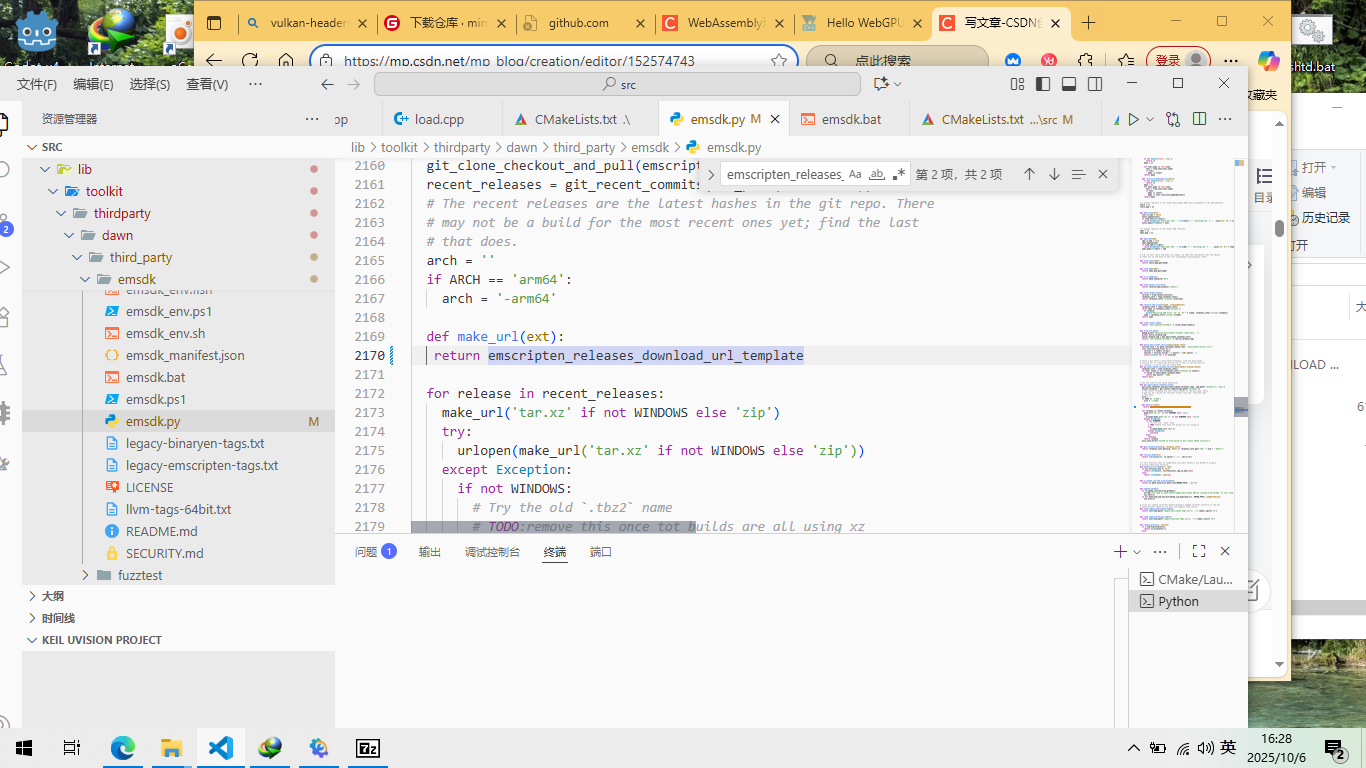
emsdk_packages_url = 'https://storage.googleapis.com/webassembly/emscripten-releases-builds/deps/'
emscripten_releases_repo = 'https://chromium.googlesource.com/emscripten-releases'
emscripten_releases_download_url_template = "file://C:\Users\15269\Downloads"
之后再次运行
发现依旧不行啊,最终才找见这个脚本里面会有一个呃download if exist这一个它默认是为TRUE的我们把这个参数给它写死成FALSE之后我们下载手动,下载好它所需要的wSam Binary然后重命名成他希望保存的这个名称,放到这个download下面之后再次运行这个程序,我们就可以看到它生成了一个upstream之后呢,就是下载其他的一些依赖,然后就可以成功配置
下好后运行这个:
# Make the "latest" SDK "active" for the current user. (writes .emscripten file)
./emsdk activate latest

# Activate PATH and other environment variables in the current terminal
source ./emsdk_env.sh
这时候啊,我们还需要手动的把这个PATH配置一下
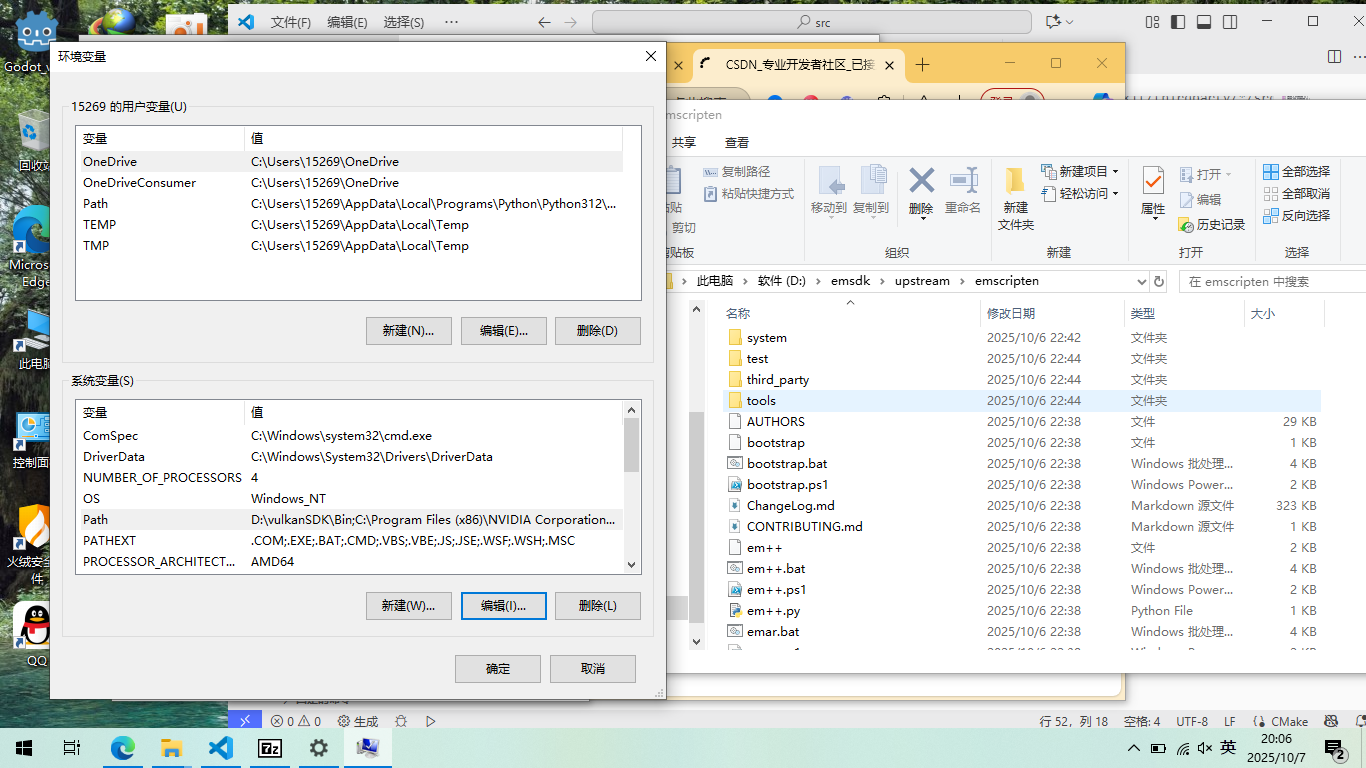
之后运行emcc -v 或 emcc -v
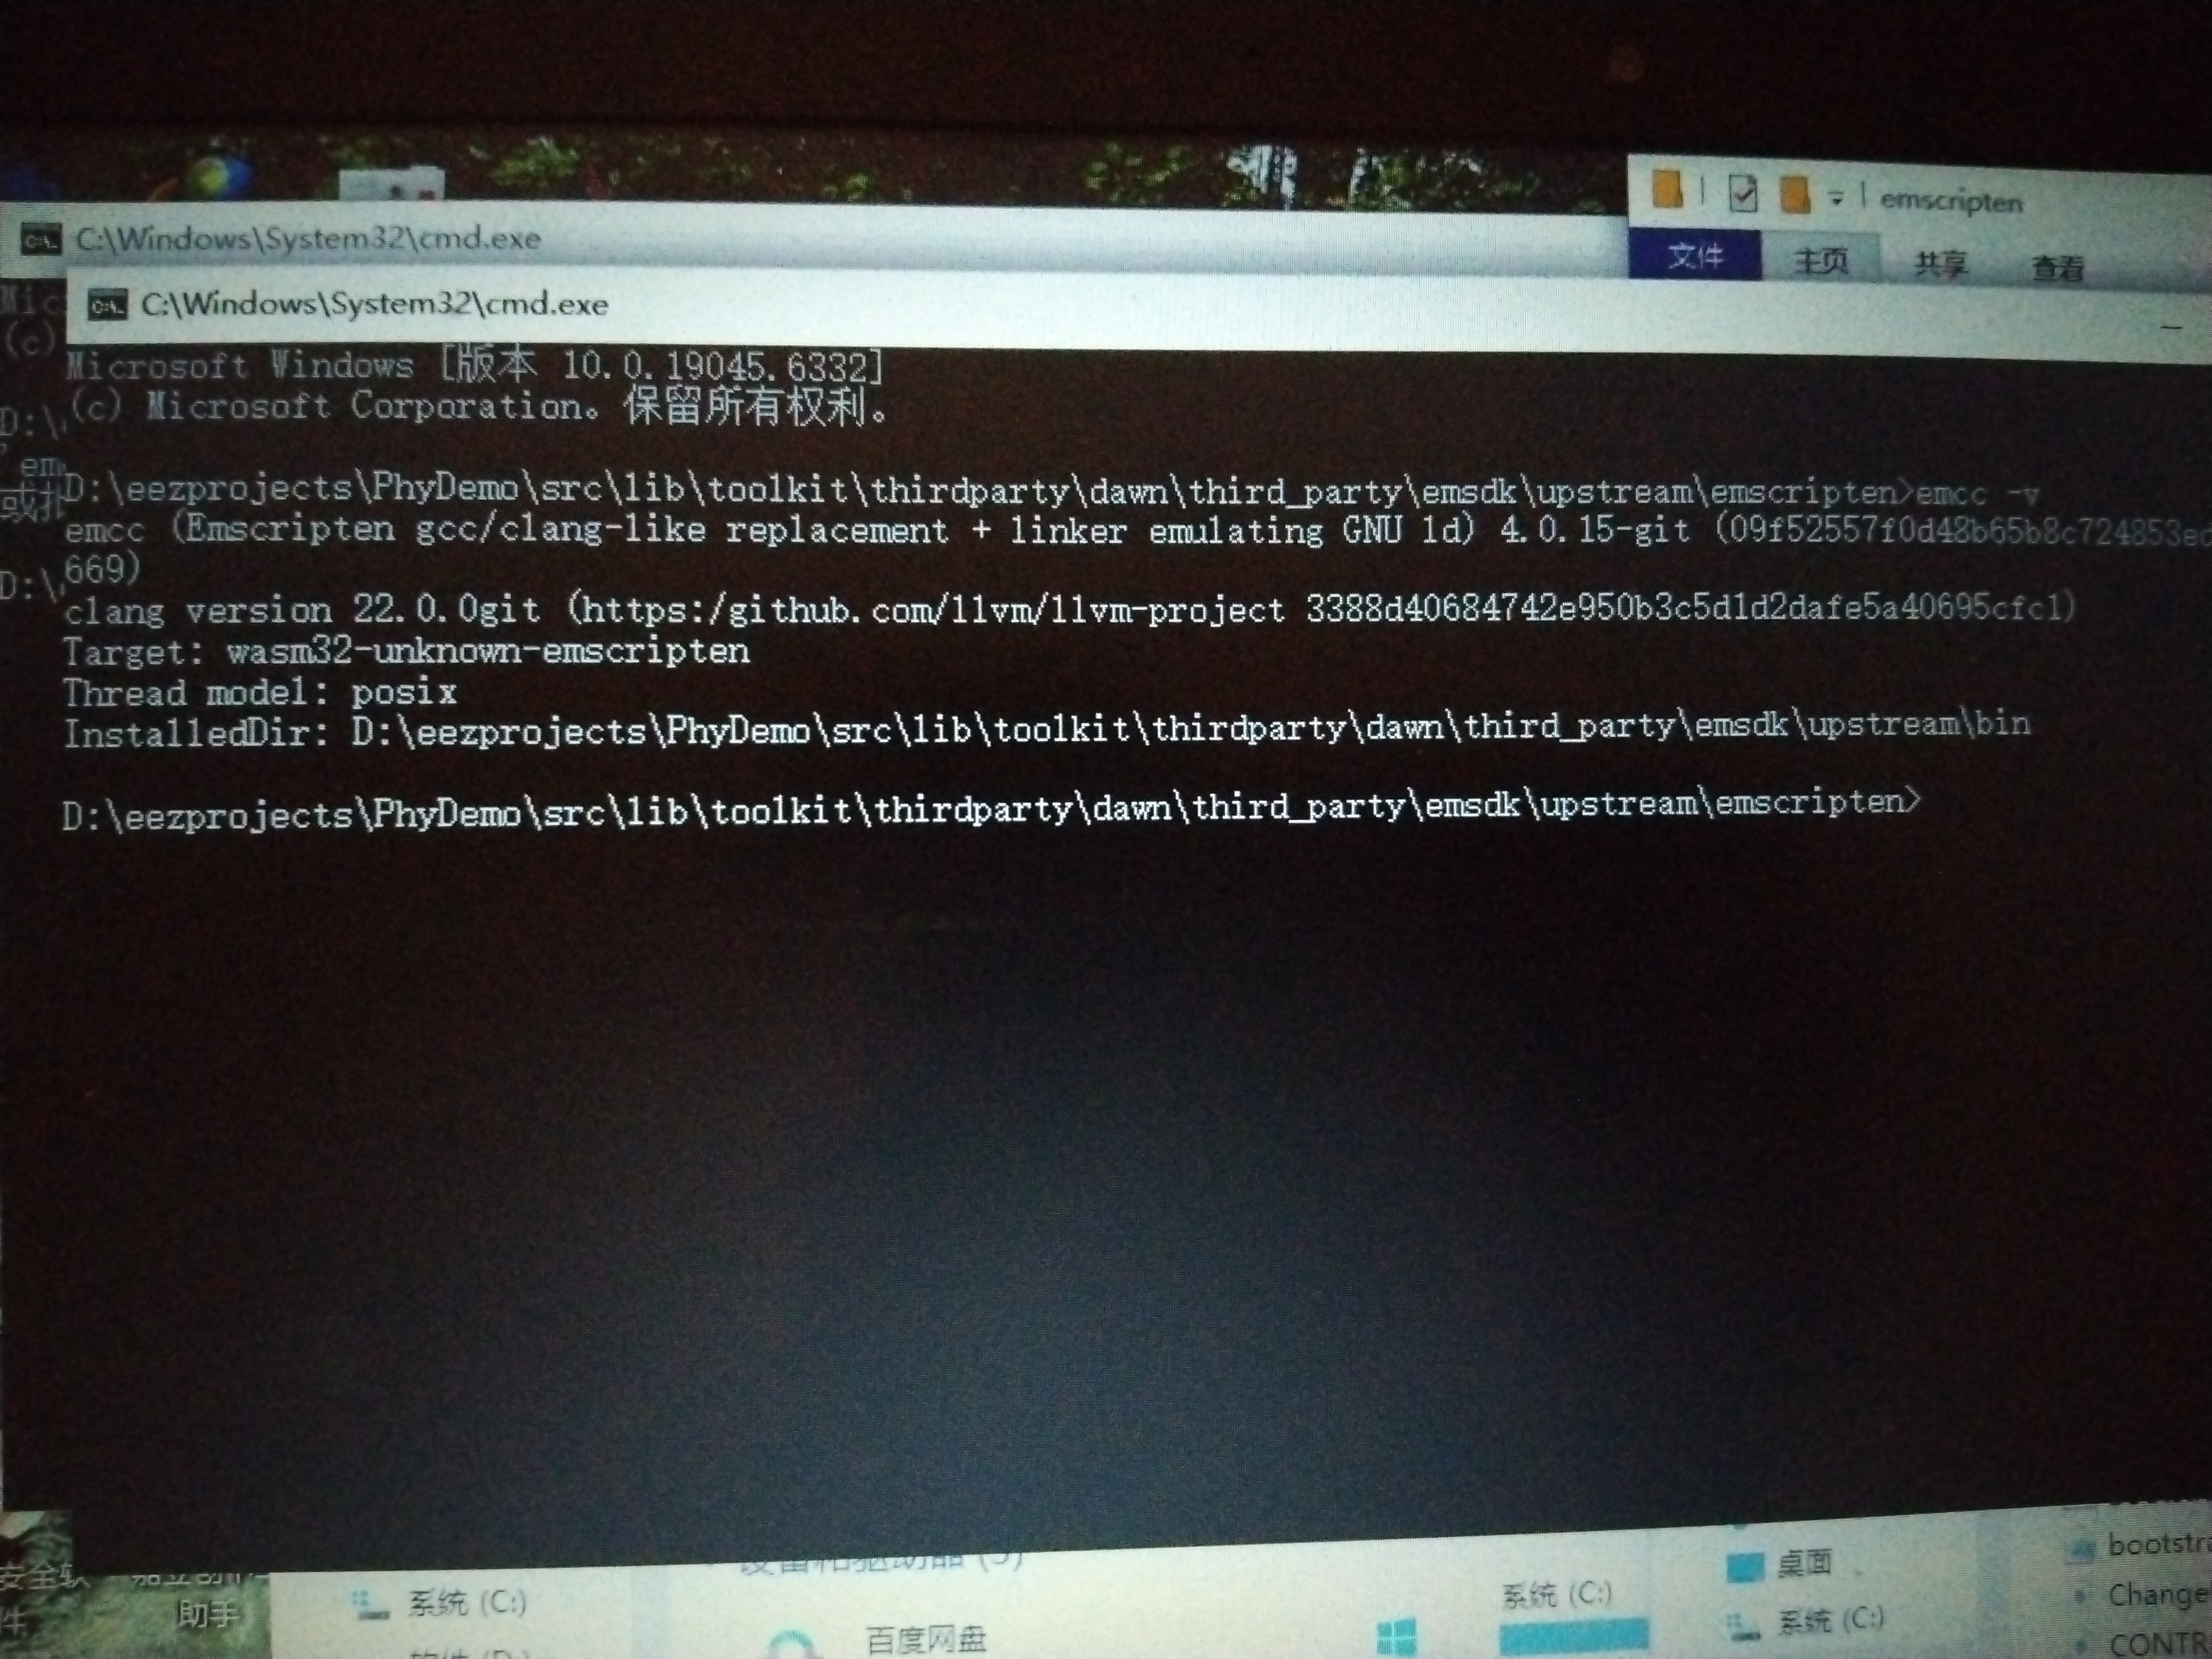
step5: verify installation
为了测试实现,我们简单地创建了WebGPU实例,也就是说,我们可以在JavaScript中得到等价的实例。然后我们检查并销毁它。
Important 重要的Make sure to include
<webgpu/webgpu.h>before using any WebGPU function or type!在使用任何WebGPU函数或类型之前,请确保包含!
// Includes
#include <webgpu/webgpu.h>
#include <iostream>
{{ Includes}} referenced in {{ file: main.cpp}}{{包括}}在{{file: main.cpp}}中引用
// [...] Includes

int main (int, char**) {
    // [...] Create WebGPU instance

    // [...] Check WebGPU instance

    // [...] Destroy WebGPU instance

    return 0;
}
{{ file: main.cpp}} {{文件:main.cpp}}
Descriptors and Creation描述符和创建
The instance is created using the
wgpuCreateInstancefunction. Like all WebGPU functions meant to create an entity, it takes as argument a descriptor, which we can use to specify options regarding how to set up this object.实例是使用函数创建的。像所有用来创建实体的WebGPU函数一样,它接受一个描述符作为参数,我们可以用它来指定关于如何设置这个对象的选项。
// We create a descriptor
WGPUInstanceDescriptor desc = {};
desc.nextInChain = nullptr;

// We create the instance using this descriptor
WGPUInstance instance = wgpuCreateInstance(&desc);
{{ Create WebGPU instance}} replaced by {{ Create WebGPU instance}} referenced in {{ file: main.cpp}}{{创建WebGPU实例}}被{{file: main.cpp}}中引用的{{创建WebGPU实例}}所取代
Note 请注意The descriptor is a kind of way to pack many function arguments together, because some descriptors really have a lot of fields. It can also be used to write utility functions that take care of populating the arguments, to ease the program's architecture.描述符是将许多函数参数打包在一起的一种方式,因为有些描述符确实有很多字段。它还可以用于编写负责填充参数的实用程序函数,以简化程序的体系结构。
We meet another WebGPU idiom in the
WGPUInstanceDescriptorstructure: the first field of a descriptor is always a pointer callednextInChain. This is a generic way for the API to enable custom extensions to be added in the future, or to return multiple entries of data. In a lot of cases, we set it tonullptr.我们在结构中遇到了另一个WebGPU习语:描述符的第一个字段总是一个指针。这是API允许在将来添加自定义扩展或返回多个数据项的通用方法。在很多情况下,我们把它设为。Check 检查
A WebGPU entity created with a
wgpuCreateSomethingfunction is technically just a pointer. It is a blind handle that identifies the actual object, which lives on the backend side and to which we never need direct access.用函数创建的WebGPU实体在技术上只是一个指针。它是一个识别实际对象的盲句柄,它位于后端,我们永远不需要直接访问它。To check that an object is valid, we can just compare it with
nullptr, or use the boolean operator:要检查一个对象是否有效,只需将其与(或使用布尔运算符)进行比较:
// We can check whether there is actually an instance created
if (!instance) {
    std::cerr << "Could not initialize WebGPU!" << std::endl;
    return 1;
}

// Display the object (WGPUInstance is a simple pointer, it may be
// copied around without worrying about its size).
std::cout << "WGPU instance: " << instance << std::endl;
{{ Check WebGPU instance}} referenced in {{ file: main.cpp}}{{检查WebGPU实例}}中引用的{{file: main.cpp}}
This should display something like
WGPU instance: 000001C0D2637720at startup.这应该在启动时显示类似的内容。Destruction and lifetime management销毁和生命周期管理
All the entities that can be created using WebGPU must eventually be released . A procedure that creates an object always looks like
wgpuCreateSomething, and its equivalent for releasing it iswgpuSomethingRelease.所有可以使用WebGPU创建的实体最终都必须被释放。创建对象的过程总是这样,而释放对象的过程也是这样。Note that each object internally holds a reference counter, and releasing it only frees related memory if no other part of your code still references it (i.e., the counter falls to 0):请注意,每个对象内部持有一个引用计数器,只有在代码中没有其他部分仍然引用它(即计数器降为0)时才释放相关内存:
WGPUSomething sth = wgpuCreateSomething(/* descriptor */);

// This means "increase the ref counter of the object sth by 1"
wgpuSomethingReference(sth);
// Now the reference is 2 (it is set to 1 at creation)

// This means "decrease the ref counter of the object sth by 1
// and if it gets down to 0 then destroy the object"
wgpuSomethingRelease(sth);
// Now the reference is back to 1, the object can still be used

// Release again
wgpuSomethingRelease(sth);
// Now the reference is down to 0, the object is destroyed and
// should no longer be used!
In particular, we need to release the global WebGPU instance:特别地,我们需要释放全局WebGPU实例:
// We clean up the WebGPU instance
wgpuInstanceRelease(instance);
{{ Destroy WebGPU instance}} referenced in {{ file: main.cpp}}{{销毁WebGPU实例}}在{{file: main.cpp}}中引用
Implementation-specific behavior¶特定于实现的行为
In order to handle the slight differences between implementations, the distributions I provide also define the following preprocessor variables:为了处理实现之间的细微差异,我提供的发行版还定义了以下预处理器变量:
// If using Dawn
#define WEBGPU_BACKEND_DAWN

// If using wgpu-native
#define WEBGPU_BACKEND_WGPU

// If using emscripten
#define WEBGPU_BACKEND_EMSCRIPTEN
Building for the Web 为Web构建
The WebGPU distribution listed above are readily compatible with Emscripten and if you have trouble with building your application for the web, you can consult the dedicated appendix.上面列出的WebGPU发行版很容易与Emscripten兼容,如果你在构建web应用程序时遇到麻烦,你可以参考专门的附录。
As we will add a few options specific to the web build from time to time, we can add a section at the end of our
CMakeLists.txt:由于我们将不时添加一些特定于web构建的选项,我们可以在我们的末尾添加一个部分:
# Options that are specific to Emscripten
if (EMSCRIPTEN)
    # [...] Emscripten-specific options
endif()
{{ file: CMakeLists.txt}} completing {{ file: CMakeLists.txt}}{{file: CMakeLists.txt}}完成{{file: CMakeLists.txt}}
For now we only change the output extension so that it is an HTML web page (rather than a WebAssembly module or JavaScript library):现在我们只更改输出扩展名,使其成为HTML网页(而不是WebAssembly模块或JavaScript库):
# Generate a full web page rather than a simple WebAssembly module
set_target_properties(App PROPERTIES SUFFIX ".html")
{{ Emscripten-specific options}} referenced in {{ file: CMakeLists.txt}}{{file: CMakeLists.txt}}中引用的{{Emscripten-specific options}}
For some reason the instance descriptor must be null (which means "use default") when using Emscripten, so we can already use our
WEBGPU_BACKEND_EMSCRIPTENmacro:由于某些原因,在使用Emscripten时,实例描述符必须为null(这意味着"使用默认值"),因此我们已经可以使用宏了:
// We create a descriptor
WGPUInstanceDescriptor desc = {};
desc.nextInChain = nullptr;

// We create the instance using this descriptor
#ifdef WEBGPU_BACKEND_EMSCRIPTEN
WGPUInstance instance = wgpuCreateInstance(nullptr);
#else //  WEBGPU_BACKEND_EMSCRIPTEN
WGPUInstance instance = wgpuCreateInstance(&desc);
#endif //  WEBGPU_BACKEND_EMSCRIPTEN
{{ Create WebGPU instance}} replacing {{ Create WebGPU instance}} referenced in {{ file: main.cpp}}{{创建WebGPU实例}}取代{{file: main.cpp}}中引用的{{创建WebGPU实例}}
Conclusion 结论
In this chapter we set up WebGPU and learnt that there are multiple backends available. We also saw the basic idioms of object creation and destruction that will be used all the time in WebGPU API!在本章中,我们设置了WebGPU,并了解了有多个可用的后端。我们还看到了将在WebGPU API中一直使用的对象创建和销毁的基本习惯用法!
使用Emscript
Running Emscripten
You can now compile your first C/C++ file to JavaScript.现在可以将第一个C/C文件编译为JavaScript。
First, let's have a look at the file to be compiled: hello_world.c. This is the simplest test code in the SDK, and as you can see, all it does is print "hello, world!" to the console and then exit.首先,让我们看一下要编译的文件:hello_world.c。这是 SDK中最简单的测试代码,正如您所看到的,它所做的就是打印 "hello, world!",然后退出。
/*
 * Copyright 2011 The Emscripten Authors.  All rights reserved.
 * Emscripten is available under two separate licenses, the MIT license and the
 * University of Illinois/NCSA Open Source License.  Both these licenses can be
 * found in the LICENSE file.
 */

#include <stdio.h>

int main() {
  printf("hello, world!\n");
  return 0;
}
To build the JavaScript version of this code, simply specify the C/C++ file after emcc (use em++ to force compilation as C++)
:要构建此代码的JavaScript版本,只需指定C/C文件 在emcc之后(使用em强制编译为C):
./emcc test/hello_world.cYou should see two files generated by that command: a.out.js and a.out.wasm . The second is a WebAssembly file containing the compiled code, and the first is a JavaScript file containing the runtime support to load and execute it. You can run them using node.js:您应该会看到该命令生成的两个文件:a.o t.js和 a.out.wasm。第二个是包含编译代码的WebAssembly文件, 第一个是包含运行时支持的JavaScript文件 执行它。你可以使用node.js来运行它们:
node a.out.jsThis prints "hello, world!" to the console, as expected.这将像预期的那样将"hello, world!"输出到控制台中。
Tip 提示If an error occurs when calling emcc , run it with the
-voption to print out a lot of useful debug information.如果在调用emcc时发生错误,请使用该选项运行它 打印出大量有用的调试信息。
Note 请注意In this section, and later on, we run some files from the
test/folder. That folder contains files for the Emscripten test suite. Some can be run standalone, but others must be run through the test harness itself, see Emscripten Test Suite for more information.在本节以及后面的部分中,我们将运行来自 文件夹中。该文件夹包含Emscripten测试套件的文件。有些是可以的 独立运行,但其他必须通过测试工具本身运行,参见 emscripting Test Suite获取更多信息。Generating HTML 生成HTML
Emscripten can also generate HTML for testing embedded JavaScript. To generate HTML, use the
-o(output) command and specify an html file as the target file:Emscripten还可以生成用于测试嵌入式JavaScript的HTML。生成 HTML,使用(output)命令并指定一个HTML 文件作为目标文件:
./emcc test/hello_world.c -o hello.htmlYou can now open
hello.htmlin a web browser.您现在可以在web浏览器中打开。
Note 请注意Unfortunately, several browsers (including Chrome and Safari ) do not support
file://XHR requests, and can't load extra files needed by the HTML (like a.wasmfile, or packaged file data as mentioned lower down). For these browsers, you'll need to serve the files using a local webserver and then openhttp://localhost:8000/hello.html).不幸的是,一些浏览器(包括Chrome和Safari)可以 不支持XHR请求,也不能加载额外的文件 所需的HTML(如文件),或如前所述的打包文件数据 降低)。对于这些浏览器,您需要使用 本地web服务器,然后打开 ).Once you have the HTML loaded in your browser, you'll see a text area for displaying the output of the
printf()calls in the native code.在浏览器中加载HTML后,您将看到一个文本区域 在本机代码中显示调用的输出。The HTML output isn't limited just to just displaying text. You can also use the SDL API to show a colored cube in a
<canvas>element (on browsers that support it). For an example, build the hello_world_sdl.c test code and then refresh the browser:HTML输出不仅限于显示文本。你也可以用 在元素中显示彩色立方体的SDL API(在浏览器上) 支持)。例如,构建hello_world_sdl.c 测试代码,然后刷新浏览器:
./emcc test/hello_world_sdl.c -o hello.htmlThe source code for the second example is given below:第二个例子的源代码如下:
// Copyright 2011 The Emscripten Authors.  All rights reserved.
// Emscripten is available under two separate licenses, the MIT license and the
// University of Illinois/NCSA Open Source License.  Both these licenses can be
// found in the LICENSE file.

#include <stdio.h>
#include <SDL/SDL.h>

#ifdef __EMSCRIPTEN__
#include <emscripten.h>
#endif

int main(int argc, char** argv) {
  printf("hello, world!\n");

  SDL_Init(SDL_INIT_VIDEO);
  SDL_Surface *screen = SDL_SetVideoMode(256, 256, 32, SDL_SWSURFACE);

#ifdef TEST_SDL_LOCK_OPTS
  EM_ASM("SDL.defaults.copyOnLock = false; SDL.defaults.discardOnLock = true; SDL.defaults.opaqueFrontBuffer = false;");
#endif

  if (SDL_MUSTLOCK(screen)) SDL_LockSurface(screen);
  for (int i = 0; i < 256; i++) {
    for (int j = 0; j < 256; j++) {
#ifdef TEST_SDL_LOCK_OPTS
      // Alpha behaves like in the browser, so write proper opaque pixels.
      int alpha = 255;
#else
      // To emulate native behavior with blitting to screen, alpha component is ignored. Test that it is so by outputting
      // data (and testing that it does get discarded)
      int alpha = (i+j) % 255;
#endif
      *((Uint32*)screen->pixels + i * 256 + j) = SDL_MapRGBA(screen->format, i, j, 255-i, alpha);
    }
  }
  if (SDL_MUSTLOCK(screen)) SDL_UnlockSurface(screen);
  SDL_Flip(screen);

  printf("you should see a smoothly-colored square - no sharp lines but the square borders!\n");
  printf("and here is some text that should be HTML-friendly: amp: |&| double-quote: |\"| quote: |'| less-than, greater-than, html-like tags: |<cheez></cheez>|\nanother line.\n");

  SDL_Quit();

  return 0;
}
Using files 使用文件
Note 请注意
Your C/C++ code can access files using the normal libc stdio API (
fopen,fclose, etc.)您的C/C代码可以使用普通的libc studio API访问文件 (、等)JavaScript is usually run in the sandboxed environment of a web browser, without direct access to the local file system. Emscripten simulates a file system that you can access from your compiled C/C++ code using the normal libc stdio API.JavaScript通常在web浏览器的沙盒环境中运行,没有 直接访问本地文件系统。Emscripten模拟一个文件系统 您可以使用普通的libc studio API从编译后的C/C代码中访问。
Files that you want to access should be preloaded or embedded into the virtual file system. Preloading (or embedding) generates a virtual file system that corresponds to the file system structure at compile time, relative to the current directory.您要访问的文件应该预加载或 嵌入到虚拟文件系统中。预压(或 嵌入)生成一个与文件系统相对应的虚拟文件系统 结构,相对于当前目录。
The hello_world_file.cpp example shows how to load a file (both the test code and the file to be loaded shown below):的hello_world_file.cpp 示例显示了如何加载文件(包括测试代码和要加载的文件) 所示):
// Copyright 2012 The Emscripten Authors.  All rights reserved.
// Emscripten is available under two separate licenses, the MIT license and the
// University of Illinois/NCSA Open Source License.  Both these licenses can be
// found in the LICENSE file.

#include <stdio.h>

int main() {
  FILE *file = fopen("test/hello_world_file.txt", "rb");
  if (!file) {
    printf("cannot open file\n");
    return 1;
  }
  while (!feof(file)) {
    char c = fgetc(file);
    if (c != EOF) {
      putchar(c);
    }
  }
  fclose (file);
  return 0;
}
==
This data has been read from a file.
The file is readable as if it were at the same location in the filesystem, including directories, as in the local filesystem where you compiled the source.
==
Note 请注意
The example expects to be able to load a file located at test/hello_world_file.txt:该示例希望能够加载位于test/hello_world_file.txt的文件:
FILE *file = fopen("test/hello_world_file.txt", "rb");We compile the example from the directory "above" test to ensure the virtual filesystem is created with the correct structure relative to the compile-time directory.我们从目录" above "中编译示例,以确保 创建的虚拟文件系统具有相对于 编译时的目录。
The following command is used to specify a data file to preload into Emscripten's virtual file system --- before running any compiled code. This approach is useful because Browsers can only load data from the network asynchronously (except in Web Workers) while a lot of native code uses synchronous file system access. Preloading ensures that the asynchronous download of data files is complete (and the file is available) before compiled code has the opportunity to access the Emscripten file system.下面的命令用于指定要在运行任何数据文件之前预加载到Emscripten的虚拟文件系统中的数据文件 编译后的代码。这种方法很有用,因为浏览器只能从 网络异步(除了在Web Workers),而大量的本地代码 使用同步文件系统访问。预加载确保异步 在编译之前,数据文件下载完成(并且文件可用) 代码有机会访问Emscripten文件系统。
./emcc test/hello_world_file.cpp -o hello.html --preload-file test/hello_world_file.txtRun the above command, then open hello.html in a web browser to see the data from hello_world_file.txt being displayed.运行上述命令,然后在web浏览器中打开hello.html查看数据 从hello_world_file.txt显示。
For more information about working with the file system see the File System Overview, File System API and Synchronous Virtual XHR Backed File System Usage.有关使用文件系统的更多信息,请参见 文件系统概述,文件系统API和 同步虚拟XHR备份文件系统使用情况。
Optimizing code 优化代码
Emscripten, like gcc and clang , generates unoptimized code by default. You can generate slightly-optimized code with the
-O1command line argument:与gcc和clang一样,Emscripten在默认情况下生成未优化的代码。你 可以使用命令生成稍微优化的代码吗 行参数:
./emcc -O1 test/hello_world.cppThe "hello world" code created in a.out.js doesn't really need to be optimized, so you won't see a difference in speed when compared to the unoptimized version.在a.o t.js中创建的"hello world"代码实际上并不需要 优化,所以你不会看到在速度上的差异 未优化的版本。
However, you can compare the generated code to see the differences.
-O1applies several minor optimizations and removes some runtime assertions. For example,printfwill have been replaced byputsin the generated code.但是,您可以比较生成的代码以查看差异。 应用几个较小的优化并删除一些运行时断言。为 示例中,将在生成的代码中被替换为。The optimizations provided by
-O2(see here) are much more aggressive. If you run the following command and inspect the generated code (a.out.js) you will see that it looks very different:(见这里)提供的优化要多得多 咄咄逼人。如果运行以下命令并检查生成的代码 (a.out.js)你会看到它看起来非常不同:
./emcc -O2 test/hello_world.cppFor more information about compiler optimization options see Optimizing Code and the emcc tool reference.有关编译器优化选项的详细信息,请参见 优化代码和emcc工具参考。
Emscripten Test Suite and Benchmarks编写测试套件和基准测试
Emscripten has a comprehensive test suite, which covers virtually all Emscripten functionality. These tests are an excellent resource for developers as they provide practical examples of most features, and are known to build successfully on the
mainbranch.Emscripten有一个全面的测试套件,它几乎涵盖了所有的Emscripten 功能。对于开发人员来说,这些测试是非常好的资源 提供大多数特性的实际示例,并且已知可以成功构建 在树枝上。See Emscripten Test Suite for more information.有关更多信息,请参阅Emscripten Test Suite。
General tips and next steps一般的建议和下一步
This tutorial walked you through your first steps in calling Emscripten from the command line. There is, of course, far more you can do with the tool. Below are other general tips for using Emscripten:方法调用Emscripten的第一步 命令行。当然,你可以用这个工具做更多的事情。下面是 其他使用Emscripten的一般提示:
This site has lots more information about compiling and building projects, integrating your native code with the web environment, packaging your code and publishing.这个网站有更多关于编译和构建的信息 项目,整合您的 本地代码与web环境, 打包代码并发布。
The Emscripten test suite is a great place to look for examples of how to use Emscripten. For example, if you want to better understand how the emcc
--pre-jsoption works, search for--pre-jsin the test suite: the test suite is extensive and there are likely to be at least some examples.Emscripten测试套件是寻找如何使用示例的好地方 Emscripten。例如,如果您想更好地理解emcc 选项有效,在测试套件中搜索:测试 套件是广泛的,可能至少有一些例子。To learn how to use Emscripten in advanced ways, read src/settings.js and emcc which describe the compiler options, and emscripten.h for details on JavaScript-specific C APIs that your C/C++ programs can use when compiled with Emscripten.要了解如何以高级方式使用Emscripten,请阅读描述编译器选项的src/settings.js和emcc。 和emscripten.h获取有关javascript特定C api的详细信息 C/C程序编译时可以使用Emscripten。
Emscript测试
Emscripten has a comprehensive test suite, which covers virtually all Emscripten functionality. These tests are an excellent resource for developers as they provide practical examples of most features, and are known to pass on the master branch. In addition to correctness tests, there are also benchmarks that you can run.Emscripten有一个全面的测试套件,它几乎涵盖了所有的Emscripten 功能。对于开发人员来说,这些测试是非常好的资源 提供大多数功能的实际示例,并将其传递给大师 分支。除了正确性测试之外,您还可以使用基准测试 运行。
This article explains how to run the test and benchmark suite, and provides an overview of what tests are available.本文解释了如何运行测试和基准测试套件,并提供了一个 可用测试的概述。
Setting up 设置
To run the tests, you need an emscripten setup, as it will run
emccand other commands. See the developer's guide for how best to do that.要运行测试,您需要一个脚本设置,因为它将运行和其他 命令。请参阅开发人员指南 怎样才能做到最好。Running tests 运行测试
Run the test suite runner (test/runner) with
--helpto see the help message:运行测试套件运行器(test/runner)以查看帮助消息:
test/runner --helpThe tests are divided into modes. You can run either an entire mode or an individual test, or use wildcards to run some tests in some modes. For example:测试分为几个模式。可以运行整个模式,也可以运行一个 单独测试,或使用通配符在某些模式下运行某些测试。例如:
# run one test (in the default mode)
test/runner test_foo

# run a bunch of tests in one mode (here, all i64 tests in -O3)
test/runner core3.test_*i64*

# run all tests in a specific mode (here, wasm2gs -O1)
test/runner wasm2js1
The core test modes (defined at the bottom of test/test_core.py) let you run the tests in variety of different configurations and with different optimization flags. For example, wasm2js or wasm64. There are also non-core test suites, that run tests in more special manner (in particular, in those tests it is not possible to say "run the test with a different optimization flag" - that is what the core tests are for). The non-core test suites include核心测试模式(在test/test_core.py底部定义) 让您在各种不同的配置中运行测试,并使用不同的 优化旗帜。例如,wasm2js或wasm64。也有非核心的 测试套件,以更特殊的方式运行测试(特别是在那些测试中) 不可能说"用不同的优化标志运行测试"- 这就是核心测试的目的)。非核心测试套件包括
other: Non-core tests running in the shell.other:在shell中运行的非核心测试。
browser: Tests that run in a browser.浏览器:在浏览器中运行的测试。
sockets: Networking tests that run in a browser.sockets:在浏览器中运行的网络测试。
interactive: Browser tests that are not fully automated, and require user interaction (these should be automated eventually).交互式:浏览器测试不是完全自动化的,并且需要用户交互(这些最终应该是自动化的)。
sanity: Tests for emscripten setting itself up. This modifies your .emscripten file temporarily.sanity:对刻字设置本身进行测试。这会改变你的。临时改写文件。
benchmark: Runs benchmarks, measuring speed and code size.benchmark:运行基准测试,测量速度和代码大小。
The wildcards we mentioned above work for non-core test modes too, for example:我们上面提到的通配符也适用于非核心测试模式,例如:
# run one browser test
test/runner browser.test_sdl_image

# run all SDL2 browser tests
test/runner browser.test_sdl2*

# run all browser tests
test/runner browser
Skipping Tests 跳过测试
An individual test can be skipped by passing the "skip:" prefix. E.g.可以通过传递"skip:"前缀跳过单个测试。如。
test/runner other skip:other.test_cmakeWildcards can also be passed in skip, so通配符也可以在skip中传递,所以
test/runner browser skip:browser.test_pthread_*will run the whole browser suite except for all the pthread tests in it.将运行整个浏览器套件,除了其中的所有pthread测试。
Exiting on first failure第一次失败就退出
Sometimes it is useful to be able to iteratively fix one test at a time. In this case the
--failfastoption can be used to exit the test runner after the first failure.有时能够一次迭代地修复一个测试是有用的。在 在这种情况下,可以使用该选项退出测试运行器 第一次失败。
Note 请注意This option only works with the serial test runner. For test suites that are normally run in parallel you can force them to run serially using
-j1.此选项仅适用于串行测试运行器。对于测试套件 它们通常是并行运行的,你可以使用 .Once a test is fixed, you continue where you left off using
--start-atoption:一旦测试是固定的,你继续你离开的地方使用选项:
test/runner browser --start-at test_foo --failfastRunning a bunch of random tests做了一堆随机测试
You can run a random subset of the test suite, using something like您可以运行测试套件的随机子集,使用类似的东西
test/runner random100Replace
100with another number as you prefer. This will run that number of random tests, and tell you the statistical likelihood of almost all the test suite passing assuming those tests do. This works just like election surveys do - given a small sample, we can predict fairly well that so-and-so percent of the public will vote for candidate A. In our case, the "candidates" are pass or fail, and we can predict how much of the test suite will pass given that sample. Assuming the sample tests all pass, we can say with high likelihood that most of the test suite will in fact pass. (Of course, this is no guarantee, and even a single test failure is serious, however, this gives a quick estimate that your patch does not cause significant and obvious breakage.)用您喜欢的其他数字替换。这将运行这个数 随机测试,并告诉你几乎所有测试的统计可能性 假设这些测试可以通过。这就像选举调查一样 给定一个小样本,我们可以很好地预测某某百分比的 公众将投票给候选人a。在我们的例子中,"候选人"是通过或 如果失败了,我们就可以预测有多少测试套件会通过 样本。假设样本测试全部通过,我们可以很有可能地说 实际上,大多数测试套件都将通过。(当然,这不是保证,而且 即使一个测试失败是严重的,然而,这给出了一个快速的估计 你的贴片不会造成明显的破损。)Important Tests 重要的测试
Please see the bottom the file test/test_core.py for the current test modes, as they may change slowly over time. When you want to run the entire test suite locally, these are currently the important commands:请参阅底部的test/test_core.py文件 对于当前的测试模式,因为它们可能会随着时间缓慢变化。当你想要 要在本地运行整个测试套件,这些是当前最重要的 命令:
# Run all core tests
test/runner core*

# Run "other" test suite
test/runner other

# Run "browser" test suite - this requires a web browser
test/runner browser

# Run "sockets" test suite - this requires a web browser too
test/runner sockets

# Run "sanity" test suite - this tests setting up emscripten during
# first run, etc., and so it modifies your .emscripten file temporarily.
test/runner sanity

# Optionally, also run benchmarks to check for regressions
test/runner benchmark
Benchmarking 基准测试
Emscripten has a benchmark suite that measures both speed and code size, which includes several interesting real-world codebases, from physics engines to compression libraries to virtual machines. It also includes some existing benchmarks such as CoreMark and LINPACK. See for example this post's section on speed which gives an overview.Emscripten有一个基准测试套件,可以测量速度和代码大小 包括几个有趣的现实世界的代码库,从物理引擎到 压缩库到虚拟机。它还包括一些现有的 比如CoreMark和LINPACK。参见示例 这篇文章是关于速度的部分 它给出了一个概述。
To run the benchmark suite, do:要运行基准测试套件,请执行:
# Run all benchmarks
test/runner benchmark
As with all the test suites, you can also run a specific benchmark:与所有测试套件一样,您还可以运行特定的基准测试:
# Run one specific benchmark
test/runner benchmark.test_skinning
You can also specify which benchmarkers are run by using the environment variable EMTEST_BENCHMARKERS. It accepts a comma separated list of named benchmarkers (names can be found in named_benchmarkers in test/test_benchmark.py).您还可以通过使用环境来指定运行哪些基准测试 变量EMTEST_BENCHMARKERS。它接受一个逗号分隔的名称列表 基准(名称可以在named_benchmarkers中找到 测试/ test_benchmark.py)。
# Run one specific benchmark and with clang and v8.
EMTEST_BENCHMARKERS=clang,v8 test/runner benchmark.test_skinning
To further customize how the benchmarks are run, you will want to edit the file test/test_benchmark.py. Some of the options include:要进一步定制基准测试的运行方式,您需要编辑该文件 测试/ test_benchmark.py。其中一些选项包括:
DEFAULT_ARGis how long the benchmark should run (they all try to run for a similar amount of time for consistency).基准测试应该运行多长时间(它们都试图运行多长时间? 保持一致性的时间也差不多)。
TEST_REPSis how many times to repeat each run (more will take longer, but should have less noise).每次跑步要重复多少次(次数越多越耗时,但是? 应该有更少的噪音)。
PROFILINGcontrols whether the builds are set up for profiling (which can increase code size, so it's not done by default).控制是否将构建设置为分析(可以 增加代码大小,因此默认情况下不会这样做)。Debugging test failures 调试测试失败
Setting the Debug mode (EMCC_DEBUG) is useful for debugging tests, as it emits debug output and intermediate files (the files go in /tmp/emscripten_temp/):设置调试模式(EMCC_DEBUG)对于调试测试非常有用 发出调试输出和中间文件(文件进入) / tmp / emscripten_temp /):
# On Windows, use "set" to set and un-set the EMCC_DEBUG environment variable:
set EMCC_DEBUG=1
test/runner test_hello_world
set EMCC_DEBUG=0

# On Linux, you can do this all in one line
EMCC_DEBUG=1 test/runner test_hello_world

# EMCC_DEBUG=2 generates additional debug information.
EMCC_DEBUG=2 test/runner test_hello_world
You can also specify
--save-dirto save the temporary directory that the test runner uses into /out/test/ . This is a test suite-specific feature, and is useful for inspecting test outputs as well as temporary files generated by the test. By default, the temporary directory will be cleaned between each test run, but you can add--no-cleanto avoid this.还可以指定保存的临时目录 测试运行器使用into /out/ Test /。这是特定于测试套件的 特性,对于检查测试输出和临时文件非常有用 由测试生成。默认情况下,将清理临时目录 在每次测试运行之间,但您可以添加以避免这种情况。The Debugging topic provides more guidance on how to debug Emscripten-generated code.调试主题提供了有关如何调试的更多指导 Emscripten-generated代码。