为什么需要GPU加速?
在视频处理领域,时间就是金钱。传统的CPU转码在处理高清、4K视频时往往需要数小时,而借助NVIDIA T4
GPU的硬件加速,同样的工作可以在几分钟内完成!本文将带您一步步在阿里云ECS上打造一个极速视频处理引擎
一、部署环境
| 类别 | 说明 |
|---|---|
| 服务器类别 | 阿里云ECS |
| 系统版本 | CentOS7.9 |
| GPU | NVIDIA T4 |
| NVIDIA驱动 | 550.127.08 |
| CUDA版本 | 12.4.1 |
| cuDNN版本 | 9.2.0.82 |
| FFmpeg版本 | 5.1.3 |
| ffnvcodec版本 | n12.0.16.0 |
| GPU编码器 | h264_nvenc, hevc_nvenc |
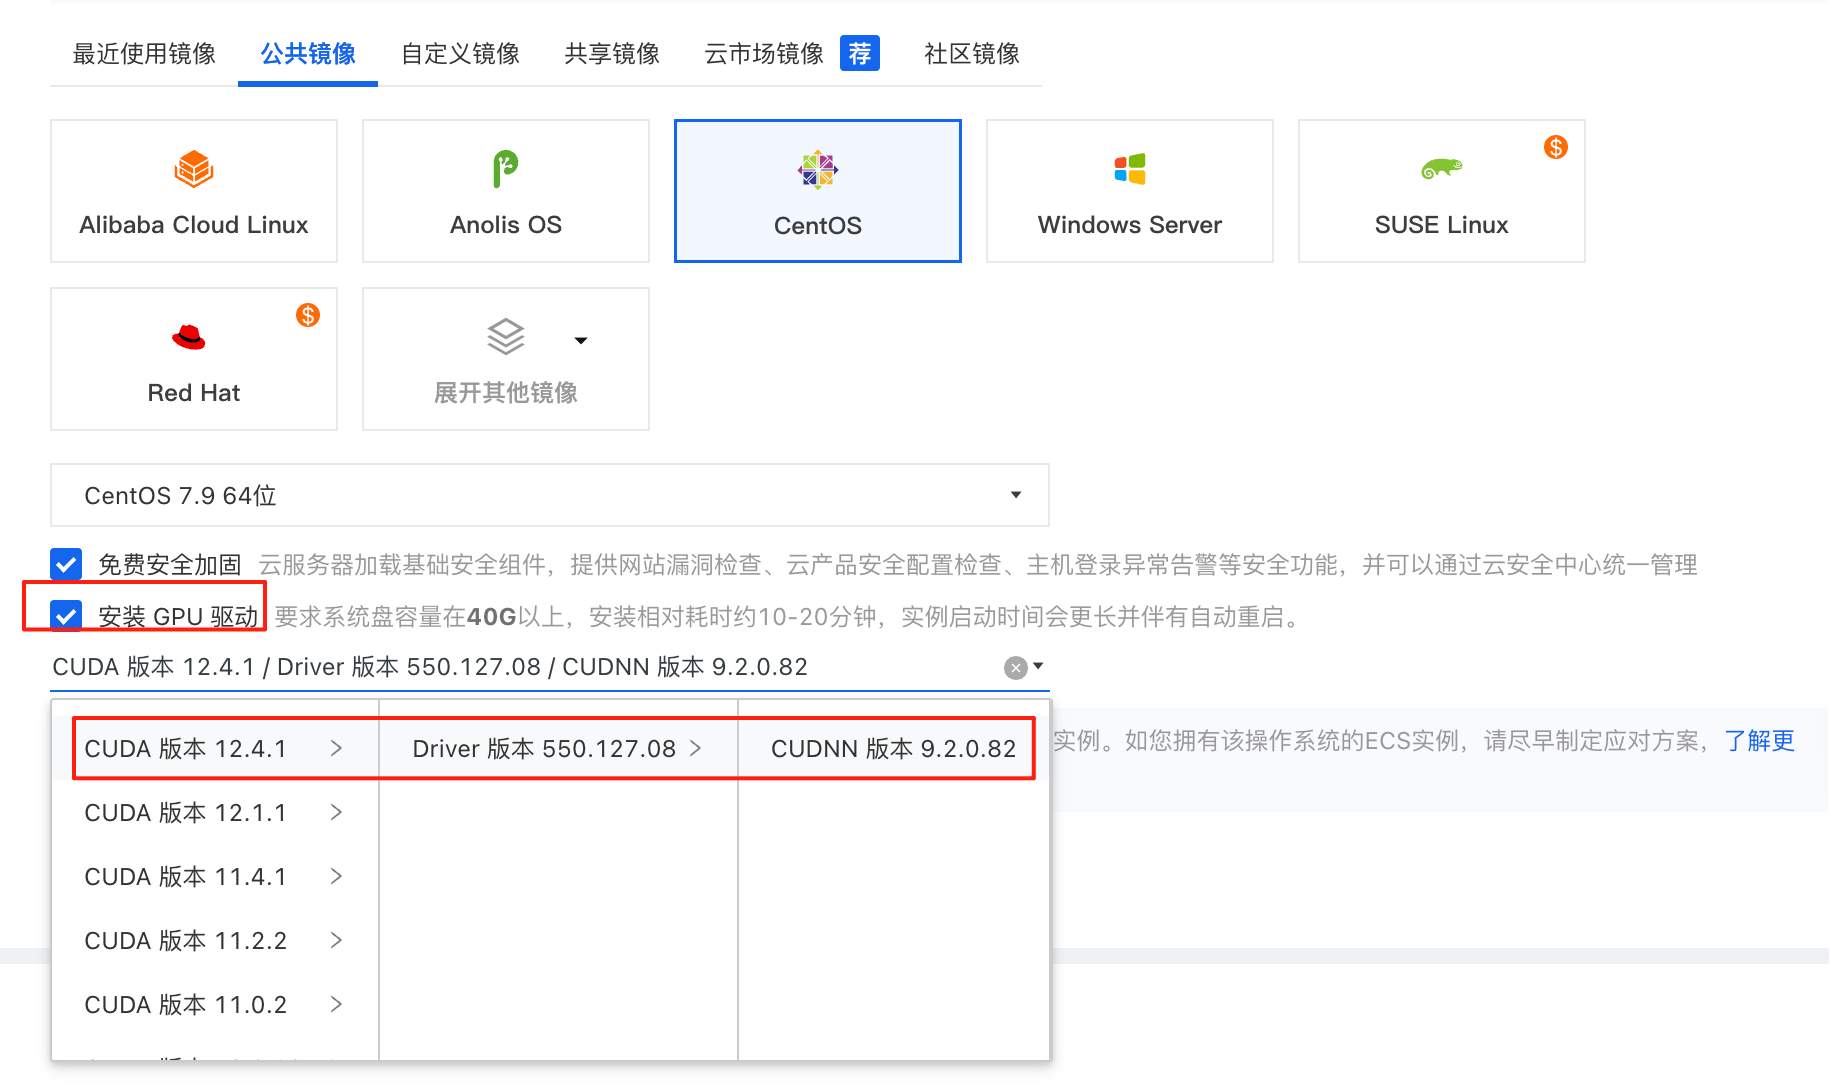
二、服务器开通
记得勾选安装GPU驱动,开机会自动安装
开机后远程进入服务器可以看到在下载驱动

再次远程服务器,重启后
bash
始连接到 root(root)@172.25.9.18  0.1
Last login: Tue Oct 21 15:11:50 2025 from 172.31.15.114

Welcome to Alibaba Cloud Elastic Compute Service !

  % Total    % Received % Xferd  Average Speed   Time    Time     Time  Current
                                 Dload  Upload   Total   Spent    Left  Speed
100    20  100    20    0     0   4042      0 --:--:-- --:--:-- --:--:--  5000
CHECKING AUTO INSTALL, DRIVER_VERSION=550.127.08 CUDA_VERSION=12.4.1 CUDNN_VERSION=9.2.0.82 , INSTALL RDMA=FALSE, INSTALL eRDMA=FALSE,  PLEASE WAIT ......
The script automatically downloads and installs a NVIDIA GPU driver and CUDA, CUDNN library. if you choose install RDMA or ERDMA, RDMA or ERDMA software will install.
if you choose install perseus, perseus environment will install as well.
1. The installation takes 15 to 20 minutes, depending on the intranet bandwidth and the quantity of vCPU cores of the instance. Please do not operate the GPU or install any GPU-related software until the GPU driver is installed successfully.
2. After the GPU is installed successfully, the instance will restarts automatically.

ALL INSTALL OK !!

nvidia-smi
Tue Oct 21 15:25:27 2025
+-----------------------------------------------------------------------------------------+
| NVIDIA-SMI 550.127.08             Driver Version: 550.127.08     CUDA Version: 12.4     |
|-----------------------------------------+------------------------+----------------------+
| GPU  Name                 Persistence-M | Bus-Id          Disp.A | Volatile Uncorr. ECC |
| Fan  Temp   Perf          Pwr:Usage/Cap |           Memory-Usage | GPU-Util  Compute M. |
|                                         |                        |               MIG M. |
|=========================================+========================+======================|
|   0  Tesla T4                       On  |   00000000:00:07.0 Off |                    0 |
| N/A   32C    P8              9W /   70W |       1MiB /  15360MiB |      0%      Default |
|                                         |                        |                  N/A |
+-----------------------------------------+------------------------+----------------------+

+-----------------------------------------------------------------------------------------+
| Processes:                                                                              |
|  GPU   GI   CI        PID   Type   Process name                              GPU Memory |
|        ID   ID                                                               Usage      |
|=========================================================================================|
|  No running processes found                                                             |
+-----------------------------------------------------------------------------------------+

nvcc --version
nvcc: NVIDIA (R) Cuda compiler driver
Copyright (c) 2005-2024 NVIDIA Corporation
Built on Thu_Mar_28_02:18:24_PDT_2024
Cuda compilation tools, release 12.4, V12.4.131
Build cuda_12.4.r12.4/compiler.34097967_0
三、系统准备
bash
# 更新系统
sudo yum update -y
sudo yum install -y epel-release
sudo yum groupinstall -y "Development Tools"

# 安装基础依赖
sudo yum install -y cmake git wget nasm
sudo yum install -y openssl-devel libxcb-devel libX11-devel
四、依赖安装
1、安装ffnvcodec(NVIDIA编解码器头文件)
bash
git clone https://git.videolan.org/git/ffmpeg/nv-codec-headers.git
Cloning into 'nv-codec-headers'...
remote: Enumerating objects: 1081, done.
remote: Counting objects: 100% (1081/1081), done.
remote: Compressing objects: 100% (918/918), done.
remote: Total 1081 (delta 583), reused 0 (delta 0), pack-reused 0
Receiving objects: 100% (1081/1081), 195.15 KiB | 0 bytes/s, done.
Resolving deltas: 100% (583/583), done.

cd nv-codec-headers

git checkout n12.0.16.0
Note: checking out 'n12.0.16.0'.
You are in 'detached HEAD' state. You can look around, make experimental
changes and commit them, and you can discard any commits you make in this
state without impacting any branches by performing another checkout.

If you want to create a new branch to retain commits you create, you may
do so (now or later) by using -b with the checkout command again. Example:

  git checkout -b new_branch_name

HEAD is now at c5e4af7... Add cuArrayCreate

make
sed 's#@@PREFIX@@#/usr/local#' ffnvcodec.pc.in > ffnvcodec.pc

sudo make install
sed 's#@@PREFIX@@#/usr/local#' ffnvcodec.pc.in > ffnvcodec.pc
install -m 0755 -d '/usr/local/include/ffnvcodec'
install -m 0644 include/ffnvcodec/*.h '/usr/local/include/ffnvcodec'
install -m 0755 -d '/usr/local/lib/pkgconfig'
install -m 0644 ffnvcodec.pc '/usr/local/lib/pkgconfig'
2、安装编码器依赖(x264/x265)
bash
cd ~
mkdir -p ~/ffmpeg_build
cd ~/ffmpeg_build

# 安装x264
git clone https://code.videolan.org/videolan/x264.git

cd x264

./configure --prefix="$HOME/ffmpeg_build" --enable-shared --enable-pic
Found no assembler
Minimum version is nasm-2.13

这里会出现报错Found no assembler,NASM汇编器缺失
cd ~
wget https://www.nasm.us/pub/nasm/releasebuilds/2.16.01/nasm-2.16.01.tar.gz
tar xzf nasm-2.16.01.tar.gz
cd nasm-2.16.01
./autogen.sh && ./configure
make -j4 && sudo make install

cd ~/ffmpeg_build/x264
./configure --prefix="$HOME/ffmpeg_build" --enable-shared --enable-pic
make -j4 && make install
cd ..

# 安装x265
cd ~
git clone https://bitbucket.org/multicoreware/x265_git.git
cd x265_git/build/linux
cmake -DCMAKE_INSTALL_PREFIX="$HOME/ffmpeg_build" -G "Unix Makefiles" ../../source
make -j4 && make install
cd ~/ffmpeg_build
3、编译安装FFmpeg
bash
# 下载FFmpeg 5.1.3(稳定版本)
wget https://ffmpeg.org/releases/ffmpeg-5.1.3.tar.xz
tar xf ffmpeg-5.1.3.tar.xz
cd ffmpeg-5.1.3

# 配置编译选项
./configure \
  --prefix="$HOME/ffmpeg_build" \
  --extra-cflags="-I/usr/local/cuda/include -I/usr/local/include/ffnvcodec" \
  --extra-ldflags="-L/root/ffmpeg_build/lib -L/usr/local/cuda/lib64 -L/usr/local/lib" \
  --enable-nonfree \
  --enable-gpl \
  --enable-version3 \
  --enable-shared \
  --disable-static \
  --enable-cuda-nvcc \
  --enable-libnpp \
  --enable-libx264 \
  --enable-libx265 \
  --enable-cuvid \
  --enable-nvenc \
  --enable-ffnvcodec \
  --extra-libs=-lpthread \
  --extra-libs=-lm
ERROR: x264 not found using pkg-config
出现报错pkg-config找不到x264库

pkg-config --exists x264

echo $?   #返回0才是正常
1

export PKG_CONFIG_PATH=$HOME/ffmpeg_build/lib/pkgconfig:$PKG_CONFIG_PATH

#检查x264
pkg-config --exists x264
echo $?
0

#检查x265
pkg-config --exists x265
echo $?
0

./configure \
  --prefix="$HOME/ffmpeg_build" \
  --extra-cflags="-I/usr/local/cuda/include -I/usr/local/include/ffnvcodec" \
  --extra-ldflags="-L/root/ffmpeg_build/lib -L/usr/local/cuda/lib64 -L/usr/local/lib" \
  --enable-nonfree \
  --enable-gpl \
  --enable-version3 \
  --enable-shared \
  --disable-static \
  --enable-cuda-nvcc \
  --enable-libnpp \
  --enable-libx264 \
  --enable-libx265 \
  --enable-cuvid \
  --enable-nvenc \
  --enable-ffnvcodec \
  --extra-libs=-lpthread \
  --extra-libs=-lm
 ERROR: cuvid requested, but not all dependencies are satisfied: ffnvcodec
出现报错没有设置正确的pkg-config路径

pkg-config --exists ffnvcodec
echo $?   #返回0才是正常
1

export PKG_CONFIG_PATH=/usr/local/lib/pkgconfig:$HOME/ffmpeg_build/lib/pkgconfig:$PKG_CONFIG_PATH
pkg-config --exists ffnvcodec
echo $?
1

./configure \
  --prefix="$HOME/ffmpeg_build" \
  --extra-cflags="-I/usr/local/cuda/include -I/usr/local/include/ffnvcodec" \
  --extra-ldflags="-L/root/ffmpeg_build/lib -L/usr/local/cuda/lib64 -L/usr/local/lib" \
  --enable-nonfree \
  --enable-gpl \
  --enable-version3 \
  --enable-shared \
  --disable-static \
  --enable-cuda-nvcc \
  --enable-libnpp \
  --enable-libx264 \
  --enable-libx265 \
  --enable-cuvid \
  --enable-nvenc \
  --enable-ffnvcodec \
  --extra-libs=-lpthread \
  --extra-libs=-lm
看到License: nonfree and unredistributable就是正常的

# 编译安装
make -j4 && make install

# 设置环境变量
echo 'export PATH="$HOME/ffmpeg_build/bin:$PATH"' >> ~/.bashrc
echo 'export LD_LIBRARY_PATH="$HOME/ffmpeg_build/lib:/usr/local/cuda/lib64:$LD_LIBRARY_PATH"' >> ~/.bashrc
source ~/.bashrc

# 查看版本
ffmpeg -version
ffmpeg version 5.1.3 Copyright (c) 2000-2022 the FFmpeg developers
built with gcc 4.8.5 (GCC) 20150623 (Red Hat 4.8.5-44)
configuration: --prefix=/root/ffmpeg_build --extra-cflags='-I/usr/local/cuda/include -I/usr/local/include/ffnvcodec' --extra-ldflags='-L/root/ffmpeg_build/lib -L/usr/local/cuda/lib64 -L/usr/local/lib' --enable-nonfree --enable-gpl --enable-version3 --enable-shared --disable-static --enable-cuda-nvcc --enable-libnpp --enable-libx264 --enable-libx265 --enable-cuvid --enable-nvenc --enable-ffnvcodec --extra-libs=-lpthread --extra-libs=-lm
libavutil      57. 28.100 / 57. 28.100
libavcodec     59. 37.100 / 59. 37.100
libavformat    59. 27.100 / 59. 27.100
libavdevice    59.  7.100 / 59.  7.100
libavfilter     8. 44.100 /  8. 44.100
libswscale      6.  7.100 /  6.  7.100
libswresample   4.  7.100 /  4.  7.100
libpostproc    56.  6.100 / 56.  6.100
五、验证结果
1、GPU加速支持验证
bash
ffmpeg -encoders | grep nvenc
# 输出:
# V....D h264_nvenc           NVIDIA NVENC H.264 encoder (codec h264)
# V....D hevc_nvenc           NVIDIA NVENC hevc encoder (codec hevc)
2、实际性能测试
bash
# 创建测试视频
ffmpeg -f lavfi -i testsrc=duration=10:size=1280x720:rate=30 -c:v libx264 test_input.mp4

# 另打开一个终端运行
watch -n 1 nvidia-smi

# 当前终端GPU加速转码测试
ffmpeg -i test_input.mp4 -c:v h264_nvenc -b:v 2M test_gpu_output.mp4

# 另一个终端可以看到GPU内存使用、GPU利用率、ffmpeg进程正常显示在GPU进程列表中
Every 1.0s: nvidia-smi                                                                                                                         Tue Oct 21 16:10:35 2025

Tue Oct 21 16:10:35 2025
+-----------------------------------------------------------------------------------------+
| NVIDIA-SMI 550.127.08             Driver Version: 550.127.08     CUDA Version: 12.4     |
|-----------------------------------------+------------------------+----------------------+
| GPU  Name                 Persistence-M | Bus-Id          Disp.A | Volatile Uncorr. ECC |
| Fan  Temp   Perf          Pwr:Usage/Cap |           Memory-Usage | GPU-Util  Compute M. |
|                                         |                        |               MIG M. |
|=========================================+========================+======================|
|   0  Tesla T4                       On  |   00000000:00:07.0 Off |                    0 |
| N/A   32C    P0             31W /   70W |     217MiB /  15360MiB |     12%      Default |
|                                         |                        |                  N/A |
+-----------------------------------------+------------------------+----------------------+

+-----------------------------------------------------------------------------------------+
| Processes:                                                                              |
|  GPU   GI   CI        PID   Type   Process name                              GPU Memory |
|        ID   ID                                                               Usage      |
|=========================================================================================|
|    0   N/A  N/A     27026      C   ffmpeg                                        213MiB |
+-----------------------------------------------------------------------------------------+
六、附:自动化部署脚本
bash
#!/bin/bash

# 阿里云ECS + NVIDIA T4 GPU FFmpeg自动化部署脚本
# 作者:基于实际部署经验总结
# 版本:1.0
# 日期:2024年

set -e  # 遇到错误立即退出

# 颜色定义
RED='\033[0;31m'
GREEN='\033[0;32m'
YELLOW='\033[1;33m'
BLUE='\033[0;34m'
NC='\033[0m' # No Color

# 日志函数
log_info() {
    echo -e "${BLUE}[INFO]${NC} $1"
}

log_success() {
    echo -e "${GREEN}[SUCCESS]${NC} $1"
}

log_warning() {
    echo -e "${YELLOW}[WARNING]${NC} $1"
}

log_error() {
    echo -e "${RED}[ERROR]${NC} $1"
}

# 检查命令执行结果
check_result() {
    if [ $? -ne 0 ]; then
        log_error "$1 failed!"
        exit 1
    else
        log_success "$1 completed"
    fi
}

# 检查系统环境
check_environment() {
    log_info "检查系统环境..."

    # 检查操作系统
    if [ ! -f /etc/redhat-release ]; then
        log_error "This script is designed for CentOS/RHEL systems only"
        exit 1
    fi

    # 检查GPU
    if ! command -v nvidia-smi &> /dev/null; then
        log_error "NVIDIA driver not found. Please install NVIDIA driver first."
        exit 1
    fi

    # 检查CUDA
    if [ ! -d "/usr/local/cuda" ]; then
        log_error "CUDA not found. Please install CUDA first."
        exit 1
    fi

    log_success "Environment check passed"
}

# 安装系统依赖
install_dependencies() {
    log_info "安装系统依赖..."

    yum update -y
    check_result "System update"

    yum install -y epel-release
    check_result "EPEL repository installation"

    yum groupinstall -y "Development Tools"
    check_result "Development tools installation"

    yum install -y cmake git wget openssl-devel libxcb-devel libX11-devel \
                  SDL2-devel libass-devel libvorbis-devel freetype-devel \
                  fontconfig-devel
    check_result "Basic dependencies installation"
}

# 安装NASM汇编器
install_nasm() {
    log_info "安装NASM汇编器..."

    cd /tmp
    wget https://www.nasm.us/pub/nasm/releasebuilds/2.16.01/nasm-2.16.01.tar.gz
    check_result "NASM download"

    tar xzf nasm-2.16.01.tar.gz
    cd nasm-2.16.01
    ./autogen.sh
    ./configure
    make -j4
    make install
    check_result "NASM compilation and installation"

    # 验证安装
    nasm --version
    check_result "NASM version check"
}

# 安装ffnvcodec
install_ffnvcodec() {
    log_info "安装NVIDIA编解码器头文件(ffnvcodec)..."

    cd /tmp
    if [ -d "nv-codec-headers" ]; then
        rm -rf nv-codec-headers
    fi

    git clone https://git.videolan.org/git/ffmpeg/nv-codec-headers.git
    check_result "ffnvcodec clone"

    cd nv-codec-headers
    git checkout n12.0.16.0
    check_result "ffnvcodec version checkout"

    make
    make install
    check_result "ffnvcodec installation"

    # 验证安装
    if [ -f "/usr/local/include/ffnvcodec/nvEncodeAPI.h" ]; then
        log_success "ffnvcodec installed successfully"
    else
        log_error "ffnvcodec installation verification failed"
        exit 1
    fi
}

# 编译安装x264
install_x264() {
    log_info "编译安装x264编码器..."

    cd /tmp
    if [ -d "x264" ]; then
        rm -rf x264
    fi

    git clone https://code.videolan.org/videolan/x264.git
    check_result "x264 clone"

    cd x264
    ./configure --prefix="$HOME/ffmpeg_build" --enable-shared --enable-pic
    check_result "x264 configuration"

    make -j4
    make install
    check_result "x264 compilation and installation"

    # 创建pkg-config文件
    mkdir -p $HOME/ffmpeg_build/lib/pkgconfig
    cat > $HOME/ffmpeg_build/lib/pkgconfig/x264.pc << 'EOF'
prefix=/root/ffmpeg_build
exec_prefix=${prefix}
libdir=${exec_prefix}/lib
includedir=${prefix}/include

Name: x264
Description: H.264 (MPEG4 AVC) encoder library
Version: 0.164.x
Libs: -L${libdir} -lx264
Libs.private: -lpthread -lm
Cflags: -I${includedir}
EOF

    log_success "x264 installed successfully"
}

# 编译安装x265
install_x265() {
    log_info "编译安装x265编码器..."

    cd /tmp
    if [ -d "x265_git" ]; then
        rm -rf x265_git
    fi

    git clone https://bitbucket.org/multicoreware/x265_git.git
    check_result "x265 clone"

    cd x265_git/build/linux
    cmake -DCMAKE_INSTALL_PREFIX="$HOME/ffmpeg_build" -G "Unix Makefiles" ../../source
    check_result "x265 configuration"

    make -j4
    make install
    check_result "x265 compilation and installation"

    # 创建pkg-config文件
    cat > $HOME/ffmpeg_build/lib/pkgconfig/x265.pc << 'EOF'
prefix=/root/ffmpeg_build
exec_prefix=${prefix}
libdir=${exec_prefix}/lib
includedir=${prefix}/include

Name: x265
Description: H.265/HEVC video encoder
Version: 3.5
Libs: -L${libdir} -lx265
Libs.private: -lstdc++ -lm -lrt -ldl
Cflags: -I${includedir}
EOF

    log_success "x265 installed successfully"
}

# 编译安装FFmpeg
install_ffmpeg() {
    log_info "编译安装FFmpeg with GPU加速..."

    cd /tmp
    wget https://ffmpeg.org/releases/ffmpeg-5.1.3.tar.xz
    check_result "FFmpeg download"

    tar xf ffmpeg-5.1.3.tar.xz
    cd ffmpeg-5.1.3

    # 设置环境变量
    export PKG_CONFIG_PATH=$HOME/ffmpeg_build/lib/pkgconfig:/usr/local/lib/pkgconfig:$PKG_CONFIG_PATH
    export LD_LIBRARY_PATH=$HOME/ffmpeg_build/lib:/usr/local/cuda/lib64:$LD_LIBRARY_PATH

    # 配置FFmpeg
    ./configure \
        --prefix="$HOME/ffmpeg_build" \
        --extra-cflags="-I/usr/local/cuda/include -I/usr/local/include/ffnvcodec" \
        --extra-ldflags="-L$HOME/ffmpeg_build/lib -L/usr/local/cuda/lib64" \
        --enable-nonfree \
        --enable-gpl \
        --enable-version3 \
        --enable-shared \
        --disable-static \
        --enable-cuda-nvcc \
        --enable-libnpp \
        --enable-libx264 \
        --enable-libx265 \
        --enable-cuvid \
        --enable-nvenc \
        --enable-ffnvcodec \
        --extra-libs=-lpthread \
        --extra-libs=-lm

    check_result "FFmpeg configuration"

    make -j4
    make install
    check_result "FFmpeg compilation and installation"
}

# 配置环境变量
setup_environment() {
    log_info "配置环境变量..."

    # 添加到bashrc
    cat >> ~/.bashrc << 'EOF'

# FFmpeg with GPU Support
export PATH="$HOME/ffmpeg_build/bin:$PATH"
export LD_LIBRARY_PATH="$HOME/ffmpeg_build/lib:/usr/local/cuda/lib64:$LD_LIBRARY_PATH"
export PKG_CONFIG_PATH="$HOME/ffmpeg_build/lib/pkgconfig:$PKG_CONFIG_PATH"
EOF

    # 立即生效
    source ~/.bashrc

    log_success "Environment variables configured"
}

# 验证安装
verify_installation() {
    log_info "验证FFmpeg安装..."

    # 检查FFmpeg版本
    ffmpeg -version
    check_result "FFmpeg version check"

    # 检查GPU编码器支持
    log_info "检查GPU编码器支持..."
    ffmpeg -encoders | grep nvenc
    if [ $? -eq 0 ]; then
        log_success "GPU encoders are available"
    else
        log_warning "GPU encoders not found, but FFmpeg is installed"
    fi

    # 创建测试视频
    log_info "创建测试视频..."
    ffmpeg -f lavfi -i testsrc=duration=5:size=1280x720:rate=30 -c:v libx264 test_input.mp4 -y
    check_result "Test video creation"

    # 测试GPU编码
    log_info "测试GPU编码..."
    ffmpeg -i test_input.mp4 -c:v h264_nvenc -b:v 2M test_gpu_output.mp4 -y
    if [ $? -eq 0 ]; then
        log_success "GPU encoding test passed"
    else
        log_warning "GPU encoding test failed, but FFmpeg is installed"
    fi

    # 清理测试文件
    rm -f test_input.mp4 test_gpu_output.mp4
}

# 显示安装总结
show_summary() {
    echo ""
    log_success "🎉 FFmpeg with GPU加速安装完成!"
    echo ""
    echo "📋 安装摘要:"
    echo "  ✅ FFmpeg版本: 5.1.3"
    echo "  ✅ GPU支持: NVIDIA T4 (h264_nvenc, hevc_nvenc)"
    echo "  ✅ 安装目录: $HOME/ffmpeg_build"
    echo "  ✅ 环境变量: 已配置"
    echo ""
    echo "🚀 使用方法:"
    echo "  基本GPU转码: ffmpeg -i input.mp4 -c:v h264_nvenc output.mp4"
    echo "  高质量转码: ffmpeg -i input.mp4 -c:v h264_nvenc -preset slow -crf 18 output.mp4"
    echo "  监控GPU: watch -n 1 nvidia-smi"
    echo ""
    echo "⚠️  注意事项:"
    echo "  - 重新登录或执行 'source ~/.bashrc' 使环境变量生效"
    echo "  - 如遇硬件解码警告,不影响GPU编码功能"
    echo ""
}

# 主函数
main() {
    echo "=========================================="
    echo "  阿里云ECS + T4 GPU FFmpeg自动化部署脚本"
    echo "=========================================="
    echo ""

    log_info "开始自动化部署过程..."

    # 执行各个步骤
    check_environment
    install_dependencies
    install_nasm
    install_ffnvcodec
    install_x264
    install_x265
    install_ffmpeg
    setup_environment
    verify_installation
    show_summary
}

# 脚本入口
if [ "$(id -u)" -ne 0 ]; then
    log_warning "建议使用root权限运行此脚本以获得最佳效果"
    read -p "是否继续? (y/n) " -n 1 -r
    echo
    if [[ ! $REPLY =~ ^[Yy]$ ]]; then
        exit 1
    fi
fi

main