
C++专栏:C++_Yupureki的博客-CSDN博客
目录
[1. C++入门](#1. C++入门)
[1.1 命名空间](#1.1 命名空间)
[1.1.1 命名空间的创建](#1.1.1 命名空间的创建)
[1.1.2 命名空间的使用](#1.1.2 命名空间的使用)
[1.2 引用](#1.2 引用)
[1.2.1 引用的概念](#1.2.1 引用的概念)
[1.2.2 引用和指针的区别(重要)](#1.2.2 引用和指针的区别(重要))
[1.2.3 引用的使用](#1.2.3 引用的使用)
[1.3 函数重载和默认参数](#1.3 函数重载和默认参数)
[1.3.1 函数重载的要求](#1.3.1 函数重载的要求)
[1.3.2 合法的函数重载示例](#1.3.2 合法的函数重载示例)
[1.3.3 编译器如何选择恰当的函数](#1.3.3 编译器如何选择恰当的函数)
[1.3.4 重载决议的详细过程](#1.3.4 重载决议的详细过程)
[1.3.5 特殊情况和注意事项](#1.3.5 特殊情况和注意事项)
[1. 常量性影响重载](#1. 常量性影响重载)
[2. 默认参数的影响](#2. 默认参数的影响)
[3. 函数模板参与重载](#3. 函数模板参与重载)
[1.3.6 缺省值](#1.3.6 缺省值)
[1.3.6.1 缺省参数的设置](#1.3.6.1 缺省参数的设置)
[1.3.6.2 全缺省函数和半缺省函数](#1.3.6.2 全缺省函数和半缺省函数)
[1.4 内联函数](#1.4 内联函数)
[1.5 nullptr](#1.5 nullptr)
[2. 类和对象(重要)](#2. 类和对象(重要))
[2.1 面向过程与面向对象](#2.1 面向过程与面向对象)
[2.1.1 核心理念对比](#2.1.1 核心理念对比)
[2.1.2 程序设计思想](#2.1.2 程序设计思想)
[2.1.3 三大特性对比](#2.1.3 三大特性对比)
[2.1.4 优缺点对比](#2.1.4 优缺点对比)
[2.2 类大小计算](#2.2 类大小计算)
[2.2.1 基本计算规则](#2.2.1 基本计算规则)
[2.2.2 内存对齐原则](#2.2.2 内存对齐原则)
[2.2.3 继承对类大小的影响](#2.2.3 继承对类大小的影响)
[2.2.4 虚函数对类大小的影响](#2.2.4 虚函数对类大小的影响)
[2.2.5 静态成员不影响类大小](#2.2.5 静态成员不影响类大小)
[2.3 class和struct的区别](#2.3 class和struct的区别)
[2.4 this指针](#2.4 this指针)
[2.5 8个默认成员函数](#2.5 8个默认成员函数)
[2.5.1 构造函数](#2.5.1 构造函数)
[2.5.2 析构函数](#2.5.2 析构函数)
[2.5.3 拷贝构造函数](#2.5.3 拷贝构造函数)
[2.5.4 拷贝赋值运算符](#2.5.4 拷贝赋值运算符)
[2.5.5 移动构造函数-C++11](#2.5.5 移动构造函数-C++11)
[2.5.6 移动赋值运算符-C++11](#2.5.6 移动赋值运算符-C++11)
[2.5.7 取地址运算符](#2.5.7 取地址运算符)
[2.5.8 const取地址运算符](#2.5.8 const取地址运算符)
[2.5.9 重要注意事项](#2.5.9 重要注意事项)
[2.6 初始化列表](#2.6 初始化列表)
[2.6.1 基本语法](#2.6.1 基本语法)
[2.6.2 初始化列表的特性](#2.6.2 初始化列表的特性)
[2.6.2.1 直接初始化 vs 赋值初始化](#2.6.2.1 直接初始化 vs 赋值初始化)
[2.6.2.2 初始化顺序由声明顺序决定](#2.6.2.2 初始化顺序由声明顺序决定)
[2.6.3 必须使用初始化列表的情况](#2.6.3 必须使用初始化列表的情况)
[常量成员(const members)](#常量成员(const members))
[引用成员(reference members)](#引用成员(reference members))
[2.7 运算符重载](#2.7 运算符重载)
[2.7.1 基本语法](#2.7.1 基本语法)
[2.7.2 不能重载的运算符](#2.7.2 不能重载的运算符)
[2.7.3 运算符重载 vs 函数重载](#2.7.3 运算符重载 vs 函数重载)
[2.7.4 运算符重载的意义](#2.7.4 运算符重载的意义)
[2.8 友元](#2.8 友元)
[2.8.1 友元函数](#2.8.1 友元函数)
[2.8.2 友元类](#2.8.2 友元类)
[2.8.3 友元成员函数](#2.8.3 友元成员函数)
[2.9 static成员](#2.9 static成员)
[2.9.1 static成员的类型](#2.9.1 static成员的类型)
[2.9.2 静态数据成员](#2.9.2 静态数据成员)
[2.9.3 静态成员函数](#2.9.3 静态成员函数)
[2.10 编译器对类的优化](#2.10 编译器对类的优化)
[2.10.1 常见优化场景:](#2.10.1 常见优化场景:)
[3. 内存管理](#3. 内存管理)
[3.1 C++的内存分布](#3.1 C++的内存分布)
[3.2 new/delete和malloc/free的区别](#3.2 new/delete和malloc/free的区别)
[3.2.1 基本概念对比](#3.2.1 基本概念对比)
[3.2.2 语法和使用方式](#3.2.2 语法和使用方式)
[3.2.3 构造函数和析构函数的调用](#3.2.3 构造函数和析构函数的调用)
[3.2.4 初始化区别](#3.2.4 初始化区别)
[3.2.5 异常处理区别](#3.2.5 异常处理区别)
[3.2.6 数组处理的区别](#3.2.6 数组处理的区别)
[3.3 operator new和operator delete](#3.3 operator new和operator delete)
[3.3.1 new/delete 的底层调用关系](#3.3.1 new/delete 的底层调用关系)
[3.3.2 operator new和operator delete的底层结构](#3.3.2 operator new和operator delete的底层结构)
[3.4 内存泄漏](#3.4 内存泄漏)
[3.4.1 内存泄漏的常见类型](#3.4.1 内存泄漏的常见类型)
[3.4.2 内存泄漏的危害](#3.4.2 内存泄漏的危害)
[3.4.3 解决和预防内存泄漏的方法](#3.4.3 解决和预防内存泄漏的方法)
[4. 模板](#4. 模板)
[4.1 模板的使用](#4.1 模板的使用)
[4.1.1 函数模板](#4.1.1 函数模板)
[4.1.2 类模板](#4.1.2 类模板)
[4.2 模板特化](#4.2 模板特化)
[4.2.1 特化步骤](#4.2.1 特化步骤)
[4.2.2 全特化](#4.2.2 全特化)
[4.2.3 偏特化](#4.2.3 偏特化)
[4.2.4 类型约束特化](#4.2.4 类型约束特化)
[4.3 模板的分离编译](#4.3 模板的分离编译)
[4.3.1 问题分析](#4.3.1 问题分析)
[4.3.2 解决方案](#4.3.2 解决方案)
[5. 继承(重要)](#5. 继承(重要))
[5.1 什么是继承?](#5.1 什么是继承?)
[5.1.1 继承的意义](#5.1.1 继承的意义)
[5.2 基类和派生类的转换](#5.2 基类和派生类的转换)
[5.3 隐藏](#5.3 隐藏)
[5.4 派生类的默认成员函数](#5.4 派生类的默认成员函数)
[5.5 多继承和菱形继承](#5.5 多继承和菱形继承)
[5.5.1 多继承](#5.5.1 多继承)
[5.5.2 菱形继承](#5.5.2 菱形继承)
[5.5.3 虚继承](#5.5.3 虚继承)
[5.6 继承和组合](#5.6 继承和组合)
[5.6.1 继承 - "is-a" 关系](#5.6.1 继承 - "is-a" 关系)
[5.6.2 组合 - "has-a" 关系](#5.6.2 组合 - "has-a" 关系)
[5.6.3 详细区别分析](#5.6.3 详细区别分析)
[5.6.4 决策流程图](#5.6.4 决策流程图)
[6. 多态(极其重要)](#6. 多态(极其重要))
[6.1 什么是多态?](#6.1 什么是多态?)
[6.2 多态的条件](#6.2 多态的条件)
[6.2.1 虚函数的重写/覆盖](#6.2.1 虚函数的重写/覆盖)
[6.2.2 基类指针/引用赋值](#6.2.2 基类指针/引用赋值)
[6.3 为什么析构函数建议是虚函数?](#6.3 为什么析构函数建议是虚函数?)
[6.4 纯虚函数和抽象类](#6.4 纯虚函数和抽象类)
[6.4.1 纯虚函数](#6.4.1 纯虚函数)
[6.4.2 抽象类](#6.4.2 抽象类)
[6.5 重载/隐藏/重写的区别](#6.5 重载/隐藏/重写的区别)
[6.5.1 基本概念对比](#6.5.1 基本概念对比)
[6.6 多态的原理](#6.6 多态的原理)
[6.6.1 虚函数表指针](#6.6.1 虚函数表指针)
[6.6.2 多态的原理](#6.6.2 多态的原理)
[7. C++11新特性](#7. C++11新特性)
[7.1 范围for](#7.1 范围for)
[7.1.1 范围for循环的使用](#7.1.1 范围for循环的使用)
[7.1.2 基本使用示例](#7.1.2 基本使用示例)
[7.1.3 范围for循环的底层原理](#7.1.3 范围for循环的底层原理)
[7.2 右值引用](#7.2 右值引用)
[7.2.1 左值与右值](#7.2.1 左值与右值)
[7.2.2 右值引用的使用](#7.2.2 右值引用的使用)
[7.2.2.1 move](#7.2.2.1 move)
[7.2.3 左值与右值的参数匹配](#7.2.3 左值与右值的参数匹配)
[7.2.4 右值引用的作用](#7.2.4 右值引用的作用)
[7.2.5 完美转发](#7.2.5 完美转发)
[7.3 Lambda](#7.3 Lambda)
[7.3.1 Lambda表达式的基本语法](#7.3.1 Lambda表达式的基本语法)
[7.3.2 基本使用示例](#7.3.2 基本使用示例)
[7.3.3 捕获列表](#7.3.3 捕获列表)
[7.4 包装器](#7.4 包装器)
[7.4.1 function的使用](#7.4.1 function的使用)
[7.4.2 bind](#7.4.2 bind)
[8. 异常和智能指针](#8. 异常和智能指针)
[8.1 异常](#8.1 异常)
[8.1.1 异常的抛出和捕获](#8.1.1 异常的抛出和捕获)
[8.1.2 栈展开](#8.1.2 栈展开)
[8.1.3 异常匹配规则](#8.1.3 异常匹配规则)
[8.1.4 异常重新抛出](#8.1.4 异常重新抛出)
[8.1.5 异常安全问题](#8.1.5 异常安全问题)
[8.1.6 异常规范](#8.1.6 异常规范)
[8.2 智能指针](#8.2 智能指针)
[8.2.1 传统内存管理的问题](#8.2.1 传统内存管理的问题)
[8.2.2 RAII设计思想](#8.2.2 RAII设计思想)
[8.2.3 C++标准库智能指针](#8.2.3 C++标准库智能指针)
[8.2.4 智能指针的原理](#8.2.4 智能指针的原理)
[8.2.5 智能指针的实现原理](#8.2.5 智能指针的实现原理)
[8.2.6 shared_ptr的循环引用问题](#8.2.6 shared_ptr的循环引用问题)
[8.2.7 weak_ptr](#8.2.7 weak_ptr)
上一篇:从零开始的C++学习生活 18:C语言复习课(期末速通)-CSDN博客
前言
C++作为C的拓展,其建立在C的语法之上而创建了很多新的语法规则。
因此在此处C++的复习课默认你已经了解并熟练掌握了C语言的基础语法规则,讲解C++的新的语法。如果忘了可以看上一篇C语言复习的博客。
我将从C++基础特性开始,系统性地复习面向对象编程、模板、STL、现代C++特性等核心知识点,帮助你构建完整的C++知识体系。每个部分都配有实用的代码示例和最佳实践建议,让复习更加高效(总字数5.4w)。

1. C++入门
1.1 命名空间
1.1.1 命名空间的创建
C++引入命名空间-namespace,不同的命名空间中相同名称的变量或函数不冲突,只需要使用对应的即可
cpp
 #include <stdio.h>
 #include <stdlib.h>
 int rand = 10;
 int main()
 {
    // 编译报错:error C2365: "rand": 重定义;以前的定义是"函数"
    printf("%d\n", rand);
    return 0;
 }
cpp
namespace test {
	int rand = 10;
	int Add(int x = 1, int y = 2)
	{
		return x + y;
	}
	int main = 20;
}
如果我们要访问命名空间中的变量,那么就要使用 **::**操作符
用命名空间名字::变量名字来访问
cpp
int main()
{
	test::rand += 1;
	cout << test::rand << endl;
	cout << test::test2::strlen << endl;
    return 0;
}
1.1.2 命名空间的使用
指定使用命名空间中的内容有三种方式
-
指定命名空间访问,即使用 :: 访问
cppint main() { test::rand += 1; } -
using将命名空间中某个成员展开
cppnamespace test{ int a = 3; } using test::a;//展开test中的a int main() { printf("%d", a);//展开后无需使用::操作符访问 } -
展开命名空间中全部成员
cppnamespace test{ int a = 3; int b = 5; } using namespace test;//展开test int main() { printf("%d", a); printf("%d", b); }
1.2 引用
1.2.1 引用的概念
引用不是新定义⼀个变量,而是给已存在变量取了⼀个别名
因此引用具有以下特性
- 引用在声明时必须初始化
- 一旦初始化后,不能再指向其他变量
- 使用引用时不需要特殊操作符
- 引用本身不占用存储空间(通常)
1.2.2 引用和指针的区别(重要)
| 特性 | 引用 | 指针 |
|---|---|---|
| 初始化 | 必须初始化 | 可以不初始化 |
| 重新赋值 | 不能重新绑定 | 可以指向不同变量 |
| 空值 | 不能为NULL | 可以为NULL或nullptr |
| 操作符 | 直接使用,自动解引用 | 需要*和&操作符 |
| 内存占用 | 通常不占额外内存 | 占用指针大小的内存 |
| 算术运算 | 不支持 | 支持指针算术 |
| 多级间接 | 只有一级 | 支持多级指针 |
引用在语法层面上不开空间,但在底层就是指针,因此实际还是要开空间。不过我们一般只探讨语法层面
1.2.3 引用的使用
引用作为函数参数
cpp
void swap(int &a, int &b) {
    int temp = a;
    a = b;
    b = temp;
}
引用作为返回值
cpp
int& getElement(int arr[], int index) {
    return arr[index];
}
引用基本使用
cpp
int x = 10;
int &ref = x;  // ref是x的引用

cout << "x = " << x << ", ref = " << ref << endl;
ref = 20;
cout << "修改后 x = " << x << endl;
1.3 函数重载和默认参数
我们在C语言中无法创造两个函数名一样的函数,即使他们的参数和返回值都不同
而我们在C++却可以创造函数名 相同但参数一定不同的几种函数,这些函数称为重载函数
1.3.1 函数重载的要求
函数重载是指在同一作用域 内,可以定义多个同名函数 ,但这些函数的参数列表必须不同。
-
函数名称必须相同
-
参数列表必须不同,体现在:
-
参数类型不同
-
参数个数不同
-
参数顺序不同
-
-
返回类型不同不足以构成重载
cpp
int func(int a);        // ✓ 正确重载
double func(int a);     // ✗ 错误!仅返回类型不同
1.3.2 合法的函数重载示例
cpp
#include <iostream>
using namespace std;

// 参数类型不同
void print(int value) {
    cout << "整数: " << value << endl;
}

void print(double value) {
    cout << "浮点数: " << value << endl;
}

void print(const string& value) {
    cout << "字符串: " << value << endl;
}

// 参数个数不同
int add(int a, int b) {
    return a + b;
}

int add(int a, int b, int c) {
    return a + b + c;
}

// 参数顺序不同
void display(int a, double b) {
    cout << "int, double: " << a << ", " << b << endl;
}

void display(double a, int b) {
    cout << "double, int: " << a << ", " << b << endl;
}

int main() {
    print(10);           // 调用 print(int)
    print(3.14);         // 调用 print(double)
    print("Hello");      // 调用 print(const string&)

    cout << add(1, 2) << endl;        // 调用 add(int, int)
    cout << add(1, 2, 3) << endl;     // 调用 add(int, int, int)

    display(5, 2.5);     // 调用 display(int, double)
    display(2.5, 5);     // 调用 display(double, int)

    return 0;
}
1.3.3 编译器如何选择恰当的函数
编译器使用重载决议过程来选择最匹配的函数,遵循以下优先级:
-
精准匹配->根据传递参数的类型匹配
cppvoid func(int a); void func(double a); func(10); // 精确匹配 func(int) func(3.14); // 精确匹配 func(double) -
类型提升->内存字节占用小的类型提升至大类型
cppvoid func(int a); void func(long a); func('A'); // char → int 提升 func(1.5f); // float → double 提升 -
标准转换->类型间的相互转换
cppvoid func(double a); func(10); // int → double 标准转换 -
用户定义转换->自定义
cppclass MyClass { public: operator int() const { return 42; } }; void func(int a); MyClass obj; func(obj); // 用户定义转换
1.3.4 重载决议的详细过程
步骤1:确定候选函数集
cpp
void process(int a);           // 候选1
void process(double a);        // 候选2
void process(int a, int b);    // 候选3

process(5);  // 候选函数:process(int) 和 process(double)
步骤2:确定可行函数
cpp
void func(int a);              // 可行
void func(double a);           // 可行
void func(int a, int b = 10);  // 可行(有默认参数)
void func(const char* a);      // 不可行

func(5);  // 所有可行函数都参与重载决议
步骤3:选择最佳匹配
编译器按照以下顺序选择最佳匹配:
-
精确匹配
-
类型提升匹配
-
标准转换匹配
-
用户定义转换匹配1/
cpp
void test(int a);        // 精确匹配
void test(short a);      // 类型提升匹配
void test(double a);     // 标准转换匹配

test(10);  // 选择 test(int) - 精确匹配
1.3.5 特殊情况和注意事项
1. 常量性影响重载
cpp
void process(int& a);           // #1
void process(const int& a);     // #2

int x = 10;
const int y = 20;

process(x);    // 调用 #1
process(y);    // 调用 #2
process(30);   // 调用 #2
2. 默认参数的影响
cpp
void display(int a);                   // #1
void display(int a, int b = 10);       // #2

display(5);  // 错误!二义性调用
3. 函数模板参与重载
cpp
template<typename T>
void process(T a) { cout << "模板" << endl; }

void process(int a) { cout << "普通函数" << endl; }

process(10);    // 调用普通函数(更特化)
process(10.5);  // 调用模板函数
二义性调用示例
cpp
void ambiguous(int a, double b);
void ambiguous(double a, int b);

ambiguous(5, 5);  // 错误!二义性调用
                  // 第一个参数:int → int (精确) 或 int → double (转换)
                  // 第二个参数:int → double (转换) 或 int → int (精确)
                  // 无法确定最佳匹配
1.3.6 缺省值
1.3.6.1 缺省参数的设置
C++中我们可以初始化形参的值
cpp
int Add(int x, int y)//C语言
{
	return x + y;
}

int Add(int x = 1, int y = 2)//C++
{
	return x + y;
}
在C++调用函数时,如果没有给函数传递参数,那么就会使用默认值
cpp
int main()
{
	cout << Add(1, 2) << endl;
	cout << Add(3) << endl;
	return 0;
}
1.3.6.2 全缺省函数和半缺省函数
全缺省函数指所有的参数都有默认值,而半缺省函数的参数从左到右中,左边的参数没有默认值,而右边的参数有默认值
cpp
// 全缺省
void Func1(int a = 10, int b = 20, int c = 30)
 {
 cout << "a = " << a << endl;
 cout << "b = " << b << endl;
 cout << "c = " << c << endl << endl;
 }


// 半缺省
void Func2(int a, int b = 10, int c = 20)
 {
 cout << "a = " << a << endl;
 cout << "b = " << b << endl;
 cout << "c = " << c << endl << endl;
 }
1.4 内联函数
为了完美地替代宏,C++引入了内联函数inline
inline对于编译器而言只是⼀个建议,具体是否使用内联函数需要编译器审批
如果代码行较少且没有过多的函数递归,编译器会使用inline
如果较为复杂,则不会使用
inline不建议声明和定义分离到两个文件,分离会导致链接错误
cpp
#include <iostream>
using namespace std;

// 内联函数:建议编译器在调用处展开
inline int Add(int a, int b) {
    return a + b;
}

// 对比宏函数
#define ADD_MACRO(a, b) ((a) + (b))

int main() {
    int x = 5, y = 3;

    cout << "内联函数: " << Add(x, y) << endl;
    cout << "宏函数: " << ADD_MACRO(x, y) << endl;

    // 查看汇编代码可以发现内联函数可能被展开
    int result = Add(x, y);

    return 0;
}
1.5 nullptr
在C++中NULL不再代表空指针,而是0,取而代之的是nullptr
cpp
#include <iostream>
using namespace std;

void Func(int x) {
    cout << "调用整型版本: " << x << endl;
}

void Func(int* ptr) {
    if (ptr == nullptr) {
        cout << "调用指针版本: 空指针" << endl;
    } else {
        cout << "调用指针版本: " << *ptr << endl;
    }
}

int main() {
    int value = 10;

    Func(0);           // 调用整型版本
    Func(NULL);        // 可能调用整型版本(取决于NULL的定义)
    Func(&value);      // 调用指针版本
    Func(nullptr);     // 明确调用指针版本

    return 0;
}
2. 类和对象(重要)
2.1 面向过程与面向对象
2.1.1 核心理念对比
| 方面 | 面向过程 | 面向对象 |
|---|---|---|
| 核心思想 | 以过程为中心 | 以对象为中心 |
| 关注点 | 怎么做(How) | 做什么(What) |
| 基本单元 | 函数 | 类、对象 |
| 数据与行为 | 分离 | 封装在一起 |
2.1.2 程序设计思想
面向过程:
-
将问题分解为一系列步骤
-
关注算法的实现过程
-
数据在函数间传递
面向对象:
-
将问题抽象为对象及其相互关系
-
关注对象的行为和属性
-
数据和行为封装在对象内部
2.1.3 三大特性对比
面向对象独有的三大特性:
封装(Encapsulation)
cpp
class BankAccount {
private:
    double balance;  // 数据隐藏
    string owner;

public:
    // 通过公共接口访问私有数据
    void deposit(double amount) {
        if (amount > 0) balance += amount;
    }

    bool withdraw(double amount) {
        if (amount <= balance) {
            balance -= amount;
            return true;
        }
        return false;
    }

    double getBalance() { return balance; }  // 受控访问
};
继承(Inheritance)
cpp
// 基类
class Animal {
protected:
    string name;
public:
    Animal(string n) : name(n) {}
    virtual void speak() = 0;  // 纯虚函数
};

// 派生类
class Dog : public Animal {
public:
    Dog(string n) : Animal(n) {}
    void speak() override {
        cout << name << " says: Woof!" << endl;
    }
};

class Cat : public Animal {
public:
    Cat(string n) : Animal(n) {}
    void speak() override {
        cout << name << " says: Meow!" << endl;
    }
};
多态(Polymorphism)
cpp
void makeAnimalSpeak(Animal* animal) {
    animal->speak();  // 同一接口,不同行为
}

int main() {
    Dog dog("Buddy");
    Cat cat("Whiskers");

    makeAnimalSpeak(&dog);  // 输出: Buddy says: Woof!
    makeAnimalSpeak(&cat);  // 输出: Whiskers says: Meow!

    return 0;
}
2.1.4 优缺点对比
面向过程的优缺点
优点:
-
性能较高(函数调用开销小)
-
适合简单、线性的问题
-
代码直观,易于理解流程
-
资源消耗相对较少
缺点:
-
代码重用性差
-
难以维护和扩展
-
数据和函数分离,安全性低
-
不适合复杂系统
面向对象的优缺点
优点:
-
代码重用性高(继承、组合)
-
易于维护和扩展
-
数据封装,安全性好
-
适合大型复杂系统
-
更贴近现实世界
缺点:
-
性能开销较大(虚函数、对象创建)
-
学习曲线较陡峭
-
设计复杂度高
-
资源消耗相对较多
2.2 类大小计算
2.2.1 基本计算规则
空类的大小
没有成员变量的类为空类,大小为1个字节
cpp
class Empty {};
cout << sizeof(Empty) << endl;  // 输出:1(至少1字节,保证对象有唯一地址)
只有成员变量的类
cpp
class Simple {
    int a;        // 4字节
    char b;       // 1字节
    double c;     // 8字节
};
// 大小计算考虑内存对齐
2.2.2 内存对齐原则
对齐规则
-
基本对齐:变量的地址通常是其对齐数的整数倍
-
结构体对齐:结构体大小是其最大成员大小的整数倍
-
偏移量规则:成员偏移量是对齐数的整数倍
-
对齐数:编译器默认对齐数与其类型的较小值(vs中默认对齐数为8)
示例分析
cpp
#include <iostream>
using namespace std;

class Example1 {
    int a;        // 4字节,偏移0
    char b;       // 1字节,偏移4
    // 填充3字节(为了对齐double)
    double c;     // 8字节,偏移8
};
// 大小 = 4 + 1 + 3(填充) + 8 = 16字节

class Example2 {
    char a;       // 1字节,偏移0
    // 填充7字节(为了对齐double)
    double b;     // 8字节,偏移8
    int c;        // 4字节,偏移16
    // 填充4字节(整体对齐到8的倍数)
};
// 大小 = 1 + 7(填充) + 8 + 4 + 4(填充) = 24字节

class Example3 {
    double a;     // 8字节,偏移0
    char b;       // 1字节,偏移8
    int c;        // 4字节,偏移12(需要从4的倍数开始)
};
// 大小 = 8 + 1 + 3(填充) + 4 = 16字节
2.2.3 继承对类大小的影响
类也是类型,按照其大小放在内存当中,且继承的基类优先放在前面
先继承的先放
单继承
cpp
class Base {
    int a;        // 4字节
    char b;       // 1字节
    // 填充3字节
}; // 大小:8字节

class Derived : public Base {
    double c;     // 8字节
    int d;        // 4字节
    // 填充4字节(整体对齐到8的倍数)
};
// 大小 = Base(8) + 8 + 4 + 4(填充) = 24字节
多继承
cpp
class Base1 {
    int a;        // 4
    // 填充4(为了对齐double)
}; // 8字节

class Base2 {
    double b;     // 8
}; // 8字节

class MultipleDerived : public Base1, public Base2 {
    char c;       // 1
    // 填充7字节
};
// 大小 = Base1(8) + Base2(8) + 1 + 7(填充) = 24字节
2.2.4 虚函数对类大小的影响
虚函数表指针
指针在32位下为4个字节,64位下为8个字节,放在前面
cpp
class NoVirtual {
    int a;        // 4字节
    double b;     // 8字节
}; // 大小:16字节

class WithVirtual {
    int a;        // 4字节
    double b;     // 8字节
    virtual void func() {}  // 添加虚函数表指针
};
// 在64位系统中:虚表指针(8) + 4 + 4(填充) + 8 = 24字节
// 内存布局:[vptr(8)][a(4)+填充(4)][b(8)]
继承中的虚函数
cpp
class VirtualBase {
    int a;                    // 4
    virtual void func1() {}   // 虚表指针:8
};
// 大小 = 8 + 4 + 4(填充) = 16字节

class VirtualDerived : public VirtualBase {
    double b;                 // 8
    virtual void func2() {}   // 不增加额外虚表指针
};
// 大小 = VirtualBase(16) + 8 = 24字节
2.2.5 静态成员不影响类大小
cpp
class WithStatic {
    int a;                    // 4字节
    double b;                 // 8字节
    static int count;         // 不占用对象内存
};
// 大小 = 4 + 4(填充) + 8 = 16字节
2.3 class和struct的区别
C++中struct也可以定义类,C++兼容C中struct的用法,同时struct升级成了类
但不同的是class中默认成员为private
struct默认为public
2.4 this指针
this指针是类中自带的隐含的指针,放在函数的第一个形参位置,但是不会显示出来,我们也不用专门地去添加
类的成员函数中访问成员变量,本质都是通过this指针访问的,如Init函数中给_year赋值, this->_year = year
cpp
#include <iostream>
using namespace std;

class Date {
public:
    // 编译器会将函数转换为:void Init(Date* const this, int year, int month, int day)
    void Init(int year, int month, int day) {
        // this指针是隐含的,不能在参数中显式写出
        // 但可以在函数体内使用

        // 以下三种写法等价:
        _year = year;           // 方式1:隐式使用this
        this->_month = month;   // 方式2:显式使用this
        this->_day = day;       // 方式3:显式使用this
    }

    void Print() {
        cout << _year << "/" << _month << "/" << _day << endl;
    }

private:
    int _year;
    int _month;
    int _day;
};

int main() {
    Date d1, d2;

    // 编译器会将调用转换为:d1.Init(&d1, 2024, 3, 31);
    d1.Init(2024, 3, 31);
    d2.Init(2024, 7, 5);

    d1.Print();  // 输出:2024/3/31
    d2.Print();  // 输出:2024/7/5

    return 0;
}
this指针的特性
-
类型 :
类型* const(常量指针) -
自动传递:编译器自动在成员函数参数中添加
-
不可修改:不能改变this指针的指向
-
隐式使用:通常不需要显式写出
2.5 8个默认成员函数
在C++中,如果一个类没有显式定义某些成员函数,编译器会自动生成一些默认的成员函数
默认成员函数包括:
-
默认构造函数
-
默认析构函数
-
默认拷贝构造函数
-
默认拷贝赋值运算符
-
默认移动构造函数(C++11起)
-
默认移动赋值运算符(C++11起)
-
默认取地址运算符(包括const和非const版本)
-
默认的const取地址运算符
2.5.1 构造函数
作用:创建对象时初始化对象
构造函数的特点:
- 函数名与类名相同
- 无返回值
- 对象实例化时系统会自动调用对应的构造函数
- 构造函数可以重载
- 如果类中没有显式定义构造函数,则C++编译器会自动生成⼀个无参的默认构造函数
cpp
class MyClass {
public:
    // 编译器生成的默认构造函数
    //MyClass() = default;
    MyClass()//用户自己写的默认构造函数
    {
        a = 1;
        b = 3.14;
    }

private:
    int a;
    double b;
};

// 使用
MyClass obj;  // 调用默认构造函数
2.5.2 析构函数
作用:对象销毁时清理资源
析构函数的特点:
- 函数名: ~类名
- 无返回值
- 一个类只能有一个析构函数
- 对象生命周期结束时自动调用
cpp
class MyClass {
public:
    // 编译器生成的默认析构函数
    ~MyClass() = default;

private:
    int* data;
};

// 使用
{
    MyClass obj;  // 创建对象
} // 离开作用域,调用析构函数
2.5.3 拷贝构造函数
作用:用一个已存在对象初始化新对象
拷贝构造函数的特点:
- 拷贝构造函数是构造函数的一个重载函数
- 拷贝构造函数的第⼀个参数必须是类类型对象的引用,不然会直接报错。
- C++规定用一个已有对象初始化一个相同的类对象时必须调用拷贝构造函数
- 默认实现时是浅拷贝
cpp
class MyClass {
public:
    // 编译器生成的默认拷贝构造函数
    MyClass(const MyClass& other) = default;

private:
    int a;
    double b;
};

// 使用
MyClass obj1;
MyClass obj2 = obj1;  // 调用拷贝构造函数
MyClass obj3(obj1);   // 调用拷贝构造函数
2.5.4 拷贝赋值运算符
作用:将一个对象的值赋给另一个已存在对象
拷贝赋值运算符的特点:
- 返回当前运算符的引用(允许链式赋值)
- 赋值运算符同样是拷贝,但运用于已有对象
- 默认是浅拷贝
cpp
class MyClass {
public:
    // 编译器生成的默认拷贝赋值运算符
    MyClass& operator=(const MyClass& other) = default;

private:
    int a;
    double b;
};

// 使用
MyClass obj1, obj2;
obj1 = obj2;  // 调用拷贝赋值运算符
2.5.5 移动构造函数-C++11
作用:从临时对象"窃取"资源来初始化新对象
移动构造函数的特点:
- 参数是同类对象的右值引用(&&)
- "窃取"对象的资源,将对象置为空
- 性能较于拷贝构造函数大大提高
- 对一个对象初始化时调用
cpp
class MyClass {
public:
    // 编译器生成的默认移动赋值运算符
    MyClass& operator=(MyClass&& other) = default;

private:
    int* data;
};

// 使用
MyClass obj;
obj = createObject();  // 调用移动赋值运算符
2.5.6 移动赋值运算符-C++11
作用:从临时对象"窃取"资源赋给已存在对象
移动赋值运算符的特点:
- 参数是同类对象的右值引用
- 返回当前对象的引用
- "窃取"资源,提高效率
- 对已有对象的赋值
cpp
class MyClass {
public:
    // 编译器生成的默认移动赋值运算符
    MyClass& operator=(MyClass&& other) = default;

private:
    int* data;
};

// 使用
MyClass obj;
obj = createObject();  // 调用移动赋值运算符
2.5.7 取地址运算符
作用:获取对象的地址
cpp
class MyClass {
public:
    // 编译器生成的默认取地址运算符
    MyClass* operator&() { return this; }

private:
    int a;
};

// 使用
MyClass obj;
MyClass* ptr = &obj;  // 调用取地址运算符
2.5.8 const取地址运算符
作用:获取const对象的地址
cpp
class MyClass {
public:
    // 编译器生成的默认const取地址运算符
    const MyClass* operator&() const { return this; }

private:
    int a;
};

// 使用
const MyClass obj;
const MyClass* ptr = &obj;  // 调用const取地址运算符
2.5.9 重要注意事项
-
浅拷贝问题:默认拷贝操作是浅拷贝,资源管理类需要重写
-
Rule of Three/Five:
-
如果需要自定义析构函数、拷贝构造函数、拷贝赋值运算符中的一个,通常需要定义全部三个
-
C++11后扩展为Rule of Five(加上移动操作)
-
-
异常安全 :移动操作通常标记为
noexcept -
自赋值处理:赋值运算符需要处理自赋值情况
2.6 初始化列表
初始化列表是C++构造函数的一部分,用于在对象创建时直接初始化成员变量,而不是先默认初始化再赋值。
2.6.1 基本语法
cpp
class MyClass {
private:
    int a;
    double b;
    std::string c;

public:
    // 初始化列表语法
    MyClass(int x, double y, const std::string& z)
        : a(x), b(y), c(z)  // 初始化列表
    {
        // 构造函数体
    }
};
2.6.2 初始化列表的特性
2.6.2.1 直接初始化 vs 赋值初始化
cpp
class Example {
private:
    int value;
    std::string name;

public:
    // 方式1:使用初始化列表(推荐)
    Example(int v, const std::string& n)
        : value(v), name(n)  // 直接初始化
    {
    }

    // 方式2:在构造函数体内赋值
    Example(int v, const std::string& n) {
        value = v;  // 实际上是赋值,不是初始化
        name = n;   // 先默认构造,再赋值
    }
};
2.6.2.2 初始化顺序由声明顺序决定
cpp
class OrderExample {
private:
    int a;
    int b;
    int c;

public:
    // 初始化顺序:a → b → c(声明顺序)
    // 不是初始化列表中写的顺序!
    OrderExample(int x) : c(x), b(c + 1), a(b + 1) {
        // 危险!b和a使用了未初始化的c和b
        cout << "a=" << a << ", b=" << b << ", c=" << c << endl;
    }
};
2.6.3 必须使用初始化列表的情况
常量成员(const members)
cpp
class ConstMember {
private:
    const int MAX_SIZE;    // 常量成员
    const double PI;       // 常量成员

public:
    // 必须使用初始化列表初始化常量成员
    ConstMember(int size)
        : MAX_SIZE(size), PI(3.14159)  // 必须在这里初始化
    {
        // 错误:不能在构造函数体内初始化常量成员
        // MAX_SIZE = size;  // 编译错误!
    }

    // 另一个构造函数
    ConstMember() : MAX_SIZE(100), PI(3.14) {
    }
};
引用成员(reference members)
cpp
class ReferenceMember {
private:
    int& ref;           // 引用成员
    const std::string& strRef;  // 常量引用成员

public:
    // 必须使用初始化列表初始化引用成员
    ReferenceMember(int& externalInt, const std::string& externalStr)
        : ref(externalInt), strRef(externalStr)  // 必须在这里绑定引用
    {
        // 错误:不能在构造函数体内绑定引用
        // ref = externalInt;  // 编译错误!这实际上是赋值,不是初始化引用
    }
};

// 使用示例
int main() {
    int value = 42;
    std::string text = "Hello";
    ReferenceMember obj(value, text);

    value = 100;  // obj.ref也会变成100
    return 0;
}
没有默认构造函数的类成员
cpp
class NoDefaultConstructor {
private:
    int data;

public:
    // 没有默认构造函数
    NoDefaultConstructor(int val) : data(val) {}
    // 编译器不会生成默认构造函数 NoDefaultConstructor()
};

class Container {
private:
    NoDefaultConstructor member;  // 没有默认构造函数的成员

public:
    // 必须使用初始化列表
    Container(int value)
        : member(value)  // 必须在这里调用有参构造函数
    {
        // 错误:不能在构造函数体内"初始化"
        // member = NoDefaultConstructor(value);  // 编译错误!
        // 因为member已经被默认构造(但NoDefaultConstructor没有默认构造函数)
    }
};
基类初始化(继承情况)
cpp
class Base {
private:
    int baseValue;

public:
    Base(int val) : baseValue(val) {}  // 没有默认构造函数
};

class Derived : public Base {
private:
    int derivedValue;

public:
    // 必须使用初始化列表初始化基类
    Derived(int baseVal, int derivedVal)
        : Base(baseVal), derivedValue(derivedVal)  // 必须在这里调用基类构造函数
    {
        // 错误:不能在构造函数体内调用基类构造函数
    }

    // 如果基类有默认构造函数,这不是必须的,但推荐使用
    Derived(int derivedVal)
        : Base(42), derivedValue(derivedVal)  // 显式调用基类构造函数
    {
    }
};
2.7 运算符重载
运算符重载operator是C++中的一种多态形式,它允许我们为自定义类型(类或结构体)重新定义运算符的行为,使这些运算符能够像操作内置类型一样操作自定义类型。
2.7.1 基本语法
cpp
class MyClass {
public:
    // 成员函数形式的运算符重载
    ReturnType operatorOP(ParameterList) {
        // 实现
    }

    // 或者作为友元函数
    friend ReturnType operatorOP(ParameterList);
};
2.7.2 不能重载的运算符
作用域解析运算符 ::
成员访问运算符 .
成员指针访问运算符 .*
条件运算符 ?:
sizeof 运算符
typeid 运算符
2.7.3 运算符重载 vs 函数重载
| 方面 | 运算符重载 | 函数重载 |
|---|---|---|
| 重载对象 | 运算符 | 函数 |
| 语法 | operator+, operator-等 |
普通函数名 |
| 目的 | 使自定义类型支持运算符 | 同一函数名处理不同类型 |
| 限制 | 只能重载现有运算符 | 可以创建任意函数名 |
| 参数数量 | 受运算符原参数数量限制 | 任意数量参数 |
代码对比
cpp
#include <iostream>
using namespace std;

class Vector {
public:
    int x, y;

    Vector(int x = 0, int y = 0) : x(x), y(y) {}

    // 运算符重载
    Vector operator+(const Vector& other) const {
        return Vector(x + other.x, y + other.y);
    }

    // 函数重载(普通方法)
    Vector add(const Vector& other) const {
        return Vector(x + other.x, y + other.y);
    }

    // 显示向量
    void display() const {
        cout << "(" << x << ", " << y << ")" << endl;
    }
};

int main() {
    Vector v1(1, 2), v2(3, 4);

    // 运算符重载使用
    Vector v3 = v1 + v2;      // 直观,类似内置类型
    v3.display();             // 输出: (4, 6)

    // 函数重载使用
    Vector v4 = v1.add(v2);   // 传统函数调用方式
    v4.display();             // 输出: (4, 6)

    return 0;
}
2.7.4 运算符重载的意义
-
提高代码可读性 - 使代码更自然、直观
-
支持自定义类型 - 让用户定义类型像内置类型一样工作
-
统一接口 - 与标准库和算法更好地集成
-
表达能力强 - 更贴近问题领域的表达方式
提高代码可读性
cpp
// 没有运算符重载
Complex c3 = c1.add(c2.multiply(c4));

// 使用运算符重载
Complex c3 = c1 + c2 * c4;  // 更直观,更易理解
使自定义类型表现像内置类型
cpp
class Complex {
private:
    double real, imag;

public:
    Complex(double r = 0, double i = 0) : real(r), imag(i) {}

    // 重载 + 运算符
    Complex operator+(const Complex& other) const {
        return Complex(real + other.real, imag + other.imag);
    }

    // 重载 - 运算符
    Complex operator-(const Complex& other) const {
        return Complex(real - other.real, imag - other.imag);
    }

    // 重载输出运算符 <<
    friend ostream& operator<<(ostream& os, const Complex& c) {
        os << c.real << " + " << c.imag << "i";
        return os;
    }
};

// 使用
Complex a(1, 2), b(3, 4);
Complex c = a + b;  // 像内置类型一样使用
cout << c << endl;  // 输出: 4 + 6i
支持标准库算法
cpp
#include <algorithm>
#include <vector>

class MyString {
private:
    string data;

public:
    MyString(const string& s) : data(s) {}

    // 重载 < 运算符,支持排序
    bool operator<(const MyString& other) const {
        return data < other.data;
    }

    // 重载 == 运算符,支持查找
    bool operator==(const MyString& other) const {
        return data == other.data;
    }
};

// 现在可以在标准算法中使用
vector<MyString> words = {"apple", "banana", "cherry"};
sort(words.begin(), words.end());  // 需要 operator<
auto it = find(words.begin(), words.end(), "banana");  // 需要 operator==
2.8 友元
友元是C++中一种打破封装性的机制,它允许一个函数或类访问另一个类的私有(private)和保护(protected)成员。友元关系不是相互的,也不是传递的。
2.8.1 友元函数
友元函数是一个非成员函数,但可以访问类的私有和保护成员。
cpp
class MyClass {
private:
    int privateData;

public:
    MyClass(int data) : privateData(data) {}

    // 声明友元函数
    friend void showPrivateData(const MyClass& obj);
};

// 定义友元函数(不是成员函数,没有MyClass::)
void showPrivateData(const MyClass& obj) {
    cout << "私有数据: " << obj.privateData << endl;  // 可以直接访问私有成员
}

// 使用
int main() {
    MyClass obj(42);
    showPrivateData(obj);  // 输出: 私有数据: 42
    return 0;
}
2.8.2 友元类
一个类可以声明另一个类为友元,这样友元类的所有成员函数都可以访问该类的私有和保护成员。
cpp
class SecretKeeper {
private:
    int secretNumber;
    string secretMessage;

public:
    SecretKeeper(int num, const string& msg)
        : secretNumber(num), secretMessage(msg) {}

    // 声明友元类
    friend class BestFriend;
};

class BestFriend {
public:
    void revealSecrets(const SecretKeeper& keeper) {
        // 可以访问SecretKeeper的私有成员
        cout << "秘密数字: " << keeper.secretNumber << endl;
        cout << "秘密消息: " << keeper.secretMessage << endl;
    }

    void modifySecret(SecretKeeper& keeper, int newNum) {
        keeper.secretNumber = newNum;  // 甚至可以修改私有成员
    }
};

// 使用
int main() {
    SecretKeeper keeper(123, "这是机密信息");
    BestFriend friendObj;

    friendObj.revealSecrets(keeper);  // 输出秘密信息
    friendObj.modifySecret(keeper, 456);  // 修改秘密数字

    return 0;
}
2.8.3 友元成员函数
可以只将另一个类的特定成员函数声明为友元,而不是整个类。
cpp
class ClassB;  // 前向声明

class ClassA {
private:
    int secretA;

public:
    ClassA(int val) : secretA(val) {}

    // 只声明ClassB的特定成员函数为友元
    friend void ClassB::accessClassA(const ClassA& obj);
};

class ClassB {
private:
    int secretB;

public:
    ClassB(int val) : secretB(val) {}

    // 这个成员函数可以访问ClassA的私有成员
    void accessClassA(const ClassA& obj) {
        cout << "访问ClassA的秘密: " << obj.secretA << endl;
    }

    // 这个函数不能访问ClassA的私有成员
    void cannotAccess(const ClassA& obj) {
        // cout << obj.secretA << endl;  // 错误!没有访问权限
    }
};
2.9 static成员
static成员是属于类本身的成员,而不是属于类的某个特定对象。所有对象共享同一个static成员。
2.9.1 static成员的类型
-
静态数据成员 (Static Data Members)
-
静态成员函数 (Static Member Functions)
2.9.2 静态数据成员
静态成员变量的特性:
- 所有的对象共享同一份份静态变量
- 属于类,不属于任何特定对象
- 即使没有创建对象,静态成员也存在
- 需要在类外单独定义和初始化
cpp
#include <iostream>
using namespace std;

class Counter {
private:
    static int count;        // 静态数据成员声明
    int id;

public:
    Counter() {
        id = ++count;        // 每次创建对象时count增加
        cout << "创建对象 " << id << endl;
    }

    ~Counter() {
        /...
    }

};

// 静态数据成员定义和初始化(必须在类外)
int Counter::count = 0;

int main() {
    /...
    return 0;
}
2.9.3 静态成员函数
静态成员函数的特性:
- 静态成员函数无法访问非静态成员
- 静态成员函数可以访问静态成员
- 类外访问静态成员函数无需创造对象,可以直接访问
cpp
class MathUtils {
private:
    static const double PI;     // 静态常量
    static int callCount;       // 记录函数调用次数

public:
    // 静态成员函数 - 工具函数
    static double circleArea(double radius) {
        callCount++;
        return PI * radius * radius;
    }

    static double circleCircumference(double radius) {
        callCount++;
        return 2 * PI * radius;
    }

    static int getCallCount() {
        return callCount;
    }

    // 静态成员函数不能访问非静态成员
    // static void errorFunction() {
    //     int x;  // 错误!不能访问非静态成员
    // }
};

// 静态成员定义
const double MathUtils::PI = 3.141592653589793;
int MathUtils::callCount = 0;

// 使用示例
int main() {
    // 不需要创建对象,直接通过类名调用
    cout << "圆面积: " << MathUtils::circleArea(5.0) << endl;
    cout << "圆周长: " << MathUtils::circleCircumference(5.0) << endl;
    cout << "函数调用次数: " << MathUtils::getCallCount() << endl;

    return 0;
}
2.10 编译器对类的优化
现代编译器会对对象的构造和拷贝进行优化,减少不必要的临时对象
2.10.1 常见优化场景:
-
连续构造 + 拷贝构造 → 合并为一次构造;
-
返回值优化(RVO/NRVO):将返回的临时对象与接收对象合并。
cpp
A f2() {
    A aa;
    return aa; // 可能被优化为直接构造在调用处
}

 int main()
 {
        // 传值传参
        // 构造+拷⻉构造
        A aa1;
        f1(aa1);


        f1(1);// 隐式类型,连续构造+拷⻉构造->优化为直接构造


        f1(A(2)); // ⼀个表达式中,连续构造+拷⻉构造->优化为⼀个构造
        cout << endl;
}
如何优化C++标准并没有严格规定,各个编译器会根据情况自行处理。当前主流的相对新⼀点的编 译器对于连续⼀个表达式步骤中的连续拷贝会进行合并优化,有些更新更"激进"的编译器还会进行跨行跨表达式的合并优化。
3. 内存管理
3.1 C++的内存分布
在C/C++程序中,内存被划分为几个关键区域,每个区域都有其特定的用途和管理方式
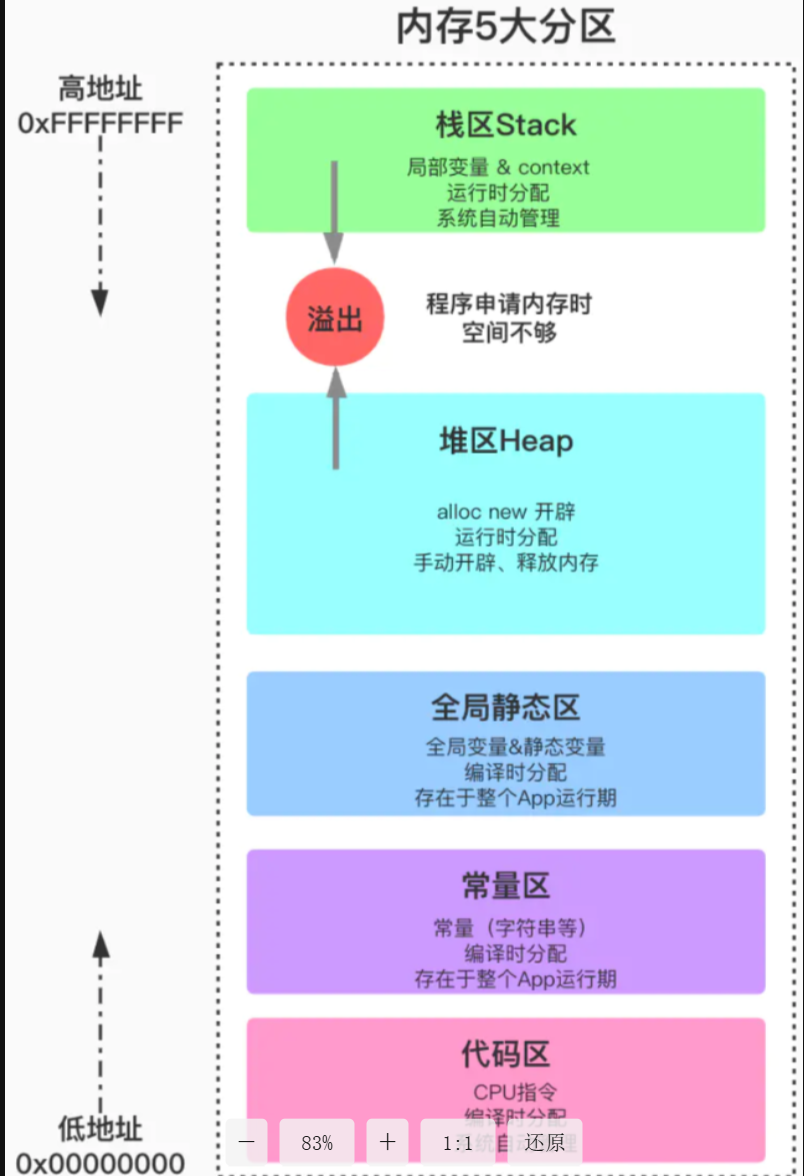
【说明】
- 栈又叫堆栈--非静态局部变量/函数参数/返回值等等,栈是向下增长的
- 堆用于程序运行时动态内存分配,堆是可以上增长的
- 数据段--存储全局数据和静态数据
- 代码段--可执行的代码/只读常量
3.2 new/delete和malloc/free的区别
3.2.1 基本概念对比
| 特性 | new/delete | malloc/free |
|---|---|---|
| 语言 | C++ 运算符 | C 语言库函数 |
| 头文件 | 不需要 | #include <cstdlib> |
| 返回值 | 类型安全指针 | void* 需要强制转换 |
| 失败处理 | 抛出 std::bad_alloc 异常 |
返回 NULL |
| 内存大小 | 自动计算 | 手动计算字节数 |
| 构造/析构 | 调用构造函数/析构函数 | 不调用 |
| 重载 | 可以重载 | 不能重载 |
| 初始化 | 可以初始化 | 不初始化 |
3.2.2 语法和使用方式
malloc/free (C风格)
cpp
#include <cstdlib>

// 分配内存
int* p1 = (int*)malloc(sizeof(int) * 10);  // 需要计算大小和类型转换
if (p1 == NULL) {
    // 处理分配失败
}

// 释放内存
free(p1);
p1 = NULL;  // 避免野指针
new/delete (C++风格)
cpp
// 分配内存并初始化
int* p2 = new int[10];  // 自动计算大小,类型安全
// 如果分配失败会抛出 std::bad_alloc 异常

// 释放内存
delete[] p2;
3.2.3 构造函数和析构函数的调用
new创建自定义类型时,会调用其默认构造函数
delete释放自定义类型时,会调用其析构函数
cpp
#include <iostream>
using namespace std;

class MyClass {
private:
    int data;
    string name;

public:
    MyClass(int d, const string& n) : data(d), name(n) {
        cout << "构造函数被调用: " << name << endl;
    }

    ~MyClass() {
        cout << "析构函数被调用: " << name << endl;
    }

    void display() const {
        cout << "Data: " << data << ", Name: " << name << endl;
    }
};

int main() {
    cout << "=== 使用 new/delete ===" << endl;
    MyClass* obj1 = new MyClass(42, "new创建的对象");
    obj1->display();
    delete obj1;  // 会调用析构函数

    cout << "\n=== 使用 malloc/free ===" << endl;
    MyClass* obj2 = (MyClass*)malloc(sizeof(MyClass));
    // 注意:这里没有调用构造函数!
    // obj2->display();  // 危险!对象未正确构造

    free(obj2);  // 不会调用析构函数

    return 0;
}
3.2.4 初始化区别
malloc申请的空间不会初始化,new可以初始化
cpp
#include <iostream>
using namespace std;

int main() {
    // malloc 不初始化内存
    int* arr1 = (int*)malloc(5 * sizeof(int));
    cout << "malloc 分配的内容(未初始化): ";
    for (int i = 0; i < 5; i++) {
        cout << arr1[i] << " ";  // 随机值
    }
    cout << endl;
    free(arr1);

    // new 可以初始化
    int* arr2 = new int[5]{1, 2, 3, 4, 5};  // 初始化列表
    cout << "new 分配的内容(已初始化): ";
    for (int i = 0; i < 5; i++) {
        cout << arr2[i] << " ";  // 1 2 3 4 5
    }
    cout << endl;
    delete[] arr2;

    // new 的默认初始化
    int* arr3 = new int[5]();  // 值初始化,全部为0
    cout << "new 值初始化的内容: ";
    for (int i = 0; i < 5; i++) {
        cout << arr3[i] << " ";  // 0 0 0 0 0
    }
    cout << endl;
    delete[] arr3;

    return 0;
}
3.2.5 异常处理区别
malloc申请空间失败时,返回的是NULL,因此使用时必须判空,new不需要,但是new需要捕获异常
cpp
#include <iostream>
#include <new>  // 对于 std::bad_alloc
#include <cstdlib>
using namespace std;

void testMalloc() {
    cout << "测试 malloc:" << endl;
    // 尝试分配巨大内存
    void* ptr = malloc(1000000000000LL);  // 1TB
    if (ptr == NULL) {
        cout << "malloc 分配失败,返回 NULL" << endl;
    } else {
        free(ptr);
    }
}

void testNew() {
    cout << "测试 new:" << endl;
    try {
        // 尝试分配巨大内存
        int* ptr = new int[1000000000000LL];  // 1TB
        delete[] ptr;
    } catch (const bad_alloc& e) {
        cout << "new 分配失败,抛出异常: " << e.what() << endl;
    }
}

// new 的无异常版本
void testNewNoThrow() {
    cout << "测试 new (nothrow):" << endl;
    int* ptr = new(nothrow) int[1000000000000LL];
    if (ptr == nullptr) {
        cout << "new (nothrow) 分配失败,返回 nullptr" << endl;
    } else {
        delete[] ptr;
    }
}

int main() {
    testMalloc();
    testNew();
    testNewNoThrow();
    return 0;
}
3.2.6 数组处理的区别
new创建数组时,会在开辟的空间头部单独开辟一块空间来存储数据的个数
数组中的每个元素如果都是自定义类型,那么会一个一个调用其默认构造函数
析构时一个一个调用其析构函数
因此析构时必须使用delete\[\],这样才是一个一个析构;如果是delete,那么就会出错
cpp
#include <iostream>
#include <cstdlib>
using namespace std;

class Object {
public:
    Object() { cout << "Object 构造" << endl; }
    ~Object() { cout << "Object 析构" << endl; }
};

int main() {
    const int SIZE = 3;

    cout << "=== malloc/free 数组 ===" << endl;
    Object* arr1 = (Object*)malloc(SIZE * sizeof(Object));
    // 注意:没有调用构造函数!
    free(arr1);  // 没有调用析构函数

    cout << "\n=== new/delete 数组 ===" << endl;
    Object* arr2 = new Object[SIZE];  // 调用 SIZE 次构造函数
    delete[] arr2;  // 调用 SIZE 次析构函数

    cout << "\n=== 混合使用(错误示例) ===" << endl;
    Object* arr3 = new Object[SIZE];
    // free(arr3);  // 错误!应该使用 delete[]
    // 或者:
    // delete arr3;  // 错误!应该使用 delete[]

    return 0;
}
3.3 operator new和operator delete
3.3.1 new/delete 的底层调用关系
在C++中,new和delete只是用户进行动态内存申请和释放的操作符
cpp
void *__CRTDECL operator new(size_t size) _THROW1(_STD bad_alloc)
{
  while ((p = malloc(size)) == 0)//new的底层其实是调用malloc
  //.......
}

void operator delete(void *pUserData)
{
  _free_dbg( pUserData, pHead->nBlockUse );//delete的底层是调用free
  //.......
}

#define free(p) _free_dbg(p, _NORMAL_BLOCK)在运用当中会分别调用对应的operator new 与operator delete函数
cpp
new → operator new → malloc
delete → operator delete → free
3.3.2 operator new和operator delete的底层结构
这两个函数的底层仍是malloc和free,只是更安全,更高效而已
cpp
#include <iostream>
#include <cstdlib>  // malloc, free

// 全局 operator new 的实现原理
void* operator new(size_t size) {
    std::cout << "全局 operator new 分配 " << size << " 字节" << std::endl;
    if (size == 0) size = 1;  // 至少分配1字节

    void* ptr = std::malloc(size);
    if (!ptr) {
        throw std::bad_alloc();  // 分配失败抛出异常
    }
    return ptr;
}

// 全局 operator delete 的实现原理
void operator delete(void* ptr) noexcept {
    std::cout << "全局 operator delete 释放内存" << std::endl;
    if (ptr) {
        std::free(ptr);
    }
}

// 数组版本
void* operator new[](size_t size) {
    std::cout << "全局 operator new[] 分配 " << size << " 字节" << std::endl;
    return operator new(size);
}

void operator delete[](void* ptr) noexcept {
    std::cout << "全局 operator delete[] 释放内存" << std::endl;
    operator delete(ptr);
}
如果 malloc申请空间成功就直接返回,否则执行用户提供的空间不足应对措施,如果用户提供该措施就继续申请,否则就抛异常。
3.4 内存泄漏
内存泄漏是指程序在动态分配内存后,失去了对这部分内存的控制,无法释放已分配的内存,导致系统内存的不断减少。
3.4.1 内存泄漏的常见类型
普通指针泄漏
cpp
class SimpleLeak {
public:
    void leakMemory() {
        int* data = new int[1000];  // 分配
        // 忘记 delete[] data;
    }

    void doubleDelete() {
        int* data = new int[100];
        delete[] data;
        // delete[] data;  // 错误!重复释放
    }
};
容器中的指针泄漏
cpp
#include <vector>
#include <string>

class ContainerLeak {
private:
    vector<string*> stringPtrs;

public:
    void addString(const string& str) {
        string* newStr = new string(str);  // 动态分配
        stringPtrs.push_back(newStr);
    }

    ~ContainerLeak() {
        // 必须手动释放容器中的所有指针
        for (auto ptr : stringPtrs) {
            delete ptr;  // 如果忘记这个循环,所有字符串都会泄漏
        }
    }
};
异常导致的内存泄漏
cpp
#include <stdexcept>

class ExceptionLeak {
public:
    void riskyFunction(int value) {
        int* buffer = new int[100];

        if (value < 0) {
            throw runtime_error("负值错误");
            // 如果在这里抛出异常,buffer 就泄漏了
        }

        // 正常处理
        delete[] buffer;  // 正常情况释放
    }

    void safeFunction(int value) {
        int* buffer = new int[100];

        try {
            if (value < 0) {
                throw runtime_error("负值错误");
            }
            // 正常处理
        }
        catch (...) {
            delete[] buffer;  // 异常时也要释放
            throw;  // 重新抛出异常
        }

        delete[] buffer;  // 正常释放
    }
};
循环引用导致的内存泄漏
cpp
#include <memory>

class Node {
public:
    shared_ptr<Node> next;
    shared_ptr<Node> prev;
    int data;

    Node(int val) : data(val) {
        cout << "Node 构造: " << data << endl;
    }

    ~Node() {
        cout << "Node 析构: " << data << endl;
    }
};

void circularReferenceLeak() {
    shared_ptr<Node> node1 = make_shared<Node>(1);
    shared_ptr<Node> node2 = make_shared<Node>(2);

    // 创建循环引用
    node1->next = node2;
    node2->prev = node1;

    // 当离开作用域时,node1 和 node2 的引用计数都不会归零
    // 因为它们互相引用,导致内存泄漏
}
3.4.2 内存泄漏的危害
-
性能下降。内存泄漏导致可用内存越来越少
-
程序崩溃。可用内存被榨干后使程序崩溃,甚至系统崩溃
-
系统不稳定。长期运行的服务器泄漏的内存越来越多
3.4.3 解决和预防内存泄漏的方法
使用智能指针
cpp
unique_ptr<int> ptr1 = make_unique<int>(42);
shared_ptr<vector<int>> data = make_shared<vector<int>>();
RAII
使用类封装,程序结束后自动调用析构函数释放内存
cpp
class FileHandler {
private:
    FILE* file;

public:
    FileHandler(const char* filename, const char* mode) {
        file = fopen(filename, mode);
        if (!file) {
            throw runtime_error("无法打开文件");
        }
    }

    ~FileHandler() {
        if (file) {
            fclose(file);
        }
    }

    // 禁用拷贝
    FileHandler(const FileHandler&) = delete;
    FileHandler& operator=(const FileHandler&) = delete;

    // 允许移动
    FileHandler(FileHandler&& other) noexcept : file(other.file) {
        other.file = nullptr;
    }

    FileHandler& operator=(FileHandler&& other) noexcept {
        if (this != &other) {
            if (file) fclose(file);
            file = other.file;
            other.file = nullptr;
        }
        return *this;
    }

    void write(const string& data) {
        if (file) {
            fwrite(data.c_str(), 1, data.size(), file);
        }
    }
};
使用标准库容器
C++的标准库容器安全性高
cpp
#include <vector>
#include <string>
#include <map>

class StandardContainerSolution {
public:
    void noManualMemoryManagement() {
        // 使用 vector 而不是动态数组
        vector<int> numbers = {1, 2, 3, 4, 5};
        numbers.push_back(6);  // 自动管理内存

        // 使用 string 而不是 char*
        string text = "Hello, World!";
        text += " Welcome!";  // 自动管理内存

        // 使用 map 而不是手动管理的键值对
        map<string, vector<int>> data;
        data["group1"] = {1, 2, 3};
        data["group2"] = {4, 5, 6};

        // 所有内存自动管理,无需担心泄漏
    }
};
抛异常
遇到错误时及时抛异常和接受
同时注意抛异常后面代码的处理
cpp
#include <memory>
#include <vector>

class ExceptionSafe {
public:
    void unsafeFunction(const vector<int>& input) {
        int* buffer = new int[input.size()];

        // 如果这里抛出异常,buffer 就泄漏了
        processData(buffer, input.size());

        delete[] buffer;
    }

    void safeFunction(const vector<int>& input) {
        // 使用 unique_ptr 确保异常安全
        unique_ptr<int[]> buffer = make_unique<int[]>(input.size());

        // 即使这里抛出异常,buffer 也会自动释放
        processData(buffer.get(), input.size());

        // 无需手动释放
    }

    void safeFunction2(const vector<int>& input) {
        // 使用 vector 更简单
        vector<int> buffer(input.size());
        processData(buffer.data(), buffer.size());
    }

private:
    void processData(int* data, size_t size) {
        // 可能抛出异常的操作
        if (size == 0) {
            throw invalid_argument("大小不能为0");
        }
        // 处理数据...
    }
};
4. 模板
模板是C++中实现泛型编程的核心机制,它允许我们编写与类型无关的代码。模板分为函数模板和类模板。
4.1 模板的使用
4.1.1 函数模板
cpp
template <typename T>
T functionName(T parameter) {
    // 函数体
}
其中<>内无论是class还是typename都可以,表示传递的类型
单参数模板
cpp
template <typename T>
T getMax(T a, T b) {
    return (a > b) ? a : b;
}
多参数模板
cpp
template <typename T1, typename T2>
void printPair(T1 first, T2 second) {
    cout << "First: " << first << ", Second: " << second << endl;
}
非类型参数的模板
非类型模板参数允许我们使用常量作为模板参数
但要注意:
-
浮点数 、类对象 以及字符串是不允许作为非类型模板参数的。
-
非类型的模板参数必须在编译期就能确认结果。
cpp
template<class T, size_t N = 10>  // N是非类型模板参数
class Array {
private:
    T _data[N];  // 使用N作为数组大小
    size_t _size = N;

public:
    size_t size() const { return _size; }
    T& operator[](size_t index) { return _data[index]; }
    const T& operator[](size_t index) const { return _data[index]; }
};
4.1.2 类模板
cpp
template <typename T>
class ClassName {
    // 类定义
};
类模板完整示例-Stack
cpp
#include <iostream>
#include <vector>
using namespace std;

// 简单的栈类模板
template <typename T>
class Stack {
private:
    vector<T> elements;

public:
    // 构造函数
    Stack() = default;

    // 入栈
    void push(const T& value) {
        elements.push_back(value);
    }

    // 出栈
    void pop() {
        if (!empty()) {
            elements.pop_back();
        }
    }

    // 获取栈顶元素
    T top() const {
        if (!empty()) {
            return elements.back();
        }
        throw out_of_range("Stack<>::top(): empty stack");
    }

    // 判断是否为空
    bool empty() const {
        return elements.empty();
    }

    // 获取大小
    size_t size() const {
        return elements.size();
    }

    // 显示栈内容
    void display() const {
        cout << "Stack (top to bottom): ";
        for (auto it = elements.rbegin(); it != elements.rend(); ++it) {
            cout << *it << " ";
        }
        cout << endl;
    }
};

// 使用示例
void testStack() {
    Stack<int> intStack;
    intStack.push(1);
    intStack.push(2);
    intStack.push(3);
    intStack.display();  // 输出: 3 2 1

    Stack<string> stringStack;
    stringStack.push("Hello");
    stringStack.push("World");
    stringStack.display();  // 输出: World Hello
}
4.2 模板特化
模板特化允许我们为特定的类型提供特殊的实现
对于浮点数,我们需要考虑精度问题;对于字符串,我们需利用strcmp来比较大小
因此对于这些特殊情况我们要单独处理
4.2.1 特化步骤
- 必须要先有一个基础的函数模板
- 关键字template后面接一对空的尖括号<>
- 函数名后跟一对尖括号,尖括号中指定需要特化的类型
- 函数形参表: 必须要和模板函数的基础参数类型完全相同,如果不同编译器可能会报一些奇怪的错误。
4.2.2 全特化
全特化是指为模板的所有参数都提供具体类型
cpp
// 函数模板特化示例
template <typename T>
void printType() {
    cout << "Unknown type" << endl;
}

template <>
void printType<int>() {
    cout << "Type: int" << endl;
}

template <>
void printType<double>() {
    cout << "Type: double" << endl;
}

template <>
void printType<string>() {
    cout << "Type: string" << endl;
}
4.2.3 偏特化
为部分模板参数提供具体类型
cpp
// 通用模板
template<typename T1, typename T2, typename T3>
class Triple {
public:
    Triple() { std::cout << "Triple<T1, T2, T3>" << std::endl; }
};

// 偏特化:第三个参数固定为int
template<typename T1, typename T2>
class Triple<T1, T2, int> {
public:
    Triple() { std::cout << "Triple<T1, T2, int>" << std::endl; }
};

// 偏特化:第二、三个参数固定
template<typename T1>
class Triple<T1, double, int> {
public:
    Triple() { std::cout << "Triple<T1, double, int>" << std::endl; }
};

void demoPartialSpecialization() {
    Triple<float, char, bool> t1;    // 通用版本
    Triple<float, char, int> t2;     // 第一个偏特化
    Triple<float, double, int> t3;   // 第二个偏特化
}
4.2.4类型约束特化
如果模板参数被特例化为指针 或引用,那么就会强制性调用含指针或引用的模板
cpp
//两个参数偏特化为指针类型
template <typename T1, typename T2>
class Data <T1*, T2*>
{
public:
     Data() {cout<<"Data<T1*, T2*>" <<endl;}
private:
     T1 _d1;
     T2 _d2;
 };
 //两个参数偏特化为引用类型
template <typename T1, typename T2>
 class Data <T1&, T2&>
 {
 public:
     Data(const T1& d1, const T2& d2)
     : _d1(d1)
     , _d2(d2)
     {
     cout<<"Data<T1&, T2&>" <<endl;
     }
 private:
 const T1 & _d1;
 const T2 & _d2;
};
     void test2 ()
    {
     Data<double , int> d1;     // 调用特化的int版本
    Data<int , double> d2;      // 调用基础的模板
    Data<int *, int*> d3;       // 调用特化的指针版本
    Data<int&, int&> d4(1, 2);  // 调用特化的指针版本
}
4.3 模板的分离编译
当模板的声明和定义分离到不同文件时,会出现链接错误
根本原因:编译模型
C++使用分离编译模型,模板的实例化需要在编译时看到完整的定义。
4.3.1 问题分析
假设math.cpp中有一个函数模板的定义,math.h有模板的定义,main函数实例化模板
- 编译math.cpp:编译器看到模板定义,但没有看到具体实例化,不会生成代码
- 编译main.cpp:编译器看到模板声明,生成对
add<int>的调用 - 链接阶段:找不到
add<int>的实现,链接失败
模板之所以叫模板,就只是一张图纸,只有你需要才会构造出相应的函数实例
math.h没有给出函数模板的函数体,main函数中不知道怎么实例化
具体的函数体在math.cpp中,但是模板不会自动实例化,只有你调用才会实例化。math.cpp中没有要实例化的代码,因此没有具体的函数。main.cpp往math.cpp找具体的函数也找不到,直接报错
4.3.2 解决方案
方案1:声明和定义放在同一文件(推荐)
cpp
// math.h
template<typename T>
T add(const T& a, const T& b) {
    return a + b;
}

// 或者使用.hpp后缀明确表示这是包含实现的头文件
// math.hpp
方案2:显式实例化(不推荐)
5. 继承(重要)
5.1 什么是继承?
继承是面向对象编程的三大特性之一(封装、继承、多态),它允许我们基于已有的类创建新的类,新的类继承原有类的特性,并可以添加新的特性或重写已有的特性。
C++支持三种继承方式:
| 访问权限 | public继承 | protected继承 | private继承 |
| public → | public | protected | private |
| protected → | protected | protected | private |
| private → | 不可见 | 不可见 | 不可见 |
|---|
在实际运用中⼀般使用都是public继承,几乎很少使用protetced/private继承,也不提倡使用 protetced/private继承,因为protetced/private继承下来的成员都只能在派生类的类里面使用,实 际中扩展维护性不强。
5.1.1 继承的意义
-
代码复用
cppclass Person {//父类 protected: string _name; public: void identity() { cout << "身份验证: " << _name << endl; } }; class Student : public Person {//子类,public继承 protected: int _stuNum; public: void PersonPrint() { _name = "zhangsan";//_name和identity()为Person中的成员变量,但继承下来,Student也能使用 identity(); cout << _name << endl; } void study() { cout << _name << "正在学习" << endl; } }; -
扩展功能
cpp// 基类 class Animal { protected: string name; int age; public: Animal(const string& n, int a) : name(n), age(a) {} virtual void speak() const { cout << name << " makes a sound." << endl; } virtual void eat() const { cout << name << " is eating." << endl; } void sleep() const { cout << name << " is sleeping." << endl; } }; // 派生类 - 扩展功能 class Dog : public Animal { private: string breed; public: Dog(const string& n, int a, const string& b) : Animal(n, a), breed(b) {} // 重写基类方法 void speak() const override { cout << name << " says: Woof! Woof!" << endl; } // 添加新功能 void fetch() const { cout << name << " is fetching the ball." << endl; } void displayBreed() const { cout << name << " is a " << breed << endl; } };
5.2 基类和派生类的转换
public继承 的派生类对象 可以赋值给基类的指针/基类的引用。这里有个形象的说法叫切片或者切 割。寓意把派生类中基类那部分切出来,基类指针或引用指向的是派生类中切出来的基类那部分。
cpp
Person p;
Student s("李四", 1002);

p = s;  // 切片:只复制Person部分,Student特有部分被丢弃
Person& rp = s;  // 引用:不会切片,但只能访问Person部分
Person* pp = &s; // 指针:不会切片,但只能访问Person部分上述Student(派生类)的对象s可以切割赋值给Person(基类)的指针 或者引用
注意一定是指针或者引用,普通的直接赋值无法转换
5.3 隐藏
我们知道C++中有多个作用域,类域也是个作用域
其中在在继承体系中基类和派生类都有独立的作用域
- 派生类和基类有相同名字的成员,派生类将屏蔽基类该成员的访问,俗称隐藏
- 需要注意的是如果是成员函数的隐藏,只需要函数名相同就构成隐藏
在派生类成员函数中,可以使用基类::基类成员显示访问
cpp
class Person {
protected:
	string _name = "zhangsan";

public:
	void identity() {
		cout << "身份验证: " << _name << endl;
	}
};

class Student : public Person {
protected:
	int _stuNum;
	string _name = "lisi";//派生类含有基类相同的变量,就会隐藏基类的变量,使用派生类的

public:
	void identity() {//相同的函数,会隐藏基类的函数
		cout << "身份验证: " << _name << endl;
	}

	void PersonPrint()
	{
		identity();//调用Student的函数,Person中的自动被隐藏
		Person::identity();//如果要调用Person中的函数,需用命名空间访问符
		cout << _name << endl;
	}

	void study() {
		cout << _name << "正在学习" << endl;
	}
};
5.4 派生类的默认成员函数
派生类必须调用基类的构造函数和析构函数
- 派生类 的构造函数 必须调用基类 的构造函数 初始化基类的那⼀部分成员。如果基类没有 默认的构造函数,则必须在派生类构造函数的初始化列表阶段显示调用。
- 派生类 的拷贝构造 函数必须调用基类的拷贝构造 完成基类的拷贝初始化。
- 派生类 的operator= 必须要调用基类的operator=完成基类的复制。需要注意的是派生类的 operator=隐藏 了基类的operator=,所以显示调用基类的operator=,需要指定基类作用域
- 派生类的析构函数会在被调用完成后自动调用基类的析构函数清理基类成员。因为这样才能保证派生类对象先清理派生类成员再清理基类成员的顺序
顺序:
基类构造->派生类构造->派生类析构->基类析构
cpp
class Person {
public:
    Person(const string& name)
    :_name(name)
    {
        cout << "Person构造: " << _name << endl;
    }
    ~Person() {
        cout << "Person析构: " << _name << endl;
    }
protected:
    string _name;
};

class Student : public Person {
public:
    Student(const string& name, int num)
        : Person(name),  //先调用基类的构造函数
         _stuNum(num) {
        cout << "Student构造,学号: " << _stuNum << endl;
    }

    ~Student() {
        cout << "Student析构,学号: " << _stuNum << endl;
        // 自动调用基类析构(~Person)
    }

protected:
    int _stuNum;
};

// 使用示例
void demo() {
    Student s("张三", 1001);
    // 输出顺序:
    // Person构造: 张三
    // Student构造,学号: 1001
    // Student析构,学号: 1001
    // Person析构: 张三
}
5.5 多继承和菱形继承
5.5.1 多继承
单继承:⼀个派生类只有⼀个直接基类时称这个继承关系为单继承
cpp
class Student : public Person //单继承多继承:⼀个派生类有两个或以上直接基类时称这个继承关系为多继承,多继承对象在内存中的模型是,先继承的基类在前面,后面继承的基类在后面,派生类成员在放到最后面。
cpp
class Assistant : public Student, public Teacher....//多继承多继承的使用和单继承差别不大,只是多了点资源而已
5.5.2 菱形继承
菱形继承是多继承的一种特殊情况。
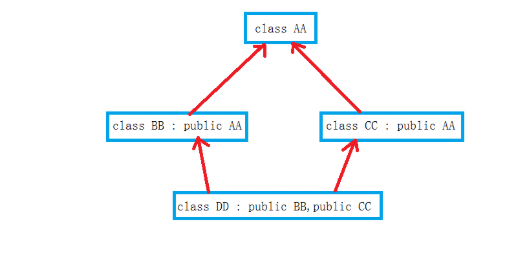
可以看见BB和CC都继承了AA,结果DD右都继承了BB和CC,相当于DD继承了两遍AA
因此菱形继承有数据冗余和二义性的问题
我们不推荐写出菱形继承,这种写法会出现数据庞大且很容易出现bug,因此很容易被开除qwq
5.5.3 虚继承
虚继承可以解决菱形继承的问题,使得最终的派生类只保留一份基类的成员
virtual修饰的继承方式是虚继承
cpp
class Person {
public:
    string _name;
};

class Student : virtual public Person {  // 虚继承
public:
    int _stuNum;
};

class Teacher : virtual public Person {  // 虚继承
public:
    int _teacherId;
};

class Assistant : public Student, public Teacher {
public:
    string _majorCourse;
};

void solution() {
    Assistant a;
    a._name = "张三";  // 现在只有一个_name,无二义性
}
5.6 继承和组合
5.6.1 继承 - "is-a" 关系
cpp
// 继承表示 "是一个" 的关系
class Animal {
public:
    virtual void speak() const = 0;
    virtual void eat() = 0;
};

class Dog : public Animal {  // Dog "is-a" Animal
public:
    void speak() const override {
        cout << "Woof! Woof!" << endl;
    }

    void eat() override {
        cout << "Eating dog food" << endl;
    }

    void fetch() {  // 狗特有的行为
        cout << "Fetching ball" << endl;
    }
};
5.6.2 组合 - "has-a" 关系
cpp
// 组合表示 "有一个" 的关系
class Engine {
public:
    void start() {
        cout << "Engine starting..." << endl;
    }

    void stop() {
        cout << "Engine stopping..." << endl;
    }
};

class Wheel {
private:
    int pressure;
public:
    Wheel(int p = 32) : pressure(p) {}

    void rotate() {
        cout << "Wheel rotating with pressure " << pressure << " PSI" << endl;
    }
};

class Car {
private:
    Engine engine;      // Car "has-a" Engine
    Wheel wheels[4];    // Car "has-a" Wheels

public:
    Car() : wheels{Wheel(32), Wheel(32), Wheel(32), Wheel(32)} {}

    void drive() {
        engine.start();
        for (auto& wheel : wheels) {
            wheel.rotate();
        }
        cout << "Car is driving" << endl;
    }

    void park() {
        engine.stop();
        cout << "Car is parked" << endl;
    }
};
5.6.3 详细区别分析
| 方面 | 继承 | 组合 |
|---|---|---|
| 关系类型 | "is-a" (是一个) | "has-a" (有一个) |
| 耦合度 | 紧密耦合 | 松散耦合 |
| 灵活性 | 较低 | 较高 |
| 代码复用 | 白箱复用 | 黑箱复用 |
5.6.4 决策流程图
选择继承还是组合?
│
├─ 是否是 "is-a" 关系?
│  ├─ 是 → 是否需要多态?
│  │  ├─ 是 → 使用公有继承
│  │  └─ 否 → 考虑使用组合
│  └─ 否 → 使用组合
│
├─ 是否需要重写大量基类方法?
│  ├─ 是 → 可能适合继承
│  └─ 否 → 可能适合组合
│
├─ 关系是否可能变化?
│  ├─ 是 → 优先选择组合(更灵活)
│  └─ 否 → 两者都可考虑
│
└─ 是否需要运行时动态改变行为?
   ├─ 是 → 优先选择组合
   └─ 否 → 两者都可考虑
6. 多态(极其重要)
6.1 什么是多态?
多态是指相同的接口表现出不同的行为。C++支持两种多态:
-
编译时多态(静态多态): 函数重载、模板
-
运行时多态(动态多态): 虚函数机制
编译时多态,我们写的代码中明确调用了哪个函数,实例化出了哪个模板,因此在编译器就实现了
运行时多态,如果满足多态的条件,那么我们使用基类的指针或者引用指向与其相关的类时,会调用不同的函数,这种属于在运行时确定,因为编译时并不知道你指向的是哪个类
6.2 多态的条件
多态是⼀个继承关系的下的类对象,因此多态是继承的拓展
要实现运行时多态,必须满足两个条件:
-
基类的指针 或引用 调用虚函数
-
派生类对基类的虚函数 进行重写
派生类必须对基类的虚函数完成重写/覆盖,重写或者覆盖了,基类和派生类之间才能有不同的函数,多态的不同形态效果才能达到
6.2.1 虚函数的重写/覆盖
类成员函数前⾯加virtual 修饰,那么这个成员函数被称为虚函数。注意非成员函数不能加virtual修 饰
对于虚函数而言,派生类中有一个跟基类完全相同的函数(返回值,名称,参数都相同),那么构成了重写
cpp
class Person {
public:
    virtual void buyTicket() {  // 虚函数
        cout << "全价票: 100元" << endl;
    }

    virtual ~Person() {  // 虚析构函数
        cout << "Person析构" << endl;
    }
};

class Student : public Person {
public:
    virtual void buyTicket() {  // 重写虚函数
        cout << "学生票: 50元" << endl;
    }

    virtual ~Student() {
        cout << "Student析构" << endl;
    }
};

class Soldier : public Person {
public:
    virtual void buyTicket() {  // 重写虚函数
        cout << "军人优先票: 80元" << endl;
    }
};
基类的函数需要用virtual修饰,派生类的无需修饰
6.2.2 基类指针/引用赋值
多态的实现一定得是基类的指针或者引用指向基类或者派生类
指向谁就调用谁的虚函数
cpp
void purchaseTicket(Person& person) {//基类(Person)的类型 此处&为引用,也可以使用指针
    person.buyTicket();  // 根据实际对象类型调用不同的函数
}

void demo() {
    Person p;//基类
    Student s;//派生类
    Soldier soldier;//派生类

    purchaseTicket(p);      // 输出: 全价票: 100元
    purchaseTicket(s);      // 输出: 学生票: 50元
    purchaseTicket(soldier); // 输出: 军人优先票: 80元
}
6.3 为什么析构函数建议是虚函数?
编译时虚构函数的名称会统一处理成destrutor,因此派生类的析构函数重写了基类的析构函数
当使用 基类指针指向派生类对象 并通过该指针删除对象时,如果基类的析构函数不是虚函数,会导致 派生类的析构函数不被调用,从而产生资源泄漏。
cpp
class A
{
public:
    virtual ~A()
    {
        cout << "~A()" << endl;
    }
};
class B : public A {
public:
    ~B()
    {
        cout << "~B()->delete:"<<_p<< endl;
        delete _p;
    }
protected:
    int* _p = new int[10];
};

// 只有派⽣类Student的析构函数重写了Person的析构函数,下⾯的delete对象调⽤析构函数,才能
构成多态,才能保证p1和p2指向的对象正确的调⽤析构函数。
int main()
{
    A* p1 = new A;
    A* p2 = new B;
    delete p1;
    delete p2;
}
6.4 纯虚函数和抽象类
6.4.1 纯虚函数
纯虚函数是在基类中声明但没有实现的虚函数,语法是在函数声明后加上 = 0。
纯虚函数不需要定义实现(实现没啥意义因为要被派生类重写,但是语法上可以实现),只要声明即可。
cpp
class Shape {
public:
    // 纯虚函数 - 没有实现
    virtual double getArea() const = 0;

    // 纯虚函数
    virtual double getPerimeter() const = 0;

    // 普通虚函数 - 有默认实现
    virtual void draw() const {
        cout << "绘制形状" << endl;
    }

    // 虚析构函数
    virtual ~Shape() {
        cout << "Shape 析构函数" << endl;
    }
};
6.4.2 抽象类
包含纯虚函数的类叫做抽象类,抽象类不能实例化出对象,如果派生类继承后不重写纯虚函数,那么派生类也是抽象类
cpp
// 抽象类:包含纯虚函数的类
class Shape {
public:
    virtual double area() const = 0;  // 纯虚函数
    virtual double perimeter() const = 0;

};


// Shape s;  // 错误:抽象类不能实例化
6.5 重载/隐藏/重写的区别
6.5.1 基本概念对比
-
重载(Overload)
-
发生在同一个作用域内(例如同一个类中)
-
函数名相同,但参数列表不同(参数类型、参数个数、参数顺序)
-
返回类型可以相同也可以不同
-
注意:仅返回类型不同不能构成重载
-
-
重写(Override)
-
发生在继承体系中,基类和派生类之间
-
派生类重新定义基类中的虚函数(函数签名必须相同)
-
函数名、参数列表、返回类型都必须相同(协变返回类型除外)
-
访问修饰符可以不同(但通常建议相同)
-
-
重定义(Redefine)
-
也发生在继承体系中,但指的是派生类重新定义基类中的非虚函数
-
函数名相同,参数列表可以相同也可以不同(实际上,如果参数列表相同,就是隐藏了基类的函数;如果参数列表不同,则相当于在派生类中重载了这个函数名,但同时也隐藏了基类的同名函数)
-
注意:重定义会隐藏基类中同名的函数(包括基类中同名的重载函数)
-
| 特性 | 重载(Overload) | 重写(Override) | 重定义(Redefine) |
|---|---|---|---|
| 作用域 | 同一作用域 | 不同作用域(继承关系) | 不同作用域(继承关系) |
| 函数签名 | 必须不同 | 必须相同 | 可以相同或不同 |
| virtual关键字 | 不需要 | 需要(基类) | 不需要 |
| 多态性 | 编译时多态 | 运行时多态 | 无多态 |
| 访问权限 | 可以不同 | 可以不同 | 可以不同 |
6.6 多态的原理
6.6.1 虚函数表指针
当满足多态时,无论是派生类还是基类,在其内存前面都存放了一个指针
该指针指向一个函数指针数组 ,数组中存放的是当前类的虚函数地址
对于这个虚函数表有以下特性:
-
对于每个包含虚函数的类,编译器会为其创建一个虚函数表。
-
虚函数表是一个函数指针数组,其中存放着该类所有虚函数的地址。
-
如果类有多个虚函数,那么虚函数表就有多个条目。
-
同类型的类共用一张虚函数表
cpp
class Base
 {
 public:
     virtual void Func1()
     {
         cout << "Func1()" << endl;
     }
 protected:
     int _b = 1;
     char _ch = 'x';
 };
6.6.2 多态的原理
当通过基类的指针或引用调用虚函数时,会直接利用其虚函数表指针指向该类的虚函数
对象->虚函数() 的实际步骤:
1. 通过对象的vptr找到虚函数表
2. 在虚函数表中找到对应函数的槽位
3. 通过函数指针调用相应的函数
cpp
#include <iostream>
using namespace std;

class Base {
public:
    virtual void func1() {
        cout << "Base::func1()" << endl;
    }

    virtual void func2() {
        cout << "Base::func2()" << endl;
    }

    virtual ~Base() {
        cout << "Base::~Base()" << endl;
    }

    void nonVirtual() {
        cout << "Base::nonVirtual()" << endl;
    }
};

class Derived : public Base {
public:
    void func1() override {
        cout << "Derived::func1()" << endl;
    }

    void func2() override {
        cout << "Derived::func2()" << endl;
    }

    ~Derived() override {
        cout << "Derived::~Derived()" << endl;
    }

    virtual void func3() {
        cout << "Derived::func3()" << endl;
    }
};
内存布局示意图:
cpp
Base 对象:
+----------------+
| vptr (指向vtable) | --> Base的虚函数表:
+----------------+       +-------------------+
| 其他数据成员     |       | &Base::func1      |
+----------------+       +-------------------+
                         | &Base::func2      |
                         +-------------------+
                         | &Base::~Base      |
                         +-------------------+

Derived 对象:
+----------------+
| vptr (指向vtable) | --> Derived的虚函数表:
+----------------+       +-------------------+
| Base的数据成员   |       | &Derived::func1   |
+----------------+       +-------------------+
| Derived的数据成员 |       | &Derived::func2   |
+----------------+       +-------------------+
                         | &Derived::~Derived |
                         +-------------------+
                         | &Derived::func3   |
                         +-------------------+
7. C++11新特性
7.1 范围for
范围for循环(也称为基于范围的for循环)是C++11引入的一种循环语法,用于遍历容器(或更一般地,范围)中的元素。它的使用非常简洁,可以避免使用迭代器或索引的繁琐。
7.1.1 范围for循环的使用
基本语法:
cpp
for (范围声明 : 范围表达式) {
    循环体
}
其中:
-
范围声明:一个变量声明,该变量将被初始化为序列中的每个元素。通常使用自动类型推导(auto)来简化。
-
范围表达式:一个表示序列的表达式,可以是数组、容器、字符串等。
7.1.2 基本使用示例
遍历各种容器
cpp
#include <iostream>
#include <vector>
#include <array>
#include <list>
#include <set>
#include <map>
#include <string>
using namespace std;

void basicUsage() {
    cout << "=== 范围for循环基本使用 ===" << endl;

    // 1. 遍历数组
    int arr[] = {1, 2, 3, 4, 5};
    cout << "数组: ";
    for (int num : arr) {
        cout << num << " ";
    }
    cout << endl;

    // 2. 遍历vector
    vector<string> fruits = {"apple", "banana", "orange"};
    cout << "vector: ";
    for (const auto& fruit : fruits) {
        cout << fruit << " ";
    }
    cout << endl;

    // 3. 遍历array
    array<double, 4> prices = {1.99, 2.49, 0.99, 3.29};
    cout << "array: ";
    for (auto price : prices) {
        cout << price << " ";
    }
    cout << endl;

    // 4. 遍历list
    list<char> letters = {'a', 'b', 'c', 'd'};
    cout << "list: ";
    for (auto letter : letters) {
        cout << letter << " ";
    }
    cout << endl;

    // 5. 遍历set
    set<int> uniqueNumbers = {5, 2, 8, 2, 5, 9}; // 重复元素会被去重
    cout << "set: ";
    for (auto num : uniqueNumbers) {
        cout << num << " ";
    }
    cout << endl;

    // 6. 遍历map
    map<string, int> scores = {{"Alice", 95}, {"Bob", 87}, {"Charlie", 92}};
    cout << "map: ";
    for (const auto& pair : scores) {
        cout << pair.first << ":" << pair.second << " ";
    }
    cout << endl;

    // 7. 遍历string
    string text = "Hello";
    cout << "string: ";
    for (char c : text) {
        cout << c << " ";
    }
    cout << endl;
}
使用引用修改元素
cpp
void test() {
    cout << "\n=== 使用引用修改元素 ===" << endl;

    vector<int> numbers = {1, 2, 3, 4, 5};

    cout << "修改前: ";
    for (auto num : numbers) {
        cout << num << " ";
    }
    cout << endl;

    // 使用引用修改元素
    for (auto& num : numbers) {
        num *= 2;  // 每个元素乘以2
    }

    cout << "修改后: ";
    for (auto num : numbers) {
        cout << num << " ";
    }
    cout << endl;

    // 对于复杂对象,使用const引用避免拷贝
    vector<string> words = {"hello", "world", "cpp"};
    cout << "使用const引用: ";
    for (const auto& word : words) {
        cout << word << " ";  // 不会拷贝string对象
    }
    cout << endl;
}
临时范围的遍历
cpp
vector<int> getNumbers() {
    return {10, 20, 30, 40, 50};
}

string getString() {
    return "Hello World";
}

void temporaryRanges() {
    cout << "\n=== 遍历临时范围 ===" << endl;

    // 遍历函数返回的临时vector
    cout << "临时vector: ";
    for (auto num : getNumbers()) {
        cout << num << " ";
    }
    cout << endl;

    // 遍历函数返回的临时string
    cout << "临时string: ";
    for (char c : getString()) {
        cout << c << " ";
    }
    cout << endl;

    // 遍历初始化列表
    cout << "初始化列表: ";
    for (auto x : {1, 1, 2, 3, 5, 8}) {  // Fibonacci序列
        cout << x << " ";
    }
    cout << endl;
}
7.1.3 范围for循环的底层原理
编译器转换规则
范围for循环会被编译器转换成等价的传统for循环:
cpp
// 原始的范围for循环
for (element_declaration : range_expression) {
    // 循环体
}

// 被编译器转换为:
{
    auto&& __range = range_expression;
    auto __begin = begin(__range);
    auto __end = end(__range);
    for (; __begin != __end; ++__begin) {
        element_declaration = *__begin;
        // 循环体
    }
}
7.2 右值引用
7.2.1 左值与右值
-
左值:有名称、有地址的对象(如变量)。
-
右值 :临时对象、字面量等(如
10、x + y)。
左值即我们平常定义的变量等,这些变量最主要的特性就是在内存中开辟了空间,所以有地址,并且具有持久性。可以出现在=左边或者右边
cpp
// 左值:可以取地址
// 以下的p、b、c、*p、s、s[0]就是常⻅的左值
int* p = new int(0);
int b = 1;
const int c = b;
*p = 10;
string s("111111");
s[0] = 'x';
cout << &c << endl;
cout << (void*)&s[0] << endl;右值一般是字面值常量或者临时变量,因此右值一般声明周期仅存在于这一行,不存在地址。只能出现在=右边
cpp
// 右值:不能取地址
double x = 1.1, y = 2.2;
// 以下⼏个10、x + y、fmin(x, y)、string("11111")都是常⻅的右值
10;
x + y;
fmin(x, y);
string("11111");
7.2.2 右值引用的使用
int& rx = x;int&& rrx = y(右值)
第一个式子为左值引用,无需多言
右值引用使用两个&&来表示,并且引用的一定得是右值
需要注意的是,rrx虽然引用的是右值,但其本身是左值
7.2.2.1 move
move是库内定义的一个返回值,其本质是强制类型转换
可将左值强制转换成右值
因此可以int&& rrx = move(x)
7.2.3 左值与右值的参数匹配
C++中可以重载函数。我们知道,编译器选定函数一定是选定最匹配的。
例如const对象一定只能选定传const的函数
普通左值对象可以传const和不带const的参数,但是如果二选一还是优先不带const,除非没有这种函数
右值对象可以传带const的或者右值引用的参数,但还是优先右值引用
cpp
void f(int& x)
{
    std::cout << "左值引⽤重载 f(" << x << ")\n";
}

void f(const int& x)
{
    std::cout << "到 const 的左值引⽤重载 f(" << x << ")\n";
}

void f(int&& x)
{
    std::cout << "右值引⽤重载 f(" << x << ")\n";
}

int main()
{
    int i = 1;
    const int ci = 2;
    f(i); // 调⽤ f(int&)
    f(ci); // 调⽤ f(const int&)
    f(3); // 调⽤ f(int&&),如果没有 f(int&&) 重载则会调⽤ f(const int&)
    f(std::move(i)); // 调⽤ f(int&&)
    int&& x = 1;
    f(x); // 调⽤ f(int& x)
    f(std::move(x)); // 调⽤ f(int&& x)
    return 0;
}
7.2.4 右值引用的作用
实现移动语义
移动语义允许我们将资源(如动态内存、文件句柄等)从一个对象"移动"到另一个对象,而不是进行昂贵的深拷贝。
cpp
class String {
public:
    String(String&& other) { // 移动构造
        data_ = other.data_;
        other.data_ = nullptr;
    }
    String& operator=(String&& other) { // 移动赋值
        if (this != &other) {
            delete[] data_;
            data_ = other.data_;
            other.data_ = nullptr;
        }
        return *this;
    }
};
引用折叠
C++中不能直接定义引用的引用如 int& && r = i; ,这样写会直接报错。但可通过模板 或typedef来实现这种写法
cpp
typedef int& lref;
typedef int&& rref;
cpp
template<class T>
void f1(T& x)
{}

template<class T>
void f2(T&& x)
{}
当实现引用的引用时,会出现引用折叠的规则:
左值引用与任何引用结合都是左值引用
右值引用和右值引用结合时才是右值引用
因此如果我们把参数定义成右值引用,那么即可以传左值也可以传右值
cpp
//参数为左值引用时,无论传的是左值还是右值,x都引用的都是左值
template<class T>
void f1(T& x)
{}

int main()
{
    int i = 1;
    f1(i);
    f1(1);//x引用的都是左值
    return 0;
}
cpp
//参数为右值引用时,只有传递的是右值,x才是右值引用
template<class T>
void f2(T&& x)
{}

int main()
{
    int i = 1;
    f1(i);//左值引用
    f1(1);//右值引用
    return 0;
}
7.2.5 完美转发
我们使用引用折叠式,即使是右值引用,那么其参数本身还是左值,我们无法在返回值时传递右值
因此我们使用完美转发forward<T>(x)来维持所传对象的性质
cpp
void f(int& x)
{
    std::cout << "左值引⽤重载 f(" << x << ")\n";
}

void f(const int& x)
{
    std::cout << "到 const 的左值引⽤重载 f(" << x << ")\n";
}

void f(int&& x)
{
    std::cout << "右值引⽤重载 f(" << x << ")\n";
}


template<class T>
void f2(T&& x)//无论传的是左值还是右值,x本身永远为左值
{
    f(forward<T>(x))//x如果是右值引用就调用f(int&& x)函数
}

int main()
{
    int i = 1;
    f1(i);//左值引用
    f1(1);//右值引用
    return 0;
}
7.3 Lambda
Lambda表达式是C++11引入的匿名函数对象,它允许我们在需要函数的地方内联定义函数,使代码更简洁、更灵活。
7.3.1 Lambda表达式的基本语法
cpp
[捕获列表](参数列表) -> 返回类型 {
    // 函数体
}
7.3.2 基本使用示例
cpp
auto add1 = [](int x, int y)->int {return x + y; };
cout << add1(1, 2) << endl;
(int x,int y)其实就是函数的参数
->int则是函数的返回值类型,也可以不写让系统自己去推
{}里面则是函数体了
cpp
#include <iostream>
#include <vector>
#include <algorithm>
using namespace std;

void basicLambda() {
    cout << "=== 基本Lambda表达式 ===" << endl;

    // 1. 无参数Lambda
    auto greet = []() {
        cout << "Hello, Lambda!" << endl;
    };
    greet();

    // 2. 带参数Lambda
    auto add = [](int a, int b) {
        return a + b;
    };
    cout << "3 + 5 = " << add(3, 5) << endl;

    // 3. 立即执行的Lambda
    []() {
        cout << "立即执行的Lambda" << endl;
    }();  // 注意这里的()

    // 4. 带返回类型的Lambda
    auto divide = [](double a, double b) -> double {
        if (b == 0) return 0;
        return a / b;
    };
    cout << "10 / 3 = " << divide(10, 3) << endl;
}
7.3.3 捕获列表
捕获列表,用于捕获外部变量,可以是值捕获、引用捕获或隐式捕获。
捕获列表的几种形式:
不捕获任何外部变量
= 以值的方式捕获所有外部变量
\& 以引用的方式捕获所有外部变量
x 以值的方式捕获x,其他变量不捕获
\&x 以引用的方式捕获x,其他变量不捕获
=, \&x 默认以值捕获,但x以引用捕获
\&, x 默认以引用捕获,但x以值捕获
cpp
int main()
{
    // 只能⽤当前lambda局部域和捕捉的对象和全局对象
    int a = 0, b = 1, c = 2, d = 3;
    auto func1 = [a, &b]
    {
        // 值捕捉的变量不能修改,引⽤捕捉的变量可以修改
        //a++;
        b++;
        int ret = a + b;
        return ret;
    };
    cout << func1() << endl;
    // 隐式值捕捉
    // ⽤了哪些变量就捕捉哪些变量
    auto func2 = [=]
    {
        int ret = a + b + c;
        return ret;
    };
    cout << func2() << endl;
}
7.4 包装器
包装器 std::function 是C++11引入的通用函数包装器,它可以存储、复制和调用任何可调用对象(函数、Lambda表达式、函数对象、成员函数等)。
7.4.1 function的使用
包含头文件和基本语法
cpp
#include <iostream>
#include <functional>  // 必须包含这个头文件
using namespace std;

// 基本语法:std::function<返回类型(参数类型列表)>
包装各种可调用对象
cpp
void basicUsage() {
    cout << "=== std::function 基本使用 ===" << endl;

    // 1. 包装普通函数
    int add(int a, int b) {
        return a + b;
    }

    std::function<int(int, int)> func1 = add;
    cout << "普通函数: " << func1(3, 5) << endl;

    // 2. 包装Lambda表达式
    std::function<int(int, int)> func2 = [](int a, int b) {
        return a * b;
    };
    cout << "Lambda: " << func2(3, 5) << endl;

    // 3. 包装函数对象(仿函数)
    struct Multiply {
        int operator()(int a, int b) const {
            return a * b;
        }
    };

    Multiply mult;
    std::function<int(int, int)> func3 = mult;
    cout << "函数对象: " << func3(3, 5) << endl;

    // 4. 包装静态成员函数
    class MathUtils {
    public:
        static int subtract(int a, int b) {
            return a - b;
        }
    };

    std::function<int(int, int)> func4 = MathUtils::subtract;
    cout << "静态成员函数: " << func4(10, 3) << endl;
}
function也能组成数组,要求就是返回值和参数都相同的可调用对象,因此和函数指针极为相似
cpp
auto func1 = [](int x, int y)->int {return x + y; };
auto func2 = [](int x, int y)->int {return x - y; };
auto func3 = [](int x, int y)->int {return x * y; };
auto func4 = [](int x, int y)->int {return x / y; };
function<int(int, int)> func[4] = { func1,func2,func3,func4 };
vector<int> v = { 5,4,3,2,1 };
sort(v.begin(), v.end(), [](int x, int y)->int {return x < y; });
for (auto& it : v)
{
	cout << it << " ";
}
cout << func[0](1, 2) << endl;
7.4.2 bind
bind是一个函数模板,他是一个可调用对象的包装器。可以用来调整参数个数和顺序
cpp
auto add5 = std::bind(std::plus<int>(), std::placeholders::_1, 5);
std::cout << add5(10); // 输出 15
上面bind里面的plus为可调用对象,std::placeholders::_1即为plus的第一个参数,因此可以看见序号为_1,本来第二个参数为_2,但是bind用5覆盖,就意味着plus的第二个参数会自动传递5
所以add5只需要传递一个10给第一个参数
cpp
template<class X>
class cal {
public:
	X plus(X x, X y)
	{
		return x + y;
	}

	X del(X x, X y)
	{
		return x - y;
	}

	X mul(X x, X y)
	{
		return x * y;
	}

	X div(X x, X y)
	{
		return x / y;
	}

private:
};

using placeholders::_1;
using placeholders::_2;
int main()
{
	cal<int> c;
	Print(c.plus(1, 2), c.del(1, 2), c.mul(1, 2), c.div(1, 2));
	function<int(int)> func[4] = { bind(&cal<int>::plus, &c, _1, 3),
		bind(&cal<int>::del, &c, _1, 3),bind(&cal<int>::mul, &c, _1, 3),
		bind(&cal<int>::div, &c, _1, 3) };
	Print(func[0](15), func[1](15), func[2](15), func[3](15));
	return 0;
}
bind本身是一个函数模板,也是一个可调用对象,因此可以用function来组成一个数组
必须要注意的是,bind内部必须有可调用对象的所有参数,那么就会发现bind内部还多了个&c
因为类函数的第一个参数默认是传递this指针,因此bind所对应的也必须传递c的地址
8. 异常和智能指针
8.1 异常
异常处理机制允许程序中独立开发的部分在运行时对出现的问题进行通信并做出相应的处理。与C语言主要通过错误码处理错误的方式不同,C++异常通过抛出对象来传递更丰富的错误信息。
异常处理的核心优势:
- 错误检测与处理分离
- 传递更详细的错误信息
- 自动的资源清理
8.1.1 异常的抛出和捕获
基本语法
程序出现问题时,我们通过抛出(throw)⼀个对象来引发⼀个异常。异常的抛出必须需要抓取(catch),该对象的类型以及当前的调用链决定了应该由哪个catch的处理代码来处理该异常。
cpp
int main()
{
    int a = 1;
    int b = 0;
    try
    {
        if (b == 0)
        {
            string s("Divide by zero condition!");
            throw s;
        }
    }
    catch (const string& s)
    {
        cout << s;
    }
}
try和catch是处理异常信息的配合。try包含了可能含有异常错误的代码(0不能做除数),如果有错误那么就会throw抛出一个变量让catch接受,如果没有抛出那么会跳过catch。这里我们选择抛出一个字符串作为错误信息,让catch接受,catch需要设定能够抓取的错误信息,就像函数参数一样。上面的catch的参数就是const string&,即抓取string类型的变量,跟我们抛出的s相同。
值得注意的是,可以有多个catch,因为异常的信息多种多样,我们会自定义多种信息,也就需要多种catch来抓取
并且当throw抛出后,throw后面的代码段不会执行,一定会跳转到catch中,如果没有对应的catch就会报错
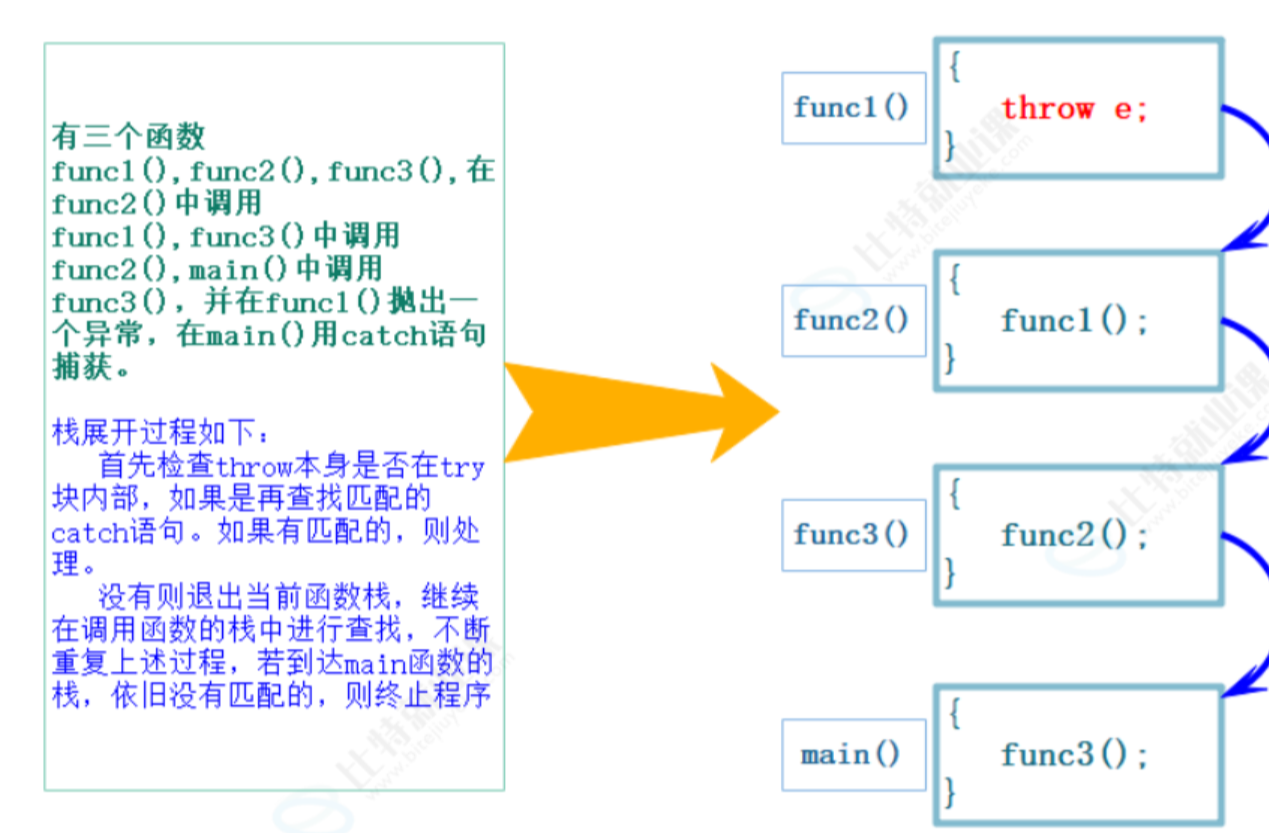
8.1.2 栈展开
当异常被抛出时,程序会暂停当前函数的执行,开始寻找匹配的catch子句:
- 首先检查throw是否在try块内部
- 如果在,查找匹配的catch语句
- 如果当前函数中没有匹配的catch,则退出当前函数,在外层调用函数中继续查找
- 如果到达main函数仍没有匹配,程序调用terminate终止
8.1.3 异常匹配规则
异常匹配遵循特定规则:
- 类型完全匹配
- 允许从非常量向常量的转换(权限缩小)
- 允许数组/函数向指针的转换
- 允许从派生类向基类的转换(最实用)
8.1.4 异常重新抛出
在某些情况下,我们需要对异常进行分类处理,部分异常在当前函数处理,其他异常重新抛出给外层
例如在微信等社交平台下,我们给他人发送信息时如果在转圈,那么其实就出现了异常。如果出现了异常肯定不能立马报错,而是要多试几次,这也是为什么转圈了一会才会提示错误
cpp
// 模拟消息发送,网络不稳定时重试
void _SendMsg(const string& s)
{
    if (rand() % 2 == 0)
    {
        throw HttpException("网络不稳定,发送失败", 102, "put");
    }
    else if (rand() % 7 == 0)
    {
        throw HttpException("你已经不是对方的好友,发送失败", 103, "put");
    }
    else
    {
        cout << "发送成功" << endl;
    }
}

void SendMsg(const string& s)
{
    // 发送消息失败时重试3次
    for (size_t i = 0; i < 4; i++)
    {
        try
        {
            _SendMsg(s);
            break;  // 发送成功,退出循环
        }
        catch (const Exception& e)
        {
            // 102号错误:网络不稳定,重试
            if (e.getid() == 102)
            {
                // 重试三次后仍然失败,重新抛出异常
                if (i == 3)
                    throw;
                cout << "开始第" << i + 1 << "次重试" << endl;
            }
            else
            {
                // 其他错误直接重新抛出
                throw;
            }
        }
    }
}

int main()
{
    srand(time(0));
    string str;
    while (cin >> str)
    {
        try
        {
            SendMsg(str);
        }
        catch (const Exception& e)
        {
            cout << e.what() << endl << endl;
        }
        catch (...)
        {
            cout << "Unkown Exception" << endl;
        }
    }
    return 0;
}
8.1.5 异常安全问题
异常抛出可能导致资源泄漏
因为throw抛出后,后面的代码不再执行,如果后面的代码有析构资源的代码,不执行就会造成资源泄露
cpp
double Divide(int a, int b)
{
    if (b == 0)
    {
        throw "Division by zero condition!";
    }
    return (double)a / (double)b;
}

void Func()
{
    // 异常可能导致array内存泄漏
    int* array = new int[10];

    try
    {
        int len, time;
        cin >> len >> time;
        cout << Divide(len, time) << endl;
    }
    catch (...)
    {
        // 捕获异常时释放内存
        cout << "delete []" << array << endl;
        delete[] array;
        throw;  // 重新抛出异常
    }

    // 正常执行时的释放
    cout << "delete []" << array << endl;
    delete[] array;
}

int main()
{
    try
    {
        Func();
    }
    catch (const char* errmsg)
    {
        cout << errmsg << endl;
    }
    catch (const exception& e)
    {
        cout << e.what() << endl;
    }
    catch (...)
    {
        cout << "Unkown Exception" << endl;
    }
    return 0;
}重要提醒:
- 析构函数中抛出异常要特别小心,可能导致资源泄漏
- 使用RAII技术(如智能指针)可以更好地解决异常安全问题
8.1.6 异常规范
C++提供了异常规范机制来声明函数是否会抛出异常:
例如noexcept明确表示该函数不会抛出异常
cpp
// noexcept表示不会抛出异常
size_type size() const noexcept;
iterator begin() noexcept;
const_iterator begin() const noexcept;

double Divide(int a, int b) noexcept
{
    if (b == 0)
    {
        throw "Division by zero condition!";  // 违反noexcept声明
    }
    return (double)a / (double)b;
}

int main()
{
    // noexcept运算符检测表达式是否会抛出异常
    int i = 0;
    cout << noexcept(Divide(1,2)) << endl;  // false
    cout << noexcept(Divide(1,0)) << endl;  // false
    cout << noexcept(++i) << endl;          // true

    return 0;
}
8.2 智能指针
8.2.1 传统内存管理的问题
传统手动内存管理在异常场景下容易导致内存泄漏:
cpp
double Divide(int a, int b)
{
    if (b == 0)
    {
        throw "Divide by zero condition!";
    }
    return (double)a / (double)b;
}

void Func()
{
    // 异常可能导致array1和array2内存泄漏
    int* array1 = new int[10];
    int* array2 = new int[10];  // 如果这里抛出异常,array1会泄漏

    try
    {
        int len, time;
        cin >> len >> time;
        cout << Divide(len, time) << endl;
    }
    catch (...)
    {
        // 需要手动释放所有资源
        cout << "delete []" << array1 << endl;
        delete[] array1;
        cout << "delete []" << array2 << endl;
        delete[] array2;
        throw;
    }

    // 正常路径也需要释放
    cout << "delete []" << array1 << endl;
    delete[] array1;
    cout << "delete []" << array2 << endl;
    delete[] array2;
}
可以看见throw抛出会违背我们所预想的代码执行逻辑,会导致没有执行释放内存的操作,造成内存泄漏。
8.2.2 RAII设计思想
RAII(Resource Acquisition Is Initialization)利用对象生命周期管理资源
RAII在获取资源时把资源委托给⼀个对象,接着控制对资源的访问, 资源在对象的生命周期内始终保持有效,最后在对象析构的时候释放资源,这样保障了资源的正常释放,避免资源泄漏问题。
说人话就是给一个类来保管,因为程序结束后会自动调用类的析构函数
cpp
template<class T>
class SmartPtr
{
public:
    // RAII:构造函数获取资源
    SmartPtr(T* ptr) : _ptr(ptr) {}

    // RAII:析构函数释放资源
    ~SmartPtr()
    {
        cout << "delete[] " << _ptr << endl;
        delete[] _ptr;
    }

    // 重载运算符,模拟指针行为
    T& operator*() { return *_ptr; }
    T* operator->() { return _ptr; }
    T& operator[](size_t i) { return _ptr[i]; }

private:
    T* _ptr;
};

// 使用RAII智能指针
void Func()
{
    SmartPtr<int> sp1 = new int[10];
    SmartPtr<int> sp2 = new int[10];

    for (size_t i = 0; i < 10; i++)
    {
        sp1[i] = sp2[i] = i;
    }

    int len, time;
    cin >> len >> time;
    cout << Divide(len, time) << endl;
    // 无论是否发生异常,资源都会自动释放
}
8.2.3 C++标准库智能指针
智能指针类型概览
| 类型 | C++版本 | 特点 | 使用场景 |
| auto_ptr | C++98 | 拷贝时转移所有权(已废弃) | 不推荐使用 |
| unique_ptr | C++11 | 独占所有权,不支持拷贝 | 不需要共享所有权的场景 |
| shared_ptr | C++11 | 共享所有权,引用计数 | 需要共享所有权的场景 |
| weak_ptr | C++11 | 不增加引用计数 | 解决循环引用问题 |
|---|
智能指针是封装的类,具体功能与指针基本一致
基本使用示例
cpp
#include <memory>
#include <iostream>
using namespace std;

struct Date
{
    int _year;
    int _month;
    int _day;

    Date(int year = 1, int month = 1, int day = 1)
        : _year(year), _month(month), _day(day)
    {}

    ~Date()
    {
        cout << "~Date()" << endl;
    }
};

int main()
{
    // auto_ptr(已废弃,仅作了解)
    auto_ptr<Date> ap1(new Date);
    auto_ptr<Date> ap2(ap1);  // ap1变为空指针
    // ap1->_year++;  // 错误:ap1已悬空

    // unique_ptr:独占所有权
    unique_ptr<Date> up1(new Date);
    // unique_ptr<Date> up2(up1);  // 错误:不支持拷贝
    unique_ptr<Date> up3(move(up1));  // 支持移动

    // shared_ptr:共享所有权
    shared_ptr<Date> sp1(new Date);
    shared_ptr<Date> sp2(sp1);  // 支持拷贝
    shared_ptr<Date> sp3(sp2);

    cout << "引用计数: " << sp1.use_count() << endl;  // 输出3

    sp1->_year++;
    cout << sp1->_year << endl;
    cout << sp2->_year << endl;  // 所有shared_ptr共享同一对象

    return 0;
}
8.2.4 智能指针的原理
auto_ptr的思路是拷贝时转移资源管理权给被拷贝对象,这种思路是不被认可的,也不建议使用
因为auto_ptr的拷贝说是拷贝,其实就是掠夺他人的资源,使得别的指针成为野指针,就容易引起野指针的访问。
unique_ptr的思路是不支持拷贝,而是移动构造和移动赋值。虽然unique_ptr也可以说是掠夺他人的资源,但是明确的说只有传递右值,即move(左值)才会进行转移,说白了不会造成意外的移动资源,而是你自愿的。你明确自愿转移资源如果出错了就怪不了别人了awa
shared_ptr的思路是共享资源,即几个指针共同指向同一块空间。但是指向同一块资源时析构就会出问题,假设程序结束,几个指针一起析构,第一个指针已经把指向的资源释放了,下一个继续释放就会出错。所以我们引入一个计数,即指向同一块空间指针的个数,只有减为0时才会释放资源
8.2.5 智能指针的实现原理
cpp
 template<class T>
    class unique_ptr
    {
    public:
        explicit unique_ptr(T* ptr) : _ptr(ptr) {}

        ~unique_ptr()
        {
            if (_ptr)
            {
                cout << "delete:" << _ptr << endl;
                delete _ptr;
            }
        }

        // 像指针一样使用
        T& operator*() { return *_ptr; }
        T* operator->() { return _ptr; }

        // 禁用拷贝
        unique_ptr(const unique_ptr<T>&) = delete;
        unique_ptr<T>& operator=(const unique_ptr<T>&) = delete;

        // 支持移动语义
        unique_ptr(unique_ptr<T>&& sp) : _ptr(sp._ptr)
        {
            sp._ptr = nullptr;
        }

        unique_ptr<T>& operator=(unique_ptr<T>&& sp)
        {
            if (this != &sp)
            {
                delete _ptr;
                _ptr = sp._ptr;
                sp._ptr = nullptr;
            }
            return *this;
        }

    private:
        T* _ptr;
    };
cpp
 template<class T>
    class shared_ptr
    {
    public:
        explicit shared_ptr(T* ptr = nullptr)
            : _ptr(ptr), _pcount(new int(1))
        {}

        template<class D>
        shared_ptr(T* ptr, D del)
            : _ptr(ptr), _pcount(new int(1)), _del(del)
        {}

        // 拷贝构造
        shared_ptr(const shared_ptr<T>& sp)
            : _ptr(sp._ptr), _pcount(sp._pcount), _del(sp._del)
        {
            ++(*_pcount);
        }

        // 拷贝赋值
        shared_ptr<T>& operator=(const shared_ptr<T>& sp)
        {
            if (_ptr != sp._ptr)
            {
                release();
                _ptr = sp._ptr;
                _pcount = sp._pcount;
                ++(*_pcount);
                _del = sp._del;
            }
            return *this;
        }

        ~shared_ptr()
        {
            release();
        }

        T* get() const { return _ptr; }
        int use_count() const { return *_pcount; }

        T& operator*() { return *_ptr; }
        T* operator->() { return _ptr; }

    private:
        void release()
        {
            if (--(*_pcount) == 0)
            {
                // 最后一个管理对象,释放资源
                _del(_ptr);
                delete _pcount;
                _ptr = nullptr;
                _pcount = nullptr;
            }
        }

        T* _ptr;
        int* _pcount;
        function<void(T*)> _del = [](T* ptr) { delete ptr; };
    };
8.2.6 shared_ptr的循环引用问题
shared_ptr并不万能,还有一点问题
如下图所述场景,n1和n2析构后,管理两个节点的引用计数减到1
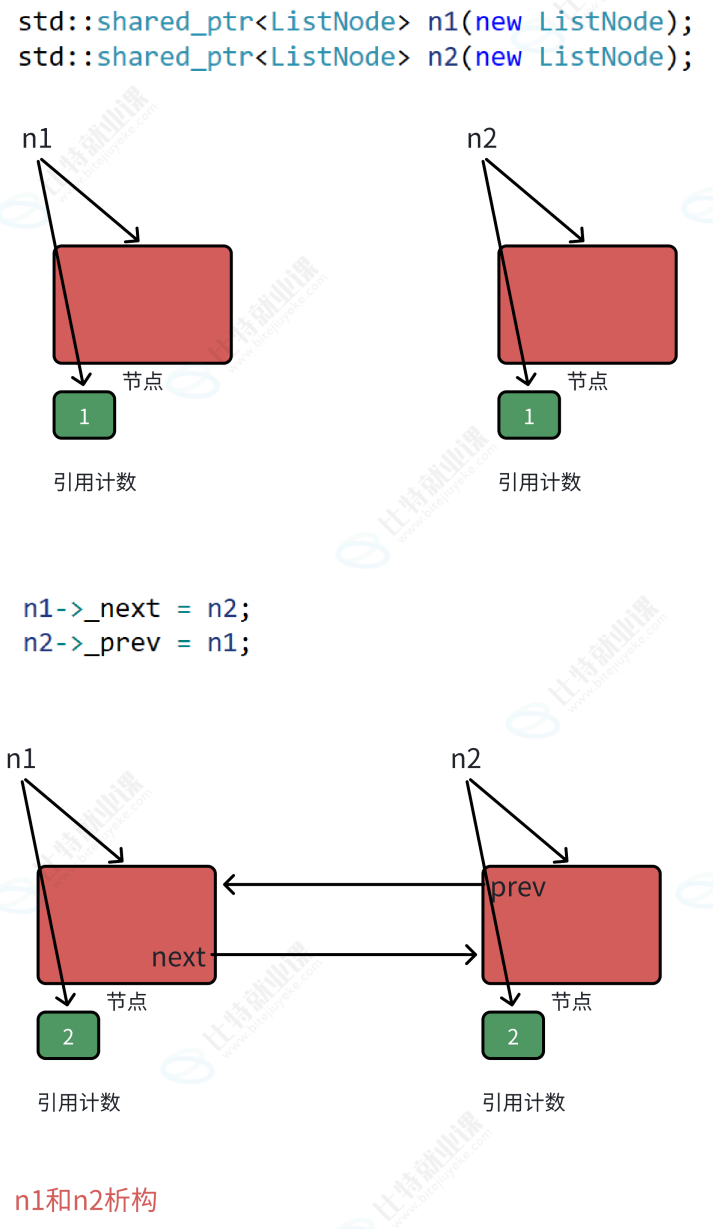

左右节点的析构又影响着旁边节点的析构,造成了循环引用问题
8.2.7 weak_ptr
weak_ptr不支持RAII,不能单独管理资源。在这里weak_ptr是辅助shared_ptr来处理循环引用的问题,具体原理是不增加计数
cpp
struct ListNode
{
    int _data;
    weak_ptr<ListNode> _next;  // 使用weak_ptr打破循环引用
    weak_ptr<ListNode> _prev;

    ~ListNode()
    {
        cout << "~ListNode()" << endl;
    }
};

int main()
{
    shared_ptr<ListNode> n1(new ListNode);
    shared_ptr<ListNode> n2(new ListNode);

    n1->_next = n2;  // n2引用计数仍为1
    n2->_prev = n1;  // n1引用计数仍为1

    cout << "n1引用计数: " << n1.use_count() << endl;  // 1
    cout << "n2引用计数: " << n2.use_count() << endl;  // 1

    return 0;
    // 正常释放,无内存泄漏
}