Welcome to 9ilk's Code World

(๑•́ ₃ •̀๑) 个人主页: 9ilk
(๑•́ ₃ •̀๑) 文章专栏: 项目
本篇博客主要是对本项目的一些使用的第三方框架技术进行介绍学习。
Protobuf
什么是Protobuf
ProtoBuf(全称Protocol Buffer)是**数据结构序列化和反序列化框架,**它具有以下特点:
- 语言无关、平台无关:即ProtoBuf支持Java、C++、Python等多种语言,支持多个平台
- 高效 : 即比XML更小、更快、更为简单
- 扩展性、兼容性好 : 你可以更新数据结构,而不影响和破坏原有的的旧程序
Protobuf使用流程:

- 编写
.proto文件,目的是为了定义结构对象(message)及属内容 - 使用
protoc编译器编译.proto文件,生成一系列接口代码,存放在新生成头文件和源文件中。 - 依赖生成的接口,将编译生成的头文件包含进我们的代码中,实现对
.proto文件中定义的字段进行设置和获取,和对message对象进行序列化和反序列化。
Protobuf快速上手
- 编写.proto
cpp
//声明语法版本
syntax="proto3";

//声明代码命名空间
package contacts;

message contact {
    //各个字段描述
    uint64 sn = 1;
    string name = 2;
    float score = 3;
}- 编译.proto文件生成对应C++文件
cpp
protoc [--proto_path=IMPORT_PATH] --cpp_out=DST_DIR path/to/file.proto

1.protoc 是 Protocol Buffer 提供的命令行编译工具。

2.--proto_path 指定 被编译的.proto 文件所在目录,可多次指定。可简写成 -I IMPORT_PATH 。如不指
定该参数,则在当前目录进行搜索。当某个.proto 文件import 其他 .proto 文件时,或需要编译的 .proto 文件不在当前目录下,这时就要
用-I 来指定搜索目录。

3.--cpp_out= 指编译后的文件为 C++ 文件。

4.DST_DIR 编译后生成文件的目标路径。

5.path/to/file.proto 要编译的.proto 文件。- 接口使用
cpp
#include"./contacts.pb.h"
#include<iostream>
#include<string>
using namespace std;

int main()
{
    contacts::contact con;
    string serial;
    //序列化
    con.set_name("小明");
    con.set_sn(1);
    con.set_score(99);
    //序列化的数据就放在该字符串对象中,这时可以对str进行序列化或网络传输
    con.SerializePartialToString(&serial);

    contacts::contact stu;
    bool ret = stu.ParseFromString(serial);
    if(ret == false)
    {
        cout << "反序列化失败" << endl;
        return
    }
    cout << stu.name() << endl;
    cout << stu.sn() << endl;
    cout << stu.score() << endl;

    return 0;
}- 编译
bash
main:test.cc contacts.pb.cc
	g++ -std=c++11 -o $@ $^ -lprotobuf
Muduo库
Muduo由陈硕开发,是一个基于非阻塞IO和事件驱动 的C++高并发TCP网络编程库。它是一款基于主从Reactor 模型的网络库,其使用用的线程模型是one loop per thread,所谓 one loop per thread指的是 :
- 一个线程只能有一个事件循环(EventLoop),用于响应计时时器和IO事件
- 一个文件描述符只能由一个线程进行读写,换句话说就是一个TCP连接必须归属于某个EventLoop管理
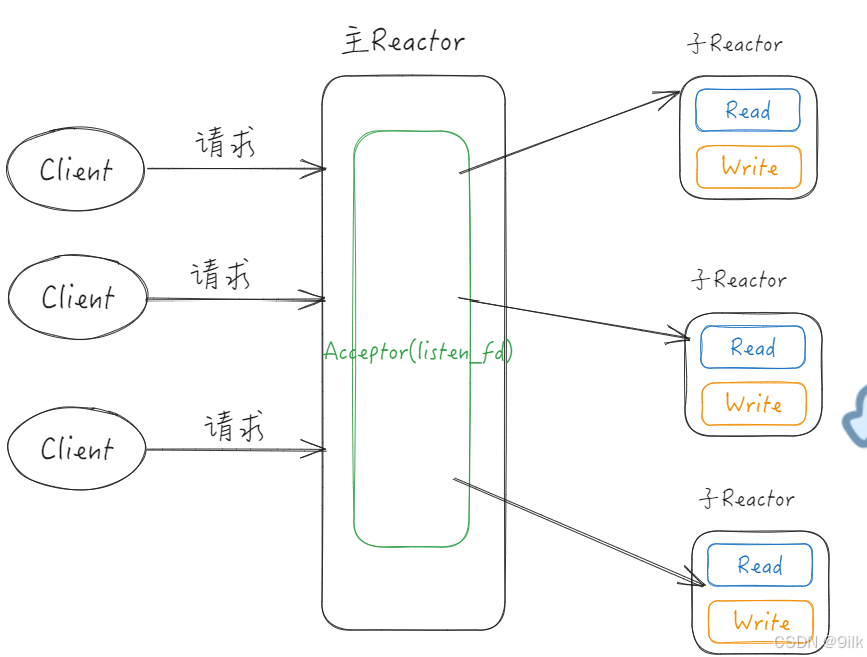
Reactor:
- 基于Reactor触发的模型(基于epoll进行IO事件监控)
- 主从Reactor模型:主Reactor只对新建连接事件进行监控(保证不受IO阻塞影响实现高效的新建连接获取);从Reactor针对新建连接进行IO事件监控(进行IO操作和业务处理)
- 主从Reactor是一个多执行流的并发模式,一个事件监控占据一个线程。
Muduo库相关类介绍
muduo::net::TcpServer类基础介绍
cpp
typedef std::shared_ptr<TcpConnection> TcpConnectionPtr;
typedef std::function<void (const TcpConnectionPtr&)> ConnectionCallback;
typedef std::function<void (const TcpConnectionPtr&,Buffer*,Timestamp)> MessageCallback;

class InetAddress : public muduo::copyable
{
public:
    InetAddress(StringArg ip, uint16_t port, bool ipv6 = false);
};

class TcpServer : noncopyable
{
public:
    enum Option
    {
        kNoReusePort,
        kReusePort,
    };
    TcpServer(EventLoop* loop,const InetAddress& listenAddr,const string& nameArg,
    Option option = kNoReusePort);

    void setThreadNum(int numThreads);

    void start();
    /// 当一个新连接建立成功的时候被调用
    void setConnectionCallback(const ConnectionCallback& cb)
    { connectionCallback_ = cb; }
    /// 消息的业务处理回调函数---这是收到新连接消息的时候被调用的函数
    void setMessageCallback(const MessageCallback& cb)
    { messageCallback_ = cb; }

};muduo::net::EventLoop类基础介绍
cpp
class EventLoop : noncopyable
{
public:

    /// Loops forever.
    /// Must be called in the same thread as creation of the object.
    void loop();
    /// Quits loop.
    /// This is not 100% thread safe, if you call through a raw pointer,
    /// better to call through shared_ptr<EventLoop> for 100% safety.
    void quit();
    TimerId runAt(Timestamp time, TimerCallback cb);
    /// Runs callback after @c delay seconds.
    /// Safe to call from other threads.
    TimerId runAfter(double delay, TimerCallback cb);
    /// Runs callback every @c interval seconds.
    /// Safe to call from other threads.
    TimerId runEvery(double interval, TimerCallback cb);
    /// Cancels the timer.
    /// Safe to call from other threads.
    void cancel(TimerId timerId);
private:
    std::atomic<bool> quit_;
    std::unique_ptr<Poller> poller_;
    mutable MutexLock mutex_;
    std::vector<Functor> pendingFunctors_ GUARDED_BY(mutex_);
}muduo::net::TcpConnection类基础介绍
cpp
class TcpConnection : noncopyable,
public
std::enable_shared_from_this<TcpConnection>
{
public:
    /// Constructs a TcpConnection with a connected sockfd
    ///
    /// User should not create this object.
    TcpConnection(EventLoop* loop,const string& name,int sockfd,const InetAddress& localAddr,
    const InetAddress& peerAddr);
    bool connected() const { return state_ == kConnected; }
    bool disconnected() const { return state_ == kDisconnected; }
    void send(string&& message); // C++11
    void send(const void* message, int len);
    void send(const StringPiece& message);
    // void send(Buffer&& message); // C++11
    void send(Buffer* message); // this one will swap data
    void shutdown(); // NOT thread safe, no simultaneous calling
    void setContext(const boost::any& context)
    { context_ = context; }
    const boost::any& getContext() const
    { return context_; }
    boost::any* getMutableContext()
    { return &context_; }
    void setConnectionCallback(const ConnectionCallback& cb)
    { connectionCallback_ = cb; }
    void setMessageCallback(const MessageCallback& cb)
    { messageCallback_ = cb; }
private:
    enum StateE { kDisconnected, kConnecting, kConnected,kDisconnecting };
    EventLoop* loop_;
    ConnectionCallback connectionCallback_;
    MessageCallback messageCallback_;
    WriteCompleteCallback writeCompleteCallback_;
    boost::any context_;
};muduo::net::TcpClient类基础介绍
cpp
class TcpClient : noncopyable
{
public:
// TcpClient(EventLoop* loop);
// TcpClient(EventLoop* loop, const string& host, uint16_t port);
    TcpClient(EventLoop* loop,const InetAddress& serverAddr,const string& nameArg);
    ~TcpClient(); // force out-line dtor, for std::unique_ptr members.
    void connect();//连接服务器
    void disconnect();//关闭连接
    void stop();
    //获取客户端对应的通信连接 Connection 对象的接口,发起 connect 后,有可能还没有连接建立成功
    TcpConnectionPtr connection() const
    {
        MutexLockGuard lock(mutex_);
        return connection_;
    }
    /// 连接服务器成功时的回调函数
    void setConnectionCallback(ConnectionCallback cb)
    { connectionCallback_ = std::move(cb); }
    /// 收到服务器发送的消息时的回调函数
    void setMessageCallback(MessageCallback cb)
    { messageCallback_ = std::move(cb); }
private:
    EventLoop* loop_;
    ConnectionCallback connectionCallback_;
    MessageCallback messageCallback_;
    WriteCompleteCallback writeCompleteCallback_;
    TcpConnectionPtr connection_ GUARDED_BY(mutex_);
};
/*
    需要注意的是,因为 muduo 库不管是服务端还是客户端都是异步操作,
    对于客户端来说如果我们在连接还没有完全建立成功的时候发送数据,这是不被允
    许的。因此我们可以使用内置的 CountDownLatch 类进行同步控制
    */
class CountDownLatch : noncopyable
{
public:
    explicit CountDownLatch(int count);
    void wait()
    {
        MutexLockGuard lock(mutex_);
        while (count_ > 0)
       {
          condition_.wait();
       }
    }
    void countDown()
    {
        MutexLockGuard lock(mutex_);
        --count_;
        if (count_ == 0)
        {
            condition_.notifyAll();
        }
    }
    int getCount() const;
private:
    mutable MutexLock mutex_;
    Condition condition_ GUARDED_BY(mutex_);
    int count_ GUARDED_BY(mutex_);
};muduo::net::Buffer类基础介绍
cpp
class Buffer : public muduo::copyable
{
public:
        static const size_t kCheapPrepend = 8;
        static const size_t kInitialSize = 1024;
        explicit Buffer(size_t initialSize = kInitialSize)
        : buffer_(kCheapPrepend + initialSize),
        readerIndex_(kCheapPrepend),
        writerIndex_(kCheapPrepend);
        void swap(Buffer& rhs)
        size_t readableBytes() const
        size_t writableBytes() const
        const char* peek() const
        const char* findEOL() const
        const char* findEOL(const char* start) const
        void retrieve(size_t len)
        void retrieveInt64()
        void retrieveInt32()
        void retrieveInt16()
        void retrieveInt8()
        string retrieveAllAsString()
        string retrieveAsString(size_t len)
        void append(const StringPiece& str)
        void append(const char* /*restrict*/ data, size_t len)
        void append(const void* /*restrict*/ data, size_t len)
        char* beginWrite()
        const char* beginWrite() const
        void hasWritten(size_t len)
        void appendInt64(int64_t x)
        void appendInt32(int32_t x)
        void appendInt16(int16_t x)
        void appendInt8(int8_t x)
        int64_t readInt64()
        int32_t readInt32()
        int16_t readInt16()
        int8_t readInt8()
        int64_t peekInt64() const
        int32_t peekInt32() const
        int16_t peekInt16() const
        int8_t peekInt8() const
        void prependInt64(int64_t x)
        void prependInt32(int32_t x)
        void prependInt16(int16_t x)
        void prependInt8(int8_t x)
        void prepend(const void* /*restrict*/ data, size_t len)
private:
    std::vector<char> buffer_;
    size_t readerIndex_;
    size_t writerIndex_;
    static const char kCRLF[];
};
Muduo搭建服务器
服务器整体框架:
- 类成员
-
tcpServer对象主要用于设置回调,告诉服务器收到请求后该如何处理 -
eventLoop对象来对描述符进行事件监控,触发事件后进行io操作调用回调。
- 类接口
-
启动服务器
start -
新连接建立成功后的回调
OnConnection -
新连接建立成功后的回调
OnConnection
cpp
#include"./include/muduo/net/TcpServer.h"
#include"./include/muduo/net/EventLoop.h"
#include"./include/muduo/net/TcpConnection.h"
#include<iostream>
using namespace std;

class DictServer
{
public:
    DictServer(int port)
    :_server(&_baseloop,,muduo::net::InetAddress("0.0.0.0",port),"DictServer",
    muduo::net::TcpServer::Option::kReusePort)
    {
          //设置回调                     _server.setConnectionCallback(std::bind(&DictServer::OnConnection,this,std::placeholders::_1));
    _server.setMessageCallback(std::bind(&DictServer::OnMessage,this,std::placeholders::_1,
        std::placeholders::_2,std::placeholders::_3));
    }

    /* 启动服务器 */
    void start()
    {
        //1.启动服务器
        _server.start();
        //2.开启事件监控
        _baseloop.loop();
    }
private:
    /* 新连接建立成功时的回调函数 */
    void OnConnection(const muduo::net::TcpConnectionPtr& conn)
    {
        if(conn->connected() == true)
            cout << "连接建立成功!" << endl;
        else
            cout << "连接建立失败!" >> endl;

    }

    /* 通信连接收到请求时的回调函数*/
    void OnMessage(const muduo::net::TcpConnectionPtr& conn,muduo::net::Buffer* buf,muduo::Timestamp time)
    {
            //1.将数据从Buffer从取出来
            string data = buf->retrieveAllAsString();
            //2.调用translate处理请求
            string result = translate(data);
            //3.发送响应
            conn->send(result);
    }

private:
    muduo::net::EventLoop _baseloop;
    muduo::net::TcpServer _server;
};

int main()
{
    DictServer server(8081);
    server.start();
    return 0;
}
注意:我们这里演示的是单Reactor,即所有连接的事件(新链接到来、I/O)都在一个EventLoop中完成,要想是主从Reactor,可以对TcpServer对象调用setThreadNum()。
Muduo搭建客户端
类成员 :
1.TcpClient类对象
2.TcpConnectionPtr
3.EventLoopThread类对象
注意:对于客户端来说不能在主线程进行事件监控 , 因为 loop****是个死循环阻塞接口 , 调用之后阻塞客户端就不能单独的调用 send****接口发送数据 (毕竟客户端需要主动向服务器发送请求), 因此我们需要在新线程中进行事件监控,
muduo库提供了EventLoopThread类,它将eventLoop和一个线程封装起来,它一旦实例化就会进行事件监控,不需要手动调用 loop
4. CountDownLact类对象
注意:
connect链接服务器不是一个阻塞接口, 是一个异步操作,直接返回 , 有可能返回的时候还没建立成功,此时获取Connection对象就有问题 , 因此我们可以使用内置的CountDownLatch类进行同步控制。也就是说,我们需要再connect之后调用这个类的wait接口进行阻塞,直到 OnConnection****被调用再唤醒。
cpp
class CountDownLatch : noncopyable
{
public:
    explicit CountDownLatch(int count);
    void wait()
    {
           MutexLockGuard lock(mutex_);
            while (count_ > 0)
            {
                condition_.wait();
            }
    }
    void countDown()
    {
        MutexLockGuard lock(mutex_);
        --count_;
        if (count_ == 0)
        {
            condition_.notifyAll();
        }
    }
    int getCount() const;
private:
    mutable MutexLock mutex_;
    Condition condition_ GUARDED_BY(mutex_);
    int count_ GUARDED_BY(mutex_);
};
注意:这个类的count只能初始化为1,否则唤醒 **countDown()**的时候无法被唤醒!
类接口:
connect():连接服务器,需要阻塞等待连接建立成功之后再返回onConnected():连接建立成功的回调函数onMessage():收到消息的回调send():客户端发送数据
cpp
#include"./include/muduo/net/TcpClient.h"
#include"./include/muduo/net/EventLoopThread.h"
#include"./include/muduo/net/TcpConnection.h"
#include"./include/muduo/base/CountDownLatch.h"
#include<iostream>
#include<unordered_map>
#include<functional>
using namespace std;

class DiceClient
{
public:
      DiceClient(const string&serverip,int port)
      :_latch(1),_client(_loopthread.startLoop(),muduo::net::InetAddress(serverip,port),"DictClient")
      {
         _client.setConnectionCallback(std::bind(&DiceClient::OnConnection,this,std::placeholders::_1));
         _client.setMessageCallback(std::bind(&DiceClient::OnMessage,this,std::placeholders::_1,
                                     std::placeholders::_2,std::placeholders::_3));
      }
      //连接服务器
      void connect()
      {
        //1.连接服务器
        _client.connect();
        //2.阻塞等待直到连接建立成功
        _latch.wait();
      }
      //发送数据
      bool send(const string& msg)
      {
         if(_conn->connected() == true)
         {
            _conn->send(msg);
            return true;
         }
         return false;
      }
private:
      //连接建立成功时的回调
      void OnConnection(const muduo::net::TcpConnectionPtr& conn)
      {
          if(conn->connected() == true)
          {
             _conn = conn;
             _latch.countDown(); //唤醒主线程
          }
          else
              _conn.reset(); //连接关闭的操作
      }
      //收到消息时候的回调
      void OnMessage(const muduo::net::TcpConnectionPtr& conn,muduo::net::Buffer* buf,muduo::Timestamp time)
      {
          cout << "翻译结果:" << buf->retrieveAllAsString() << endl;
      }

private:
   muduo::CountDownLatch _latch;
   muduo::net::EventLoopThread _loopthread;
   muduo::net::TcpClient _client;
   muduo::net::TcpConnectionPtr _conn;
};


int main()
{
    DiceClient client("127.0.0.1",8081);
    client.connect();

    while(1)
    {
        string buf;
        cin >> buf;
        client.send(buf);
    }
}
Muduo库Protobuf通信流程
我们前面写的muduo库搭建客户端和服务器的demo还有的不足是没有考虑到应用层协议和tcp黏包问题 (即可能将多条请求当作一条请求)。其实muduo库内部也实现了简单的关于protobuf协议的一些接口和类。
ProtobufCodec类
该类是muduo库中对于protobuf协议的处理类,其内部实现了onMessage回调接口,对于接收到的数据进行基于 protobuf****协议的请求处理 ,然后将解析出的信息,存放到 对应请求的protobuf请求类对象中,然后最终调用设置进去的消息处理回调函数进行对应请求的处理。 因此在构造的时候需要将ProtobufCodec::onMessage设置为TcpClient的新消息回调
cpp
typedef std::shared_ptr<google::protobuf::Message> MessagePtr;

//
// FIXME: merge with RpcCodec
//
class ProtobufCodec : muduo::noncopyable
{
 public:

  enum ErrorCode
  {
    kNoError = 0,
    kInvalidLength,
    kCheckSumError,
    kInvalidNameLen,
    kUnknownMessageType,
    kParseError,
  };

  typedef std::function<void (const muduo::net::TcpConnectionPtr&,
                                const MessagePtr&,
                                muduo::Timestamp)> ProtobufMessageCallback;

  typedef std::function<void (const muduo::net::TcpConnectionPtr&,
                                muduo::net::Buffer*,
                                muduo::Timestamp,
                                ErrorCode)> ErrorCallback;
 //这里的messageCb是针对 protobuf请求进行处理的函数,它声明在
// dispatcher.h中的ProtobufDispatcher类
  explicit ProtobufCodec(const ProtobufMessageCallback& messageCb)
    : messageCallback_(messageCb), //这就是设置的请求处理回调函数
      errorCallback_(defaultErrorCallback)
  {
  }

  ProtobufCodec(const ProtobufMessageCallback& messageCb, const ErrorCallback& errorCb)
    : messageCallback_(messageCb),
      errorCallback_(errorCb)
  {
  }

//onMessage的功能是接收消息进行解析,得到了proto中定义的请求后调用设置的messageCallback_进行处理
  void onMessage(const muduo::net::TcpConnectionPtr& conn,
                 muduo::net::Buffer* buf,
                 muduo::Timestamp receiveTime);

  void send(const muduo::net::TcpConnectionPtr& conn,
            const google::protobuf::Message& message)
  {
    // FIXME: serialize to TcpConnection::outputBuffer()
    muduo::net::Buffer buf;
    fillEmptyBuffer(&buf, message);
    conn->send(&buf);
  }

  static const muduo::string& errorCodeToString(ErrorCode errorCode);
  static void fillEmptyBuffer(muduo::net::Buffer* buf, const google::protobuf::Message& message);
  static google::protobuf::Message* createMessage(const std::string& type_name);
  static MessagePtr parse(const char* buf, int len, ErrorCode* errorCode);

 private:
  static void defaultErrorCallback(const muduo::net::TcpConnectionPtr&,
                                   muduo::net::Buffer*,
                                   muduo::Timestamp,
                                   ErrorCode);

  ProtobufMessageCallback messageCallback_;
  ErrorCallback errorCallback_;

  const static int kHeaderLen = sizeof(int32_t);
  const static int kMinMessageLen = 2*kHeaderLen + 2; // nameLen + typeName + checkSum
  const static int kMaxMessageLen = 64*1024*1024; // same as codec_stream.h kDefaultTotalBytesLimit
};

#endif // MUDUO_EXAMPLES_PROTOBUF_CODEC_CODEC_HProtobufCodec::onMessage()就是先根据应用层协议对请求进行解析,再调messageCallback_(即onProtobufMessage)对请求进行分发。
cpp
void ProtobufCodec::onMessage(const TcpConnectionPtr& conn,
                              Buffer* buf,
                              Timestamp receiveTime)
{
  while (buf->readableBytes() >= kMinMessageLen + kHeaderLen)
  {
    const int32_t len = buf->peekInt32();
    if (len > kMaxMessageLen || len < kMinMessageLen)
    {
      errorCallback_(conn, buf, receiveTime, kInvalidLength);
      break;
    }
    else if (buf->readableBytes() >= implicit_cast<size_t>(len + kHeaderLen))
    {
      ErrorCode errorCode = kNoError;
      MessagePtr message = parse(buf->peek()+kHeaderLen, len, &errorCode);
      if (errorCode == kNoError && message)
      {   // 这里的messageCallback_其实就是onProtobufMessage
        messageCallback_(conn, message, receiveTime);
        buf->retrieve(kHeaderLen+len);
      }
      else
      {
        errorCallback_(conn, buf, receiveTime, errorCode);
        break;
      }
    }
    else
    {
      break;
    }
  }
}ProtobufDispatcher类
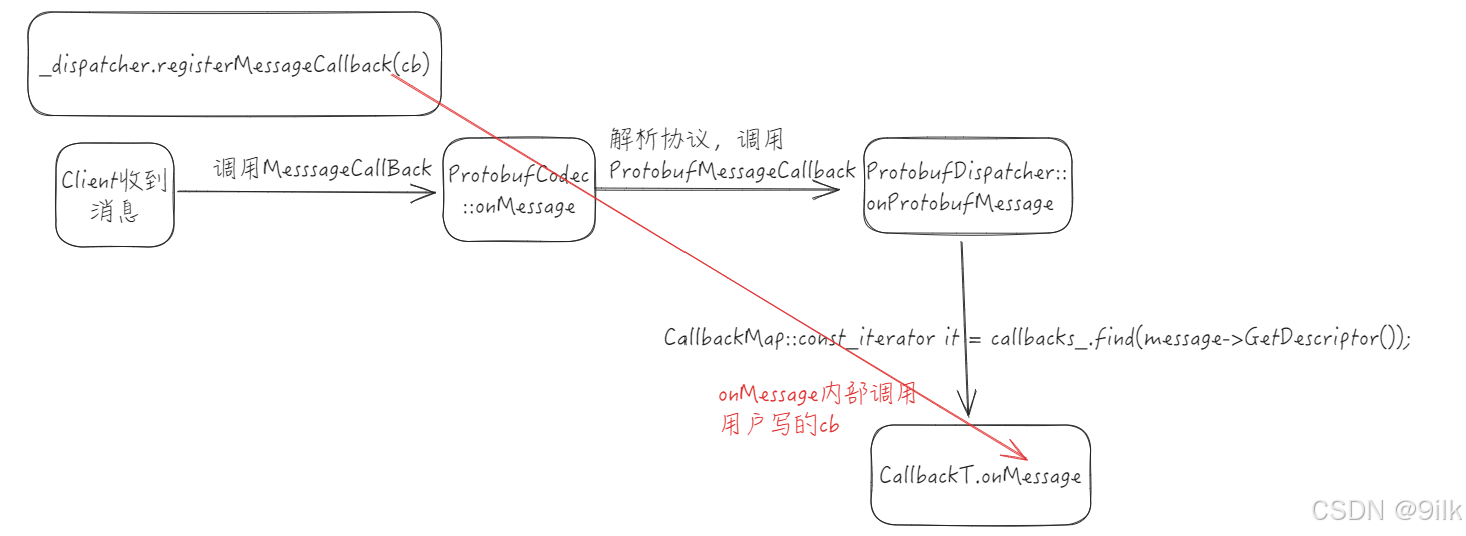
该类是一个protobuf请求的分发处理类 ,我们用户在使用的时候 , 就是在这个类对象中注册哪个请求应该用哪个业务函数进行处理。 它内部的onProtobufMessage接口就是上边构造ProtobufCodec的参数Protobuf::messageCallback_设置的回调函数,相当于ProtobufCodec中onMessage接口会设置给服务器作为消息回调函数 ,其内部对于接收到的数据进行基于 protobuf****协议的解析,得到请求后,通过 ProtobufDispatcher::onProtobufMessage****接口进行请求分发处理,也是确定当前请求应该用哪一个注册的业务函数进行处理。
cpp
//这是一个protobuf请求分发器,需要用户注册不同请求的不同处理函数
//注册完毕后服务器收到指定请求后就会使用对应接口进行处理
class ProtobufDispatcher
{
 public:
  typedef std::function<void (const muduo::net::TcpConnectionPtr&,
                                const MessagePtr& message,
                                muduo::Timestamp)> ProtobufMessageCallback;
//构造对象时需要传入一个默认的业务处理函数,以便于找不到对应请求的处理函数时调用
  explicit ProtobufDispatcher(const ProtobufMessageCallback& defaultCb)
    : defaultCallback_(defaultCb)
  {
  }
//这个是别人实现的proto中定义的类型请求进行处理的函数,内部会调用我们自己传入的业务处理函数
  void onProtobufMessage(const muduo::net::TcpConnectionPtr& conn,
                         const MessagePtr& message,
                         muduo::Timestamp receiveTime) const
  {
    CallbackMap::const_iterator it = callbacks_.find(message->GetDescriptor());
    if (it != callbacks_.end())
    {
      it->second->onMessage(conn, message, receiveTime);
    }
    else
    {
      defaultCallback_(conn, message, receiveTime);
    }
  }

  template<typename T>
  void registerMessageCallback(const typename CallbackT<T>::ProtobufMessageTCallback& callback)
  {
    std::shared_ptr<CallbackT<T> > pd(new CallbackT<T>(callback));
    callbacks_[T::descriptor()] = pd;
  }

 private:
  typedef std::map<const google::protobuf::Descriptor*, std::shared_ptr<Callback> > CallbackMap;

  CallbackMap callbacks_;
  ProtobufMessageCallback defaultCallback_;
};registerMessageCallBack()这个接口非常巧妙,基于proto中的请求类型将我们自己的业务处理函数与对应的请求给关联起来,相当于通过这个成员变量中的CallbackMap callbacks_能够知道收到什么请求后应该用什么处理函数进行处理。其实就是注册针对哪种请求--应该用哪个我们自己的函数进行处理的映射关系。
我们通过Protobuf生成不同的请求类型,而callbacks_这个map需要统一的类型, 此时为了统一,使用CallbackT对我们传入的接口进行二次封装。
cpp
class Callback : muduo::noncopyable
{
public:
virtual ~Callback() = default;
virtual void onMessage(const muduo::net::TcpConnectionPtr&,
const MessagePtr& message,
muduo::Timestamp) const = 0;
};
template <typename T>
class CallbackT : public Callback
{
static_assert(std::is_base_of<google::protobuf::Message, T>::value,
"T must be derived from gpb::Message.");
public:
typedef std::function<void (const muduo::net::TcpConnectionPtr&,
const std::shared_ptr<T>& message,
muduo::Timestamp)> ProtobufMessageTCallback;
CallbackT(const ProtobufMessageTCallback& callback)
: callback_(callback)
{
}
void onMessage(const muduo::net::TcpConnectionPtr& conn,
const MessagePtr& message,
muduo::Timestamp receiveTime) const override
{
std::shared_ptr<T> concrete = muduo::down_pointer_cast<T>(message);
assert(concrete != NULL);
callback_(conn, concrete, receiveTime);
}
private:
ProtobufMessageTCallback callback_;
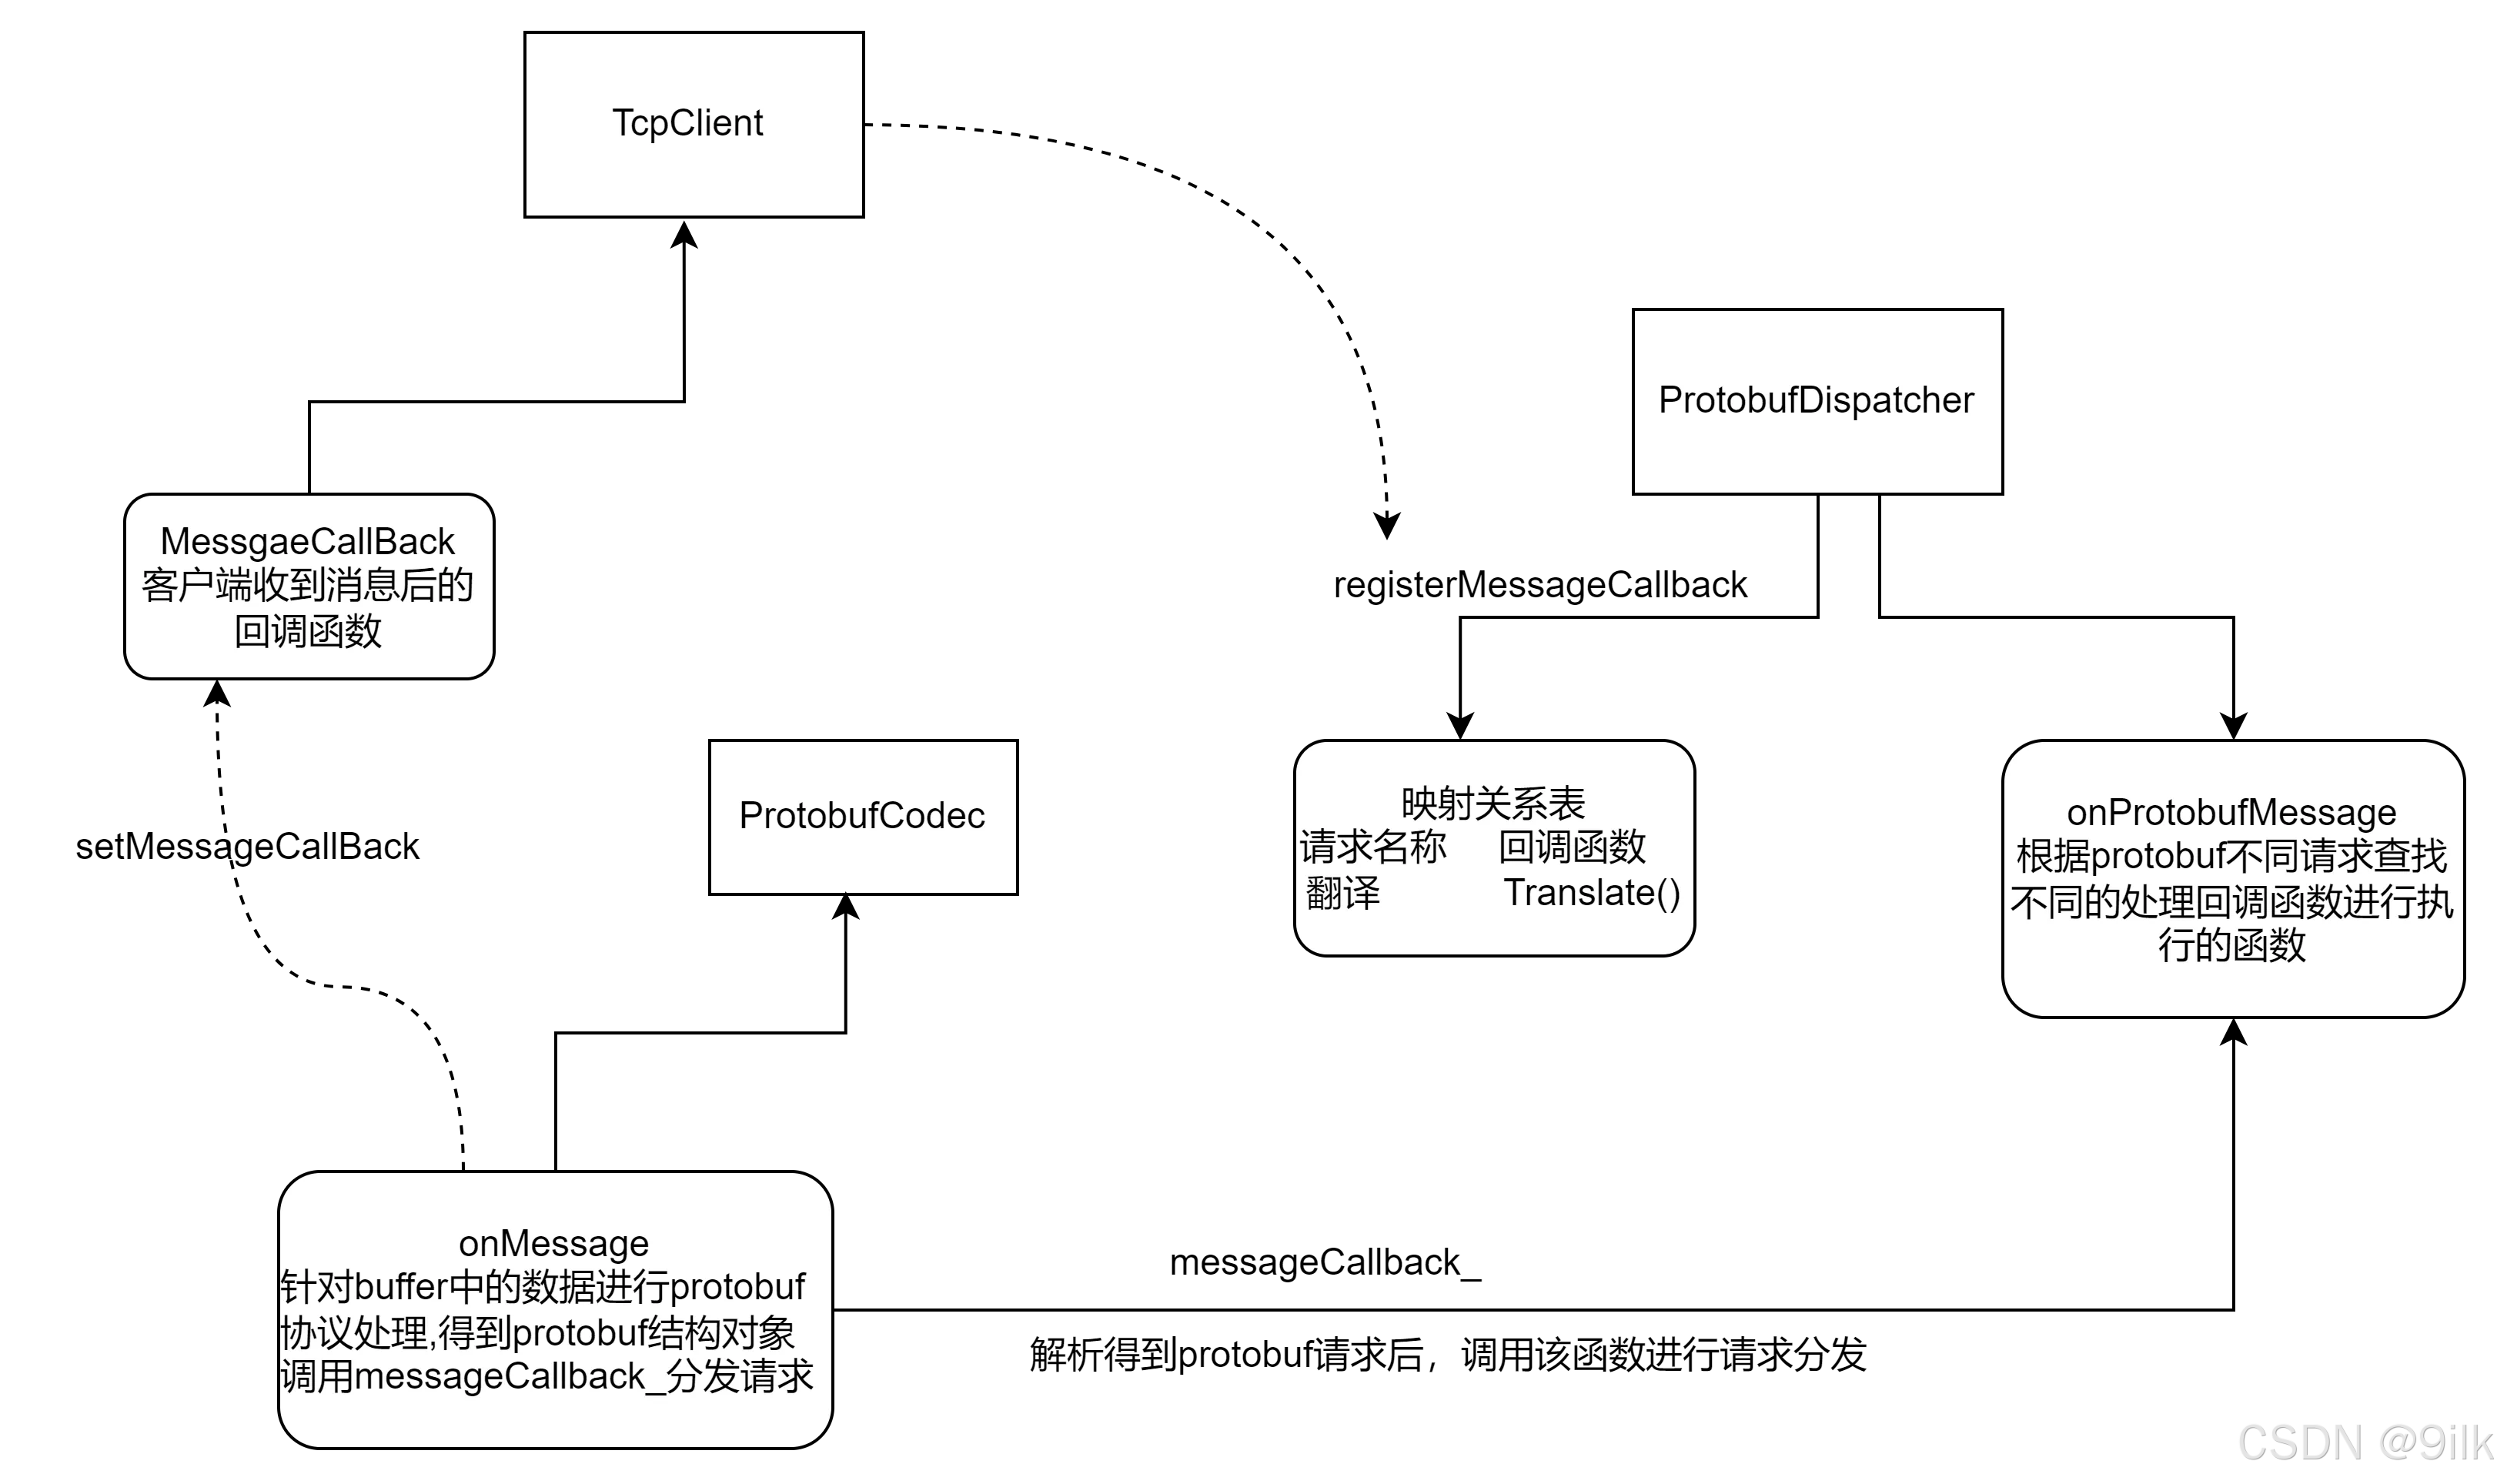
};主要原理如图:

- 应用层协议
能实现上述请求和函数之间的映射,需要我们能正确的取出请求,这离不开应用层协议。使用二进制的方式设计应用层协议。因为MQMessage的消息体是使用Protobuf进行序列化的,本身是按照二进制存储的,所以不太适合用json等文本格式来定义协议。
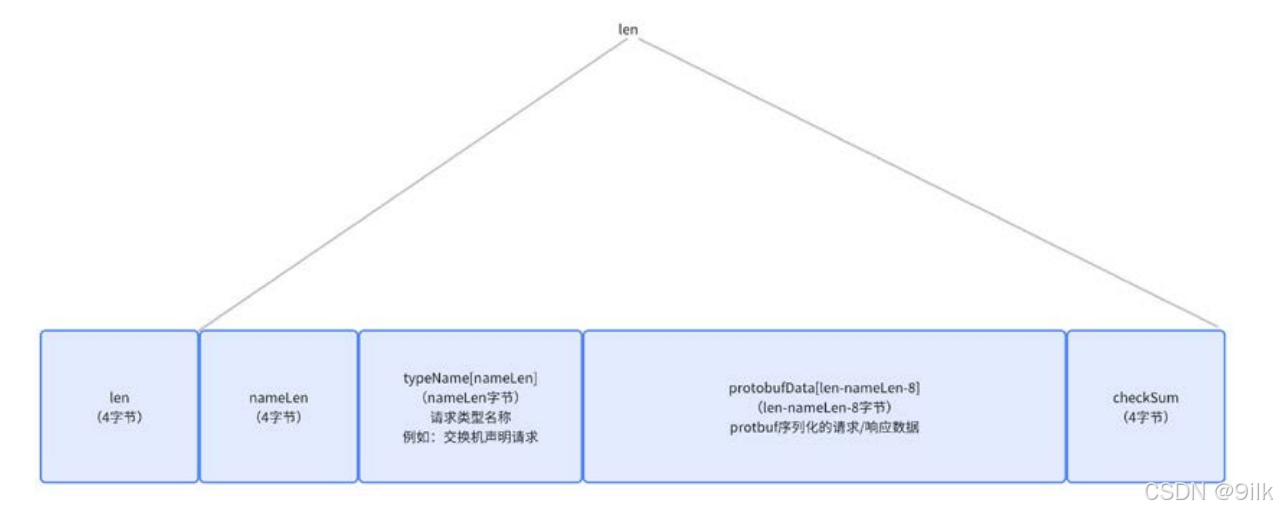
• len:4 个字节, 表示整个报文的长度
• nameLen: 4 个字节, 表示 typeName 数组的长度
• typeName:是个字节数组, 占 nameLen 个字节, 表示请求/响应报文的类型名, 作用是分发不同消息到对应的远端接口调用中
• protobufData:是个字节数组, 占 len - nameLen - 8 个字节, 表示请求/响应参数数据通过 protobuf 序列化之后的二进制
• checkSum:4 个字节, 表示整个消息的校验和, 作用是为了校验请求/响应报文 的完整性。
protobuf根据我们的proto文件生成的代码中 , 会生成对应多类型的类 , 比如TranslateRequest对应了一个TranslateRequest类 , 而不仅如此 ,protobuf比我们想象中做的事情更多,每个对应的类中,都包含有一个描述结构的指针 :
cpp
static const ::google::protobuf::Descriptor* descriptor这个描述结构非常重要,其内部可以获取到当前对应类类型名称,以及各项成员的名称,因此通过这些名称,加上协议中的typename字段,就可以实现完美的对应关系了。
- 通信流程图
Muduo库Protobuf通信demo
服务端:
cpp
#include"../include/muduo/proto/codec.h"
#include"../include/muduo/proto/dispatcher.h"
#include"../include/muduo/base/Logging.h"
#include"../include/muduo/base/Mutex.h"
#include"../include/muduo/net/EventLoop.h"
#include"../include/muduo/net/TcpServer.h"
#include"request.pb.h"
#include<unistd.h>
#include<stdlib.h>
#include<unordered_map>
#include<memory>
#include<iostream>
using namespace std;
using namespace muduo::net;
using namespace muduo;

class Server
{
public:
    typedef shared_ptr<zmq::TranslateRequest> TranslateRequestPtr;
    typedef shared_ptr<zmq::AddRequest> AddRequestPtr;

    Server(int port)
    :_server(&_baseloop,InetAddress("0.0.0.0",port),"proServer",muduo::net::TcpServer::kReusePort)
    ,_dispatcher(std::bind(&Server::onUnknownMessage,this,std::placeholders::_1,std::placeholders::_2,std::placeholders::_3)),
    _codec(std::bind(&ProtobufDispatcher::onProtobufMessage,&_dispatcher,std::placeholders::_1,std::placeholders::_2,std::placeholders::_3))
    {
          //为翻译和加法请求注册回调
          _dispatcher.registerMessageCallback<zmq::TranslateRequest>(std::bind(&Server::onTranslate,this,std::placeholders::_1,std::placeholders::_2,std::placeholders::_3));
          _dispatcher.registerMessageCallback<zmq::AddRequest>(std::bind(&Server::onAdd,this,std::placeholders::_1,std::placeholders::_2,std::placeholders::_3));
          //设置连接建立和收到消息的回调
          _server.setConnectionCallback(std::bind(&Server::onConnection,this,std::placeholders::_1));
          _server.setMessageCallback(std::bind(&ProtobufCodec::onMessage,&_codec,std::placeholders::_1,std::placeholders::_2,std::placeholders::_3));
    }
public:
    void Start()
    {
        _server.start();
        _baseloop.loop();//开启事件监控
    }


private:
    string translate(const string& word)
    {
         static unordered_map<string,string> words = {
            {"hello","你好"},
            {"world","世界"},
            {"beautiful","美丽的"},
            {"home","家"},
            {"person","人"}
         };
         auto it = words.find(word);
         if(it == words.end()) return "Unknown";
         return it->second;
    }
//   typedef std::function<void (const muduo::net::TcpConnectionPtr&,
//      CallBackT maps中回调的类型          const std::shared_ptr<T>& message,
//                                 muduo::Timestamp)> ProtobufMessageTCallback;
    void onTranslate(const TcpConnectionPtr& conn,const TranslateRequestPtr& message,Timestamp)
    {
        //1.提取message中的有效信息,即需要进行翻译的内容
        string req_msg = message->msg();
        //2.进行翻译得到结果
        string rsp_msg = translate(req_msg);
        //3.组织protobuf的响应
        zmq::TranslateResponse resp;
        resp.set_msg(rsp_msg);
        //4.发送响应(注意需要先进行序列化再发送)
        _codec.send(conn,resp);
    }

    void onAdd(const TcpConnectionPtr& conn,const AddRequestPtr& message,Timestamp)
    {
        int num1  = message->num1();
        int num2  = message->num2();
        int result = num1 + num2;
        zmq::AddResponse rsp;
        rsp.set_result(result);
        _codec.send(conn,rsp);
    }


    void onUnknownMessage(const TcpConnectionPtr& conn,const MessagePtr& message,Timestamp)
    {
         LOG_INFO << "onUnknownMessage:" << message->GetTypeName();
         //关闭连接
         conn->shutdown();
    }

    void onConnection(const TcpConnectionPtr& conn)
    {
         if(conn->connected())
            LOG_INFO << "连接获取成功:" << conn->peerAddress().toIpPort();
         else
            LOG_INFO << "连接建立失败" ;
    }

private:
   EventLoop _baseloop;
   TcpServer _server;  //服务器对象
   ProtobufDispatcher _dispatcher; //请求分发器 --- 要向其中注册请求处理函数
   ProtobufCodec _codec;//protobuf协议处理器 --- 针对收到的请求数据进行protobuf协议处理
};

int main()
{
    Server server(8085);
    server.Start();
    return 0;
}
客户端:
cpp
#include"../include/muduo/proto/codec.h"
#include"../include/muduo/proto/dispatcher.h"
#include"../include/muduo/base/Logging.h"
#include"../include/muduo/base/Mutex.h"
#include"../include/muduo/net/EventLoop.h"
#include"../include/muduo/net/EventLoopThread.h"
#include"../include/muduo/net/TcpClient.h"
#include "../../../mqcommon/logger.hpp"
#include"request.pb.h"
#include<unistd.h>
#include<stdlib.h>
#include<unordered_map>
#include<memory>
#include<iostream>
using namespace std;
using namespace muduo::net;
using namespace muduo;


class Client
{
public:
   typedef shared_ptr<zmq::TranslateResponse> TranslateResponsePtr;
   typedef shared_ptr<zmq::AddResponse> AddResponsePtr;

   Client(const string& server_ip,int port):
   _latch(1),
   _client(_loopthread.startLoop(),InetAddress(server_ip,port),"protobuf_client"),
   _dispatcher(std::bind(&Client::onUnknownMessage,this,std::placeholders::_1,std::placeholders::_2,std::placeholders::_3)),
   _codec(std::bind(&ProtobufDispatcher::onProtobufMessage,&_dispatcher,std::placeholders::_1,std::placeholders::_2,std::placeholders::_3))
   {
       //为请求设置回调
        _dispatcher.registerMessageCallback<zmq::TranslateResponse>(std::bind(&Client::onTranslate,this,std::placeholders::_1,std::placeholders::_2,std::placeholders::_3));
        _dispatcher.registerMessageCallback<zmq::AddResponse>(std::bind(&Client::onAdd,this,std::placeholders::_1,std::placeholders::_2,std::placeholders::_3));
       //设置连接建立和收到消息的回调
       _client.setConnectionCallback(std::bind(&Client::onConnection,this,std::placeholders::_1));
       _client.setMessageCallback(std::bind(&ProtobufCodec::onMessage,&_codec,std::placeholders::_1,std::placeholders::_2,std::placeholders::_3));
   }
public:
    //连接服务器 --- 需要阻塞等待连接建立成功之后返回
    void connect()
    {
        _client.connect(); //异步直接返回
        _latch.wait(); //阻塞等待直到连接建立成功
        DBG_LOG("连接%p",_conn.get());
    }

     //发送请求(1.先构造请求 2.序列化之后再发送)
     void Translate(const string& word)
     {
         //1.构造请求
         zmq::TranslateRequest req;
         req.set_msg(word);
         //2.发送
         send(&req);
     }

     void Add(int num1,int num2)
     {
        //1.构造请求
        zmq::AddRequest req;
        req.set_num1(num1);
        req.set_num2(num2);
        //2.发送
        send(&req);
     }

private:
    bool send(const google::protobuf::Message* message) //序列化之后再发送 前提是连接状态正常
    {
        if(_conn->connected()) //连接状态正常再发送否则返回false
        {
             _codec.send(_conn,*message);
             return true;
        }
        return false;
    }

    //收到请求回复
    void onTranslate(const TcpConnectionPtr& conn,const TranslateResponsePtr message,Timestamp)
    {
       cout << "翻译结果是:" << message->msg() << endl;
    }

    void onAdd(const TcpConnectionPtr& conn,const AddResponsePtr& message,Timestamp)
    {
        cout << "运算结果是:" << message->result() << endl;
    }

    void onUnknownMessage(const TcpConnectionPtr& conn,const MessagePtr& message,Timestamp)
    {
         LOG_INFO << "onUnknownMessage:" << message->GetTypeName();
         //关闭连接
         conn->shutdown();
    }

    void onConnection(const TcpConnectionPtr& conn)
    {
        if(conn->connected())
        {
            _latch.countDown();//唤醒主线程中的线程
            _conn = conn;
            DBG_LOG("连接建立成功:%p",_conn.get());
        }
        else //关闭连接
          _conn.reset();
    }

private:
   CountDownLatch _latch;  //实现同步的
   EventLoopThread _loopthread;//异步循环处理线程
   TcpConnectionPtr _conn;
   TcpClient _client;
   ProtobufDispatcher _dispatcher;//请求分发
   ProtobufCodec _codec;//协议处理
   //codec要用到dispatcher因此分发器要先声明
};

int main()
{
    Client client("127.0.0.1",8085);
    client.connect();
    client.Translate("home");
    client.Translate("hello");
    client.Add(11231,222);
    client.Add(1121,8022);
    sleep(8);
    return 0;
}
SQLite
什么是SQLite
SQLite是一个进程内的轻量级数据库 ,它实现了自给自足的的、无服务器的、零配置的、事务性 的SQL数据库引擎。它是一个零配置的数据库,这意味着与其他数据库不一样,我们不需要在系统中配置 。像其他数据库,SQLite引擎不是一个独立的进程 , 可以按应用程序需求进行静态或动态连接 , SQLite直接访问其存储文件。
为什么使用SQLite:
- 不需要一个单独的服务器进程或操作的系统(无服务器的)
SQLite不需要配置- 一个完整的
SQLite数据库是存储在一个单一的跨平台的磁盘文件 SQLite是非常小的,是轻量级的,完全配置时小于400KiB,省略可选功能配置时小于250KiBSQLite是自给自足的,这意味着不需要任何外部的依赖SQLite事务是完全兼容ACID的,允许从多个进程或线程安全访问SQLite支持SQL92(SQL2)标准的大多数查询语言的功能老SQLite使用ANSI-C编写的,并提供了简单和易于使用的APISQLite可在UNIX(Linux,MacOS-X,Android,iOS)和Windows(Win32,WinCE,WinRT)中运行
SQLite3 C/C++ API
- 查看当前数据库在编译阶段是否启动了线程安全
cpp
int sqlite3_threadsafe();- 返回值:0表示未启用线程安全;1表示启用线程安全。
sqlite3是有三种安全等级:a. 非线程安全模式;b. 线程安全模式(不同的连接在不同的线程/进程间是安全的,即一个句柄不能用于多线程间)c. 串行化模式(可以在不同的线程/进程间使用同一个句柄)
- 创建/打开数据库文件,并返回操作句柄
cpp
int sqlite3_open(const char *filename, sqlite3 **ppDb)- 返回值:成功返回
SQLITE_OK - 注意:这个接口比较简单只有两个参数,它会使用默认的打开标志,总是以读写的模式打开 ,如果文件不存在则创建,且使用默认的虚拟文件系统,如果想要更精细化的控制可以使用
sqlite3_open_v2
cpp
int sqlite3_open_v2(
  const char *filename,   /* 数据库文件名 */
  sqlite3 **ppDb,        /* 输出:数据库句柄 */
  int flags,             /* 打开标志 */
  const char *zVfs       /* VFS名称 */
);int sqlite3_open_v2(
const char *filename, /* 数据库文件名 */
sqlite3 **ppDb, /* 输出:数据库句柄 */
int flags, /* 打开标志 */
const char *zVfs /* VFS名称 */
);flag:打开标志。
SQLITE_OPEN_READWRITE -- 以可读可写方式打开数据库文件。
SQLITE_OPEN_CREATE -- 不存在数据库文件则创建。
SQLITE_OPEN_NOMUTEX-- 多线程模式,只要不同的线程使用不同的连接即可保证线程安全
SQLITE_OPEN_FULLMUTEX-- 串行化模式
- 返回值:
SQLITE_OK表示成功。
- 执行语句
cpp
int sqlite3_exec(
  sqlite3*,                                  /* An open database */
  const char *sql,                           /* SQL to be evaluated */
  int (*callback)(void*,int,char**,char**),  /* Callback function */
  void *,                                    /* 1st argument to callback */
  char **errmsg                              /* Error msg written here */
);- 参数一:数据库连接句柄,必须是一个有效句柄,不能为
NULL - 参数二:
SQL语句字符串,字符串中可以是单条或多条SQL语句,多条语句会按顺序执行。 - 参数三:回调函数指针
回调参数一:用户的自定义数据指针,是设置的在回调时传入的arg参数
回调参数二:一行中数据的列数
回调参数三:存储一行数据的字符指针数组(列值数组,字符串形式)
回调参数四:列名数组,即每一列的字段名称
- 参数四:传递给回调的用户数据,可以是任何类型的指针,会原样传递给回调函数,可以为NULL,用于在回调中访问上下文信息,比如可以外部传入然后保存查询结果。
- 参数五:错误信息输出。可以传入NULL表示不获取错误信息,但是注意如果想获取错误信息,最后一定要用
sqlite3_free()释放,不能使用free。 - 注意:如果使用 **sqlite3_exec()**执行查询语句,每找到一行结果就会调用一次回调!
- 回调函数返回值:成功处理返回
0,返回非0会触发abort退出程序。 SQLITE_OK表示成功。
- 销毁句柄
cpp
int sqlite3_close(sqlite3* db); 成功返回SQLITE_OK
int sqlite3_close_v2(sqlite3*);推荐使用--无论如何都会返回SQLITE_OK
获取错误信息:
cpp
const char *sqlite3_errmsg(sqlite3* db);封装SqlHelper
cpp
class SqLiteHelper
{
public:
    typedef int(*SqlCallBack)(void*,int,char**,char**);
    SqLiteHelper(const string& db_file)
    :_db_file(db_file),_handler(nullptr)
    {}
    /* 打开数据库
    SQLITE_OPEN_READWRITE:可读可写方式打开数据库文件
    SQLITE_OPEN_CREATE:不存在则新建
    SQLITE_OPEN_NOMUTEX:多线程模式
    */
    bool open()
    {
        int ret = sqlite3_open_v2(_db_file.c_str(),&_handler,SQLITE_OPEN_READWRITE |
                                SQLITE_OPEN_CREATE | SQLITE_OPEN_NOMUTEX,nullptr);
        if(ret != SQLITE_OK)
        {
            cout << "打开数据库文件失败" << endl;
            cout << sqlite3_errmsg(_handler) << endl;
            return false;
        }
        return true;
    }

    /* 关闭数据库 */
    void close()
    {
        if(_handler)
          sqlite3_close_v2(_handler);
    }

    /* 执行数据库操作 */
    bool exec(const string& sql,SqlCallBack cb,void* arg)
    {
        int ret = sqlite3_exec(_handler,sql.c_str(),cb,arg,nullptr);
        if(ret != SQLITE_OK)
        {
            cout << sql << "执行失败" << endl;
            cout << sqlite3_errmsg(_handler) << endl;
            return false;
        }
        return true;
    }

private:
    string _db_file; //一库一文件
    sqlite3* _handler; //操作句柄
};
gTest
什么是gTest
GTest是一个跨平台的C++单元测试框架,由google公司发布。gtest是为了在不同平台上为编写C++单元测试而生成的。它提供了丰富的断言、致命和非致命判断、参数化等等。它的使用分为:
- 简单的宏断言
- 事件机制(全局,单独)
宏与断言
TEST宏
cpp
TEST(test_case_name,test_name)
TSET_F(test_fixture,test_name)TEST:``test_casea_name表示总测试名称,test_name表示总测试内测试用例的名称。TEST主要用来创建一个简单测试,它定义了一个测试函数,在这个函数中可以使用任何C++代码并且使用框架提供的断言进行检查。TEST_F:主要用进单元测试,适用于多个测试场景如果需要相同的数据配置的情况,即相同的数据测不同的行为。
- 断言
GTest中的断言的宏可以分为两类 :
ASSERT_系列:如果当前点检测失败则退出当前函数。EXPECT_系列:如果当前点检测失败则继续往下执行。
cpp
//bool值检查
ASSERT_TRUE(参数)  期待结果是true
ASSERT_FALSE(参数)  期待结果是false

///数值型数据检查
ASSERT_EQ(参数1,参数2)  传入的是需要比较的两个数 equal
ASSERT_NE(参数1,参数2)  not equal 不等于才返回true
ASSERT_LT(参数1,参数2)  less than 小于才返回true
ASSERT_GT(参数1,参数2)  greater than 大于才返回true
ASSERT_LE(参数1,参数2)  less equal 小于等于才返回true
ASSERT_GE(参数1,参数2)  greater equal  大于等于才返回true
事件机制
GTest中的事件机制是指在测试前和测试后提供给用户自行添加操作的机制,而且该机制也可以让同一测试套件下的测试用例共享数据。GTest框架中事件的结构层次:
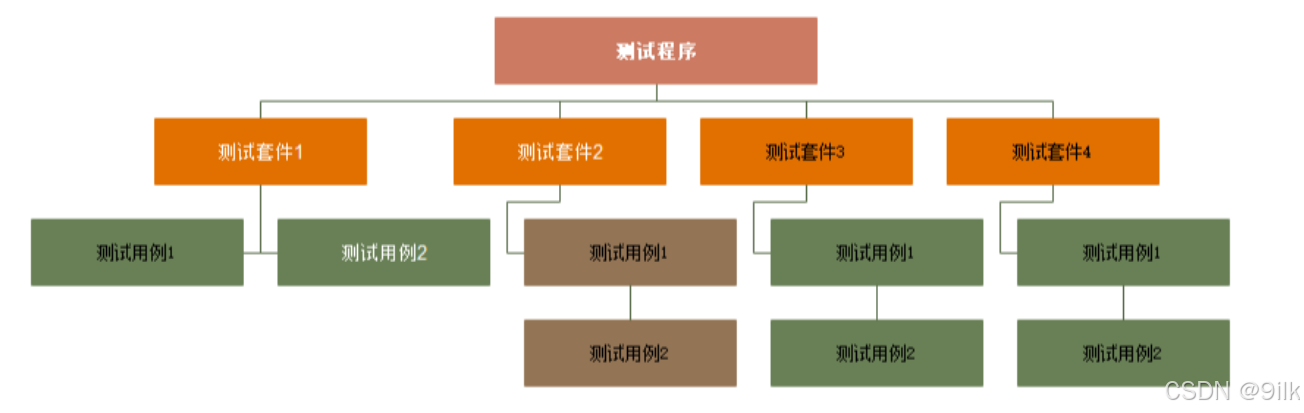
- 测试程序:一个测试程序只有一个
main函数,也可以说是一个可执行程序是一个测试程序。该级别的事件机制是在程序的开始和结束执行。 - 测试套件:代表一个测试用例的集合体,该级别的事件机制是在整体的测试案例开始和结束执行。
- 测试用例:该级别的事件机制是在每个测试用例开始和结束都执行。
事件机制的最大好处是能够为我们各个测试用来提前准备好测试环境,并在测试完毕后用于销毁环境,这样有个好处是如果我们有一段代码需要进行多种不同方法的测试,则可以通过测试机制在每个测试用例之前初始化测试环境和数据,并在测试完毕后清理测试造成的影响。
不同测试套件区别:
**全局测试套件:**在整体的测试中,只会初始化一次环境,在所有测试用例完毕后,才会清理环境(所有测试套件之前初始化,所有测试套件之后清理)。
**独立测试套件:**在每次的单元测试中,都会重新初始化测试环境,完毕后清现理环境。
- 全局测试套件:针对整个测试程序 。实现全局的事件机制,需要创建一个自己的类,然后继承
testing:Environment类,然后分别实现成员函数SetUp和TearDown, 同时在main函数内进行调用testing::AddGlobalTestEnvironment(new MyEnvironMent);函数添加全局的事件机制。
cpp
#include<iostream>
#include<vector>
#include<string>
#include<gtest/gtest.h>
using namespace std;

class MyEnvironment : public testing::Environment
{
public:
    virtual void SetUp() override
    {
       cout << "单元测试执行前的环境初始化!\n" ;
    }
    virtual void TearDown()
    {
       cout << "单元测试执行完毕后的环境清理\n" ;
    }
};

TEST(env1,test1)
{
    cout << "env1:test1" << endl;
}


TEST(env1,test2)
{
    cout << "env1:test2" << endl;
}

TEST(env2,test1)
{
    cout << "env2:test1" << endl;
}


TEST(env2,test2)
{
    cout << "env2:test2" << endl;
}

int main(int argc,char* argv[])
{
   testing::InitGoogleTest(&argc,argv);
   testing::AddGlobalTestEnvironment(new MyEnvironment);
   RUN_ALL_TESTS();
   return 0;
}
测试结果:
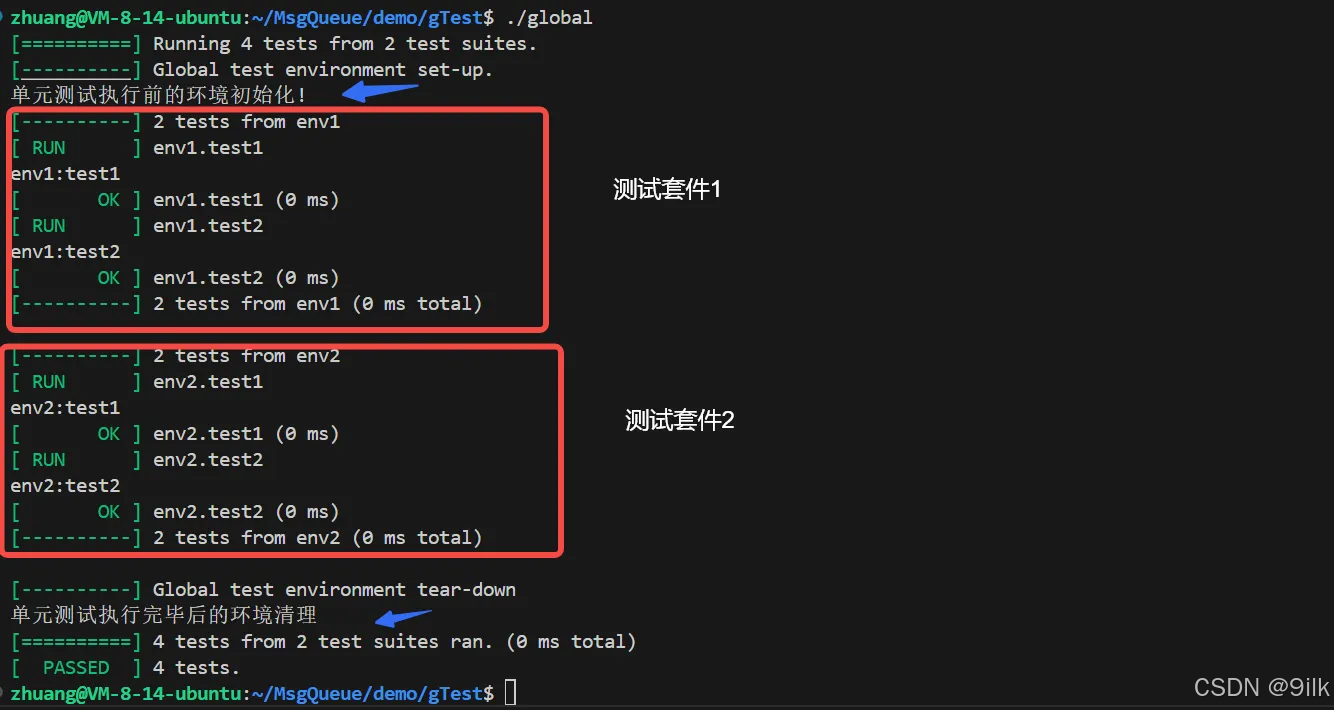
注意:全局测试套件有一个缺陷就是每一个单元测试之间是会相互影响的,比如下面的代码,此时想解决这个问题就涉及到独立测试套件
cpp
#include<iostream>
#include<vector>
#include<string>
#include<gtest/gtest.h>
#include<unordered_map>
using namespace std;

unordered_map<string,string> mymap;
class MyEnvironment : public testing::Environment
{
public:
    virtual void SetUp() override
    {
       cout << "单元测试执行前的环境初始化!\n" ;
    }
    virtual void TearDown()
    {
       cout << "单元测试执行完毕后的环境清理\n" ;
    }
};

TEST(map,test1)
{
    cout << "测试1:" << endl;
    mymap["hello"] = "你好";
}

TEST(map,test2)
{
    cout << "测试2:" << endl;
    EXPECT_EQ(mymap.size(),0);
}

// TEST(env1,test1)
// {
//     cout << "env1:test1" << endl;
// }


// TEST(env1,test2)
// {
//     cout << "env1:test2" << endl;
// }

// TEST(env2,test1)
// {
//     cout << "env2:test1" << endl;
// }


// TEST(env2,test2)
// {
//     cout << "env2:test2" << endl;
// }

int main(int argc,char* argv[])
{
   testing::InitGoogleTest(&argc,argv);
   testing::AddGlobalTestEnvironment(new MyEnvironment);
   RUN_ALL_TESTS();
   return 0;
}
此时测试1就会影响到测试2。
- 独立测试套件(
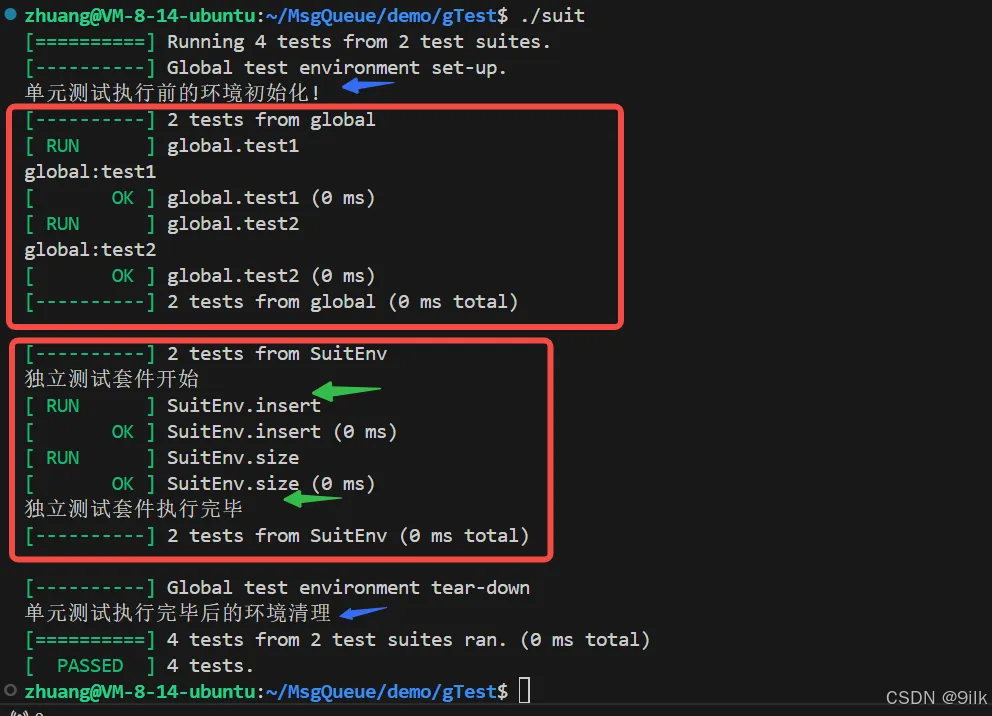
TestSuit事件):针对一个个测试套件 。测试套件的事件机制我们同样需要去创建一个类,继承自testing::Test,实现两个静态函数SetUpTestCase和TearDowenTestCase,测试套件的事件机制不需要像全局事件机制一样在 main****注册,而是需要将我们平时使用的 TEST****宏改为 TEST_F****宏。
SetUpTestCase():该函数是在测试套件第一个测试用例开始前运行。TearDownTestCase():该函数是在测试套件最后一个测试用例结束后执行。- 注意: TEST_F****的第一个参数是我们创建的类名!也就是当前测试套件的名称,这样在 TEST_F****宏的测试套件中就可以访问类中的成员了
- 每个
TEST_F在执行前都会重新构造一个新的SuitEnv对象,这样其内部的成员是每个测试用例的各私有一份了,互不影响。
cpp
#include<iostream>
#include<vector>
#include<string>
#include<unordered_map>
#include<gtest/gtest.h>
using namespace std;

class MyEnvironment : public testing::Environment
{
public:
    virtual void SetUp() override
    {
       cout << "单元测试执行前的环境初始化!\n" ;
    }
    virtual void TearDown()
    {
       cout << "单元测试执行完毕后的环境清理\n" ;
    }
};

class SuitEnv : public testing::Test
{
public:
     static void SetUpTestCase()
     {
        cout << "独立测试套件开始" << endl;
     }

     static void TearDownTestCase()
     {
        cout << "独立测试套件执行完毕" << endl;
     }

public:
     unordered_map<string,string> _mymap;
};

TEST(global,test1)
{
  cout << "global:test1" << endl;
}

TEST(global,test2)
{
  cout << "global:test2" << endl;
}

TEST_F(SuitEnv,insert)
{
    _mymap["hello"] = "你好";
    _mymap["world"] = "事件";
}

TEST_F(SuitEnv,size)
{
    EXPECT_EQ(_mymap.size(),0);
}


int main(int argc,char* argv[])
{
   testing::InitGoogleTest(&argc,argv);
   testing::AddGlobalTestEnvironment(new MyEnvironment);
   RUN_ALL_TESTS();
   return  0;
}
测试结果:
假设我有一个全局的测试数据容器,在 SetUpTestCase()**中插入公共测试数据 ,但如果我想在每个测试用例进行前准备独立的测试数据** 该如何做到?此时涉及到TestCase事件。
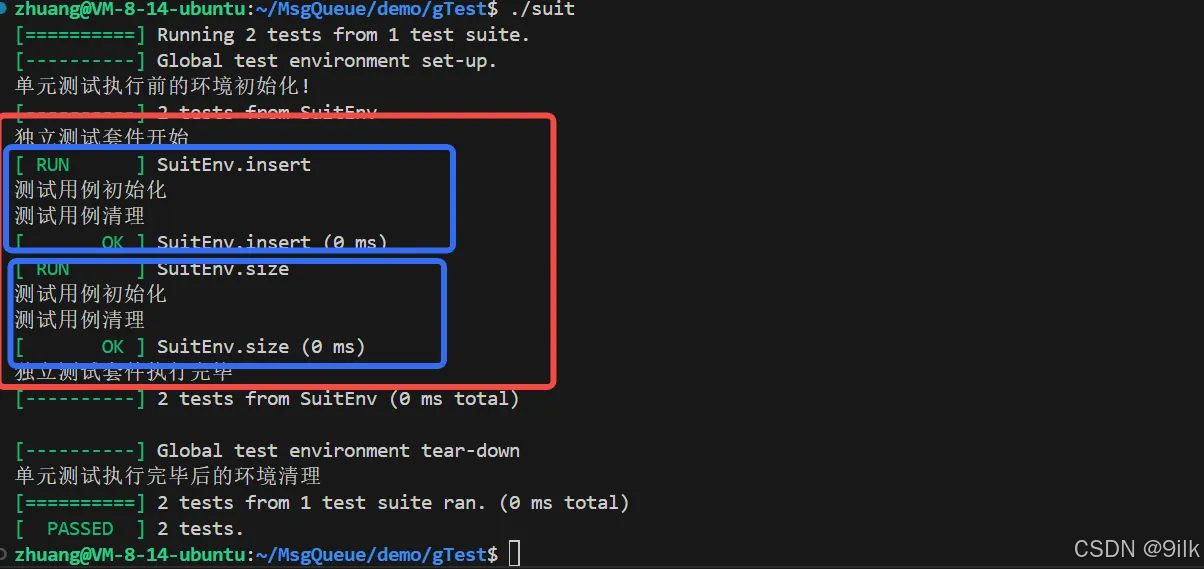
TestCase事件:针对一个个测试用例 。测试用例的事件机制的创建和测试套件的基本一样,不同地方在于测试用例实现的两个函数分别是是Setup和TearDown,这两个函数也不是静态函数 。这两个函数是在测试套件内每一个测试用例执行前和执行后分别调用的
SetUp函数是在一个测试用例的开始前执行。TearDown()函数是在一个测试用例的结束后执行。
cpp
#include<iostream>
#include<vector>
#include<string>
#include<unordered_map>
#include<gtest/gtest.h>
using namespace std;

class MyEnvironment : public testing::Environment
{
public:
    virtual void SetUp() override
    {
       cout << "单元测试执行前的环境初始化!\n" ;
    }
    virtual void TearDown()
    {
       cout << "单元测试执行完毕后的环境清理\n" ;
    }
};

class SuitEnv : public testing::Test
{
public:
    //假设我有一个全局的测试数据容器,在这里插入公共的测试数据
     static void SetUpTestCase()
     {
        cout << "独立测试套件开始" << endl;
     }

     static void TearDownTestCase()
     {
        cout << "独立测试套件执行完毕" << endl;
     }
     //在这里插入每个单元测试所需的独立的测试数据
     void SetUp()override
     {
         cout << "测试用例初始化" << endl;
         _mymap.insert(make_pair("hello","你好"));
         _mymap.insert(make_pair("bye","再见"));
     }
     //在这里清理每个单元测试自己插入的数据
     void TearDown() override
     {
        _mymap.clear();
        cout << "测试用例清理" << endl;
    }
public:
     unordered_map<string,string> _mymap;
};


TEST_F(SuitEnv,insert)
{
    // _mymap["hello"] = "你好";
    // _mymap["world"] = "事件";
    _mymap["see you"] = "再见";
    ASSERT_EQ(_mymap.size(),3);
}

TEST_F(SuitEnv,size)
{
    // EXPECT_EQ(_mymap.size(),0);
    EXPECT_EQ(_mymap.size(),2);
}


int main(int argc,char* argv[])
{
   testing::InitGoogleTest(&argc,argv);
   testing::AddGlobalTestEnvironment(new MyEnvironment);
   RUN_ALL_TESTS();
   return  0;
}
测试结果:
可能会有疑惑:能不能把初始化动作挪到 SetUpTestCase()/TearDownTestCase()?独立测试套件不是各自测试用例成员变量私有一份吗?
其实是不行的,一旦你把初始化动作挪到
SetUpTestCase()/TearDownTestCase(),就必须把成员变量改成static,否则编译都过不了(静态函数里访问非静态变量)。改成 static 后,数据就不再属于"每个测试用例对象",而属于"整个测试套件"
C++11异步操作实现线程池
std::future:是C++11标准库中的一个模板类,它表示一个异步操作的结果 。当我们在多线程编程中使用异步任务时,std::future可以帮助我们在需要的时候获取任务的执行结果。std::future的一个重要特性是能够阻塞当前线程,直到异步操作完成(同步关系),从而确保我们在获取结果时不会遇到未完成的操作。
应用场景 :
- 异步任务 : 当我们需要在后台执行一些耗时操作时,如网络请求或计算密集型任务等,
std::future可以用来表示这些异步任务的结果。通过将任务与主线程分离,我们可以实现任务的并行处理,从而提高程序的执行效率。 - 并发控制 : 在多线程编程中,我们可能需要等待某些任务完成成后才能继续执行其他操作。通过使用std::future,我们可以实现线程之间的同步,确保任务完成后再获取结果并继续执行后续操作。
- 结果获取 :
std::future提供了一种安全的方式来获取异步任务的结果。我们可以使用std::future::get()函数来获取任务的结果,此函数会阻塞当前线程 ,直到异步操作完成 。这样,在调用get()函数时,我们可以确保已经获取到了了所需的结果。
future可以通过以下三种方式构造 :

async关联异步任务
std::async是一种将任务与std::future关联的简单方法。它创建并运行一个异步任务 ,并返回一个与该任务结果关联的 std::future对象。默认情况下,std::async是否启动一个新线程,或者在等待future时,任务是否同步运行都取决于你给的参数。这个参数为std::launch类型
std::launch::deferred表明该函数会被延迟调用 , 直到在futurre上调用get()或者wait()才会开始执行任务std::launch:async表明函数会在自己创建的线程上运行std::launch::deferred | std::launch::async内部通过系统等条件自动选择策略- 注意 :
std::future与async关联是有保证一个关联关系的 , 调用get()获取异步任务结果的时候 , 如果异步任务没执行完主线程会阻塞,async策略和deferred策略都是如此
promise
std::promise提供了一种设置值的方式 ,它可以在设置之后通过相关联的std::future对象进行读取。换种说法就是之前说过std::future可以读取一个异步函数的返回值了,但是要等待就绪,而std::promise就提供一种方式手动让 std::future****就绪
cpp
#include<thread>
#include<iostream>
#include<thread>
#include<future>
using namespace std;

void Add(int num1,int num2,std::promise<int>&prom)
{
    std::this_thread::sleep_for(std::chrono::seconds(3));
    prom.set_value(num1+num2);
    cout << "set_value" << endl;
    std::this_thread::sleep_for(std::chrono::seconds(5));
    cout << "sleep over..." << endl;
    return;
}

int main()
{
   std::promise<int> prom;
   std::future<int> fu = prom.get_future();
   std::thread thr(Add,11,22,std::ref(prom));
   int res = fu.get();
   cout << "sum:" << res << endl;
   thr.join();
    return 0;
}
packaged_task
std::packaged_task就是将任务和std::future绑定在一起的模板,是一种对任务的封装 。我们可以通过std:packaged_task对象获取任务相关联的std::future对象,通过调用get_future()方法获得。std::packaged_task的模板参数是是函数签名。可以把std::future和std::async看成是分开的,而std::packaaged_task则是一个整体。
cpp
#include<thread>
#include<iostream>
#include<thread>
#include<future>
using namespace std;

//pakcaged_task是一个模板类,实例化的对象可以对一个函数进行二次封装
//pakcaged_task可以通过get_future获取一个future对象,
//来获取封装的这个函数的异步执行结果
int Add(int num1,int num2)
{
   std::this_thread::sleep_for(std::chrono::seconds(3));
   return num1 + num2;
}

int main()
{
    std::packaged_task<int(int,int)> task(Add);
    std::future<int> fu = task.get_future();
    std::async(std::launch::async,task,11,22);
    int sum = fu.get();
    cout << sum << endl;
    return 0;
}-
需要注意的是,task虽然重载了
()运算符可以当作一个可调用对象来调用执行任务,但是它其实并不是一个函数 ,所以导致它作为线程的入口函数时,语法上看没有问题,但是实际编译的时候会报错 ;而packaged_task禁止了拷贝构造 ,且因为每个packaged_task所封装的函数签名都有可能不同 ,因此也无法当作参数一样传递 ,传引用也不可取 ,毕竟任务在多线程下执行存在局部变量声明周期的问题,因此不能传引用。 -
简单方法就是在堆上new packaged_task,用智能指针管理它的生命周期,然后封装函数传地址进行解引用调用了,而类型不同的问题,在使用的时候可以使用 auto****类型推导来解决问题。
-
还有一种解决方法是使用std::move将任务移动到现场中异步执行,比如std::thread worker(std::move(task),5);
cpp
#include<thread>
#include<iostream>
#include<thread>
#include<future>
#include<memory>
using namespace std;

//pakcaged_task是一个模板类,实例化的对象可以对一个函数进行二次封装
//pakcaged_task可以通过get_future获取一个future对象,
//来获取封装的这个函数的异步执行结果
int Add(int num1,int num2)
{
   std::this_thread::sleep_for(std::chrono::seconds(3));
   cout << " Add .." << endl;
   return num1 + num2;
}


int main()
{
    auto ptask = std::make_shared<std::packaged_task<int(int,int)>>(Add);
    std::future<int> fu = ptask->get_future();
    std::thread thr([ptask](){
       (*ptask)(11,22);
   });
   cout << "get before..." << endl;
   int sum = fu.get();
   cout << "sum: " << sum << endl;
   thr.join();
   return 0;
}
C++11线程池
基于线程池执行任务的时候 , 入口函数内部执行逻辑是固定的,因此选择std::packaged_task加上std::future的组合实现 。
线程池工作思想:
- 用户传入要执行的函数,以及需要处理的数据(函数的参数),由线程池中的工作线程来执行函数完成任务。
管理的成员:
- 任务池:用vector维护的一个函数池
- 互斥锁&条件变量:实现同步互斥
- 一定数量的工作线程:用于不断从任务池取出任务执行任务
- 结束运行标志:以便于控制线程池的结束。
管理的操作:
- 入队任务:入队一个函数和参数
- 停止运行:终止线程池
cpp
#include<iostream>
#include<vector>
#include<thread>
#include<future>
#include<atomic>
#include<memory>
#include<mutex>
#include<functional>
#include<condition_variable>
using namespace std;

class ThreadPool
{
public:
     using Functor = std::function<void(void)>;
     ThreadPool(int thread_count = 1)
     :_stop(false)
     {
         for(int  i = 0 ; i < thread_count ; i++)
           _threads.emplace_back(&ThreadPool::ThreadEntry,this);
     }
     ~ThreadPool()
     {
        stop();
     }

     //push传入的首先是一个用户要执行的函数,再是不定参,表示要处理的数据也就是要
     //传入函数的参数,push函数内部会将这个传入函数封装成一个异步任务(packaged_task)
     //返回future对象方便用户获取异步执行结果
     template<typename F,typename... Args>
     auto push(F&& func,Args&& ... args) ->std::future<decltype(func(args...))>
     {
         //1.将传入的函数封装成packaged_task任务
         using return_type = decltype(func(args...));
         auto task = std::bind(std::forward<F>(func),std::forward<Args>(args)...);
         auto ptask = std::make_shared<std::packaged_task<return_type()>>(task);
         std::future<return_type> fu = ptask->get_future();
         //2.构造一个lambda匿名函数,函数内部执行packaged_task任务
         {
            unique_lock<std::mutex> lock(_mtx);
            //3.将构造出的匿名函数对象抛入任务池中
            _tasks.push_back([ptask](){
                (*ptask)();
            });
            //唤醒工作线程执行任务
            _cv.notify_all();
         }
         return fu;
     }
private:
     void stop() //停止运行
     {
        _stop = true;
        //唤醒线程
        _cv.notify_all();
        //回收线程
        for(int i = 0 ; i < _threads.size() ; i++)
            _threads[i].join();
     }
     void ThreadEntry() //内部不断从任务池中取出任务并执行
     {
        while(!_stop)
        {
            vector<Functor> tmp_tasks;
            {
                unique_lock<std::mutex> lock(_mtx);
                //任务池有数据/stop设置为true
                _cv.wait(lock,[this](){return _stop || !_tasks.empty();});
                tmp_tasks.swap(_tasks);
            }
            //执行任务
            for(auto& task : tmp_tasks)
            {
                task();
            }
       }
     }

private:
     std::mutex _mtx;
     std::condition_variable _cv;
     ///  注意互斥锁和条件变量要在线程之前初始化好,否则线程先运行但用到他们就会崩溃
     std::atomic<bool> _stop;
     vector<thread> _threads;
     vector<Functor> _tasks;
};


int Add(int num1,int num2)
{
    cout <<  "线程" <<std::this_thread::get_id() <<endl;
    return num1+num2;
}

int main()
{
    cout << "主线程:" << std::this_thread::get_id() <<endl;
    ThreadPool pool(2);
    for(int i = 0 ; i < 100; i++)
    {
        std::future<int> fu = pool.push(Add,11,i);
        cout << fu.get() << endl;
    }
    return 0;
}