大家好,我是 方圆 。最近学习了一下 Nacos 源码,顺便为 Nacos 开源项目提交了 10+ 个 PR,成为了 Nacos 项目的 Contributor。Nacos 是一个非常活跃且包容的社区,大家可以在 Github-Nacos 关注并认领 ISSUE。本篇文章基于 Nacos 的 3.1.0 版本,准备详细解释一下 Nacos 对配置管理的核心流程,方便之后了解和学习 Nacos 的同学。
本文将主要分成两大部分:
- 当配置发生变更时,Nacos Server 服务端是如何保证配置数据的一致性的,在这个小节内我们会讨论两种情况,分别关于 Nacos Server 的单机部署和集群部署
- 当配置发生变更时,Nacos Client 客户端是如何保证及时更新配置,并保证配置内容是最新的
在每个部分我都会在讲解源码前将具体的逻辑使用图示整理出来,方便想理解原理而不想看源码的同学,同时也能让想看源码的同学快速入手。如果大家对 Nacos 感兴趣,可以将源码 clone 下来,Debug 调试整个流程,这样学习和理解的效果更佳。
Nacos Server 服务端
当我们在 Nacos 控制台变更配置时,不论是单机部署还是集群部署都会经过以下逻辑,请求会由 ConsoleConfigController 来承接,调用其中的 publishConfig 发布配置的方法,如下所示:
java
@NacosApi
@RestController
@RequestMapping("/v3/console/cs/config")
@ExtractorManager.Extractor(httpExtractor = ConfigDefaultHttpParamExtractor.class)
public class ConsoleConfigController {

    private final ConfigProxy configProxy;

    public ConsoleConfigController(ConfigProxy configProxy) {
        this.configProxy = configProxy;
    }

    @PostMapping()
    @Secured(action = ActionTypes.WRITE, signType = SignType.CONFIG, apiType = ApiType.CONSOLE_API)
    public Result<Boolean> publishConfig(HttpServletRequest request, ConfigFormV3 configForm) throws NacosException {
        // check required
        configForm.validateWithContent();
        final boolean namespaceTransferred = NamespaceUtil.isNeedTransferNamespace(configForm.getNamespaceId());
        configForm.setNamespaceId(NamespaceUtil.processNamespaceParameter(configForm.getNamespaceId()));

        // check param
        ParamUtils.checkParam(configForm.getDataId(), configForm.getGroup(), "datumId", configForm.getContent());
        ParamUtils.checkParamV2(configForm.getTag());

        if (StringUtils.isBlank(configForm.getSrcUser())) {
            configForm.setSrcUser(RequestUtil.getSrcUserName(request));
        }
        if (!ConfigType.isValidType(configForm.getType())) {
            configForm.setType(ConfigType.getDefaultType().getType());
        }

        ConfigRequestInfo configRequestInfo = new ConfigRequestInfo();
        configRequestInfo.setSrcIp(RequestUtil.getRemoteIp(request));
        configRequestInfo.setRequestIpApp(RequestUtil.getAppName(request));
        configRequestInfo.setBetaIps(request.getHeader("betaIps"));
        configRequestInfo.setCasMd5(request.getHeader("casMd5"));
        configRequestInfo.setNamespaceTransferred(namespaceTransferred);

        return Result.success(configProxy.publishConfig(configForm, configRequestInfo));
    }
}
Controller 中并没有值得特别关注的逻辑,包含必要的参数校验和执行 ConfigProxy#publishConfig 方法,后者从命名来看,包含了 Proxy 字样,暗示它是一个代理类,具体的实现逻辑如下所示:
java
@Service
public class ConfigProxy {

    private final ConfigHandler configHandler;

    @Autowired
    public ConfigProxy(ConfigHandler configHandler) {
        this.configHandler = configHandler;
    }

    /**
     * Add or update configuration.
     */
    public Boolean publishConfig(ConfigForm configForm, ConfigRequestInfo configRequestInfo) throws NacosException {
        return configHandler.publishConfig(configForm, configRequestInfo);
    }
    // ...
}
可以发现它使用了 静态代理模式 ,并没有做发布配置的逻辑,而是注入了 ConfigHandler 类,并调用其 publishConfig 方法,那么它代理了什么呢?如下图所示:
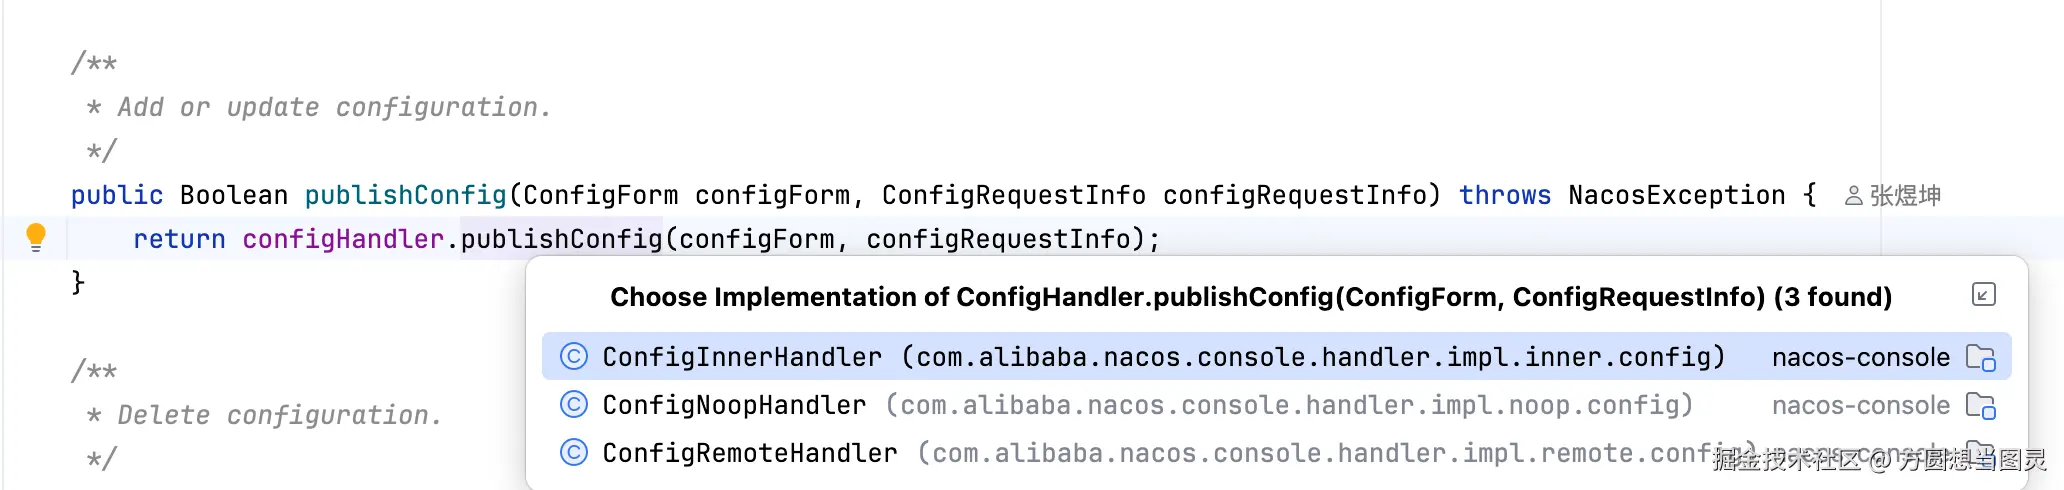
ConfigHandler 是一个接口,它有多个实现类,当在 Nacos 中采用不同的配置时,会注入不同的实现类,所以这部分代理操作实际上根据不同的配置来选择不同的策略。在这里我们仅关注 ConfigInnerHandler 实现策略,它会执行到 ConfigOperationService#publishConfig 发布配置的核心逻辑。这个方法的逻辑虽然很长,但是其中值得关注的内容我已经用序号标注了,分别为 "写入数据库的逻辑" 和 "发布 ConfigDataChangeEvent 配置变更事件":
java
public class ConfigOperationService {

    private ConfigInfoPersistService configInfoPersistService;

    private ConfigInfoGrayPersistService configInfoGrayPersistService;

    private ConfigMigrateService configMigrateService;

    private static final Logger LOGGER = LoggerFactory.getLogger(ConfigOperationService.class);

    public ConfigOperationService(ConfigInfoPersistService configInfoPersistService,
                                  ConfigInfoGrayPersistService configInfoGrayPersistService,
                                  ConfigMigrateService configMigrateService) {
        this.configInfoPersistService = configInfoPersistService;
        this.configInfoGrayPersistService = configInfoGrayPersistService;
        this.configMigrateService = configMigrateService;
    }

    public Boolean publishConfig(ConfigForm configForm, ConfigRequestInfo configRequestInfo, String encryptedDataKey) throws NacosException {
        Map<String, Object> configAdvanceInfo = getConfigAdvanceInfo(configForm);
        ParamUtils.checkParam(configAdvanceInfo);

        configForm.setEncryptedDataKey(encryptedDataKey);
        ConfigInfo configInfo = new ConfigInfo(configForm.getDataId(), configForm.getGroup(),
                configForm.getNamespaceId(), configForm.getAppName(), configForm.getContent());
        // set old md5
        if (StringUtils.isNotBlank(configRequestInfo.getCasMd5())) {
            configInfo.setMd5(configRequestInfo.getCasMd5());
        }
        configInfo.setType(configForm.getType());
        configInfo.setEncryptedDataKey(encryptedDataKey);

        // 1. 写入数据库的逻辑:区分了 md5 是否为空
        if (StringUtils.isNotBlank(configRequestInfo.getCasMd5())) {
            // 非空会执行 CAS 比较并交换的操作
            configOperateResult = configInfoPersistService.insertOrUpdateCas(configRequestInfo.getSrcIp(),
                    configForm.getSrcUser(), configInfo, configAdvanceInfo);
            if (!configOperateResult.isSuccess()) {
                LOGGER.warn(
                        "[cas-publish-config-fail] srcIp = {}, dataId= {}, casMd5 = {}, msg = server md5 may have changed.",
                        configRequestInfo.getSrcIp(), configForm.getDataId(), configRequestInfo.getCasMd5());
                throw new NacosApiException(HttpStatus.INTERNAL_SERVER_ERROR.value(), ErrorCode.RESOURCE_CONFLICT,
                        "Cas publish fail, server md5 may have changed.");
            }
        } else {
            if (configRequestInfo.getUpdateForExist()) {
                configOperateResult = configInfoPersistService.insertOrUpdate(configRequestInfo.getSrcIp(),
                        configForm.getSrcUser(), configInfo, configAdvanceInfo);
            } else {
                try {
                    configOperateResult = configInfoPersistService.addConfigInfo(configRequestInfo.getSrcIp(),
                            configForm.getSrcUser(), configInfo, configAdvanceInfo);
                } catch (DataIntegrityViolationException ive) {
                    configOperateResult = new ConfigOperateResult(false);
                }
            }
        }

        if (!configOperateResult.isSuccess()) {
            LOGGER.warn("[publish-config-failed] config already exists. dataId: {}, group: {}, namespaceId: {}",
                    configForm.getDataId(), configForm.getGroup(), configForm.getNamespaceId());
            throw new ConfigAlreadyExistsException(
                    String.format("config already exist, dataId: %s, group: %s, namespaceId: %s",
                            configForm.getDataId(), configForm.getGroup(), configForm.getNamespaceId()));
        }

        // 2. 发布 ConfigDataChangeEvent 配置变更事件
        ConfigChangePublisher.notifyConfigChange(
                new ConfigDataChangeEvent(configForm.getDataId(), configForm.getGroup(), configForm.getNamespaceId(),
                        configOperateResult.getLastModified()));

        return true;
    }
}
接下来我们根据 "单机部署,采用 MySQL 数据库" 和 "集群部署,采用内嵌 Derby 数据库" 来讨论具体的逻辑。
单机部署,采用 MySQL 数据库
在单机部署并采用 MySQL 数据库时,Nacos 服务端在配置变更后执行逻辑的流程图如下所示:
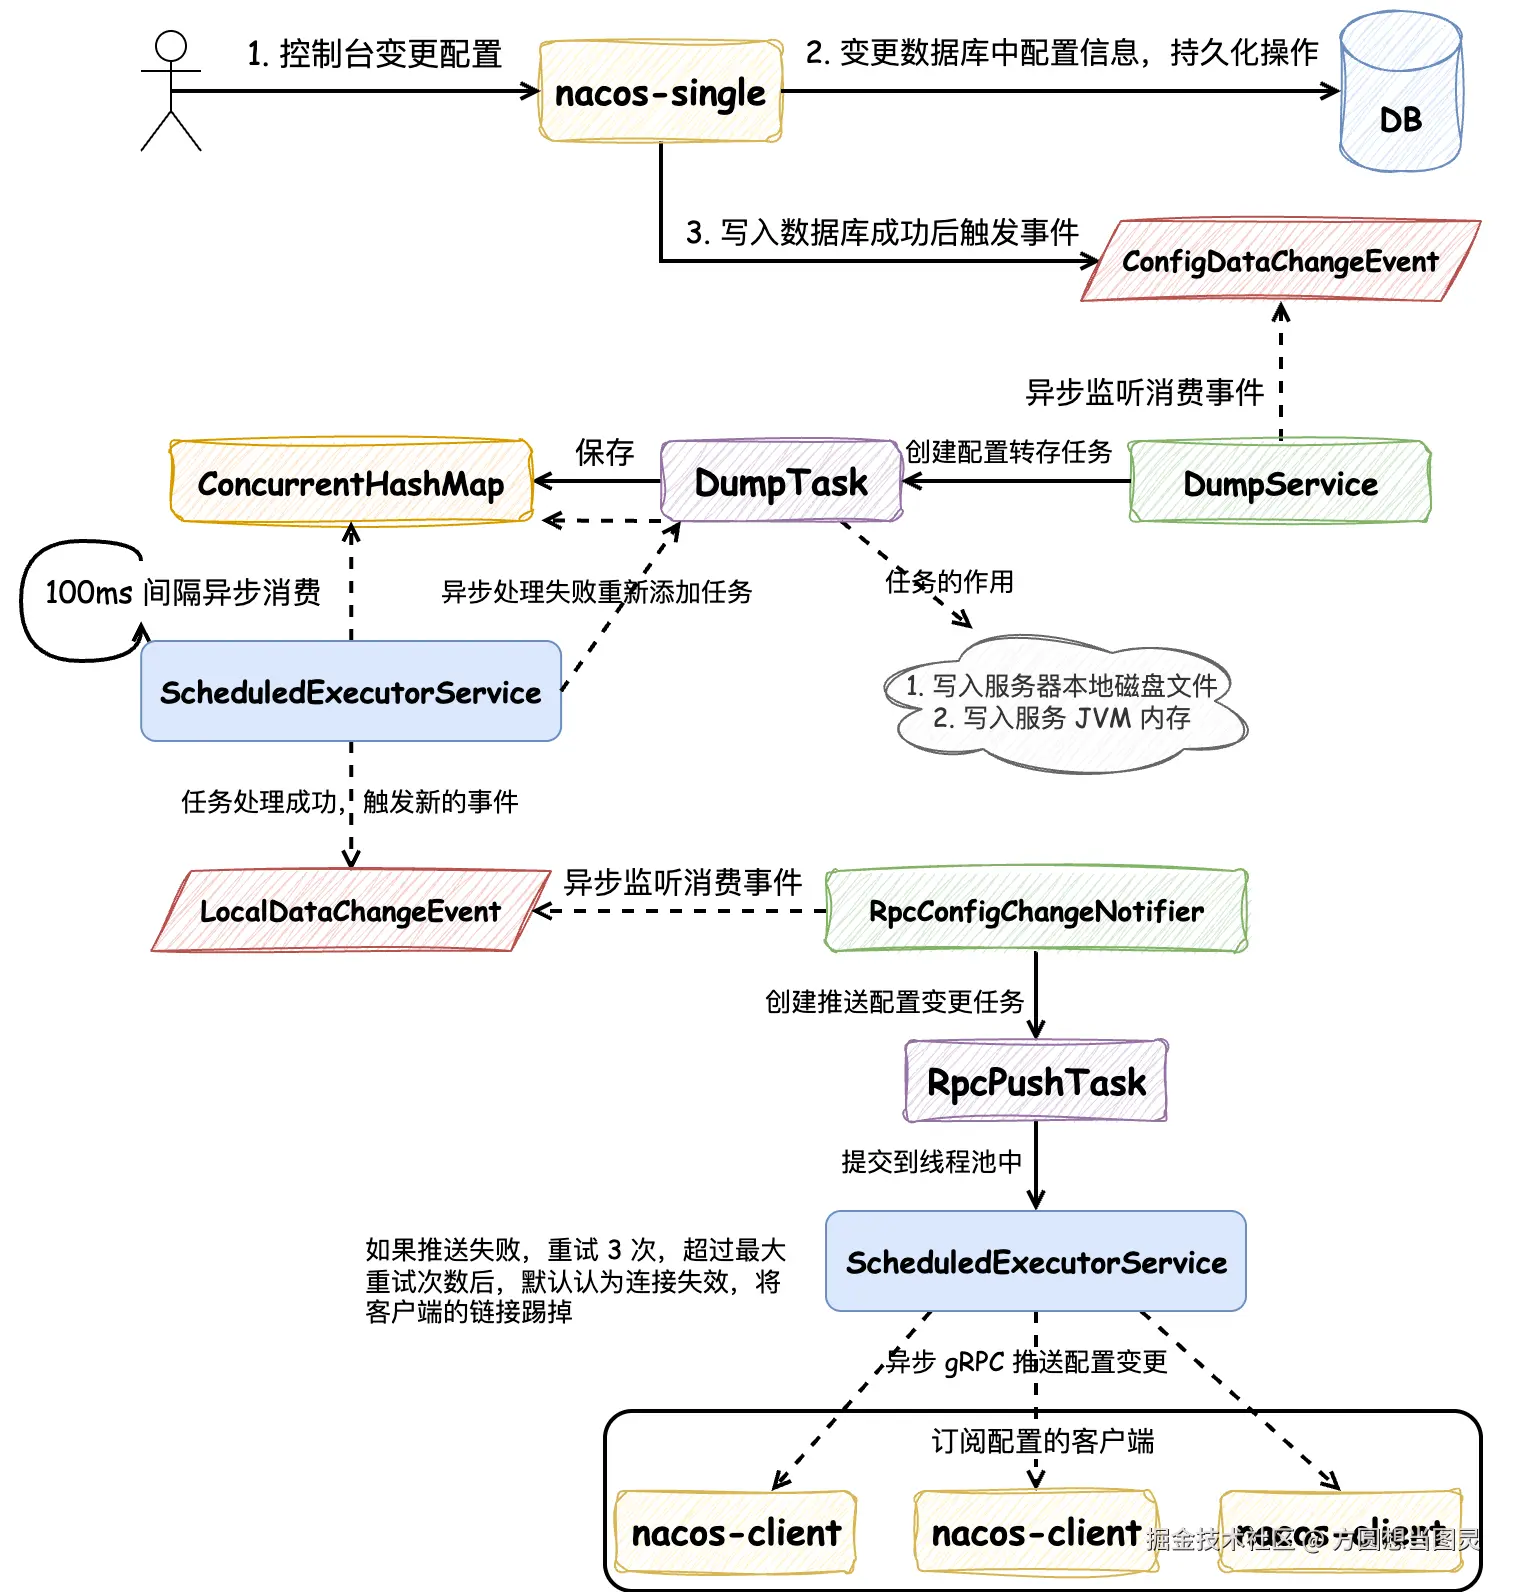
在控制台变更配置后,会先写入 MySQL 数据库,写入成功继续执行,如果写入失败则抛出异常,控制台会提示配置写入失败,就不再执行后续的逻辑了。
在写入 MySQL 数据库成功后,会触发 ConfigDataChangeEvent 配置发生变更的事件,由 DumpService 监听并消费。消费这个事件时,会创建 DumpTask 任务,这个任务的作用有两个:将配置信息 写入本地磁盘文件 和 写入服务 JVM 内存 ,这样 即使在 MySQL 数据库发生宕机时,客户端也能正常读取配置信息 ,写入本地磁盘相当于做了数据库的容灾。DumpTask 被创建后会被保存在一个 ConcurrentHashMap 中,由一个 ScheduledExecutorService 定时 100ms 执行的线程池定期处理任务,如果任务在执行时失败,都会被重新添加到 ConcurrentHashMap 中,无限次重试处理。
DumpTask 处理完成后,会再次发出 LocalDataChangeEvent 本地缓存变更事件,这个事件由 RpcConfigChangeNotifier 监听并消费。RpcConfigChangeNotifier 处理这个事件时会创建 RpcPushTask 为客户端推送配置变更的任务,这个任务同样会被添加到另一个 ScheduledExecutorService 中去执行,但是异步推送变更的任务不会无限重试,最多只会重试 3 次。在这里大家可能会有疑问:如果重试超过 3 次没有成功,那么 Nacos 客户端该如何获取到最新的配置变更呢?其实 Nacos 客户端不只是通过 Nacos 服务端推送获取配置变更,而且还能通过主动从 Nacos 服务端拉取获取配置变更,这个逻辑在后续的内容中解释。
以上便是 Nacos 服务端在单机部署并采用 MySQL 数据库时主要的逻辑流程,接下来我们深入分析具体的源码。
在 "写入数据库的逻辑" 中,Nacos 区分了 MD5 是否为空的两种情况,MD5 在 Nacos 表示的是什么含义呢?Nacos 中的每项配置都会根据其 配置的内容 计算出 MD5 值,并将其存储在数据库中,因为 MD5 加密后输出长度固定,所以可以根据配置的 MD5 值快速判断配置内容是否发生变更。
MD5(Message Digest Algorithm 5)是一种广泛使用的密码散列函数,可以产生出一个128位(16字节)的散列值(hash value),用来确保信息传输完整一致。不过现在更推荐使用 SHA-256 或更新的散列算法来替代 MD5。
Nacos 在发布配置时,如果 MD5 值不为空则调用 ConfigInfoPersistService#insertOrUpdateCas 方法,这个方法使用了 CAS 操作,在执行 UPDATE SQL 时会先判断数据库中配置的 MD5 值是否与请求中的 MD5 值相同,如果相同则执行更新操作,否则不执行更新操作,这样能够避免多人在控制台同时修改配置造成的并发写入问题。
如果 MD5 值为空的话,那么直接调用 ConfigInfoPersistService#insertOrUpdate 方法,直接落库。
在数据库操作完成后,配置变更已经在保存在数据库了 ,之后会发布 ConfigDataChangeEvent 配置变更事件,这是一个异步处理的操作,在单机部署模式下,需要关注 DumpService 对这个事件的消费,它会执行 DumpService#handleConfigDataChange 方法,将配置变更事件转换为配置转储任务 DumpTask:
java
/**
 * 监听并处理 ConfigDataChangeEvent 事件
 * 将 ConfigDataChangeEvent 转换为 DumpRequest,交给 DumpProcessor 处理
 * 作用:将配置变更事件转换为配置转储任务,更新本地缓存
 */
public abstract class DumpService {

    private TaskManager dumpTaskMgr;

    void handleConfigDataChange(Event event) {
        // Generate ConfigDataChangeEvent concurrently
        if (event instanceof ConfigDataChangeEvent) {
            ConfigDataChangeEvent evt = (ConfigDataChangeEvent) event;
            DumpRequest dumpRequest = DumpRequest.create(evt.dataId, evt.group, evt.tenant, evt.lastModifiedTs,
                    NetUtils.localIp());
            dumpRequest.setGrayName(evt.grayName);
            // 执行 dump 转储操作,由 DumpProcessor 处理
            DumpService.this.dump(dumpRequest);
        }
    }

    public void dump(DumpRequest dumpRequest) {
        dumpFormal(dumpRequest.getDataId(), dumpRequest.getGroup(), dumpRequest.getTenant(),
                    dumpRequest.getLastModifiedTs(), dumpRequest.getSourceIp());
    }

    private void dumpFormal(String dataId, String group, String tenant, long lastModified, String handleIp) {
        // 生成 Task 的 Key 值,格式为:dataId+group+tenant
        // eg: default_config+DEFAULT_GROUP+public 其中 default_config 为配置的名称,DEFAULT_GROUP 为分组ID,public 为命名空间ID
        String groupKey = GroupKey2.getKey(dataId, group, tenant);
        String taskKey = groupKey;
        // 生成转储任务 DumpTask
        dumpTaskMgr.addTask(taskKey, new DumpTask(groupKey, null, lastModified, handleIp));
        DUMP_LOG.info("[dump] add formal task. groupKey={}", groupKey);

    }
}
调用 TaskManager#addTask 方法添加配置转储任务 DumpTask,最终会执行以下逻辑:
java
public class NacosDelayTaskExecuteEngine extends AbstractNacosTaskExecuteEngine<AbstractDelayTask> {

    protected final ReentrantLock lock = new ReentrantLock();

    protected final ConcurrentHashMap<Object, AbstractDelayTask> tasks;

    @Override
    public void addTask(Object key, AbstractDelayTask newTask) {
        lock.lock();
        try {
            AbstractDelayTask existTask = tasks.get(key);
            if (null != existTask) {
                newTask.merge(existTask);
            }
            tasks.put(key, newTask);
        } finally {
            lock.unlock();
        }
    }
}
在这个方法中有两点需要注意:
ReentrantLock lock变量:在向ConcurrentHashMap<Object, AbstractDelayTask> tasks添加任务时执行了加锁操作ConcurrentHashMap<Object, AbstractDelayTask> tasks变量:该变量是并发安全的,但是仍然在操作前执行了加锁操作
因为 AbstractDelayTask#merge 方法并不是并发安全的,多线程操作时可能发生未知的情况,所以便需要注意以上两点。现在,转储任务 DumpTask 已经被添加到 ConcurrentHashMap<Object, AbstractDelayTask> tasks 中了,那么这个任务是如何被执行的呢?
我们先看一下 NacosDelayTaskExecuteEngine 的构造方法,在构造方法中创建了 ScheduledExecutorService processingExecutor 变量用于定期(100ms)执行 ProcessRunnable 任务,ProcessRunnable 是静态内部类,调用 processTasks 方法来处理任务:
java
public class NacosDelayTaskExecuteEngine extends AbstractNacosTaskExecuteEngine<AbstractDelayTask> {

    private final ScheduledExecutorService processingExecutor;

    protected final ConcurrentHashMap<Object, AbstractDelayTask> tasks;

    protected final ReentrantLock lock = new ReentrantLock();

    // processInterval 处理间隔默认值为 100ms
    public NacosDelayTaskExecuteEngine(String name, int initCapacity, Logger logger, long processInterval) {
        super(logger);
        tasks = new ConcurrentHashMap<>(initCapacity);
        processingExecutor = ExecutorFactory.newSingleScheduledExecutorService(new NameThreadFactory(name));
        processingExecutor.scheduleWithFixedDelay(new ProcessRunnable(), processInterval, processInterval, TimeUnit.MILLISECONDS);
    }

    private class ProcessRunnable implements Runnable {

        @Override
        public void run() {
            try {
                processTasks();
            } catch (Throwable e) {
                getEngineLog().error(e.toString(), e);
            }
        }
    }

    protected void processTasks() {
        Collection<Object> keys = getAllTaskKeys();
        for (Object taskKey : keys) {
            // 逐个删除而不是在上面统一删除,删除的时候而且加了锁,这样即使被多个线程拿到多个 Key,也能通过加锁避免执行重复的任务
            AbstractDelayTask task = removeTask(taskKey);
            if (null == task) {
                continue;
            }
            // 此处使用了策略模式,可以针对不同的 key 来定义不同的处理策略,这里默认使用了 DumpProcessor
            NacosTaskProcessor processor = getProcessor(taskKey);
            try {
                // 处理失败或者抛出异常都会重试
                if (!processor.process(task)) {
                    retryFailedTask(taskKey, task);
                }
            } catch (Throwable e) {
                getEngineLog().error("Nacos task execute error ", e);
                retryFailedTask(taskKey, task);
            }
        }
    }

    private void retryFailedTask(Object key, AbstractDelayTask task) {
        task.setLastProcessTime(System.currentTimeMillis());
        // 重新调用上文中的 NacosDelayTaskExecuteEngine#addTask 方法
        addTask(key, task);
    }

    @Override
    public Collection<Object> getAllTaskKeys() {
        Collection<Object> keys = new HashSet<>();
        lock.lock();
        try {
            // 将 DumpService 执行时添加的 Key 在这里获取,但没有删除操作,而是在后续的步骤中遍历一个加锁删除一个
            keys.addAll(tasks.keySet());
        } finally {
            lock.unlock();
        }
        return keys;
    }

    @Override
    public AbstractDelayTask removeTask(Object key) {
        lock.lock();
        try {
            AbstractDelayTask task = tasks.get(key);
            if (null != task && task.shouldProcess()) {
                return tasks.remove(key);
            } else {
                return null;
            }
        } finally {
            lock.unlock();
        }
    }
}在上述逻辑中,getAllTaskKeys 和 removeTask 方法中仍然使用了 ReentrantLock 加锁,但是在这两个方法中都是读操作,而且是定时线程池定期执行,发生并发问题的概率非常小,实际上我认为可以采用不加锁的方案,或者可以考虑将 ConcurrentHashMap 换成 ConcurrentLinkedDeque 队列,任务在队列尾部添加,每次线程在执行任务时直接将队列头部的任务取出,执行失败或者不满足执行条件再将它放回到队列中 。不过,这种异步执行任务的多线程设计采用的是 "生产者消费者"模式,这种设计方法还是非常值得学习的。
接下来我们看一下 DumpProcessor#process 方法中,到底执行了什么逻辑,如下所示,大部分都是参数赋值,重点是 从数据库中将配置查询出来 后,执行了 DumpConfigHandler#configDump 方法:
java
public class DumpProcessor implements NacosTaskProcessor {

    final ConfigInfoPersistService configInfoPersistService;

    @Override
    public boolean process(NacosTask task) {
        DumpTask dumpTask = (DumpTask) task;
        String[] pair = GroupKey2.parseKey(dumpTask.getGroupKey());
        String dataId = pair[0];
        String group = pair[1];
        String tenant = pair[2];
        long lastModifiedOut = dumpTask.getLastModified();
        String handleIp = dumpTask.getHandleIp();
        String grayName = dumpTask.getGrayName();

        ConfigDumpEvent.ConfigDumpEventBuilder build = ConfigDumpEvent.builder().namespaceId(tenant).dataId(dataId)
                .group(group).grayName(grayName).handleIp(handleIp);
        String type = "formal";

        // 从数据库读取配置信息,构建 ConfigDumpEvent 事件
        ConfigInfoWrapper cf = configInfoPersistService.findConfigInfo(dataId, group, tenant);
        build.remove(Objects.isNull(cf));
        build.content(Objects.isNull(cf) ? null : cf.getContent());
        build.type(Objects.isNull(cf) ? null : cf.getType());
        build.encryptedDataKey(Objects.isNull(cf) ? null : cf.getEncryptedDataKey());
        build.lastModifiedTs(Objects.isNull(cf) ? lastModifiedOut : cf.getLastModified());
        return DumpConfigHandler.configDump(build.build());
    }
}
为了方便理解,省略一系列不重要的源码,最终会执行到 ConfigCacheService#dumpWithMd5 方法,在这个方法中修改缓存前会添加写锁 tryWriteLock,添加写锁成功后才能继续处理,后续处理逻辑中有两步比较重要:"写入到本地文件" 和 "更新 JVM 本地缓存对象":
java
public class ConfigCacheService {

    public static boolean dumpWithMd5(String dataId, String group, String tenant, String content, String md5,
                                      long lastModifiedTs, String type, String encryptedDataKey) {
        String groupKey = GroupKey2.getKey(dataId, group, tenant);
        CacheItem ci = makeSure(groupKey, encryptedDataKey);
        ci.setType(type);
        // 对某个缓存的操作添加了写锁
        final int lockResult = tryWriteLock(groupKey);

        if (lockResult < 0) {
            DUMP_LOG.warn("[dump-error] write lock failed. {}", groupKey);
            return false;
        }

        try {
            // 校验修改时间
            boolean lastModifiedOutDated = lastModifiedTs < ConfigCacheService.getLastModifiedTs(groupKey);
            if (lastModifiedOutDated) {
                DUMP_LOG.warn("[dump-ignore] timestamp is outdated,groupKey={}", groupKey);
                return true;
            }

            boolean newLastModified = lastModifiedTs > ConfigCacheService.getLastModifiedTs(groupKey);

            if (md5 == null) {
                md5 = MD5Utils.md5Hex(content, PERSIST_ENCODE);
            }

            // 1. 写入到本地文件中
            String localContentMd5 = ConfigCacheService.getContentMd5(groupKey);
            boolean md5Changed = !md5.equals(localContentMd5);
            if (md5Changed) {
                DUMP_LOG.info("[dump] md5 changed, save to disk cache ,groupKey={}, newMd5={},oldMd5={}", groupKey, md5, localContentMd5);
                ConfigDiskServiceFactory.getInstance().saveToDisk(dataId, group, tenant, content);
            } else {
                DUMP_LOG.warn("[dump-ignore] ignore to save to disk cache. md5 consistent,groupKey={}, md5={}", groupKey, md5);
            }

            // 2. 更新 JVM 本地缓存对象 CacheItem
            if (md5Changed) {
                DUMP_LOG.info(
                        "[dump] md5 changed, update md5 and timestamp in jvm cache ,groupKey={}, newMd5={},oldMd5={},lastModifiedTs={}",
                        groupKey, md5, localContentMd5, lastModifiedTs);
                updateMd5(groupKey, md5, content, lastModifiedTs, encryptedDataKey);
            } else if (newLastModified) {
                DUMP_LOG.info(
                        "[dump] md5 consistent ,timestamp changed, update timestamp only in jvm cache ,groupKey={},lastModifiedTs={}",
                        groupKey, lastModifiedTs);
                updateTimeStamp(groupKey, lastModifiedTs, encryptedDataKey);
            } else {
                DUMP_LOG.warn(
                        "[dump-ignore] ignore to save to jvm cache. md5 consistent and no new timestamp changed.groupKey={}",
                        groupKey);
            }

            return true;
        } catch (IOException ioe) {
            DUMP_LOG.error("[dump-exception] save disk error. " + groupKey + ", " + ioe);
            if (ioe.getMessage() != null) {
                String errMsg = ioe.getMessage();
                if (errMsg.contains(NO_SPACE_CN) || errMsg.contains(NO_SPACE_EN) || errMsg.contains(DISK_QUOTA_CN)
                        || errMsg.contains(DISK_QUOTA_EN)) {
                    // Protect from disk full.
                    FATAL_LOG.error("Local Disk Full,Exit", ioe);
                    EnvUtil.systemExit();
                }
            }
            return false;
        } finally {
            releaseWriteLock(groupKey);
        }
    }

}
我们先来看一下 "写入到本地文件" 的逻辑,它最终会执行到 ConfigDiskService#saveToDisk 方法:
java
public class ConfigRawDiskService implements ConfigDiskService {

    // 将配置信息写入磁盘文件
    public void saveToDisk(String dataId, String group, String tenant, String content) throws IOException {
        File targetFile = targetFile(dataId, group, tenant);
        FileUtils.writeStringToFile(targetFile, content, ENCODE_UTF8);
    }
}在这个方法中,它会将配置信息写入磁盘文件中,也就是说:Nacos 配置变更后,会异步将配置信息写入磁盘文件。这个文件何时被读取我们先不关注,我们先来考虑一下,如果配置变更在写入数据库成功后,服务立即宕机,也就是说磁盘文件还没有来得及写入,那么磁盘文件的数据该如何和数据库数据保持一致呢?
Nacos 借助 @PostConstruct 注解,在服务启动时,会执行 DumpService#dumpOperate 方法,这个方法的源码就不在这里贴了,它最终会执行到 DumpAllProcessor#process 方法,分页查询出所有的配置信息,逐一异步写入本地磁盘文件中,这样就保证了磁盘文件和数据库数据的一致性。
接下来我们再来看一下 "更新 JVM 本地缓存对象" 的逻辑,这段逻辑并不复杂,首先它需要保证在 JVM 本地缓存中创建了 CacheItem 本地缓存对象,然后创建 ConfigCache 对象记录必要的信息,注意在这段逻辑中,并没有为配置的内容 content 定义字段保存,这些逻辑完成后,发送了 LocalDataChangeEvent 事件:
发送
LocalDataChangeEvent事件的逻辑比较隐蔽,就像分布式事务中协同式 Saga 的设计模式(参见《微服务设计模式》),一个事件处理完成再去处理下一个事件,这使得代码的复杂度增加。
java
public class ConfigCacheService {

    /**
     * groupKey -> cacheItem.
     */
    static final ConcurrentHashMap<String, CacheItem> CACHE = new ConcurrentHashMap<>();

    public static void updateMd5(String groupKey, String md5, String content, long lastModifiedTs, String encryptedDataKey) {
        CacheItem cache = makeSure(groupKey, encryptedDataKey);
        ConfigCache configCache = cache.getConfigCache();
        if (configCache.getMd5() == null || !configCache.getMd5().equals(md5)) {
            configCache.setMd5(md5);
            configCache.setLastModifiedTs(lastModifiedTs);
            configCache.setEncryptedDataKey(encryptedDataKey);
            ConfigCachePostProcessorDelegate.getInstance().postProcess(configCache, content);
            // 更新本地 JVM 缓存后,发布 LocalDataChangeEvent 事件
            NotifyCenter.publishEvent(new LocalDataChangeEvent(groupKey));
        }
    }

    static CacheItem makeSure(final String groupKey, final String encryptedDataKey) {
        CacheItem item = CACHE.get(groupKey);
        if (null != item) {
            return item;
        }
        CacheItem tmp = new CacheItem(groupKey, encryptedDataKey);
        item = CACHE.putIfAbsent(groupKey, tmp);
        return (null == item) ? tmp : item;
    }
}
现在,配置变更已经成功写入数据库、磁盘文件和 JVM 内存,保证了在 Nacos Server 端配置数据的一致性。接下来便是由 Nacos Server 推送给 Nacos Client 的流程,这个逻辑便是在 LocalDataChangeEvent 事件的处理逻辑中完成的,RpcConfigChangeNotifier#onEvent 方法会监听 LocalDataChangeEvent 事件,并执行 configDataChanged 方法,这个方法的逻辑比较复杂,我们分段来看:
java
public class RpcConfigChangeNotifier extends Subscriber<LocalDataChangeEvent> {

    @Autowired
    ConfigChangeListenContext configChangeListenContext;

    @Autowired
    private ConnectionManager connectionManager;

    @Override
    public void onEvent(LocalDataChangeEvent event) {
        String groupKey = event.groupKey;

        String[] strings = GroupKey.parseKey(groupKey);
        String dataId = strings[0];
        String group = strings[1];
        String tenant = strings.length > 2 ? strings[2] : "";

        // 监听LocalDataChangeEvent事件,通过 gRPC 双向流推送配置变更通知到客户端
        configDataChanged(groupKey, dataId, group, tenant);
    }

    public void configDataChanged(String groupKey, String dataId, String group, String tenant) {
        // 获取所有监听该配置的客户端连接
        Set<String> listeners = configChangeListenContext.getListeners(groupKey);
        if (CollectionUtils.isEmpty(listeners)) {
            return;
        }

        int notifyClientCount = 0;
        for (final String client : listeners) {
            Connection connection = connectionManager.getConnection(client);
            if (connection == null) {
                continue;
            }
            boolean ifNamespaceTransfer = configChangeListenContext.getConfigListenState(client, groupKey).isNamespaceTransfer();
            if (ifNamespaceTransfer) {
                tenant = null;
            }
            ConnectionMeta metaInfo = connection.getMetaInfo();
            String clientIp = metaInfo.getClientIp();

            // 构建 ConfigChangeNotifyRequest 请求,包含变更的配置信息
            ConfigChangeNotifyRequest notifyRequest = ConfigChangeNotifyRequest.build(dataId, group, tenant);

            // 创建 RpcPushTask 异步推送任务,支持重试机制
            RpcPushTask rpcPushRetryTask = new RpcPushTask(notifyRequest,
                    ConfigCommonConfig.getInstance().getMaxPushRetryTimes(), client, clientIp, metaInfo.getAppName());
            // 异步推送通知
            push(rpcPushRetryTask, connectionManager);
            notifyClientCount++;
        }
    }

    // 处理推送任务重试逻辑,支持延迟重试和连接管理
    private static void push(RpcPushTask retryTask, ConnectionManager connectionManager) {
        ConfigChangeNotifyRequest notifyRequest = retryTask.getNotifyRequest();
        if (retryTask.isOverTimes()) {
            // 重试次数超限,注销客户端连接
            connectionManager.unregister(retryTask.getConnectionId());
        } else if (connectionManager.getConnection(retryTask.getConnectionId()) != null) {
            // 客户端连接存在,延迟重试推送(首次延迟0s,第二次2s,第三次4s),
            // 本质上执行的是 ScheduledExecutorService#schedule(Runnable command, long delay, TimeUnit unit); 方法
            ConfigExecutor.scheduleClientConfigNotifier(retryTask, retryTask.getTryTimes() * 2, TimeUnit.SECONDS);
        } else {
            // 客户端已离线,忽略推送任务
        }
    }
}
在 configDataChanged 方法中,会先获取当前连接到 Nacos Server 的 所有订阅某个配置 groupKey 的 Nacos Client 连接,创建 RpcPushTask 异步推送任务,并调用 push 方法异步推送配置变更通知,注意这里执行配置推送任务时,使用的是 ScheduledExecutorService#schedule 它会根据重试次数指定延迟推送时间,首次推送是不延迟的,如果超过重试次数,表示客户端无法响应,则注销客户端连接,接下来我们看一下 RpcPushTask 的逻辑,它是 RpcConfigChangeNotifier 的内部类:
java
public class RpcConfigChangeNotifier extends Subscriber<LocalDataChangeEvent> {

    class RpcPushTask implements Runnable {

        ConfigChangeNotifyRequest notifyRequest;

        int maxRetryTimes;

        int tryTimes = 0;

        String connectionId;

        String clientIp;

        String appName;

        public RpcPushTask(ConfigChangeNotifyRequest notifyRequest, int maxRetryTimes, String connectionId,
                           String clientIp, String appName) {
            this.notifyRequest = notifyRequest;
            this.maxRetryTimes = maxRetryTimes;
            this.connectionId = connectionId;
            this.clientIp = clientIp;
            this.appName = appName;
        }

        public boolean isOverTimes() {
            return maxRetryTimes > 0 && this.tryTimes >= maxRetryTimes;
        }

        // 异步执行配置推送任务
        @Override
        public void run() {
            // 累加推送配置的重试次数
            tryTimes++;
            TpsCheckRequest tpsCheckRequest = new TpsCheckRequest();

            tpsCheckRequest.setPointName(POINT_CONFIG_PUSH);
            if (!tpsControlManager.check(tpsCheckRequest).isSuccess()) {
                // TPS限流检查失败,延迟重试推送任务
                push(this, connectionManager);
            } else {
                // TPS检查通过,通过 gRPC 双向流推送配置变更通知到客户端
                rpcPushService.pushWithCallback(connectionId, notifyRequest,
                        new RpcPushCallback(this, tpsControlManager, connectionManager),
                        ConfigExecutor.getClientConfigNotifierServiceExecutor());
            }
        }
    }
}
RpcPushTask#run 方法中会先检查限流配置,如果限流检查通过会通过 gRPC 推送配置变更到 Nacos Client,借助的是 gRPC 的双向流接口,并根据结果调用 RpcPushCallback 中的回调方法,RpcPushCallback 是 RpcConfigChangeNotifier 的内部类。如果配置推送成功会记录推送成功统计,否则调用 RpcConfigChangeNotifier#push 方法重试推送配置,如果超过最大重试次数(3次)则注销掉客户端:
java
public class RpcConfigChangeNotifier extends Subscriber<LocalDataChangeEvent> {

    static class RpcPushCallback extends AbstractPushCallBack {

        RpcPushTask rpcPushTask;

        TpsControlManager tpsControlManager;

        ConnectionManager connectionManager;

        public RpcPushCallback(RpcPushTask rpcPushTask, TpsControlManager tpsControlManager,
                               ConnectionManager connectionManager) {
            super(3000L);
            this.rpcPushTask = rpcPushTask;
            this.tpsControlManager = tpsControlManager;
            this.connectionManager = connectionManager;
        }

        @Override
        public void onSuccess() {
            // 客户端成功接收配置变更通知,记录推送成功统计
            TpsCheckRequest tpsCheckRequest = new TpsCheckRequest();
            tpsCheckRequest.setPointName(POINT_CONFIG_PUSH_SUCCESS);
            tpsControlManager.check(tpsCheckRequest);
        }

        @Override
        public void onFail(Throwable e) {
            // 推送失败,记录失败统计并进行重试
            TpsCheckRequest tpsCheckRequest = new TpsCheckRequest();
            tpsCheckRequest.setPointName(POINT_CONFIG_PUSH_FAIL);
            tpsControlManager.check(tpsCheckRequest);
            Loggers.REMOTE_PUSH.warn("Push fail, dataId={}, group={}, tenant={}, clientId={}",
                    rpcPushTask.getNotifyRequest().getDataId(), rpcPushTask.getNotifyRequest().getGroup(),
                    rpcPushTask.getNotifyRequest().getTenant(), rpcPushTask.getConnectionId(), e);
            push(rpcPushTask, connectionManager);
        }
    }
}注意,RpcPushTask 在执行过程中都是没有被持久化的,也就是说一旦在执行过程中发生服务宕机,这些任务也会丢失,没有办法重新拉起向订阅配置的客户端推送,这样会不会导致客户端无法收到配置变更通知呢?实际上是不会的,配置变更除了服务端会主动推送以外,客户端还存在主动拉取的机制,也就是说 配置同步是推、拉结合的,保证客户端能够及时感知到配置变更,客户端的具体逻辑我们在后文中再解释。
以上我们讲解了 Nacos Server 单机采用 MySQL 数据库部署时,保证配置变更高可用的机制,接下来我们再看一下当集群部署并使用内嵌 Derby 数据库时,保证配置变更高可用的实现。
集群部署,采用内嵌 Derby 数据库
Nacos Server 在集群模式部署时,也可以使用 MySQL 数据库,不过因为集群模式使用 MySQL 数据库与单机模式使用 MySQL 数据库对数据一致性的保证没有区别,所以我们就不再讨论这种情况了。值得讨论的是:在集群模式下,Nacos Server 还支持使用内嵌数据库 Derby 部署,这种情况下,Nacos 采用了 Raft 算法保证了集群的强一致性,Raft 算法的实现它使用的是 开源项目 JRaft。在本文中,我们不会具体讲解 Raft 算法的流程,如果大家感兴趣可以参考文章 深入理解分布式共识算法 Raft。如下图所示:
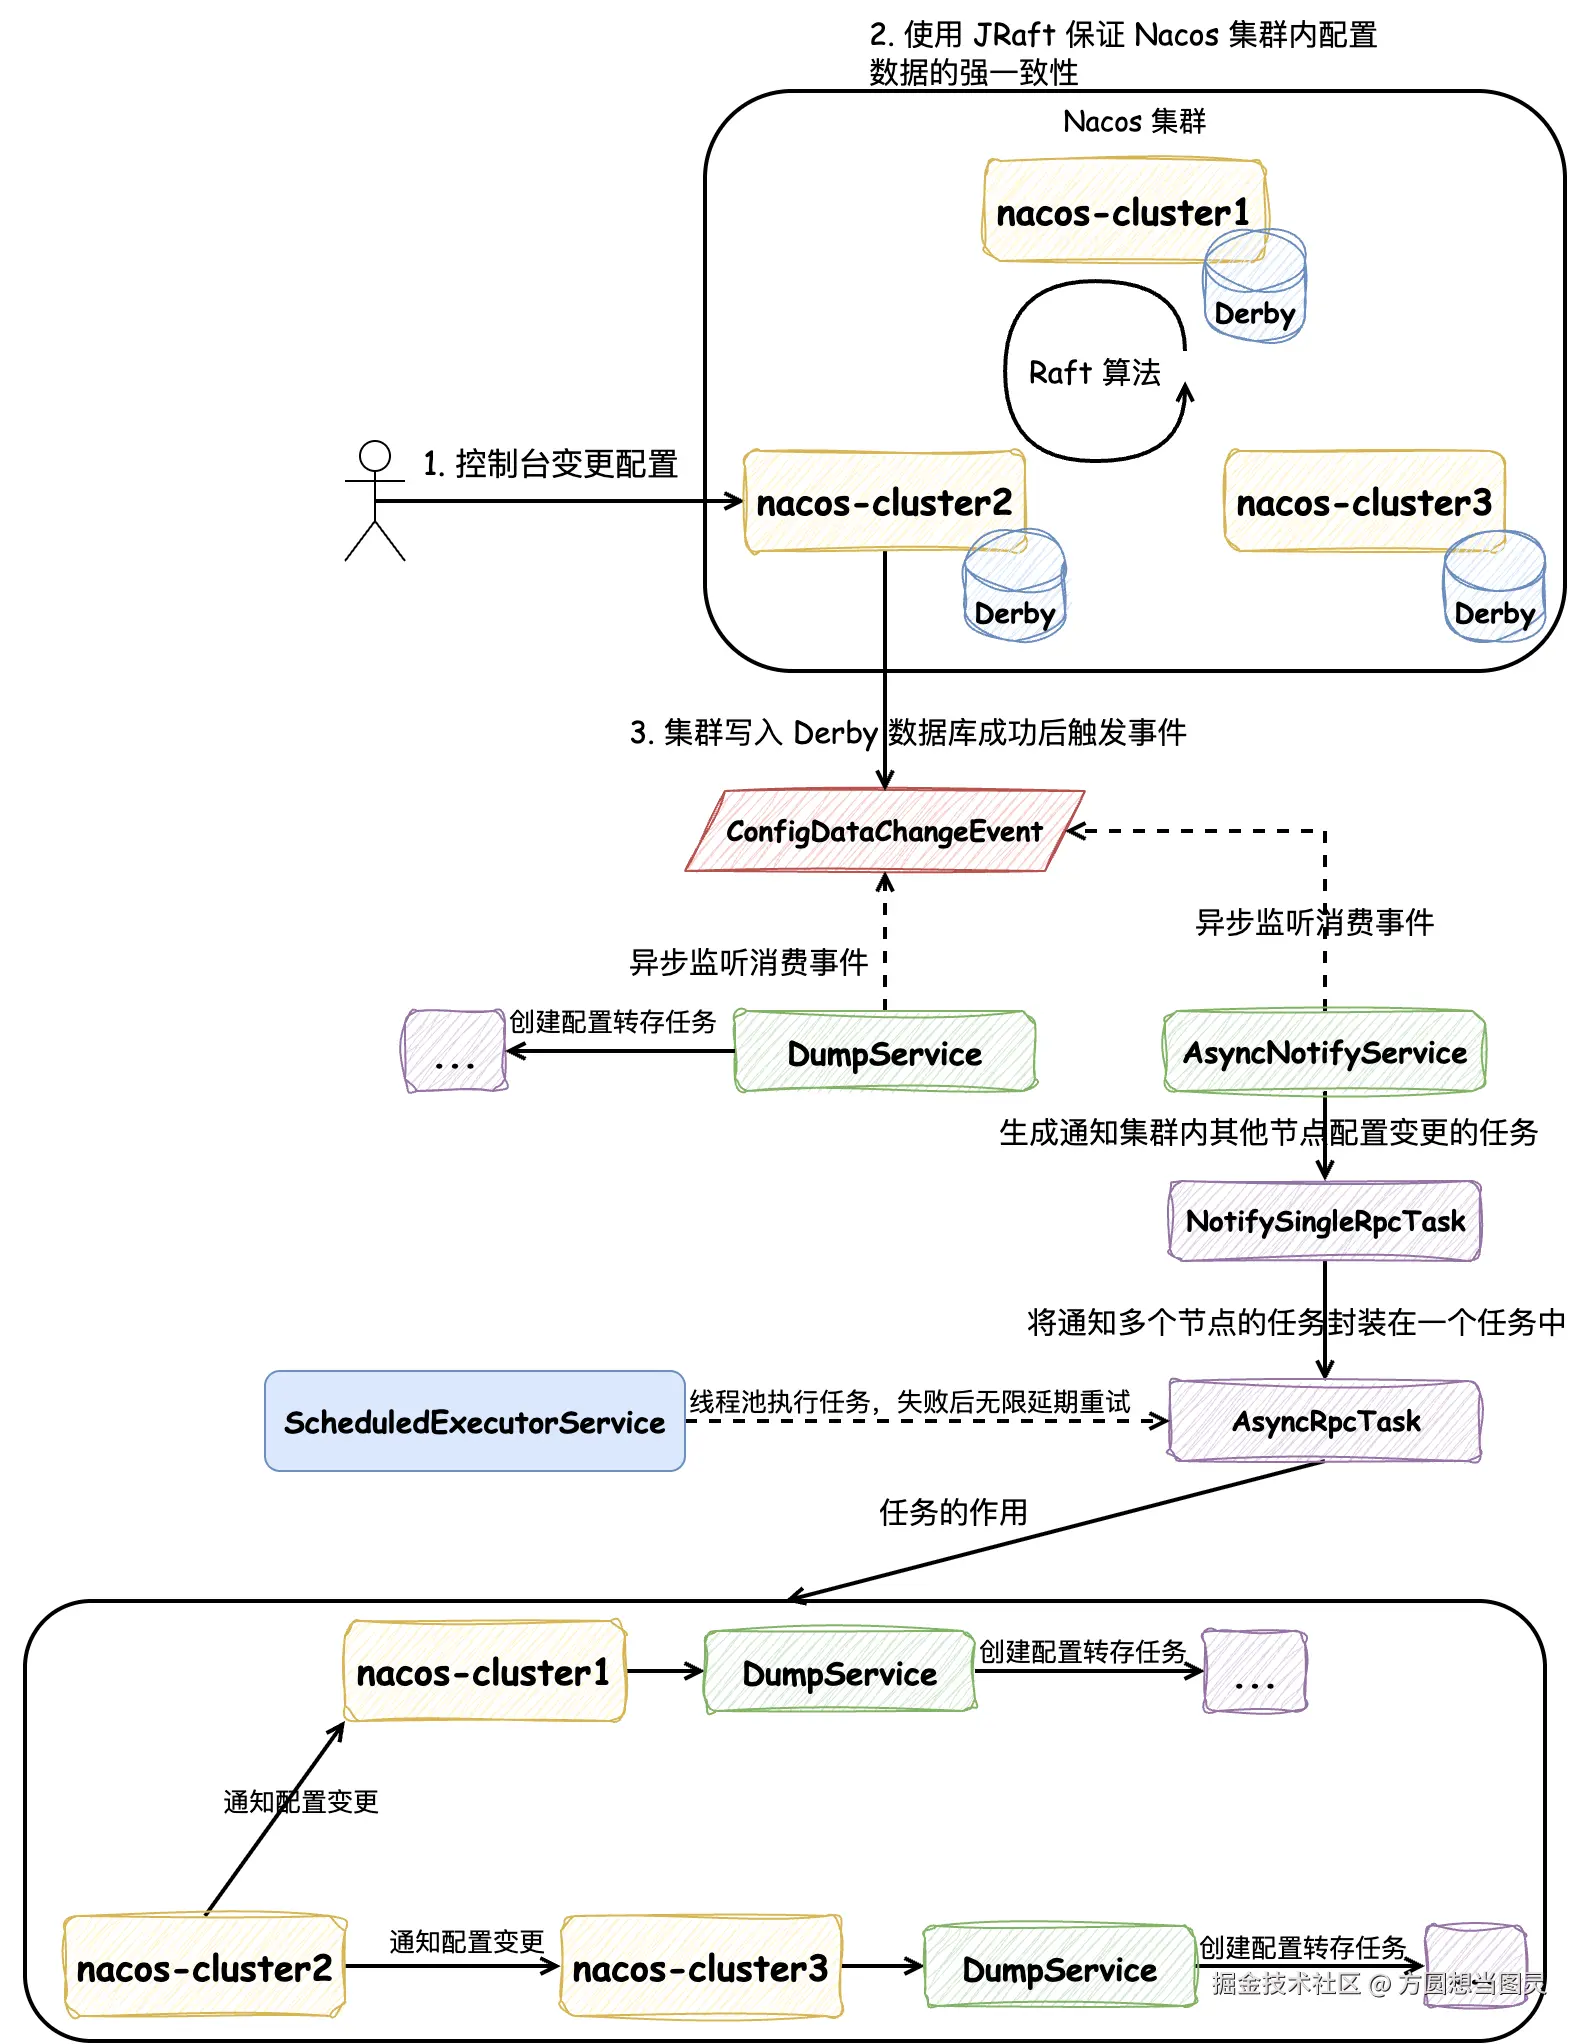
Nacos 在集群部署时,在控制台进行配置变更后,请求只会打到其中一台服务上,在这一台服务上会触发 JRaft 算法来完成各个服务内的 Derby 数据的写入,同样地,与写入 MySQL 的流程一致,只有在 JRaft 写入执行成功后才能继续处理。
在接收到请求的这台服务上,它会像单机模式一样发送 ConfigDataChangeEvent 事件,触发文件转存的操作,因为这部分内容是重复的就不再赘述了。集群模式与单机模式不同的是还有一个 AsyncNotifyService 服务会监听消费 ConfigDataChangeEvent 事件。AsyncNotifyService 的功能是 通知集群内其他节点触发文件转存的操作 ,如图所示,它会将通知集群内每个节点的请求封装成 NotifySingleRpcTask,创建所有节点的通知任务后,打包创建 AsyncRpcTask 任务,这个任务会被添加到 ScheduledExecutorService 线程池中,由线程池异步延时处理,如果发生处理失败的情况,会重新提交到线程池中,作为新的任务进行处理,以此来保证通知任务的处理成功。
以上就是 Nacos 在集群模式下采用 Derby 数据库时配置变更的处理流程,下面的内容我们根据源码来分析:当在 Nacos 控制台对配置进行修改时,Nacos 是如何借助 JRaft 保证数据一致性的。
同样地,ConsoleConfigController#publishConfig 方法是在 Nacos 控制台修改配置的入口,承接配置变更的 POST 请求:
java
@NacosApi
@RestController
@RequestMapping("/v3/console/cs/config")
@ExtractorManager.Extractor(httpExtractor = ConfigDefaultHttpParamExtractor.class)
public class ConsoleConfigController {

    private final ConfigProxy configProxy;

    public ConsoleConfigController(ConfigProxy configProxy) {
        this.configProxy = configProxy;
    }

    @PostMapping()
    @Secured(action = ActionTypes.WRITE, signType = SignType.CONFIG, apiType = ApiType.CONSOLE_API)
    public Result<Boolean> publishConfig(HttpServletRequest request, ConfigFormV3 configForm) throws NacosException {
        // ...

        return Result.success(configProxy.publishConfig(configForm, configRequestInfo));
    }
}
因为 Nacos Server 启动时配置内嵌(Embedded)数据库 Derby,所以它会执行到 EmbeddedConfigInfoPersistServiceImpl 相关的方法中,我们以其中的 EmbeddedConfigInfoPersistServiceImpl#updateConfigInfoCas 方法为例,在这个方法中有一个私有方法 updateConfigInfoAtomicCas 特别关键,它主要在这里封装 SQL 的参数,并生成一条 SQL 并不立即执行,而是封装到上下文 EmbeddedStorageContextHolder 中:
java
@Service("embeddedConfigInfoPersistServiceImpl")
public class EmbeddedConfigInfoPersistServiceImpl implements ConfigInfoPersistService {

    private ConfigOperateResult updateConfigInfoAtomicCas(final ConfigInfo configInfo, final String srcIp,
                                                          final String srcUser, Map<String, Object> configAdvanceInfo) {
        // 处理 SQL 的入参
        MapperContext context = new MapperContext();
        context.putUpdateParameter(FieldConstant.CONTENT, configInfo.getContent());
        // ...
        // 生成 SQL 而不执行(ConfigInfoMapper#updateConfigInfoAtomicCas 在接口中定义的 default 方法)
        MapperResult mapperResult = configInfoMapper.updateConfigInfoAtomicCas(context);

        // 保存在上下文中
        EmbeddedStorageContextHolder.addSqlContext(Boolean.TRUE, mapperResult.getSql(),
                mapperResult.getParamList().toArray());
        return getConfigInfoOperateResult(configInfo.getDataId(), configInfo.getGroup(), tenantTmp);
    }
}

public interface ConfigInfoMapper extends Mapper {
    default MapperResult updateConfigInfoAtomicCas(MapperContext context) {
        List<Object> paramList = new ArrayList<>();

        // 封装 set 中的参数
        paramList.add(context.getUpdateParameter(FieldConstant.CONTENT));
        // ...
        // 封装 where 中的参数
        paramList.add(context.getWhereParameter(FieldConstant.MD5));
        // ...
        String sql = "UPDATE config_info SET " + "content=?, md5=?, src_ip=?, src_user=?, gmt_modified="
                + getFunction("NOW()")
                + ", app_name=?, c_desc=?, c_use=?, effect=?, type=?, c_schema=?, encrypted_data_key=? "
                + "WHERE data_id=? AND group_id=? AND tenant_id=? AND (md5=? OR md5 IS NULL OR md5='')";
        return new MapperResult(sql, paramList);
    }
}
在这里有两个点值得注意:
- 生成 Update SQL 而不执行,却放在了上下文
EmbeddedStorageContextHolder中,它是一个ThreadLocal对象 - 生成的 SQL 使用 CAS 的策略,在 WHERE 条件中它会将前端控制台配置的 MD5 值作为条件传入,防止并发修改配置时的脏写问题
现在既然已经将变更 Derby 数据库 Update SQL 保存在了上下文中,接下来就是看它什么时候被执行了,它会继续执行 DatabaseOperate#blockUpdate 方法,从它的命名中也能发现它是同步阻塞执行的逻辑:
java
public interface DatabaseOperate {
    // ...

    // 阻塞更新逻辑
    default Boolean blockUpdate(BiConsumer<Boolean, Throwable> consumer) {
        try {
            // 在上下文中获取 SQL
            return update(EmbeddedStorageContextHolder.getCurrentSqlContext(), consumer);
        } finally {
            EmbeddedStorageContextHolder.cleanAllContext();
        }
    }

}
它是一个 default 方法,会调用 DistributedDatabaseOperateImpl#update 方法,它会将 SQL 封装在 WriteRequest 中,调用封装好的 Raft 协议的 write 方法:
java
public class DistributedDatabaseOperateImpl extends RequestProcessor4CP implements BaseDatabaseOperate {

    private CPProtocol protocol;

    @Override
    public Boolean update(List<ModifyRequest> sqlContext, BiConsumer<Boolean, Throwable> consumer) {
        try {
            final String key =
                    System.currentTimeMillis() + "-" + group() + "-" + memberManager.getSelf().getAddress() + "-"
                            + MD5Utils.md5Hex(sqlContext.toString(), PersistenceConstant.DEFAULT_ENCODE);
            WriteRequest request = WriteRequest.newBuilder().setGroup(group()).setKey(key)
                    // 将 SQL 序列化成字节数组保存在 WriteRequest 中
                    .setData(ByteString.copyFrom(serializer.serialize(sqlContext)))
                    .putAllExtendInfo(EmbeddedStorageContextHolder.getCurrentExtendInfo())
                    .setType(sqlContext.getClass().getCanonicalName()).build();

            if (Objects.isNull(consumer)) {
                // 重要:raft 协议 write 开始执行,同步阻塞调用
                Response response = this.protocol.write(request);
                if (response.getSuccess()) {
                    return true;
                }
                LOGGER.error("execute sql modify operation failed : {}", response.getErrMsg());
                return false;
            } else {
                // ...
            }
            return true;
        } catch (TimeoutException e) {
            LOGGER.error("An timeout exception occurred during the update operation");
            throw new NacosRuntimeException(NacosException.SERVER_ERROR, e.toString());
        } catch (Throwable e) {
            LOGGER.error("An exception occurred during the update operation : {}", e);
            throw new NacosRuntimeException(NacosException.SERVER_ERROR, e.toString());
        }
    }
}
其中 Response response = this.protocol.write(request); 逻辑为执行 Raft 算法的写流程:
java
public class JRaftProtocol extends AbstractConsistencyProtocol<RaftConfig, RequestProcessor4CP>
        implements CPProtocol<RaftConfig, RequestProcessor4CP> {

    @Override
    public Response write(WriteRequest request) throws Exception {
        // 依靠 CompletableFuture 实现阻塞同步调用
        CompletableFuture<Response> future = writeAsync(request);
        return future.get(10_000L, TimeUnit.MILLISECONDS);
    }

    @Override
    public CompletableFuture<Response> writeAsync(WriteRequest request) {
        return raftServer.commit(request.getGroup(), request, new CompletableFuture<>());
    }
}
在这段逻辑中依靠 CompletableFuture 实现了同步阻塞的写调用。JRaftServer#commit 方法是处理 Raft 算法中写请求的流程:
java
public class JRaftServer {
    /**
     * [raft] 处理写请求,所有写操作必须通过 Leader 节点处理
     */
    public CompletableFuture<Response> commit(final String group, final Message data,
                                              final CompletableFuture<Response> future) {
        LoggerUtils.printIfDebugEnabled(Loggers.RAFT, "data requested this time : {}", data);
        final RaftGroupTuple tuple = findTupleByGroup(group);
        if (tuple == null) {
            future.completeExceptionally(new IllegalArgumentException("No corresponding Raft Group found : " + group));
            return future;
        }

        FailoverClosureImpl closure = new FailoverClosureImpl(future);

        final Node node = tuple.node;
        if (node.isLeader()) {
            // 当前节点是 Leader,直接应用写操作到状态机
            applyOperation(node, data, closure);
        } else {
            // 当前节点不是 Leader,将请求转发给 Leader 处理
            invokeToLeader(group, data, rpcRequestTimeoutMs, closure);
        }
        return future;
    }
}
如果是 Leader 节点的话,直接操作日志写入,在这里的逻辑都是与 JRaft 框架相关了,不过我们只需要关注与 Raft 算法有关的流程,注意注释信息:
java
public class JRaftServer {

    public void applyOperation(Node node, Message data, FailoverClosure closure) {
        // Task 是用户使用 jraft 最核心的类之一,用于向一个 raft 集群提交一个任务,这个任务提交到 leader,并复制到其他 follower 节点
        // 通俗的理解为让 Leader 节点记录 log 日志,并同步到其他 Follower 节点
        final Task task = new Task();
        // done 表示任务的回调方法,在任务完成的时候,即 apply 的时候,通知此回调对象,无论成功还是失败。
        task.setDone(new NacosClosure(data, status -> {
            NacosClosure.NacosStatus nacosStatus = (NacosClosure.NacosStatus) status;
            closure.setThrowable(nacosStatus.getThrowable());
            closure.setResponse(nacosStatus.getResponse());
            closure.run(nacosStatus);
        }));

        // add request type field at the head of task data.
        byte[] requestTypeFieldBytes = new byte[2];
        requestTypeFieldBytes[0] = ProtoMessageUtil.REQUEST_TYPE_FIELD_TAG;
        if (data instanceof ReadRequest) {
            requestTypeFieldBytes[1] = ProtoMessageUtil.REQUEST_TYPE_READ;
        } else {
            requestTypeFieldBytes[1] = ProtoMessageUtil.REQUEST_TYPE_WRITE;
        }

        // data 任务的数据,在本次逻辑中是变更配置的 SQL,用户应当将要复制的业务数据通过一定序列化方式(比如 java/hessian2) 序列化成一个 ByteBuffer,放到 task 里
        byte[] dataBytes = data.toByteArray();
        task.setData((ByteBuffer) ByteBuffer.allocate(requestTypeFieldBytes.length + dataBytes.length)
                .put(requestTypeFieldBytes).put(dataBytes).position(0));
        // 使用 node 提交任务,node 可以为是 Raft 集群的 Leader 节点,操作 apply 方法之后表示将日志记录下来并给其他 Follower 节点同步
        node.apply(task);
    }
}
当在 Raft 集群中有超过半数节点已经将本次任务的日志持久化后,它会自动调用 StateMachineAdapter#onApply 方法,表示将日志应用到状态机,即使写请求生效:
java
class NacosStateMachine extends StateMachineAdapter {

    /**
     * 最核心的方法,应用任务列表应用到状态机,任务将按照提交顺序应用。
     * 请注意,当这个方法返回的时候,我们就认为这一批任务都已经成功应用到状态机上,如果你没有完全应用(比如错误、异常),
     * 将会被当做一个 critical 级别的错误,报告给状态机的 StateMachineAdapter#onError 方法,错误类型为 ERROR_TYPE_STATE_MACHINE
     */
    @Override
    public void onApply(Iterator iter) {
        int index = 0;
        int applied = 0;
        Message message;
        NacosClosure closure = null;
        try {
            // 遍历处理本次应用的任务(日志)
            while (iter.hasNext()) {
                // 结果通过 Status 告知,Status#isOk() 告诉你成功还是失败
                Status status = Status.OK();
                try {
                    // 如果 task 没有设置 closure,那么 done 会是 null,
                    // 另外在 follower 节点上,done 也是 null,因为 done 不会被复制到除了 leader 节点之外的其他 raft 节点
                    if (iter.done() != null) {
                        // 获取回调函数
                        closure = (NacosClosure) iter.done();
                        // 从 Leader 节点的日志条目中获取消息
                        message = closure.getMessage();
                    } else {
                        // 从 Follower 节点复制的日志条目中解析消息
                        final ByteBuffer data = iter.getData();
                        // 解析成 SQL
                        message = ProtoMessageUtil.parse(data.array());
                        if (message instanceof ReadRequest) {
                            // Follower 节点忽略读请求,只处理写请求
                            applied++;
                            index++;
                            iter.next();
                            continue;
                        }
                    }

                    LoggerUtils.printIfDebugEnabled(Loggers.RAFT, "receive log : {}", message);

                    // 应用写请求到业务状态机,实现数据的持久化存储
                    if (message instanceof WriteRequest) {
                        // 使 Update SQL 执行并生效,在 Response 中返回执行结果
                        Response response = processor.onApply((WriteRequest) message);
                        // 对结果的后置处理
                        postProcessor(response, closure);
                    }

                    // 处理读请求(仅在 Leader 节点)
                    if (message instanceof ReadRequest) {
                        Response response = processor.onRequest((ReadRequest) message);
                        postProcessor(response, closure);
                    }
                } catch (Throwable e) {
                    index++;
                    status.setError(RaftError.UNKNOWN, e.toString());
                    Optional.ofNullable(closure).ifPresent(closure1 -> closure1.setThrowable(e));
                    throw e;
                } finally {
                    Optional.ofNullable(closure).ifPresent(closure1 -> closure1.run(status));
                }

                applied++;
                index++;
                iter.next();
            }
        } catch (Throwable t) {
            // 状态机应用失败时进行回滚,保证数据一致性
            Loggers.RAFT.error("processor : {}, stateMachine meet critical error: {}.", processor, t);
            iter.setErrorAndRollback(index - applied,
                    new Status(RaftError.ESTATEMACHINE, "StateMachine meet critical error: %s.",
                            ExceptionUtil.getStackTrace(t)));
        }
    }
}
因为将任务应用到状态机时会在 Leader 和 Follower 节点都执行,所以以上逻辑会包含针对 Leader 节点和 Follower 节点的执行逻辑。它会在 Response response = processor.onApply((WriteRequest) message); 逻辑中完成 Update SQL 的执行,如下 DistributedDatabaseOperateImpl#onApply 方法:
java
@Conditional(ConditionDistributedEmbedStorage.class)
@Component
public class DistributedDatabaseOperateImpl extends RequestProcessor4CP implements BaseDatabaseOperate {

    @Override
    public Response onApply(WriteRequest log) {
        LoggerUtils.printIfDebugEnabled(LOGGER, "onApply info : log : {}", log);
        final ByteString byteString = log.getData();
        Preconditions.checkArgument(byteString != null, "Log.getData() must not null");
        final Lock lock = readLock;
        lock.lock();
        try {
            // 将任务中的数据转换成本次修改配置要执行的 SQL
            List<ModifyRequest> sqlContext = serializer.deserialize(byteString.toByteArray(), List.class);
            sqlLimiter.doLimitForModifyRequest(sqlContext);
            boolean isOk = false;
            // 区分导入和非导入逻辑
            if (log.containsExtendInfo(DATA_IMPORT_KEY)) {
                isOk = doDataImport(jdbcTemplate, sqlContext);
            } else {
                sqlContext.sort(Comparator.comparingInt(ModifyRequest::getExecuteNo));
                // 执行修改 SQL
                isOk = update(transactionTemplate, jdbcTemplate, sqlContext);
                PersistenceExecutor.executeEmbeddedDump(() -> {
                    for (EmbeddedApplyHook each : EmbeddedApplyHookHolder.getInstance().getAllHooks()) {
                        each.afterApply(log);
                    }
                });
            }

            return Response.newBuilder().setSuccess(isOk).build();
        } catch (BadSqlGrammarException | DataIntegrityViolationException e) {
            return Response.newBuilder().setSuccess(false).setErrMsg(e.toString()).build();
        } catch (DataAccessException e) {
            throw new ConsistencyException(e.toString());
        } catch (Exception e) {
            LoggerUtils.printIfWarnEnabled(LOGGER, "onApply warn : log : {}", log, e);
            return Response.newBuilder().setSuccess(false).setErrMsg(e.toString()).build();
        } finally {
            lock.unlock();
        }
    }
}
执行完成后,通过 Response 对象来判断执行成功还是执行失败,postProcessor 方法负责后置处理,最终回调的逻辑如下:
java
public class FailoverClosureImpl implements FailoverClosure {

    // ...

    private final CompletableFuture<Response> future;

    @Override
    public void run(Status status) {
        // 调用 CompletableFuture#complete 方法标记任务完成,同步阻塞调用恢复,并返回结果值
        if (status.isOk()) {
            future.complete(data);
            return;
        }
        final Throwable throwable = this.throwable;
        future.completeExceptionally(Objects.nonNull(throwable) ? new ConsistencyException(throwable.getMessage())
                : new ConsistencyException("operation failure"));
    }

}
其中 future 字段为在执行 Raft 的写请求时保证同步阻塞调用的 CompletableFuture,如果执行成功调用 CompletableFuture#complete 方法便能让停止阻塞并返回结果,以上便是在 Nacos 集群中执行写请求的流程。在 Nacos 源码的 DistributedDatabaseOperateImpl 类上有以下流程图注释能非常清晰的反映整个流程:
- 用户
user执行配置变更时执行publishConfig的逻辑,要执行的 SQL 会被保存在上下文SqlContextUtils中 - 对数据库的操作都会被提交到 JRaft 协议状态机
JRaftProtocol中执行,应用onApply到状态机时会从上下文SqlContextUtils中获取 SQL 并执行 - 同步阻塞返回用户
user结果
text
                   ┌────────────────────┐
               ┌──▶│   PersistService   │
               │   └────────────────────┘ ┌─────────────────┐
               │              │           │                 │
               │              │           │                 │
               │              │           │                 │
               │              │           │                 │
               │              │           │                 │
               │              │           │                 │
               │              │           │                 │
               │              │           │                 ▼
               │              │           │      ┌────────────────────┐          save sql
               │              ▼           │      │     saveConfig     │──────────context─────────────┐
               │     ┌────────────────┐   │      └────────────────────┘                              │
               │     │ publishConfig  │───┘                 │                                        │
               │     └────────────────┘                     │                                        │
               │                                            ▼                                        ▼
               │                               ┌─────────────────────────┐    save sql    ┌────────────────────┐
               │                               │ saveConfigTagRelations  │────context────▶│  SqlContextUtils   │◀─┐
        publish config                         └─────────────────────────┘                └────────────────────┘  │
               │                                            │                                        ▲            │
               │                                            │                                        │            │
               │                                            ▼                                        │            │
               │                                ┌───────────────────────┐         save sql           │            │
            ┌────┐                              │   saveConfigHistory   │─────────context────────────┘            │
            │user│                              └───────────────────────┘                                         │
            └────┘                                                                                                │
               ▲                                                                                                  │
               │                                           ┌1:getCurrentSqlContexts───────────────────────────────┘
               │                                           │
               │                                           │
               │                                           │
               │           ┌───────────────┐    ┌─────────────────────┐
               │           │ JdbcTemplate  │◀───│   DatabaseOperate   │───┐
       4:execute result    └───────────────┘    └─────────────────────┘   │
               │                   │                       ▲              │
               │                   │                       │              │
               │                   │                  3:onApply         2:submit(List<ModifyRequest>)
               │                   │                       │              │
               │                   ▼                       │              │
               │           ┌──────────────┐                │              │
               │           │ Apache Derby │    ┌───────────────────────┐  │
               │           └──────────────┘    │     JRaftProtocol     │◀─┘
               │                               └───────────────────────┘
               │                                           │
               │                                           │
               └───────────────────────────────────────────┘
当 Raft 的流程执行完成后,会回到在文章开头我们提到的 ConfigOperationService#publishConfig 方法中,在单机部署的模式下,我们提到过:Nacos 会触发 ConfigDataChangeEvent 事件来触发 DumpTask 来将配置信息写入到本地磁盘文件和 JVM 缓存中,并在随后触发 LocalDataChangeEvent 事件通知连接到该单机上所有的 Nacos Client 保证配置变更的通知。现在我们来考虑一个问题:当我们在控制台修改配置信息时,配置变更的请求只会打到 Nacos 集群的某一台服务上,在这一台服务上会执行 Dump 文件的操作并通知连接到该台服务器上的 Nacos Client 配置变更,那 集群中其他节点是不是也需要通知连接到本身的 Nacos Client 配置变更 呢?答案是肯定的。
在集群模式下,ConfigDataChangeEvent 事件会被 AsyncNotifyService 消费,其中的 AsyncNotifyService#handleConfigDataChangeEvent 方法会处理 ConfigDataChangeEvent 事件来完成通知集群内其他节点配置发生变更的操作:
java
@Service
public class AsyncNotifyService {

    private ServerMemberManager memberManager;

    // 处理 ConfigDataChangeEvent 事件
    void handleConfigDataChangeEvent(Event event) {
        if (event instanceof ConfigDataChangeEvent) {
            ConfigDataChangeEvent evt = (ConfigDataChangeEvent) event;

            MetricsMonitor.incrementConfigChangeCount(evt.tenant, evt.group, evt.dataId);
            // 集群中除了自己的所有节点
            Collection<Member> ipList = memberManager.allMembersWithoutSelf();

            Queue<NotifySingleRpcTask> rpcQueue = new LinkedList<>();

            for (Member member : ipList) {
                // 生成通知其他节点数据变更的任务,包含配置信息和节点IP信息
                NotifySingleRpcTask notifySingleRpcTask = generateTask(evt, member);
                // 加入队列
                rpcQueue.add(notifySingleRpcTask);
            }
            // 异步执行任务
            if (!rpcQueue.isEmpty()) {
                ConfigExecutor.executeAsyncNotify(new AsyncRpcTask(rpcQueue));
            }
        }
    }
}
它会将变更的配置和要通知的节点信息封装成一个个 NotifySingleRpcTask 异步任务,并放在队列 Queue<NotifySingleRpcTask> 中,随后使用线程池异步执行 ConfigExecutor#executeAsyncNotify 队列中所有的任务。AsyncRpcTask 是在 AsyncNotifyService 封装的内部类,执行通知的逻辑为 AsyncNotifyService#executeAsyncRpcTask 方法,借助 gRPC 通知其他节点,并在失败后重试,请关注以下逻辑的注释信息:
java
@Service
public class AsyncNotifyService {

    private static final int MIN_RETRY_INTERVAL = 500;

    private static final int INCREASE_STEPS = 1000;

    private static final int MAX_COUNT = 6;

    @Autowired
    private ConfigClusterRpcClientProxy configClusterRpcClientProxy;

    private ServerMemberManager memberManager;

    public class AsyncRpcTask implements Runnable {

        private Queue<NotifySingleRpcTask> queue;

        public AsyncRpcTask(Queue<NotifySingleRpcTask> queue) {
            this.queue = queue;
        }

        @Override
        public void run() {
            // 处理通知其他节点配置变更的任务
            executeAsyncRpcTask(queue);
        }
    }

    void executeAsyncRpcTask(Queue<NotifySingleRpcTask> queue) {
        while (!queue.isEmpty()) {
            NotifySingleRpcTask task = queue.poll();

            ConfigChangeClusterSyncRequest syncRequest = new ConfigChangeClusterSyncRequest();
            syncRequest.setDataId(task.getDataId());
            syncRequest.setTenant(task.getTenant());
            syncRequest.setGroup(task.getGroup());
            syncRequest.setLastModified(task.getLastModified());
            syncRequest.setGrayName(task.getGrayName());
            syncRequest.setBeta(task.isBeta());
            syncRequest.setTag(task.getTag());
            Member member = task.member;

            String event = getNotifyEvent(task);
            if (memberManager.hasMember(member.getAddress())) {
                // 将可能下线的服务放入异步队列延迟执行,健康的服务器直接通知
                boolean unHealthNeedDelay = isUnHealthy(member.getAddress());
                if (unHealthNeedDelay) {
                    ConfigTraceService.logNotifyEvent(task.getDataId(), task.getGroup(), task.getTenant(), null,
                            task.getLastModified(), InetUtils.getSelfIP(), event,
                            ConfigTraceService.NOTIFY_TYPE_UNHEALTH, 0, member.getAddress());
                    asyncTaskExecute(task);
                } else {
                    try {
                        // gRPC 通知配置发生变更
                        configClusterRpcClientProxy.syncConfigChange(member, syncRequest,
                                new AsyncRpcNotifyCallBack(AsyncNotifyService.this, task));
                    } catch (Exception e) {
                        // 无限重试,直到重试成功或服务停止
                        MetricsMonitor.getConfigNotifyException().increment();
                        asyncTaskExecute(task);
                    }
                }
            } else {
                //No nothing if  member has offline.
            }
        }
    }

    private void asyncTaskExecute(NotifySingleRpcTask task) {
        // 获取重试延迟时间
        int delay = getDelayTime(task);
        Queue<NotifySingleRpcTask> queue = new LinkedList<>();
        queue.add(task);
        // 借助 ScheduledExecutorService 线程池延迟执行的任务
        AsyncRpcTask asyncTask = new AsyncRpcTask(queue);
        ConfigExecutor.scheduleAsyncNotify(asyncTask, delay, TimeUnit.MILLISECONDS);
    }

    // 执行失败后获取延迟执行的时间
    private static int getDelayTime(NotifySingleRpcTask task) {
        // 失败次数
        int failCount = task.getFailCount();
        // 指数级计算重试间隔
        int delay = MIN_RETRY_INTERVAL + failCount * failCount * INCREASE_STEPS;
        // 最大重试次数限制,超过后仍然继续重试,只是限制了重试间隔的指数爆炸
        if (failCount <= MAX_COUNT) {
            task.setFailCount(failCount + 1);
        }
        return delay;
    }

}
集群中其他节点在收到 ConfigChangeClusterSyncRequest 请求后,会在 ConfigChangeClusterSyncRequestHandler 类中处理:
java
@Component
@InvokeSource(source = {RemoteConstants.LABEL_SOURCE_CLUSTER})
public class ConfigChangeClusterSyncRequestHandler
        extends RequestHandler<ConfigChangeClusterSyncRequest, ConfigChangeClusterSyncResponse> {

    private final DumpService dumpService;

    private ConfigMigrateService configMigrateService;

    public ConfigChangeClusterSyncRequestHandler(DumpService dumpService,
                                                 ConfigMigrateService configMigrateService) {
        this.dumpService = dumpService;
        this.configMigrateService = configMigrateService;
    }

    @Override
    @NamespaceValidation
    @TpsControl(pointName = "ClusterConfigChangeNotify")
    @ExtractorManager.Extractor(rpcExtractor = ConfigRequestParamExtractor.class)
    @Secured(signType = SignType.CONFIG, apiType = ApiType.INNER_API)
    public ConfigChangeClusterSyncResponse handle(ConfigChangeClusterSyncRequest configChangeSyncRequest,
                                                  RequestMeta meta) throws NacosException {
        // 参数校验
        checkCompatity(configChangeSyncRequest, meta);
        ParamUtils.checkParam(configChangeSyncRequest.getTag());

        // 执行 Dump 操作
        DumpRequest dumpRequest = DumpRequest.create(configChangeSyncRequest.getDataId(),
                configChangeSyncRequest.getGroup(), configChangeSyncRequest.getTenant(),
                configChangeSyncRequest.getLastModified(), meta.getClientIp());
        dumpRequest.setGrayName(configChangeSyncRequest.getGrayName());
        dumpService.dump(dumpRequest);

        return new ConfigChangeClusterSyncResponse();
    }

    // ...
}
它的逻辑非常简单,接受到请求后,执行文件 Dump 操作并通知连接到服务本身的所有 Nacos Client 客户端配置发生变更。接下来,我们再看一下在 Nacos Server 端通过控制台查询配置数据时,读取 Derby 数据库是如何读取的。在开始具体的逻辑前,先给大家留一个问题:在集群模式部署时,每个集群实例都有一份配置数据的副本,当请求打到不同的实例时,如果存在实例未完成最新配置数据的写入,会不会存在多次请求不一致的情况呢?
在 Nacos Server 端通过控制台读取配置数据
在 Nacos 集群模式下使用内嵌 Derby 数据库时遵循 Raft 算法,如果要查询配置信息时它采用的是 ReadIndex Read 实现线性一致性读,我们直接略过非核心代码,分析与 Raft 相关的源码部分:
java
public class JRaftServer {
    /**
     * [raft] 处理读请求,使用 ReadIndex 机制保证线性一致性读
     */
    CompletableFuture<Response> get(final ReadRequest request) {
        final String group = request.getGroup();
        CompletableFuture<Response> future = new CompletableFuture<>();
        final RaftGroupTuple tuple = findTupleByGroup(group);
        if (Objects.isNull(tuple)) {
            future.completeExceptionally(new NoSuchRaftGroupException(group));
            return future;
        }
        final Node node = tuple.node;
        final RequestProcessor processor = tuple.processor;
        try {
            // 使用 ReadIndex Read 机制确保读取到的数据是最新的已提交数据
            // 其中 requestContext (第一个入参)提供给用户作为请求的附加上下文,可以在 closure 里再次拿到继续处理
            node.readIndex(BytesUtil.EMPTY_BYTES, new ReadIndexClosure() {
                @Override
                public void run(Status status, long index, byte[] reqCtx) {
                    // ReadIndex 成功,传入的 closure 将被调用,可以安全地从本地状态机读取数据
                    if (status.isOk()) {
                        try {
                            Response response = processor.onRequest(request);
                            future.complete(response);
                        } catch (Throwable t) {
                            MetricsMonitor.raftReadIndexFailed();
                            future.completeExceptionally(new ConsistencyException(
                                    "The conformance protocol is temporarily unavailable for reading", t));
                        }
                        return;
                    }
                    MetricsMonitor.raftReadIndexFailed();
                    Loggers.RAFT.error("ReadIndex has error : {}, go to Leader read.", status.getErrorMsg());
                    MetricsMonitor.raftReadFromLeader();
                    // ReadIndex 失败,降级到 Leader 读取保证一致性
                    readFromLeader(request, future);
                }
            });
            return future;
        } catch (Throwable e) {
            // ReadIndex 异常,直接从 Leader 读取
            MetricsMonitor.raftReadFromLeader();
            Loggers.RAFT.warn("Raft linear read failed, go to Leader read logic : {}", e.toString());
            // run raft read
            readFromLeader(request, future);
            return future;
        }
    }

    // raft log process
    public void readFromLeader(final ReadRequest request, final CompletableFuture<Response> future) {
        commit(request.getGroup(), request, future);
    }
}
这部分源码比较简单,因为 JRaft 框架将 ReadIndex Read 的实现封装起来了,开放出了 readIndex 方法来直接复用,注意如果在 ReadIndex 时失败,会走 Raft Log 流程来处理读请求,这个开销就相对来说比较大了。如果大家对 Raft 算法不了解,可以阅读参考 深入理解分布式共识算法 Raft。
至此,变更配置后 Nacos Server 端对配置数据一致性的保证相关的源码逻辑就已经讲解完了,接下来我们就要看看 Nacos Client 是如何接收配置变更并更新配置信息的。
由于社区最大字数限制,请看下篇:Nacos 源码深度畅游:Nacos 配置同步详解(下)。