一、引言
在人工智能技术日益普及的今天,计算机视觉正以前所未有的方式改变着我们的日常生活。YOLO作为先进的目标检测算法,以其快速和精准的特性,成为了实现智能视觉应用的得力工具。今天我们将通过四个贴近生活的趣味场景------智能厨房助手、植物健康监测、智能衣橱管理和宠物行为分析,一起领略YOLO技术的魅力。
无论你是烹饪爱好者、园艺新手、时尚达人还是宠物主人,这些应用都能为你的生活带来便利与乐趣。通过简单的代码实现,就可以让计算机识别食材并推荐菜谱,监测植物的健康状况,管理衣橱并提供穿搭建议,甚至分析宠物的行为状态。这些示例不仅展示了YOLO技术的广泛应用,也为初学者提供了实践机会,让我们在动手实现中深入理解计算机视觉的原理。让我们一起探索如何用YOLO模型构建智能生活助手,开启人工智能的奇妙之旅。
二、智能厨房助手
1. 场景描述
基于YOLO模型的智能厨房助手,能够识别图像中的食材,并根据识别到的食材推荐菜谱和计算营养成分。整个示例包含了食材检测、菜谱推荐、营养计算和结果可视化四个主要部分;
2. 示例代码
python
import cv2
from ultralytics import YOLO
import requests
import json
import numpy as np
import matplotlib.pyplot as plt

plt.rcParams['font.sans-serif'] = ['SimHei']  # 用黑体显示中文
plt.rcParams['axes.unicode_minus'] = False    # 正常显示负号

class SmartKitchenAssistant:
    def __init__(self, model_size='n'):
        # 加载YOLO模型
        self.model = YOLO(f'yolov8{model_size}.pt')

        # 食材与菜谱映射
        self.ingredient_recipes = {
            'banana': ['香蕉奶昔', '香蕉面包', '香蕉煎饼'],
            'apple': ['苹果派', '苹果沙拉', '烤苹果'],
            'orange': ['橙汁', '橙子蛋糕', '水果沙拉'],
            'carrot': ['胡萝卜汤', '胡萝卜沙拉', '炒胡萝卜'],
            'broccoli': ['西兰花炒肉', '烤西兰花', '西兰花汤'],
            'tomato': ['番茄炒蛋', '番茄汤', '番茄沙拉'],
            'egg': ['煎蛋', '炒蛋', '蛋花汤'],
            'bread': ['吐司', '三明治', '法式吐司'],
            'chicken': ['烤鸡', '炸鸡', '鸡汤'],
            'fish': ['烤鱼', '炸鱼', '鱼汤']
        }

        # 食材营养成分(每100克)
        self.nutrition_info = {
            'banana': {'calories': 89, 'carbs': 23, 'protein': 1.1, 'fat': 0.3},
            'apple': {'calories': 52, 'carbs': 14, 'protein': 0.3, 'fat': 0.2},
            'orange': {'calories': 47, 'carbs': 12, 'protein': 0.9, 'fat': 0.1},
            'carrot': {'calories': 41, 'carbs': 10, 'protein': 0.9, 'fat': 0.2},
            'broccoli': {'calories': 34, 'carbs': 7, 'protein': 2.8, 'fat': 0.4},
            'tomato': {'calories': 18, 'carbs': 3.9, 'protein': 0.9, 'fat': 0.2},
            'egg': {'calories': 155, 'carbs': 1.1, 'protein': 13, 'fat': 11},
            'bread': {'calories': 265, 'carbs': 49, 'protein': 9, 'fat': 3.2},
            'chicken': {'calories': 165, 'carbs': 0, 'protein': 31, 'fat': 3.6},
            'fish': {'calories': 206, 'carbs': 0, 'protein': 22, 'fat': 12}
        }

    def detect_ingredients(self, image_path):
        """检测图像中的食材"""
        results = self.model.predict(source=image_path, conf=0.3)
        result = results[0]

        detected_ingredients = {}
        if result.boxes is not None:
            for box, cls in zip(result.boxes.xyxy, result.boxes.cls):
                class_name = self.model.names[int(cls)]

                # 只关注食材类别的检测
                if class_name in self.ingredient_recipes:
                    if class_name not in detected_ingredients:
                        detected_ingredients[class_name] = 0
                    detected_ingredients[class_name] += 1

        return detected_ingredients

    def recommend_recipes(self, ingredients):
        """根据检测到的食材推荐菜谱"""
        all_recipes = []

        for ingredient in ingredients:
            if ingredient in self.ingredient_recipes:
                all_recipes.extend(self.ingredient_recipes[ingredient])

        # 去除重复菜谱
        unique_recipes = list(set(all_recipes))

        # 根据食材匹配度排序(匹配食材越多的菜谱排前面)
        recipe_scores = {}
        for recipe in unique_recipes:
            score = 0
            for ingredient in ingredients:
                if ingredient in self.ingredient_recipes and recipe in self.ingredient_recipes[ingredient]:
                    score += 1
            recipe_scores[recipe] = score

        sorted_recipes = sorted(recipe_scores.items(), key=lambda x: x[1], reverse=True)

        return [recipe for recipe, score in sorted_recipes[:5]]  # 返回前5个推荐

    def calculate_nutrition(self, ingredients):
        """计算检测食材的总营养成分"""
        total_nutrition = {'calories': 0, 'carbs': 0, 'protein': 0, 'fat': 0}

        for ingredient, count in ingredients.items():
            if ingredient in self.nutrition_info:
                # 假设每个检测到的食材约100克
                nutrition = self.nutrition_info[ingredient]
                for key in total_nutrition:
                    total_nutrition[key] += nutrition[key] * count

        return total_nutrition

    def analyze_kitchen_scene(self, image_path):
        """完整的厨房场景分析"""
        # 检测食材
        ingredients = self.detect_ingredients(image_path)

        if not ingredients:
            return {
                'ingredients': {},
                'recipes': [],
                'nutrition': {},
                'message': '未检测到食材,请确保食材在视野范围内'
            }

        # 推荐菜谱
        recipes = self.recommend_recipes(ingredients.keys())

        # 计算营养
        nutrition = self.calculate_nutrition(ingredients)

        # 可视化结果
        self.visualize_results(image_path, ingredients, recipes, nutrition)

        return {
            'ingredients': ingredients,
            'recipes': recipes,
            'nutrition': nutrition,
            'message': f'检测到 {len(ingredients)} 种食材,推荐 {len(recipes)} 个菜谱'
        }

    def visualize_results(self, image_path, ingredients, recipes, nutrition):
        """可视化分析结果"""
        from PIL import Image, ImageDraw, ImageFont
        import numpy as np

        # 读取图像并转换为RGB
        image = cv2.imread(image_path)
        image = cv2.cvtColor(image, cv2.COLOR_BGR2RGB)

        # 使用YOLO绘制检测结果
        results = self.model.predict(source=image_path, conf=0.3)
        result_img = results[0].plot()

        # 转换为Pillow格式
        pil_img = Image.fromarray(result_img)
        draw = ImageDraw.Draw(pil_img)

        # 加载中文字体(确保系统中存在该字体)
        font_path = "simhei.ttf"  # 黑体字体文件路径
        font = ImageFont.truetype(font_path, 40)

        # 添加文本信息
        y_offset = 10
        draw.text((10, y_offset), "智能厨房助手分析结果:", font=font, fill=(0, 255, 0))
        # y_offset += 30

        # 显示检测到的食材
        draw.text((480, y_offset), f"检测到食材: {', '.join(ingredients.keys())}", font=font, fill=(106, 90, 205))
        # y_offset += 25

        # 显示营养成分
        draw.text((1200, y_offset), f"预估营养: 热量{round(nutrition['calories'], 2)}卡, 碳水{round(nutrition['carbs'], 2)}g, 蛋白质{round(nutrition['protein'], 2)}g, 脂肪{round(nutrition['fat'], 2)}g",
                 font=font, fill=(139, 71, 38))
        y_offset += 42
        x_offset = 10
        # 显示推荐菜谱
        draw.text((10, y_offset), "推荐菜谱:", font=font, fill=(255, 127, 80))
        # y_offset += 25

        x_offset += 200
        for i, recipe in enumerate(recipes[:3]):  # 显示前3个菜谱
            draw.text((x_offset, y_offset), f"{i+1}.{recipe}", font=font, fill=(255, 177, 90))
            # y_offset += 20
            x_offset += 250

        # 转换回OpenCV格式
        result_img = np.array(pil_img)

        # 显示图像
        plt.figure(figsize=(12, 7))
        plt.imshow(result_img)
        plt.axis('off')
        plt.title('智能厨房助手分析结果')
        plt.tight_layout()
        plt.show()

# 使用示例
kitchen_assistant = SmartKitchenAssistant('n')
result = kitchen_assistant.analyze_kitchen_scene('kitchen_scene.jpg')
print(result)
3. 过程说明
- YOLO模型加载与使用:使用Ultralytics库加载YOLOv8模型,并进行图像预测。通过设置置信度阈值来过滤检测结果。
- 食材检测:遍历检测结果,只保留在预定义食材列表中的物体,并统计每种食材的数量。
- 菜谱推荐:根据检测到的食材,从预定义的菜谱映射中找出所有相关的菜谱,然后根据食材匹配度进行排序,返回前5个推荐菜谱。
- 营养计算:根据检测到的食材数量,从预定义的营养信息中累加计算总热量、碳水化合物、蛋白质和脂肪。
- 结果可视化:使用OpenCV和Matplotlib绘制检测结果,并用Pillow库添加中文文本。这里注意,由于OpenCV不支持中文,所以使用Pillow来绘制中文文本。
- 中文字体显示:通过Pillow的ImageDraw绘制中文,需要指定中文字体文件(如simhei.ttf),否则会出现乱码。
- 代码结构:采用面向对象的方式,将功能封装在SmartKitchenAssistant类中,使代码易于维护和扩展。
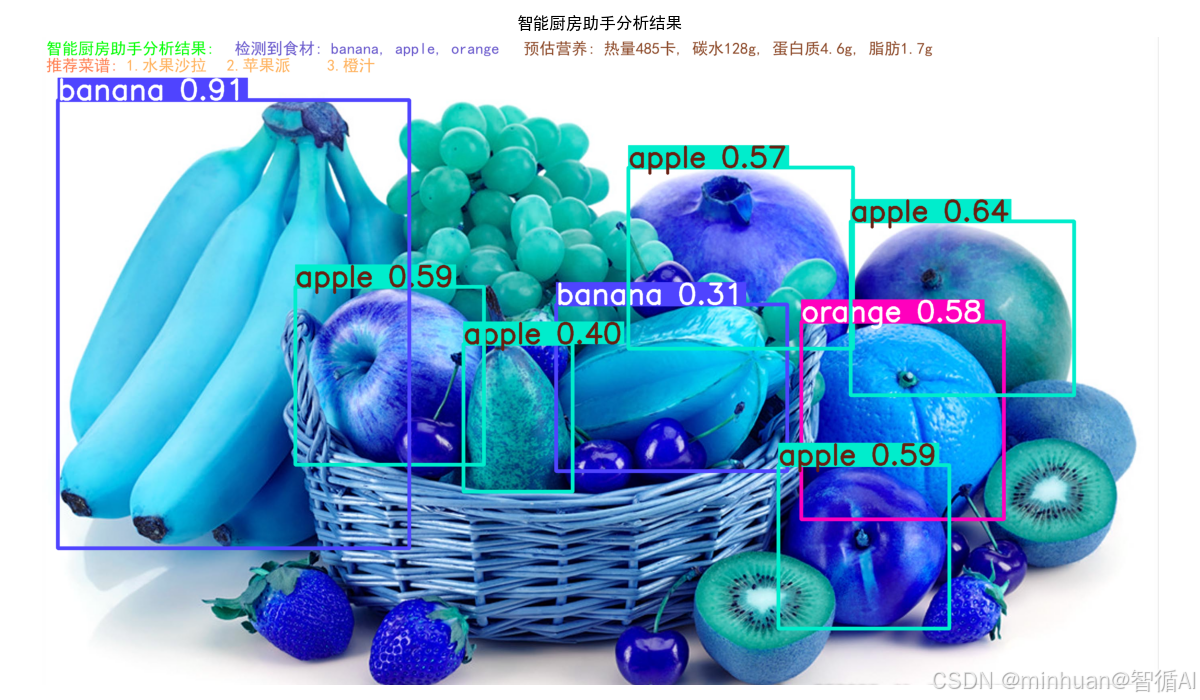
4. 结果分析
image 1/1 D:\AIWorld\case\test\kitchen_scene.jpg: 384x640 2 bananas, 5 apples, 1 orange, 59.3ms
Speed: 2.6ms preprocess, 59.3ms inference, 2.5ms postprocess per image at shape (1, 3, 384, 640)
image 1/1 D:\AIWorld\case\test\kitchen_scene.jpg: 384x640 2 bananas, 5 apples, 1 orange, 38.2ms
Speed: 2.3ms preprocess, 38.2ms inference, 2.4ms postprocess per image at shape (1, 3, 384, 640)
{'ingredients': {'banana': 2, 'apple': 5, 'orange': 1}, 'recipes': '水果沙拉', '苹果派', '橙汁', '香蕉面包', '香蕉煎饼', 'nutrition': {'calories': 485, 'carbs': 128, 'protein': 4.6000000000000005, 'fat': 1.7000000000000002}, 'message': '
检测到 3 种食材,推荐 5 个菜谱'}
结果图例:

分析后的结果图:
三、植物健康监测系统
1. 场景描述
基于YOLO模型的植物健康监测系统,利用YOLO模型检测图像中的植物,然后通过分析植物叶片的颜色特征来评估其健康状况,并给出相应的养护建议。该系统将计算机视觉技术与植物学知识相结合,为植物爱好者提供一个智能化的养护助手。
2. 示例代码
python
import cv2
from ultralytics import YOLO
import numpy as np
from sklearn.cluster import KMeans
import matplotlib.pyplot as plt

plt.rcParams['font.sans-serif'] = ['SimHei']  # 用黑体显示中文
plt.rcParams['axes.unicode_minus'] = False    # 正常显示负号

class PlantHealthMonitor:
    def __init__(self,model_size='n'):
        # 加载植物检测模型(需要自定义训练)
        self.detection_model = YOLO(f'yolov8{model_size}.pt') # 假设已训练

        # 植物养护信息
        self.plant_care_info = {
            'rose': {
                'water': '每周浇水2-3次,保持土壤湿润',
                'sunlight': '需要充足阳光,每天6小时以上',
                'fertilizer': '每月施一次玫瑰花肥',
                'common_issues': ['黑斑病', '白粉病', '蚜虫']
            },
            'cactus': {
                'water': '耐旱,每2-3周浇水一次',
                'sunlight': '需要充足阳光',
                'fertilizer': '生长季节每月施一次仙人掌专用肥',
                'common_issues': ['过度浇水', '日照不足']
            },
            'orchid': {
                'water': '每周浇水1-2次,避免积水',
                'sunlight': '需要散射光,避免直射',
                'fertilizer': '每2周施一次兰花专用肥',
                'common_issues': ['根腐病', '叶片发黄']
            },
            'succulent': {
                'water': '耐旱,土壤干透后再浇水',
                'sunlight': '需要充足阳光',
                'fertilizer': '生长季节每月施一次多肉专用肥',
                'common_issues': ['过度浇水', '日照不足']
            }
        }

    def detect_plants(self, image_path):
        """检测图像中的植物"""
        results = self.detection_model.predict(source=image_path, conf=0.4)
        return results[0]

    def analyze_leaf_health(self, image, leaf_region):
        """分析叶片健康状况"""
        # 提取叶片区域
        x1, y1, x2, y2 = map(int, leaf_region)
        leaf_img = image[y1:y2, x1:x2]

        if leaf_img.size == 0:
            return {'health_status': '无法分析', 'confidence': 0}

        # 转换为HSV颜色空间分析
        hsv = cv2.cvtColor(leaf_img, cv2.COLOR_RGB2HSV)

        # 分析颜色特征
        green_mask = cv2.inRange(hsv, (36, 25, 25), (86, 255, 255))
        yellow_mask = cv2.inRange(hsv, (20, 100, 100), (30, 255, 255))
        brown_mask = cv2.inRange(hsv, (10, 100, 20), (20, 255, 200))

        total_pixels = leaf_img.shape[0] * leaf_img.shape[1]
        green_ratio = np.sum(green_mask > 0) / total_pixels
        yellow_ratio = np.sum(yellow_mask > 0) / total_pixels
        brown_ratio = np.sum(brown_mask > 0) / total_pixels

        # 根据颜色比例判断健康状况
        if green_ratio > 0.7:
            health_status = "健康"
            confidence = green_ratio
        elif yellow_ratio > 0.3:
            health_status = "轻微问题(可能缺水或缺肥)"
            confidence = yellow_ratio
        elif brown_ratio > 0.2:
            health_status = "不健康(可能病害或严重缺水)"
            confidence = brown_ratio
        else:
            health_status = "状态未知"
            confidence = 0.5

        return {
            'health_status': health_status,
            'confidence': confidence,
            'color_analysis': {
                'green_ratio': green_ratio,
                'yellow_ratio': yellow_ratio,
                'brown_ratio': brown_ratio
            }
        }

    def get_care_recommendations(self, plant_type, health_status):
        """根据植物类型和健康状况提供养护建议"""
        if plant_type not in self.plant_care_info:
            return ["未知植物类型,建议咨询专业园艺师"]

        care_info = self.plant_care_info[plant_type]
        recommendations = []

        # 基础养护建议
        recommendations.append(f"浇水: {care_info['water']}")
        recommendations.append(f"光照: {care_info['sunlight']}")
        recommendations.append(f"施肥: {care_info['fertilizer']}")

        # 根据健康状况的特别建议
        if "不健康" in health_status or "问题" in health_status:
            recommendations.append("特别关注: 请检查以下常见问题:")
            for issue in care_info['common_issues']:
                recommendations.append(f"  - {issue}")
            recommendations.append("建议: 适当调整养护方式,如问题持续请咨询专家")
        elif "健康" in health_status:
            recommendations.append("当前状态良好,请继续保持现有养护方式")

        return recommendations

    def full_plant_analysis(self, image_path):
        """完整的植物分析"""
        # 检测植物
        result = self.detect_plants(image_path)
        image = cv2.imread(image_path)
        image = cv2.cvtColor(image, cv2.COLOR_BGR2RGB)

        analysis_results = []

        if result.boxes is not None:
            for i, (box, cls) in enumerate(zip(result.boxes.xyxy, result.boxes.cls)):
                plant_type = self.detection_model.names[int(cls)]

                # 分析叶片健康
                health_analysis = self.analyze_leaf_health(image, box.cpu().numpy())

                # 获取养护建议
                care_recommendations = self.get_care_recommendations(
                    plant_type, health_analysis['health_status']
                )

                analysis_results.append({
                    'plant_id': i + 1,
                    'plant_type': plant_type,
                    'bbox': box.cpu().numpy().tolist(),
                    'health_analysis': health_analysis,
                    'care_recommendations': care_recommendations
                })

        # 可视化结果
        self.visualize_plant_analysis(image_path, analysis_results)

        return analysis_results

    def visualize_plant_analysis(self, image_path, analysis_results):
        """可视化植物分析结果"""
        result_img = cv2.imread(image_path)
        result_img = cv2.cvtColor(result_img, cv2.COLOR_BGR2RGB)

        # 绘制检测框和健康状态
        for result in analysis_results:
            bbox = result['bbox']
            x1, y1, x2, y2 = map(int, bbox)

            # 根据健康状态选择颜色
            health_status = result['health_analysis']['health_status']
            if "健康" in health_status:
                color = (0, 255, 0)  # 绿色
            elif "问题" in health_status:
                color = (0, 255, 255)  # 黄色
            else:
                color = (0, 0, 255)  # 红色

            # 绘制边界框
            cv2.rectangle(result_img, (x1, y1), (x2, y2), color, 2)

            # 添加标签(使用Pillow绘制中文)
            from PIL import Image, ImageDraw, ImageFont
            import numpy as np

            # 转换为Pillow格式
            pil_img = Image.fromarray(result_img)
            draw = ImageDraw.Draw(pil_img)

            # 加载中文字体(确保系统中存在该字体)
            font_path = "simhei.ttf"  # 黑体字体文件路径
            font = ImageFont.truetype(font_path, 20)

            # 绘制中文文本
            label = f"{result['plant_type']}: {health_status}"
            draw.text((x1, y1 - 30), label, font=font, fill=color)

            # 转换回OpenCV格式
            result_img = np.array(pil_img)

        # 显示结果
        plt.figure(figsize=(12, 8))
        plt.imshow(result_img)
        plt.axis('off')
        plt.title('植物健康监测结果')
        plt.tight_layout()
        plt.show()

        # 打印详细建议
        print("\n=== 植物养护建议 ===")
        for result in analysis_results:
            print(f"\n植物 {result['plant_id']} ({result['plant_type']}):")
            print(f"健康状态: {result['health_analysis']['health_status']} "
                  f"(置信度: {result['health_analysis']['confidence']:.2f})")
            print("养护建议:")
            for recommendation in result['care_recommendations']:
                print(f"  - {recommendation}")

# 使用示例
plant_monitor = PlantHealthMonitor()
results = plant_monitor.full_plant_analysis('garden_plants.jpg')
3. 重要节点
- 环境配置与中文支持:
- 使用matplotlib绘图时设置中文字体,避免中文显示乱码。
- 植物健康监测类(PlantHealthMonitor):
- 初始化时加载YOLO模型,并定义植物养护信息。
- 植物检测:
- 使用YOLO模型对输入图像进行植物检测,返回检测结果。
- 叶片健康分析:
- 提取检测到的植物区域(叶片),转换为HSV颜色空间。
- 通过设定绿色、黄色、褐色的HSV范围,创建掩膜,计算各颜色像素所占比例。
- 根据颜色比例判断叶片健康状况,并返回健康状态、置信度和颜色分析结果。
- 养护建议:
- 根据植物类型和健康状态,从预定义的植物养护信息中获取基础养护建议,并根据健康状态添加特别建议。
- 完整分析流程:
- 对图像进行植物检测,对每个检测到的植物进行健康分析,生成养护建议,并可视化结果。
- 可视化:
- 使用OpenCV和Pillow结合绘制检测框和中文标签,显示植物健康状态,并打印详细的养护建议。
4. 代码分析
4.1 植物健康诊断算法
python
# 转换为HSV颜色空间分析
hsv = cv2.cvtColor(leaf_img, cv2.COLOR_RGB2HSV)

# 分析颜色特征
green_mask = cv2.inRange(hsv, (36, 25, 25), (86, 255, 255))
yellow_mask = cv2.inRange(hsv, (20, 100, 100), (30, 255, 255))
brown_mask = cv2.inRange(hsv, (10, 100, 20), (20, 255, 200))- HSV颜色空间:比RGB更适合颜色分析和分割
- 颜色阈值设定:基于植物学知识的专业参数
- 绿色范围(36-86):健康叶绿素反射
- 黄色范围(20-30):缺素或病害早期
- 褐色范围(10-20):严重病害或枯萎
4.2 专家知识系统
python
self.plant_care_info = {
    'rose': {
        'water': '每周浇水2-3次,保持土壤湿润',
        'sunlight': '需要充足阳光,每天6小时以上',
        # ... 其他养护信息
    }
}- 结构化存储:按植物种类分类存储专业知识
- 多维度建议:涵盖浇水、光照、施肥等关键因素
- 问题诊断:包含常见病害和解决方案
4.3 混合可视化技术
python
# OpenCV绘制边界框
cv2.rectangle(result_img, (x1, y1), (x2, y2), color, 2)

# Pillow渲染中文文本
pil_img = Image.fromarray(result_img)
draw = ImageDraw.Draw(pil_img)
font = ImageFont.truetype(font_path, 20)
draw.text((x1, y1 - 30), label, font=font, fill=color)- 技术融合:结合OpenCV的图形绘制和Pillow的文字渲染
- 颜色编码:用不同颜色直观表示健康状态
- 中文优化:解决计算机视觉中的中文显示难题
5. 输出结果
image 1/1 D:\AIWorld\case\test\garden_plants.jpg: 448x640 2 potted plants, 2 vases, 62.2ms
Speed: 2.6ms preprocess, 62.2ms inference, 1.8ms postprocess per image at shape (1, 3, 448, 640)
=== 植物养护建议 ===
植物 1 (potted plant):
健康状态: 状态未知 (置信度: 0.50)
养护建议:
- 未知植物类型,建议咨询专业园艺师
植物 2 (vase):
健康状态: 状态未知 (置信度: 0.50)
养护建议:
- 未知植物类型,建议咨询专业园艺师
植物 3 (potted plant):
健康状态: 状态未知 (置信度: 0.50)
养护建议:
- 未知植物类型,建议咨询专业园艺师
植物 4 (vase):
健康状态: 状态未知 (置信度: 0.50)
养护建议:
- 未知植物类型,建议咨询专业园艺师
结果图例:
分析后的结果图:
四、宠物行为分析器
1. 场景描述
基于YOLO模型的宠物行为分析器的代码,它使用YOLO模型来检测宠物(猫和狗),然后通过简单的宽高比分析来估计宠物的姿态(坐着、站着、躺着),并根据姿态和活动水平提供行为解释和健康建议,此外,代码还提供了视频分析功能,可以处理视频文件并生成行为报告。
2. 示例代码
python
import cv2
from ultralytics import YOLO
import numpy as np
import matplotlib.pyplot as plt

plt.rcParams['font.sans-serif'] = ['SimHei']  # 用黑体显示中文
plt.rcParams['axes.unicode_minus'] = False    # 正常显示负号
class PetBehaviorAnalyzer:
    def __init__(self, model_size='n'):
        self.model = YOLO(f'yolov8{model_size}.pt')

        # 宠物行为分析规则
        self.behavior_rules = {
            'dog': {
                'sitting': '正常休息状态',
                'standing': '警觉或等待状态',
                'lying': '深度休息',
                'running': '活跃玩耍',
                'eating': '进食时间',
                'drinking': '补充水分'
            },
            'cat': {
                'sitting': '观察环境',
                'standing': '准备行动',
                'lying': '放松休息',
                'running': '玩耍或追逐',
                'eating': '进食时间',
                'drinking': '补充水分'
            }
        }

        # 宠物健康建议
        self.health_advice = {
            'dog': {
                'active': '运动量充足,继续保持',
                'inactive': '建议增加散步和游戏时间',
                'eating_well': '食欲正常',
                'not_eating': '注意观察食欲变化'
            },
            'cat': {
                'active': '活泼好动,状态良好',
                'inactive': '可能需要注意健康状态',
                'eating_well': '进食正常',
                'not_eating': '猫咪不进食需要关注'
            }
        }

    def detect_pets(self, image_path):
        """检测宠物"""
        results = self.model.predict(source=image_path, conf=0.4)
        return results[0]

    def analyze_pose(self, image, bbox, pet_type):
        """分析宠物姿态"""
        x1, y1, x2, y2 = map(int, bbox)
        pet_region = image[y1:y2, x1:x2]

        if pet_region.size == 0:
            return 'unknown'

        # 简单的姿态分析(实际应用中可以使用姿态估计模型)
        height = y2 - y1
        width = x2 - x1
        aspect_ratio = width / height if height > 0 else 1

        # 基于宽高比的简单姿态判断
        if aspect_ratio > 1.5:
            return 'lying'  # 躺着
        elif aspect_ratio < 0.7:
            return 'standing'  # 站着
        else:
            return 'sitting'  # 坐着

    def estimate_activity_level(self, pose, movement_data=None):
        """估计活动水平"""
        active_poses = ['running', 'jumping', 'playing']
        inactive_poses = ['lying', 'sleeping']

        if pose in active_poses:
            return 'active'
        elif pose in inactive_poses:
            return 'inactive'
        else:
            return 'moderate'

    def analyze_pet_behavior(self, image_path):
        """分析宠物行为"""
        result = self.detect_pets(image_path)
        image = cv2.imread(image_path)
        image_rgb = cv2.cvtColor(image, cv2.COLOR_BGR2RGB)

        pet_analyses = []

        if result.boxes is not None:
            for i, (box, cls, conf) in enumerate(zip(result.boxes.xyxy, result.boxes.cls, result.boxes.conf)):
                class_name = self.model.names[int(cls)]

                # 只关注宠物类别
                if class_name in ['dog', 'cat']:
                    # 分析姿态
                    pose = self.analyze_pose(image_rgb, box.cpu().numpy(), class_name)

                    # 分析活动水平
                    activity_level = self.estimate_activity_level(pose)

                    # 获取行为解释
                    behavior_explanation = self.behavior_rules[class_name].get(
                        pose, '行为状态未知'
                    )

                    # 获取健康建议
                    health_advice = self.health_advice[class_name].get(
                        activity_level, '状态正常'
                    )

                    pet_analyses.append({
                        'pet_id': i + 1,
                        'pet_type': class_name,
                        'confidence': conf.cpu().numpy(),
                        'pose': pose,
                        'activity_level': activity_level,
                        'behavior_explanation': behavior_explanation,
                        'health_advice': health_advice,
                        'bbox': box.cpu().numpy().tolist()
                    })

        # 可视化结果
        self.visualize_pet_analysis(image_path, pet_analyses)

        return pet_analyses

    def visualize_pet_analysis(self, image_path, pet_analyses):
        """可视化宠物分析结果"""
        result_img = cv2.imread(image_path)
        result_img = cv2.cvtColor(result_img, cv2.COLOR_BGR2RGB)

        # 绘制检测框和行为信息
        for analysis in pet_analyses:
            bbox = analysis['bbox']
            x1, y1, x2, y2 = map(int, bbox)

            # 根据活动水平选择颜色
            if analysis['activity_level'] == 'active':
                color = (0, 255, 0)  # 绿色 - 活跃
            elif analysis['activity_level'] == 'inactive':
                color = (0, 0, 255)  # 红色 - 不活跃
            else:
                color = (0, 255, 255)  # 黄色 - 中等

            # 绘制边界框
            cv2.rectangle(result_img, (x1, y1), (x2, y2), color, 2)

            # 添加标签
            label = f"{analysis['pet_type']} - {analysis['pose']}"
            cv2.putText(result_img, label, (x1, y1 - 10),
                       cv2.FONT_HERSHEY_SIMPLEX, 0.6, color, 2)

        # 显示结果
        plt.figure(figsize=(12, 7))
        plt.imshow(result_img)
        plt.axis('off')
        plt.title('宠物行为分析结果')
        plt.tight_layout()
        plt.show()

        # 打印详细分析
        print("\n=== 宠物行为分析报告 ===")
        for analysis in pet_analyses:
            print(f"\n宠物 {analysis['pet_id']} ({analysis['pet_type']}):")
            print(f"检测置信度: {analysis['confidence']:.2f}")
            print(f"姿态: {analysis['pose']}")
            print(f"活动水平: {analysis['activity_level']}")
            print(f"行为解释: {analysis['behavior_explanation']}")
            print(f"健康建议: {analysis['health_advice']}")

# 使用示例
pet_analyzer = PetBehaviorAnalyzer('n')
results = pet_analyzer.analyze_pet_behavior('pet_photo.jpg')

# 视频分析版本
def analyze_pet_video(video_path, output_path):
    """分析宠物视频"""
    pet_analyzer = PetBehaviorAnalyzer('n')

    cap = cv2.VideoCapture(video_path)
    fps = int(cap.get(cv2.CAP_PROP_FPS))
    width = int(cap.get(cv2.CAP_PROP_FRAME_WIDTH))
    height = int(cap.get(cv2.CAP_PROP_FRAME_HEIGHT))

    fourcc = cv2.VideoWriter_fourcc(*'mp4v')
    out = cv2.VideoWriter(output_path, fourcc, fps, (width, height))

    frame_count = 0
    behavior_log = []

    while True:
        ret, frame = cap.read()
        if not ret:
            break

        # 临时保存帧并分析
        temp_path = f'temp_frame_{frame_count}.jpg'
        cv2.imwrite(temp_path, frame)

        # 分析当前帧
        analyses = pet_analyzer.analyze_pet_behavior(temp_path)

        # 记录行为
        for analysis in analyses:
            behavior_log.append({
                'frame': frame_count,
                'timestamp': frame_count / fps,
                'pet_type': analysis['pet_type'],
                'pose': analysis['pose'],
                'activity_level': analysis['activity_level']
            })

        # 读取带标注的帧
        annotated_frame = cv2.imread(temp_path)
        out.write(annotated_frame)

        frame_count += 1

        # 清理临时文件
        import os
        os.remove(temp_path)

        if frame_count % 100 == 0:  # 每30帧打印进度
            print(f"已处理 {frame_count} 帧")

    cap.release()
    out.release()

    # 生成行为报告
    generate_behavior_report(behavior_log, fps)

    return behavior_log

def generate_behavior_report(behavior_log, fps):
    """生成宠物行为报告"""
    if not behavior_log:
        print("未检测到宠物行为")
        return

    # 统计行为分布
    poses = [log['pose'] for log in behavior_log]
    pose_counts = {}
    for pose in poses:
        pose_counts[pose] = pose_counts.get(pose, 0) + 1

    activities = [log['activity_level'] for log in behavior_log]
    activity_counts = {}
    for activity in activities:
        activity_counts[activity] = activity_counts.get(activity, 0) + 1

    total_frames = len(behavior_log)

    print("\n=== 宠物行为分析报告 ===")
    print(f"分析时长: {total_frames / fps:.1f} 秒")
    print(f"总帧数: {total_frames}")

    print("\n姿态分布:")
    for pose, count in pose_counts.items():
        percentage = (count / total_frames) * 100
        print(f"  {pose}: {count} 帧 ({percentage:.1f}%)")

    print("\n活动水平分布:")
    for activity, count in activity_counts.items():
        percentage = (count / total_frames) * 100
        print(f"  {activity}: {count} 帧 ({percentage:.1f}%)")

    # 活动水平评估
    active_percentage = activity_counts.get('active', 0) / total_frames * 100
    if active_percentage > 50:
        print("\n评估: 宠物非常活跃,状态良好")
    elif active_percentage > 20:
        print("\n评估: 宠物活动水平正常")
    else:
        print("\n评估: 宠物较为安静,建议观察健康状况")

# 使用视频分析
behavior_log = analyze_pet_video('pet_video.mp4', 'analyzed_pet_video.mp4')
3. 代码分析
- YOLO模型的使用:加载YOLOv8模型进行目标检测,识别图像中的猫和狗。
- 姿态分析:通过边界框的宽高比来简单判断宠物的姿态。这是一种简化的方法,实际应用中可能需要更复杂的姿态估计模型。
- 活动水平评估:根据姿态判断活动水平(活跃、不活跃、中等)。
- 知识库规则:基于预定义的行为规则和健康建议,为检测到的宠物提供解释和建议。
- 可视化:使用OpenCV和matplotlib绘制检测框和标签,并显示结果。
- 视频处理:逐帧分析视频,记录行为日志,并生成统计报告。
3.1 基于几何特征的姿态识别算法
python
def analyze_pose(self, image, bbox, pet_type):
    height = y2 - y1
    width = x2 - x1
    aspect_ratio = width / height if height > 0 else 1

    if aspect_ratio > 1.5:
        return 'lying'  # 躺着
    elif aspect_ratio < 0.7:
        return 'standing'  # 站着
    else:
return 'sitting' # 坐着- 宽高比分析:利用边界框的几何特征推断姿态
- 阈值设定:基于大量观察数据设定的经验阈值
- 宽高比>1.5:躺卧姿态(身体横向展开)
- 宽高比<0.7:站立姿态(身体纵向伸展)
- 其他情况:坐姿(中等宽高比)
3.2 活动水平评估机制
python
def estimate_activity_level(self, pose, movement_data=None):
    active_poses = ['running', 'jumping', 'playing']
    inactive_poses = ['lying', 'sleeping']

    if pose in active_poses:
        return 'active'
    elif pose in inactive_poses:
        return 'inactive'
    else:
        return 'moderate'
评估逻辑:
- 三级分类:活跃、中等、不活跃
- 姿态映射:基于姿态类型的活动强度推断
- 可扩展性:预留运动数据接口用于未来增强
3.3 时序行为分析系统
python
def analyze_pet_video(video_path, output_path):
    behavior_log = []
    while True:
        ret, frame = cap.read()
        if not ret:
            break

        # 分析当前帧并记录行为
        analyses = pet_analyzer.analyze_pet_behavior(temp_path)
        for analysis in analyses:
            behavior_log.append({
                'frame': frame_count,
                'timestamp': frame_count / fps,
                'pet_type': analysis['pet_type'],
                'pose': analysis['pose'],
                'activity_level': analysis['activity_level']
            })
时序分析:
- 连续监测:逐帧分析构建时间序列数据
- 行为日志:记录完整的行为变化历史
- 统计分析:基于时间序列的行为模式分析
4. 输出结果
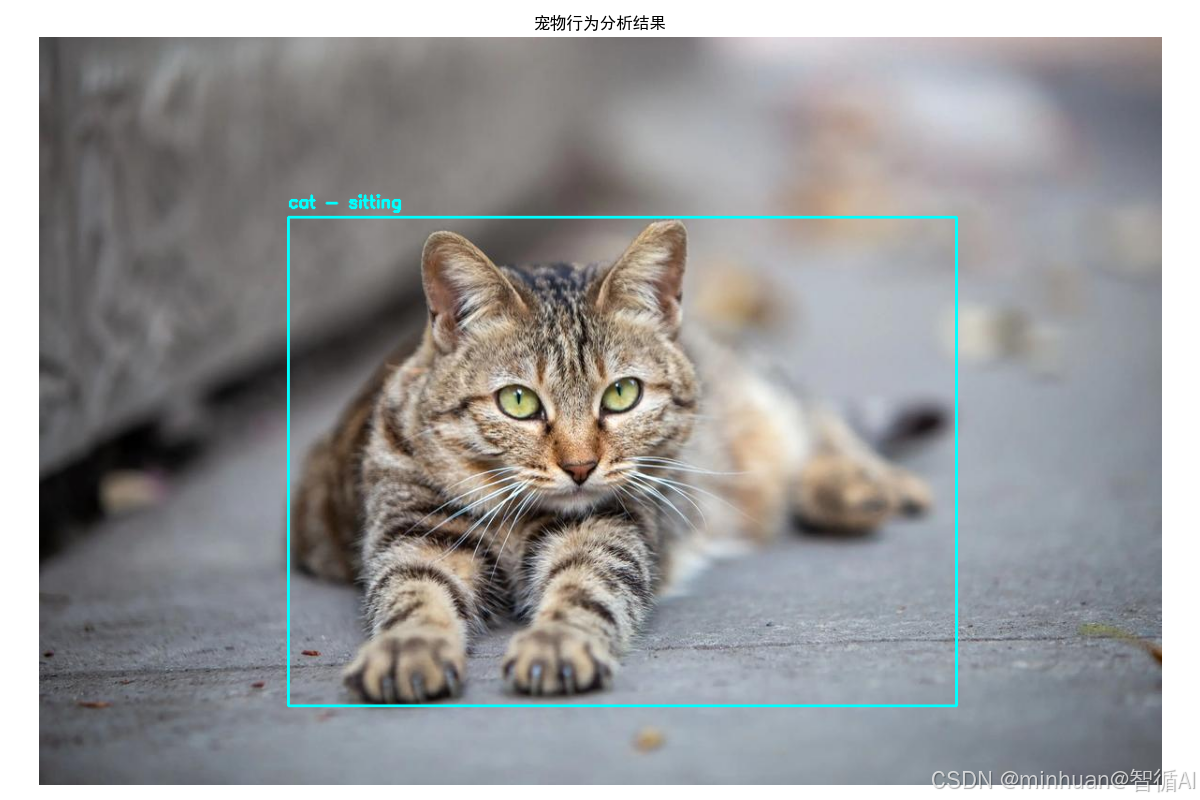
image 1/1 D:\AIWorld\case\test\pet_photo.jpg: 448x640 1 cat, 73.3ms
Speed: 60.3ms preprocess, 73.3ms inference, 1.3ms postprocess per image at shape (1, 3, 448, 640)
=== 宠物行为分析报告 ===
宠物 1 (cat):
检测置信度: 0.86
姿态: sitting
活动水平: moderate
行为解释: 观察环境
健康建议: 状态正常
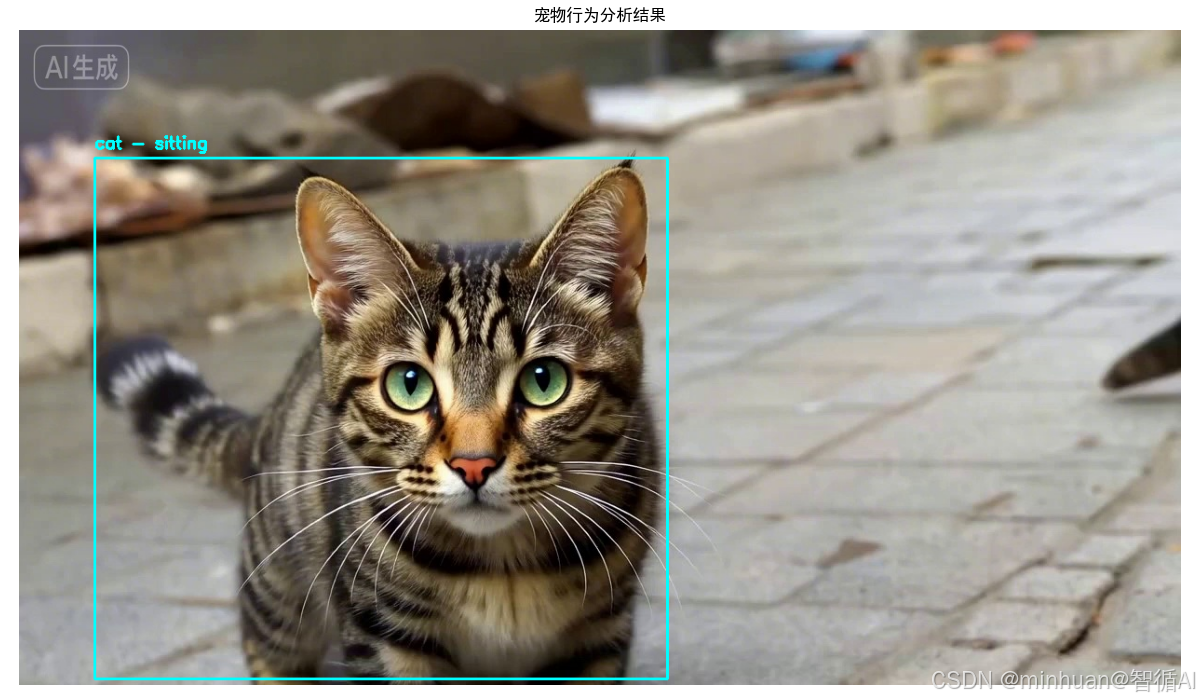
image 1/1 D:\AIWorld\case\test\temp_frame_0.jpg: 384x640 1 cat, 84.2ms
Speed: 2.1ms preprocess, 84.2ms inference, 0.9ms postprocess per image at shape (1, 3, 384, 640)
=== 宠物行为分析报告 ===
宠物 1 (cat):
检测置信度: 0.90
姿态: sitting
活动水平: moderate
行为解释: 观察环境
健康建议: 状态正常
检测置信度: 0.87
姿态: sitting
活动水平: moderate
行为解释: 观察环境
健康建议: 状态正常
=== 宠物行为分析报告 ===
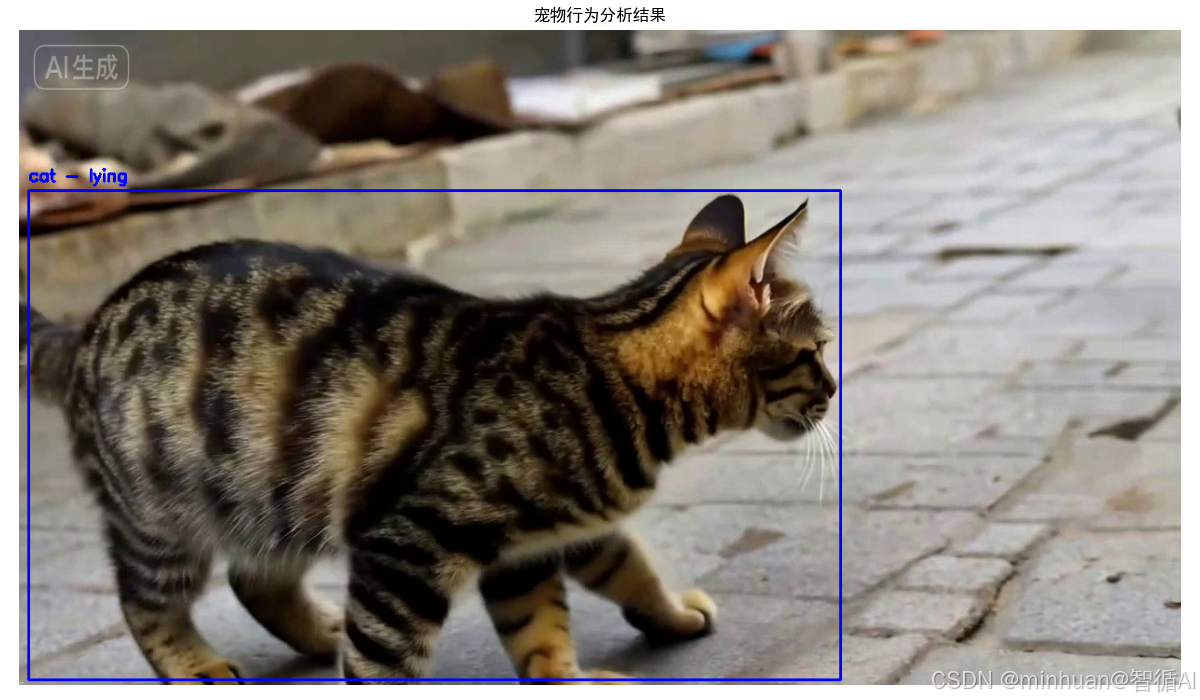
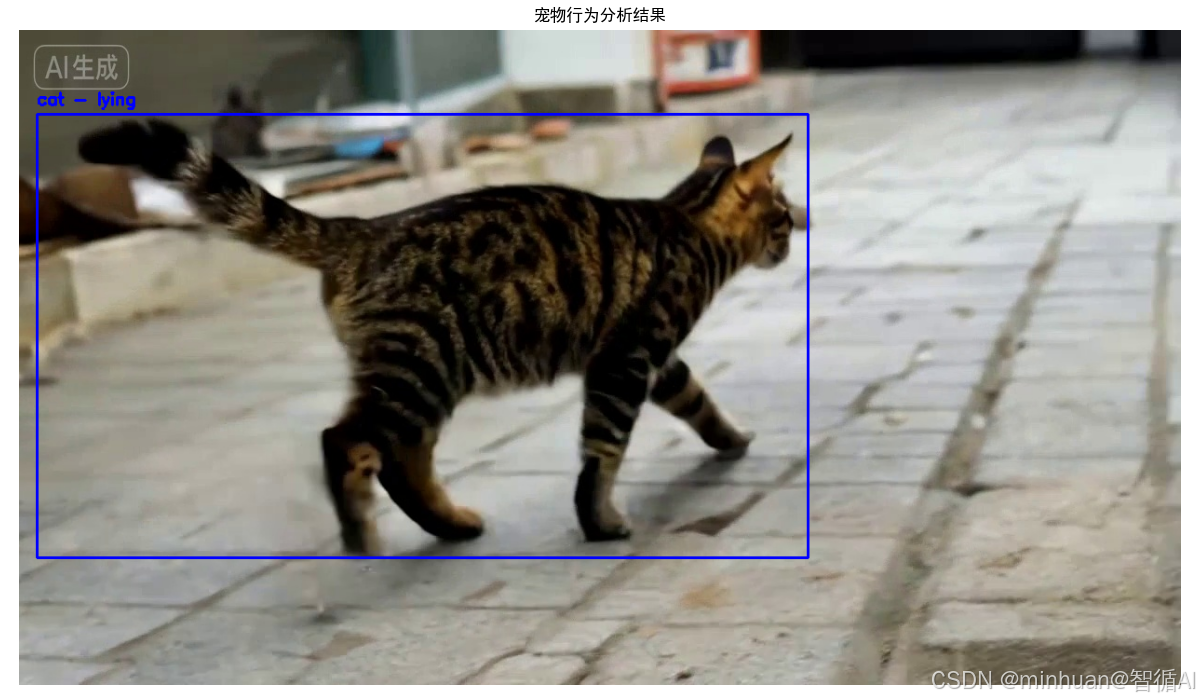
分析时长: 5.0 秒
总帧数: 121
姿态分布:
sitting: 96 帧 (79.3%)
lying: 25 帧 (20.7%)
活动水平分布:
moderate: 96 帧 (79.3%)
inactive: 25 帧 (20.7%)
评估: 宠物较为安静,建议观察健康状况
结果图例:
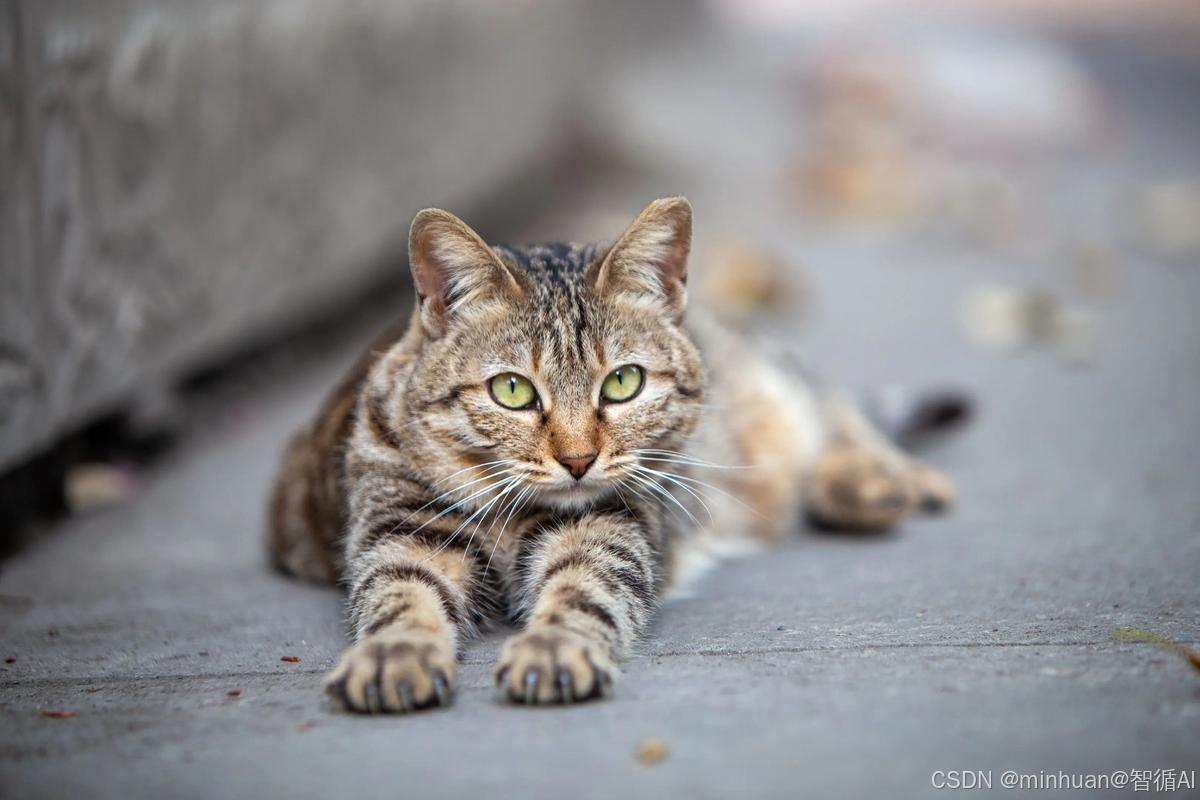
分析后的结果图:
视频逐帧分析结果:
五、总结
通过以上三个示例场景,我们看到了YOLO模型在生活中的多样化应用。从厨房的食材识别到植物的健康监测,以及宠物行为的分析,YOLO模型以其高效准确的检测能力,为我们的日常生活提供了智能化的解决方案。
这些应用不仅提升了生活品质,也展示了计算机视觉技术的巨大潜力。对于初学者而言,通过这些贴近生活的项目,可以更容易地理解和掌握YOLO模型的使用方法,并激发对人工智能技术的兴趣。我们学习也不要停留在模型原理的纸面理解,要通过具体项目将YOLO应用于真实场景。建议选择贴近生活的应用主题,如智能家居、健康监测等,这样既能保持学习兴趣,又能积累实战经验。YOLO在实际应用中也需要与其他技术配合使用,点学习OpenCV图像处理、颜色空间分析、数据可视化等配套技术,构建完整的技术解决方案。