文章目录
- [docker swarm 和containerd](#docker swarm 和containerd)
- [docker swarm](#docker swarm)
-
- [**docker swarm中重要的概念**](#docker swarm中重要的概念)
- **部署swarm集群**
- **运行第一个Service**
- **如何实现Service伸缩?**
- **Swarm如何实现Failover?**
- **如何访问Service?**
- [**神奇的routing mesh**](#神奇的routing mesh)
- containerd
-
- 一、Containerd介绍
-
- 1.前言
- 2.Containerd前世今生
- 3.Containerd架构
-
- [3.1 架构图](#3.1 架构图)
- [3.2 常用插件](#3.2 常用插件)
- [3.3 架构缩略图](#3.3 架构缩略图)
- [3.4 与其它容器运行时工具性能对比](#3.4 与其它容器运行时工具性能对比)
- 二、Containerd安装
- 三、Containerd容器镜像管理
- 四、Containerd容器管理
- [五、Containerd NameSpace管理](#五、Containerd NameSpace管理)
- nerdctl实践
-
- [**nerdctl** 安装](#nerdctl 安装)
- [**nerdctl** 管理镜像](#nerdctl 管理镜像)
- [**nerdctl** **管理容器**](#nerdctl 管理容器)
-
- 帮助信息
- **ls**
- **run**
- **rm**
- **prune**
- **rename**
- [**stop** **和** **start**](#stop 和 start)
- **restart**
- [**pause** **和** **unpause**](#pause 和 unpause)
- **kill**
- **exec**
- **cp**
- **inspect**
- **logs**
- **commit**
- [**nerdctl 管理网络**](#nerdctl 管理网络)
- [**nerdctl** 管理存储](#nerdctl 管理存储)
- [**nerdctl** **管理命名空间**](#nerdctl 管理命名空间)
- [**crictl** **实践**](#crictl 实践)
-
- [**crictl** **命令介绍**](#crictl 命令介绍)
- [**crictl** **命令安装**](#crictl 命令安装)
- [**crictl** **命令实践**](#crictl 命令实践)
docker swarm 和containerd
docker swarm
docker swarm中重要的概念
从主机的层面来看,Docker Swarm 管理的是 Docker Host 集群。所以先来讨论一个重要的概念 - 集群化(Clustering)。
服务器集群由一组网络上相互连接的服务器组成,它们一起协同工作。一个集群和一堆服务器最显著的区别在于:
集群能够像 单个 系统那样工作,同时提供高可用、负载均衡和并行处理。
如果我们部署应用和服务时选择的是多个独立的服务器而非集群,资源的整体利用率则很难达到最优,因为我们无法提前知道如何分布这些应用才能达到资源利用的最大化。而且,应用使用资源的趋势是波动的,早上某些服务可能需要大量的内存,而下午使用量就降下来了。提前指定应用应该运行在哪个服务器上会丧失业务的弹性,当某个服务器宕机了,我们不得不手工将受影响的应用迁移到其他服务器上。
实现集群化后我们的思维方式就必须改变了:不再考虑一个一个的服务器,而是将集群看做是一个整体。
部署应用时,我们只考虑需要多少内存和 CPU,而不是考虑会使用那台服务器的内存和 CPU。我们不应该关心应用会被部署在哪里,我们关心的是运行这个应用需要哪些资源,然后将它部署到集群,集群管理程序(比如 Docker Swarm)会搞定这些细节。
集群整体容量的调整是通过往集群中添加和删除主机节点实现的。但不管做怎样的操作,集群始终还是一个整体。
本章,我们会创建 Docker Swarm 集群、部署应用、伸缩扩展应用,以及对应用执行滚动升级。
Docker Swarm Mode
Docker v1.12 是一个非常重要的版本,Docker 重新实现了集群的编排方式。在此之前,提供集群功能的Docker Swarm 是一个单独的软件,而且依赖外部数据库(比如 Consul、etcd 或 Zookeeper)。
从 v1.12 开始,Docker Swarm 的功能已经完全与 Docker Engine 集成,要管理集群,只需要启动Swarm Mode。安装好 Docker,Swarm 就已经在那里了,服务发现也在那里了(不需要安装 Consul 等外部数据库)。
相比 Kubernetes,用 Docker Swarm 创建集群非常简单,不需要额外安装任何软件,也不需要做任何额外的配置。很适合作为学习容器编排引擎的起点。
重要概念
在创建集群之前,先明确几个概念。
swarm
swarm 运行 Docker Engine 的多个主机组成的集群。
从 v1.12 开始,集群管理和编排功能已经集成进 Docker Engine。当 Docker Engine 初始化了一个swarm 或者加入到一个存在的 swarm 时,它就启动了 swarm mode。没启动 swarm mode 时,Docker 执行的是容器命令;运行 swarm mode 后,Docker 增加了编排service 的能力。
Docker 允许在同一个 Docker 主机上既运行 swarm service,又运行单独的容器。
node
swarm 中的每个 Docker Engine 都是一个 node,有两种类型的 node:manager 和 worker。
为了向 swarm 中部署应用,我们需要在 manager node 上执行部署命令,manager node 会将部署任务拆解并分配给一个或多个 worker node 完成部署。
manager node 负责执行编排和集群管理工作,保持并维护 swarm 处于期望的状态。swarm 中如果有多个 manager node,它们会自动协商并选举出一个 leader 执行编排任务。
woker node 接受并执行由 manager node 派发的任务。默认配置下 manager node 同时也是一个worker node,不过可以将其配置成 manager-only node,让其专职负责编排和集群管理工作。
work node 会定期向 manager node 报告自己的状态和它正在执行的任务的状态,这样 manager 就可以维护整个集群的状态。
service
service 定义了 worker node 上要执行的任务。swarm 的主要编排任务就是保证 service 处于期望的状态下。
举一个 service 的例子:在 swarm 中启动一个 http 服务,使用的镜像是 httpd:latest,副本数为 3。
manager node 负责创建这个 service,经过分析知道需要启动 3 个 httpd 容器,根据当前各 worker node 的状态将运行容器的任务分配下去,比如 worker1 上运行两个容器,worker2 上运行一个容器。
运行了一段时间,worker2 突然宕机了,manager 监控到这个故障,于是立即在 worker3 上启动了一个新的 httpd 容器。
这样就保证了 service 处于期望的三个副本状态。
下一节我们开始实践 Docker Swarm。
部署swarm集群
本节我们将创建三节点的 swarm 集群。
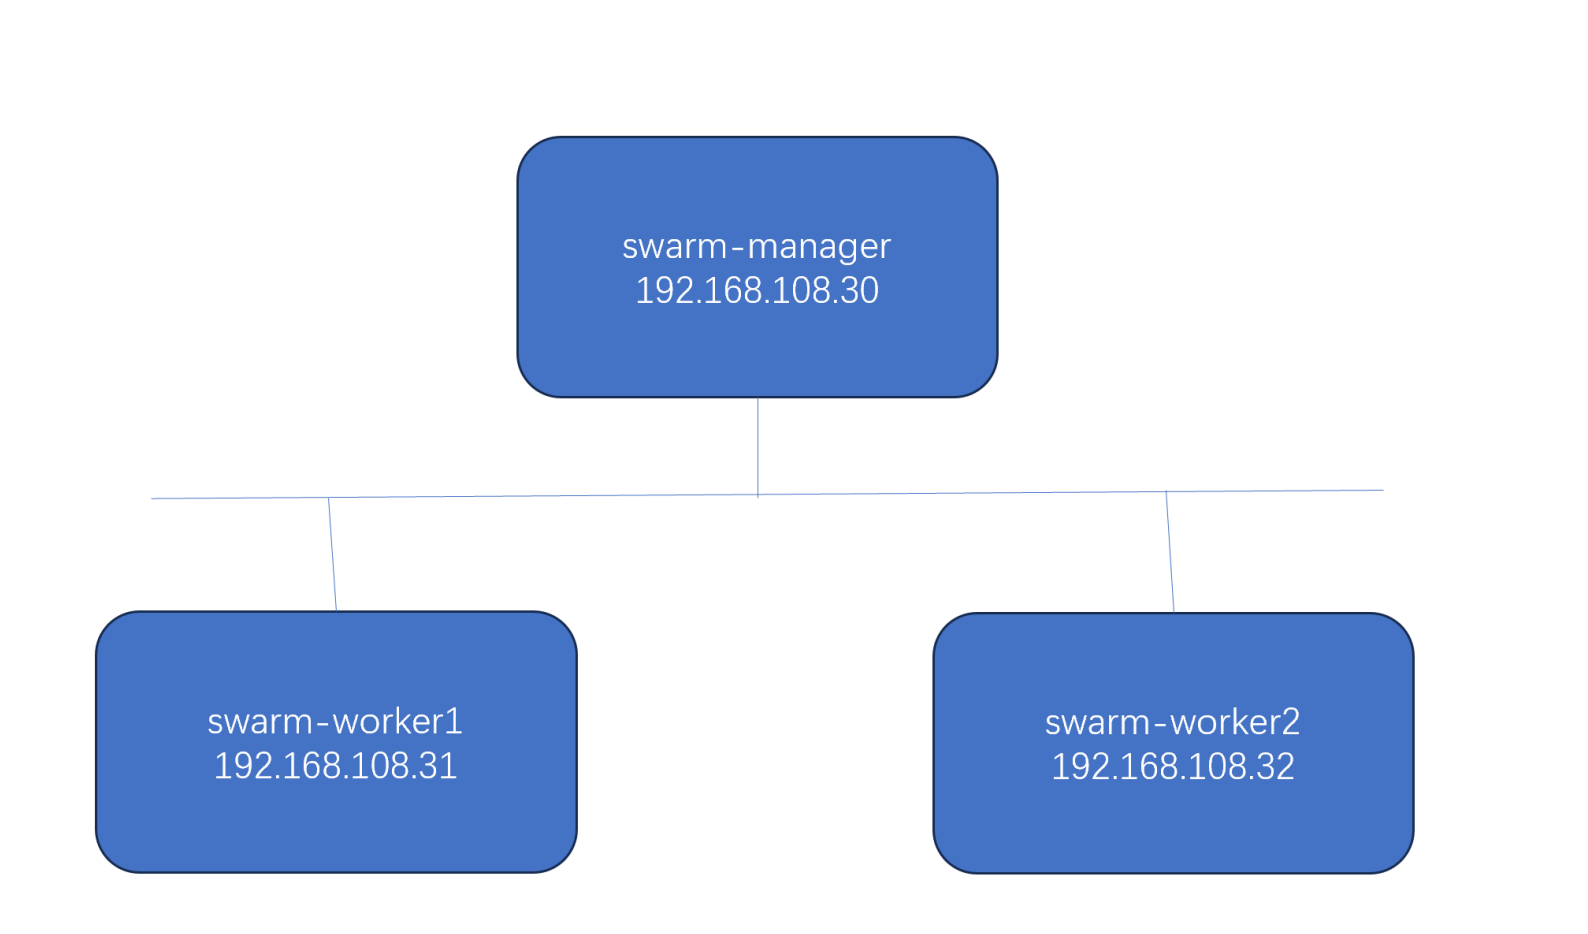
swarm-manager 是 manager node,swarm-worker1 和 swarm-worker2 是 worker node。
通过 docker教案 中安装的docker虚拟机,完整克隆出swarm-manager,swarm-worker1,swarm worker2,并修改IP地址与主机名与上图相同。
所有节点的 Docker 版本均不低于 v1.12。我们的实验环境 node 的操作系统为 centos-stream-8,当然其他 Linux 也是可以的。
在 swarm-manager 上执行如下命令创建 swarm。
bash
[root@swarm-manager ~ 09:55:36]# docker swarm init --advertise-addr 192.168.108.30
Swarm initialized: current node (kutadbcr1h1r7m6q11ne9ivp5) is now a manager.

To add a worker to this swarm, run the following command:

    docker swarm join --token SWMTKN-1-5smkdkskyuavjjy9fqgso3w9liizz1ewdv4liopuq05jey39tv-alqfy86djj99d1lt84hz1950o 192.168.108.30:2377

To add a manager to this swarm, run 'docker swarm join-token manager' and follow the instructions.
--advertise-addr 指定与其他 node 通信的地址。
docker swarm init 输出告诉我们:
① swarm 创建成功,swarm-manager 成为 manager node。
② 添加 worker node 需要执行的命令。
③ 添加 manager node 需要执行的命令。
执行 docker node ls 查看当前 swarm 的 node,目前只有一个 manager
bash
[root@swarm-manager ~ 09:55:42]# docker node ls
ID                            HOSTNAME        STATUS    AVAILABILITY   MANAGER STATUS   ENGINE VERSION
kutadbcr1h1r7m6q11ne9ivp5 *   swarm-manager   Ready     Active         Leader           26.1.3
复制前面的 docker swarm join 命令,在 swarm-worker1 和 swarm-worker2 上执行,将它们添加到 swarm 中。命令输出如下:
注意:三个节点将防火墙zone设置为trust
bash
[root@swarm-manager ~ 09:56:14]# firewall-cmd --set-default-zone=trusted
success

[root@swarm-worker1 ~ 09:53:59]# firewall-cmd --set-default-zone=trusted
success

[root@swarm-worker2 ~ 09:54:45]# firewall-cmd --set-default-zone=trusted
success
bash
[root@swarm-worker1 ~ 09:56:52]# docker swarm join --token SWMTKN-1-5smkdkskyuavjjy9fqgso3w9liizz1ewdv4liopuq05jey39tv-alqfy86djj99d1lt84hz1950o 192.168.108.30:2377
This node joined a swarm as a worker.

[root@swarm-worker2 ~ 09:57:15]# docker swarm join --token SWMTKN-1-5smkdkskyuavjjy9fqgso3w9liizz1ewdv4liopuq05jey39tv-alqfy86djj99d1lt84hz1950o 192.168.108.30:2377
This node joined a swarm as a worker.
docker node ls 可以看到两个 worker node 已经添加进来了。
bash
[root@swarm-manager ~ 09:56:23]# docker node ls
ID                            HOSTNAME        STATUS    AVAILABILITY   MANAGER STATUS   ENGINE VERSION
kutadbcr1h1r7m6q11ne9ivp5 *   swarm-manager   Ready     Active         Leader           26.1.3
9qr5hcz4oi7sloy7068jhaoq4     swarm-worker1   Ready     Active                          26.1.3
6ji3xus80aftrb01i5p87dy0q     swarm-worker2   Ready     Active                          26.1.3
只能在manager节点
bash
[root@swarm-worker2 ~ 09:57:33]# docker node ls
Error response from daemon: This node is not a swarm manager. Worker nodes can't be used to view or modify cluster state. Please run this command on a manager node or promote the current node to a manager.
如果当时没有记录下 docker swarm init 提示的添加 worker 的完整命令,可以通过 docker swarm join-token worker 查看。
bash
[root@swarm-manager ~ 09:58:01]# docker swarm join-token worker
To add a worker to this swarm, run the following command:

    docker swarm join --token SWMTKN-1-5smkdkskyuavjjy9fqgso3w9liizz1ewdv4liopuq05jey39tv-alqfy86djj99d1lt84hz1950o 192.168.108.30:2377
注意:此命令只能在 manager node 上执行。
至此,三节点的 swarm 集群就已经搭建好了,操作还是相当简单的。
下一节我们将在 swarm 中部署第一个 service。
运行第一个Service
上一节我们创建好了 Swarm 集群, 现在部署一个运行 httpd 镜像的 service,执行如下命令
bash
[root@swarm-manager ~ 09:58:09]# docker service create --name web_server httpd
h09kutqg9fg8233adf6626l4x
overall progress: 1 out of 1 tasks
1/1: running
verify: Service h09kutqg9fg8233adf6626l4x converged
部署 service 的命令形式与运行容器的 docker run 很相似, --name 为 service 命名, httpd 为镜像的名字。
通过 docker service ls 可以查看当前 swarm 中的 service。
bash
[root@swarm-manager ~ 10:25:48]# docker service ls
ID             NAME         MODE         REPLICAS   IMAGE          PORTS
h09kutqg9fg8   web_server   replicated   0/1        httpd:latest
REPLICAS 显示当前副本信息, 1/1 的意思是 web_server 这个 service 期望的容器副本数量为 1,目前已经启动的副本数量为 1。也就是当前 service 已经部署完成。命令 docker service ps 可以查看service 每个副本的状态。
bash
[root@swarm-manager ~ 10:27:44]# docker service ps web_server
ID             NAME           IMAGE          NODE            DESIRED STATE   CURRENT STATE                ERROR     PORTS
sbvp2c3wboe7   web_server.1   httpd:latest   `swarm-manager`   Running         Running about a minute ago
可以看到 service 唯一的副本被分派到 swarm-worker2 ,当前的状态CURRENT是 Running ,达到期望DESIRED的状态 Running
如果觉得不放心,还可以到 swarm-worker2去确认 httpd 容器已经运行。
bash
[root@swarm-manager ~ 10:28:04]# docker ps
CONTAINER ID   IMAGE          COMMAND              CREATED              STATUS              PORTS     NAMES
1a2b7f955437   httpd:latest   "httpd-foreground"   About a minute ago   Up About a minute   80/tcp    web_server.1.sbvp2c3wboe7964ud602n30no
当前 web_server 在 swarm 中的分布如图所示。
目前为止 Service 与普通的容器还没有太大的不同,下一节我们就要学习容器编排引擎的强大功能了,首先从应用伸缩 Scale Up/Down 开始。
如何实现Service伸缩?
上一节部署了只有一个副本的 Service,不过对于 web 服务,我们通常会运行多个实例。这样可以负载
均衡,同时也能提供高可用。
swarm 要实现这个目标非常简单,增加 service 的副本数就可以了。在 swarm-manager 上执行如下命
令:
bash
[root@swarm-manager ~ 10:47:32]# docker service scale web_server=5
web_server scaled to 5
overall progress: 5 out of 5 tasks
1/5: running
2/5: running
3/5: running
4/5: running
5/5: running
verify: Service web_server converged
副本数增加到 5,通过 docker service ls 和 docker service ps 查看副本的详细信息。
bash
[root@swarm-manager ~ 10:47:56]# docker service ls
ID             NAME         MODE         REPLICAS   IMAGE          PORTS
h09kutqg9fg8   web_server   replicated   5/5        httpd:latest
[root@swarm-manager ~ 10:48:04]# docker service ps web_server
ID             NAME           IMAGE          NODE            DESIRED STATE   CURRENT STATE            ERROR     PORTS
sbvp2c3wboe7   web_server.1   httpd:latest   swarm-manager   Running         Running 21 minutes ago
j86k0phz3s6z   web_server.2   httpd:latest   swarm-worker2   Running         Running 25 seconds ago
mu7xrtsntidd   web_server.3   httpd:latest   swarm-worker1   Running         Running 24 seconds ago
lxvwld3irmle   web_server.4   httpd:latest   swarm-worker1   Running         Running 24 seconds ago
00nt6dfacntf   web_server.5   httpd:latest   swarm-manager   Running         Running 24 seconds ago
5 个副本已经分布在 swarm 的所有三个节点上。
默认配置下 manager node 也是 worker node,所以swarm-manager 上也运行了副本。如果不希望在manager 上运行 service,可以执行如下命令:
bash
[root@swarm-manager ~ 10:48:16]# docker node update --availability drain swarm-manager
swarm-manager
通过 docker node ls 查看各节点现在的状态:
bash
[root@swarm-manager ~ 10:48:55]# docker node ls
ID                            HOSTNAME        STATUS    AVAILABILITY   MANAGER STATUS   ENGINE VERSION
kutadbcr1h1r7m6q11ne9ivp5 *   swarm-manager   Ready     Drain          Leader           26.1.3
9qr5hcz4oi7sloy7068jhaoq4     swarm-worker1   Ready     Active                          26.1.3
6ji3xus80aftrb01i5p87dy0q     swarm-worker2   Ready     Active                          26.1.3
Drain 表示 swarm-manager 已经不负责运行 service,之前 swarm-manager 运行的那个副本会如何处理呢?用 docker service ps 查看一下:
bash
[root@swarm-manager ~ 10:49:03]# docker service ps web_server
ID             NAME               IMAGE          NODE            DESIRED STATE   CURRENT STATE                ERROR     PORTS
s3tb06bi7619   web_server.1       httpd:latest   swarm-worker2   Running         Running 15 seconds ago
sbvp2c3wboe7    \_ web_server.1   httpd:latest   swarm-manager   Shutdown        Shutdown 15 seconds ago
j86k0phz3s6z   web_server.2       httpd:latest   swarm-worker2   Running         Running about a minute ago
mu7xrtsntidd   web_server.3       httpd:latest   swarm-worker1   Running         Running about a minute ago
lxvwld3irmle   web_server.4       httpd:latest   swarm-worker1   Running         Running about a minute ago
q1dgyva3bxf4   web_server.5       httpd:latest   swarm-worker2   Running         Running 15 seconds ago
00nt6dfacntf    \_ web_server.5   httpd:latest   swarm-manager   Shutdown        Shutdown 15 seconds ago
前面我们的场景是 scale up,我们还可以 scale down,减少副本数,运行下面的命令:
bash
[root@swarm-manager ~ 10:49:12]# docker service scale web_server=3
web_server scaled to 3
overall progress: 3 out of 3 tasks
1/3: running
2/3: running
3/3:
verify: Service web_server converged
[root@swarm-manager ~ 10:49:39]# docker service ls
ID             NAME         MODE         REPLICAS   IMAGE          PORTS
h09kutqg9fg8   web_server   replicated   3/3        httpd:latest
[root@swarm-manager ~ 10:49:47]# docker service ps web_server
ID             NAME               IMAGE          NODE            DESIRED STATE   CURRENT STATE                 ERROR     PORTS
s3tb06bi7619   web_server.1       httpd:latest   swarm-worker2   Running         Running about a minute ago
sbvp2c3wboe7    \_ web_server.1   httpd:latest   swarm-manager   Shutdown        Shutdown about a minute ago
j86k0phz3s6z   web_server.2       httpd:latest   swarm-worker2   Running         Running 2 minutes ago
mu7xrtsntidd   web_server.3       httpd:latest   swarm-worker1   Running         Running 2 minutes ago
00nt6dfacntf   web_server.5       httpd:latest   swarm-manager   Shutdown        Shutdown about a minute ago
Service 的伸缩就讨论到这里,下一节我们学习故障切换 Failover。
Swarm如何实现Failover?
故障是在所难免的,容器可能崩溃,Docker Host 可能宕机,不过幸运的是,Swarm 已经内置了failover 策略。
创建 service 的时候,我们没有告诉 swarm 发生故障时该如何处理,只是说明了我们期望的状态(比如运行3个副本),swarm 会尽最大的努力达成这个期望状态,无论发生什么状况。
以上一节我们部署的 Service 为例,当前 3 个副本分布在 swarm-worker1 和 swarm-worker2 上
现在我们测试 swarm 的 failover 特性,关闭 swarm-worker1。
对swarm-worker1关机
Swarm 会检测到 swarm-worker1 的故障,并标记为 Down。
bash
[root@swarm-manager ~ 10:50:01]# docker node ls
ID                            HOSTNAME        STATUS    AVAILABILITY   MANAGER STATUS   ENGINE VERSION
kutadbcr1h1r7m6q11ne9ivp5 *   swarm-manager   Ready     Drain          Leader           26.1.3
9qr5hcz4oi7sloy7068jhaoq4     swarm-worker1   `Ready`     Active                          26.1.3
6ji3xus80aftrb01i5p87dy0q     swarm-worker2   Ready     Active                          26.1.3
[root@swarm-manager ~ 11:00:50]# docker node ls
ID                            HOSTNAME        STATUS    AVAILABILITY   MANAGER STATUS   ENGINE VERSION
kutadbcr1h1r7m6q11ne9ivp5 *   swarm-manager   Ready     Drain          Leader           26.1.3
9qr5hcz4oi7sloy7068jhaoq4     swarm-worker1   `Down`      Active                          26.1.3
6ji3xus80aftrb01i5p87dy0q     swarm-worker2   Ready     Active                          26.1.3
Swarm 会将 swarm-worker1 上的副本调度到其他可用节点。我们可以通过 docker service ps 观察这个 failover 过程。
bash
[root@swarm-manager ~ 11:01:02]# docker service ps web_server
ID             NAME               IMAGE          NODE            DESIRED STATE   CURRENT STATE             ERROR     PORTS
s3tb06bi7619   web_server.1       httpd:latest   swarm-worker2   Running         Running 12 minutes ago
sbvp2c3wboe7    \_ web_server.1   httpd:latest   swarm-manager   Shutdown        Shutdown 12 minutes ago
j86k0phz3s6z   web_server.2       httpd:latest   swarm-worker2   Running         Running 13 minutes ago
p8g4ofawstf6   web_server.3       httpd:latest   swarm-worker2   Running         Running 17 seconds ago
mu7xrtsntidd    \_ web_server.3   httpd:latest   swarm-worker1   Shutdown        Running 13 minutes ago
00nt6dfacntf   web_server.5       httpd:latest   swarm-manager   Shutdown        Shutdown 12 minutes ago
bash
[root@swarm-manager ~ 11:01:16]# docker service ls
ID             NAME         MODE         REPLICAS   IMAGE          PORTS
h09kutqg9fg8   web_server   replicated   4/3        httpd:latest
如何访问Service?
前面我们已经学习了如何部署 service,也验证了 swarm 的 failover 特性。不过截止到现在,有一个重要问题还没有涉及:如何访问 service?这就是本节要讨论的问题。
为了便于分析,我们重新部署 web_server。
bash
[root@swarm-manager ~ 11:32:10]# docker service rm web_server
web_server
[root@swarm-manager ~ 11:32:49]# docker service create --name web_server --replicas=2 httpd
image httpd:latest could not be accessed on a registry to record
its digest. Each node will access httpd:latest independently,
possibly leading to different nodes running different
versions of the image.

hjd6gdvrf2cusjhsnjucw94ns
overall progress: 2 out of 2 tasks
1/2: running
2/2: running
verify: Service hjd6gdvrf2cusjhsnjucw94ns converged
[root@swarm-manager ~ 11:34:37]# docker service ps web_server
ID             NAME           IMAGE          NODE            DESIRED STATE   CURRENT STATE            ERROR     PORTS
ybmxav4jqu5y   web_server.1   httpd:latest   swarm-worker1   Running         Running 34 seconds ago
v755zendq8rv   web_server.2   httpd:latest   swarm-worker2   Running         Running 20 seconds ago
① docker service rm 删除 web_server,service 的所有副本(容器)都会被删除。
② 重新创建 service,这次直接用 --replicas=2 创建两个副本。
③ 每个 worker node 上运行了一个副本。
好了,现在 service 已经在那里了,我们如何访问呢?
要访问 http 服务,最起码网络得通吧,服务的 IP 我们得知道吧,但这些信息目前我们都不清楚。不过至
少我们知道每个副本都是一个运行的容器,要不先看看容器的网络配置吧。
bash
[root@swarm-worker1 ~ 11:34:14]# docker ps
CONTAINER ID   IMAGE          COMMAND              CREATED          STATUS          PORTS     NAMES
9281308e38f8   httpd:latest   "httpd-foreground"   41 seconds ago   Up 41 seconds   80/tcp    web_server.1.ybmxav4jqu5y7n1mbtjqczk93
在 swarm-worker1 上运行了一个容器,是 web_server 的一个副本,容器监听了 80 端口,但并没有映射到 Docker Host,所以只能通过容器的 IP 访问。查看一下容器的 IP。
bash
[root@swarm-worker1 ~ 11:34:58]# docker inspect 92
[
    {
        "Id": "9281308e38f8dd1c0078af5d91ae5c44965437a20b1dd8dfd4bdad907c679868",
        "Created": "2025-11-24T03:34:17.303591254Z",
        "Path": "httpd-foreground",
        "Args": [],
        "State": {
            "Status": "running",
            "Running": true,
            "Paused": false,
            "Restarting": false,
            "OOMKilled": false,
            "Dead": false,
            "Pid": 2719,
            "ExitCode": 0,
            "Error": "",
            "StartedAt": "2025-11-24T03:34:17.961250613Z",
            "FinishedAt": "0001-01-01T00:00:00Z"
        },
        "Image": "sha256:c00bfb4edfeb0206fa0e988e51b588a442deca46cb4ea69b3cd7e08f93b429ae",
        "ResolvConfPath": "/var/lib/docker/containers/9281308e38f8dd1c0078af5d91ae5c44965437a20b1dd8dfd4bdad907c679868/resolv.conf",
        "HostnamePath": "/var/lib/docker/containers/9281308e38f8dd1c0078af5d91ae5c44965437a20b1dd8dfd4bdad907c679868/hostname",
        "HostsPath": "/var/lib/docker/containers/9281308e38f8dd1c0078af5d91ae5c44965437a20b1dd8dfd4bdad907c679868/hosts",
        "LogPath": "/var/lib/docker/containers/9281308e38f8dd1c0078af5d91ae5c44965437a20b1dd8dfd4bdad907c679868/9281308e38f8dd1c0078af5d91ae5c44965437a20b1dd8dfd4bdad907c679868-json.log",
        "Name": "/web_server.1.ybmxav4jqu5y7n1mbtjqczk93",
        "RestartCount": 0,
        "Driver": "overlay2",
        "Platform": "linux",
        "MountLabel": "",
        "ProcessLabel": "",
        "AppArmorProfile": "",
        "ExecIDs": null,
        "HostConfig": {
            "Binds": null,
            "ContainerIDFile": "",
            "LogConfig": {
                "Type": "json-file",
                "Config": {}
            },
            "NetworkMode": "bridge",
            "PortBindings": {},
            "RestartPolicy": {
                "Name": "no",
                "MaximumRetryCount": 0
            },
            "AutoRemove": false,
            "VolumeDriver": "",
            "VolumesFrom": null,
            "ConsoleSize": [
                0,
                0
            ],
            "CapAdd": null,
            "CapDrop": null,
            "CgroupnsMode": "host",
            "Dns": null,
            "DnsOptions": null,
            "DnsSearch": null,
            "ExtraHosts": null,
            "GroupAdd": null,
            "IpcMode": "private",
            "Cgroup": "",
            "Links": null,
            "OomScoreAdj": 0,
            "PidMode": "",
            "Privileged": false,
            "PublishAllPorts": false,
            "ReadonlyRootfs": false,
            "SecurityOpt": null,
            "UTSMode": "",
            "UsernsMode": "",
            "ShmSize": 67108864,
            "Runtime": "runc",
            "Isolation": "default",
            "CpuShares": 0,
            "Memory": 0,
            "NanoCpus": 0,
            "CgroupParent": "",
            "BlkioWeight": 0,
            "BlkioWeightDevice": null,
            "BlkioDeviceReadBps": null,
            "BlkioDeviceWriteBps": null,
            "BlkioDeviceReadIOps": null,
            "BlkioDeviceWriteIOps": null,
            "CpuPeriod": 0,
            "CpuQuota": 0,
            "CpuRealtimePeriod": 0,
            "CpuRealtimeRuntime": 0,
            "CpusetCpus": "",
            "CpusetMems": "",
            "Devices": null,
            "DeviceCgroupRules": null,
            "DeviceRequests": null,
            "MemoryReservation": 0,
            "MemorySwap": 0,
            "MemorySwappiness": null,
            "OomKillDisable": false,
            "PidsLimit": null,
            "Ulimits": [],
            "CpuCount": 0,
            "CpuPercent": 0,
            "IOMaximumIOps": 0,
            "IOMaximumBandwidth": 0,
            "MaskedPaths": [
                "/proc/asound",
                "/proc/acpi",
                "/proc/kcore",
                "/proc/keys",
                "/proc/latency_stats",
                "/proc/timer_list",
                "/proc/timer_stats",
                "/proc/sched_debug",
                "/proc/scsi",
                "/sys/firmware",
                "/sys/devices/virtual/powercap"
            ],
            "ReadonlyPaths": [
                "/proc/bus",
                "/proc/fs",
                "/proc/irq",
                "/proc/sys",
                "/proc/sysrq-trigger"
            ],
            "Init": false
        },
        "GraphDriver": {
            "Data": {
                "LowerDir": "/var/lib/docker/overlay2/28885cf8923972b91ea0891d8c96d049308b4765a795dec65f3bcb9ca8943741-init/diff:/var/lib/docker/overlay2/f607c16d06b8c2e85814eb31b759d7af9679283aa8a2a3a813008386f1b977b9/diff:/var/lib/docker/overlay2/ea2200672f8a7a64592e58b1100a8abeb42a4e87756e94417bb3003438384e6b/diff:/var/lib/docker/overlay2/bae6c09ec09223df4ece050aea4569a32e6c001e3c28388dca11251637b84a0a/diff:/var/lib/docker/overlay2/038a09a1ecb64a44254a45cf4314f944f6fddba8cd38a8e5833951c8ffebe8d4/diff:/var/lib/docker/overlay2/7c174c5a4c9351294622126b5a4856b9fa72039b5cba3f6a58471ca24dbb20f7/diff:/var/lib/docker/overlay2/8e31f40b99b4d5440239c0efb651f4804def488fd74dc5a77a952fb35a7e60ed/diff",
                "MergedDir": "/var/lib/docker/overlay2/28885cf8923972b91ea0891d8c96d049308b4765a795dec65f3bcb9ca8943741/merged",
                "UpperDir": "/var/lib/docker/overlay2/28885cf8923972b91ea0891d8c96d049308b4765a795dec65f3bcb9ca8943741/diff",
                "WorkDir": "/var/lib/docker/overlay2/28885cf8923972b91ea0891d8c96d049308b4765a795dec65f3bcb9ca8943741/work"
            },
            "Name": "overlay2"
        },
        "Mounts": [],
        "Config": {
            "Hostname": "9281308e38f8",
            "Domainname": "",
            "User": "",
            "AttachStdin": false,
            "AttachStdout": false,
            "AttachStderr": false,
            "ExposedPorts": {
                "80/tcp": {}
            },
            "Tty": false,
            "OpenStdin": false,
            "StdinOnce": false,
            "Env": [
                "PATH=/usr/local/apache2/bin:/usr/local/sbin:/usr/local/bin:/usr/sbin:/usr/bin:/sbin:/bin",
                "HTTPD_PREFIX=/usr/local/apache2",
                "HTTPD_VERSION=2.4.65",
                "HTTPD_SHA256=58b8be97d9940ec17f7656c0c6b9f41b618aac468b894b534148e3296c53b8b3",
                "HTTPD_PATCHES="
            ],
            "Cmd": [
                "httpd-foreground"
            ],
            "Image": "httpd:latest",
            "Volumes": null,
            "WorkingDir": "/usr/local/apache2",
            "Entrypoint": null,
            "OnBuild": null,
            "Labels": {
                "com.docker.swarm.node.id": "9qr5hcz4oi7sloy7068jhaoq4",
                "com.docker.swarm.service.id": "hjd6gdvrf2cusjhsnjucw94ns",
                "com.docker.swarm.service.name": "web_server",
                "com.docker.swarm.task": "",
                "com.docker.swarm.task.id": "ybmxav4jqu5y7n1mbtjqczk93",
                "com.docker.swarm.task.name": "web_server.1.ybmxav4jqu5y7n1mbtjqczk93"
            },
            "StopSignal": "SIGWINCH"
        },
        "NetworkSettings": {
            "Bridge": "",
            "SandboxID": "cbf711b1679daaa963fa6f13cca46d37a2d57e79838900317d48f861eeb969bd",
            "SandboxKey": "/var/run/docker/netns/cbf711b1679d",
            "Ports": {
                "80/tcp": null
            },
            "HairpinMode": false,
            "LinkLocalIPv6Address": "",
            "LinkLocalIPv6PrefixLen": 0,
            "SecondaryIPAddresses": null,
            "SecondaryIPv6Addresses": null,
            "EndpointID": "e6793e2409dae66af12f464c6453f220817f74d5eeb760fab7497a5dac4ff273",
            "Gateway": "172.17.0.1",
            "GlobalIPv6Address": "",
            "GlobalIPv6PrefixLen": 0,
            "IPAddress": "172.17.0.2",
            "IPPrefixLen": 16,
            "IPv6Gateway": "",
            "MacAddress": "02:42:ac:11:00:02",
            "Networks": {
                "bridge": {
                    "IPAMConfig": null,
                    "Links": null,
                    "Aliases": null,
                    "MacAddress": "02:42:ac:11:00:02",
                    "NetworkID": "d74790536903176a04124b6390193690e048ff13b7d91b0184cfa6d3ce378f46",
                    "EndpointID": "e6793e2409dae66af12f464c6453f220817f74d5eeb760fab7497a5dac4ff273",
                    "Gateway": "172.17.0.1",
                    `"IPAddress": "172.17.0.2"`,
                    "IPPrefixLen": 16,
                    "IPv6Gateway": "",
                    "GlobalIPv6Address": "",
                    "GlobalIPv6PrefixLen": 0,
                    "DriverOpts": null,
                    "DNSNames": null
                }
            }
        }
    }
]
容器 IP 为 172.17.0.2 ,实际上连接的是 Docker 默认 bridge 网络。
我们可以直接在 swarm-worker1 上访问容器的 http 服务。
bash
[root@swarm-worker1 ~ 11:35:17]# curl 172.17.0.2
<html><body><h1>It works!</h1></body></html>
但这样的访问也仅仅是容器层面的访问,服务并没有暴露给外部网络,只能在 Docker 主机上访问。换句话说,当前配置下,我们无法访问 service web_server。
从外部访问 service
要将 service 暴露到外部,方法其实很简单,执行下面的命令:
bash
[root@swarm-manager ~ 11:36:23]# docker service update --publish-add 8080:80 web_server
web_server
overall progress: 2 out of 2 tasks
1/2: running
2/2: running
verify: Service web_server converged
如果是新建 service,可以直接用使用 --publish 参数,比如:
bash
[root@swarm-manager ~]# docker service create --name web_server --publish 8080:80
--replicas=2 httpd
容器在 80 端口上监听 http 请求, --publish-add 8080:80 将容器的 80 映射到主机的 8080 端口,这样外部网络就能访问到 service 了。
bash
[root@swarm-manager ~ 11:36:46]# curl http://192.168.108.30:8080
<html><body><h1>It works!</h1></body></html>
[root@swarm-manager ~ 11:37:06]# curl http://192.168.108.31:8080
<html><body><h1>It works!</h1></body></html>
[root@swarm-manager ~ 11:37:09]# curl http://192.168.108.32:8080
<html><body><h1>It works!</h1></body></html>
大家可能会奇怪,为什么 curl 集群中任何一个节点的 8080 端口,都能够访问到 web_server?
这实际上就是使用 swarm 的好处了,这个功能叫做 routing mesh,我们下一节重点讨论。
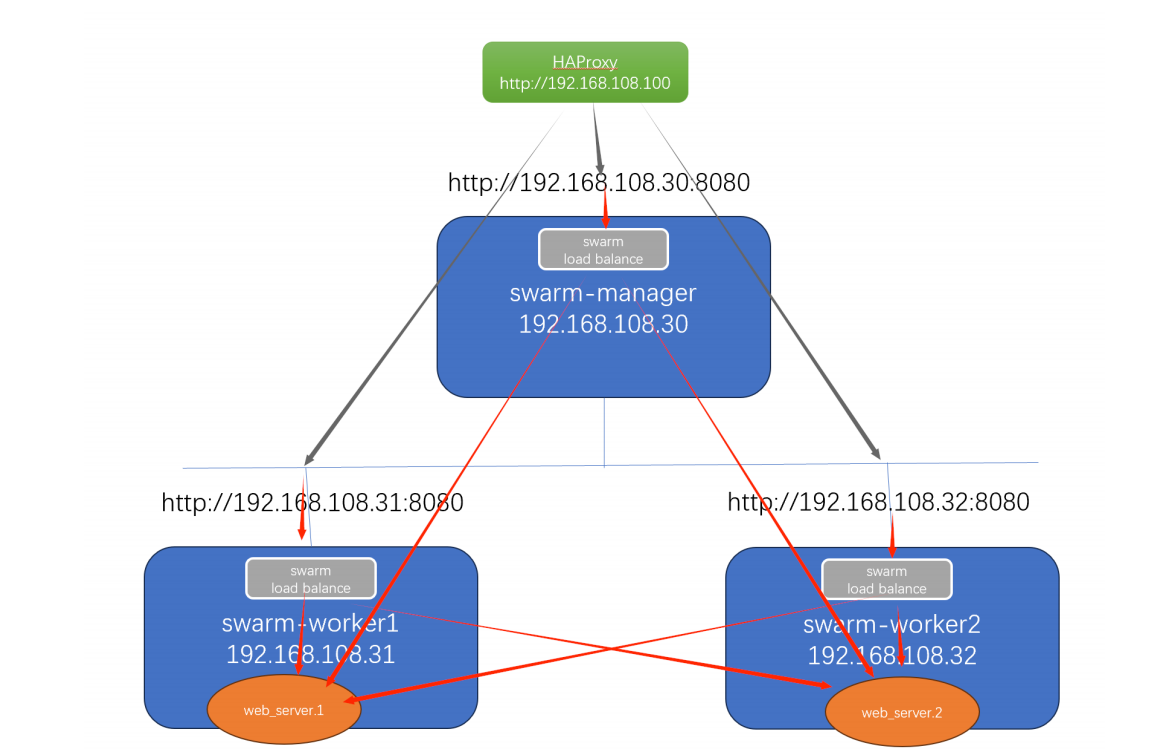
神奇的routing mesh
接上一节案例,当我们访问任何节点的 8080 端口时,swarm 内部的 load balancer 会将请求转发给web_server 其中的一个副本。
这就是 routing mesh 的作用。
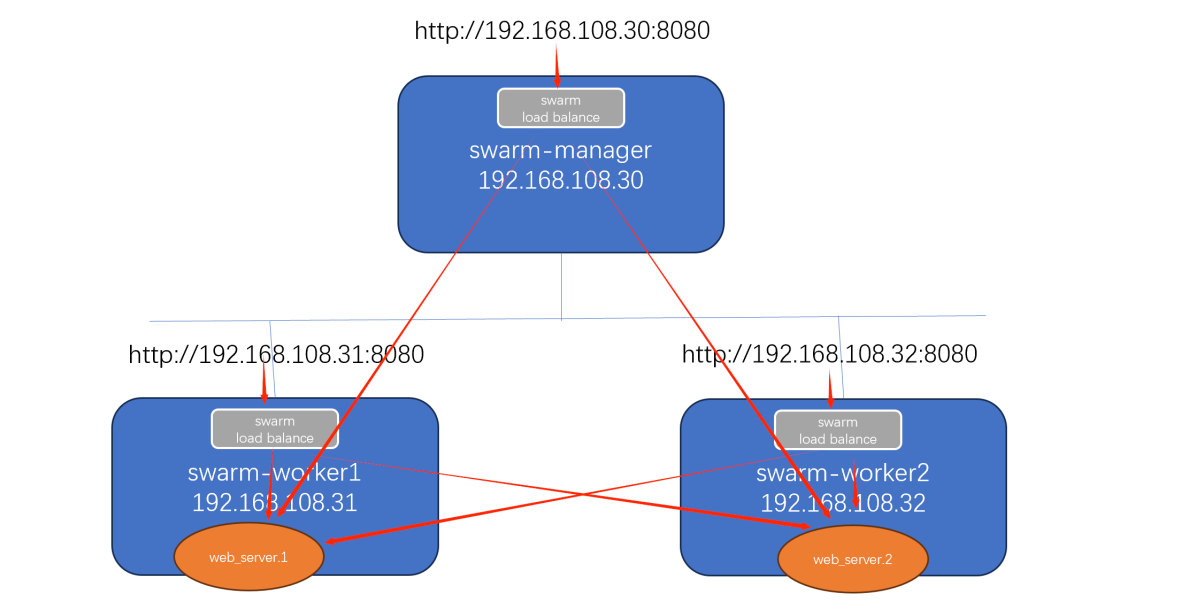
所以,无论访问哪个节点,即使该节点上没有运行 service 的副本,最终都能访问到 service。
另外,我们还可以配置一个外部 load balancer,将请求路由到 swarm service。比如配置 HAProxy,将请求分发到各个节点的 8080 端口。
ingress 网络
当我们应用 --publish-add 8080:80 时,swarm 会重新配置 service,我们看看容器都发生了哪些重要变化。
bash
[root@swarm-manager ~ 11:37:23]# docker service ps web_server
ID             NAME               IMAGE          NODE            DESIRED STATE   CURRENT STATE             ERROR     PORTS
7ha2gxid3h5u   web_server.1       httpd:latest   swarm-worker1   Running         Running 57 seconds ago
ybmxav4jqu5y    \_ web_server.1   httpd:latest   swarm-worker1   Shutdown        Shutdown 57 seconds ago
2xrn1tvnu3dz   web_server.2       httpd:latest   swarm-worker2   Running         Running 55 seconds ago
v755zendq8rv    \_ web_server.2   httpd:latest   swarm-worker2   Shutdown        Shutdown 55 seconds ago
是不是觉得很诧异?之前的所有副本都被 Shutdown,然后启动了新的副本。我们查看一下新副本的容器网络配置。
bash
[root@swarm-worker1 ~ 11:35:36]# docker inspect 92
[
    {
        "Id": "9281308e38f8dd1c0078af5d91ae5c44965437a20b1dd8dfd4bdad907c679868",
        "Created": "2025-11-24T03:34:17.303591254Z",
        "Path": "httpd-foreground",
        "Args": [],
        "State": {
            "Status": "exited",
            "Running": false,
            "Paused": false,
            "Restarting": false,
            "OOMKilled": false,
            "Dead": false,
            "Pid": 0,
            "ExitCode": 0,
            "Error": "",
            "StartedAt": "2025-11-24T03:34:17.961250613Z",
            "FinishedAt": "2025-11-24T03:36:35.199467761Z"
        },
        "Image": "sha256:c00bfb4edfeb0206fa0e988e51b588a442deca46cb4ea69b3cd7e08f93b429ae",
        "ResolvConfPath": "/var/lib/docker/containers/9281308e38f8dd1c0078af5d91ae5c44965437a20b1dd8dfd4bdad907c679868/resolv.conf",
        "HostnamePath": "/var/lib/docker/containers/9281308e38f8dd1c0078af5d91ae5c44965437a20b1dd8dfd4bdad907c679868/hostname",
        "HostsPath": "/var/lib/docker/containers/9281308e38f8dd1c0078af5d91ae5c44965437a20b1dd8dfd4bdad907c679868/hosts",
        "LogPath": "/var/lib/docker/containers/9281308e38f8dd1c0078af5d91ae5c44965437a20b1dd8dfd4bdad907c679868/9281308e38f8dd1c0078af5d91ae5c44965437a20b1dd8dfd4bdad907c679868-json.log",
        "Name": "/web_server.1.ybmxav4jqu5y7n1mbtjqczk93",
        "RestartCount": 0,
        "Driver": "overlay2",
        "Platform": "linux",
        "MountLabel": "",
        "ProcessLabel": "",
        "AppArmorProfile": "",
        "ExecIDs": null,
        "HostConfig": {
            "Binds": null,
            "ContainerIDFile": "",
            "LogConfig": {
                "Type": "json-file",
                "Config": {}
            },
            "NetworkMode": "bridge",
            "PortBindings": {},
            "RestartPolicy": {
                "Name": "no",
                "MaximumRetryCount": 0
            },
            "AutoRemove": false,
            "VolumeDriver": "",
            "VolumesFrom": null,
            "ConsoleSize": [
                0,
                0
            ],
            "CapAdd": null,
            "CapDrop": null,
            "CgroupnsMode": "host",
            "Dns": null,
            "DnsOptions": null,
            "DnsSearch": null,
            "ExtraHosts": null,
            "GroupAdd": null,
            "IpcMode": "private",
            "Cgroup": "",
            "Links": null,
            "OomScoreAdj": 0,
            "PidMode": "",
            "Privileged": false,
            "PublishAllPorts": false,
            "ReadonlyRootfs": false,
            "SecurityOpt": null,
            "UTSMode": "",
            "UsernsMode": "",
            "ShmSize": 67108864,
            "Runtime": "runc",
            "Isolation": "default",
            "CpuShares": 0,
            "Memory": 0,
            "NanoCpus": 0,
            "CgroupParent": "",
            "BlkioWeight": 0,
            "BlkioWeightDevice": null,
            "BlkioDeviceReadBps": null,
            "BlkioDeviceWriteBps": null,
            "BlkioDeviceReadIOps": null,
            "BlkioDeviceWriteIOps": null,
            "CpuPeriod": 0,
            "CpuQuota": 0,
            "CpuRealtimePeriod": 0,
            "CpuRealtimeRuntime": 0,
            "CpusetCpus": "",
            "CpusetMems": "",
            "Devices": null,
            "DeviceCgroupRules": null,
            "DeviceRequests": null,
            "MemoryReservation": 0,
            "MemorySwap": 0,
            "MemorySwappiness": null,
            "OomKillDisable": false,
            "PidsLimit": null,
            "Ulimits": [],
            "CpuCount": 0,
            "CpuPercent": 0,
            "IOMaximumIOps": 0,
            "IOMaximumBandwidth": 0,
            "MaskedPaths": [
                "/proc/asound",
                "/proc/acpi",
                "/proc/kcore",
                "/proc/keys",
                "/proc/latency_stats",
                "/proc/timer_list",
                "/proc/timer_stats",
                "/proc/sched_debug",
                "/proc/scsi",
                "/sys/firmware",
                "/sys/devices/virtual/powercap"
            ],
            "ReadonlyPaths": [
                "/proc/bus",
                "/proc/fs",
                "/proc/irq",
                "/proc/sys",
                "/proc/sysrq-trigger"
            ],
            "Init": false
        },
        "GraphDriver": {
            "Data": {
                "LowerDir": "/var/lib/docker/overlay2/28885cf8923972b91ea0891d8c96d049308b4765a795dec65f3bcb9ca8943741-init/diff:/var/lib/docker/overlay2/f607c16d06b8c2e85814eb31b759d7af9679283aa8a2a3a813008386f1b977b9/diff:/var/lib/docker/overlay2/ea2200672f8a7a64592e58b1100a8abeb42a4e87756e94417bb3003438384e6b/diff:/var/lib/docker/overlay2/bae6c09ec09223df4ece050aea4569a32e6c001e3c28388dca11251637b84a0a/diff:/var/lib/docker/overlay2/038a09a1ecb64a44254a45cf4314f944f6fddba8cd38a8e5833951c8ffebe8d4/diff:/var/lib/docker/overlay2/7c174c5a4c9351294622126b5a4856b9fa72039b5cba3f6a58471ca24dbb20f7/diff:/var/lib/docker/overlay2/8e31f40b99b4d5440239c0efb651f4804def488fd74dc5a77a952fb35a7e60ed/diff",
                "MergedDir": "/var/lib/docker/overlay2/28885cf8923972b91ea0891d8c96d049308b4765a795dec65f3bcb9ca8943741/merged",
                "UpperDir": "/var/lib/docker/overlay2/28885cf8923972b91ea0891d8c96d049308b4765a795dec65f3bcb9ca8943741/diff",
                "WorkDir": "/var/lib/docker/overlay2/28885cf8923972b91ea0891d8c96d049308b4765a795dec65f3bcb9ca8943741/work"
            },
            "Name": "overlay2"
        },
        "Mounts": [],
        "Config": {
            "Hostname": "9281308e38f8",
            "Domainname": "",
            "User": "",
            "AttachStdin": false,
            "AttachStdout": false,
            "AttachStderr": false,
            "ExposedPorts": {
                "80/tcp": {}
            },
            "Tty": false,
            "OpenStdin": false,
            "StdinOnce": false,
            "Env": [
                "PATH=/usr/local/apache2/bin:/usr/local/sbin:/usr/local/bin:/usr/sbin:/usr/bin:/sbin:/bin",
                "HTTPD_PREFIX=/usr/local/apache2",
                "HTTPD_VERSION=2.4.65",
                "HTTPD_SHA256=58b8be97d9940ec17f7656c0c6b9f41b618aac468b894b534148e3296c53b8b3",
                "HTTPD_PATCHES="
            ],
            "Cmd": [
                "httpd-foreground"
            ],
            "Image": "httpd:latest",
            "Volumes": null,
            "WorkingDir": "/usr/local/apache2",
            "Entrypoint": null,
            "OnBuild": null,
            "Labels": {
                "com.docker.swarm.node.id": "9qr5hcz4oi7sloy7068jhaoq4",
                "com.docker.swarm.service.id": "hjd6gdvrf2cusjhsnjucw94ns",
                "com.docker.swarm.service.name": "web_server",
                "com.docker.swarm.task": "",
                "com.docker.swarm.task.id": "ybmxav4jqu5y7n1mbtjqczk93",
                "com.docker.swarm.task.name": "web_server.1.ybmxav4jqu5y7n1mbtjqczk93"
            },
            "StopSignal": "SIGWINCH"
        },
        "NetworkSettings": {
            "Bridge": "",
            "SandboxID": "cbf711b1679daaa963fa6f13cca46d37a2d57e79838900317d48f861eeb969bd",
            "SandboxKey": "/var/run/docker/netns/cbf711b1679d",
            "Ports": {},
            "HairpinMode": false,
            "LinkLocalIPv6Address": "",
            "LinkLocalIPv6PrefixLen": 0,
            "SecondaryIPAddresses": null,
            "SecondaryIPv6Addresses": null,
            "EndpointID": "",
            "Gateway": "",
            "GlobalIPv6Address": "",
            "GlobalIPv6PrefixLen": 0,
            "IPAddress": "",
            "IPPrefixLen": 0,
            "IPv6Gateway": "",
            "MacAddress": "",
            "Networks": {
                "bridge": {
                    "IPAMConfig": null,
                    "Links": null,
                    "Aliases": null,
                    "MacAddress": "",
                    "NetworkID": "d74790536903176a04124b6390193690e048ff13b7d91b0184cfa6d3ce378f46",
                    "EndpointID": "",
                    "Gateway": "",
                    "IPAddress": "",
                    "IPPrefixLen": 0,
                    "IPv6Gateway": "",
                    "GlobalIPv6Address": "",
                    "GlobalIPv6PrefixLen": 0,
                    "DriverOpts": null,
                    "DNSNames": null
                }
            }
        }
    }
]
容器的网络与 --publish-add 之前已经大不一样了。
bash
[root@swarm-worker1 ~ 11:37:40]# docker network ls
NETWORK ID     NAME              DRIVER    SCOPE
d74790536903   bridge            bridge    local
ee6400f60a57   docker_gwbridge   bridge    local
0a2de003f10e   host              host      local
r9xpy7pshqve   ingress           overlay   swarm
f216aa9a5fb9   none              null      local
实际上:
ingress ,其作用是让运行在不同主机上的容器可以相互通信。
docker_gwbridge ,其作用是让容器能够访问到外网。
ingress 网络是 swarm 创建时 Docker 为自动我们创建的,swarm 中的每个 node 都能使用ingress 。
通过 overlay 网络,主机与容器、容器与容器之间可以相互访问;同时,routing mesh 将外部请求路由到不同主机的容器,从而实现了外部网络对 service 的访问。
containerd
一、Containerd介绍
1.前言
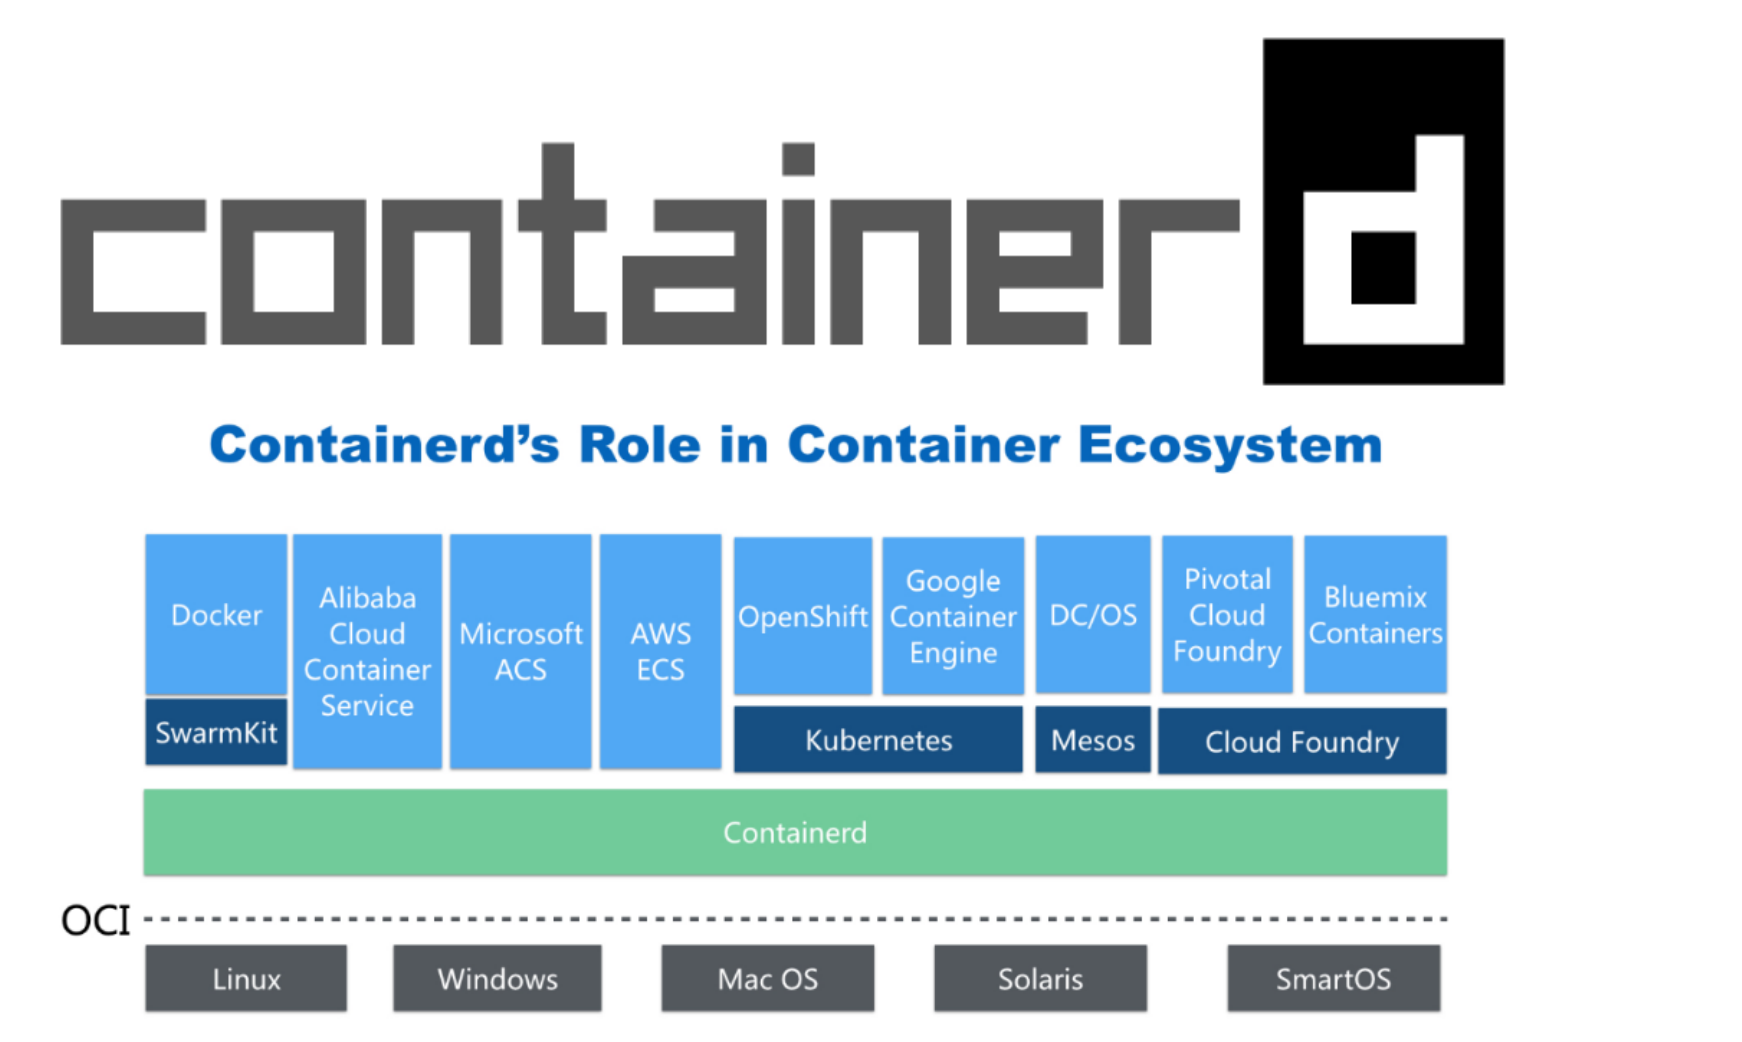
- 早在2016年3月,Docker 1.11的Docker Engine里就包含了containerd,而现在则是把containerd 从Docker Engine里彻底剥离出来,作为一个独立的开源项目独立发展,目标是提供一个更加开 放、稳定的容器运行基础设施。和原先包含在Docker Engine里containerd比,独立的 containerd将具有更多的功能,可以涵盖整个容器运行时管理的所有需求。
- containerd并不是直接面向最终用户的,而是主要用于集成到更上层的系统里,比如Swarm, Kubernetes, Mesos等容器编排系统。
- containerd以Daemon的形式运行在系统上,通过暴露底层的gRPC API,上层系统可以通过这些 API管理机器上的容器。
- 每个containerd只负责一台机器,Pull镜像,对容器的操作(启动、停止等),网络,存储都是由 containerd完成。具体运行容器由runC负责,实际上只要是符合OCI规范的容器都可以支持。
- 对于容器编排服务来说,运行时只需要使用containerd+runC,更加轻量,容易管理。
- 独立之后containerd的特性演进可以和Docker Engine分开,专注容器运行时管理,可以更稳定。
2.Containerd前世今生
2013年docker公司在推出docker产品后,由于其对全球技术产生了一定的影响力,Google公司明显感觉 到自己公司内部所使用的Brog系统江湖地位受到的威胁,希望Docker公司能够与自己联合打造一款开源 的容器运行时作为Docker核心依赖,但Docker公司拒绝了;接着Google公司联合RedHat、IBM等公司 说服Docker公司把其容器核心技术libcontainer捐给中立社区(OCI,Open Container Intiative),并更名为 runC。 为了进一步遏制Docker在未来技术市场影响力,避免在容器市场上Docker一家独大,Google公司带领导RedHat、IBM等成立了CNCF(Cloud Native Computing Fundation)基金会,即云原生计算基金 会。CNCF的目标很明确,既然在容器应用领域无法与Docker相抗衡,那就做Google更有经验的技术市 场------大规模容器编排应用场景,Google公司把自己内部使用的Brog系统开源------Kubernetes,也就是 我们今天所说的云原生技术生态。
2016年Docker公司推出了Docker Swarm,意在一统Docker生态,让Docker既可以实现容器应用管 理,也可以实现大规模容器编排,经过近1年左右时间的市场验证后,发现在容器编排方面无法独立抗衡 kubernetes,所以Docker公司于2017年正式宣布原生支持Kubernetes,至此,Docker在大规模容器编排 应用市场败下阵来,但是Docker依然不甘心失败,把Docker核心依赖Containerd捐给了CNCF,依此说 明Docker依旧是一个PaaS平台。
2020年CNCF基金会宣布Kubernetes 1.20版本将不再仅支持Docker容器管理工具,此事的起因主要也与 Docker捐给CNCF基金会的Containerd有关,早期为了实现Kubernetes能够使用Docker实现容器管理, 专门在Kubernetes组件中集成一个shim(垫片)技术,用来将Kubernetes容器运行时接口(CRI, Container Runntime Interface)调用翻译成Docker的API,这样就可以很好地使用Docker了,但是随着 Kubernetes在全球技术市场的广泛应用,有更多的容器管理工具的出现,它们都想能够借助于 Kubernetes被用户所使用,所以就提出标准化容器运行时接口,只要适配了这个接口就可以集成到 Kubernetes生态当中,所以Kubernetes取消了对shim的维护,并且由于Containerd技术的成功,可以 实现无缝对接Kubernetes,所以接下来Kubernetes容器运行时的主角是Containerd。
3.Containerd架构
3.1 架构图
Containerd设计的目的是为了嵌入到Kubernetes中使用,它是一个工业级的容器运行时,不提供给开发 人员和终端用户直接使用,这样就避免了与Docker产生竞争,但事实上,Containerd已经实现大多数容 器管理功能,例如:容器生命周期管理、容器镜像传输和管理、容器存储与网络管理等。
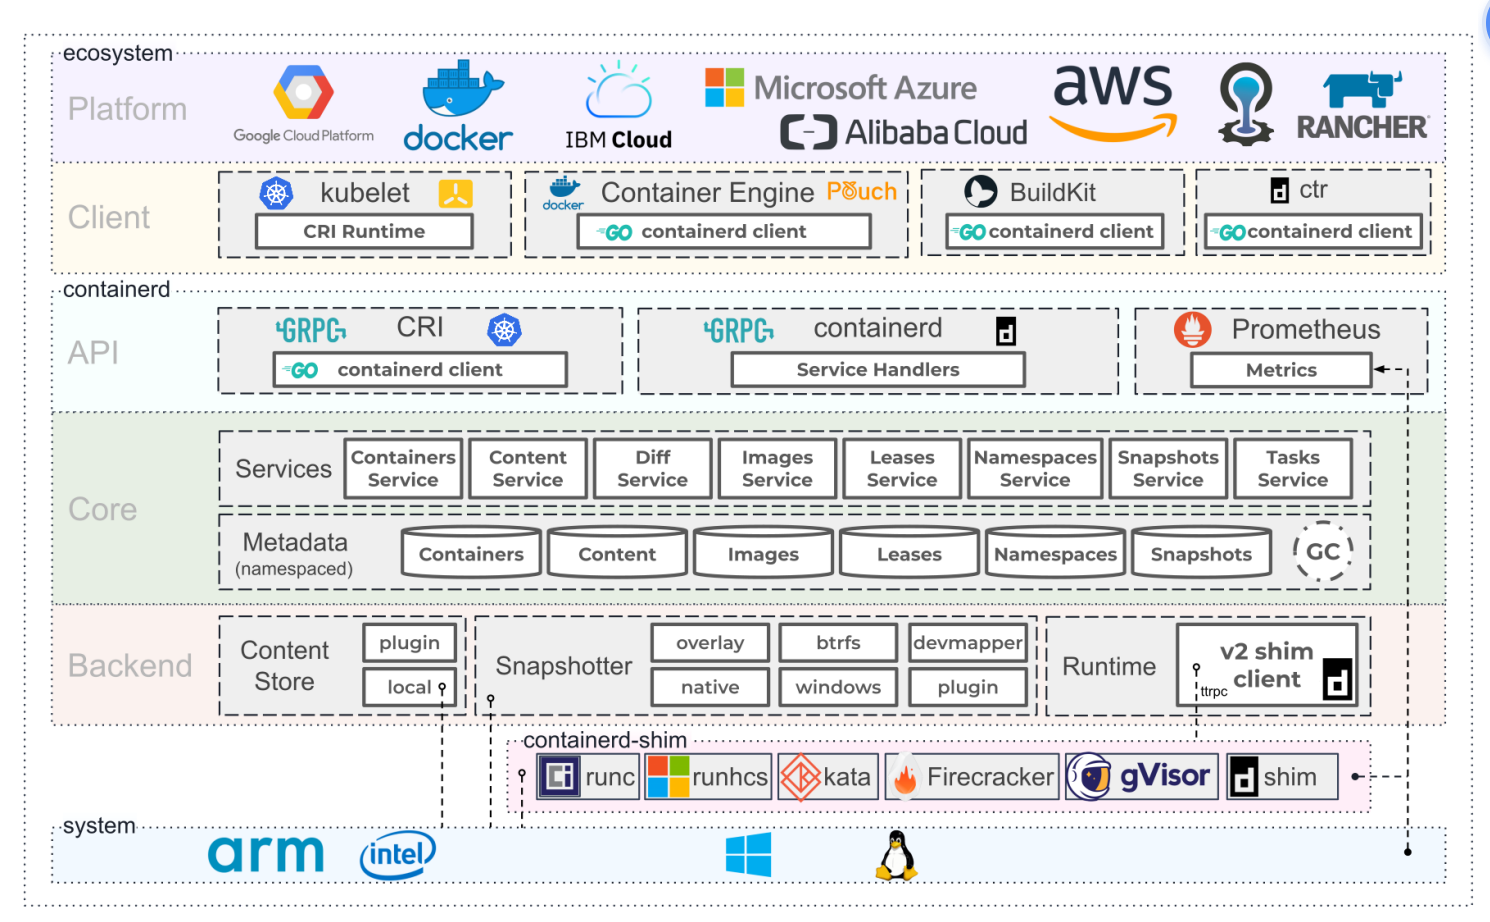
- Containerd 采用标准的 C/S 架构
- 服务端通过 GRPC 协议提供稳定的 API
- 客户端通过调用服务端的 API 进行高级的操作
- 为了实现解耦,Containerd 将不同的职责划分给不同的组件,每个组件就相当于一个子系统 (subsystem)。连接不同子系统的组件被称为模块。
- Containerd 两大子系统为:
- Bundle : 在 Containerd 中,Bundle 包含了配置、元数据和根文件系统数据,你可以理解为 容器的文件系统。而 Bundle 子系统允许用户从镜像中提取和打包 Bundles。
- Runtime : Runtime 子系统用来执行 Bundles,比如创建容器。
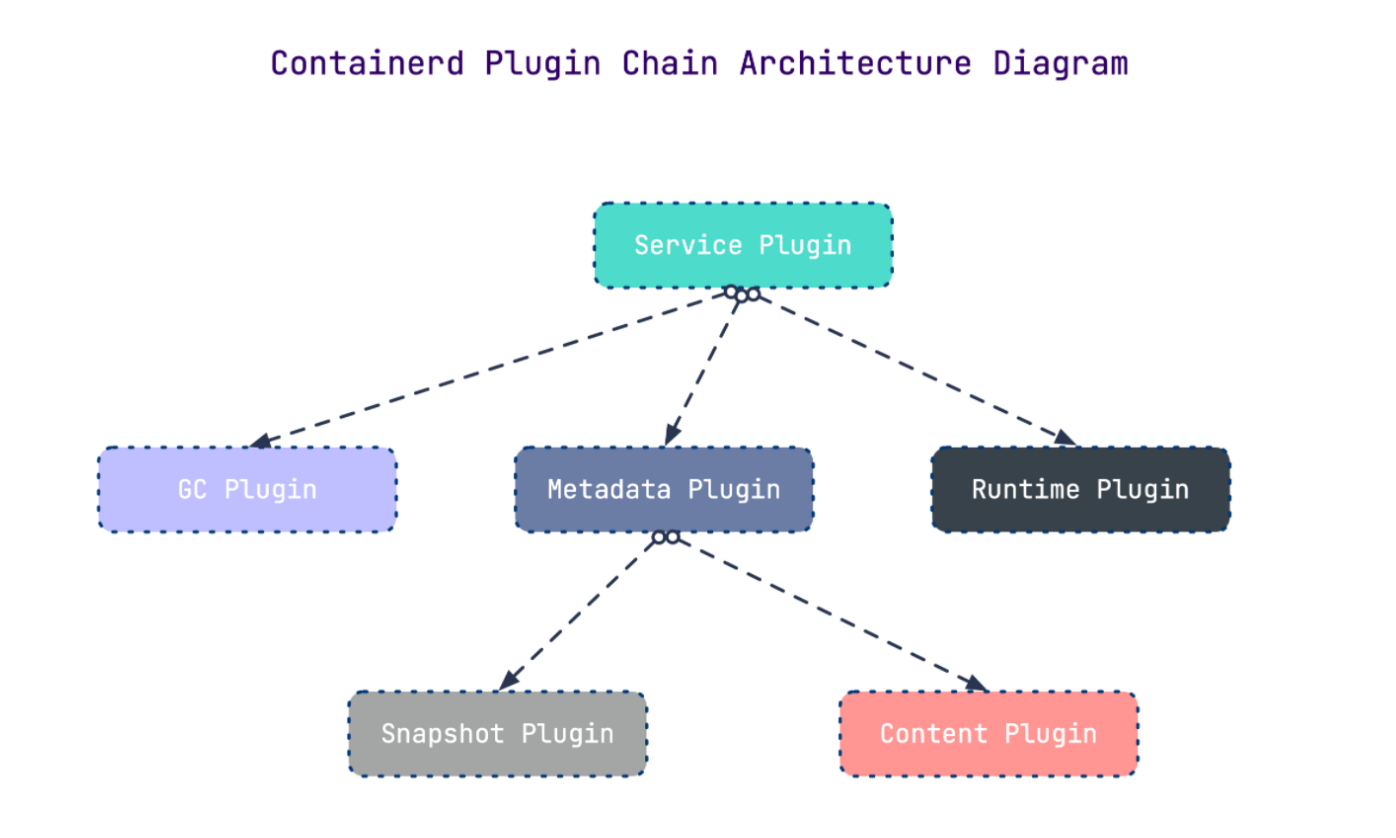
- 其中,每一个子系统的行为都由一个或多个模块协作完成(架构图中的 Core 部分)。每一种类型 的模块都以插件的形式集成到 Containerd 中,而且插件之间是相互依赖的。 例如,上图中的每一个长虚线的方框都表示一种类型的插件,包括 Service Plugin、Metadata Plugin、GC Plugin、Runtime Plugin 等,其中 Service Plugin 又会依赖 Metadata Plugin、GC Plugin 和 Runtime Plugin。每一个小方框都表示一个细分的插件,例如 Metadata Plugin 依赖 Containers Plugin、Content Plugin 等。
3.2 常用插件
- Content Plugin : 提供对镜像中可寻址内容的访问,所有不可变的内容都被存储在这里。
- Snapshot Plugin : 用来管理容器镜像的文件系统快照。镜像中的每一个 layer 都会被解压成文件 系统快照,类似于 Docker 中的 graphdriver 。
- Metrics : 暴露各个组件的监控指标。
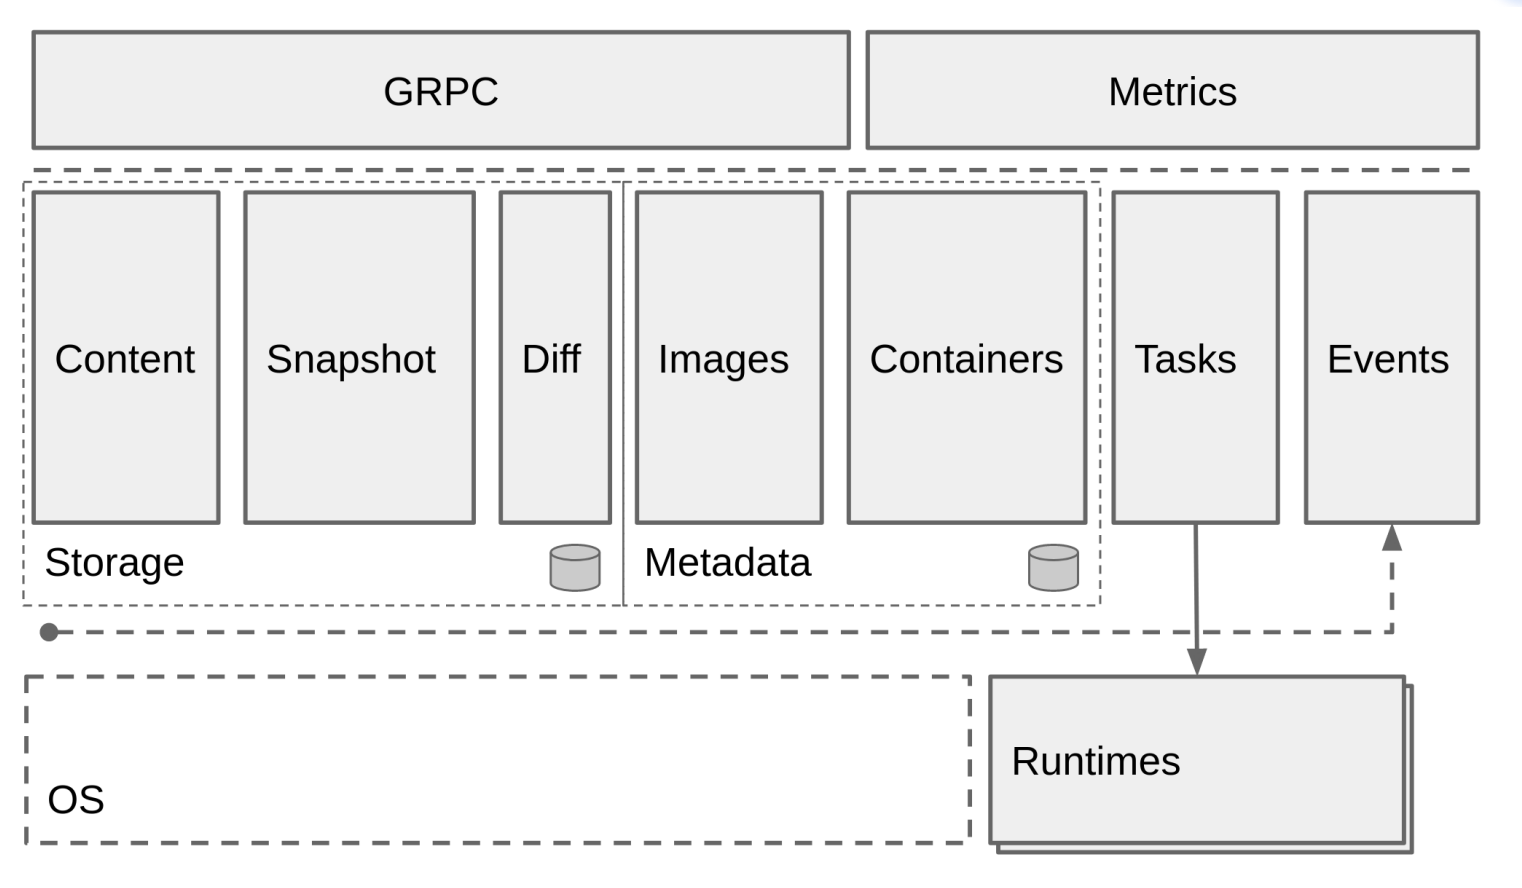
3.3 架构缩略图
Containerd 被分为三个大块: Storage 、 Metadata 和 Runtime
3.4 与其它容器运行时工具性能对比
这是使用 bucketbench 对 Docker、crio 和 Containerd 的性能测试结果,包括启动、停止和删除容器, 以比较它们所耗的时间:
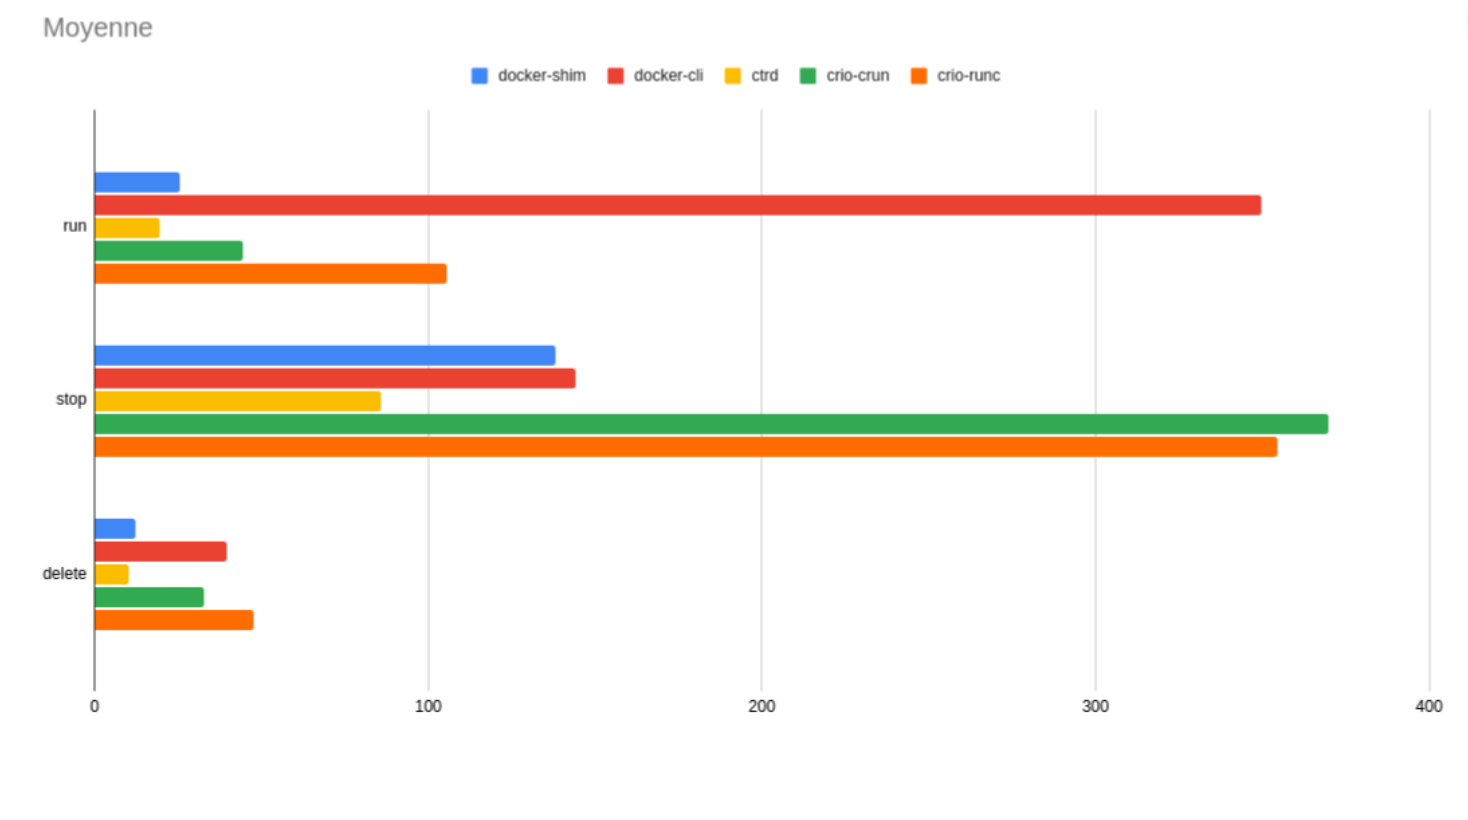
结论: Containerd 在各个方面都表现良好,总体性能优于 Docker 和 crio 。
二、Containerd安装
操作系统: CentOS Stream 8
1.YUM方式安装
基于 CentOS-Stream-8模板制作.md 制作的模板克隆一台虚拟机命名为Containerd
安装必要工具
bash
[root@localhost ~ 13:38:43]# yum install -y yum-utils device-mapper-persistent-data lvm2 vim
CentOS Stream 8 - BaseOS                                 43 kB/s | 3.9 kB     00:00
CentOS Stream 8 - AppStream                              39 kB/s | 4.4 kB     00:00
Package device-mapper-persistent-data-0.9.0-7.el8.x86_64 is already installed.
Package lvm2-8:2.03.14-14.el8.x86_64 is already installed.
Dependencies resolved.
========================================================================================
 Package               Architecture  Version                     Repository        Size
========================================================================================
Installing:
 vim-enhanced          x86_64        2:8.0.1763-19.el8.4         appstream        1.4 M
 yum-utils             noarch        4.0.21-25.el8               baseos            80 k
Installing dependencies:
 gpm-libs              x86_64        1.20.7-17.el8               appstream         39 k
 vim-common            x86_64        2:8.0.1763-19.el8.4         appstream        6.3 M
 vim-filesystem        noarch        2:8.0.1763-19.el8.4         appstream         50 k

Transaction Summary
========================================================================================
Install  5 Packages

... ...

Complete!
安装Containerd
bash
# 1.获取阿里云YUM源
[root@localhost ~ 13:39:06]# yum-config-manager --add-repo https://mirrors.aliyun.com/docker-ce/linux/centos/docker-ce.repo
Adding repo from: https://mirrors.aliyun.com/docker-ce/linux/centos/docker-ce.repo
[root@localhost ~ 13:39:30]# yum makecache
Docker CE Stable - x86_64                               514 kB/s |  66 kB     00:00
CentOS Stream 8 - BaseOS                                 78 kB/s | 3.9 kB     00:00
CentOS Stream 8 - AppStream                              57 kB/s | 4.4 kB     00:00
Metadata cache created.

# 2.查看YUM源中Containerd软件
[root@localhost ~ 13:39:42]# yum list |grep containerd
containerd.io.x86_64                                   1.6.32-3.1.el8                                        docker-ce-stable

# 3.安装Containerd.io软件,即可安装Containerd
[root@localhost ~ 13:39:57]# yum install -y containerd.io
Last metadata expiration check: 0:00:30 ago on Mon 24 Nov 2025 01:39:40 PM CST.
Dependencies resolved.
========================================================================================
 Package           Arch   Version                                Repository        Size
========================================================================================
Installing:
 containerd.io     x86_64 1.6.32-3.1.el8                         docker-ce-stable  35 M
Installing dependencies:
 container-selinux noarch 2:2.229.0-2.module_el8+847+7863d4e6    appstream         71 k
Enabling module streams:
 container-tools          rhel8

Transaction Summary
========================================================================================
Install  2 Packages

Total download size: 35 M
Installed size: 117 M
Downloading Packages:
(1/2): container-selinux-2.229.0-2.module_el8+847+7863d 906 kB/s |  71 kB     00:00
(2/2): containerd.io-1.6.32-3.1.el8.x86_64.rpm          8.7 MB/s |  35 MB     00:04
----------------------------------------------------------------------------------------
Total                                                   8.7 MB/s |  35 MB     00:04
Docker CE Stable - x86_64                                32 kB/s | 1.6 kB     00:00
Importing GPG key 0x621E9F35:
 Userid     : "Docker Release (CE rpm) <docker@docker.com>"
 Fingerprint: 060A 61C5 1B55 8A7F 742B 77AA C52F EB6B 621E 9F35
 From       : https://mirrors.aliyun.com/docker-ce/linux/centos/gpg
Key imported successfully
Running transaction check
Transaction check succeeded.
Running transaction test
Transaction test succeeded.
Running transaction
  Preparing        :                                                                1/1
  Running scriptlet: container-selinux-2:2.229.0-2.module_el8+847+7863d4e6.noarch   1/2
  Installing       : container-selinux-2:2.229.0-2.module_el8+847+7863d4e6.noarch   1/2
  Running scriptlet: container-selinux-2:2.229.0-2.module_el8+847+7863d4e6.noarch   1/2
  Installing       : containerd.io-1.6.32-3.1.el8.x86_64                            2/2
  Running scriptlet: containerd.io-1.6.32-3.1.el8.x86_64                            2/2
  Running scriptlet: container-selinux-2:2.229.0-2.module_el8+847+7863d4e6.noarch   2/2
  Running scriptlet: containerd.io-1.6.32-3.1.el8.x86_64                            2/2
  Verifying        : containerd.io-1.6.32-3.1.el8.x86_64                            1/2
  Verifying        : container-selinux-2:2.229.0-2.module_el8+847+7863d4e6.noarch   2/2

Installed:
  container-selinux-2:2.229.0-2.module_el8+847+7863d4e6.noarch
  containerd.io-1.6.32-3.1.el8.x86_64

Complete!

# 4.使用rpm -qa命令查看是否安装
[root@localhost ~ 13:41:25]# rpm -aq |grep containerd
containerd.io-1.6.32-3.1.el8.x86_64

# 5.设置containerd服务启动及开机自启动
[root@localhost ~ 13:41:46]# systemctl enable containerd --now
Created symlink /etc/systemd/system/multi-user.target.wants/containerd.service → /usr/lib/systemd/system/containerd.service.

[root@localhost ~ 13:42:27]# systemctl status containerd
● containerd.service - containerd container runtime
   Loaded: loaded (/usr/lib/systemd/system/containerd.service; enabled; vendor preset: >
   Active: active (running) since Mon 2025-11-24 13:42:10 CST; 22s ago
     Docs: https://containerd.io
  Process: 10574 ExecStartPre=/sbin/modprobe overlay (code=exited, status=0/SUCCESS)
 Main PID: 10576 (containerd)
    Tasks: 8
   Memory: 16.4M
   CGroup: /system.slice/containerd.service
           └─10576 /usr/bin/containerd

Nov 24 13:42:10 localhost.localdomain containerd[10576]: time="2025-11-24T13:42:10.2802>
Nov 24 13:42:10 localhost.localdomain containerd[10576]: time="2025-11-24T13:42:10.2802>
Nov 24 13:42:10 localhost.localdomain containerd[10576]: time="2025-11-24T13:42:10.2802>
Nov 24 13:42:10 localhost.localdomain containerd[10576]: time="2025-11-24T13:42:10.2802>
Nov 24 13:42:10 localhost.localdomain containerd[10576]: time="2025-11-24T13:42:10.2803>
Nov 24 13:42:10 localhost.localdomain containerd[10576]: time="2025-11-24T13:42:10.2803>
Nov 24 13:42:10 localhost.localdomain containerd[10576]: time="2025-11-24T13:42:10.2805>
Nov 24 13:42:10 localhost.localdomain containerd[10576]: time="2025-11-24T13:42:10.2805>
Nov 24 13:42:10 localhost.localdomain containerd[10576]: time="2025-11-24T13:42:10.2806>
Nov 24 13:42:10 localhost.localdomain systemd[1]: Started containerd container runtime.

# 6.验证
# 安装Containerd时ctr命令亦可使用,ctr命令主要用于管理容器及容器镜像等。
# 使用ctr命令查看Containerd客户端及服务端相关信息
[root@localhost ~ 13:42:43]# ctr version
Client:
  Version:  1.6.32
  Revision: 8b3b7ca2e5ce38e8f31a34f35b2b68ceb8470d89
  Go version: go1.21.10

Server:
  Version:  1.6.32
  Revision: 8b3b7ca2e5ce38e8f31a34f35b2b68ceb8470d89
  UUID: 5540d6f0-9fa8-492e-b58e-64382e8972ec
2.二进制方式安装
Containerd有两种安装包:
- 第一种是containerd-xxx,这种包用于单机测试没问题,不包含runC,需要提前安装。
- 第二种是cri-containerd-cni-xxxx,包含runc和k8s里的所需要的相关文件。k8s集群里需要用到此 包。虽然包含runC,但是依赖系统中的seccomp(安全计算模式,是一种限制容器调用系统资源的 模式。)
2 . 1 安 装 C o n t a i n e r d
打 开 git h u b 官 网 , 搜 索 c o n t ain e r d 项 目,找到1.6.32,往下翻,找到软件包下载,然后上传到centos 也可以右击,复制链接,wget下载 https://github.com/containerd/containerd/releases/download/v1.6.32/cri-containerd-cni-1.6.32-linux-amd64.tar.gz
bash
# 1.下载Containerd安装包
[root@localhost ~ 14:11:51]# ls
anaconda-ks.cfg  cri-containerd-cni-1.6.32-linux-amd64.tar.gz

# 2.安装containerd
[root@localhost ~ 14:13:11]# mkdir containerd
[root@localhost ~ 14:13:20]# tar xf cri-containerd-cni-1.6.32-linux-amd64.tar.gz -C containerd/
[root@localhost ~ 14:13:44]# cd containerd/
[root@localhost containerd 14:13:52]# ls
cri-containerd.DEPRECATED.txt  etc  opt  usr
[root@localhost containerd 14:13:53]# yum install -y tree
CentOS Stream 8 - BaseOS                                 28 kB/s | 3.9 kB     00:00
CentOS Stream 8 - AppStream                              80 kB/s | 4.4 kB     00:00
Dependencies resolved.
========================================================================================
 Package          Architecture       Version                   Repository          Size
========================================================================================
Installing:
 tree             x86_64             1.7.0-15.el8              baseos              59 k

Transaction Summary
========================================================================================
Install  1 Package

Total download size: 59 k
Installed size: 109 k
Downloading Packages:
tree-1.7.0-15.el8.x86_64.rpm                            521 kB/s |  59 kB     00:00
----------------------------------------------------------------------------------------
Total                                                   511 kB/s |  59 kB     00:00
Running transaction check
Transaction check succeeded.
Running transaction test
Transaction test succeeded.
Running transaction
  Preparing        :                                                                1/1
  Installing       : tree-1.7.0-15.el8.x86_64                                       1/1
  Running scriptlet: tree-1.7.0-15.el8.x86_64                                       1/1
  Verifying        : tree-1.7.0-15.el8.x86_64                                       1/1

Installed:
  tree-1.7.0-15.el8.x86_64

Complete!
[root@localhost containerd 14:14:04]# tree
.
├── cri-containerd.DEPRECATED.txt
├── etc  #etc目录主要为containerd服务管理配置文件及cni虚拟网卡配置文件
│   ├── cni
│   │   └── net.d
│   │       └── 10-containerd-net.conflist  #网络插件配置文件
│   ├── crictl.yaml
│   └── systemd
│       └── system
│           └── containerd.service #服务配置文件
├── opt  #opt目录主要为gce环境中使用containerd配置文件及cni插件
│   ├── cni #网络插件
│   │   └── bin
│   │       ├── bandwidth
│   │       ├── bridge
│   │       ├── dhcp
│   │       ├── firewall
│   │       ├── host-device
│   │       ├── host-local
│   │       ├── ipvlan
│   │       ├── loopback
│   │       ├── macvlan
│   │       ├── portmap
│   │       ├── ptp
│   │       ├── sbr
│   │       ├── static
│   │       ├── tuning
│   │       ├── vlan
│   │       └── vrf
│   └── containerd
│       └── cluster
│           ├── gce
│           │   ├── cloud-init
│           │   │   ├── master.yaml
│           │   │   └── node.yaml
│           │   ├── cni.template
│           │   ├── configure.sh
│           │   └── env
│           └── version
└── usr  #usr目录主要为containerd运行时文件,包含runc
    └── local  # bin,sbin命令
        ├── bin
        │   ├── containerd
        │   ├── containerd-shim
        │   ├── containerd-shim-runc-v1
        │   ├── containerd-shim-runc-v2
        │   ├── containerd-stress
        │   ├── crictl
        │   ├── critest
        │   ├── ctd-decoder
        │   └── ctr
        └── sbin
            └── runc

16 directories, 36 files

#查看containerd.service文件,了解containerd文件安装位置
[root@localhost containerd 14:14:06]# cat etc/systemd/system/containerd.service
# Copyright The containerd Authors.
#
# Licensed under the Apache License, Version 2.0 (the "License");
# you may not use this file except in compliance with the License.
# You may obtain a copy of the License at
#
#     http://www.apache.org/licenses/LICENSE-2.0
#
# Unless required by applicable law or agreed to in writing, software
# distributed under the License is distributed on an "AS IS" BASIS,
# WITHOUT WARRANTIES OR CONDITIONS OF ANY KIND, either express or implied.
# See the License for the specific language governing permissions and
# limitations under the License.

[Unit]
Description=containerd container runtime
Documentation=https://containerd.io
After=network.target local-fs.target

[Service]
ExecStartPre=-/sbin/modprobe overlay
#查看此位置,把containerd二进制文件放置于此处即可完成安装。
ExecStart=/usr/local/bin/containerd

Type=notify
Delegate=yes
KillMode=process
Restart=always
RestartSec=5
# Having non-zero Limit*s causes performance problems due to accounting overhead
# in the kernel. We recommend using cgroups to do container-local accounting.
LimitNPROC=infinity
LimitCORE=infinity
LimitNOFILE=infinity
# Comment TasksMax if your systemd version does not supports it.
# Only systemd 226 and above support this version.
TasksMax=infinity
OOMScoreAdjust=-999

[Install]
WantedBy=multi-user.target

#复制containerd运行时文件至系统
[root@localhost containerd 14:15:27]# cp usr/local/bin/* /usr/local/bin/

#添加containerd.service文件至系统
[root@localhost containerd 14:15:42]# cp etc/systemd/system/containerd.service /usr/lib/systemd/system/containerd.service

# 生成containerd模块配置文件,可以自定义一下配置,如有私有镜像仓库等,按需配置
[root@localhost containerd 14:16:20]# mkdir /etc/containerd
[root@localhost containerd 14:16:33]# containerd config default > /etc/containerd/config.toml
[root@localhost containerd 14:17:01]# cat /etc/containerd/config.toml
disabled_plugins = []
imports = []
oom_score = 0
plugin_dir = ""
required_plugins = []
root = "/var/lib/containerd"
state = "/run/containerd"
temp = ""
version = 2

[cgroup]
  path = ""

[debug]
  address = ""
  format = ""
  gid = 0
  level = ""
  uid = 0

[grpc]
  address = "/run/containerd/containerd.sock"
  gid = 0
  max_recv_message_size = 16777216
  max_send_message_size = 16777216
  tcp_address = ""
  tcp_tls_ca = ""
  tcp_tls_cert = ""
  tcp_tls_key = ""
  uid = 0

[metrics]
  address = ""
  grpc_histogram = false

[plugins]

  [plugins."io.containerd.gc.v1.scheduler"]
    deletion_threshold = 0
    mutation_threshold = 100
    pause_threshold = 0.02
    schedule_delay = "0s"
    startup_delay = "100ms"

  [plugins."io.containerd.grpc.v1.cri"]
    device_ownership_from_security_context = false
    disable_apparmor = false
    disable_cgroup = false
    disable_hugetlb_controller = true
    disable_proc_mount = false
    disable_tcp_service = true
    drain_exec_sync_io_timeout = "0s"
    enable_selinux = false
    enable_tls_streaming = false
    enable_unprivileged_icmp = false
    enable_unprivileged_ports = false
    ignore_deprecation_warnings = []
    ignore_image_defined_volumes = false
    max_concurrent_downloads = 3
    max_container_log_line_size = 16384
    netns_mounts_under_state_dir = false
    restrict_oom_score_adj = false
    sandbox_image = "registry.k8s.io/pause:3.6"
    selinux_category_range = 1024
    stats_collect_period = 10
    stream_idle_timeout = "4h0m0s"
    stream_server_address = "127.0.0.1"
    stream_server_port = "0"
    systemd_cgroup = false
    tolerate_missing_hugetlb_controller = true
    unset_seccomp_profile = ""

    [plugins."io.containerd.grpc.v1.cri".cni]
      bin_dir = "/opt/cni/bin"
      conf_dir = "/etc/cni/net.d"
      conf_template = ""
      ip_pref = ""
      max_conf_num = 1

    [plugins."io.containerd.grpc.v1.cri".containerd]
      default_runtime_name = "runc"
      disable_snapshot_annotations = true
      discard_unpacked_layers = false
      ignore_rdt_not_enabled_errors = false
      no_pivot = false
      snapshotter = "overlayfs"

      [plugins."io.containerd.grpc.v1.cri".containerd.default_runtime]
        base_runtime_spec = ""
        cni_conf_dir = ""
        cni_max_conf_num = 0
        container_annotations = []
        pod_annotations = []
        privileged_without_host_devices = false
        runtime_engine = ""
        runtime_path = ""
        runtime_root = ""
        runtime_type = ""

        [plugins."io.containerd.grpc.v1.cri".containerd.default_runtime.options]

      [plugins."io.containerd.grpc.v1.cri".containerd.runtimes]

        [plugins."io.containerd.grpc.v1.cri".containerd.runtimes.runc]
          base_runtime_spec = ""
          cni_conf_dir = ""
          cni_max_conf_num = 0
          container_annotations = []
          pod_annotations = []
          privileged_without_host_devices = false
          runtime_engine = ""
          runtime_path = ""
          runtime_root = ""
          runtime_type = "io.containerd.runc.v2"

          [plugins."io.containerd.grpc.v1.cri".containerd.runtimes.runc.options]
            BinaryName = ""
            CriuImagePath = ""
            CriuPath = ""
            CriuWorkPath = ""
            IoGid = 0
            IoUid = 0
            NoNewKeyring = false
            NoPivotRoot = false
            Root = ""
            ShimCgroup = ""
            SystemdCgroup = false

      [plugins."io.containerd.grpc.v1.cri".containerd.untrusted_workload_runtime]
        base_runtime_spec = ""
        cni_conf_dir = ""
        cni_max_conf_num = 0
        container_annotations = []
        pod_annotations = []
        privileged_without_host_devices = false
        runtime_engine = ""
        runtime_path = ""
        runtime_root = ""
        runtime_type = ""

        [plugins."io.containerd.grpc.v1.cri".containerd.untrusted_workload_runtime.options]

    [plugins."io.containerd.grpc.v1.cri".image_decryption]
      key_model = "node"

    [plugins."io.containerd.grpc.v1.cri".registry]
      config_path = ""

      [plugins."io.containerd.grpc.v1.cri".registry.auths]

      [plugins."io.containerd.grpc.v1.cri".registry.configs]

      [plugins."io.containerd.grpc.v1.cri".registry.headers]

      [plugins."io.containerd.grpc.v1.cri".registry.mirrors]

    [plugins."io.containerd.grpc.v1.cri".x509_key_pair_streaming]
      tls_cert_file = ""
      tls_key_file = ""

  [plugins."io.containerd.internal.v1.opt"]
    path = "/opt/containerd"

  [plugins."io.containerd.internal.v1.restart"]
    interval = "10s"

  [plugins."io.containerd.internal.v1.tracing"]

  [plugins."io.containerd.metadata.v1.bolt"]
    content_sharing_policy = "shared"

  [plugins."io.containerd.monitor.v1.cgroups"]
    no_prometheus = false

  [plugins."io.containerd.runtime.v1.linux"]
    no_shim = false
    runtime = "runc"
    runtime_root = ""
    shim = "containerd-shim"
    shim_debug = false

  [plugins."io.containerd.runtime.v2.task"]
    platforms = ["linux/amd64"]
    sched_core = false

  [plugins."io.containerd.service.v1.diff-service"]
    default = ["walking"]

  [plugins."io.containerd.service.v1.tasks-service"]
    rdt_config_file = ""

  [plugins."io.containerd.snapshotter.v1.aufs"]
    root_path = ""

  [plugins."io.containerd.snapshotter.v1.btrfs"]
    root_path = ""

  [plugins."io.containerd.snapshotter.v1.devmapper"]
    async_remove = false
    base_image_size = ""
    discard_blocks = false
    fs_options = ""
    fs_type = ""
    pool_name = ""
    root_path = ""

  [plugins."io.containerd.snapshotter.v1.native"]
    root_path = ""

  [plugins."io.containerd.snapshotter.v1.overlayfs"]
    mount_options = []
    root_path = ""
    sync_remove = false
    upperdir_label = false

  [plugins."io.containerd.snapshotter.v1.zfs"]
    root_path = ""

  [plugins."io.containerd.tracing.processor.v1.otlp"]

[proxy_plugins]

[stream_processors]

  [stream_processors."io.containerd.ocicrypt.decoder.v1.tar"]
    accepts = ["application/vnd.oci.image.layer.v1.tar+encrypted"]
    args = ["--decryption-keys-path", "/etc/containerd/ocicrypt/keys"]
    env = ["OCICRYPT_KEYPROVIDER_CONFIG=/etc/containerd/ocicrypt/ocicrypt_keyprovider.conf"]
    path = "ctd-decoder"
    returns = "application/vnd.oci.image.layer.v1.tar"

  [stream_processors."io.containerd.ocicrypt.decoder.v1.tar.gzip"]
    accepts = ["application/vnd.oci.image.layer.v1.tar+gzip+encrypted"]
    args = ["--decryption-keys-path", "/etc/containerd/ocicrypt/keys"]
    env = ["OCICRYPT_KEYPROVIDER_CONFIG=/etc/containerd/ocicrypt/ocicrypt_keyprovider.conf"]
    path = "ctd-decoder"
    returns = "application/vnd.oci.image.layer.v1.tar+gzip"

[timeouts]
  "io.containerd.timeout.bolt.open" = "0s"
  "io.containerd.timeout.shim.cleanup" = "5s"
  "io.containerd.timeout.shim.load" = "5s"
  "io.containerd.timeout.shim.shutdown" = "3s"
  "io.containerd.timeout.task.state" = "2s"

[ttrpc]
  address = ""
  gid = 0
  uid = 0

#启动containerd并验证
[root@localhost containerd 14:17:11]# systemctl enable containerd --now
Created symlink /etc/systemd/system/multi-user.target.wants/containerd.service → /usr/lib/systemd/system/containerd.service.
[root@localhost containerd 14:17:33]# systemctl status containerd
● containerd.service - containerd container runtime
   Loaded: loaded (/usr/lib/systemd/system/containerd.service; enabled; vendor preset: >
   Active: active (running) since Mon 2025-11-24 14:17:33 CST; 12s ago
     Docs: https://containerd.io
  Process: 10279 ExecStartPre=/sbin/modprobe overlay (code=exited, status=0/SUCCESS)
 Main PID: 10283 (containerd)
    Tasks: 10
   Memory: 17.6M
   CGroup: /system.slice/containerd.service
           └─10283 /usr/local/bin/containerd

Nov 24 14:17:33 localhost.localdomain containerd[10283]: time="2025-11-24T14:17:33.8281>
Nov 24 14:17:33 localhost.localdomain containerd[10283]: time="2025-11-24T14:17:33.8282>
Nov 24 14:17:33 localhost.localdomain containerd[10283]: time="2025-11-24T14:17:33.8282>
Nov 24 14:17:33 localhost.localdomain containerd[10283]: time="2025-11-24T14:17:33.8282>
Nov 24 14:17:33 localhost.localdomain containerd[10283]: time="2025-11-24T14:17:33.8284>
Nov 24 14:17:33 localhost.localdomain containerd[10283]: time="2025-11-24T14:17:33.8284>
Nov 24 14:17:33 localhost.localdomain containerd[10283]: time="2025-11-24T14:17:33.8284>
Nov 24 14:17:33 localhost.localdomain containerd[10283]: time="2025-11-24T14:17:33.8284>
Nov 24 14:17:33 localhost.localdomain containerd[10283]: time="2025-11-24T14:17:33.8285>
Nov 24 14:17:33 localhost.localdomain systemd[1]: Started containerd container runtime.
[root@localhost containerd 14:17:47]# ctr version
Client:
  Version:  v1.6.32
  Revision: 8b3b7ca2e5ce38e8f31a34f35b2b68ceb8470d89
  Go version: go1.21.10

Server:
  Version:  v1.6.32
  Revision: 8b3b7ca2e5ce38e8f31a34f35b2b68ceb8470d89
  UUID: 73649c74-44a0-42db-a540-7121110dcac2
2.2 安装runC
由于二进制包中提供的runC默认需要系统中安装seccomp支持,需要单独安装,且不同版本runC对 seccomp版本要求一致,所以建议单独下载runC 二进制包进行安装,里面包含了seccomp模块支持 下载地址:https://github.com/opencontainers/runc/releases
bash
# 使用wget下载runc
[root@localhost ~]# wget
https://github.com/opencontainers/runc/releases/download/v1.3.0/runc.amd64

[root@localhost containerd 14:17:54]# cd ..
[root@localhost ~ 14:18:17]# ls
anaconda-ks.cfg  containerd  cri-containerd-cni-1.6.32-linux-amd64.tar.gz  runc.amd64

# 安装runc
[root@localhost ~ 14:18:18]# mv runc.amd64 /usr/sbin/runc

# 为runc添加可执行权限
[root@localhost ~ 14:18:35]# chmod +x /usr/sbin/runc

# 使用runc命令验证是否安装成功
[root@localhost ~ 14:18:50]# runc -v
runc version 1.3.0
commit: v1.3.0-0-g4ca628d1
spec: 1.2.1
go: go1.23.8
libseccomp: 2.5.6
三、Containerd容器镜像管理
3.1.帮助命令
- docker使用docker images命令管理镜像
- 单机containerd使用ctr images命令管理像,containerd本身的CLI
- k8s中containerd使用crictl images命令管理镜像, Kubernetes社区的专用CLI工具
bash
#命令帮助
[root@localhost ~ 15:15:29]# ctr --help
NAME:
   ctr -
        __
  _____/ /______
 / ___/ __/ ___/
/ /__/ /_/ /
\___/\__/_/

containerd CLI


USAGE:
   ctr [global options] command [command options] [arguments...]

VERSION:
   1.6.32

DESCRIPTION:

ctr is an unsupported debug and administrative client for interacting
with the containerd daemon. Because it is unsupported, the commands,
options, and operations are not guaranteed to be backward compatible or
stable from release to release of the containerd project.

COMMANDS:
   plugins, plugin            provides information about containerd plugins
   version                    print the client and server versions
   containers, c, container   manage containers
   content                    manage content
   events, event              display containerd events
   images, image, i           manage images
   leases                     manage leases
   namespaces, namespace, ns  manage namespaces
   pprof                      provide golang pprof outputs for containerd
   run                        run a container
   snapshots, snapshot        manage snapshots
   tasks, t, task             manage tasks
   install                    install a new package
   oci                        OCI tools
   deprecations
   shim                       interact with a shim directly
   help, h                    Shows a list of commands or help for one command

GLOBAL OPTIONS:
   --debug                      enable debug output in logs
   --address value, -a value    address for containerd's GRPC server (default: "/run/containerd/containerd.sock") [$CONTAINERD_ADDRESS]
   --timeout value              total timeout for ctr commands (default: 0s)
   --connect-timeout value      timeout for connecting to containerd (default: 0s)
   --namespace value, -n value  namespace to use with commands (default: "default") [$CONTAINERD_NAMESPACE]
   --help, -h                   show help
   --version, -v                print the version

# 子命令帮助
[root@localhost ~ 15:15:43]# ctr images --help
NAME:
   ctr images - manage images

USAGE:
   ctr images command [command options] [arguments...]

COMMANDS:
   check                    check existing images to ensure all content is available locally
   export                   export images
   import                   import images
   list, ls                 list images known to containerd
   mount                    mount an image to a target path
   unmount                  unmount the image from the target
   pull                     pull an image from a remote
   push                     push an image to a remote
   delete, del, remove, rm  remove one or more images by reference
   tag                      tag an image
   label                    set and clear labels for an image
   convert                  convert an image

OPTIONS:
   --help, -h  show help
3.2.查看镜像
bash
[root@localhost ~ 15:15:55]# ctr images list
REF TYPE DIGEST SIZE PLATFORMS LABELS
[root@localhost ~ 15:16:05]# ctr images ls
REF TYPE DIGEST SIZE PLATFORMS LABELS
[root@localhost ~ 15:16:12]# ctr image list
REF TYPE DIGEST SIZE PLATFORMS LABELS
[root@localhost ~ 15:16:18]# ctr image ls
REF TYPE DIGEST SIZE PLATFORMS LABELS
[root@localhost ~ 15:16:23]# ctr i list
REF TYPE DIGEST SIZE PLATFORMS LABELS
[root@localhost ~ 15:16:27]# ctr i ls
REF TYPE DIGEST SIZE PLATFORMS LABELS
3.3.下载镜像
containerd支持oci标准的镜像,所以可以直接使用docker官方或dockerfile构建的镜像。
bash
# 这里ctr命令pull镜像时,不能直接把镜像名字写成nginx:alpine,这里未配置加速器
[root@localhost ~ 15:16:29]# ctr images pull 054b8ac70e8010d90f2ac00ef29e6580.mirror.swr.myhuaweicloud.com/library/nginx:latest
054b8ac70e8010d90f2ac00ef29e6580.mirror.swr.myhuaweicloud.com/library/nginx:latest: resolved       |++++++++++++++++++++++++++++++++++++++|
index-sha256:553f64aecdc31b5bf944521731cd70e35da4faed96b2b7548a3d8e2598c52a42:      done           |++++++++++++++++++++++++++++++++++++++|
manifest-sha256:5c733364e9a8f7e6d7289ceaad623c6600479fe95c3ab5534f07bfd7416d9541:   done           |++++++++++++++++++++++++++++++++++++++|
layer-sha256:de57a609c9d5148f10b38f5c920d276e9e38b2856fe16c0aae1450613dc12051:      done           |++++++++++++++++++++++++++++++++++++++|
config-sha256:60adc2e137e757418d4d771822fa3b3f5d3b4ad58ef2385d200c9ee78375b6d5:     done           |++++++++++++++++++++++++++++++++++++++|
layer-sha256:0e4bc2bd6656e6e004e3c749af70e5650bac2258243eb0949dea51cb8b7863db:      done           |++++++++++++++++++++++++++++++++++++++|
layer-sha256:b5feb73171bf1bcf29fdd1ba642c3d30cdf4c6329b19d89be14d209d778c89ba:      done           |++++++++++++++++++++++++++++++++++++++|
layer-sha256:108ab82928207dabd9abfddbc960dd842364037563fc560b8f6304e4a91454fe:      done           |++++++++++++++++++++++++++++++++++++++|
layer-sha256:53d743880af45adf9f141eec1fe3a413087e528075a5d8884d6215ddfdd2b806:      done           |++++++++++++++++++++++++++++++++++++++|
layer-sha256:77fa2eb0631772679b0e48eca04f4906fba5fe94377e01618873a4a1171107ce:      done           |++++++++++++++++++++++++++++++++++++++|
layer-sha256:192e2451f8751fb74549c932e26a9bcfd7b669fe2f5bd8381ea5ac65f09b256b:      done           |++++++++++++++++++++++++++++++++++++++|
elapsed: 20.6s                                                                      total:  56.6 M (2.7 MiB/s)
unpacking linux/amd64 sha256:553f64aecdc31b5bf944521731cd70e35da4faed96b2b7548a3d8e2598c52a42...
done: 1.82676885s

# 验证现象
[root@localhost ~ 15:17:10]# ctr image ls
REF                                                                                TYPE                                    DIGEST                                                                  SIZE     PLATFORMS                                                                                                              LABELS
054b8ac70e8010d90f2ac00ef29e6580.mirror.swr.myhuaweicloud.com/library/nginx:latest application/vnd.oci.image.index.v1+json sha256:553f64aecdc31b5bf944521731cd70e35da4faed96b2b7548a3d8e2598c52a42 57.0 MiB linux/386,linux/amd64,linux/arm/v5,linux/arm/v7,linux/arm64/v8,linux/ppc64le,linux/riscv64,linux/s390x,unknown/unknown -
3.4.镜像挂载
方便查看镜像中包含的内容
bash
# 挂载
[root@localhost ~ 15:17:21]# ctr images mount 054b8ac70e8010d90f2ac00ef29e6580.mirror.swr.myhuaweicloud.com/library/nginx:latest /mnt
sha256:7ab4a6fb632471ab3ee41345cf86ffaf7ecf2bf70be36232658a9374809268e7
/mnt

# 查看挂载
[root@localhost ~ 15:32:46]# ls /mnt
bin   docker-entrypoint.d   home   media  proc  sbin  tmp
boot  docker-entrypoint.sh  lib    mnt    root  srv   usr
dev   etc                   lib64  opt    run   sys   var

# 卸载
[root@localhost ~ 15:32:50]# umount /mnt
3.5.镜像导出
bash
#--platform linux/amd64,导出指定平台镜像
[root@localhost ~ 15:33:33]# ctr i export --platform linux/amd64 nginx.img 054b8ac70e8010d90f2ac00ef29e6580.mirror.swr.myhuaweicloud.com/library/nginx:latest
[root@localhost ~ 15:33:57]# ls
anaconda-ks.cfg  nginx.img
3.6.镜像删除
bash
# ctr image rm帮助
[root@localhost ~ 15:33:59]# ctr image rm --help
NAME:
   ctr images delete - remove one or more images by reference

USAGE:
   ctr images delete [command options] [flags] <ref> [<ref>, ...]

DESCRIPTION:
   remove one or more images by reference

OPTIONS:
   --sync  Synchronously remove image and all associated resources

# 删除指定镜像
[root@localhost ~ 15:34:09]# ctr image rm 054b8ac70e8010d90f2ac00ef29e6580.mirror.swr.myhuaweicloud.com/library/nginx:latest
054b8ac70e8010d90f2ac00ef29e6580.mirror.swr.myhuaweicloud.com/library/nginx:latest

# 验证现象
[root@localhost ~ 15:34:20]# ctr images ls
REF TYPE DIGEST SIZE PLATFORMS LABELS
3.7.镜像导入
bash
# 导入镜像
[root@localhost ~ 15:34:28]# ctr images import --platform linux/amd64 nginx.img
unpacking 054b8ac70e8010d90f2ac00ef29e6580.mirror.swr.myhuaweicloud.com/library/nginx:latest (sha256:553f64aecdc31b5bf944521731cd70e35da4faed96b2b7548a3d8e2598c52a42)...done

# 验证现象
[root@localhost ~ 15:34:58]# ctr image ls
REF                                                                                TYPE                                    DIGEST                                                                  SIZE     PLATFORMS                                                                                                              LABELS
054b8ac70e8010d90f2ac00ef29e6580.mirror.swr.myhuaweicloud.com/library/nginx:latest application/vnd.oci.image.index.v1+json sha256:553f64aecdc31b5bf944521731cd70e35da4faed96b2b7548a3d8e2598c52a42 57.0 MiB linux/386,linux/amd64,linux/arm/v5,linux/arm/v7,linux/arm64/v8,linux/ppc64le,linux/riscv64,linux/s390x,unknown/unknown -
3.8.修改镜像tag
bash
# 把054b8ac70e8010d90f2ac00ef29e6580.mirror.swr.myhuaweicloud.com/library/nginx:latest 修改为 nginx:latest
[root@localhost ~ 15:35:04]# ctr images tag 054b8ac70e8010d90f2ac00ef29e6580.mirror.swr.myhuaweicloud.com/library/nginx:latest nginx:latest
nginx:latest

# 验证现象
[root@localhost ~ 15:35:25]# ctr image ls
REF                                                                                TYPE                                    DIGEST                                                                  SIZE     PLATFORMS                                                                                                              LABELS
054b8ac70e8010d90f2ac00ef29e6580.mirror.swr.myhuaweicloud.com/library/nginx:latest application/vnd.oci.image.index.v1+json sha256:553f64aecdc31b5bf944521731cd70e35da4faed96b2b7548a3d8e2598c52a42 57.0 MiB linux/386,linux/amd64,linux/arm/v5,linux/arm/v7,linux/arm64/v8,linux/ppc64le,linux/riscv64,linux/s390x,unknown/unknown -
nginx:latest                                                                       application/vnd.oci.image.index.v1+json sha256:553f64aecdc31b5bf944521731cd70e35da4faed96b2b7548a3d8e2598c52a42 57.0 MiB linux/386,linux/amd64,linux/arm/v5,linux/arm/v7,linux/arm64/v8,linux/ppc64le,linux/riscv64,linux/s390x,unknown/unknown -
[root@localhost ~ 15:35:26]#
四、Containerd容器管理
bash
[root@localhost ~ 16:10:04]# ctr tasks resume nginx2
[root@localhost ~ 16:07:08]# ctr task ls
TASK PID STATUS
[root@localhost ~ 16:07:38]# ctr task start -d nginx1#1.获取命令帮助
#ctr命令帮助
[root@localhost ~ 16:05:33]# ctr -help
NAME:
ctr -
__
_____/ /______
/ ___/ __/ ___/
/ /__/ /_/ /
\___/\__/_/
containerd CLI
USAGE:
ctr [global options] command [command options] [arguments...]
VERSION:
1.6.32
DESCRIPTION:
ctr is an unsupported debug and administrative client for interacting
with the containerd daemon. Because it is unsupported, the commands,
options, and operations are not guaranteed to be backward compatible or
stable from release to release of the containerd project.
COMMANDS:
plugins, plugin provides information about containerd plugins
version print the client and server versions
containers, c, container manage containers
content manage content
events, event display containerd events
images, image, i manage images
leases manage leases
namespaces, namespace, ns manage namespaces
pprof provide golang pprof outputs for containerd
run run a container
snapshots, snapshot manage snapshots
tasks, t, task manage tasks
install install a new package
oci OCI tools
deprecations
shim interact with a shim directly
help, h Shows a list of commands or help for one command
GLOBAL OPTIONS:
--debug enable debug output in logs
--address value, -a value address for containerd's GRPC server (default: "/run/containerd/containerd.sock") [$CONTAINERD_ADDRESS]
--timeout value total timeout for ctr commands (default: 0s)
--connect-timeout value timeout for connecting to containerd (default: 0s)
--namespace value, -n value namespace to use with commands (default: "default") [$CONTAINERD_NAMESPACE]
--help, -h show help
--version, -v print the version
#获取创建静态容器命令帮助 使用`ctr container create `命令创建容器后,容器并没有处于运行状态,其只是一个静态的容器。这个 container 对象只是包含了运行一个容器所需的资源及配置的数据结构,例如: namespaces、rootfs 和容器的配置都已经初始化成功了,只是用户进程(本案例为nginx)还没有启动。需要使用`ctr tasks`命令才能获取一个动态容器。
[root@localhost ~ 16:05:45]# ctr container --help
NAME:
ctr containers - manage containers
USAGE:
ctr containers command [command options] [arguments...]
COMMANDS:
create create container
delete, del, remove, rm delete one or more existing containers
info get info about a container
list, ls list containers
label set and clear labels for a container
checkpoint checkpoint a container
restore restore a container from checkpoint
OPTIONS:
--help, -h show help
# 使用`ctr run`命令可以创建一个静态容器并使其运行。一步到位运行容器。
[root@localhost ~ 16:05:58]# ctr run --help
NAME:
ctr run - run a container
USAGE:
ctr run [command options] [flags] Image|RootFS ID [COMMAND] [ARG...]
OPTIONS:
--rm remove the container after running, cannot be used with --detach
--null-io send all IO to /dev/null
--log-uri value log uri
--detach, -d detach from the task after it has started execution, cannot be used with --rm
--fifo-dir value directory used for storing IO FIFOs
--cgroup value cgroup path (To disable use of cgroup, set to "" explicitly)
--platform value run image for specific platform
--cni enable cni networking for the container
--runc-binary value specify runc-compatible binary
--runc-root value specify runc-compatible root
--runc-systemd-cgroup start runc with systemd cgroup manager
--uidmap container-uid:host-uid:length run inside a user namespace with the specified UID mapping range; specified with the format container-uid:host-uid:length
--gidmap container-gid:host-gid:length run inside a user namespace with the specified GID mapping range; specified with the format container-gid:host-gid:length
--remap-labels provide the user namespace ID remapping to the snapshotter via label options; requires snapshotter support
--cpus value set the CFS cpu quota (default: 0)
--cpu-shares value set the cpu shares (default: 1024)
--snapshotter value snapshotter name. Empty value stands for the default value. [$CONTAINERD_SNAPSHOTTER]
--snapshotter-label value labels added to the new snapshot for this container.
--config value, -c value path to the runtime-specific spec config file
--cwd value specify the working directory of the process
--env value specify additional container environment variables (e.g. FOO=bar)
--env-file value specify additional container environment variables in a file(e.g. FOO=bar, one per line)
--label value specify additional labels (e.g. foo=bar)
--annotation value specify additional OCI annotations (e.g. foo=bar)
--mount value specify additional container mount (e.g. type=bind,src=/tmp,dst=/host,options=rbind:ro)
--net-host enable host networking for the container
--privileged run privileged container
--read-only set the containers filesystem as readonly
--runtime value runtime name (default: "io.containerd.runc.v2")
--runtime-config-path value optional runtime config path
--tty, -t allocate a TTY for the container
--with-ns value specify existing Linux namespaces to join at container runtime (format '<nstype>:<path>')
--pid-file value file path to write the task's pid
--gpus value add gpus to the container
--allow-new-privs turn off OCI spec's NoNewPrivileges feature flag
--memory-limit value memory limit (in bytes) for the container (default: 0)
--device value file path to a device to add to the container; or a path to a directory tree of devices to add to the container
--cap-add value add Linux capabilities (Set capabilities with 'CAP_' prefix)
--cap-drop value drop Linux capabilities (Set capabilities with 'CAP_' prefix)
--seccomp enable the default seccomp profile
--seccomp-profile value file path to custom seccomp profile. seccomp must be set to true, before using seccomp-profile
--apparmor-default-profile value enable AppArmor with the default profile with the specified name, e.g. "cri-containerd.apparmor.d"
--apparmor-profile value enable AppArmor with an existing custom profile
--rdt-class value name of the RDT class to associate the container with. Specifies a Class of Service (CLOS) for cache and memory bandwidth management.
--rootfs use custom rootfs that is not managed by containerd snapshotter
--no-pivot disable use of pivot-root (linux only)
--cpu-quota value Limit CPU CFS quota (default: -1)
--cpu-period value Limit CPU CFS period (default: 0)
--rootfs-propagation value set the propagation of the container rootfs
#2.查看容器(container表示静态容器,可用c缩写代表container)
# 可以简写为 ctr c ls
[root@localhost ~ 16:06:07]# ctr container ls
CONTAINER IMAGE RUNTIME
#3.查看任务(task表示容器里跑的进程, 可用t缩写代表task)
# 可以简写为 ctr t ls
[root@localhost ~ 16:06:25]# ctr task ls
TASK PID STATUS
#4.创建静态容器
[root@localhost ~ 16:06:32]# ctr container create nginx:latest nginx1
[root@localhost ~ 16:06:50]# ctr container ls
CONTAINER IMAGE RUNTIME
nginx1 nginx:latest io.containerd.runc.v2
[root@localhost ~ 16:06:57]# ctr container info nginx1
{
"ID": "nginx1",
"Labels": {
"io.containerd.image.config.stop-signal": "SIGQUIT",
"maintainer": "NGINX Docker Maintainers \u003cdocker-maint@nginx.com\u003e"
},
"Image": "nginx:latest",
"Runtime": {
"Name": "io.containerd.runc.v2",
"Options": {
"type_url": "containerd.runc.v1.Options"
}
},
"SnapshotKey": "nginx1",
"Snapshotter": "overlayfs",
"CreatedAt": "2025-11-24T08:06:50.661138928Z",
"UpdatedAt": "2025-11-24T08:06:50.661138928Z",
"Extensions": null,
"Spec": {
"ociVersion": "1.0.2-dev",
"process": {
"user": {
"uid": 0,
"gid": 0,
"additionalGids": [
0
]
},
"args": [
"/docker-entrypoint.sh",
"nginx",
"-g",
"daemon off;"
],
"env": [
"PATH=/usr/local/sbin:/usr/local/bin:/usr/sbin:/usr/bin:/sbin:/bin",
"NGINX_VERSION=1.29.3",
"NJS_VERSION=0.9.4",
"NJS_RELEASE=1~trixie",
"PKG_RELEASE=1~trixie",
"DYNPKG_RELEASE=1~trixie"
],
"cwd": "/",
"capabilities": {
"bounding": [
"CAP_CHOWN",
"CAP_DAC_OVERRIDE",
"CAP_FSETID",
"CAP_FOWNER",
"CAP_MKNOD",
"CAP_NET_RAW",
"CAP_SETGID",
"CAP_SETUID",
"CAP_SETFCAP",
"CAP_SETPCAP",
"CAP_NET_BIND_SERVICE",
"CAP_SYS_CHROOT",
"CAP_KILL",
"CAP_AUDIT_WRITE"
],
"effective": [
"CAP_CHOWN",
"CAP_DAC_OVERRIDE",
"CAP_FSETID",
"CAP_FOWNER",
"CAP_MKNOD",
"CAP_NET_RAW",
"CAP_SETGID",
"CAP_SETUID",
"CAP_SETFCAP",
"CAP_SETPCAP",
"CAP_NET_BIND_SERVICE",
"CAP_SYS_CHROOT",
"CAP_KILL",
"CAP_AUDIT_WRITE"
],
"permitted": [
"CAP_CHOWN",
"CAP_DAC_OVERRIDE",
"CAP_FSETID",
"CAP_FOWNER",
"CAP_MKNOD",
"CAP_NET_RAW",
"CAP_SETGID",
"CAP_SETUID",
"CAP_SETFCAP",
"CAP_SETPCAP",
"CAP_NET_BIND_SERVICE",
"CAP_SYS_CHROOT",
"CAP_KILL",
"CAP_AUDIT_WRITE"
]
},
"rlimits": [
{
"type": "RLIMIT_NOFILE",
"hard": 1024,
"soft": 1024
}
],
"noNewPrivileges": true
},
"root": {
"path": "rootfs"
},
"mounts": [
{
"destination": "/proc",
"type": "proc",
"source": "proc",
"options": [
"nosuid",
"noexec",
"nodev"
]
},
{
"destination": "/dev",
"type": "tmpfs",
"source": "tmpfs",
"options": [
"nosuid",
"strictatime",
"mode=755",
"size=65536k"
]
},
{
"destination": "/dev/pts",
"type": "devpts",
"source": "devpts",
"options": [
"nosuid",
"noexec",
"newinstance",
"ptmxmode=0666",
"mode=0620",
"gid=5"
]
},
{
"destination": "/dev/shm",
"type": "tmpfs",
"source": "shm",
"options": [
"nosuid",
"noexec",
"nodev",
"mode=1777",
"size=65536k"
]
},
{
"destination": "/dev/mqueue",
"type": "mqueue",
"source": "mqueue",
"options": [
"nosuid",
"noexec",
"nodev"
]
},
{
"destination": "/sys",
"type": "sysfs",
"source": "sysfs",
"options": [
"nosuid",
"noexec",
"nodev",
"ro"
]
},
{
"destination": "/run",
"type": "tmpfs",
"source": "tmpfs",
"options": [
"nosuid",
"strictatime",
"mode=755",
"size=65536k"
]
}
],
"linux": {
"resources": {
"devices": [
{
"allow": false,
"access": "rwm"
},
{
"allow": true,
"type": "c",
"major": 1,
"minor": 3,
"access": "rwm"
},
{
"allow": true,
"type": "c",
"major": 1,
"minor": 8,
"access": "rwm"
},
{
"allow": true,
"type": "c",
"major": 1,
"minor": 7,
"access": "rwm"
},
{
"allow": true,
"type": "c",
"major": 5,
"minor": 0,
"access": "rwm"
},
{
"allow": true,
"type": "c",
"major": 1,
"minor": 5,
"access": "rwm"
},
{
"allow": true,
"type": "c",
"major": 1,
"minor": 9,
"access": "rwm"
},
{
"allow": true,
"type": "c",
"major": 5,
"minor": 1,
"access": "rwm"
},
{
"allow": true,
"type": "c",
"major": 136,
"access": "rwm"
},
{
"allow": true,
"type": "c",
"major": 5,
"minor": 2,
"access": "rwm"
}
]
},
"cgroupsPath": "/default/nginx1",
"namespaces": [
{
"type": "pid"
},
{
"type": "ipc"
},
{
"type": "uts"
},
{
"type": "mount"
},
{
"type": "network"
}
],
"maskedPaths": [
"/proc/acpi",
"/proc/asound",
"/proc/kcore",
"/proc/keys",
"/proc/latency_stats",
"/proc/timer_list",
"/proc/timer_stats",
"/proc/sched_debug",
"/sys/firmware",
"/sys/devices/virtual/powercap",
"/proc/scsi"
],
"readonlyPaths": [
"/proc/bus",
"/proc/fs",
"/proc/irq",
"/proc/sys",
"/proc/sysrq-trigger"
]
}
}
}
#5.静态容器启动为动态容器
[root@localhost ~ 16:07:08]# ctr task ls
TASK PID STATUS
#启动task,即表时在容器中运行了进程,即为动态容器 -d 后台
[root@localhost ~ 16:07:38]# ctr task start -d nginx1
#容器是以宿主机进程的方式存在的
[root@localhost ~ 16:08:14]# ctr task ls
TASK PID STATUS
nginx1 1979 RUNNING
[root@localhost ~ 16:08:17]# ps aux |grep 1979
root 1979 0.0 0.2 14764 8964 ? Ss 16:08 0:00 nginx: master process nginx -g daemon off;
root 2022 0.0 0.0 12216 1208 pts/0 S+ 16:08 0:00 grep --color=auto 1979
#6.进入容器操作
#为exec进程设定一个id,可以随意输入,只要保证唯一即可,也可使用$RANDOM变量
[root@localhost ~ 16:08:29]# ctr task exec --exec-id $RANDOM -t nginx1 /bin/bash
root@localhost:/# ls
bin docker-entrypoint.d home media proc sbin tmp
boot docker-entrypoint.sh lib mnt root srv usr
dev etc lib64 opt run sys var
root@localhost:/# pwd
/
root@localhost:/# exit
exit
#7.直接运行一个动态容器
# --net-host 代表容器的IP就是宿主机的IP(相当于docker里的host类型网络)
[root@localhost ~ 16:09:28]# ctr run -d --net-host nginx:latest nginx2
#8.暂停容器
[root@localhost ~ 16:09:46]# ctr tasks pause nginx2
[root@localhost ~ 16:10:01]# ctr task ls
TASK PID STATUS
nginx1 1979 RUNNING
#状态为PAUSED,表示暂停
nginx2 2082 PAUSED
#9.恢复容器
[root@localhost ~ 16:10:04]# ctr tasks resume nginx2
[root@localhost ~ 16:10:22]# ctr task ls
TASK PID STATUS
nginx1 1979 RUNNING
#恢复RUNNING
nginx2 2082 RUNNING
#10.停止容器
[root@localhost ~ 16:10:25]# ctr tasks kill nginx2
[root@localhost ~ 16:10:41]# ctr tasks ls
TASK PID STATUS
nginx1 1979 RUNNING
#容器停止后STATUS为STOPPED
nginx2 2082 STOPPED
#11.删除容器
#必须先停止tasks或先删除task,再删除容器
[root@localhost ~ 16:10:52]# ctr tasks delete nginx2
[root@localhost ~ 16:11:07]# ctr tasks ls
TASK PID STATUS
nginx1 1979 RUNNING
# 查看静态容器,确认其还存在于系统中,然后删除
[root@localhost ~ 16:11:10]# ctr container delete nginx2
[root@localhost ~ 16:11:31]# ctr container ls
CONTAINER IMAGE RUNTIME
nginx1 nginx:latest io.containerd.runc.v2五、Containerd NameSpace管理
containerd中namespace的作用为隔离运行的容器,可以实现运行多个容器
bash
#1.列出已有namespace
#containerd默认工作在default命名空间
[root@localhost ~ 16:43:23]# ctr namespace ls
NAME    LABELS
default

#在docker环境中打
[root@docker ~]# ctr namespace ls
NAME LABELS
#docker默认工作在moby空间
moby

#2.创建namespace
[root@localhost ~ 16:43:45]# ctr namespace create myns
[root@localhost ~ 16:44:32]# ctr namespace create testns
[root@localhost ~ 16:44:50]# ctr namespace ls
NAME    LABELS
default
myns
testns

#3.删除namespace
[root@localhost ~ 16:44:52]# ctr namespace rm testns
testns
[root@localhost ~ 16:44:55]# ctr namespace ls
NAME    LABELS
default
myns

#4.查看指定namespace中镜像
[root@localhost ~ 16:44:57]# ctr -n myns images ls
REF TYPE DIGEST SIZE PLATFORMS LABELS

#5.查看指定namespace中是否有用户进程在运行
[root@localhost ~ 16:45:08]# ctr -n myns tasks ls
TASK    PID    STATUS

#6.在指定namespace中下载容器镜像
[root@localhost ~ 16:45:44]# ctr -n myns images pull 054b8ac70e8010d90f2ac00ef29e6580.mirror.swr.myhuaweicloud.com/library/nginx:latest
054b8ac70e8010d90f2ac00ef29e6580.mirror.swr.myhuaweicloud.com/library/nginx:latest: resolved       |++++++++++++++++++++++++++++++++++++++|
index-sha256:553f64aecdc31b5bf944521731cd70e35da4faed96b2b7548a3d8e2598c52a42:      done           |++++++++++++++++++++++++++++++++++++++|
manifest-sha256:5c733364e9a8f7e6d7289ceaad623c6600479fe95c3ab5534f07bfd7416d9541:   done           |++++++++++++++++++++++++++++++++++++++|
layer-sha256:de57a609c9d5148f10b38f5c920d276e9e38b2856fe16c0aae1450613dc12051:      done           |++++++++++++++++++++++++++++++++++++++|
config-sha256:60adc2e137e757418d4d771822fa3b3f5d3b4ad58ef2385d200c9ee78375b6d5:     done           |++++++++++++++++++++++++++++++++++++++|
layer-sha256:0e4bc2bd6656e6e004e3c749af70e5650bac2258243eb0949dea51cb8b7863db:      done           |++++++++++++++++++++++++++++++++++++++|
layer-sha256:53d743880af45adf9f141eec1fe3a413087e528075a5d8884d6215ddfdd2b806:      done           |++++++++++++++++++++++++++++++++++++++|
layer-sha256:77fa2eb0631772679b0e48eca04f4906fba5fe94377e01618873a4a1171107ce:      done           |++++++++++++++++++++++++++++++++++++++|
layer-sha256:b5feb73171bf1bcf29fdd1ba642c3d30cdf4c6329b19d89be14d209d778c89ba:      done           |++++++++++++++++++++++++++++++++++++++|
layer-sha256:192e2451f8751fb74549c932e26a9bcfd7b669fe2f5bd8381ea5ac65f09b256b:      done           |++++++++++++++++++++++++++++++++++++++|
layer-sha256:108ab82928207dabd9abfddbc960dd842364037563fc560b8f6304e4a91454fe:      done           |++++++++++++++++++++++++++++++++++++++|
elapsed: 1.7 s                                                                      total:   0.0 B (0.0 B/s)
unpacking linux/amd64 sha256:553f64aecdc31b5bf944521731cd70e35da4faed96b2b7548a3d8e2598c52a42...
done: 1.800614512s
[root@localhost ~ 16:46:04]# ctr -n myns images ls
REF                                                                                TYPE                                    DIGEST                                                                  SIZE     PLATFORMS                                                                                                              LABELS
054b8ac70e8010d90f2ac00ef29e6580.mirror.swr.myhuaweicloud.com/library/nginx:latest application/vnd.oci.image.index.v1+json sha256:553f64aecdc31b5bf944521731cd70e35da4faed96b2b7548a3d8e2598c52a42 57.0 MiB linux/386,linux/amd64,linux/arm/v5,linux/arm/v7,linux/arm64/v8,linux/ppc64le,linux/riscv64,linux/s390x,unknown/unknown -


#7.在指定namespace中创建静态容器
[root@localhost ~ 16:46:13]# ctr -n myns container create 054b8ac70e8010d90f2ac00ef29e6580.mirror.swr.myhuaweicloud.com/library/nginx:latest mynginx


#8.查看在指定namespace中创建的容器
[root@localhost ~ 16:46:39]# ctr -n myns container ls
CONTAINER    IMAGE                                                                                 RUNTIME
mynginx      054b8ac70e8010d90f2ac00ef29e6580.mirror.swr.myhuaweicloud.com/library/nginx:latest    io.containerd.runc.v2
[root@localhost ~ 16:46:49]# ctr -n myns task start -d mynginx
/docker-entrypoint.sh: /docker-entrypoint.d/ is not empty, will attempt to perform configuration
/docker-entrypoint.sh: Looking for shell scripts in /docker-entrypoint.d/
/docker-entrypoint.sh: Launching /docker-entrypoint.d/10-listen-on-ipv6-by-default.sh
[root@localhost ~ 16:47:07]# ctr -n myns tasks ls
TASK       PID     STATUS
mynginx    2374    RUNNING
nerdctl实践
nerdctl 安装
我们推荐使用 nerdctl 管理containerd,命令语法与 docker 一致。
截止 2023-05-24 最新版本是 v 1.4.0
github项目地址:https://github.com/containerd/nerdctl/releases
cni插件项目地址:https://github.com/containernetworking/plugins/releases
bash
# 下载并安装
[root@localhost ~ 09:49:43]#wget
https://github.com/containerd/nerdctl/releases/download/v1.4.0/nerdctl-1.4.0-
linux-amd64.tar.gz
[root@localhost ~ 09:49:44]# tar -xf nerdctl-1.4.0-linux-amd64.tar.gz -C /usr/bin/

# 配置nerdctl命令自动补全
[root@localhost ~ 09:50:22]# nerdctl completion bash > /etc/bash_completion.d/nerdctl
[root@localhost ~ 09:50:26]# source /etc/bash_completion.d/nerdctl

# 下载nerdctl所需要的cni插件
[root@localhost ~ 09:50:31]#wget
https://github.com/containernetworking/plugins/releases/download/v1.3.0/cni-plugins-linux-amd64-v1.3.0.tgz
[root@localhost ~ 09:50:31]# mkdir -p /opt/cni/bin
[root@localhost ~ 09:50:39]# tar -xf cni-plugins-linux-amd64-v1.3.0.tgz -C /opt/cni/bin
如果nerdctl补全是报错信息如下:
bash[root@localhost ~ 09:50:44]# nerdctl cre-bash: _get_comp_words_by_ref: command not found FATA[0000] unknown subcommand "cre" for "nerdctl" Did you mean this? cp create rm解决方法:安装
bash-completion
bash[root@localhost ~ 09:50:57]# yum install -y bash-completion vim Last metadata expiration check: 20:11:26 ago on Mon 24 Nov 2025 01:39:40 PM CST. Package vim-enhanced-2:8.0.1763-19.el8.4.x86_64 is already installed. Dependencies resolved. ======================================================================================== ... ... Complete!
配置镜像加速
bash
#编辑containerd的配置文件config.toml,如果不存在,需要手动生成,方法 containerd configdefault > /etc/containerd/config.toml,在配置文件中搜索关键字"config_path",在其下面添加镜像加速参数
[root@localhost ~ 09:51:48]# containerd config default > /etc/containerd/config.toml
[root@localhost ~ 09:52:10]# vim /etc/containerd/config.toml
[plugins."io.containerd.grpc.v1.cri".registry]
#配置这里
config_path = "/etc/containerd/certs.d"
[root@localhost ~ 09:52:39]# mkdir -p /etc/containerd/certs.d/docker.io
[root@localhost ~ 09:52:47]# vim /etc/containerd/certs.d/docker.io/hosts.toml
[root@localhost ~ 09:53:05]# cat /etc/containerd/certs.d/docker.io/hosts.toml
server = "https://054b8ac70e8010d90f2ac00ef29e6580.mirror.swr.myhuaweicloud.com"
[host."https://054b8ac70e8010d90f2ac00ef29e6580.mirror.swr.myhuaweicloud.com"]
  capabilities = ["pull", "resolve"]

#重启containerd服务生效
[root@localhost ~ 09:55:32]# systemctl restart containerd
nerdctl 管理镜像
bash
[root@localhost ~ 11:00:13]# nerdctl image <tab><tab>
build    (Build an image from a Dockerfile. Needs buildkitd to be running.)
convert  (convert an image)
decrypt  (decrypt an image)
encrypt  (encrypt image layers)
history  (Show the history of an image)
inspect  (Display detailed information on one or more images.)
load     (Load an image from a tar archive or STDIN)
ls       (List images)
prune    (Remove unused images)
pull     (Pull an image from a registry. Optionally specify "ipfs://" or "ipns://" sch...)
push     (Push an image or a repository to a registry. Optionally specify "ipfs://" or...)
rm       (Remove one or more images)
save     (Save one or more images to a tar archive (streamed to STDOUT by default))
tag      (Create a tag TARGET_IMAGE that refers to SOURCE_IMAGE)
ls
作用:查看本地镜像清单。
bash
[root@localhost ~ 09:55:40]# nerdctl image ls
REPOSITORY    TAG    IMAGE ID    CREATED    PLATFORM    SIZE    BLOB SIZE

# 可简写如下
[root@localhost ~ 09:56:18]# nerdctl images
REPOSITORY    TAG    IMAGE ID    CREATED    PLATFORM    SIZE    BLOB SIZE
pull
作用:从网络上下载镜像。
bash
#下载镜像busybox
[root@localhost ~]# nerdctl image pull busybox

# 可简写如下下载httpd
[root@localhost ~]# nerdctl pull httpd

[root@localhost ~ 09:57:47]# nerdctl image ls
REPOSITORY    TAG       IMAGE ID        CREATED               PLATFORM       SIZE         BLOB SIZE
busybox       latest    e3652a00a2fa    About a minute ago    linux/amd64    4.3 MiB      2.1 MiB
httpd         latest    f9b88f3f093d    12 seconds ago        linux/amd64    121.0 MiB    43.1 MiB
rm
作用:删除本地不用的镜像。
bash
[root@localhost ~ 09:58:00]# nerdctl image rm httpd
Untagged: docker.io/library/httpd:latest@sha256:f9b88f3f093d925525ec272bbe28e72967ffe1a40da813fe84df9fcb2fad3f30
Deleted: sha256:70a290c5e58b68f39496ab93a62f21b8b2ca0502e97905131838de1b39a37cbb
Deleted: sha256:de88e4999fda633254a27ec2c1a544fc99a537452047b7c2291d929c88e7c8ad
Deleted: sha256:5f70bf18a086007016e948b04aed3b82103a36bea41755b6cddfaf10ace3c6ef
Deleted: sha256:5dc0365682c64f7f609c24f251b8aa8e23f06d2a7173c4bfda7a75c7ecf8fb7f
Deleted: sha256:1b73832a486843e9370366283c40daf298c85e77d4787b6da7804a3d93576198
Deleted: sha256:3ecb2dcd541478fbfcb6d2976471d5708186caf1f903c1ec745ce7787ccb017f
[root@localhost ~ 09:58:08]# nerdctl image ls
REPOSITORY    TAG       IMAGE ID        CREATED               PLATFORM       SIZE       BLOB SIZE
busybox       latest    e3652a00a2fa    About a minute ago    linux/amd64    4.3 MiB    2.1 MiB
tag
作用:给镜像打标签
bash
[root@localhost ~ 09:58:14]# nerdctl tag busybox busybox_containerd
[root@localhost ~ 09:58:23]# nerdctl image ls
REPOSITORY            TAG       IMAGE ID        CREATED               PLATFORM       SIZE       BLOB SIZE
busybox               latest    e3652a00a2fa    About a minute ago    linux/amd64    4.3 MiB    2.1 MiB
busybox_containerd    latest    e3652a00a2fa    2 seconds ago         linux/amd64    4.3 MiB    2.1 MiB
save
作用:将本地镜像导出为文件。
bash
[root@localhost ~ 09:58:26]# nerdctl image save busybox -o busybox.tar
[root@localhost ~ 09:58:34]# ls
anaconda-ks.cfg  cni-plugins-linux-amd64-v1.3.0.tgz
busybox.tar      nerdctl-1.4.0-linux-amd64.tar.gz

# 可简写为
[root@localhost ~ 09:58:26]# nerdctl save busybox -o busybox.tar

# 删除镜像
[root@localhost ~ 09:58:35]# nerdctl image rm busybox
Untagged: docker.io/library/busybox:latest@sha256:e3652a00a2fabd16ce889f0aa32c38eec347b997e73bd09e69c962ec7f8732ee
Deleted: sha256:e14542cc062958c3bfada9c260a6ae47bb2906fd8b514999774760710dbce3cb
[root@localhost ~ 09:58:42]# nerdctl image ls
REPOSITORY            TAG       IMAGE ID        CREATED           PLATFORM       SIZE       BLOB SIZE
busybox_containerd    latest    e3652a00a2fa    25 seconds ago    linux/amd64    4.3 MiB    2.1 MiB
load
作用:导入tar文件中镜像。
bash
[root@localhost ~ 09:58:49]# nerdctl image load -i busybox.tar
unpacking docker.io/library/busybox:latest (sha256:e3652a00a2fabd16ce889f0aa32c38eec347b997e73bd09e69c962ec7f8732ee)...
Loaded image: busybox:latest

# 可简写为
[root@localhost ~ 09:58:59]# nerdctl load -i busybox.tar
unpacking docker.io/library/busybox:latest (sha256:e3652a00a2fabd16ce889f0aa32c38eec347b997e73bd09e69c962ec7f8732ee)...
Loaded image: busybox:latest
[root@localhost ~ 09:59:07]# nerdctl image ls
REPOSITORY            TAG       IMAGE ID        CREATED           PLATFORM       SIZE       BLOB SIZE
busybox               latest    e3652a00a2fa    11 seconds ago    linux/amd64    4.3 MiB    2.1 MiB
busybox_containerd    latest    e3652a00a2fa    47 seconds ago    linux/amd64    4.3 MiB    2.1 MiB
history
作用:查看镜像构建时的历史命令层次结构。
bash
[root@localhost ~ 09:59:11]# nerdctl image history busybox
SNAPSHOT                                                                   CREATED          CREATED BY                           SIZE       COMMENT
sha256:e14542cc062958c3bfada9c260a6ae47bb2906fd8b514999774760710dbce3cb    14 months ago    BusyBox 1.37.0 (glibc), Debian 13    4.3 MiB
inspect
作用:查看镜像详细信息。
bash
[root@localhost ~ 09:59:18]# nerdctl image inspect busybox
[
    {
        "Id": "sha256:08ef35a1c3f050afbbd64194ffd1b8d5878659f5491567f26d1c814513ae9649",
        "RepoTags": [
            "busybox:latest"
        ],
        "RepoDigests": [
            "busybox@sha256:e3652a00a2fabd16ce889f0aa32c38eec347b997e73bd09e69c962ec7f8732ee"
        ],
        "Comment": "",
        "Created": "2024-09-26T21:31:42Z",
        "Author": "",
        "Config": {
            "AttachStdin": false,
            "Env": [
                "PATH=/usr/local/sbin:/usr/local/bin:/usr/sbin:/usr/bin:/sbin:/bin"
            ],
            "Cmd": [
                "sh"
            ]
        },
        "Architecture": "amd64",
        "Os": "linux",
        "Size": 4493312,
        "RootFS": {
            "Type": "layers",
            "Layers": [
                "sha256:e14542cc062958c3bfada9c260a6ae47bb2906fd8b514999774760710dbce3cb"
            ]
        },
        "Metadata": {
            "LastTagTime": "0001-01-01T00:00:00Z"
        }
    }
]
prune
作用:删除所有未使用的镜像。
bash
[root@localhost ~ 09:59:25]# nerdctl image prune --all --force
Deleted Images:
Untagged: docker.io/library/busybox:latest
deleted: sha256:e14542cc062958c3bfada9c260a6ae47bb2906fd8b514999774760710dbce3cb
Untagged: docker.io/library/busybox_containerd:latest
deleted: sha256:e14542cc062958c3bfada9c260a6ae47bb2906fd8b514999774760710dbce3cb

[root@localhost ~ 09:59:33]# nerdctl image ls
REPOSITORY    TAG    IMAGE ID    CREATED    PLATFORM    SIZE    BLOB SIZE
nerdctl 管理容器
帮助信息
bash
[root@localhost ~ 10:23:15]# nerdctl containerd --help
nerdctl is a command line interface for containerd

Config file ($NERDCTL_TOML): /etc/nerdctl/nerdctl.toml

Usage: nerdctl [flags]

Management commands:
  apparmor   Manage AppArmor profiles
  builder    Manage builds
  container  Manage containers
  image      Manage images
  ipfs       Distributing images on IPFS
  namespace  Manage containerd namespaces
  network    Manage networks
  system     Manage containerd
  volume     Manage volumes

Commands:
  build       Build an image from a Dockerfile. Needs buildkitd to be running.
  commit      Create a new image from a container's changes
  completion  Generate the autocompletion script for the specified shell
  compose     Compose
  cp          Copy files/folders between a running container and the local filesystem.
  create      Create a new container. Optionally specify "ipfs://" or "ipns://" scheme to pull image from IPFS.
  events      Get real time events from the server
  exec        Run a command in a running container
  help        Help about any command
  history     Show the history of an image
  images      List images
  info        Display system-wide information
  inspect     Return low-level information on objects.
  kill        Kill one or more running containers
  load        Load an image from a tar archive or STDIN
  login       Log in to a container registry
  logout      Log out from a container registry
  logs        Fetch the logs of a container. Expected to be used with 'nerdctl run -d'.
  pause       Pause all processes within one or more containers
  port        List port mappings or a specific mapping for the container
  ps          List containers
  pull        Pull an image from a registry. Optionally specify "ipfs://" or "ipns://" scheme to pull image from IPFS.
  push        Push an image or a repository to a registry. Optionally specify "ipfs://" or "ipns://" scheme to push image to IPFS.
  rename      rename a container
  restart     Restart one or more running containers
  rm          Remove one or more containers
  rmi         Remove one or more images
  run         Run a command in a new container. Optionally specify "ipfs://" or "ipns://" scheme to pull image from IPFS.
  save        Save one or more images to a tar archive (streamed to STDOUT by default)
  start       Start one or more running containers
  stats       Display a live stream of container(s) resource usage statistics.
  stop        Stop one or more running containers
  tag         Create a tag TARGET_IMAGE that refers to SOURCE_IMAGE
  top         Display the running processes of a container
  unpause     Unpause all processes within one or more containers
  update      Update one or more running containers
  version     Show the nerdctl version information
  wait        Block until one or more containers stop, then print their exit codes.

Flags:
  -H, --H string                 Alias of --address (default "/run/containerd/containerd.sock")
  -a, --a string                 Alias of --address (default "/run/containerd/containerd.sock")
      --address string           containerd address, optionally with "unix://" prefix [$CONTAINERD_ADDRESS] (default "/run/containerd/containerd.sock")
      --cgroup-manager string    Cgroup manager to use ("cgroupfs"|"systemd") (default "cgroupfs")
      --cni-netconfpath string   cni config directory [$NETCONFPATH] (default "/etc/cni/net.d")
      --cni-path string          cni plugins binary directory [$CNI_PATH] (default "/opt/cni/bin")
      --data-root string         Root directory of persistent nerdctl state (managed by nerdctl, not by containerd) (default "/var/lib/nerdctl")
      --debug                    debug mode
      --debug-full               debug mode (with full output)
      --experimental             Control experimental: https://github.com/containerd/nerdctl/blob/main/docs/experimental.md [$NERDCTL_EXPERIMENTAL] (default true)
  -h, --help                     help for nerdctl
      --host string              Alias of --address (default "/run/containerd/containerd.sock")
      --host-gateway-ip string   IP address that the special 'host-gateway' string in --add-host resolves to. Defaults to the IP address of the host. It has no effect without setting --add-host [$NERDCTL_HOST_GATEWAY_IP] (default "192.168.108.128")
      --hosts-dir strings        A directory that contains <HOST:PORT>/hosts.toml (containerd style) or <HOST:PORT>/{ca.cert, cert.pem, key.pem} (docker style) (default [/etc/containerd/certs.d,/etc/docker/certs.d])
      --insecure-registry        skips verifying HTTPS certs, and allows falling back to plain HTTP
  -n, --n string                 Alias of --namespace (default "default")
      --namespace string         containerd namespace, such as "moby" for Docker, "k8s.io" for Kubernetes [$CONTAINERD_NAMESPACE] (default "default")
      --snapshotter string       containerd snapshotter [$CONTAINERD_SNAPSHOTTER] (default "overlayfs")
      --storage-driver string    Alias of --snapshotter (default "overlayfs")
  -v, --version                  version for nerdctl

Run 'nerdctl COMMAND --help' for more information on a command.
ls
作用:查看容器清单。
bash
[root@localhost ~ 10:23:26]# nerdctl container ls
# 可简写为
CONTAINER ID    IMAGE    COMMAND    CREATED    STATUS    PORTS    NAMES
[root@localhost ~ 10:23:34]# nerdctl ps
CONTAINER ID    IMAGE    COMMAND    CREATED    STATUS    PORTS    NAMES

# 使用-a选项查看所有容器,包括未运行的
[root@localhost ~ 10:23:39]# nerdctl ps -a
CONTAINER ID    IMAGE    COMMAND    CREATED    STATUS    PORTS    NAMES
常用选项:
-
-a, --all Show all containers (default shows just running)
-
-f, --filter strings Filter matches containers based on given conditions
-
--format string Format the output using the given Go template, e.g, '{{json .}}', 'wide'
run
作用:创建并运行容器。
bash
[root@localhost ~ 10:23:49]# nerdctl run --help
Run a command in a new container. Optionally specify "ipfs://" or "ipns://" scheme to pull image from IPFS.

Usage: nerdctl run [flags] IMAGE [COMMAND] [ARG...]

Flags:
      --add-host strings                               Add a custom host-to-IP mapping (host:ip)
      --blkio-weight uint16                            Block IO (relative weight), between 10 and 1000, or 0 to disable (default 0)
      --cap-add strings                                Add Linux capabilities
      --cap-drop strings                               Drop Linux capabilities
      --cgroup-conf strings                            Configure cgroup v2 (key=value)
      --cgroup-parent string                           Optional parent cgroup for the container
      --cgroupns string                                Cgroup namespace to use, the default depends on the cgroup version ("host"|"private") (default "host")
      --cidfile string                                 Write the container ID to the file
      --cosign-certificate-identity string             The identity expected in a valid Fulcio certificate for --verify=cosign. Valid values include email address, DNS names, IP addresses, and URIs. Either --cosign-certificate-identity or --cosign-certificate-identity-regexp must be set for keyless flows
      --cosign-certificate-identity-regexp string      A regular expression alternative to --cosign-certificate-identity for --verify=cosign. Accepts the Go regular expression syntax described at https://golang.org/s/re2syntax. Either --cosign-certificate-identity or --cosign-certificate-identity-regexp must be set for keyless flows
      --cosign-certificate-oidc-issuer string          The OIDC issuer expected in a valid Fulcio certificate for --verify=cosign, e.g. https://token.actions.githubusercontent.com or https://oauth2.sigstore.dev/auth. Either --cosign-certificate-oidc-issuer or --cosign-certificate-oidc-issuer-regexp must be set for keyless flows
      --cosign-certificate-oidc-issuer-regexp string   A regular expression alternative to --certificate-oidc-issuer for --verify=cosign. Accepts the Go regular expression syntax described at https://golang.org/s/re2syntax. Either --cosign-certificate-oidc-issuer or --cosign-certificate-oidc-issuer-regexp must be set for keyless flows
      --cosign-key string                              Path to the public key file, KMS, URI or Kubernetes Secret for --verify=cosign
      --cpu-period uint                                Limit CPU CFS (Completely Fair Scheduler) period
      --cpu-quota int                                  Limit CPU CFS (Completely Fair Scheduler) quota (default -1)
      --cpu-shares uint                                CPU shares (relative weight)
      --cpus float                                     Number of CPUs
      --cpuset-cpus string                             CPUs in which to allow execution (0-3, 0,1)
      --cpuset-mems string                             MEMs in which to allow execution (0-3, 0,1)
  -d, --detach                                         Run container in background and print container ID
      --device strings                                 Add a host device to the container
      --dns strings                                    Set custom DNS servers
      --dns-opt strings                                Set DNS options
      --dns-option strings                             Set DNS options
      --dns-search strings                             Set custom DNS search domains
      --entrypoint stringArray                         Overwrite the default ENTRYPOINT of the image
  -e, --env stringArray                                Set environment variables
      --env-file strings                               Set environment variables from file
      --gpus stringArray                               GPU devices to add to the container ('all' to pass all GPUs)
      --group-add strings                              Add additional groups to join
      --help                                           show help
  -h, --hostname string                                Container host name
      --init                                           Run an init process inside the container, Default to use tini
      --init-binary string                             The custom binary to use as the init process (default "tini")
  -i, --interactive                                    Keep STDIN open even if not attached
      --ip string                                      IPv4 address to assign to the container
      --ipc string                                     IPC namespace to use ("host"|"private")
      --ipfs-address string                            multiaddr of IPFS API (default uses $IPFS_PATH env variable if defined or local directory ~/.ipfs)
      --isolation string                               Specify isolation technology for container. On Linux the only valid value is default. Windows options are host, process and hyperv with process isolation as the default (default "default")
      --kernel-memory string                           Kernel memory limit (deprecated)
  -l, --label stringArray                              Set metadata on container
      --label-file strings                             Set metadata on container from file
      --log-driver string                              Logging driver for the container. Default is json-file. It also supports logURI (eg: --log-driver binary://<path>) (default "json-file")
      --log-opt stringArray                            Log driver options
      --mac-address string                             MAC address to assign to the container
  -m, --memory string                                  Memory limit
      --memory-reservation string                      Memory soft limit
      --memory-swap string                             Swap limit equal to memory plus swap: '-1' to enable unlimited swap
      --memory-swappiness int                          Tune container memory swappiness (0 to 100) (default -1) (default -1)
      --mount stringArray                              Attach a filesystem mount to the container
      --name string                                    Assign a name to the container
      --net strings                                    Connect a container to a network ("bridge"|"host"|"none"|<CNI>) (default [bridge])
      --network strings                                Connect a container to a network ("bridge"|"host"|"none"|"container:<container>"|<CNI>) (default [bridge])
      --oom-kill-disable                               Disable OOM Killer
      --oom-score-adj int                              Tune container's OOM preferences (-1000 to 1000, rootless: 100 to 1000)
      --pid string                                     PID namespace to use
      --pidfile string                                 file path to write the task's pid
      --pids-limit int                                 Tune container pids limit (set -1 for unlimited) (default -1)
      --platform string                                Set platform (e.g. "amd64", "arm64")
      --privileged                                     Give extended privileges to this container
  -p, --publish strings                                Publish a container's port(s) to the host
      --pull string                                    Pull image before running ("always"|"missing"|"never") (default "missing")
      --rdt-class string                               Name of the RDT class (or CLOS) to associate the container with
      --read-only                                      Mount the container's root filesystem as read only
      --restart string                                 Restart policy to apply when a container exits (implemented values: "no"|"always|on-failure:n|unless-stopped") (default "no")
      --rm                                             Automatically remove the container when it exits
      --rootfs                                         The first argument is not an image but the rootfs to the exploded container
      --runtime string                                 Runtime to use for this container, e.g. "crun", or "io.containerd.runsc.v1" (default "io.containerd.runc.v2")
      --security-opt stringArray                       Security options
      --shm-size string                                Size of /dev/shm
      --stop-signal string                             Signal to stop a container (default "SIGTERM")
      --stop-timeout int                               Timeout (in seconds) to stop a container
      --sysctl stringArray                             Sysctl options
      --tmpfs stringArray                              Mount a tmpfs directory
  -t, --tty                                            Allocate a pseudo-TTY
      --ulimit strings                                 Ulimit options
      --umask string                                   Set the umask inside the container. Defaults to 0022
  -u, --user string                                    Username or UID (format: <name|uid>[:<group|gid>])
      --uts string                                     UTS namespace to use
      --verify string                                  Verify the image (none|cosign|notation) (default "none")
  -v, --volume stringArray                             Bind mount a volume
  -w, --workdir string                                 Working directory inside the container

See also 'nerdctl --help' for the global flags such as '--namespace', '--snapshotter', and '--cgroup-manager'.


[root@localhost ~ 10:23:59]# nerdctl container run -it ubuntu
docker.io/library/ubuntu:latest:                                                  resolved       |++++++++++++++++++++++++++++++++++++++|
index-sha256:c35e29c9450151419d9448b0fd75374fec4fff364a27f176fb458d472dfc9e54:    done           |++++++++++++++++++++++++++++++++++++++|
manifest-sha256:4fdf0125919d24aec972544669dcd7d6a26a8ad7e6561c73d5549bd6db258ac2: done           |++++++++++++++++++++++++++++++++++++++|
config-sha256:c3a134f2ace4f6d480733efcfef27c60ea8ed48be1cd36f2c17ec0729775b2c8:   done           |++++++++++++++++++++++++++++++++++++++|
layer-sha256:20043066d3d5c78b45520c5707319835ac7d1f3d7f0dded0138ea0897d6a3188:    done           |++++++++++++++++++++++++++++++++++++++|
elapsed: 69.6s                                                                    total:  28.4 M (417.2 KiB/s)
root@056bf20c03a3:/# ls
bin   dev  home  lib64  mnt  proc  run   srv  tmp  var
boot  etc  lib   media  opt  root  sbin  sys  usr
root@056bf20c03a3:/# pwd
/
root@056bf20c03a3:/# exit
exit

# 可简写为
[root@localhost ~ 10:23:59]# nerdctl  run -it ubuntu

# 容器状态为Exited
[root@localhost ~ 10:25:41]# nerdctl container ls
CONTAINER ID    IMAGE    COMMAND    CREATED    STATUS    PORTS    NAMES
[root@localhost ~ 10:25:47]# nerdctl container ls -a
CONTAINER ID    IMAGE                              COMMAND        CREATED           STATUS                      PORTS    NAMES
056bf20c03a3    docker.io/library/ubuntu:latest    "/bin/bash"    27 seconds ago    Exited (0) 9 seconds ago             ubuntu-056bf
[root@localhost ~ 10:25:51]# nerdctl ps -a
CONTAINER ID    IMAGE                              COMMAND        CREATED           STATUS                       PORTS    NAMES
056bf20c03a3    docker.io/library/ubuntu:latest    "/bin/bash"    33 seconds ago    Exited (0) 15 seconds ago             ubuntu-056bf
常用选项:
-
--cpu-shares uint CPU shares (relative weight)
-
--cpus float Number of CPUs
-
-d, --detach Run container in background and print container ID
-
--dns strings Set custom DNS servers
-
-e, --env stringArray Set environment variables
-
-h, --hostname string Container host name
-
-i, --interactive Keep STDIN open even if not attached
-
--ip string Pv4 address to assign to the container
-
--mac-address string MAC address to assign to the container
-
-m, --memory string Memory limit
-
--name string Assign a name to the container
-
--net strings Connect a container to a network ("bridge"|"host"|"none"|) (default bridge)
-
--network strings Connect a container to a network ("bridge"|"host"|"none"|"container:"|) (default bridge)
-
--privileged Give extended privileges to this container
-
--pull string Pull image before running ("always"|"missing"|"never") (default "missing")
-
--restart string Restart policy to apply when a container exits (implemented values: "no"|"always|on-failure:n|unless-stopped") (default "no")
-
--rm Automatically remove the container when it exits
-
--runtime string Runtime to use for this container, e.g.
-
--stop-signal string Signal to stop a container (default "SIGTERM")
-
--stop-timeout Timeout (in seconds) to stop a container
-
-t, --tty Allocate a pseudo-TTY
-
-v, --volume Bind mount a volume
rm
作用:删除容器。
bash
[root@localhost ~ 10:25:56]# nerdctl container rm 05
05
[root@localhost ~ 10:26:07]# nerdctl ps -a
CONTAINER ID    IMAGE    COMMAND    CREATED    STATUS    PORTS    NAMES
prune
作用:删除所有未运行的容器。
bash
[root@localhost ~ 10:26:12]# nerdctl container run ubuntu
[root@localhost ~ 10:26:26]# nerdctl container run ubuntu
[root@localhost ~ 10:26:27]# nerdctl container ls -a
CONTAINER ID    IMAGE                              COMMAND        CREATED          STATUS                      PORTS    NAMES
b2ac3d5c4b0d    docker.io/library/ubuntu:latest    "/bin/bash"    8 seconds ago    Exited (0) 7 seconds ago             ubuntu-b2ac3
dbac3706d291    docker.io/library/ubuntu:latest    "/bin/bash"    9 seconds ago    Exited (0) 9 seconds ago             ubuntu-dbac3

[root@localhost ~ 10:26:48]# nerdctl container prune --force
Deleted Containers:
b2ac3d5c4b0d233fbe24317e93e6a34c6b5920394982c305a3b55816ae85bc54
dbac3706d291df69164928e859fa68157425b76f4ba3d97014549d480c193c14
[root@localhost ~ 10:26:53]# nerdctl ps -a
CONTAINER ID    IMAGE    COMMAND    CREATED    STATUS    PORTS    NAMES
rename
作用:重命名容器。
bash
[root@localhost ~ 10:27:04]# nerdctl container run --name ubuntu-1 ubuntu
[root@localhost ~ 10:27:31]# nerdctl ps -a
CONTAINER ID    IMAGE                              COMMAND        CREATED          STATUS                      PORTS    NAMES
65b41b36289a    docker.io/library/ubuntu:latest    "/bin/bash"    8 seconds ago    Exited (0) 7 seconds ago             ubuntu-1
[root@localhost ~ 10:28:08]# nerdctl container rename ubuntu-1 ubuntu-2
[root@localhost ~ 10:28:15]# nerdctl ps -a
CONTAINER ID    IMAGE                              COMMAND        CREATED           STATUS                       PORTS    NAMES
65b41b36289a    docker.io/library/ubuntu:latest    "/bin/bash"    47 seconds ago    Exited (0) 47 seconds ago             ubuntu-2
[root@localhost ~ 10:28:19]# nerdctl  rename ubuntu-2 ubuntu

[root@localhost ~]# nerdctl container rm ubuntu
ubuntu
stop 和 start
作用:停止和启动容器。
bash
[root@localhost ~]# nerdctl container run -d --name nginx1 nginx
FATA[0000] no such container ubuntu-a


docker.io/library/nginx:latest:                                                   resolved       |++++++++++++++++++++++++++++++++++++++|
index-sha256:553f64aecdc31b5bf944521731cd70e35da4faed96b2b7548a3d8e2598c52a42:    done           |++++++++++++++++++++++++++++++++++++++|
manifest-sha256:5c733364e9a8f7e6d7289ceaad623c6600479fe95c3ab5534f07bfd7416d9541: done           |++++++++++++++++++++++++++++++++++++++|
config-sha256:60adc2e137e757418d4d771822fa3b3f5d3b4ad58ef2385d200c9ee78375b6d5:   done           |++++++++++++++++++++++++++++++++++++++|
layer-sha256:b5feb73171bf1bcf29fdd1ba642c3d30cdf4c6329b19d89be14d209d778c89ba:    done           |++++++++++++++++++++++++++++++++++++++|
layer-sha256:de57a609c9d5148f10b38f5c920d276e9e38b2856fe16c0aae1450613dc12051:    done           |++++++++++++++++++++++++++++++++++++++|
layer-sha256:0e4bc2bd6656e6e004e3c749af70e5650bac2258243eb0949dea51cb8b7863db:    done           |++++++++++++++++++++++++++++++++++++++|
layer-sha256:108ab82928207dabd9abfddbc960dd842364037563fc560b8f6304e4a91454fe:    done           |++++++++++++++++++++++++++++++++++++++|
layer-sha256:53d743880af45adf9f141eec1fe3a413087e528075a5d8884d6215ddfdd2b806:    done           |++++++++++++++++++++++++++++++++++++++|
layer-sha256:77fa2eb0631772679b0e48eca04f4906fba5fe94377e01618873a4a1171107ce:    done           |++++++++++++++++++++++++++++++++++++++|
layer-sha256:192e2451f8751fb74549c932e26a9bcfd7b669fe2f5bd8381ea5ac65f09b256b:    done           |++++++++++++++++++++++++++++++++++++++|
elapsed: 60.5s                                                                    total:  57.0 M (964.8 KiB/s)
a51cda89af543aa919b4a2732d4bc1a3dab87083ac96347c58d648192bb4f6fa
[root@localhost ~ 10:30:31]# nerdctl container ls --format "{{.Names}} {{.Status}}"
nginx1 Up
[root@localhost ~ 10:31:16]# nerdctl container stop nginx1
nginx1
[root@localhost ~ 10:31:30]# nerdctl ps -a  --format "{{.Names}} {{.Status}}"
nginx1 Exited (0) 24 seconds ago
[root@localhost ~ 10:31:53]# nerdctl container start nginx1
nginx1
[root@localhost ~ 10:32:07]# nerdctl ps -a  --format "{{.Names}} {{.Status}}"
nginx1 Up
restart
作用:重启容器。
bash
[root@localhost ~ 10:32:08]# nerdctl container restart nginx1
nginx1
[root@localhost ~ 10:32:28]# nerdctl ps -a  --format "{{.Names}} {{.Status}}"
nginx1 Up
pause 和 unpause
作用:挂起和取消挂起容器。
bash
[root@localhost ~ 10:32:29]# nerdctl container pause nginx1
nginx1
[root@localhost ~ 10:32:43]# nerdctl ps -a  --format "{{.Names}} {{.Status}}"
nginx1 Paused
[root@localhost ~ 10:32:45]# nerdctl container unpause nginx1
nginx1
[root@localhost ~ 10:33:01]# nerdctl ps -a  --format "{{.Names}} {{.Status}}"
nginx1 Up
kill
作用:给容器发信号,默认发KILL信号。
bash
[root@localhost ~ 10:33:04]# nerdctl container kill nginx1
a51cda89af543aa919b4a2732d4bc1a3dab87083ac96347c58d648192bb4f6fa
[root@localhost ~ 10:33:23]# nerdctl ps -a  --format "{{.Names}} {{.Status}}"
nginx1 Exited (137) 3 seconds ago
exec
作用:在运行的容器内部执行命令。
bash
[root@localhost ~ 10:33:27]# nerdctl container start nginx1
nginx1
[root@localhost ~ 10:33:46]# nerdctl container exec -it nginx1 bash
root@a51cda89af54:/# ls
bin   docker-entrypoint.d   home   media  proc  sbin  tmp
boot  docker-entrypoint.sh  lib    mnt    root  srv   usr
dev   etc                   lib64  opt    run   sys   var
root@a51cda89af54:/# pwd
/
root@a51cda89af54:/# exit
exit
cp
作用:将宿主机文件复制给容器。
bash
[root@localhost ~ 10:34:17]# nerdctl container cp /etc/hostname nginx1:
[root@localhost ~ 10:34:37]# nerdctl container exec nginx1 ls hostname
hostname
inspect
作用:查看容器详细信息。
bash
[root@localhost ~ 10:35:00]# nerdctl container inspect nginx1
[
    {
        "Id": "a51cda89af543aa919b4a2732d4bc1a3dab87083ac96347c58d648192bb4f6fa",
        "Created": "2025-11-25T02:30:30.891626488Z",
        "Path": "/docker-entrypoint.sh",
        "Args": [
            "nginx",
            "-g",
            "daemon off;"
        ],
        "State": {
            "Status": "running",
            "Running": true,
            "Paused": false,
            "Restarting": false,
            "Pid": 4335,
            "ExitCode": 0,
            "Error": "",
            "FinishedAt": "0001-01-01T00:00:00Z"
        },
        "Image": "docker.io/library/nginx:latest",
        "ResolvConfPath": "/var/lib/nerdctl/1935db59/containers/default/a51cda89af543aa919b4a2732d4bc1a3dab87083ac96347c58d648192bb4f6fa/resolv.conf",
        "HostnamePath": "/var/lib/nerdctl/1935db59/containers/default/a51cda89af543aa919b4a2732d4bc1a3dab87083ac96347c58d648192bb4f6fa/hostname",
        "LogPath": "/var/lib/nerdctl/1935db59/containers/default/a51cda89af543aa919b4a2732d4bc1a3dab87083ac96347c58d648192bb4f6fa/a51cda89af543aa919b4a2732d4bc1a3dab87083ac96347c58d648192bb4f6fa-json.log",
        "Name": "nginx1",
        "RestartCount": 0,
        "Driver": "overlayfs",
        "Platform": "linux",
        "AppArmorProfile": "",
        "Mounts": null,
        "Config": {
            "Hostname": "a51cda89af54",
            "AttachStdin": false,
            "Labels": {
                "containerd.io/restart.explicitly-stopped": "false",
                "io.containerd.image.config.stop-signal": "SIGQUIT",
                "nerdctl/extraHosts": "null",
                "nerdctl/hostname": "a51cda89af54",
                "nerdctl/log-uri": "binary:///usr/bin/nerdctl?_NERDCTL_INTERNAL_LOGGING=%2Fvar%2Flib%2Fnerdctl%2F1935db59",
                "nerdctl/name": "nginx1",
                "nerdctl/namespace": "default",
                "nerdctl/networks": "[\"bridge\"]",
                "nerdctl/platform": "linux/amd64",
                "nerdctl/state-dir": "/var/lib/nerdctl/1935db59/containers/default/a51cda89af543aa919b4a2732d4bc1a3dab87083ac96347c58d648192bb4f6fa"
            }
        },
        "NetworkSettings": {
            "GlobalIPv6Address": "",
            "GlobalIPv6PrefixLen": 0,
            "IPAddress": "10.4.0.9",
            "IPPrefixLen": 24,
            "MacAddress": "26:64:9c:f3:81:60",
            "Networks": {
                "unknown-eth0": {
                    "IPAddress": "10.4.0.9",
                    "IPPrefixLen": 24,
                    "GlobalIPv6Address": "",
                    "GlobalIPv6PrefixLen": 0,
                    "MacAddress": "26:64:9c:f3:81:60"
                }
            }
        }
    }
]
logs
作用:显示容器console终端内容。
bash
[root@localhost ~ 10:35:34]# nerdctl container logs nginx1
/docker-entrypoint.sh: /docker-entrypoint.d/ is not empty, will attempt to perform configuration
/docker-entrypoint.sh: Looking for shell scripts in /docker-entrypoint.d/
/docker-entrypoint.sh: Launching /docker-entrypoint.d/10-listen-on-ipv6-by-default.sh
10-listen-on-ipv6-by-default.sh: info: IPv6 listen already enabled
/docker-entrypoint.sh: Sourcing /docker-entrypoint.d/15-local-resolvers.envsh
/docker-entrypoint.sh: Launching /docker-entrypoint.d/20-envsubst-on-templates.sh
/docker-entrypoint.sh: Launching /docker-entrypoint.d/30-tune-worker-processes.sh
/docker-entrypoint.sh: Configuration complete; ready for start up
2025/11/25 02:33:46 [notice] 1#1: using the "epoll" event method
2025/11/25 02:33:46 [notice] 1#1: nginx/1.29.3
2025/11/25 02:33:46 [notice] 1#1: built by gcc 14.2.0 (Debian 14.2.0-19)
2025/11/25 02:33:46 [notice] 1#1: OS: Linux 4.18.0-553.6.1.el8.x86_64
2025/11/25 02:33:46 [notice] 1#1: getrlimit(RLIMIT_NOFILE): 1024:1024
2025/11/25 02:33:46 [notice] 1#1: start worker processes
2025/11/25 02:33:46 [notice] 1#1: start worker process 22
2025/11/25 02:33:46 [notice] 1#1: start worker process 23
[root@localhost ~ 10:35:39]# nerdctl container run --name nginx -d -p 8080:80 nginx
7746c59721ba8b3bc536f532e9b06e81698c886f63432196ef191e38619026ca

[root@localhost ~ 10:36:12]# nerdctl container port nginx
80/tcp -> 0.0.0.0:8080
commit
作用:将容器提交为镜像。
bash
[root@localhost ~ 10:36:30]# nerdctl commit nginx nginx_containerd
sha256:8dd9f80f769a2e69699a80aaef10fb673e9801f7668a4525cbcc9448ede831d4
[root@localhost ~ 10:37:51]# nerdctl images
REPOSITORY          TAG       IMAGE ID        CREATED           PLATFORM       SIZE         BLOB SIZE
nginx               latest    553f64aecdc3    7 minutes ago     linux/amd64    154.7 MiB    57.0 MiB
nginx_containerd    latest    548c893a0fde    10 seconds ago    linux/amd64    154.7 MiB    57.0 MiB
ubuntu              latest    c35e29c94501    12 minutes ago    linux/amd64    81.1 MiB     28.4 MiB
[root@localhost ~ 10:38:01]#
nerdctl 管理网络
Containerd 中的网络与Docker类似,所有网络接口默认都是虚拟接口。
当使用nerdctl创建容器时,nerdctl命令会创建一个名称为bridge的Linux网桥(其上有一个nerdctl0内部接口),利用了Linux虚拟网络技术,在本地主机和容器内分别创建一个虚拟接口,并让它们彼此连通(这样的一对接口叫做vethpair)。Containerd 默认指定了nerdctl0接口的IP地址和子网掩码,让主机和容器之间可以通过网桥相互通信。
bash
[root@localhost ~ 10:53:30]# nerdctl run -d busybox -- sleep infinity
docker.io/library/busybox:latest:                                                 resolved       |++++++++++++++++++++++++++++++++++++++|
index-sha256:e3652a00a2fabd16ce889f0aa32c38eec347b997e73bd09e69c962ec7f8732ee:    done           |++++++++++++++++++++++++++++++++++++++|
manifest-sha256:870e815c3a50dd0f6b40efddb319c72c32c3ee340b5a3e8945904232ccd12f44: done           |++++++++++++++++++++++++++++++++++++++|
config-sha256:08ef35a1c3f050afbbd64194ffd1b8d5878659f5491567f26d1c814513ae9649:   done           |++++++++++++++++++++++++++++++++++++++|
layer-sha256:e59838ecfec5e79eb4371e9995ef86c8000fe1c67d7b9fa7b57e996d9ba772ff:    done           |++++++++++++++++++++++++++++++++++++++|
elapsed: 4.7 s                                                                    total:  2.1 Mi (462.0 KiB/s)
721877354daec95921b4bc96823c07d7d894f58531867df098494f652e17d96d
[root@localhost ~ 10:54:08]# nerdctl container ls
CONTAINER ID    IMAGE                               COMMAND                   CREATED           STATUS    PORTS                   NAMES
721877354dae    docker.io/library/busybox:latest    "sleep infinity"          7 seconds ago     Up                                busybox-72187
7746c59721ba    docker.io/library/nginx:latest      "/docker-entrypoint...."    18 minutes ago    Up        0.0.0.0:8080->80/tcp    nginx
a51cda89af54    docker.io/library/nginx:latest      "/docker-entrypoint...."    23 minutes ago    Up                                nginx1
[root@localhost ~ 10:54:15]# nerdctl exec 72 -- ip a
1: lo: <LOOPBACK,UP,LOWER_UP> mtu 65536 qdisc noqueue qlen 1000
    link/loopback 00:00:00:00:00:00 brd 00:00:00:00:00:00
    inet 127.0.0.1/8 scope host lo
       valid_lft forever preferred_lft forever
    inet6 ::1/128 scope host
       valid_lft forever preferred_lft forever
2: eth0@if13: <BROADCAST,MULTICAST,UP,LOWER_UP,M-DOWN> mtu 1500 qdisc noqueue
    link/ether 0e:51:38:ad:d4:7e brd ff:ff:ff:ff:ff:ff
    inet 10.4.0.11/24 brd 10.4.0.255 scope global eth0
       valid_lft forever preferred_lft forever
    inet6 fe80::c51:38ff:fead:d47e/64 scope link
       valid_lft forever preferred_lft forever
容器内看到的网卡名: 2: eth0@if13 ,@if13代表对端是13号网卡。
bash
[root@localhost ~ 10:54:38]# ip a
1: lo: <LOOPBACK,UP,LOWER_UP> mtu 65536 qdisc noqueue state UNKNOWN group default qlen 1000
    link/loopback 00:00:00:00:00:00 brd 00:00:00:00:00:00
    inet 127.0.0.1/8 scope host lo
       valid_lft forever preferred_lft forever
    inet6 ::1/128 scope host
       valid_lft forever preferred_lft forever
2: ens160: <BROADCAST,MULTICAST,UP,LOWER_UP> mtu 1500 qdisc mq state UP group default qlen 1000
    link/ether 00:0c:29:e0:1b:4d brd ff:ff:ff:ff:ff:ff
    altname enp3s0
    inet 192.168.108.128/24 brd 192.168.108.255 scope global dynamic noprefixroute ens160
       valid_lft 1480sec preferred_lft 1480sec
    inet6 fe80::20c:29ff:fee0:1b4d/64 scope link noprefixroute
       valid_lft forever preferred_lft forever
3: nerdctl0: <BROADCAST,MULTICAST,UP,LOWER_UP> mtu 1500 qdisc noqueue state UP group default qlen 1000
    link/ether d2:7f:81:dc:00:1d brd ff:ff:ff:ff:ff:ff
    inet 10.4.0.1/24 brd 10.4.0.255 scope global nerdctl0
       valid_lft forever preferred_lft forever
    inet6 fe80::d07f:81ff:fedc:1d/64 scope link
       valid_lft forever preferred_lft forever
11: vethc55921fc@if2: <BROADCAST,MULTICAST,UP,LOWER_UP> mtu 1500 qdisc noqueue master nerdctl0 state UP group default
    link/ether 6a:0f:11:ce:2a:d8 brd ff:ff:ff:ff:ff:ff link-netnsid 0
    inet6 fe80::680f:11ff:fece:2ad8/64 scope link
       valid_lft forever preferred_lft forever
12: veth9b2f953f@if2: <BROADCAST,MULTICAST,UP,LOWER_UP> mtu 1500 qdisc noqueue master nerdctl0 state UP group default
    link/ether 8a:72:43:d6:09:fd brd ff:ff:ff:ff:ff:ff link-netnsid 1
    inet6 fe80::8872:43ff:fed6:9fd/64 scope link
       valid_lft forever preferred_lft forever
13: veth47237124@if2: <BROADCAST,MULTICAST,UP,LOWER_UP> mtu 1500 qdisc noqueue master nerdctl0 state UP group default
    link/ether 6a:2d:cb:eb:2e:80 brd ff:ff:ff:ff:ff:ff link-netnsid 2
    inet6 fe80::682d:cbff:feeb:2e80/64 scope link
       valid_lft forever preferred_lft forever
对应容器主机的网卡: 13: veth47237124@if2 , @if2 代表对端容器内对应2号网卡。
bash
[root@localhost ~ 10:54:45]# nerdctl network ls
NETWORK ID      NAME      FILE
17f29b073143    bridge    /etc/cni/net.d/nerdctl-bridge.conflist
                host
                none
[root@localhost ~ 10:54:56]# nerdctl network inspect bridge
[
    {
        "Name": "bridge",
        "Id": "17f29b073143d8cd97b5bbe492bdeffec1c5fee55cc1fe2112c8b9335f8b6121",
        "IPAM": {
            "Config": [
                {
                    "Subnet": "10.4.0.0/24",
                    "Gateway": "10.4.0.1"
                }
            ]
        },
        "Labels": {
            "nerdctl/default-network": "true"
        }
    }
]

# 主机中nerdctl0就是容器的网关
[root@localhost ~ 10:55:11]# ip addr show nerdctl0
3: nerdctl0: <BROADCAST,MULTICAST,UP,LOWER_UP> mtu 1500 qdisc noqueue state UP group default qlen 1000
    link/ether d2:7f:81:dc:00:1d brd ff:ff:ff:ff:ff:ff
    inet 10.4.0.1/24 brd 10.4.0.255 scope global nerdctl0
       valid_lft forever preferred_lft forever
    inet6 fe80::d07f:81ff:fedc:1d/64 scope link
       valid_lft forever preferred_lft forever
目前 Containerd 网桥是Linux网桥,用户可以使用 brctl show 命令查看网桥和端口连接信息。
bash
#配置下载brctl
[root@localhost ~ 10:55:23]# cd /etc/yum.repos.d/
[root@localhost yum.repos.d 10:55:37]# vim cloud.repo
[root@localhost yum.repos.d 10:56:04]# yum install -y bridge-utils
CentOS 8 - OpenStack victoria                           2.1 MB/s | 3.3 MB     00:01
Last metadata expiration check: 0:00:02 ago on Tue 25 Nov 2025 10:56:18 AM CST.
Dependencies resolved.
========================================================================================
 Package            Architecture Version          Repository                       Size
========================================================================================
Installing:
 bridge-utils       x86_64       1.6-4.el8        centos-openstack-victoria        39 k

Transaction Summary
========================================================================================
Install  1 Package

Total download size: 39 k
Installed size: 78 k
Downloading Packages:
bridge-utils-1.6-4.el8.x86_64.rpm                       166 kB/s |  39 kB     00:00
----------------------------------------------------------------------------------------
Total                                                   164 kB/s |  39 kB     00:00
Running transaction check
Transaction check succeeded.
Running transaction test
Transaction test succeeded.
Running transaction
  Preparing        :                                                                1/1
  Installing       : bridge-utils-1.6-4.el8.x86_64                                  1/1
  Running scriptlet: bridge-utils-1.6-4.el8.x86_64                                  1/1
  Verifying        : bridge-utils-1.6-4.el8.x86_64                                  1/1

Installed:
  bridge-utils-1.6-4.el8.x86_64

Complete!
[root@localhost yum.repos.d 10:56:24]# cd


[root@localhost ~ 10:56:26]# brctl show
bridge name     bridge id               STP enabled     interfaces
nerdctl0                8000.d27f81dc001d       no              veth47237124
                                                        veth9b2f953f
                                                        vethc55921fc
nerdctl network 命令使用帮助
bash
[root@localhost ~ 10:56:32]# nerdctl network --help
Manage networks

Usage: nerdctl network [flags]

Commands:
  create   Create a network
  inspect  Display detailed information on one or more networks
  ls       List networks
  prune    Remove all unused networks
  rm       Remove one or more networks

Flags:
  -h, --help   help for network

See also 'nerdctl --help' for the global flags such as '--namespace', '--snapshotter', and '--cgroup-manager'.
nerdctl 管理存储
nerdctl volume 命令使用帮助
bash
[root@localhost ~ 11:23:01]# nerdctl volume --help
Manage volumes

Usage: nerdctl volume [flags]

Commands:
  create   Create a volume
  inspect  Display detailed information on one or more volumes
  ls       List volumes
  prune    Remove all unused local volumes
  rm       Remove one or more volumes

Flags:
  -h, --help   help for volume

See also 'nerdctl --help' for the global flags such as '--namespace', '--snapshotter', and '--cgroup-manager'.
nerdctl 命令创建容器的时候,可以使用 -v 选项将本地目录挂载给容器实现数据持久化。
bash
[root@localhost ~ 11:23:18]# mkdir /data
[root@localhost ~ 11:23:26]# nerdctl run -d -v /data:/data busybox -- sleep infinity
ac518cd66769527664bfce0ff08d9b731b5c8e7d9907680ef0e02c39cdaf52ea
[root@localhost ~ 11:23:57]# touch /data/f1
[root@localhost ~ 11:24:04]# ls /data
f1
[root@localhost ~ 11:24:13]# nerdctl exec busybox-ac518 -- ls /data
f1
nerdctl 命令创建容器的时候,也可以使用 -v 选项指定volume。
bash
# 直接写容器目录,会自动生成目录
[root@localhost ~ 11:24:35]# nerdctl run -d -v /data busybox --  sleep infinity
c157947617dc3b80324986674f4f4db0ef390e2af5937b640ff10c528dae8474
[root@localhost ~ 11:25:07]# nerdctl exec busybox-c1579 -- touch /data/f2
[root@localhost ~ 11:25:34]# ls /data
f1

#指定宿主机生成的目录名为data
[root@localhost ~ 11:25:42]# nerdctl run -d -v data:/data busybox -- sleep infinity
86764ef51190a9ea8aa357276a9126832f189744039e0f1776d7dbae3c12c7d9
[root@localhost ~ 11:26:43]# nerdctl exec busybox-86764 -- touch /data/f3

[root@localhost ~ 11:27:03]# nerdctl volume ls
VOLUME NAME                                                         DIRECTORY
24dacfeaf01540e89dffd70e03f5db84ff33545bd1103d4195643845989503df    /var/lib/nerdctl/1935db59/volumes/default/24dacfeaf01540e89dffd70e03f5db84ff33545bd1103d4195643845989503df/_data
data                                                                /var/lib/nerdctl/1935db59/volumes/default/data/_data
[root@localhost ~ 11:27:10]# ls /var/lib/nerdctl/1935db59/volumes/default/data/_data
f3

[root@localhost ~ 11:27:40]# ls  /var/lib/nerdctl/1935db59/volumes/default/24dacfeaf0154
f2
[root@localhost ~ 11:27:49]#
nerdctl 管理命名空间
bash
[root@localhost ~ 11:41:56]# nerdctl namespace
Unrelated to Linux namespaces and Kubernetes namespaces

Usage: nerdctl namespace [flags]

Aliases: namespace, ns
Commands:
  create   Create a new namespace
  inspect  Display detailed information on one or more namespaces.
  ls       List containerd namespaces
  remove   Remove one or more namespaces
  update   Update labels for a namespace

Flags:
  -h, --help   help for namespace

See also 'nerdctl --help' for the global flags such as '--namespace', '--snapshotter', and '--cgroup-manager'.
[root@localhost ~ 11:42:01]# nerdctl namespace ls
NAME       CONTAINERS    IMAGES    VOLUMES    LABELS
default    6             4         2
crictl 实践
crictl 命令介绍
crictl 命令是遵循 CRI 接口规范的一个命令行工具,通常用它来检查和管理 kubelet 节点上的容器运
行时和镜像。
在kubernetes集群环境中,当我们执行 kubectl 命令式, kubelet 代理会自动调用crictl命令管理镜像
和容器。
手动执行 crictl 命令时,一般用于查看镜像和容器。
crictl 命令安装
配置kubernetes源:
bash
[root@localhost ~ 11:42:43]# vim /etc/yum.repos.d/kubernetes.repo
[kubernetes]
name=Kubernetes
baseurl=https://mirrors.aliyun.com/kubernetes-new/core/stable/v1.30/rpm/
enabled=1
gpgcheck=1
gpgkey=https://mirrors.aliyun.com/kubernetes-new/core/stable/v1.30/rpm/repodata/repomd.xml.key
安装CRI命令
bash
[root@localhost ~ 11:43:35]# yum install -y cri-tools
Last metadata expiration check: 0:00:09 ago on Tue 25 Nov 2025 11:43:33 AM CST.
Dependencies resolved.
========================================================================================
 Package           Architecture   Version                      Repository          Size
========================================================================================
Installing:
 cri-tools         x86_64         1.30.1-150500.1.1            kubernetes         8.6 M

Transaction Summary
========================================================================================
Install  1 Package

Total download size: 8.6 M
Installed size: 44 M
Downloading Packages:
cri-tools-1.30.1-150500.1.1.x86_64.rpm                  8.1 MB/s | 8.6 MB     00:01
----------------------------------------------------------------------------------------
Total                                                   8.1 MB/s | 8.6 MB     00:01
Kubernetes                                               11 kB/s | 1.7 kB     00:00
Importing GPG key 0x9A296436:
 Userid     : "isv:kubernetes OBS Project <isv:kubernetes@build.opensuse.org>"
 Fingerprint: DE15 B144 86CD 377B 9E87 6E1A 2346 54DA 9A29 6436
 From       : https://mirrors.aliyun.com/kubernetes-new/core/stable/v1.30/rpm/repodata/repomd.xml.key
Key imported successfully
Running transaction check
Transaction check succeeded.
Running transaction test
Transaction test succeeded.
Running transaction
  Preparing        :                                                                1/1
  Installing       : cri-tools-1.30.1-150500.1.1.x86_64                             1/1
  Verifying        : cri-tools-1.30.1-150500.1.1.x86_64                             1/1

Installed:
  cri-tools-1.30.1-150500.1.1.x86_64

Complete!
crictl 命令配置
使用 crictl 命令之前,需要先配置 /etc/crictl.yaml 。
示例:配置crictl后端运行时使用containerd。
bash
[root@localhost ~ 11:43:47]# vim /etc/crictl.yaml
runtime-endpoint: unix:///run/containerd/containerd.sock
image-endpoint: unix:///run/containerd/containerd.sock
timeout: 5
debug: false
也可以通过命令进行设置:
bash
crictl config runtime-endpoint unix:///run/containerd/containerd.sock
crictl config image-endpoint unix:///run/containerd/containerd.sock
更多命令操作,可以直接在命令行输入命令查看帮助。
bash
[root@localhost ~ 11:44:29]# crictl config --help
NAME:
   crictl config - Get and set crictl client configuration options

USAGE:
   crictl config [command options] [<crictl options>]

EXAMPLE:
   crictl config --set debug=true

CRICTL OPTIONS:
   runtime-endpoint:      Container runtime endpoint
   image-endpoint:        Image endpoint
   timeout:               Timeout of connecting to server (default: 2s)
   debug:                 Enable debug output (default: false)
   pull-image-on-create:  Enable pulling image on create requests (default: false)
   disable-pull-on-run:   Disable pulling image on run requests (default: false)

OPTIONS:
   --get value                  show the option value
   --list                       show all option value (default: false)
   --set value [ --set value ]  set option (can specify multiple or separate values with commas: opt1=val1,opt2=val2)
   --help, -h                   show help
crictl 命令实践
帮助信息
bash
[root@localhost ~ 11:44:36]# crictl
NAME:
   crictl - client for CRI

USAGE:
   crictl [global options] command [command options]

VERSION:
   v1.30.1

COMMANDS:
   attach              Attach to a running container
   create              Create a new container
   exec                Run a command in a running container
   version             Display runtime version information
   images, image, img  List images
   inspect             Display the status of one or more containers
   inspecti            Return the status of one or more images
   imagefsinfo         Return image filesystem info
   inspectp            Display the status of one or more pods
   logs                Fetch the logs of a container
   port-forward        Forward local port to a pod
   ps                  List containers
   pull                Pull an image from a registry
   run                 Run a new container inside a sandbox
   runp                Run a new pod
   rm                  Remove one or more containers
   rmi                 Remove one or more images
   rmp                 Remove one or more pods
   pods                List pods
   start               Start one or more created containers
   info                Display information of the container runtime
   stop                Stop one or more running containers
   stopp               Stop one or more running pods
   update              Update one or more running containers
   config              Get and set crictl client configuration options
   stats               List container(s) resource usage statistics
   statsp              List pod statistics. Stats represent a structured API that will fulfill the Kubelet's /stats/summary endpoint.
   metricsp            List pod metrics. Metrics are unstructured key/value pairs gathered by CRI meant to replace cAdvisor's /metrics/cadvisor endpoint.
   completion          Output shell completion code
   checkpoint          Checkpoint one or more running containers
   runtime-config      Retrieve the container runtime configuration
   events, event       Stream the events of containers
   help, h             Shows a list of commands or help for one command

GLOBAL OPTIONS:
   --config value, -c value                   Location of the client config file. If not specified and the default does not exist, the program's directory is searched as well (default: "/etc/crictl.yaml") [$CRI_CONFIG_FILE]
   --debug, -D                                Enable debug mode (default: false)
   --enable-tracing                           Enable OpenTelemetry tracing. (default: false)
   --image-endpoint value, -i value           Endpoint of CRI image manager service (default: uses 'runtime-endpoint' setting) [$IMAGE_SERVICE_ENDPOINT]
   --runtime-endpoint value, -r value         Endpoint of CRI container runtime service (default: uses in order the first successful one of [unix:///run/containerd/containerd.sock unix:///run/crio/crio.sock unix:///var/run/cri-dockerd.sock]). Default is now deprecated and the endpoint should be set instead. [$CONTAINER_RUNTIME_ENDPOINT]
   --timeout value, -t value                  Timeout of connecting to the server in seconds (e.g. 2s, 20s.). 0 or less is set to default (default: 2s)
   --tracing-endpoint value                   Address to which the gRPC tracing collector will send spans to. (default: "127.0.0.1:4317")
   --tracing-sampling-rate-per-million value  Number of samples to collect per million OpenTelemetry spans. Set to 1000000 or -1 to always sample. (default: -1)
   --help, -h                                 show help
   --version, -v                              print the version
bash
[root@localhost ~ 11:44:47]# crictl pull httpd
Image is up to date for sha256:c00bfb4edfeb0206fa0e988e51b588a442deca46cb4ea69b3cd7e08f93b429ae
[root@localhost ~ 11:45:07]# crictl images
IMAGE                     TAG                 IMAGE ID            SIZE
docker.io/library/httpd   latest              c00bfb4edfeb0       45.2MB
镜像命令
-
images, image, img List images
-
pull Pull an image from a registry
-
inspecti Return the status of one or more images
-
imagefsinfo Return image filesystem info
-
rmi Remove one or more images
容器命令
-
ps List containers
-
create Create a new container
-
run Run a new container inside a sandbox
-
inspect Display the status of one or more containers
-
info Display information of the container runtime
-
attach Attach to a running container
-
exec Run a command in a running container
-
logs Fetch the logs of a container
-
update Update one or more running containers
-
stats List container(s) resource usage statistics
-
checkpoint Checkpoint one or more running containers
-
start Start one or more created containers
-
stop Stop one or more running containers
-
rm Remove one or more containers
pod命令
-
pods List pods
-
runp Run a new pod
-
inspectp Display the status of one or more pods
-
statsp List pod resource usage statistics
-
port-forward Forward local port to a pod
-
stopp Stop one or more running pods
-
rmp Remove one or more pods
其他命令
-
version Display runtime version information
-
config Get and set crictl client configuration options
-
completion Output shell completion code
-
help, h Shows a list of commands or help for one command
命令行对照表
| 命令功能 | docker | podman | nerdctl | ctr | crictl |
|---|---|---|---|---|---|
| 查看容器状态 | docker ps | podman ps | nerdctl ps | ctr task ls/ctr container ls | ctictl ps |
| 查看镜像 | docker images | podman images | nerdctl images | ctr image ls | crictl images |
| 查看容器日志 | docker logs | podman logs | nerdctl logs | 无 | crictl logs |
| 查看容器信息 | docker inspect | podman inspect | nerdctl inspect | ctr container info | crictl inspect |
| 查看容器资源 | docker stats | podman stats | nerdctl stats | 无 | crictl stats |
| 运行新容器 | docker run | podman run | nerdctl run | ctr run | 无 |
| 修改镜像标签 | docker tag | podman tag | nerdctl tag | ctr image tag | 无 |
| 创建新容器 | docker create | podman create | nerdctl create | ctr container create | crictl create |
| 导入镜像 | docker load | podman load | nerdctl load | ctr image import | 无 |
| 导出镜像 | docker save | podman save | nerdctl save | ctr image export | 无 |
| 删除容器 | docker rm | podman rm | nerdctl rm | ctr container rm | crictl rm |
| 删除镜像 | docker rmi | podman rmi | nerdctl rmi | ctr image rm | crictl rmi |
| 拉取镜像 | docker pull | podman pull | nerdctl pull | ctr image pull | crictl pull |
| 推送镜像 | docker push | podman push | nerdctl push | ctr image push | 无 |
| 在容器内部执行命 | docker exec | podman exec | nerdctl exec | 无 | crictl exec |
如果您还对Docker比较怀旧的话,执行"alias docker=nerdctl"这样的命令后,您依然可以体验到与Docker相似的感觉。
nerdctl 和 crictl 都是用于管理和操作容器的命令行工具,但是它们在开发者、设计目的和功能上有所不同。
-
nerdctl:
- 开发者:由Docker的创始人之一,也是containerd项目的主要贡献者Akihiro Suda开发。
- 设计目的:nerdctl是一个兼容Docker CLI的containerd CLI,意味着大部分Docker命令可以在nerdctl中运行。
- 功能:它可以管理容器的生命周期,如创建、运行、停止和删除容器。此外,它还支持镜像管理,网络管理,卷管理等。
-
crictl:
- 开发者:由Kubernetes项目社区开发。
- 设计目的:crictl是一个命令行接口,用于与任何实现了Kubernetes容器运行时接口(CRI)的容器运行时进行交互,例如containerd,CRI-O等。
- 功能:它主要用于调试,可以从Kubernetes API Server的角度检查和理解容器运行时的行为。它允许用户直接与容器运行时进行交互,实现容器生命周期管理,镜像管理等。
总的来说,二者主要区别在于他们的使用场景和目标用户并不完全相同。nerdctl更适合需要Docker CLI兼容性的用户,而crictl则更适合需要调试和理解Kubernetes CRI容器运行时行为的用户。
s of one or more containers
-
info Display information of the container runtime
-
attach Attach to a running container
-
exec Run a command in a running container
-
logs Fetch the logs of a container
-
update Update one or more running containers
-
stats List container(s) resource usage statistics
-
checkpoint Checkpoint one or more running containers
-
start Start one or more created containers
-
stop Stop one or more running containers
-
rm Remove one or more containers
pod命令
-
pods List pods
-
runp Run a new pod
-
inspectp Display the status of one or more pods
-
statsp List pod resource usage statistics
-
port-forward Forward local port to a pod
-
stopp Stop one or more running pods
-
rmp Remove one or more pods
其他命令
-
version Display runtime version information
-
config Get and set crictl client configuration options
-
completion Output shell completion code
-
help, h Shows a list of commands or help for one command
命令行对照表
| 命令功能 | docker | podman | nerdctl | ctr | crictl |
|---|---|---|---|---|---|
| 查看容器状态 | docker ps | podman ps | nerdctl ps | ctr task ls/ctr container ls | ctictl ps |
| 查看镜像 | docker images | podman images | nerdctl images | ctr image ls | crictl images |
| 查看容器日志 | docker logs | podman logs | nerdctl logs | 无 | crictl logs |
| 查看容器信息 | docker inspect | podman inspect | nerdctl inspect | ctr container info | crictl inspect |
| 查看容器资源 | docker stats | podman stats | nerdctl stats | 无 | crictl stats |
| 运行新容器 | docker run | podman run | nerdctl run | ctr run | 无 |
| 修改镜像标签 | docker tag | podman tag | nerdctl tag | ctr image tag | 无 |
| 创建新容器 | docker create | podman create | nerdctl create | ctr container create | crictl create |
| 导入镜像 | docker load | podman load | nerdctl load | ctr image import | 无 |
| 导出镜像 | docker save | podman save | nerdctl save | ctr image export | 无 |
| 删除容器 | docker rm | podman rm | nerdctl rm | ctr container rm | crictl rm |
| 删除镜像 | docker rmi | podman rmi | nerdctl rmi | ctr image rm | crictl rmi |
| 拉取镜像 | docker pull | podman pull | nerdctl pull | ctr image pull | crictl pull |
| 推送镜像 | docker push | podman push | nerdctl push | ctr image push | 无 |
| 在容器内部执行命 | docker exec | podman exec | nerdctl exec | 无 | crictl exec |
如果您还对Docker比较怀旧的话,执行"alias docker=nerdctl"这样的命令后,您依然可以体验到与Docker相似的感觉。
nerdctl 和 crictl 都是用于管理和操作容器的命令行工具,但是它们在开发者、设计目的和功能上有所不同。
-
nerdctl:
- 开发者:由Docker的创始人之一,也是containerd项目的主要贡献者Akihiro Suda开发。
- 设计目的:nerdctl是一个兼容Docker CLI的containerd CLI,意味着大部分Docker命令可以在nerdctl中运行。
- 功能:它可以管理容器的生命周期,如创建、运行、停止和删除容器。此外,它还支持镜像管理,网络管理,卷管理等。
-
crictl:
- 开发者:由Kubernetes项目社区开发。
- 设计目的:crictl是一个命令行接口,用于与任何实现了Kubernetes容器运行时接口(CRI)的容器运行时进行交互,例如containerd,CRI-O等。
- 功能:它主要用于调试,可以从Kubernetes API Server的角度检查和理解容器运行时的行为。它允许用户直接与容器运行时进行交互,实现容器生命周期管理,镜像管理等。
总的来说,二者主要区别在于他们的使用场景和目标用户并不完全相同。nerdctl更适合需要Docker CLI兼容性的用户,而crictl则更适合需要调试和理解Kubernetes CRI容器运行时行为的用户。