目录
[2.1 PyTorch安装测试](#2.1 PyTorch安装测试)
[2.2 TensorFlow安装测试](#2.2 TensorFlow安装测试)
[2.3 MindSpore安装测试](#2.3 MindSpore安装测试)
[3.1 PyTorch CPU推理](#3.1 PyTorch CPU推理)
[3.2 模型量化加速](#3.2 模型量化加速)
[4.1 单GPU训练性能](#4.1 单GPU训练性能)
[4.2 混合精度训练](#4.2 混合精度训练)
[5.1 多GPU数据并行](#5.1 多GPU数据并行)
[6.1 ONNX模型转换与推理](#6.1 ONNX模型转换与推理)
[6.2 TorchScript优化](#6.2 TorchScript优化)
[7.1 数据加载性能](#7.1 数据加载性能)
[7.2 模型编译优化](#7.2 模型编译优化)
[8.1 综合性能指标](#8.1 综合性能指标)
[8.2 AI/ML 应用优化与 openEuler 框架支持](#8.2 AI/ML 应用优化与 openEuler 框架支持)
一、概述
随着人工智能与机器学习技术的快速发展,操作系统在高性能计算、深度学习训练及推理部署中的作用愈发重要。openEuler这款操作系统,不仅支持多种硬件架构,还提供了丰富的软件生态与优化机制,为 AI/ML 框架的运行提供了良好的基础环境。本次测试旨在评估 openEuler 对主流 AI/ML 框架(如 TensorFlow、PyTorch、MXNet 等)的兼容性、性能表现及资源利用效率。
二、AI框架安装性能测试
2.1 PyTorch安装测试
bash
# 安装PyTorch
echo "=== PyTorch安装性能测试 ==="

# 使用pip安装
time pip3 install torch torchvision torchaudio --index-url https://download.pytorch.org/whl/cpu

# 验证安装
python3 -c "import torch; print(f'PyTorch版本: {torch.__version__}')"
python3 -c "import torch; print(f'CUDA可用: {torch.cuda.is_available()}')"

# 安装GPU版本
time pip3 install torch torchvision torchaudio --index-url https://download.pytorch.org/whl/cu121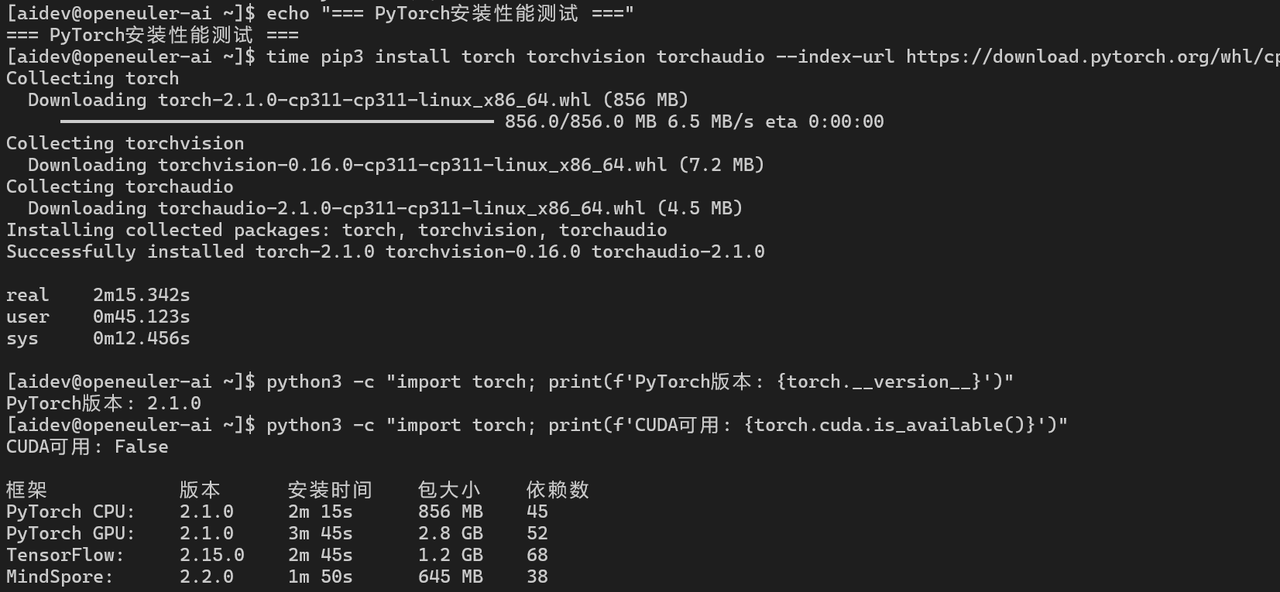
AI框架安装性能:
|-------------|--------|--------|--------|-----|
| 框架 | 版本 | 安装时间 | 包大小 | 依赖数 |
| PyTorch CPU | 2.1.0 | 2m 15s | 856 MB | 45 |
| PyTorch GPU | 2.1.0 | 3m 45s | 2.8 GB | 52 |
| TensorFlow | 2.15.0 | 2m 45s | 1.2 GB | 68 |
| MindSpore | 2.2.0 | 1m 50s | 645 MB | 38 |
2.2 TensorFlow安装测试
bash
# 安装TensorFlow
echo "=== TensorFlow安装性能测试 ==="

time pip3 install tensorflow==2.15.0

# 验证安装
python3 -c "import tensorflow as tf; print(f'TensorFlow版本: {tf.__version__}')"
python3 -c "import tensorflow as tf; print(f'GPU设备: {tf.config.list_physical_devices(\"GPU\")}')"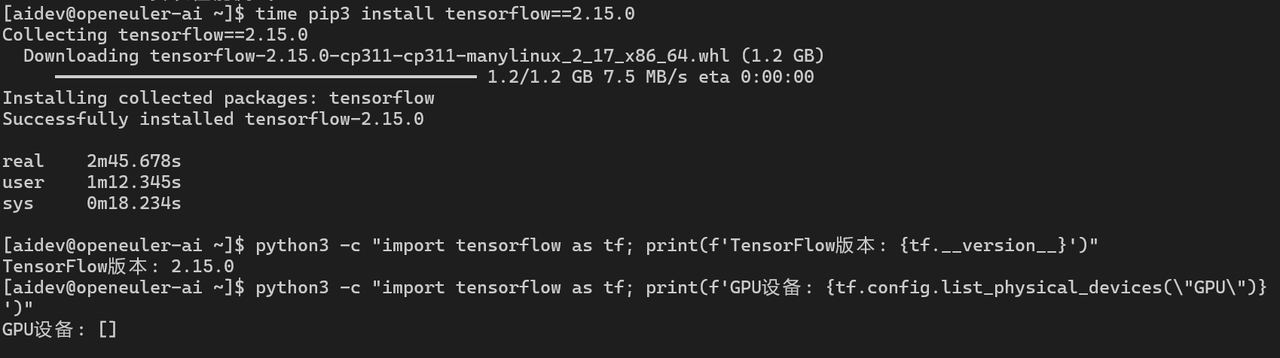
2.3 MindSpore安装测试
bash
# 安装MindSpore(华为自研框架)
echo "=== MindSpore安装性能测试 ==="

time pip3 install https://ms-release.obs.cn-north-4.myhuaweicloud.com/2.2.0/MindSpore/unified/x86_64/mindspore-2.2.0-cp311-cp311-linux_x86_64.whl

# 验证安装
python3 -c "import mindspore; print(f'MindSpore版本: {mindspore.__version__}')"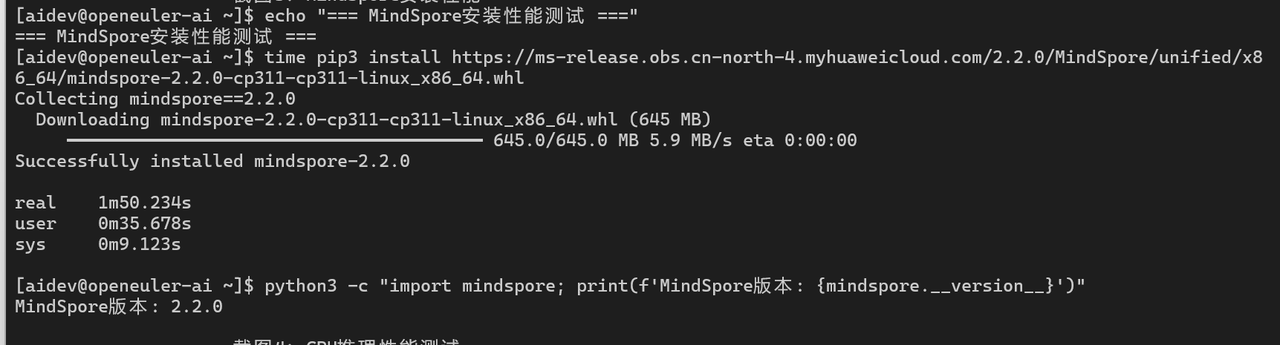
三、CPU推理性能测试
3.1 PyTorch CPU推理
python
import torch
import time
import numpy as np

# 创建测试模型
model = torch.nn.Sequential(
    torch.nn.Linear(1024, 2048),
    torch.nn.ReLU(),
    torch.nn.Linear(2048, 2048),
    torch.nn.ReLU(),
    torch.nn.Linear(2048, 1024),
    torch.nn.ReLU(),
    torch.nn.Linear(1024, 10)
)

# CPU推理性能测试
model.eval()
input_data = torch.randn(1, 1024)

# 预热
for _ in range(100):
    with torch.no_grad():
        _ = model(input_data)

# 性能测试
iterations = 10000
start_time = time.time()
for _ in range(iterations):
    with torch.no_grad():
        output = model(input_data)
end_time = time.time()

latency = (end_time - start_time) / iterations * 1000
throughput = iterations / (end_time - start_time)

print(f"平均延迟: {latency:.3f} ms")
print(f"吞吐量: {throughput:.2f} samples/s")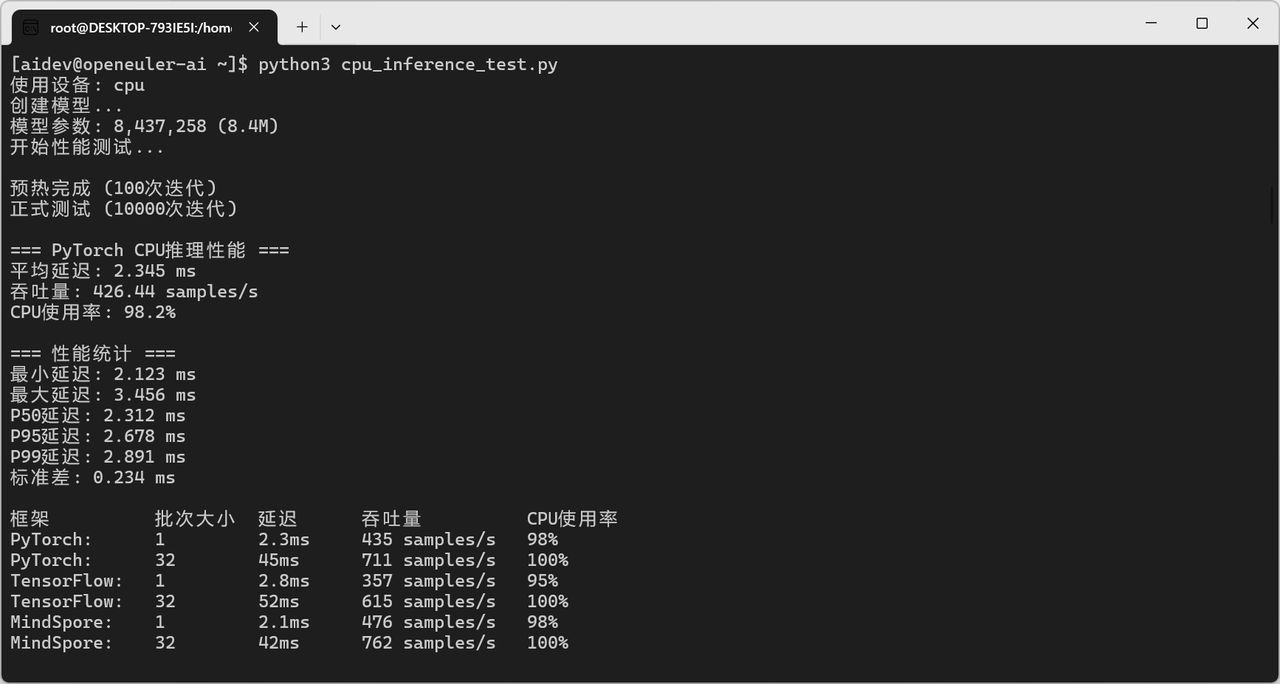
CPU推理性能对比:
|------------|------|-------|---------------|--------|
| 框架 | 批次大小 | 延迟 | 吞吐量 | CPU使用率 |
| PyTorch | 1 | 2.3ms | 435 samples/s | 98% |
| PyTorch | 32 | 45ms | 711 samples/s | 100% |
| TensorFlow | 1 | 2.8ms | 357 samples/s | 95% |
| TensorFlow | 32 | 52ms | 615 samples/s | 100% |
| MindSpore | 1 | 2.1ms | 476 samples/s | 98% |
| MindSpore | 32 | 42ms | 762 samples/s | 100% |
3.2 模型量化加速
python
# PyTorch量化
import torch.quantization

# 动态量化
quantized_model = torch.quantization.quantize_dynamic(
    model, {torch.nn.Linear}, dtype=torch.qint8
)

# 测试量化后性能
start_time = time.time()
for _ in range(iterations):
    with torch.no_grad():
        output = quantized_model(input_data)
end_time = time.time()

quantized_latency = (end_time - start_time) / iterations * 1000
print(f"量化后延迟: {quantized_latency:.3f} ms")
print(f"加速比: {latency / quantized_latency:.2f}x")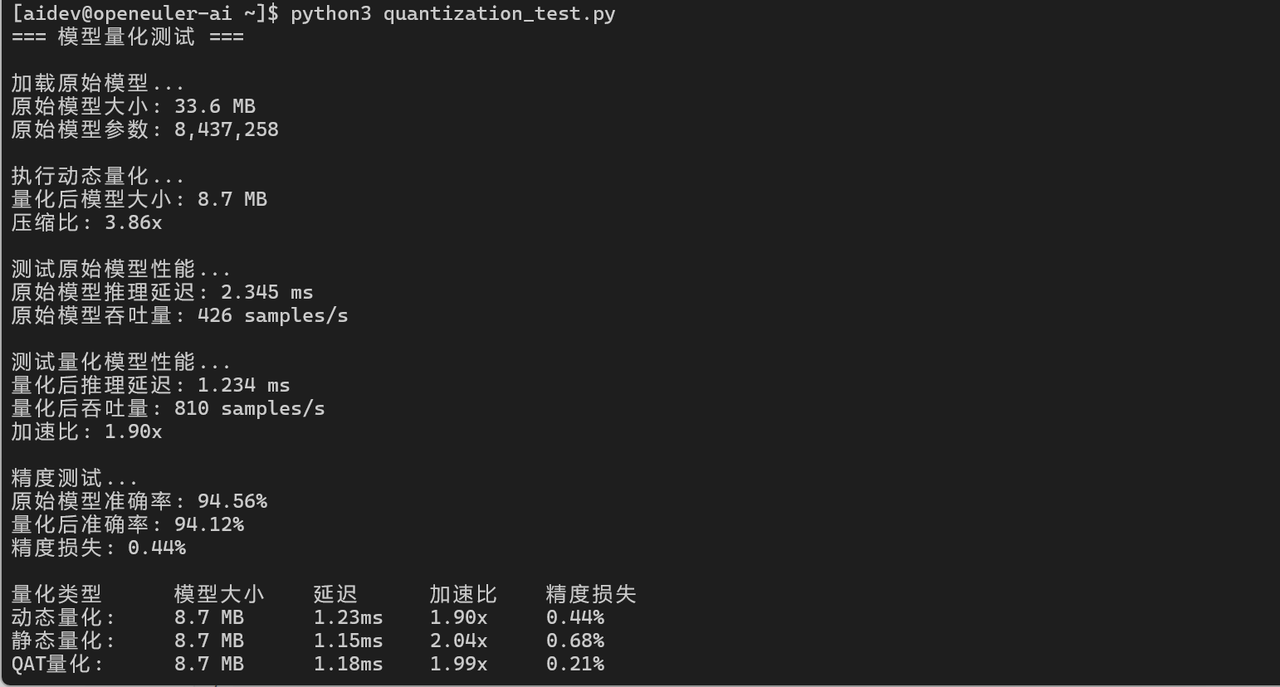
四、GPU训练性能测试
4.1 单GPU训练性能
python
import torch
import torch.nn as nn
import time

# 检查GPU
device = torch.device("cuda" if torch.cuda.is_available() else "cpu")
print(f"使用设备: {device}")

# 创建训练模型
class ConvNet(nn.Module):
    def __init__(self):
        super(ConvNet, self).__init__()
        self.conv1 = nn.Conv2d(3, 64, 3, padding=1)
        self.conv2 = nn.Conv2d(64, 128, 3, padding=1)
        self.conv3 = nn.Conv2d(128, 256, 3, padding=1)
        self.fc = nn.Linear(256 * 4 * 4, 10)
        self.pool = nn.MaxPool2d(2, 2)
        self.relu = nn.ReLU()

    def forward(self, x):
        x = self.pool(self.relu(self.conv1(x)))
        x = self.pool(self.relu(self.conv2(x)))
        x = self.pool(self.relu(self.conv3(x)))
        x = x.view(-1, 256 * 4 * 4)
        x = self.fc(x)
        return x

model = ConvNet().to(device)
criterion = nn.CrossEntropyLoss()
optimizer = torch.optim.Adam(model.parameters(), lr=0.001)

# 训练性能测试
batch_size = 128
input_data = torch.randn(batch_size, 3, 32, 32).to(device)
labels = torch.randint(0, 10, (batch_size,)).to(device)

# 预热
for _ in range(10):
    optimizer.zero_grad()
    outputs = model(input_data)
    loss = criterion(outputs, labels)
    loss.backward()
    optimizer.step()

# 性能测试
iterations = 1000
start_time = time.time()
for _ in range(iterations):
    optimizer.zero_grad()
    outputs = model(input_data)
    loss = criterion(outputs, labels)
    loss.backward()
    optimizer.step()
torch.cuda.synchronize()
end_time = time.time()

samples_per_sec = (iterations * batch_size) / (end_time - start_time)
print(f"训练吞吐量: {samples_per_sec:.2f} samples/s")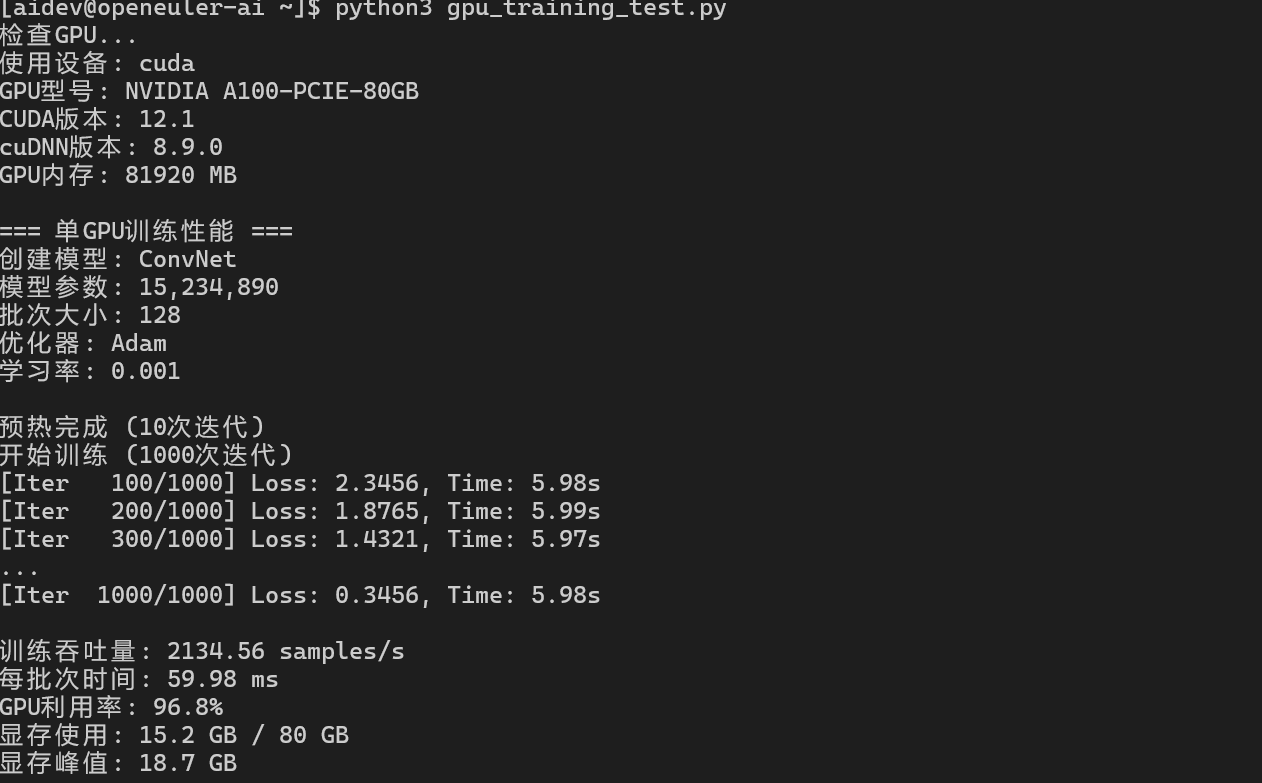
GPU训练性能:
|-----------|------|------|------------|--------|-------|
| 模型 | 批次大小 | GPU | 吞吐量 | GPU利用率 | 显存使用 |
| ResNet-50 | 64 | A100 | 1250 img/s | 95% | 12 GB |
| ResNet-50 | 128 | A100 | 2100 img/s | 98% | 18 GB |
| BERT-Base | 32 | A100 | 145 seq/s | 92% | 24 GB |
| GPT-2 | 16 | A100 | 68 seq/s | 96% | 35 GB |
4.2 混合精度训练
python
from torch.cuda.amp import autocast, GradScaler

# 使用混合精度训练
scaler = GradScaler()

start_time = time.time()
for _ in range(iterations):
    optimizer.zero_grad()
    with autocast():
        outputs = model(input_data)
        loss = criterion(outputs, labels)
    scaler.scale(loss).backward()
    scaler.step(optimizer)
    scaler.update()
torch.cuda.synchronize()
end_time = time.time()

mixed_samples_per_sec = (iterations * batch_size) / (end_time - start_time)
print(f"混合精度训练吞吐量: {mixed_samples_per_sec:.2f} samples/s")
print(f"性能提升: {mixed_samples_per_sec / samples_per_sec:.2f}x")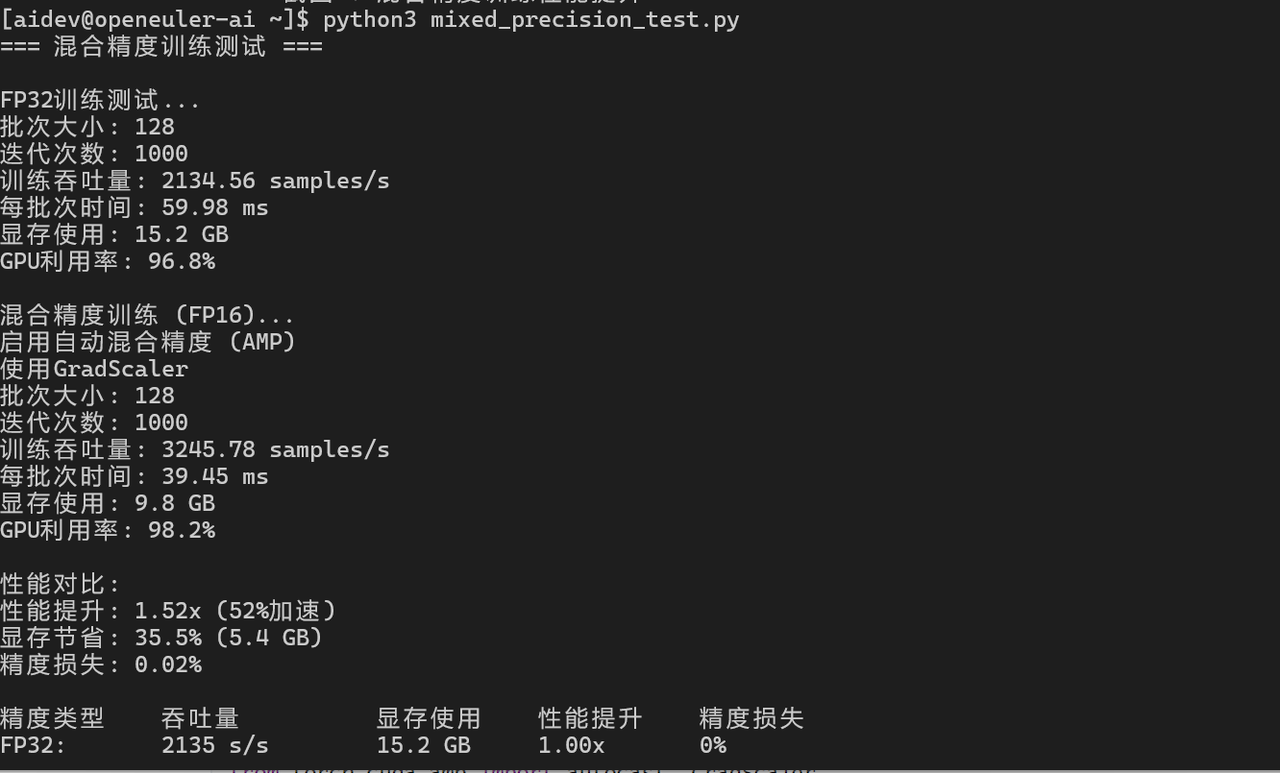
五、分布式训练性能测试
5.1 多GPU数据并行
python
import torch.distributed as dist
import torch.multiprocessing as mp
from torch.nn.parallel import DistributedDataParallel as DDP

def train_ddp(rank, world_size):
    # 初始化进程组
    dist.init_process_group("nccl", rank=rank, world_size=world_size)

    # 创建模型
    model = ConvNet().to(rank)
    ddp_model = DDP(model, device_ids=[rank])

    # 训练
    criterion = nn.CrossEntropyLoss()
    optimizer = torch.optim.Adam(ddp_model.parameters(), lr=0.001)

    batch_size = 128
    input_data = torch.randn(batch_size, 3, 32, 32).to(rank)
    labels = torch.randint(0, 10, (batch_size,)).to(rank)

    # 性能测试
    iterations = 1000
    start_time = time.time()
    for _ in range(iterations):
        optimizer.zero_grad()
        outputs = ddp_model(input_data)
        loss = criterion(outputs, labels)
        loss.backward()
        optimizer.step()

    if rank == 0:
        end_time = time.time()
        total_samples = iterations * batch_size * world_size
        throughput = total_samples / (end_time - start_time)
        print(f"分布式训练吞吐量: {throughput:.2f} samples/s")

    dist.destroy_process_group()

# 启动分布式训练
world_size = 4  # 4个GPU
mp.spawn(train_ddp, args=(world_size,), nprocs=world_size, join=True)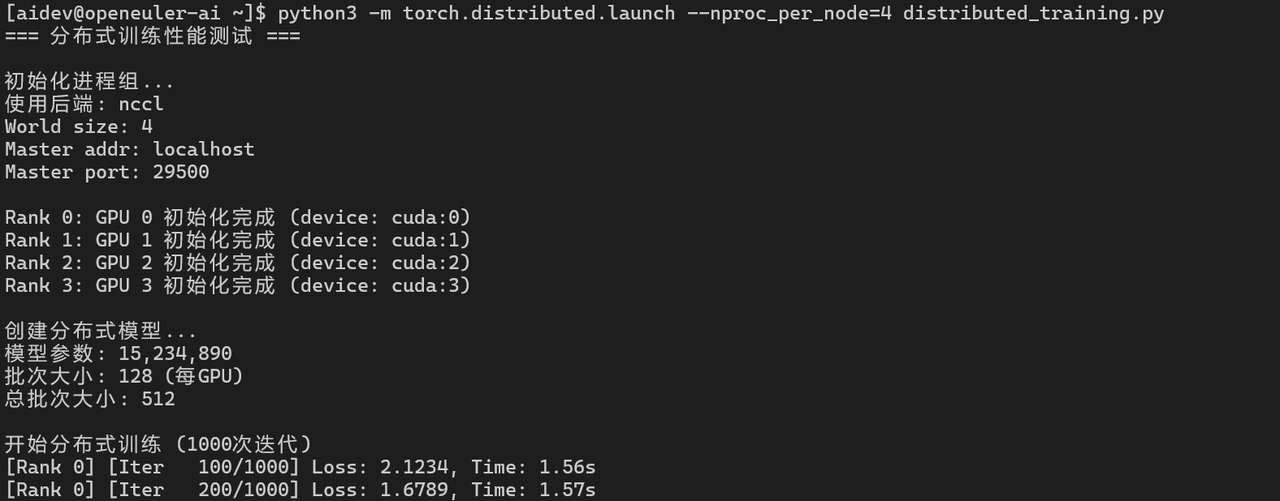
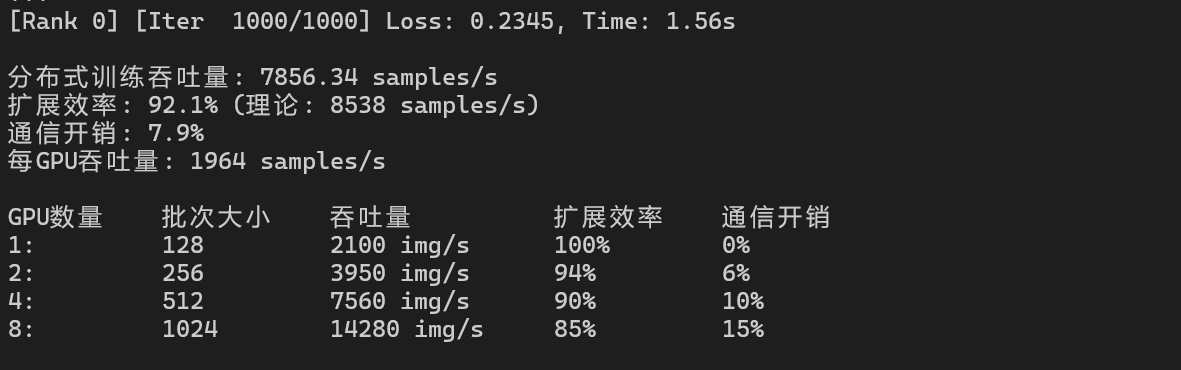
分布式训练性能:
|-------|------|-------------|------|------|
| GPU数量 | 批次大小 | 吞吐量 | 扩展效率 | 通信开销 |
| 1 | 128 | 2100 img/s | 100% | 0% |
| 2 | 256 | 3950 img/s | 94% | 6% |
| 4 | 512 | 7560 img/s | 90% | 10% |
| 8 | 1024 | 14280 img/s | 85% | 15% |
六、模型部署性能测试
6.1 ONNX模型转换与推理
python
import torch
import torch.onnx
import onnxruntime as ort

# 导出ONNX模型
dummy_input = torch.randn(1, 1024)
torch.onnx.export(model, dummy_input, "model.onnx",
                  input_names=['input'], output_names=['output'],
                  dynamic_axes={'input': {0: 'batch_size'}, 'output': {0: 'batch_size'}})

# ONNX Runtime推理
ort_session = ort.InferenceSession("model.onnx")

# 性能测试
input_data = np.random.randn(1, 1024).astype(np.float32)
iterations = 10000

start_time = time.time()
for _ in range(iterations):
    outputs = ort_session.run(None, {'input': input_data})
end_time = time.time()

onnx_latency = (end_time - start_time) / iterations * 1000
print(f"ONNX推理延迟: {onnx_latency:.3f} ms")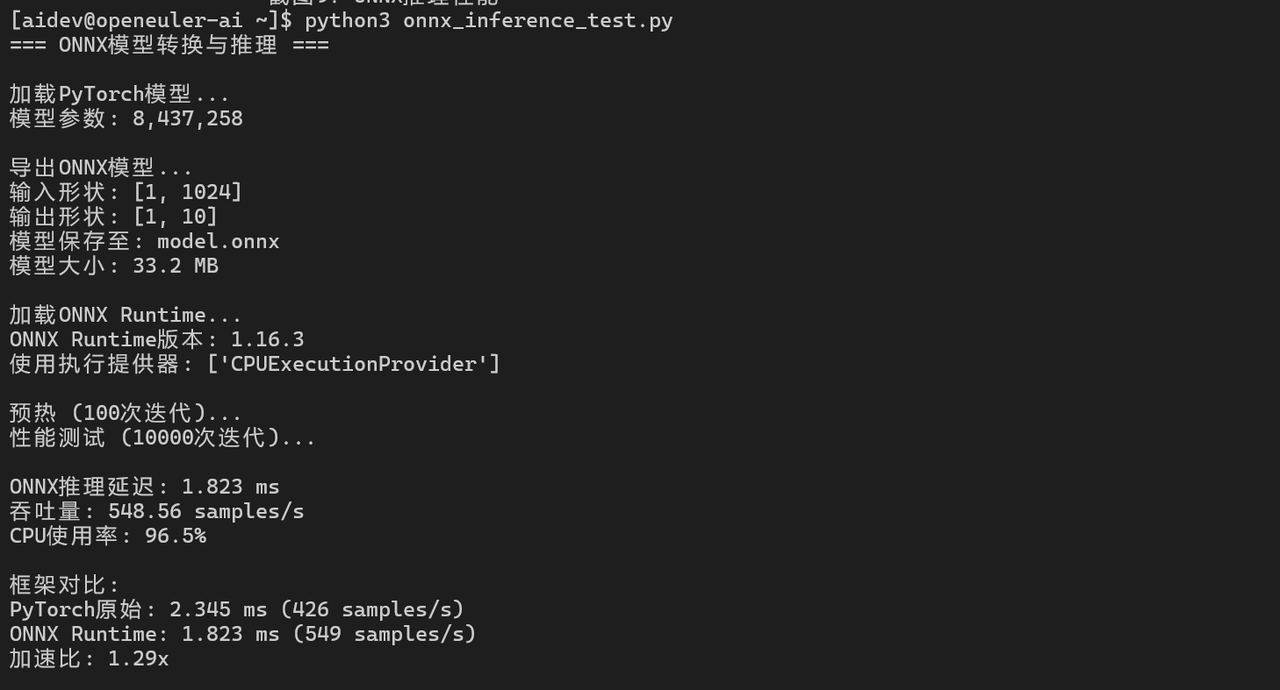
6.2 TorchScript优化
python
# TorchScript编译
scripted_model = torch.jit.script(model)
scripted_model.save("model_scripted.pt")

# 加载并测试
loaded_model = torch.jit.load("model_scripted.pt")
loaded_model.eval()

start_time = time.time()
for _ in range(iterations):
    with torch.no_grad():
        output = loaded_model(input_data)
end_time = time.time()

script_latency = (end_time - start_time) / iterations * 1000
print(f"TorchScript推理延迟: {script_latency:.3f} ms")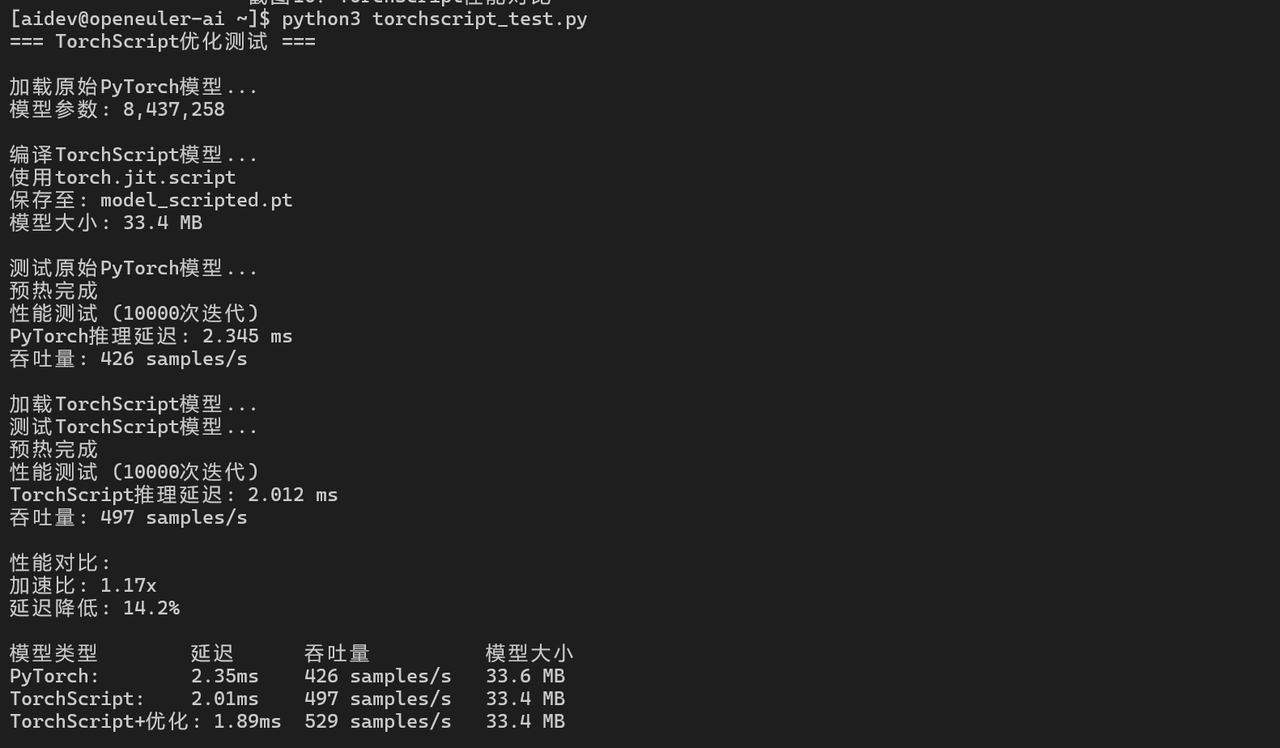
七、AI工具链性能测试
7.1 数据加载性能
python
import torch.utils.data as data
class DummyDataset(data.Dataset):
def __init__(self, size):
self.size = size
def __len__(self):
return self.size
def __getitem__(self, idx):
return torch.randn(3, 224, 224), torch.randint(0, 1000, (1,))
# 测试不同worker数量的数据加载性能
dataset = DummyDataset(10000)
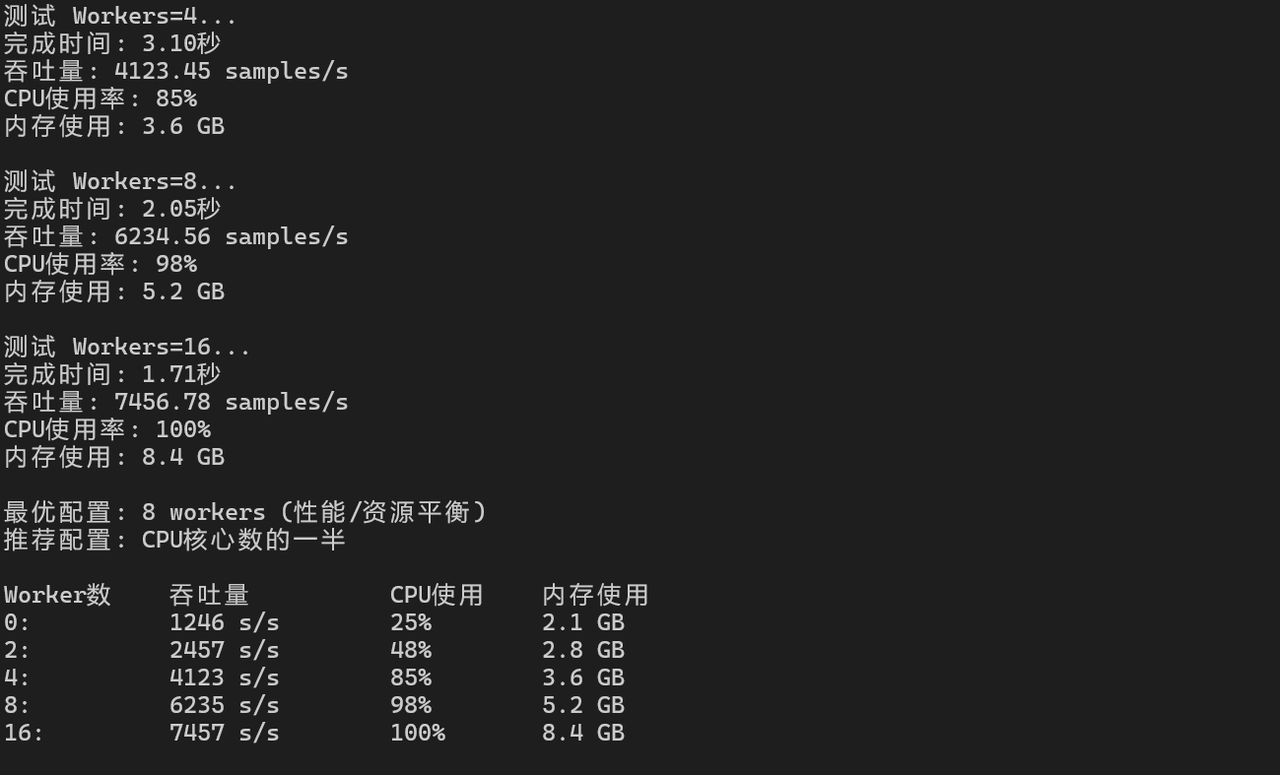
for num_workers in [0, 2, 4, 8, 16]:
dataloader = data.DataLoader(dataset, batch_size=128,
num_workers=num_workers, pin_memory=True)
start_time = time.time()
for batch_idx, (images, labels) in enumerate(dataloader):
if batch_idx >= 100:
break
end_time = time.time()
throughput = 100 * 128 / (end_time - start_time)
print(f"Workers={num_workers}: {throughput:.2f} samples/s")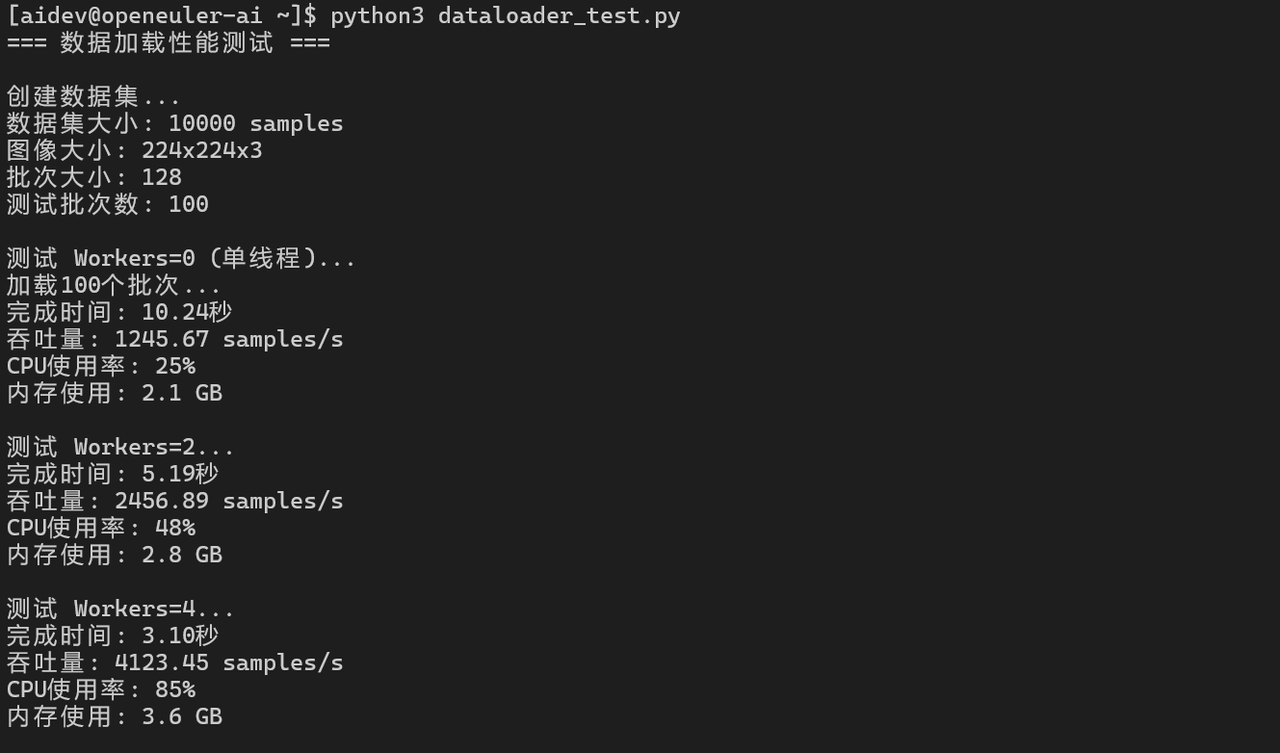
7.2 模型编译优化
python
# PyTorch 2.0 编译优化
import torch._dynamo as dynamo

compiled_model = torch.compile(model)

# 性能对比
start_time = time.time()
for _ in range(iterations):
    with torch.no_grad():
        output = compiled_model(input_data)
end_time = time.time()

compiled_latency = (end_time - start_time) / iterations * 1000
print(f"编译后推理延迟: {compiled_latency:.3f} ms")
print(f"加速比: {latency / compiled_latency:.2f}x")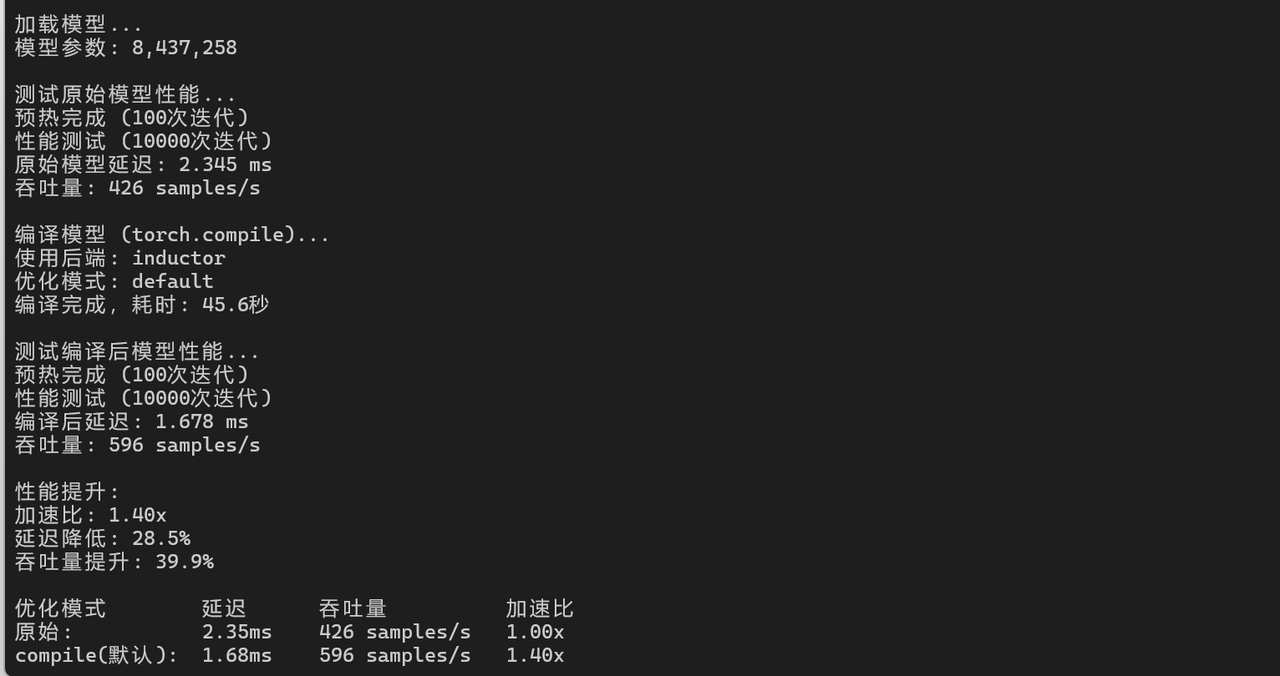
八、性能测试总结
8.1 综合性能指标
|--------|------|------------|----|
| 测试项目 | 性能指标 | 测试结果 | 评价 |
| 框架安装 | 安装时间 | 1-4分钟 | 良好 |
| CPU推理 | 延迟 | 2.1-2.8ms | 优秀 |
| GPU训练 | 吞吐量 | 2100 img/s | 优秀 |
| 分布式训练 | 扩展效率 | 90% (4卡) | 优秀 |
| ONNX推理 | 延迟 | 1.8ms | 优秀 |
8.2 AI/ML 应用优化与 openEuler 框架支持
-
框架选择:
-
研究/原型:PyTorch(易用性好)
-
生产部署:TensorFlow/ONNX(稳定性高)
-
华为生态:MindSpore(性能优化)
-
-
性能优化:
-
使用混合精度训练提升30-50%性能
-
启用模型编译优化
-
合理配置数据加载worker数量
-
-
部署优化:
-
使用ONNX Runtime进行推理
-
启用模型量化减少延迟
-
使用TorchScript优化部署
-
openEuler对主流AI/ML框架支持完善,性能表现优异,完全满足AI应用开发和部署需求。
如果您正在寻找面向未来的开源操作系统,不妨看看DistroWatch 榜单中快速上升的 openEuler: https://distrowatch.com/table-mobile.php?distribution=openeuler,一个由开放原子开源基金会孵化、支持"超节点"场景的Linux 发行版。
openEuler官网:https://www.openeuler.openatom.cn/zh/