背景
今天准备给台新服务器安装MySQL,才发现MySQL的最新版本已经到了9.5.0,而长期支持版(LTS)也已经更新到了8.4.7了。

之后我翻阅了一些资料,关于性能方面的提升就不多说了,主要是下发这个版本支持时间。
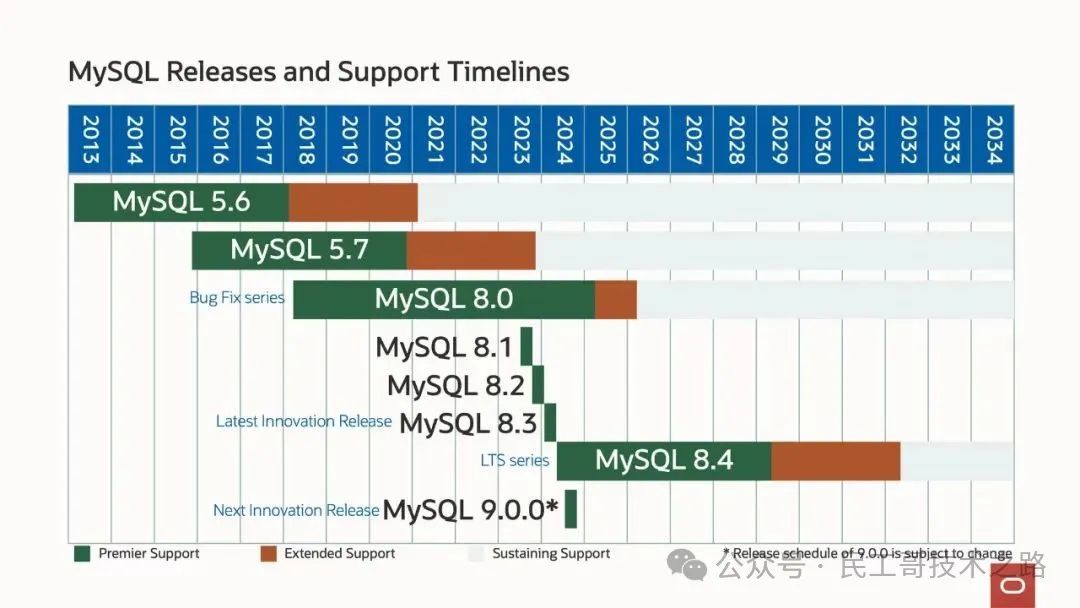
MySQL各版本支持时间(转载自参考文章)
按照图示,MySQL 8.0版本将于2026年4月结束服务支持,而8.4系列的支持到2032年,既然是新部署的服务器,使用新版似乎是个不错的选择。
下载MySQL
说干就干,下载地址:https://dev.mysql.com/downloads/mysql/
在网页中可选的安装包特别多,对于小白来说真是眼花缭乱,所以选择第一个DEB Bundle(离线全量包,tar压缩包)即可。
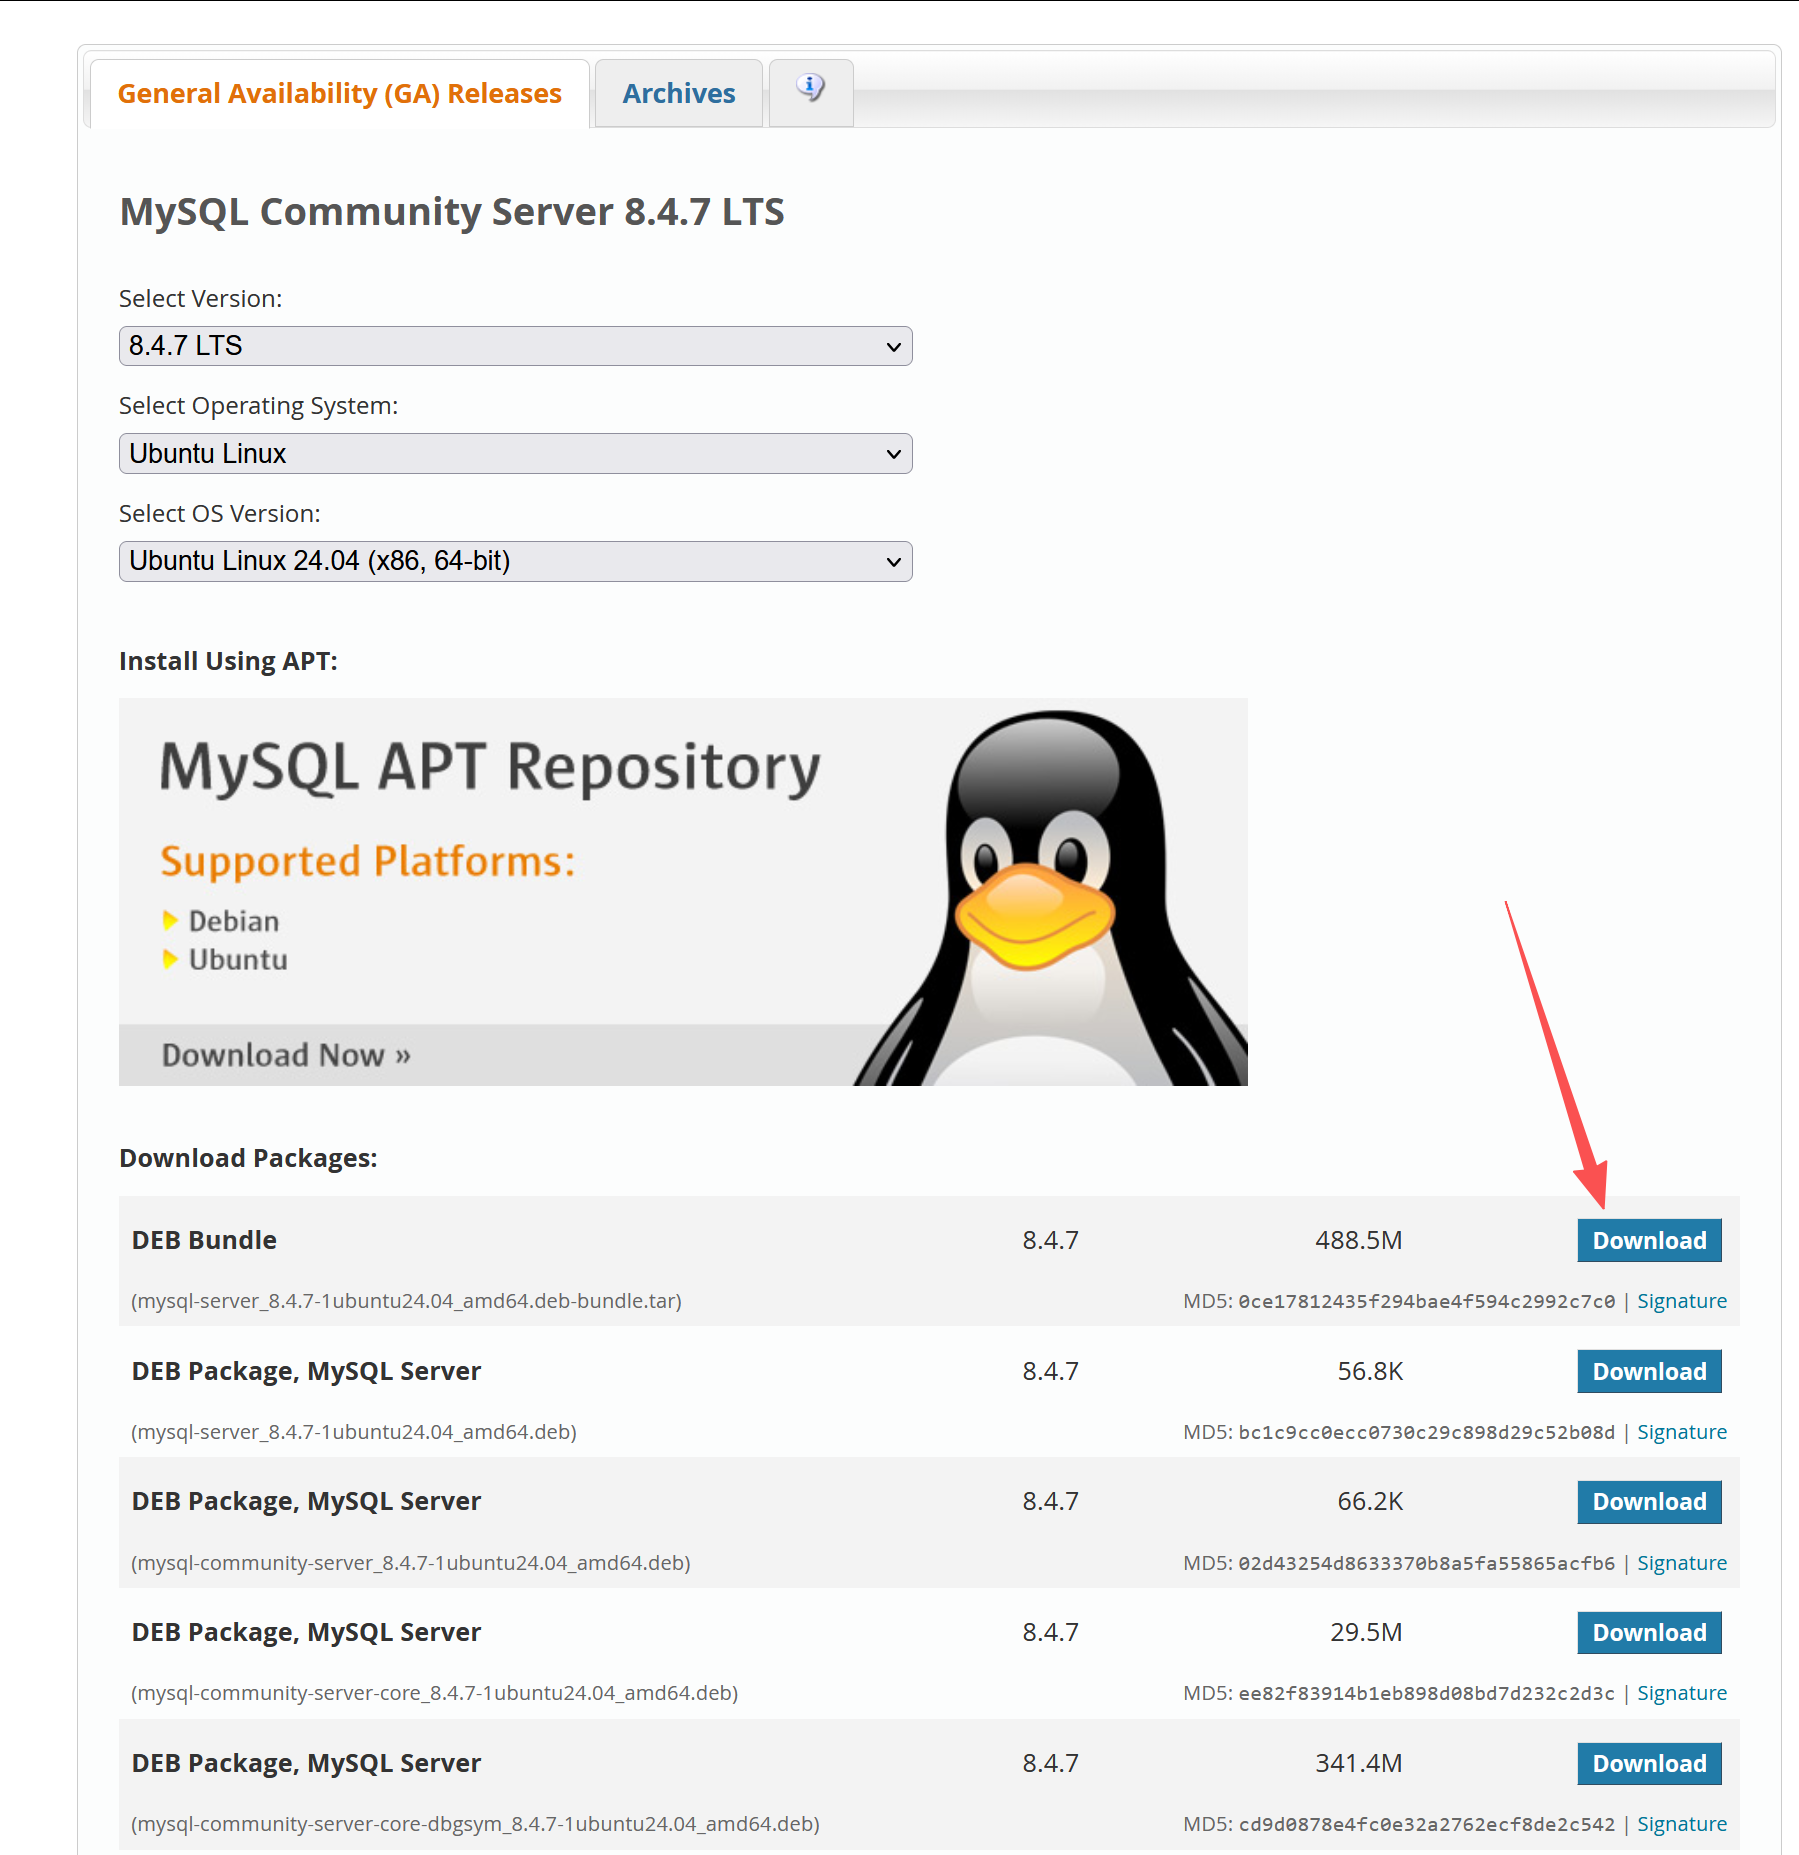
在下载页面,不会直接跳转,我们选择下发这个地址即可。
在这里,可以使用浏览器下载好上传到Ubuntu,也可以直接在终端中使用wget下载。
wget https://dev.mysql.com/get/Downloads/MySQL-8.4/mysql-server_8.4.7-1ubuntu24.04_amd64.deb-bundle.tar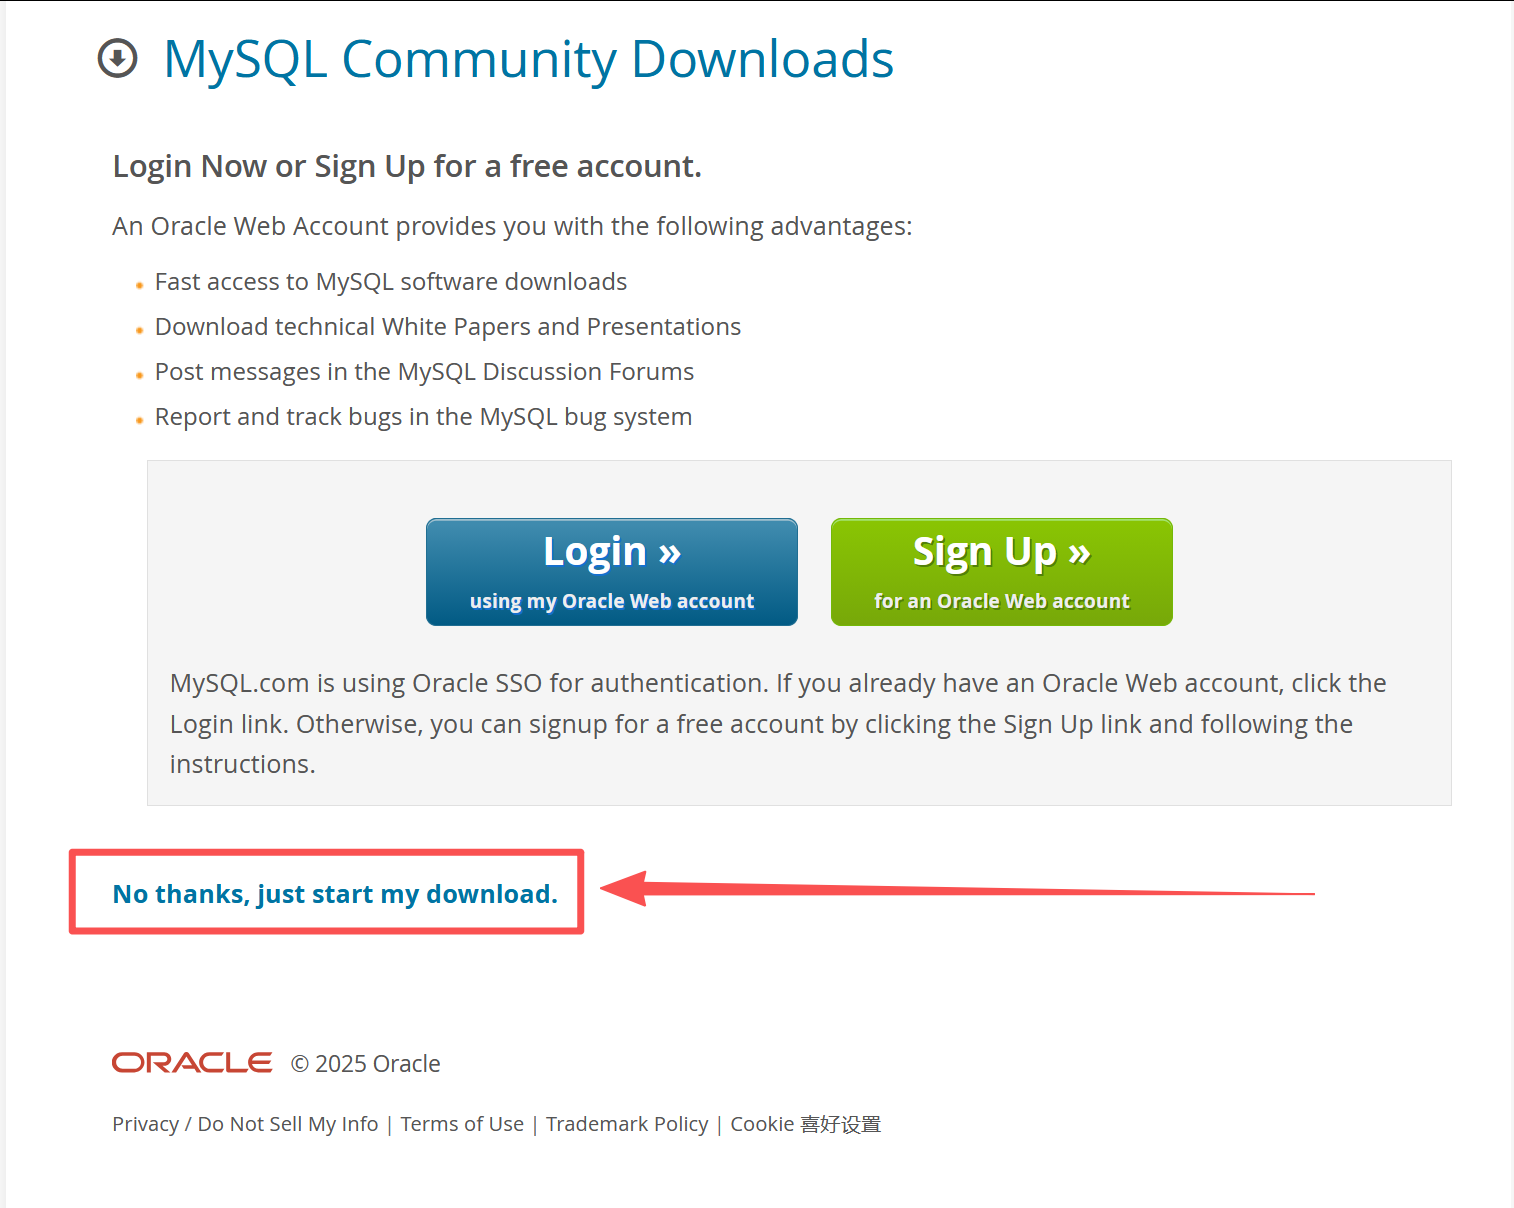
解压安装包
下载好后,我们可以用ls列出文件,然后使用tar命令解压,可以看到解压了很多deb文件,接下来要逐个进行安装。
tar -xvf mysql-server_8.4.7-1ubuntu24.04_amd64.deb-bundle.tar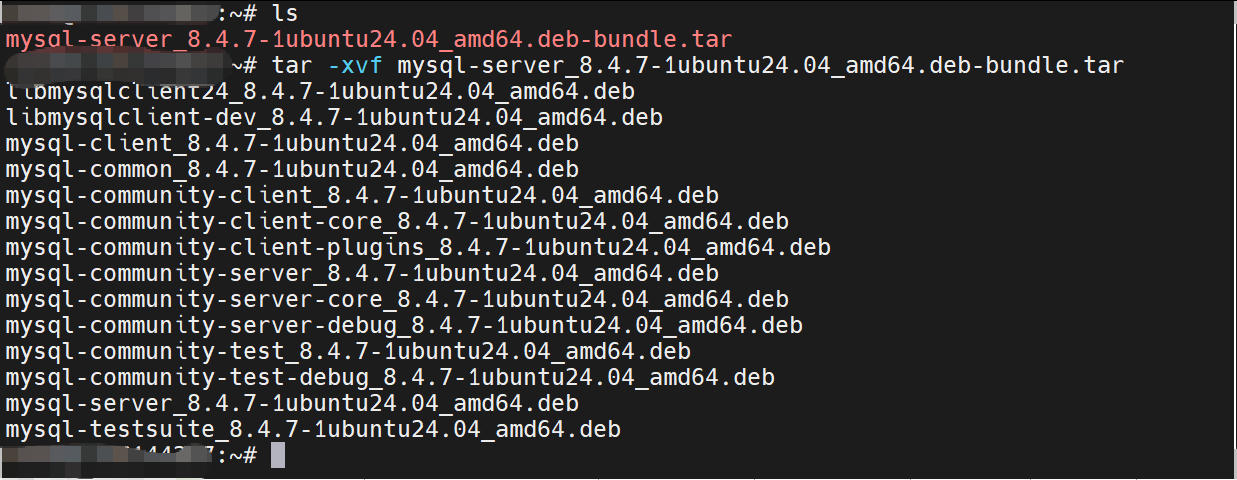
一共14个deb包。
libmysqlclient24_8.4.7-1ubuntu24.04_amd64.deb
libmysqlclient-dev_8.4.7-1ubuntu24.04_amd64.deb
mysql-client_8.4.7-1ubuntu24.04_amd64.deb
mysql-common_8.4.7-1ubuntu24.04_amd64.deb
mysql-community-client_8.4.7-1ubuntu24.04_amd64.deb
mysql-community-client-core_8.4.7-1ubuntu24.04_amd64.deb
mysql-community-client-plugins_8.4.7-1ubuntu24.04_amd64.deb
mysql-community-server_8.4.7-1ubuntu24.04_amd64.deb
mysql-community-server-core_8.4.7-1ubuntu24.04_amd64.deb
mysql-community-server-debug_8.4.7-1ubuntu24.04_amd64.deb
mysql-community-test_8.4.7-1ubuntu24.04_amd64.deb
mysql-community-test-debug_8.4.7-1ubuntu24.04_amd64.deb
mysql-server_8.4.7-1ubuntu24.04_amd64.deb
mysql-testsuite_8.4.7-1ubuntu24.04_amd64.deb
这些包与包之间是有依赖关系,需要按顺序安装,即使找不到资料,也可以自己试验一下。比如以下直接安装mysql-community-server_8.4.7-1ubuntu24.04_amd64.deb,就会提示有三个包需要先安装。
sudo dpkg -i mysql-community-server_8.4.7-1ubuntu24.04_amd64.deb
Selecting previously unselected package mysql-community-server.
(Reading database ... 88354 files and directories currently installed.)
Preparing to unpack mysql-community-server_8.4.7-1ubuntu24.04_amd64.deb ...
Unpacking mysql-community-server (8.4.7-1ubuntu24.04) ...
dpkg: dependency problems prevent configuration of mysql-community-server:
mysql-community-server depends on mysql-common (>= 8.4.7-1ubuntu24.04); however:
Package mysql-common is not installed.
mysql-community-server depends on mysql-client (= 8.4.7-1ubuntu24.04); however:
Package mysql-client is not installed.
mysql-community-server depends on mysql-community-server-core (= 8.4.7-1ubuntu24.04); however:
Package mysql-community-server-core is not installed.
dpkg: error processing package mysql-community-server (--install):
dependency problems - leaving unconfigured
Errors were encountered while processing:
mysql-community-server
按顺序安装
接下来,是笔者按照自己测试的结果制作的安装顺序,供大家可以参考:
bash
sudo dpkg -i mysql-common_8.4.7-1ubuntu24.04_amd64.deb
sudo dpkg -i mysql-community-client-plugins_8.4.7-1ubuntu24.04_amd64.deb
sudo dpkg -i mysql-community-client-core_8.4.7-1ubuntu24.04_amd64.deb
sudo dpkg -i mysql-community-client_8.4.7-1ubuntu24.04_amd64.deb
sudo dpkg -i mysql-client_8.4.7-1ubuntu24.04_amd64.deb
装完以上几个,再到安装mysql-community-server-core时,会提示Package libmecab2 is not installed.
sudo dpkg -i mysql-community-server-core_8.4.7-1ubuntu24.04_amd64.deb
(Reading database ... 88747 files and directories currently installed.)
Preparing to unpack mysql-community-server-core_8.4.7-1ubuntu24.04_amd64.deb ...
Unpacking mysql-community-server-core (8.4.7-1ubuntu24.04) over (8.4.7-1ubuntu24.04) ...
dpkg: dependency problems prevent configuration of mysql-community-server-core:
mysql-community-server-core depends on libmecab2 (>= 0.996); however:
Package libmecab2 is not installed.
dpkg: error processing package mysql-community-server-core (--install):
dependency problems - leaving unconfigured
Processing triggers for libc-bin (2.39-0ubuntu8.6) ...
Processing triggers for man-db (2.12.0-4build2) ...
Errors were encountered while processing:
mysql-community-server-core
这个并不是MySQL自己的组件,需要单独安装
sudo apt install -y libmecab2sudo apt install -y libmecab2
Reading package lists... Done
Building dependency tree... Done
Reading state information... Done
The following NEW packages will be installed:
libmecab2
0 upgraded, 1 newly installed, 0 to remove and 1 not upgraded.
Need to get 201 kB of archives.
After this operation, 872 kB of additional disk space will be used.
Get:1 https://mirrors.aliyun.com/ubuntu noble/main amd64 libmecab2 amd64 0.996-14ubuntu4 201 kB
Fetched 201 kB in 0s (478 kB/s)
Selecting previously unselected package libmecab2:amd64.
(Reading database ... 88444 files and directories currently installed.)
Preparing to unpack .../libmecab2_0.996-14ubuntu4_amd64.deb ...
Unpacking libmecab2:amd64 (0.996-14ubuntu4) ...
Setting up libmecab2:amd64 (0.996-14ubuntu4) ...
Processing triggers for libc-bin (2.39-0ubuntu8.6) ...
Scanning processes...
Scanning linux images...
Running kernel seems to be up-to-date.
No services need to be restarted.
No containers need to be restarted.
No user sessions are running outdated binaries.
No VM guests are running outdated hypervisor (qemu) binaries on this host.
这里有点意思的是,在还没安装这个libmecab2之前,已经尝试了安装mysql-community-server,之后安装libmecab2之后,会马上提示输入MySQL密码了,所以说MySQL的依赖包之间的安装顺序并不影响程序安装,只是还不能用的一个提示?不过为了顺利使用,大家少折腾没必要的报错,还是按照这个顺序继续安装吧。
继续安装
bash
sudo dpkg -i mysql-community-server-core_8.4.7-1ubuntu24.04_amd64.deb
sudo dpkg -i mysql-community-server_8.4.7-1ubuntu24.04_amd64.deb
完成上述的mysql-community-server安装后,页面弹出了一个配置窗口,需要在这里设置root密码
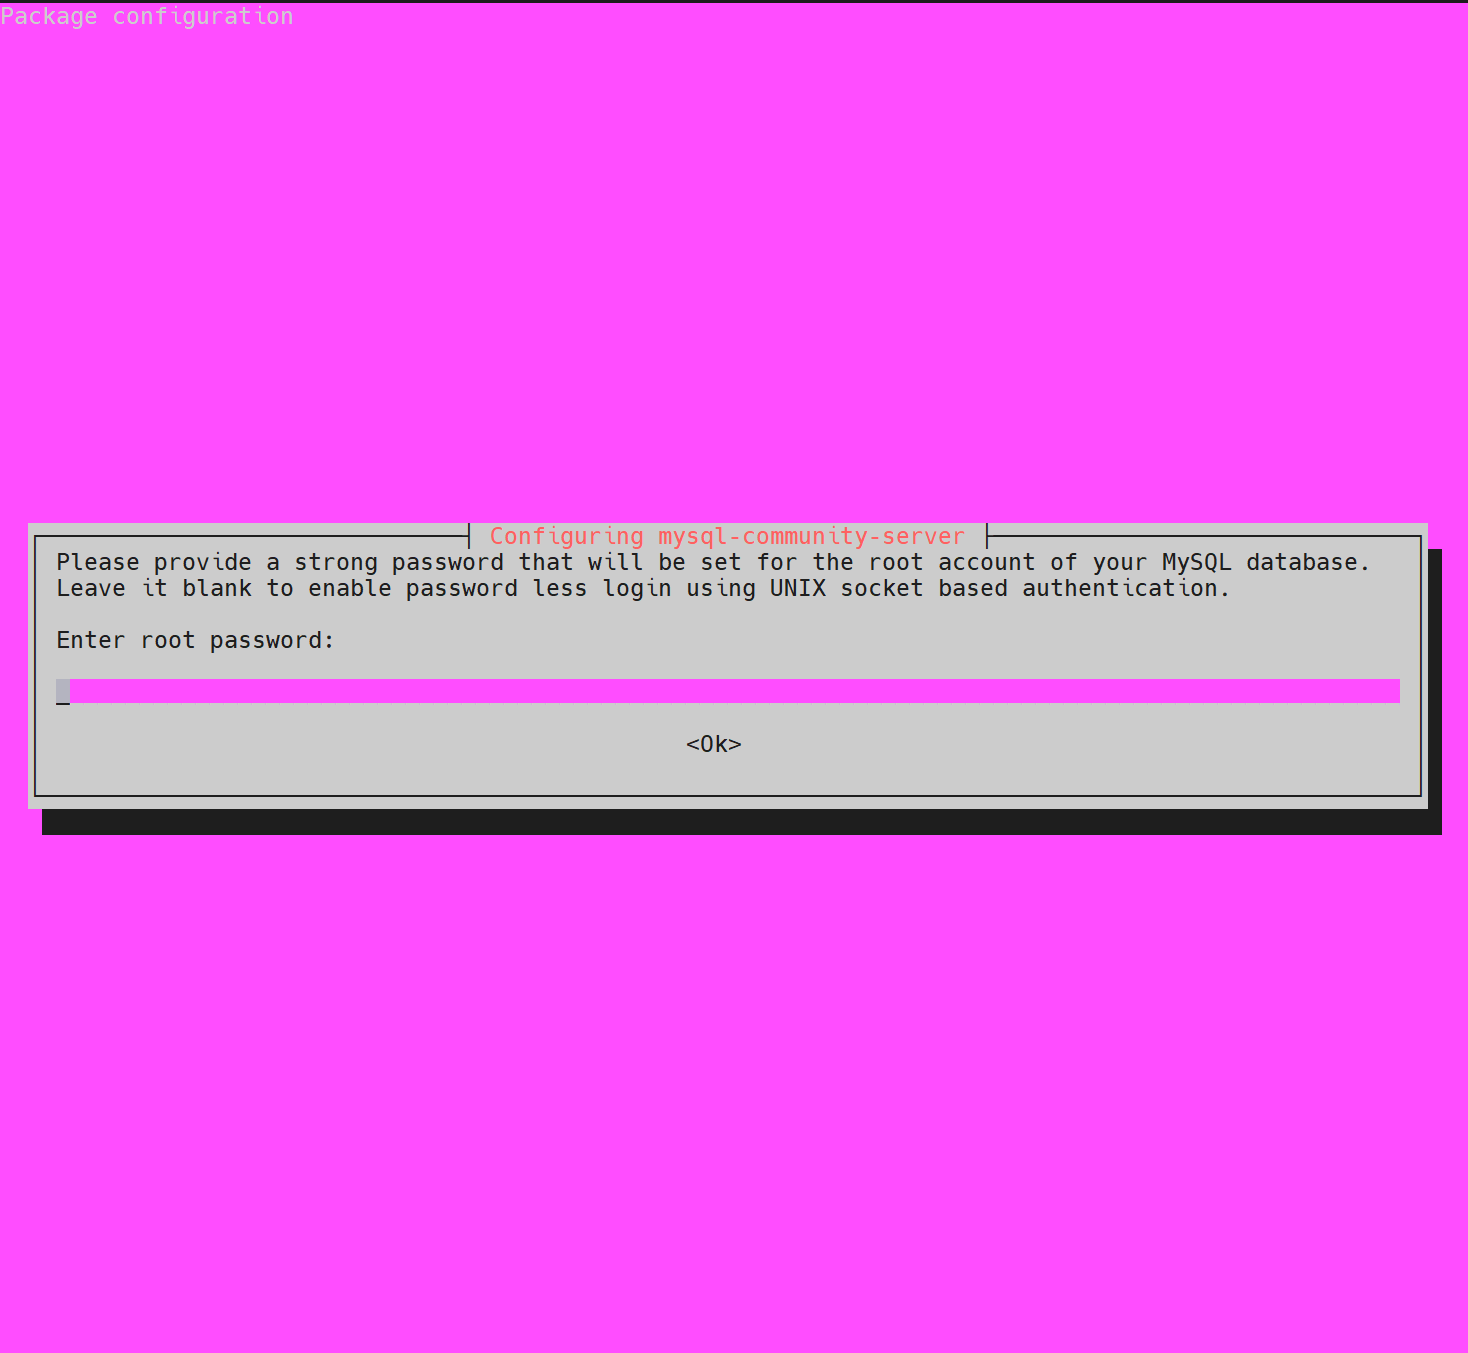
设置好密码后,安装就完成了。
sudo dpkg -i mysql-community-server_8.4.7-1ubuntu24.04_amd64.deb
Selecting previously unselected package mysql-community-server.
(Reading database ... 88696 files and directories currently installed.)
Preparing to unpack mysql-community-server_8.4.7-1ubuntu24.04_amd64.deb ...
Unpacking mysql-community-server (8.4.7-1ubuntu24.04) ...
Setting up mysql-community-server (8.4.7-1ubuntu24.04) ...
update-alternatives: using /etc/mysql/mysql.cnf to provide /etc/mysql/my.cnf (my.cnf) in auto mode
Created symlink /etc/systemd/system/multi-user.target.wants/mysql.service → /usr/lib/systemd/system/mysql.service.
和其他的教程相比,这里属于是最小化安装了,其他文档还有安装libmysqlclient等,不过我这里经过多次重装试验,测试到这里确实已经可以正常使用了,就不额外安装其他内容了。
测试使用
接下来,我们使用命令登录,输入自己前面设置的密码,登录成功!
bash
mysql -u root -p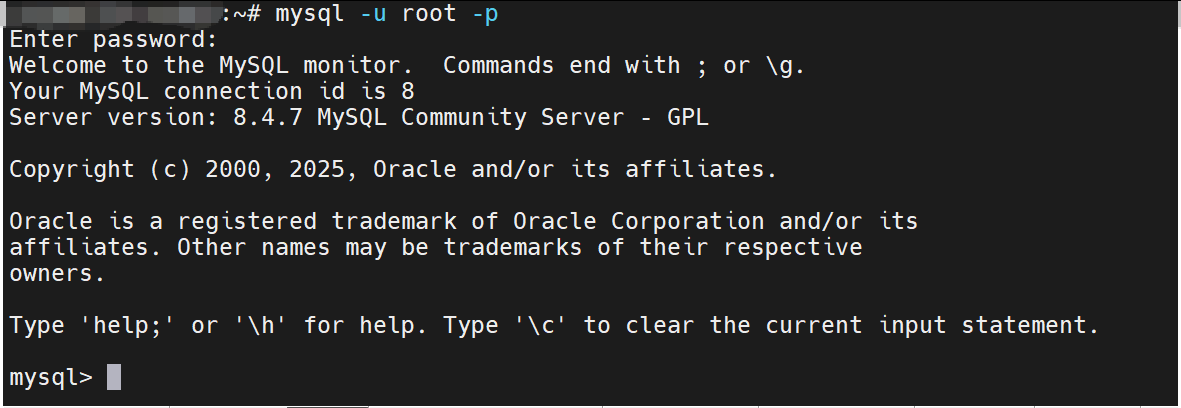
外部访问用户设置
签名是在MySQL的本地环境中直接连接,如果在其他的主机上直接连接,会出现以下提示:
HY0001130 null, message from server: "Host 'X.X.X.X' is not allowed to connect to this MySQL server".
这是MySQL的用户没有设置其他地址访问的权限。
在默认配置中,root账户只允许localhost访问。因此,我们有以下解决思路:
设置root账号的全域访问
设置host为%(全域)访问
update user set host = '%' where user = 'root'; 刷新权限
FLUSH PRIVILEGES; 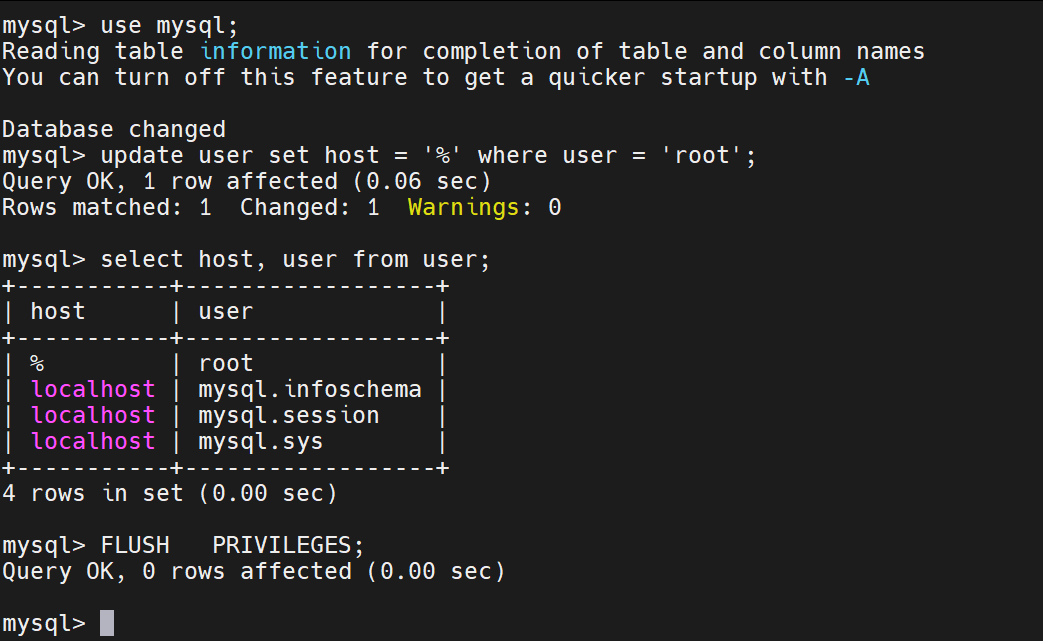
这样,就可以在任意位置使用root账户建立连接了。
创建指定位置的连接账户
直接使用root账户全域访问,存在较大的风险,从网络安全的角度来说,一般不建议这样做,我们可以创建一个 'root'的'x.x.x.x'账户,并分配访问权限,这样可以保证只对该IP开放,更加的安全。
bash
CREATE USER 'root'@'x.x.x.x' IDENTIFIED BY 'some_pass';

GRANT ALL PRIVILEGES ON *.* TO  'root'@'x.x.x.x'  WITH GRANT OPTION;
从查询出来的用户来看,同样是root,但是host不一样,在MySQL中就是一个新的用户了。
如果需要修改密码,可以使用下面的命令:
bash
ALTER USER 'root'@'x.x.x.x' IDENTIFIED BY 'newPassword';诚然,为了更好地使用,实现数据访问安全,还应对权限做更细致的划分,如增删查改的细分权限,和对某数据库某表的访问权,不过这个属于数据库管理上更细致的内容,这里就不展开讲了。
最后
到这里,Ubuntu Linux 24.04 安装MySQL 8.4.7的全部流程都已经通了,感谢每篇参考资料的作者,也感谢大家的支持!
参考链接:
https://blog.csdn.net/mingongge/article/details/142536753
https://blog.csdn.net/u010804417/article/details/138701949
https://blog.csdn.net/weixin_28692817/article/details/113906785
https://developer.aliyun.com/article/1684189