打开⽂件的⽅式不仅仅是fopen,ifstream等流式,他们是语⾔层的⽅案,其实系统才是打开⽂件最底层的⽅案。所以这篇博客将讲述系统⽂件IO函数
1.初识open函数
输入命令man 2 open即可查看系统调用open函数的内容
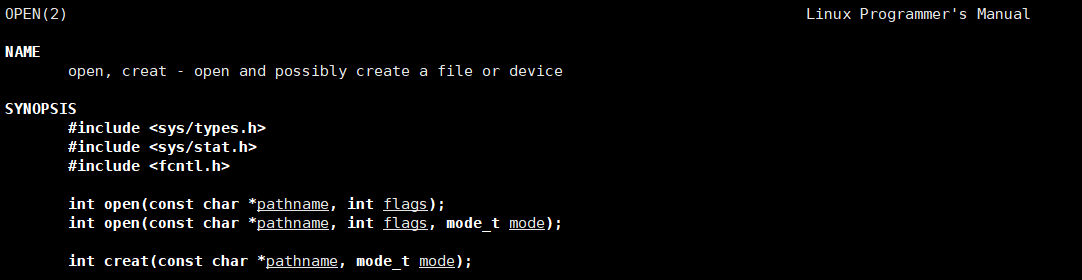
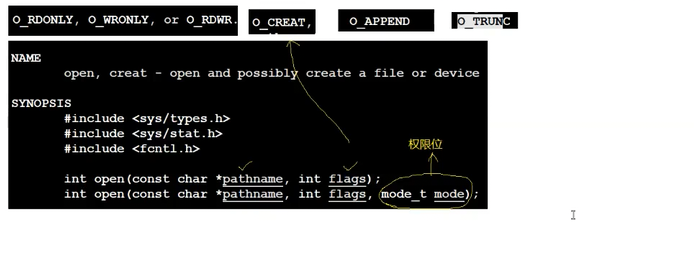
如果想查看一个文件,就使用两个参数的open
如果想要w一个文件,就使用三个参数的open
其中mode就是标志位
2.标志位flags
1.什么是标志位
标志位(也常叫状态位 / 标志位掩码 )是编程中一种利用整数的二进制位来表示多个独立的状态、命令或属性的设计技巧。简单来说:
- 一个整数在内存中以二进制形式存储(比如 32 位整数有 32 个二进制位,每位是 0 或 1);
- 我们将每一个二进制位映射为一个独立的 "开关" 或 "命令"(1 表示开启 / 生效,0 表示关闭 / 无效);
- 再通过宏定义给每个位赋予具体的语义(比如第 0 位代表 "读",第 1 位代表 "写");
- 最终可以通过位运算 (位或
|、位与&等)来组合多个标志,或判断某个标志是否生效。
你提到的 "可读可写不需要传两个参数,而是传读宏 | 写宏",正是标志位的核心用法 ------用一个整数参数承载多个独立的命令 / 状态,而非多个参数。
从本质上讲,标志位就是位图(BitMap)的一种简化应用:用整数的每一位作为 "位",用整数值作为 "图",实现对多个布尔状态的高效存储和操作
2.传递标志位
下面我们使用自己的编写的宏来代替表示标志位,通过| & 运算来传递标志位
flags.c :
cpp
#include <stdio.h>

#define ONE_FLAG 1 << 0 //0000 0000... 0000 0001
#define TWO_FLAG 1 << 1 //0000 0000... 0000 0010
#define THREE_FLAG 1 << 2 //0000 0000... 0000 0100
#define FOUR_FLAG 1 << 3 //0000 0000... 0000 1000

void Print(int mode)
{
    if (mode & ONE_FLAG)
    {
        printf("ONE! ");
    }
    if (mode & TWO_FLAG)
    {
        printf("TWO! ");
    }
    if (mode & THREE_FLAG)
    {
        printf("THREE! ");
    }
    if (mode & FOUR_FLAG)
    {
        printf("FOUR! ");
    }
}

int main()
{
    Print(ONE_FLAG);
    printf("\n");
    Print(ONE_FLAG | TWO_FLAG);
    printf("\n");
    Print(ONE_FLAG | TWO_FLAG | THREE_FLAG);
    printf("\n");
    Print(ONE_FLAG | TWO_FLAG | THREE_FLAG | FOUR_FLAG);
    printf("\n");
    return 0;
}
运行结果如下:

实现了通过传入不同的标志位打印出了对应的结果
3.使用open函数
下面是myfile.c
cpp
#include <stdio.h>
#include <sys/types.h>
#include <sys/stat.h>
#include <fcntl.h>

int main()
{
    int fd = open("log.txt", O_CREAT | O_WRONLY, 0666);
    if (fd < 0)
    {
        perror("fd open");
        return 1;
    }
    return 0;
}
运行结果如下:
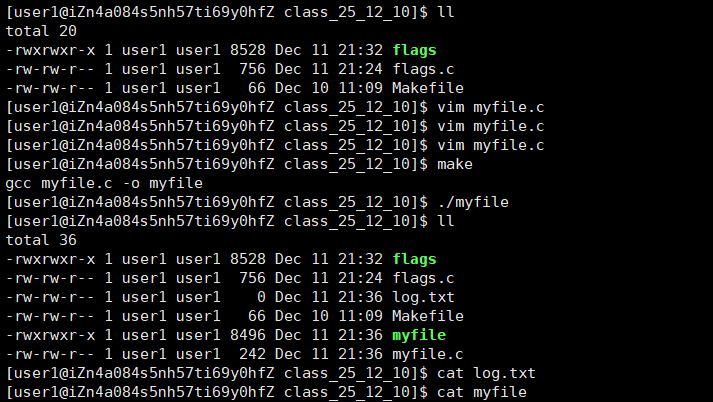
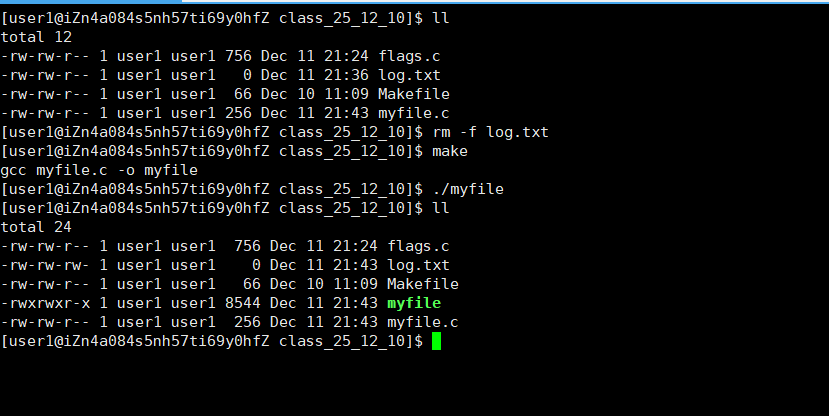
如果你仔细观察就会发现,明明我们设置的权限位是0666,开始创建出来的log.txt是664,这是为什么呢?
那当然是mask啦,每个进程都会有自己的mask(掩码),我们可以使用umask(0)来将该进程掩码调为0,这样我们创造的权限就不会变啦
myfile.c:
cpp
#include <stdio.h>
#include <sys/types.h>
#include <sys/stat.h>
#include <fcntl.h>

int main()
{
    umask(0);
    int fd = open("log.txt", O_CREAT | O_WRONLY, 0666);
    if (fd < 0)
    {
        perror("fd open");
        return 1;
    }
    return 0;
}
4.使用close函数
我们打开了log.txt,当然得关闭一下,所以我们来学习关闭函数--close
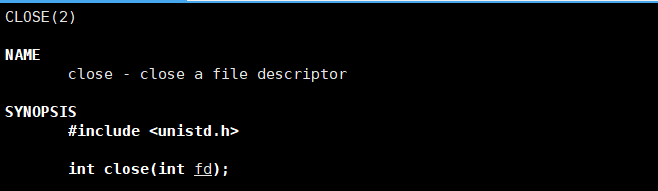
其实很简单,只需要传入fd即可关闭
myfile.c:
cpp
#include <stdio.h>
#include <sys/types.h>
#include <sys/stat.h>
#include <fcntl.h>
#include <unistd.h>

int main()
{
    umask(0);
    int fd = open("log.txt", O_CREAT | O_WRONLY, 0666);
    if (fd < 0)
    {
        perror("fd open");
        return 1;
    }
    printf("fd : %d\n", fd);
    close(fd);
    return 0;
}
运行结果如下:

5.使用write函数

其中fd是你打开的文件描述符,buf是你要写的内容,count是最多写入多少数量
基础使用
下面是myfile.c代码
cpp
#include <stdio.h>
#include <sys/types.h>
#include <sys/stat.h>
#include <fcntl.h>
#include <unistd.h>
#include <string.h>

int main()
{
    umask(0);
    int fd = open("log.txt", O_CREAT | O_WRONLY, 0666);
    if (fd < 0)
    {
        perror("fd open");
        return 1;
    }
    int cnt = 5;
    const char* buffer = "hello bit\n";
    while (cnt--)
    {
        write(fd, buffer, strlen(buffer));
    }
    //printf("fd : %d\n", fd);
    close(fd);
    return 0;
}
运行结果如下,成功向log.txt写入五条消息
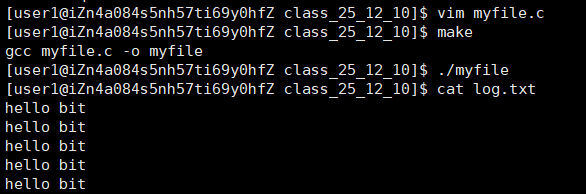
那么我们现在再写入一条短点的字符串呢
cpp
#include <stdio.h>
#include <sys/types.h>
#include <sys/stat.h>
#include <fcntl.h>
#include <unistd.h>
#include <string.h>

int main()
{
    umask(0);
    int fd = open("log.txt", O_CREAT | O_WRONLY, 0666);
    if (fd < 0)
    {
        perror("fd open");
        return 1;
    }
    //int cnt = 5;
    //const char* buffer = "hello bit\n";
    const char* buffer = "abcd";
    write(fd, buffer, strlen(buffer));
    //while (cnt--)
    //{
    //    write(fd, buffer, strlen(buffer));
    //}
    //printf("fd : %d\n", fd);
    close(fd);
    return 0;
}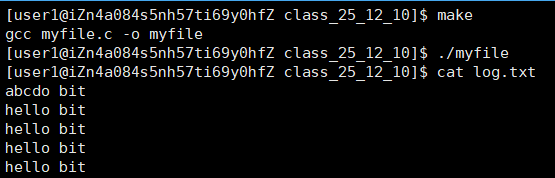
我们惊奇的发现居然不是清空文件再写入,而是直接覆盖式的写入!
那是因为在我们调用c语言封装的fwrite(w),它默认是清空的,但是在系统write中,只有我们加入对应标志位(O_TRUNC)才能清空
myfile.c :
cpp
#include <stdio.h>
#include <sys/types.h>
#include <sys/stat.h>
#include <fcntl.h>
#include <unistd.h>
#include <string.h>

int main()
{
    umask(0);
    //int fd = open("log.txt", O_CREAT | O_WRONLY, 0666);
    int fd = open("log.txt", O_CREAT | O_WRONLY | O_TRUNC, 0666);
    if (fd < 0)
    {
        perror("fd open");
        return 1;
    }
    //int cnt = 5;
    //const char* buffer = "hello bit\n";
    const char* buffer = "abcd";
    write(fd, buffer, strlen(buffer));
    //while (cnt--)
    //{
    //    write(fd, buffer, strlen(buffer));
    //}
    //printf("fd : %d\n", fd);
    close(fd);
    return 0;
}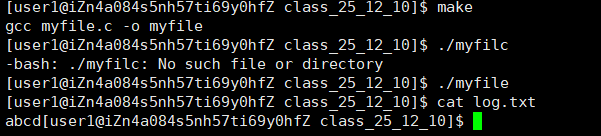
那如果我们不想覆盖写入,也不想清空写入,而是追加写入该怎么办呢,只需要加入宏定义标志位--O_APPEND
myfile.c:
cpp
#include <stdio.h>
#include <sys/types.h>
#include <sys/stat.h>
#include <fcntl.h>
#include <unistd.h>
#include <string.h>

int main()
{
    umask(0);
    //int fd = open("log.txt", O_CREAT | O_WRONLY, 0666);
    //int fd = open("log.txt", O_CREAT | O_WRONLY | O_TRUNC, 0666);
    int fd = open("log.txt", O_CREAT | O_WRONLY | O_APPEND, 0666);
    if (fd < 0)
    {
        perror("fd open");
        return 1;
    }
    //int cnt = 5;
    //const char* buffer = "hello bit\n";
    const char* buffer = "abcd";
    write(fd, buffer, strlen(buffer));
    //while (cnt--)
    //{
    //    write(fd, buffer, strlen(buffer));
    //}
    //printf("fd : %d\n", fd);
    close(fd);
    return 0;
}
运行结果符合预期:
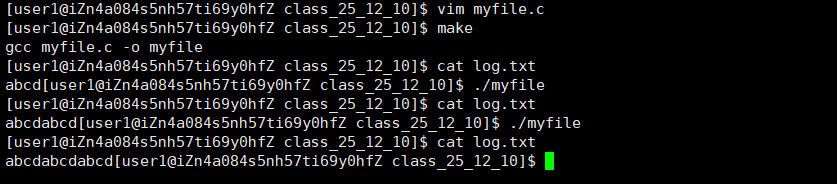
我们回到开头,open函数并非是char* buf,而是void* buf,说明它可以传入任意类型的参数
我们又学过,我们可以以字符形式写入,也可以以二进制形式写入
那么我考考你,我们要写入123456是写入1, 2, 3, 4, 5, 6还是直接写入123456呢?
答案就在下面的代码中:
myfile.c:
cpp
#include <stdio.h>
#include <sys/types.h>
#include <sys/stat.h>
#include <fcntl.h>
#include <unistd.h>
#include <string.h>

int main()
{
    umask(0);
    //int fd = open("log.txt", O_CREAT | O_WRONLY, 0666);
    int fd = open("log.txt", O_CREAT | O_WRONLY | O_TRUNC, 0666);
    //int fd = open("log.txt", O_CREAT | O_WRONLY | O_APPEND, 0666);
    if (fd < 0)
    {
        perror("fd open");
        return 1;
    }
    //int cnt = 5;
    //const char* buffer = "hello bit\n";
    //const char* buffer = "abcd";
    int n = 123456;
    //write(fd, buffer, strlen(buffer));
    write(fd, &n, sizeof(n));
    //while (cnt--)
    //{
    //    write(fd, buffer, strlen(buffer));
    //}
    //printf("fd : %d\n", fd);
    close(fd);
    return 0;
}
运行并且使用vim打开log.txt
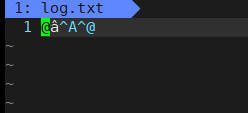
这就是以123456的二进制写入
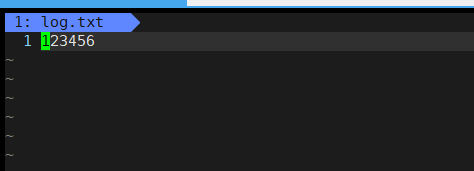
如果我们将123456转化为字符串写入
myfile.c:
cpp
#include <stdio.h>
#include <sys/types.h>
#include <sys/stat.h>
#include <fcntl.h>
#include <unistd.h>
#include <string.h>

int main()
{
    umask(0);
    //int fd = open("log.txt", O_CREAT | O_WRONLY, 0666);
    int fd = open("log.txt", O_CREAT | O_WRONLY | O_TRUNC, 0666);
    //int fd = open("log.txt", O_CREAT | O_WRONLY | O_APPEND, 0666);
    if (fd < 0)
    {
        perror("fd open");
        return 1;
    }
    //int cnt = 5;
    //const char* buffer = "hello bit\n";
    //const char* buffer = "abcd";
    int n = 123456;
    //write(fd, buffer, strlen(buffer));
    //write(fd, &n, sizeof(n));
    char buffer[16];
    int num = snprintf(buffer, sizeof(buffer), "%d", n);
    buffer[num] = '\0';
    write(fd, buffer, strlen(buffer));
    //while (cnt--)
    //{
    //    write(fd, buffer, strlen(buffer));
    //}
    //printf("fd : %d\n", fd);
    close(fd);
    return 0;
}
运行并且使用vim打开log.txt
所以总结一下:

系统是不管你的写入方式的,语言层(如c,c++,java,py等)会提供自己的接口(如fwrite,iostream等)让你以你想要的方式写入
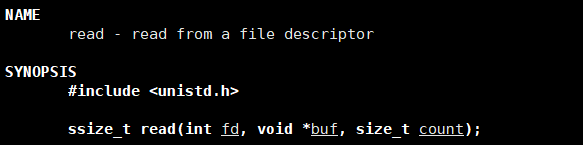
6.使用read函数
man 2 read查看定义
编写myfile.c代码:
cpp
#include <stdio.h>
#include <sys/types.h>
#include <sys/stat.h>
#include <fcntl.h>
#include <unistd.h>
#include <string.h>

int main()
{
    //写
    /*
    umask(0);
    //int fd = open("log.txt", O_CREAT | O_WRONLY, 0666);
    int fd = open("log.txt", O_CREAT | O_WRONLY | O_TRUNC, 0666);
    //int fd = open("log.txt", O_CREAT | O_WRONLY | O_APPEND, 0666);
    if (fd < 0)
    {
        perror("fd open");
        return 1;
    }
    //int cnt = 5;
    //const char* buffer = "hello bit\n";
    //const char* buffer = "abcd";
    int n = 123456;
    //write(fd, buffer, strlen(buffer));
    //write(fd, &n, sizeof(n));
    char buffer[16];
    int num = snprintf(buffer, sizeof(buffer), "%d", n);
    buffer[num] = '\0';
    write(fd, buffer, strlen(buffer));
    //while (cnt--)
    //{
    //    write(fd, buffer, strlen(buffer));
    //}
    //printf("fd : %d\n", fd);
    close(fd);
    return 0;
    */
    //读
    int fd = open("log.txt", O_RDONLY);
    if (fd < 0)
    {
        perror("fd open");
        return 1;
    }
    while (1)
    {
        char buffer[64];
        int n = read(fd, buffer, sizeof(buffer) - 1);
        if (n < 0) //读取失败
        {
            printf("读取失败!\n");
            return 1;
        }
        else if (n == 0) // n == 0 : 已到达 文件结束(EOF) 或 对端关闭写端且无数据可读
        {
            break;
        }
        else // n > 0 : 读取到n个字符
        {
            buffer[n] = '\0';
            printf("%s", buffer);
        }
    }
    close(fd);
    return 0;
}