江科大的课程详细丰富,所以这里开始记录课程的内容知识点还有补充,可以更好用来复习和学习
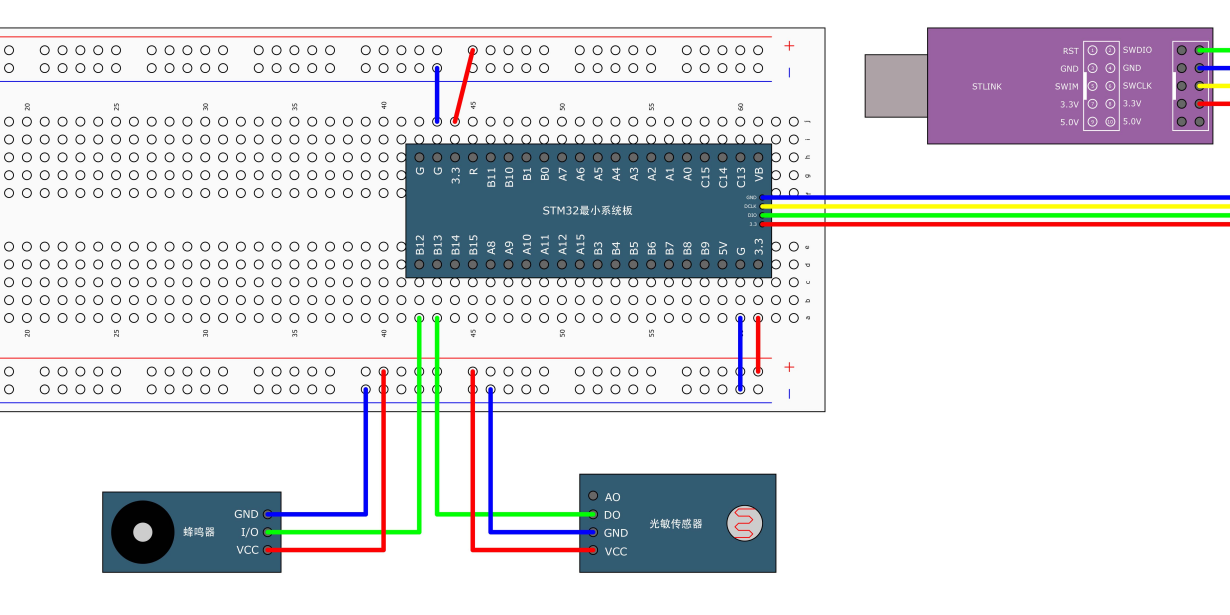
老规矩先上代码和连线图然后看最下面的解释
Buzzer.h
cs
#ifndef __BUZZER_H
#define __BUZZER_H

void Buzzer_Init(void);
void Buzzer_ON(void);
void Buzzer_OFF(void);
void Buzzer_Turn(void);

#endif
Buzzer.c
cs
#include "stm32f10x.h"                  // Device header

void Buzzer_Init(void)
{
	RCC_APB2PeriphClockCmd(RCC_APB2Periph_GPIOB, ENABLE);//GPIOB模式

	GPIO_InitTypeDef GPIO_InitStructure;
	GPIO_InitStructure.GPIO_Mode = GPIO_Mode_Out_PP;    //推挽输出模式
	GPIO_InitStructure.GPIO_Pin = GPIO_Pin_12;
	GPIO_InitStructure.GPIO_Speed = GPIO_Speed_50MHz;
	GPIO_Init(GPIOB, &GPIO_InitStructure);

	GPIO_SetBits(GPIOB, GPIO_Pin_12);                   //让蜂鸣器处于高电平状态先让他不响
}

void Buzzer_ON(void)
{
	GPIO_ResetBits(GPIOB, GPIO_Pin_12);
}

void Buzzer_OFF(void)
{
	GPIO_SetBits(GPIOB, GPIO_Pin_12);
}

void Buzzer_Turn(void)  //这个只是补充,我们不用这个函数
{
	if (GPIO_ReadOutputDataBit(GPIOB, GPIO_Pin_12) == 0)  //这个函数的作用是读出输出引脚pin12的状态,如果是0也就是低电平模式就是要响了
	{
		GPIO_SetBits(GPIOB, GPIO_Pin_12); //那就取反让他不响
	}
	else
	{
		GPIO_ResetBits(GPIOB, GPIO_Pin_12);
	}
}
Lightsensor.h
cs
#ifndef __LIGHT_SENSOR_H
#define __LIGHT_SENSOR_H

void LightSensor_Init(void);
uint8_t LightSensor_Get(void);

#endif
Lightsensor.c
cs
#include "stm32f10x.h"                  // Device header

void LightSensor_Init(void)
{
	RCC_APB2PeriphClockCmd(RCC_APB2Periph_GPIOB, ENABLE);

	GPIO_InitTypeDef GPIO_InitStructure;
	GPIO_InitStructure.GPIO_Mode = GPIO_Mode_IPU;
	GPIO_InitStructure.GPIO_Pin = GPIO_Pin_13;
	GPIO_InitStructure.GPIO_Speed = GPIO_Speed_50MHz;
	GPIO_Init(GPIOB, &GPIO_InitStructure);
}

uint8_t LightSensor_Get(void)
{
	return GPIO_ReadInputDataBit(GPIOB, GPIO_Pin_13);  //读出输入到光敏传感器的信息然后return
}
main.c
cs
#include "stm32f10x.h"                  // Device header
#include "Delay.h"
#include "Buzzer.h"
#include "LightSensor.h"

int main(void)
{
	Buzzer_Init();
	LightSensor_Init();

	while (1)
	{
		if (LightSensor_Get() == 1) //如果读取到是1,那就是光被挡住了,蜂鸣器响
		{
			Buzzer_ON();
		}
		else
		{
			Buzzer_OFF();
		}
	}
}
看起来代码非常多,其实没有多少,分析一下就可以得到想要的效果
我们这个代码的效果就是当光敏传感器光线被挡住就会发去声音,不遮住就不会响
我们首先看主函数,先是定义了Buzzer和Lightsensor两个函数,这个时候我们就要回到函数里面了解内容,了解之后看主函数的解释就可以了