1.前言
crest是一款海洋模拟插件,其开源的基础版本位于github(https://github.com/wave-harmonic/crest),年末清下Flag,学习下该插件源码。
1.1.对比Boat Attack
之前基于BoatAttack(https://github.com/Unity-Technologies/BoatAttack)做过一套水体方案,对比下两者。
- Boat Attack Water
BoatAttack没有海底渲染,Lod只有mesh做了远处简化处理,没有系统级Lod的设计。
水体交互通过叠加Gerstner波形实现,但有叠加上限限制。
无FFT波形,只有Gerstner波。
无吃水线、海底实现。
无船只水体交互,只有深度差泡沫效果,海浪是粒子特效。
- Crest
完整的大规模海面LOD方案,大量ComputeShader处理,但也提供常规VF Shader兼容性支持,需要自己开关。
波形模拟做了封装处理,可自由切换FFT与Gerstner,可自定义某块区域用哪一种。
查询接口做了封装处理,一套接口可以支持异步和非异步。
基础版本没有吃水线,但有完善海底实现。
船只与水体可配置波浪等交互,海浪是GPU Instancing的内置特效。
1.2 插件结构
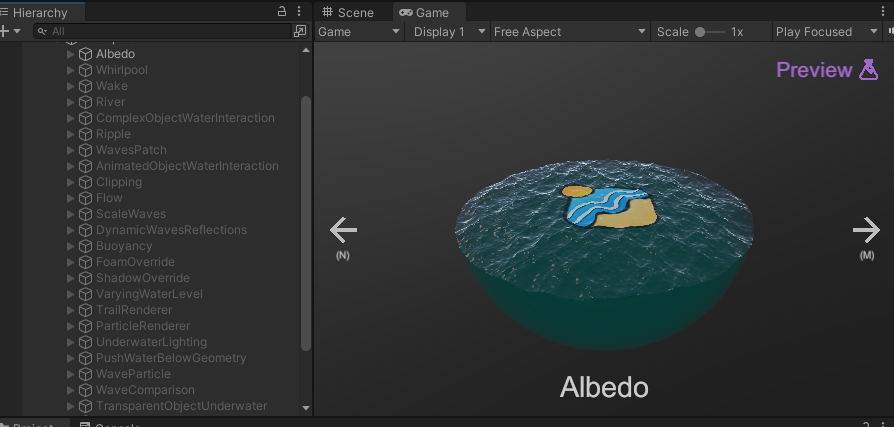
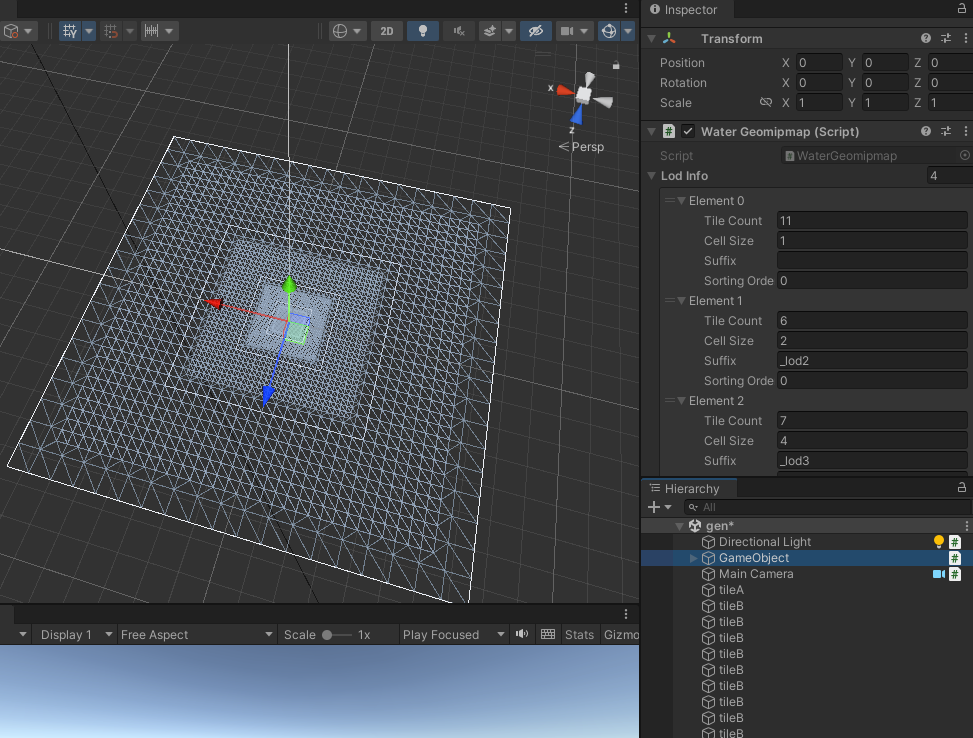
以github上开源的基础版本为例,Examples.unity场景有所有效果演示
核心逻辑在OceanRenderer中,但要让海洋正常运行需要一定层级结构配置,例如参考BoatScene.unity
Shader部分较为清晰,主要在Ocean.shader中,包含折射、反射、泡沫、SSS等基础的海水实现。
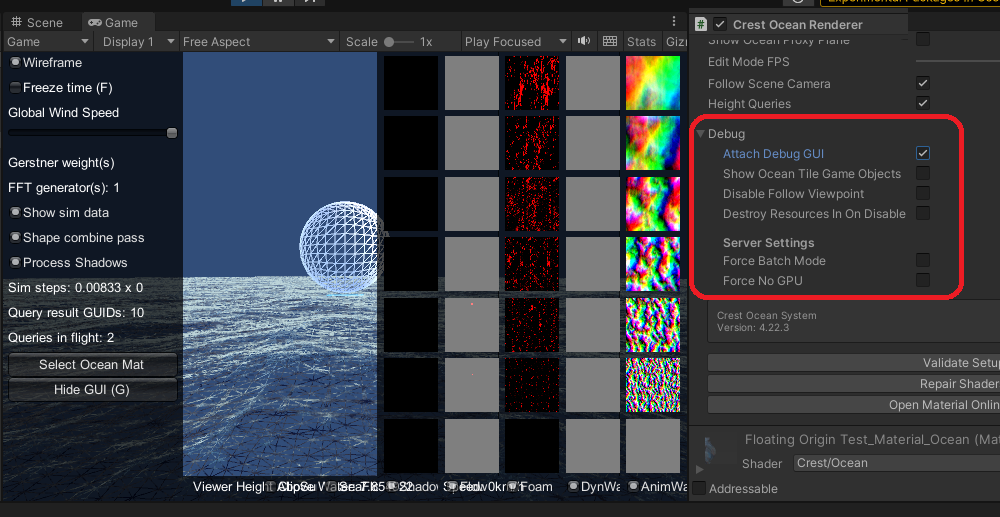
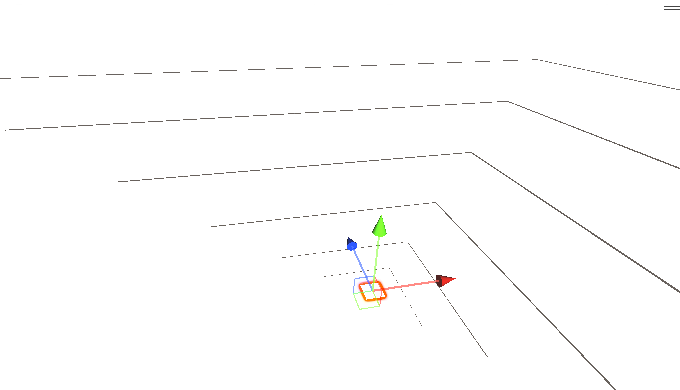
展开OceanRenderer的Debug菜单后,可显示Tile、线框等。
2.Tile & ShiftingOrigin
2.1 Tile拼接
在OceanRenderer脚本处勾选showOceanTileGameObjects即可显示隐藏的Chunk对象
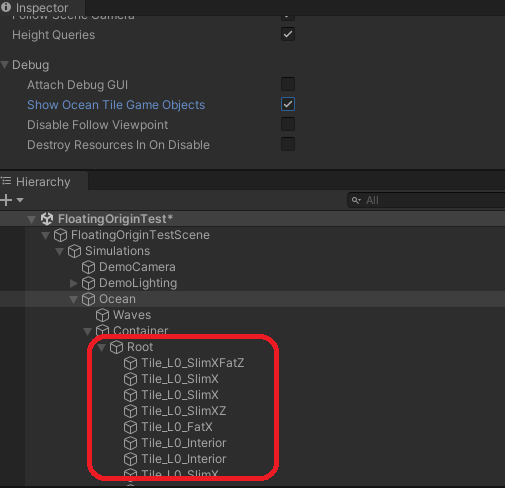
具体代码在OceanBuilder的GenerateMesh中。
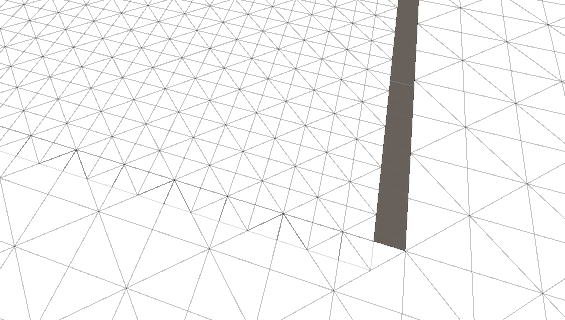
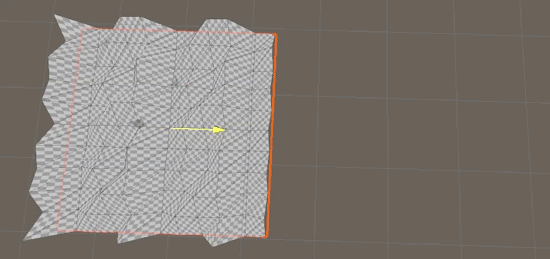
所有Tile都是独立Mesh,替换为Unlit shader查看,会发现有接缝:
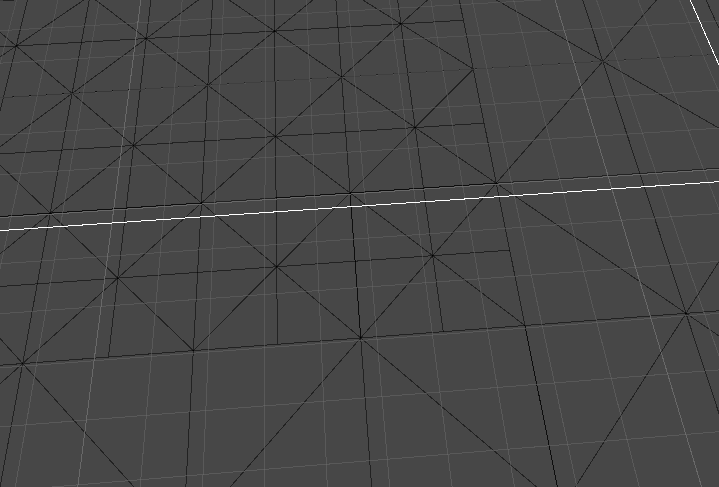
Shader中通过SnapAndTransitionVertLayout函数,进行坐标偏移修复,解决接缝问题。
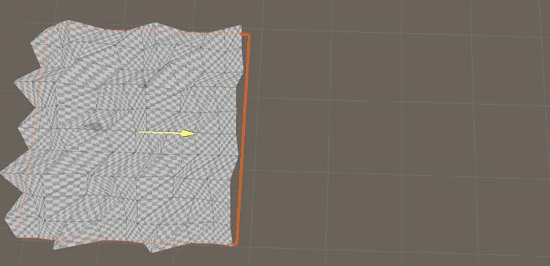
unlit shader:
切回带Snap函数的shader:
但感觉实际上也可以用类似geo mipmap的做法,离线生成一张带顶点缝合的大型Mesh,
实时跟着Camera走(缺点是不好按Tile优化):
2.2 ShiftingOrigin实现原理
当实际坐标大于某阈值时,直接让transform.position减去一定偏移量,实现拉回,从而避免
因浮点数偏差而导致模型出现撕扯问题。
维基百科(http://wiki.unity3d.com/index.php/Floating_Origin)
插件实现:
public class ShiftingOrigin : CustomMonoBehaviour
{
    ...
    void FixedUpdate()
    {
        var newOrigin = Vector3.zero;

        if (Mathf.Abs(transform.position.x) > _threshold) ...
        if (Mathf.Abs(transform.position.y) > _threshold) ...
        if (Mathf.Abs(transform.position.z) > _threshold) ... if (newOrigin != Vector3.zero) { MoveOrigin(newOrigin); } } }
2.3 Texel对齐
为了避免偏移时无法对齐mesh网格,实际还会进行一步Texel偏移操作。
即用最小lod网格的尺寸进行坐标量化,避免shader通过世界坐标采样噪声贴图时,
因为浮点数采样到完全不同的中间位置,造成抖动感。
有Texel量化对齐的移动:
无Texel量化对齐的移动:
代码可参考LodTransform
public class LodTransform : IShiftingOrigin
{
    ...

    public void UpdateTransforms()
    {
        for (int lodIdx = 0; lodIdx < LodCount; lodIdx++)
        {
            ...

            // find snap period
            _renderData[lodIdx].Current._textureRes = OceanRenderer.Instance.LodDataResolution;
            _renderData[lodIdx].Current._texelWidth = 2f * camOrthSize / _renderData[lodIdx].Current._textureRes;
            // snap so that shape texels are stationary
            _renderData[lodIdx].Current._posSnapped =OceanRenderer.Instance.Root.position - new Vector3(Mathf.Repeat(OceanRenderer.Instance.Root.position.x, _renderData\[lodIdx\].Current._texelWidth), 0f, Mathf.Repeat(OceanRenderer.Instance.Root.position.z, _renderData\[lodIdx\].Current._texelWidth));
3.LOD系统
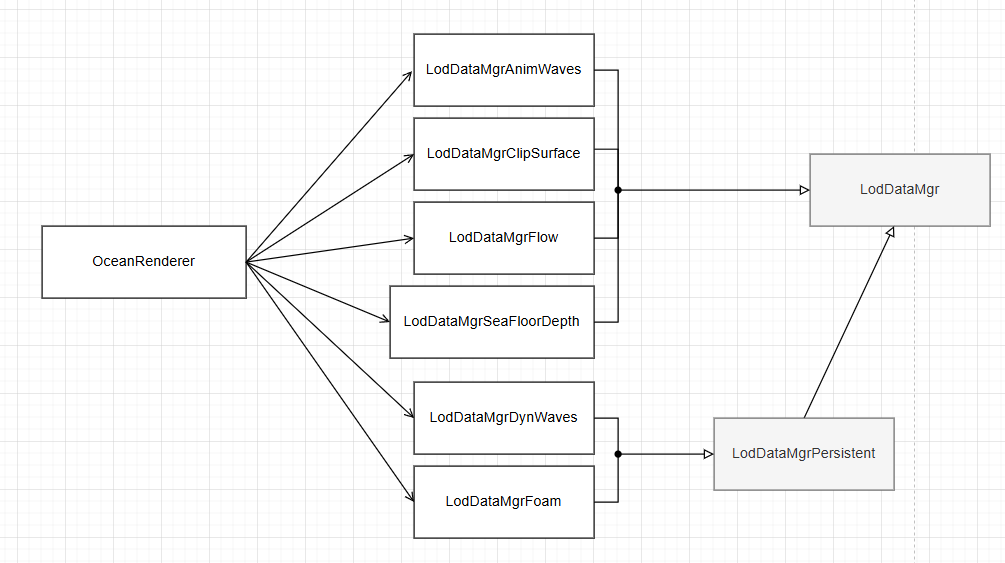
可以说整个插件的核心都是围绕着LOD系统,各类模块都继承自LodDataMgr
继承LodDataMgr的模块:
-
LodDataMgrAlbedo,类似于Decal
-
LodDataMgrAnimWaves,指定波形
-
LodDataMgrClipSurface,使用SDF或其他方式裁剪海面
-
LodDataMgrDynWaves,动态修改波
-
LodDataMgrFlow,通过Crest内部FlowMap和内部样条线,实现类似河流流动效果
-
LodDataMgrFoam,泡沫
-
LodDataMgrPersistent,中间基类,提供子步骤模拟,以避免物理模拟/查询等出错
-
LodDataMgrSeaFloorDepth,维护海平面相对海底的高度数据,生成中间贴图,用于后续的浅水区着色等
整体继承关系如下:
3.1 Lod调试

可通过设置Viewpoint并拖拽,直接调试LOD。
(这里的LOD还包括俯视角拉远,海洋细节也会自动切LOD)
3.2 Lod Input组件
每个Lod模块通过基类的注册代码逻辑,可针对对应模块注册若干Input脚本进行扩展。
以Albedo为例,继承逻辑关系如下:
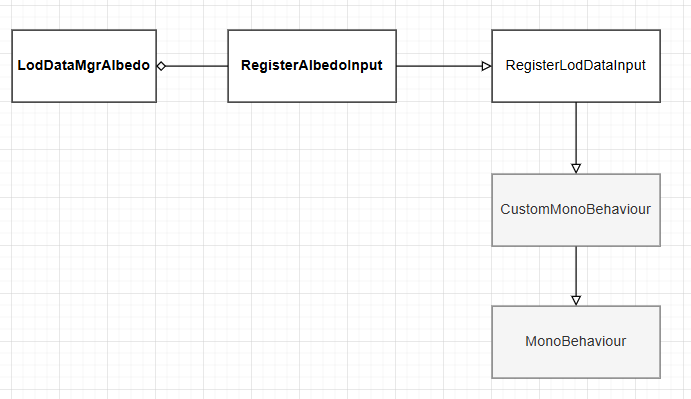
s_registrar是基类(RegisterLodDataInputBase)中处理对应各类型Input的静态字典,其中OceanInput是List类型
可注册若干Input。
using OceanInput = CrestSortedList<int, ILodDataInput>;
...
public abstract partial class RegisterLodDataInputBase : CustomMonoBehaviour, ILodDataInput
{
    ...
    static Dictionary<Type, OceanInput> s_registrar = new Dictionary<Type, OceanInput>();

    public static OceanInput GetRegistrar(Type lodDataMgrType)
    {
        if (!s_registrar.TryGetValue(lodDataMgrType, out var registered))
        {
            registered = new OceanInput(Helpers.DuplicateComparison); s_registrar.Add(lodDataMgrType, registered); } return registered; } ...
注册代码:
public static void RegisterInput(ILodDataInput input, int queueSortIndex, int subSortIndex)
{
    var registrar = GetRegistrar(typeof(LodDataType));
    registrar.Remove(input);

    // Allow sorting within a queue. Callers can pass in things like sibling index to get deterministic sorting
    int maxSubIndex = 1000;
    int finalSortIndex = queueSortIndex * maxSubIndex + Mathf.Min(subSortIndex, maxSubIndex - 1);

    registrar.Add(finalSortIndex, input);
}
3.3 Lod的RT绘制
BuildCommandBuffer是基类LogDataMgr比较重要的接口,
子类重写BuildCommandBuffer自定义CommandBuffer的命令,通过基类工具函数SubmitDraws/SubmitDrawsFiltered
最终拿到Input,绘制Mesh,完成当前组件对应的那张RT的编辑。
为了说明的更清晰些,看下该插件的渲染流程。
在渲染管线运行之前,Crest会预先执行LodData的相关操作,完成不同RT的绘制,
被绘制的RT根据LOD级别存放在Texture2DArray中。
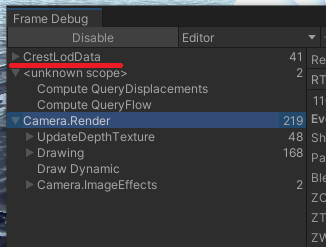
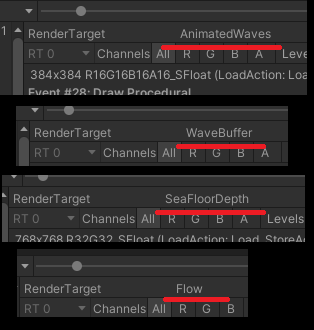
例如Albedo的所有绘制RT,会绘制至Albedo上,
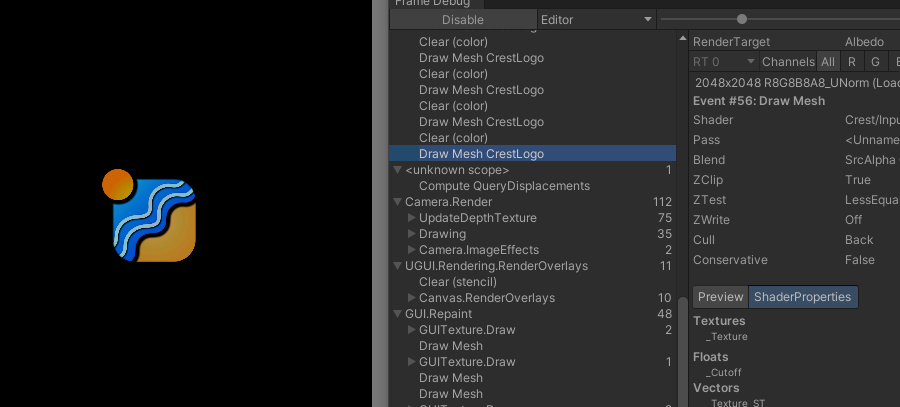
并作为Texture2DArray参数传入。
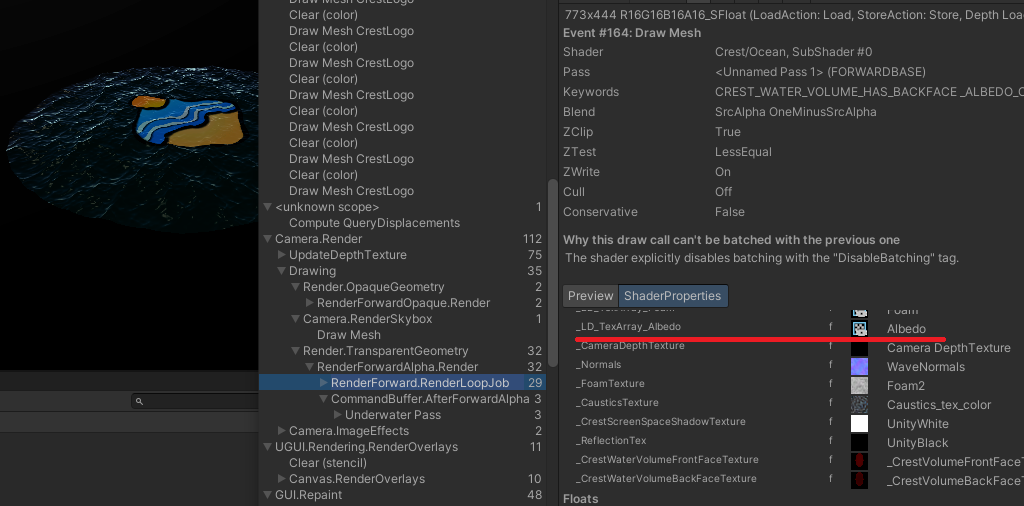
不同LOD对应的俯视角相机矩阵存放在LodTransform中
public class LodTransform : IShiftingOrigin
{
   ...
   public BufferedData<RenderData>[] _renderData;
远处的Lod将应用更大的俯视角,更低分辨率的贴图。
LOD系统的好处是,所有区域信息都是信息化存在的,例如某块区域被标记为海浪,某块区域被标记为河流。
它们不受分辨率影响,会根据观测点位置在需要的时候 被绘制到对应的LOD贴图上,最后交给Ocean shader渲染。
4.查询&交互
4.1 查询
Crest提供了异步查询接口,允许的异步执行时间为1帧,当到达下一帧时,将强行
完成异步工作。查询逻辑用了双缓冲结构,本帧的异步数据执行时将拿出第二份备用数据,
用于注册新的查询请求。
以ICollProvider为例,CollProviderBakedFFT是CollProvider的其中一个实现。
QueryData中存放了3个字典:
class QueryData
{
    public Dictionary<int, int3> _segmentRegistryNewQueries = new Dictionary<int, int3>();
    public Dictionary<int, int3> _segmentRegistryQueriesInProgress = new Dictionary<int, int3>();
    public Dictionary<int, int3> _segmentRegistryQueriesResults = new Dictionary<int, int3>();


    public int RegisterQueryPoints(int ownerHash, Vector3[] queryPoints, int dataToWriteThisFrame)
    {
    }

    public void Flip() { } }
当外部执行RegisterQueryPoints进行注册查询时,数据会被加到_segmentRegistryNewQueries。
当外部执行RetrieveDisps尝试取回查询结果时,会从_segmentRegistryQueriesResults中取得。
当执行Flip时,将更换两套数据,上一轮次的数据回收待查询使用,这一轮次的数据开始异步执行。
public void Flip()
{
    // Results become the next query input (last stage cycles back to first)
    var nextQueries = _segmentRegistryQueriesResults;
    // In progress queries become results
    _segmentRegistryQueriesResults = _segmentRegistryQueriesInProgress;
    // Newly collected queries are now being processed
    _segmentRegistryQueriesInProgress = _segmentRegistryNewQueries;
    // The old results become the new queries
    _segmentRegistryNewQueries = nextQueries;

    // Clear so if something stops querying it's cleaned out
 _segmentRegistryNewQueries.Clear(); foreach (var registration in _segmentRegistryQueriesInProgress) { var age = Time.frameCount - registration.Value.z; // If query has not been used in a while, throw it away if (age < 10) { ... _segmentRegistryNewQueries.Add(registration.Key, newSegment); } } }
类似的设计在BufferedData中也有体现。
RetrieveSucceeded接口检查当前是否异步执行结束,可以取得数据。
在BakedFFT中:
public int Query(
    int i_ownerHash,
    float i_minSpatialLength,
    Vector3[] i_queryPoints,
    float[] o_resultHeights,
    Vector3[] o_resultNorms,
    Vector3[] o_resultVels
    )
{
    ... /*检查异步是否处理完成,尝试取得数据*/
    return allCopied ? (int)QueryStatus.Success : (int)QueryStatus.ResultsNotReadyYet;
}

public bool RetrieveSucceeded(int queryStatus) { return queryStatus == (int)QueryStatus.Success; }
而在Gerstner中,由于不需要异步查询,直接返回0:
public int Query(int i_ownerHash, float i_minSpatialLength, Vector3[] i_queryPoints, float[] o_resultHeights, Vector3[] o_resultNorms, Vector3[] o_resultVels)
{
    ...
    return 0;
}

public bool RetrieveSucceeded(int queryStatus)
{
    return queryStatus == 0;
}
4.2 查询可视化调试
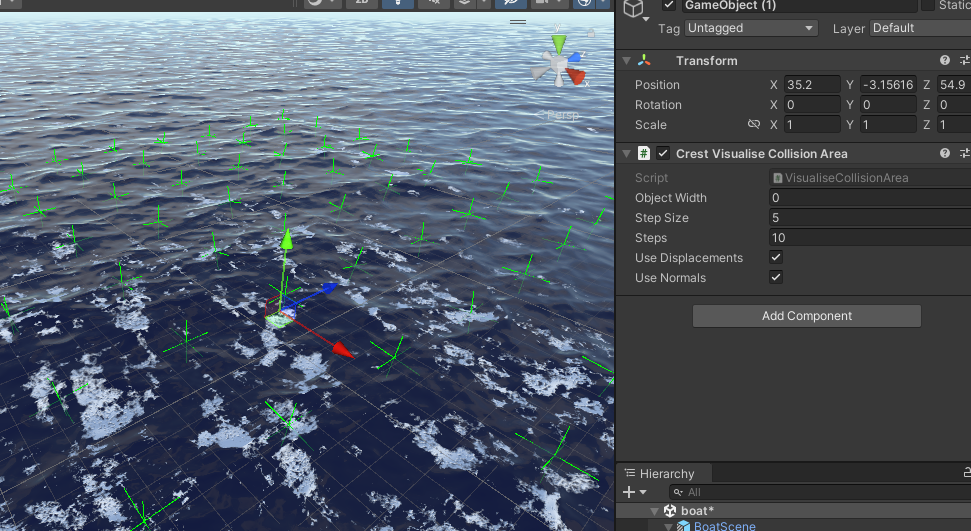
通过挂载VisualiseCollisionArea脚本,可对海面区域进行可视化的查询调试。
4.3 循环队列
循环队列是CPU缓存利用非常高效的数据结构,因为下标循环滚动,不会像栈那样,只有靠近栈顶的一些元素被频繁使用。
如BufferedData:
public void Flip()
{
    _currentFrameIndex = (_currentFrameIndex + 1) % _buffers.Length;
}
使用双下标的循环队列,可以处理生产者与消费者逻辑,甚至还适用于对象池(释放时,交换释放对象到下标2,下标2前进1)。
插件也有一个双下标循环队列实现:SegmentRegistrarRingBuffer
4.4 AsyncGPUReadback
Unity提供了异步GPU数据取回的接口,比如RT转Tex2D用该接口效率会更高,
或者ComputeShader执行结果通过该接口异步返回等。
插件查询部分使用了该接口。
之前写过测试:https://www.cnblogs.com/hont/p/11351273.html
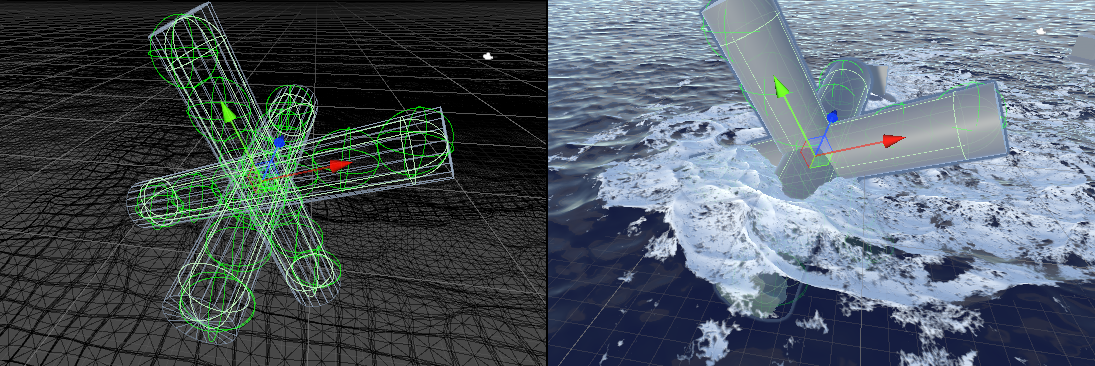
4.5 SphereWaterInteraction(水体交互)
也并非所有LOD组件都走Input扩展,例如SphereWaterInteraction,直接注册到s_Instances中,
并由静态方法SphereWaterInteraction.SubmitDraws调用执行。
public partial class SphereWaterInteraction : CustomMonoBehaviour, ILodDataInput
{
internal static List<SphereWaterInteraction> s_Instances = new List<SphereWaterInteraction>();
void OnEnable()
{
...
s_Instances.Add(this);
}
void OnDisable()
{
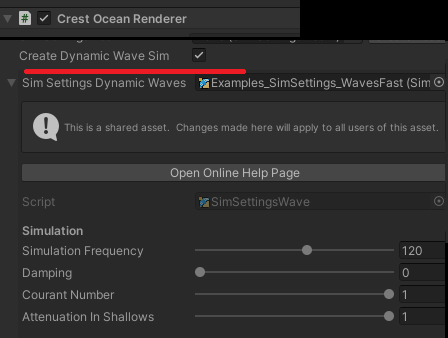
s_Instances.Remove(this); } public static void SubmitDraws(LodDataMgr manager, int lodIndex, CommandBuffer buffer) [RuntimeInitializeOnLoadMethod(RuntimeInitializeLoadType.SubsystemRegistration)] static void OnLoad() { ClearInstanceData(); s_Instances.Clear(); } }使用水体交互需要在OceanRenderer处勾选CreateDynamicWaveSim,并设置配置文件
水体交互的代码是关联到LodDataMgrDynWaves ,最后在DynamicWaves这个RT上绘制。
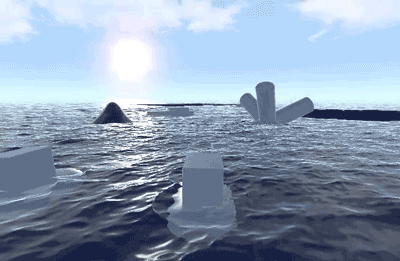
官方Demo的复杂形状用的球体组合的方式。
4.6 BoatProbes/SimpleFloatingObject
船体模拟通过配置_forcePoints实现浮力
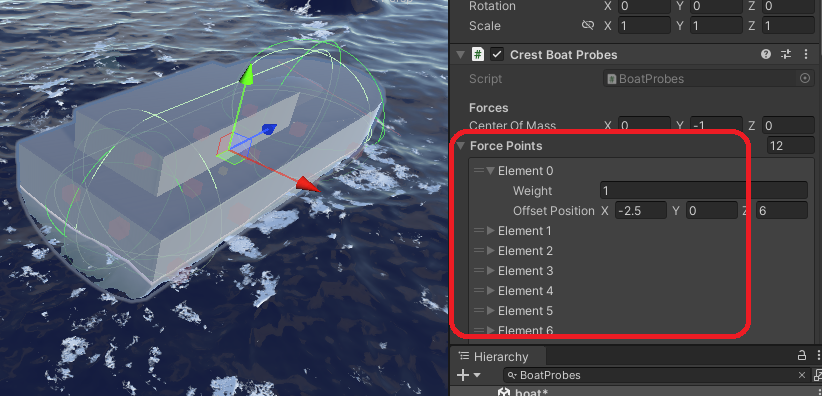
_forcePoints再通过水面信息查询,得到水面高度后传给Unity Rigidbody实现浮力。
而船体自身引擎动力,海洋Flow流向信息也会在FixedUpdate中更新。
而SimpleFloatingObject为简化版逻辑,没有高度查询,但会去取Flow,可让漂浮对象跟着流向移动。
void FixedUpdateBuoyancy()
{
    var archimedesForceMagnitude = WATER_DENSITY * Mathf.Abs(Physics.gravity.y);

    for (int i = 0; i < _forcePoints.Length; i++)
    {
        var waterHeight = OceanRenderer.Instance.SeaLevel + _queryResultDisps[i].y;
        var heightDiff = waterHeight - _queryPoints[i].y;
        if (heightDiff > 0) { var force = _forceMultiplier * _forcePoints[i]._weight * archimedesForceMagnitude * heightDiff * Vector3.up / _totalWeight; if (_maximumBuoyancyForce < Mathf.Infinity) { force = Vector3.ClampMagnitude(force, _maximumBuoyancyForce); } _rb.AddForceAtPosition(force, _queryPoints[i]); } } }
5.水下渲染Underwater
Camera挂载UnderwaterRenderer后可进行水下渲染。
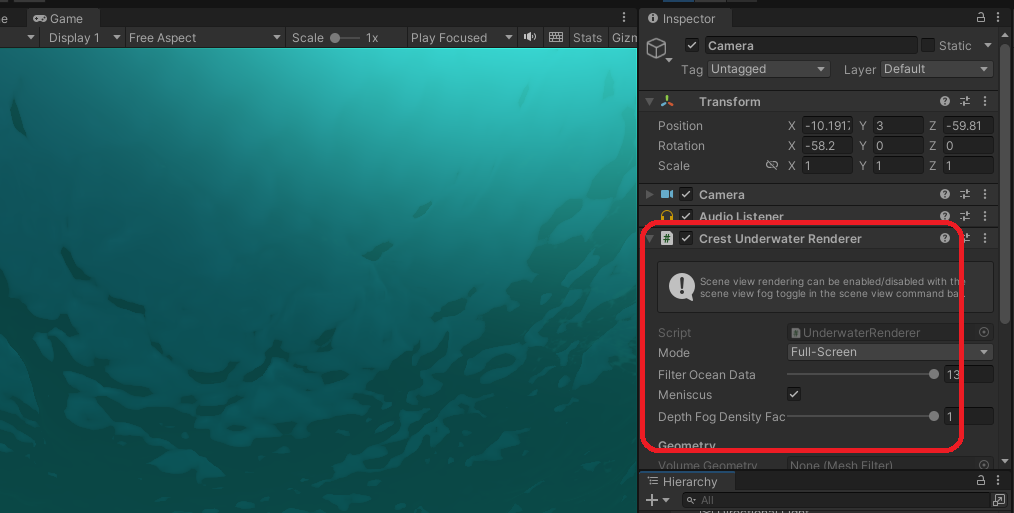
Shader部分检测是否在水下逻辑:
half4 Frag(const Varyings input, const booli_isFrontFace : SV_IsFrontFace) : SV_Target
{
    ...
    #if _UNDERWATER_ON
    const bool underwater = IsUnderwater(i_isFrontFace, _CrestForceUnderwater);
    #else
    const bool underwater = false;
    #endif


bool IsUnderwater(const bool i_isFrontFace, const float i_forceUnderwater)
{
    // We are well below water.
    if (i_forceUnderwater > 0.0)
    {
        return true; } // We are well above water. if (i_forceUnderwater < 0.0) { return false; } return !i_isFrontFace; }
可见,直接通过Frag参数进行了判断。
6.杂项
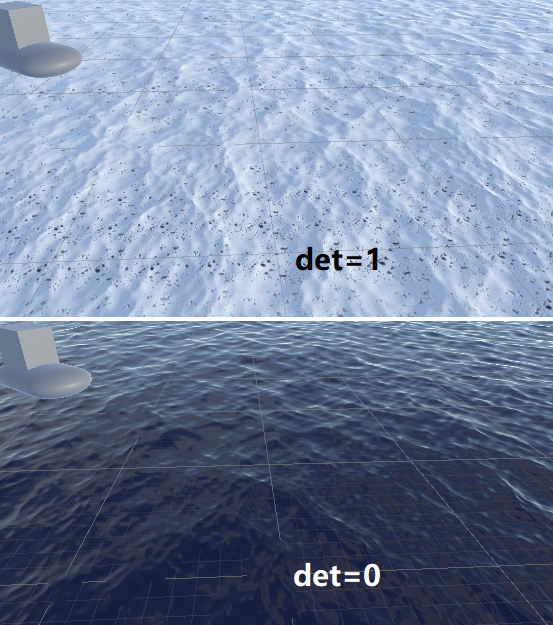
6.1 UpdateFoam.compute 浪花计算
插件通过雅可比矩阵求秩的做法,计算当前贴图的收缩/膨胀状态,从而进行浪花绘制。
(同样的做法在OceanHelpersNew.hlsl SampleDisplacementsNormals函数中也有使用)
float3 disp = s.xyz;
float3 disp_x = dd.zyy + sx.xyz;
float3 disp_z = dd.yyz + sz.xyz;
// The determinant of the displacement Jacobian is a good measure for turbulence:
// > 1: Stretch
// < 1: Squash
// < 0: Overlap
const float2x2 jacobian = (float4(disp_x.xz, disp_z.xz) - disp.xzxz) / wavesCascadeParams._texelWidth;
// Determinant is < 1 for pinched, < 0 for overlap/inversion
const float det = determinant( jacobian );
foam += 5.0 * simDeltaTime * _WaveFoamStrength * saturate( _WaveFoamCoverage - det + foamBase * 0.7 );
调试下该值,det为1和为0时效果区别。
6.2 ComputeShader RWTexture2D 直接绘制
在传统VF Shader中,绘制一张RT需要通过至少2张RT PingPong的方式绘制,
ComputeShader直接通过RWTexture2D可避免这一问题。
https://docs.microsoft.com/en-us/windows/desktop/direct3dhlsl/sm5-object-rwtexture2d
插件中使用了这个技巧进行优化,在ShapeCombine.compute中,但缺点是不能进行双线性采样等方式,只能手写。
6.3 OceanDepthCache
该脚本创建ODC深度信息,从而实现浅水区等效果。该脚本有一套完善的俯视角相机、参数创建逻辑,
可参考使用(实际上很多效果都需要俯视角相机,照搬比较正规的做法还是有必要的)。
在Examples.unity的River/DepthCache Demo中有具体使用。
6.4 Validate验证系统
该插件有一套自己的验证系统。
public interface IValidated
{
    bool Validate(OceanRenderer ocean, ValidatedHelper.ShowMessage showMessage);
}
当参数配置缺失或错误时,该验证系统将通过showMessage函数跳出报错GUI,以方便使用。

6.5 EmbeddedAssetHelpers
直接在MonoBehaviour上显示和编辑ScriptableObject对象参数,用的Cinemachine实现
EmbeddedAssetHelpers.cs
// This file is subject to the Unity Companion License:
// https://github.com/Unity-Technologies/com.unity.cinemachine/blob/593fa283bee378322337e5d9f5a7b91331a45799/LICENSE.md

// Lovingly adapted from Cinemachine:
// https://github.com/Unity-Technologies/com.unity.cinemachine/blob/593fa283bee378322337e5d9f5a7b91331a45799/Editor/Utility/EmbeddedAssetHelpers.cs海洋洋流:https://en.wikipedia.org/wiki/Ocean_current