文章目录
-
- 文件描述符与重定向原理:揭开Linux文件操作的神秘面纱
- 一、重新认识"文件"
-
- [1.1 狭义理解:磁盘上的文件](#1.1 狭义理解:磁盘上的文件)
- [1.2 广义理解:一切皆文件](#1.2 广义理解:一切皆文件)
- [1.3 文件操作的归类认知](#1.3 文件操作的归类认知)
- [1.4 系统角度的理解](#1.4 系统角度的理解)
- 二、回顾C文件接口
-
- [2.1 打开文件](#2.1 打开文件)
- [2.2 写文件](#2.2 写文件)
- [2.3 读文件](#2.3 读文件)
- [2.4 实现简单的cat命令](#2.4 实现简单的cat命令)
- [2.5 stdin & stdout & stderr](#2.5 stdin & stdout & stderr)
- [2.6 文件打开方式](#2.6 文件打开方式)
- 三、系统文件I/O
-
- [3.1 系统调用 vs 库函数](#3.1 系统调用 vs 库函数)
- [3.2 传递标志位的技巧](#3.2 传递标志位的技巧)
- [3.3 open函数详解](#3.3 open函数详解)
- [3.4 write函数](#3.4 write函数)
- [3.5 read函数](#3.5 read函数)
- [3.6 对比C接口与系统接口](#3.6 对比C接口与系统接口)
- 四、文件描述符fd的本质
-
- [4.1 open的返回值:文件描述符](#4.1 open的返回值:文件描述符)
- [4.2 0/1/2:标准输入/输出/错误](#4.2 0/1/2:标准输入/输出/错误)
- [4.3 fd的本质:数组下标](#4.3 fd的本质:数组下标)
-
- [4.3.1 内核数据结构](#4.3.1 内核数据结构)
- [4.3.2 数据结构关系图](#4.3.2 数据结构关系图)
- [4.3.3 open的工作流程](#4.3.3 open的工作流程)
- [4.4 fd的分配规则](#4.4 fd的分配规则)
- 五、重定向原理
-
- [5.1 什么是重定向](#5.1 什么是重定向)
- [5.2 输出重定向的实现](#5.2 输出重定向的实现)
- [5.3 dup2系统调用](#5.3 dup2系统调用)
- [5.4 完整的重定向示例](#5.4 完整的重定向示例)
- [5.5 追加重定向](#5.5 追加重定向)
- 六、为mini-shell添加重定向功能
-
- [6.1 重定向的类型](#6.1 重定向的类型)
- [6.2 解析重定向](#6.2 解析重定向)
- [6.3 执行重定向](#6.3 执行重定向)
- [6.4 修改ExecuteCommand](#6.4 修改ExecuteCommand)
- [6.5 测试重定向](#6.5 测试重定向)
- 七、总结与展望
文件描述符与重定向原理:揭开Linux文件操作的神秘面纱
💬 欢迎讨论 :这是Linux系统编程系列的第七篇文章。在前六篇中,我们系统学习了进程的创建、状态管理、调度、内存、等待和程序替换,并实现了一个mini-shell。但shell的核心功能还有重定向 (
ls > file.txt)没有实现。要理解重定向,必须先理解文件描述符的本质。本篇将从系统调用的角度,揭开文件操作的神秘面纱。👍 点赞、收藏与分享:这篇文章包含了大量原理分析和内核数据结构剖析,如果对你有帮助,请点赞、收藏并分享!
🚀 循序渐进:建议先学习前六篇文章,特别是第六篇的mini-shell实现,这样学习重定向会更轻松。
一、重新认识"文件"
在深入学习文件描述符之前,我们需要重新审视"文件"这个概念。
1.1 狭义理解:磁盘上的文件
在日常使用中,我们对文件的理解是:
文件在磁盘里:
- 文件保存在磁盘上,如
.txt、.c、.mp4等 - 磁盘是永久性存储介质,因此文件是持久化的
- 磁盘是外设(既是输入设备也是输出设备)
文件操作的本质:
- 对文件的所有操作,都是对外设的输入和输出
- 简称I/O (Input/Output)
让我们思考一个简单的例子:
cpp
#include <stdio.h>

int main() {
    FILE *fp = fopen("test.txt", "w");
    fwrite("hello", 5, 1, fp);
    fclose(fp);
    return 0;
}
这段代码看似简单,但本质上发生了什么?
- 程序向操作系统请求打开文件
- 操作系统与磁盘(外设)通信
- 数据从内存传输到磁盘
- 磁盘进行物理写入操作
这就是I/O的本质:数据在内存与外设之间的传输。
1.2 广义理解:一切皆文件
Linux有一个著名的设计哲学:"一切皆文件"(Everything is a file)
这意味着:
- 磁盘文件是文件
- 键盘也是文件
- 显示器也是文件
- 网卡也是文件
- 进程信息 也是文件(
/proc目录) - 管道也是文件
- socket也是文件
这种抽象带来了巨大的好处:统一的接口!
cpp
// 读磁盘文件
int fd = open("test.txt", O_RDONLY);
read(fd, buf, size);

// 读键盘输入
read(0, buf, size);  // 0代表标准输入

// 读网络数据
int sockfd = socket(...);
read(sockfd, buf, size);
同样的read函数,可以读取不同的设备!这就是"一切皆文件"的威力。
1.3 文件操作的归类认知
让我们来做一个实验:
bash
touch empty.txt
ls -lh empty.txt
-rw-r--r-- 1 user user 0 Dec 16 10:00 empty.txt一个0KB的空文件占用磁盘空间吗?答案是:占用!
因为= 文件内容 + 文件属性(元数据)
即使文件内容为空,文件属性也要占用空间,比如:
- 文件名
- 文件权限(rwx)
- 文件大小
- 创建时间、修改时间
- 文件所有者、所属组
- inode编号
因此,所有的文件操作本质上可以分为两类:
- 文件内容操作:read、write
- 文件属性操作:chmod、chown、stat
1.4 系统角度的理解
让我们站在操作系统的角度思考文件操作:
关键事实:
- 对文件的操作本质是进程对文件的操作
- 磁盘的管理者是操作系统
- 文件的读写本质是通过系统调用实现的
看一段代码:
cpp
#include <stdio.h>

int main() {
    FILE *fp = fopen("myfile", "w");
    if(!fp) {
        printf("fopen error!\n");
        return 1;
    }
    while(1);  // 死循环,让进程一直运行
    fclose(fp);
    return 0;
}
问题:打开的myfile文件在哪个路径下?
答案:在程序的当前工作目录下。
系统怎么知道程序的当前路径?
可以通过/proc文件系统查看:
bash
./myProc &
[1] 15000

ls -l /proc/15000/cwd
lrwxrwxrwx 1 user user 0 Dec 16 10:05 /proc/15000/cwd -> /home/user/test

ls -l /proc/15000/exe
lrwxrwxrwx 1 user user 0 Dec 16 10:05 /proc/15000/exe -> /home/user/test/myProc
其中:
cwd(Current Working Directory):指向当前进程的工作目录exe:指向启动当前进程的可执行文件
结论:打开文件的本质是进程打开文件,进程知道自己在哪里,即使文件不带路径,操作系统也能知道要创建的文件放在哪里。
二、回顾C文件接口
在学习系统调用之前,让我们先回顾一下C标准库提供的文件接口。
2.1 打开文件
cpp
#include <stdio.h>

int main() {
    FILE *fp = fopen("myfile", "w");
    if(!fp) {
        printf("fopen error!\n");
        return 1;
    }

    while(1);  // 保持进程运行

    fclose(fp);
    return 0;
}
编译运行后,我们可以查看进程打开的文件:
bash
gcc test.c -o test
./test &
[1] 16000

ls -l /proc/16000/fd
total 0
lrwx------ 1 user user 64 Dec 16 10:10 0 -> /dev/pts/0
lrwx------ 1 user user 64 Dec 16 10:10 1 -> /dev/pts/0
lrwx------ 1 user user 64 Dec 16 10:10 2 -> /dev/pts/0
l-wx------ 1 user user 64 Dec 16 10:10 3 -> /home/user/test/myfile
发现了什么?
- 文件描述符0、1、2分别指向终端设备
- 文件描述符3指向我们打开的myfile
2.2 写文件
cpp
#include <stdio.h>
#include <string.h>

int main() {
    FILE *fp = fopen("myfile", "w");
    if(!fp) {
        printf("fopen error!\n");
        return 1;
    }

    const char *msg = "hello bit!\n";
    int count = 5;

    while(count--) {
        fwrite(msg, strlen(msg), 1, fp);
    }

    fclose(fp);
    return 0;
}
运行后,myfile的内容:
bash
cat myfile
hello bit!
hello bit!
hello bit!
hello bit!
hello bit!
2.3 读文件
cpp
#include <stdio.h>
#include <string.h>

int main() {
    FILE *fp = fopen("myfile", "r");
    if(!fp) {
        printf("fopen error!\n");
        return 1;
    }

    char buf[1024];
    const char *msg = "hello bit!\n";

    while(1) {
        ssize_t s = fread(buf, 1, strlen(msg), fp);
        if(s > 0) {
            buf[s] = 0;
            printf("%s", buf);
        }
        if(feof(fp)) {
            break;
        }
    }

    fclose(fp);
    return 0;
}
2.4 实现简单的cat命令
cpp
#include <stdio.h>
#include <string.h>

int main(int argc, char* argv[]) {
    if(argc != 2) {
        printf("Usage: %s <filename>\n", argv[0]);
        return 1;
    }

    FILE *fp = fopen(argv[1], "r");
    if(!fp) {
        perror("fopen");
        return 2;
    }

    char buf[1024];
    while(1) {
        int s = fread(buf, 1, sizeof(buf), fp);
        if(s > 0) {
            buf[s] = 0;
            printf("%s", buf);
        }
        if(feof(fp)) {
            break;
        }
    }

    fclose(fp);
    return 0;
}
测试:
bash
gcc mycat.c -o mycat
./mycat myfile
hello bit!
hello bit!
hello bit!
hello bit!
hello bit!
2.5 stdin & stdout & stderr
C标准库默认会打开三个输入输出流:
cpp
#include <stdio.h>

extern FILE *stdin;   // 标准输入
extern FILE *stdout;  // 标准输出
extern FILE *stderr; // 标准错误它们都是FILE*类型,与fopen的返回值类型相同。
我们可以直接使用它们:
cpp
#include <stdio.h>
#include <string.h>

int main() {
    const char *msg0 = "hello printf\n";
    const char *msg1 = "hello fwrite\n";
    const char *msg2 = "hello fprintf\n";

    printf("%s", msg0);                          // 输出到stdout
    fwrite(msg1, strlen(msg1), 1, stdout);       // 输出到stdout
    fprintf(stdout, "%s", msg2);                 // 输出到stdout
    fprintf(stderr, "hello stderr\n");           // 输出到stderr

    return 0;
}
2.6 文件打开方式
fopen支持多种打开方式:
| 模式 | 说明 |
|---|---|
| "r" | 只读打开,文件必须存在,文件指针在开头 |
| "r+" | 读写打开,文件必须存在,文件指针在开头 |
| "w" | 只写打开,文件不存在则创建,存在则清空,文件指针在开头 |
| "w+" | 读写打开,文件不存在则创建,存在则清空,文件指针在开头 |
| "a" | 追加打开,文件不存在则创建,文件指针在末尾 |
| "a+" | 读和追加打开,文件不存在则创建,读从开头,写在末尾 |
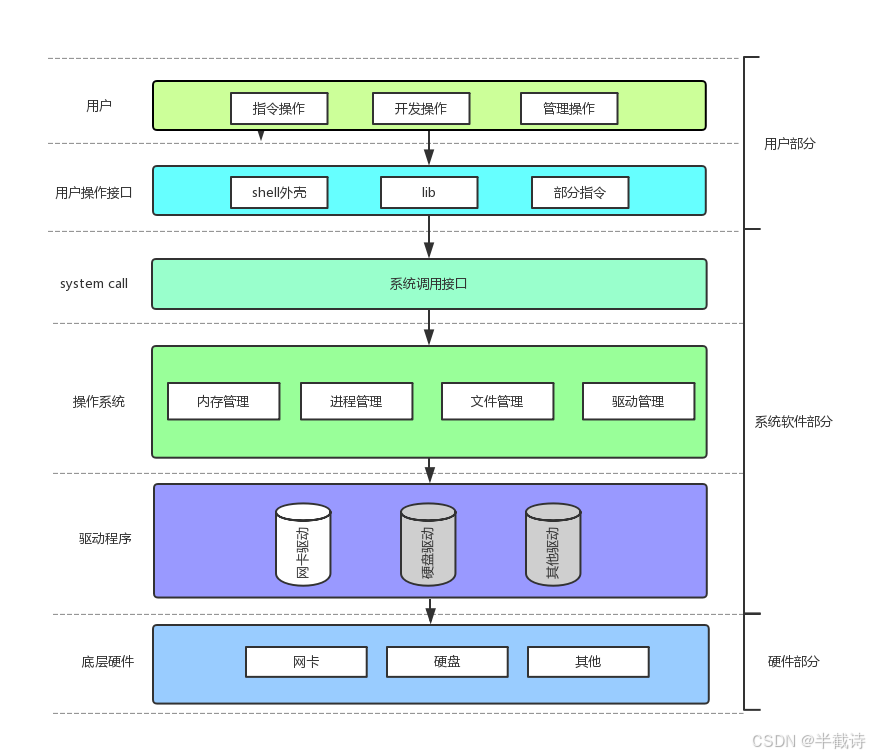
三、系统文件I/O
C标准库的文件操作(fopen、fread、fwrite)是对系统调用的封装。现在让我们学习更底层的系统文件I/O接口。
3.1 系统调用 vs 库函数
在继续之前,我们需要理解两个重要概念:
库函数(Library Function):
- 由C标准库提供:fopen、fclose、fread、fwrite
- 在用户态执行
- 提供了缓冲区机制
- 跨平台性好
系统调用(System Call):
- 由操作系统提供:open、close、read、write
- 需要陷入内核态执行
- 没有用户态缓冲区
- 与操作系统紧密相关
它们的关系:
bash
应用程序
    ↓
C标准库函数(fopen, fread, fwrite)
    ↓
系统调用(open, read, write)
    ↓
操作系统内核
    ↓
硬件设备
一张图说明:
3.2 传递标志位的技巧
在学习open函数之前,先了解一个重要技巧:如何用位运算传递多个标志位。
cpp
#include <stdio.h>

#define ONE   0x01  // 0000 0001
#define TWO   0x02  // 0000 0010
#define THREE 0x04  // 0000 0100
#define FOUR  0x08  // 0000 1000

void func(int flags) {
    if(flags & ONE)   printf("flags has ONE! ");
    if(flags & TWO)   printf("flags has TWO! ");
    if(flags & THREE) printf("flags has THREE! ");
    if(flags & FOUR)  printf("flags has FOUR! ");
    printf("\n");
}

int main() {
    func(ONE);                      // 传递一个标志
    func(THREE);                    // 传递一个标志
    func(ONE | TWO);                // 传递两个标志
    func(ONE | THREE | FOUR);       // 传递三个标志
    func(ONE | TWO | THREE | FOUR); // 传递所有标志
    return 0;
}
运行结果:
bash
flags has ONE!
flags has THREE!
flags has ONE! flags has TWO!
flags has ONE! flags has THREE! flags has FOUR!
flags has ONE! flags has TWO! flags has THREE! flags has FOUR!
原理:
- 每个标志占用一个比特位
- 使用按位或
|组合多个标志 - 使用按位与
&检查是否包含某个标志
这种技巧在系统调用中被广泛使用。
3.3 open函数详解
cpp
#include <sys/types.h>
#include <sys/stat.h>
#include <fcntl.h>

int open(const char *pathname, int flags);
int open(const char *pathname, int flags, mode_t mode);
参数说明:
pathname:要打开或创建的文件路径
flags :打开文件的方式,可以用|组合多个标志
必选标志(三选一):
O_RDONLY:只读O_WRONLY:只写O_RDWR:读写
可选标志:
O_CREAT:文件不存在则创建O_APPEND:追加写入O_TRUNC:清空文件内容
mode :当使用O_CREAT创建文件时,指定文件权限(如0644)
返回值:
- 成功:返回文件描述符(非负整数)
- 失败:返回-1,并设置errno
示例1:只读打开
cpp
int fd = open("test.txt", O_RDONLY);
if(fd < 0) {
    perror("open");
    return 1;
}
示例2:创建并写入
cpp
int fd = open("test.txt", O_WRONLY | O_CREAT | O_TRUNC, 0644);
if(fd < 0) {
    perror("open");
    return 1;
}
示例3:追加写入
cpp
int fd = open("test.txt", O_WRONLY | O_CREAT | O_APPEND, 0644);
if(fd < 0) {
    perror("open");
    return 1;
}
注意mode参数:
因为mode参数受umask影响,实际权限 = mode & ~umask
如果想实际输入权限就是最终文件权限,使用umask()可以设置新建文件的uamsk值
cpp
umask(0);  // 清除umask
int fd = open("test.txt", O_WRONLY | O_CREAT, 0644);
// 文件权限将是 rw-r--r--
3.4 write函数
cpp
#include <unistd.h>

ssize_t write(int fd, const void *buf, size_t count);
参数:
fd:文件描述符buf:要写入的数据缓冲区count:要写入的字节数
返回值:
- 成功:返回实际写入的字节数
- 失败:返回-1
示例:
cpp
#include <stdio.h>
#include <sys/types.h>
#include <sys/stat.h>
#include <fcntl.h>
#include <unistd.h>
#include <string.h>

int main() {
    umask(0);
    int fd = open("myfile", O_WRONLY | O_CREAT, 0644);
    if(fd < 0) {
        perror("open");
        return 1;
    }

    int count = 5;
    const char *msg = "hello bit!\n";
    int len = strlen(msg);

    while(count--) {
        write(fd, msg, len);
    }

    close(fd);
    return 0;
}
3.5 read函数
cpp
#include <unistd.h>

ssize_t read(int fd, void *buf, size_t count);
参数:
fd:文件描述符buf:读取数据的缓冲区count:期望读取的字节数
返回值:
- 成功:返回实际读取的字节数
- 文件末尾:返回0
- 失败:返回-1
示例:
cpp
#include <stdio.h>
#include <sys/types.h>
#include <sys/stat.h>
#include <fcntl.h>
#include <unistd.h>
#include <string.h>

int main() {
    int fd = open("myfile", O_RDONLY);
    if(fd < 0) {
        perror("open");
        return 1;
    }

    const char *msg = "hello bit!\n";
    char buf[1024];

    while(1) {
        ssize_t s = read(fd, buf, strlen(msg));
        if(s > 0) {
            printf("%s", buf);
        } else {
            break;
        }
    }

    close(fd);
    return 0;
}
3.6 对比C接口与系统接口
让我们用同样的功能,对比两种实现:
C标准库版本:
cpp
FILE *fp = fopen("test.txt", "w");
const char *msg = "hello\n";
fwrite(msg, strlen(msg), 1, fp);
fclose(fp);
系统调用版本:
cpp
int fd = open("test.txt", O_WRONLY | O_CREAT | O_TRUNC, 0644);
const char *msg = "hello\n";
write(fd, msg, strlen(msg));
close(fd);
区别:
- 返回值:
FILE* vs int - 接口:
fopen/fwrite/fclose vs open/write/close - 缓冲区:有 vs 无(后面详细讲)
四、文件描述符fd的本质
这是本篇文章的核心部分:理解文件描述符的本质。
4.1 open的返回值:文件描述符
通过前面的学习,我们知道open函数返回一个整数,叫做文件描述符(file descriptor, fd)。
cpp
int fd = open("test.txt", O_RDONLY);
printf("fd = %d\n", fd);
运行后输出:
bash
fd = 3为什么是3?
4.2 0/1/2:标准输入/输出/错误
Linux进程默认会打开三个文件描述符:
| fd | 含义 | 对应设备 |
|---|---|---|
| 0 | 标准输入(stdin) | 键盘 |
| 1 | 标准输出(stdout) | 显示器 |
| 2 | 标准错误(stderr) | 显示器 |
我们可以直接使用这些文件描述符:
cpp
#include <stdio.h>
#include <unistd.h>
#include <string.h>

int main() {
    char buf[1024];

    // 从键盘读取(fd=0)
    ssize_t s = read(0, buf, sizeof(buf));
    if(s > 0) {
        buf[s] = 0;

        // 写到显示器(fd=1)
        write(1, buf, strlen(buf));

        // 写到标准错误(fd=2)
        write(2, buf, strlen(buf));
    }

    return 0;
}
运行:
bash
./test
hello world   ← 输入
hello world   ← 标准输出
hello world   ← 标准错误
4.3 fd的本质:数组下标
那么,文件描述符到底是什么?答案是:数组下标!
4.3.1 内核数据结构
让我们从内核的角度理解文件描述符。
进程控制块(PCB)
从之前的文章我们已经很熟悉了,每个进程都有一个PCB,在Linux中就是task_struct结构体:
c
// 位置:/usr/src/kernels/.../include/linux/sched.h
struct task_struct {
    // ... 其他字段

    struct files_struct *files;  // 指向文件描述符表

    // ... 其他字段
};
文件描述符表
files_struct结构体:
c
// 位置:/usr/src/kernels/.../include/linux/fdtable.h
struct files_struct {
    atomic_t count;              // 引用计数
    struct fdtable __rcu *fdt;   // 文件描述符表
    struct fdtable fdtab;        // 文件描述符表(初始)

    // ...

    struct file __rcu * fd_array[NR_OPEN_DEFAULT];  // 文件指针数组

    // ...
};
关键:fd_array
这是一个指针数组,每个元素指向一个struct file对象。
文件对象
c
// 位置:/usr/src/kernels/.../include/linux/fs.h
struct file {
    struct inode *f_inode;               // 指向inode
    const struct file_operations *f_op;  // 文件操作函数指针表
    atomic_long_t f_count;               // 引用计数
    unsigned int f_flags;                // 文件打开标志
    fmode_t f_mode;                      // 访问模式
    loff_t f_pos;                        // 当前读写位置

    // ...
};
4.3.2 数据结构关系图
bash
进程(task_struct)
    ↓
    files (struct files_struct*)
    ↓
┌──────────────────────────────┐
│   files_struct               │
│                              │
│  fd_array[]:                 │
│  ┌────┬────┬────┬────┬─────┐ │
│  │ 0  │ 1  │ 2  │ 3  │ ... │ │
│  └─┬──┴─┬──┴─┬──┴─┬──┴─────┘ │
└────┼────┼────┼────┼──────────┘
     │    │    │    │
     ↓    ↓    ↓    ↓
   stdin stdout stderr file
   ↓    ↓    ↓    ↓
  键盘  显示器 显示器  磁盘文件
因此,文件描述符fd就是fd_array数组的下标!
4.3.3 open的工作流程
当我们调用open时:
cpp
int fd = open("test.txt", O_RDONLY);内核的工作流程:
-
在内存中创建
struct file对象- 初始化inode指针
- 初始化file_operations函数指针
- 初始化文件位置f_pos
-
在进程的fd_array中找到空位
- 从下标0开始扫描
- 找到第一个NULL的位置
- 通常是3(因为0/1/2已被占用)
-
将file对象的地址存入fd_array3
-
返回下标3给用户
这就是为什么fd是一个整数!
4.4 fd的分配规则
规则:在fd_array中,找到当前没有被使用的最小的下标。
让我们通过实验验证:
实验1:正常打开文件
cpp
#include <stdio.h>
#include <sys/types.h>
#include <sys/stat.h>
#include <fcntl.h>

int main() {
    int fd = open("myfile", O_RDONLY | O_CREAT, 0644);
    if(fd < 0) {
        perror("open");
        return 1;
    }

    printf("fd: %d\n", fd);

    close(fd);
    return 0;
}
输出:
bash
fd: 3实验2:关闭标准输入后打开文件
cpp
#include <stdio.h>
#include <sys/types.h>
#include <sys/stat.h>
#include <fcntl.h>
#include <unistd.h>

int main() {
    close(0);  // 关闭标准输入

    int fd = open("myfile", O_RDONLY | O_CREAT, 0644);
    if(fd < 0) {
        perror("open");
        return 1;
    }

    printf("fd: %d\n", fd);

    close(fd);
    return 0;
}
输出:
bash
fd: 0实验3:关闭标准错误后打开文件
cpp
#include <stdio.h>
#include <sys/types.h>
#include <sys/stat.h>
#include <fcntl.h>
#include <unistd.h>

int main() {
    close(2);  // 关闭标准错误

    int fd = open("myfile", O_RDONLY | O_CREAT, 0644);
    if(fd < 0) {
        perror("open");
        return 1;
    }

    printf("fd: %d\n", fd);

    close(fd);
    return 0;
}
输出:
bash
fd: 2结论:文件描述符的分配规则是"最小未使用原则"。
五、重定向原理
现在我们终于可以理解重定向的原理了!
5.1 什么是重定向
在shell中,我们经常使用重定向:
bash
# 输出重定向
ls -l > file.txt

# 追加重定向
echo "hello" >> file.txt

# 输入重定向
cat < input.txt

# 错误重定向
ls /nonexist 2> error.txt
重定向的本质是什么?
改变文件描述符指向的文件!
5.2 输出重定向的实现
让我们实现一个简单的输出重定向:
cpp
#include <stdio.h>
#include <sys/types.h>
#include <sys/stat.h>
#include <fcntl.h>
#include <unistd.h>

int main() {
    close(1);  // 关闭标准输出

    // 打开文件,由于fd=1空闲,open会返回1
    int fd = open("myfile", O_WRONLY | O_CREAT | O_TRUNC, 0644);

    printf("fd: %d\n", fd);  // 这句话会写到myfile中!

    close(fd);
    return 0;
}
运行:
bash
gcc test.c -o test
./test
cat myfile
fd: 1
惊不惊喜?意不意外?
本来应该打印到屏幕的内容,竟然写到了文件中!
原理分析:
bash
执行前:
fd_array[0] → 键盘
fd_array[1] → 显示器  ← printf使用fd=1
fd_array[2] → 显示器

执行close(1)后:
fd_array[0] → 键盘
fd_array[1] → NULL    ← 空闲
fd_array[2] → 显示器

执行open后:
fd_array[0] → 键盘
fd_array[1] → myfile  ← open返回1,printf使用fd=1
fd_array[2] → 显示器
printf本来往fd=1写数据,现在fd=1指向了myfile,所以数据写到了myfile中!
5.3 dup2系统调用
上面的方法虽然可行,但不够优雅。Linux提供了专门的系统调用:dup2。
cpp
#include <unistd.h>

int dup2(int oldfd, int newfd);
功能:
- 将
oldfd复制到newfd - 如果
newfd已经打开,会先关闭它 - 使得
newfd和oldfd指向同一个文件
返回值:
- 成功:返回newfd
- 失败:返回-1
示例1:输出重定向
cpp
#include <stdio.h>
#include <unistd.h>
#include <fcntl.h>
#include <sys/types.h>
#include <sys/stat.h>

int main() {
    int fd = open("./log.txt", O_CREAT | O_WRONLY | O_TRUNC, 0644);
    if(fd < 0) {
        perror("open");
        return 1;
    }

    // 将fd复制到1,使得1指向log.txt
    dup2(fd, 1);

    // 现在printf会写到log.txt中
    printf("hello world\n");
    printf("fd = %d\n", fd);

    close(fd);
    return 0;
}
运行:
bash
gcc test.c -o test
./test
cat log.txt
hello world
fd = 3
示例2:输入重定向
cpp
#include <stdio.h>
#include <unistd.h>
#include <fcntl.h>
#include <sys/types.h>
#include <sys/stat.h>
#include <string.h>

int main() {
    // 先创建一个测试文件
    int wfd = open("input.txt", O_CREAT | O_WRONLY | O_TRUNC, 0644);
    const char *msg = "hello from file\n";
    write(wfd, msg, strlen(msg));
    close(wfd);

    // 打开文件用于读取
    int fd = open("input.txt", O_RDONLY);
    if(fd < 0) {
        perror("open");
        return 1;
    }

    // 将fd复制到0,使得0指向input.txt
    dup2(fd, 0);

    // 现在scanf会从input.txt读取
    char buf[1024];
    scanf("%s", buf);
    printf("Read: %s\n", buf);

    close(fd);
    return 0;
}
5.4 完整的重定向示例
让我们写一个更完整的例子,实现类似shell的重定向:
cpp
#include <stdio.h>
#include <unistd.h>
#include <fcntl.h>
#include <sys/types.h>
#include <sys/stat.h>
#include <string.h>

int main() {
    int fd = open("./log.txt", O_CREAT | O_RDWR | O_TRUNC, 0644);
    if(fd < 0) {
        perror("open");
        return 1;
    }

    // 重定向标准输出到文件
    dup2(fd, 1);

    // 现在可以正常使用stdin和stdout
    for(;;) {
        char buf[1024] = {0};
        ssize_t read_size = read(0, buf, sizeof(buf) - 1);
        if(read_size < 0) {
            perror("read");
            break;
        }

        // printf会写到log.txt中
        printf("%s", buf);
        fflush(stdout);  // 刷新缓冲区
    }

    close(fd);
    return 0;
}
5.5 追加重定向
追加重定向使用O_APPEND标志:
cpp
#include <stdio.h>
#include <unistd.h>
#include <fcntl.h>
#include <sys/types.h>
#include <sys/stat.h>

int main() {
    // 使用O_APPEND标志
    int fd = open("./log.txt", O_CREAT | O_WRONLY | O_APPEND, 0644);
    if(fd < 0) {
        perror("open");
        return 1;
    }

    dup2(fd, 1);

    printf("This line will be appended\n");

    close(fd);
    return 0;
}
每次运行,都会在文件末尾追加内容。
六、为mini-shell添加重定向功能
现在让我们把重定向功能添加到第六篇实现的mini-shell中!
6.1 重定向的类型
我们需要支持三种重定向:
cpp
#define NoneRedir    0  // 无重定向
#define InputRedir   1  // 输入重定向 <
#define OutputRedir  2  // 输出重定向 >
#define AppendRedir  3  // 追加重定向 >>
6.2 解析重定向
需要解析命令行中的重定向符号:
cpp
int redir = NoneRedir;
char *filename = nullptr;

void ParseRedir(char command_buffer[], int len) {
    int end = len - 1;
    while(end >= 0) {
        if(command_buffer[end] == '<') {
            redir = InputRedir;
            command_buffer[end] = 0;
            filename = &command_buffer[end] + 1;
            // 去除前导空格
            while(isspace(*filename)) filename++;
            break;
        }
        else if(command_buffer[end] == '>') {
            if(end > 0 && command_buffer[end-1] == '>') {
                redir = AppendRedir;
                command_buffer[end] = 0;
                command_buffer[end-1] = 0;
                filename = &command_buffer[end] + 1;
                while(isspace(*filename)) filename++;
                break;
            }
            else {
                redir = OutputRedir;
                command_buffer[end] = 0;
                filename = &command_buffer[end] + 1;
                while(isspace(*filename)) filename++;
                break;
            }
        }
        else {
            end--;
        }
    }
}
6.3 执行重定向
在子进程中执行重定向:
cpp
void DoRedir() {
    if(redir == InputRedir) {
        if(filename) {
            int fd = open(filename, O_RDONLY);
            if(fd < 0) {
                perror("open");
                exit(2);
            }
            dup2(fd, 0);
            close(fd);
        }
        else {
            fprintf(stderr, "syntax error: no input file\n");
            exit(1);
        }
    }
    else if(redir == OutputRedir) {
        if(filename) {
            int fd = open(filename, O_CREAT | O_WRONLY | O_TRUNC, 0666);
            if(fd < 0) {
                perror("open");
                exit(4);
            }
            dup2(fd, 1);
            close(fd);
        }
        else {
            fprintf(stderr, "syntax error: no output file\n");
            exit(3);
        }
    }
    else if(redir == AppendRedir) {
        if(filename) {
            int fd = open(filename, O_CREAT | O_WRONLY | O_APPEND, 0666);
            if(fd < 0) {
                perror("open");
                exit(6);
            }
            dup2(fd, 1);
            close(fd);
        }
        else {
            fprintf(stderr, "syntax error: no append file\n");
            exit(5);
        }
    }
}
6.4 修改ExecuteCommand
在fork后、exec前执行重定向:
cpp
bool ExecuteCommand() {
    pid_t id = fork();

    if(id < 0) {
        perror("fork");
        return false;
    }
    else if(id == 0) {
        // 子进程
        DoRedir();  // 执行重定向

        execvpe(gargv[0], gargv, genv);
        exit(7);
    }
    else {
        int status = 0;
        pid_t rid = waitpid(id, &status, 0);

        if(rid > 0) {
            if(WIFEXITED(status)) {
                lastcode = WEXITSTATUS(status);
            }
            else {
                lastcode = 100;
            }
            return true;
        }
    }

    return false;
}
6.5 测试重定向
现在我们的shell支持重定向了!
bash
[user@localhost test]$ ls -l > file.txt
[user@localhost test]$ cat file.txt
total 32
-rwxr-xr-x 1 user user 18000 Dec 16 15:30 myshell
-rw-r--r-- 1 user user   256 Dec 16 15:35 file.txt

[user@localhost test]$ echo hello >> file.txt
[user@localhost test]$ cat file.txt
total 32
-rwxr-xr-x 1 user user 18000 Dec 16 15:30 myshell
-rw-r--r-- 1 user user   256 Dec 16 15:35 file.txt
hello

[user@localhost test]$ cat < file.txt
total 32
-rwxr-xr-x 1 user user 18000 Dec 16 15:30 myshell
-rw-r--r-- 1 user user   256 Dec 16 15:35 file.txt
hello
七、总结与展望
通过本篇文章,我们系统地学习了文件描述符和重定向的原理:
核心知识点:
-
文件的理解
- 狭义:磁盘上的文件
- 广义:一切皆文件
- 文件 = 内容 + 属性
-
系统调用vs库函数
- open/read/write/close是系统调用
- fopen/fread/fwrite/fclose是库函数
- 库函数封装系统调用
-
文件描述符的本质
- fd是进程fd_array数组的下标
- 0/1/2:标准输入/输出/错误
- 分配规则:最小未使用原则
-
重定向的原理
- 改变fd指向的文件
- close + open实现重定向
- dup2是更优雅的方案
-
为shell添加重定向
- 解析命令行中的>、>>、<
- 在子进程中执行重定向
- exec不影响重定向
重要原理图:
bash
进程PCB → files_struct → fd_array[] → file对象 → 设备
                       ↓
                    fd就是数组下标
重定向本质:
bash
close(1)               → fd_array[1] = NULL
open("file.txt")       → fd_array[1] = file对象
printf(...)            → 通过fd=1写入,实际写到file.txt
在下一篇文章中,我们将更加深入理解"一切皆文件"的设计哲学,学习file_operations结构体,并理解缓冲区机制。我们还会自己实现一个简易的IO库,彻底理解FILE结构体与fd的关系。
💡 思考题:
- 为什么重定向必须在子进程中执行?如果在父进程中执行会怎样?
- 如何实现同时重定向标准输出和标准错误?(
ls 1> file.txt 2>&1)- 如何实现管道?提示:pipe系统调用创建两个fd
以上就是关于文件描述符与重定向原理的全部内容!下一篇我们将深入理解"一切皆文件"和缓冲区机制!