1. docker部署canal
1.1 主数据库创建用户并授权
# 创建canal_sync用户
CREATE USER 'canal_sync'@'%';

# 设置密码
ALTER USER 'canal_sync'@'%' IDENTIFIED WITH mysql_native_password BY '123456';

# 授予复制权限
GRANT SELECT, REPLICATION SLAVE, REPLICATION CLIENT ON *.* TO 'canal_sync'@'%';

# 刷新权限
FLUSH PRIVILEGES;
1.2 部署canal
# 1.创建文件夹
mkdir -p /usr/local/software/canal/conf

# 2.创建配置文件instance.properties,内容如下:
vim instance.properties

#################################################
## mysql serverId , v1.0.26+ will autoGen
# canal.instance.mysql.slaveId=0
# 本地数据的主从id分别是1 2 所以这里设置成3
canal.instance.mysql.slaveId=3

# enable gtid use true/false
canal.instance.gtidon=false

# position info
# 主数据库ip和端口
canal.instance.master.address=172.19.146.151:3306
canal.instance.master.journal.name=
canal.instance.master.position=
canal.instance.master.timestamp=
canal.instance.master.gtid=

# rds oss binlog
canal.instance.rds.accesskey=
canal.instance.rds.secretkey=
canal.instance.rds.instanceId=

# table meta tsdb info
canal.instance.tsdb.enable=true
#canal.instance.tsdb.url=jdbc:mysql://127.0.0.1:3306/canal_tsdb
#canal.instance.tsdb.dbUsername=canal
#canal.instance.tsdb.dbPassword=canal

#canal.instance.standby.address =
#canal.instance.standby.journal.name =
#canal.instance.standby.position =
#canal.instance.standby.timestamp =
#canal.instance.standby.gtid=

# username/password
# 文章1.1创建的用户名和密码
canal.instance.dbUsername=canal_sync
canal.instance.dbPassword=123456
canal.instance.connectionCharset = UTF-8
# enable druid Decrypt database password
canal.instance.enableDruid=false
#canal.instance.pwdPublicKey=MFwwDQYJKoZIhvcNAQEBBQADSwAwSAJBALK4BUxdDltRRE5/zXpVEVPUgunvscYFtEip3pmLlhrWpacX7y7GCMo2/JM6LeHmiiNdH1FWgGCpUfircSwlWKUCAwEAAQ==

# table regex
canal.instance.filter.regex=.*\\..*
# table black regex
canal.instance.filter.black.regex=
# table field filter(format: schema1.tableName1:field1/field2,schema2.tableName2:field1/field2)
#canal.instance.filter.field=test1.t_product:id/subject/keywords,test2.t_company:id/name/contact/ch
# table field black filter(format: schema1.tableName1:field1/field2,schema2.tableName2:field1/field2)
#canal.instance.filter.black.field=test1.t_product:subject/product_image,test2.t_company:id/name/contact/ch

# mq config
canal.mq.topic=example
# dynamic topic route by schema or table regex
#canal.mq.dynamicTopic=mytest1.user,mytest2\\..*,.*\\..*
canal.mq.partition=0
# hash partition config
#canal.mq.partitionsNum=3
#canal.mq.partitionHash=test.table:id^name,.*\\..*
#################################################

# 3.启动docker命令
docker run -d \
--name my_canal \
-p 11111:11111 \
-v /usr/local/software/canal/conf/instance.properties:/home/admin/canal-server/conf/example/instance.properties \
canal/canal-server:v1.1.7
2. docker部署redis
# 1.创建文件夹
mkdir -p /usr/local/software/redis/{conf,data}

# 2.创建配置文件redis.conf
vim /usr/local/software/redis/conf/redis.conf

# 允许远程访问
bind 0.0.0.0
# 服务监听端口
port 6379
# 是否以守护进程运行(与docker -d选项有冲突)
#daemonize yes
# 日志文件路径(未挂载的路径会出现权限问题)
logfile "/data/redis.log"
# 设置客户端连接密码
requirepass "123456"
# RDB快照文件名
dbfilename "node1.rdb"
#持久化策略, 10秒内有个1个key改动,执行快照
save 10 1
# 导出rdb数据库文件压缩字符串和对象,默认是yes,会浪费CPU但是节省空间
rdbcompression yes
# 导入时是否检查
rdbchecksum yes
# 是否开启AOF持久化模式
appendonly yes
# AOF文件名称
appendfilename "node1.aof"
# 同步方式 always | everysec | no
appendfsync everysec
# AOF重写期间是否同步
no-appendfsync-on-rewrite no
# 重写触发配置
auto-aof-rewrite-percentage 100
auto-aof-rewrite-min-size 64mb
# 加载AOF时如果有错如何处理
# yes表示如果AOF尾部文件出问题,写log记录并继续执行。no表示提示写入等待修复后写入
aof-load-truncated yes
# 若主节点设置了密码,从节点需通过此配置项提供密码
masterauth "123456"

# 3.拉取镜像并部署redis
docker run -d \
--name redis_node1 \
-v /usr/local/software/redis/data:/data \
-v /usr/local/software/redis/conf/redis.conf:/etc/redis/redis.conf \
-p 6379:6379 \
redis:7.0.12 \
redis-server /etc/redis/redis.conf
3. 将本地项目打包上传服务器
3.1 配置JDK17
# 1.下载jdk17安装包,并解压(路径/usr/local/software/jdk17/jdk17)

# 2.编辑/etc/profile,追加如下内容:
vim /etc/profile

JAVA_HOME=/usr/local/software/jdk17/jdk17
CLASSPATH=$JAVA_HOME/lib/
PATH=$PATH:$JAVA_HOME/bin
export PATH JAVA_HOME CLASSPATH

# 3.立即生效
source /etc/profile

# 4.验证安装是否正确
java -version
3.2 上传项目并启动
# 1.上传项目demo.jar

# 2.启动项目
nohup java -jar demo.jar &
3.3 代码片段1
@Component
@Slf4j
public class CanalRedisConsumer implements ApplicationRunner {

    @Autowired
    private RedisTemplate redisTemplate;

    /**
     * 应用启动后执行的主逻辑方法,用于连接 Canal 服务并监听数据库变更事件。
     * <p>
     * 该方法会持续从 Canal Server 获取 binlog 数据,并根据操作类型(增、删、改)调用相应的处理方法。
     * </p>
     *
     * @param args 启动参数,由 Spring Boot 提供
     * @throws Exception 执行过程中可能抛出的异常
     */
    @Override
    public void run(ApplicationArguments args) throws Exception {
        // 创建一个单点连接的 Canal 连接器,连接指定地址和实例
        CanalConnector canalConnector = CanalConnectors.newSingleConnector(new InetSocketAddress("172.19.240.111", 11111), "example", "", "");

        try {
            // 循环尝试连接 Canal Server,直到成功为止
            while (true) {
                try {
                    canalConnector.connect();
                    break;
                } catch (CanalClientException e) {
                    log.error("Connect to Canal Server failed, retrying...\n");
                }
            }

            // 订阅所有数据库表的变更信息
            canalConnector.subscribe(".*\\..*");

            // 回滚到未确认的位置,确保消费位置正确
            canalConnector.rollback();

            // 持续拉取 Canal 中的数据变更消息
            while (true) {
                // 不带 ACK 地获取最多 100 条记录的消息批次
                Message message = canalConnector.getWithoutAck(100);
                long batchId = message.getId();

                // 如果没有新数据,则等待一段时间再继续拉取
                if (batchId == -1 || message.getEntries().isEmpty()) {
                    try {
                        log.info("No new data, waiting for push...");
                        TimeUnit.SECONDS.sleep(1);
                    } catch (InterruptedException e) {
                        log.error(e.getMessage());
                    }
                } else {
                    // 遍历每条变更记录进行解析与处理
                    for (CanalEntry.Entry entry : message.getEntries()) {

                        // 跳过事务开始和结束标记
                        if (entry.getEntryType() == CanalEntry.EntryType.TRANSACTIONBEGIN ||
                                entry.getEntryType() == CanalEntry.EntryType.TRANSACTIONEND) {
                            continue;
                        }

                        // 解析行变更内容
                        CanalEntry.RowChange rowChange = null;
                        try {
                            rowChange = CanalEntry.RowChange.parseFrom(entry.getStoreValue());
                        } catch (Exception e) {
                            throw new RuntimeException("Error parsing Canal Entry.", e);
                        }

                        // 获取库名、表名及事件类型
                        String schema = entry.getHeader().getSchemaName();
                        String table = entry.getHeader().getTableName();
                        CanalEntry.EventType eventType = rowChange.getEventType();

                        // 处理每一行数据变更
                        for (CanalEntry.RowData rowData : rowChange.getRowDatasList()) {
                            if (eventType == CanalEntry.EventType.DELETE) {
                                deleteData(schema, table, rowData);
                            } else if (eventType == CanalEntry.EventType.INSERT) {
                                insertOrUpdateData(schema, table, rowData);
                            } else {
                                // UPDATE 类型也使用插入或更新的方法处理
                                insertOrUpdateData(schema, table, rowData);
                            }
                        }
                    }

                    // 确认已处理完当前批次的消息
                    try {
                        canalConnector.ack(batchId);
                    } catch (Exception e) {
                        // 若确认失败则回滚该批次
                        canalConnector.rollback(batchId);
                    }
                }
            }
        } finally {
            // 最终断开与 Canal Server 的连接
            canalConnector.disconnect();
        }
    }

    /**
     * 删除行数据
     */
    private void deleteData(String schema, String table, CanalEntry.RowData rowData) {
        List<CanalEntry.Column> columns = rowData.getBeforeColumnsList();
        JSONObject json = new JSONObject();
        for (CanalEntry.Column column : columns) {
            json.put(column.getName(), column.getValue());
        }
        log.info("删除redis数据: {}", json.toJSONString());
        String key = table + ":" + columns.get(0).getValue();
        log.info("delete key: {}", key);
        redisTemplate.delete(key);
    }


    /**
     * 插入或者新增数据
     */
    private void insertOrUpdateData(String schema, String table, CanalEntry.RowData rowData) {
        List<CanalEntry.Column> columns = rowData.getAfterColumnsList();
        JSONObject json = new JSONObject();
        for (CanalEntry.Column column : columns) {
            json.put(column.getName(), column.getValue());
        }
        log.info("新增或更新redis数据: {}", json.toJSONString());
        String key = table + ":" + columns.get(0).getValue();
        log.info("add key: {}", key);
        redisTemplate.opsForValue().set(key, json);
    }
}
3.4 代码片段2
@RestController
@RequestMapping("/api/v1/product")
public class ProductController {

    @Autowired
    private ProductService productService;

    @PostMapping("/add")
    public JsonData addProduct(@RequestBody ProductCreateReq req) {
        return productService.addProduct(req);
    }

    @PostMapping("/update")
    public JsonData updateProduct(@RequestBody ProductUpdateReq req) {
        return productService.updateProduct(req);
    }

    @PostMapping("/delete")
    public JsonData deleteProduct(@RequestBody ProductDeleteReq req) {
        return productService.deleteProduct(req);
    }

    @GetMapping("/findById")
    public JsonData queryProductById(@RequestParam("id") Long id) {
        return productService.queryProductById(id);
    }
}
3.5 相关依赖
# mysql
<dependency>
    <groupId>com.mysql</groupId>
    <artifactId>mysql-connector-j</artifactId>
    <scope>runtime</scope>
</dependency>

<dependency>
    <groupId>org.springframework.boot</groupId>
    <artifactId>spring-boot-starter-jdbc</artifactId>
</dependency>

# canal
<dependency>
    <groupId>com.alibaba.otter</groupId>
    <artifactId>canal.client</artifactId>
    <version>1.1.7</version>
</dependency>

# redis
<dependency>
    <groupId>org.springframework.boot</groupId>
    <artifactId>spring-boot-starter-data-redis</artifactId>
</dependency>
4. 部署nginx
4.1 安装openresty (默认安装路径 /usr/local/openresty)
# add the repo:
wget https://openresty.org/package/rocky/openresty2.repo
sudo mv openresty2.repo /etc/yum.repos.d/openresty.repo

# update the index:
sudo yum check-update

# 安装依赖
sudo yum install -y openresty openresty-resty

# 校验是否安装成功
resty -v
上述主要针对Rocky Linux 9.x , 其他操作系统请查看 https://openresty.org/en/linux-packages.html
4.2 创建lua.cache
# 1.创建文件夹
mkdir -p /usr/local/openresty/nginx/lua

# 2.创建并编辑cache.lua
vim cache.lua

local redis = require "resty.redis"
local redis_server = "172.19.146.151"
local redis_port = 6379
local redis_pwd = "123456"

local function get_from_redis(key)
    local red = redis:new()

    local ok, err = red:connect(redis_server, redis_port)
    red:auth(redis_pwd)
    if not ok then
        ngx.log(ngx.ERR, "failed to connect to Redis: ", err)
        return ""
    end
    local result, err = red:get(key)
    if not result then
        ngx.log(ngx.ERR, "failed to get ", key, " from Redis: ", err)
        return ""
    end
    red:set_keepalive(10000, 100)
    return result
end

local function get_cache_data()
    local uri = ngx.var.uri
    local id = ngx.var.arg_id

    ngx.log(ngx.ERR, "URI: ", uri)
    ngx.log(ngx.ERR, "Args: ", ngx.var.args)

    local start_pos = string.find(uri, "/", 6) + 1
    local end_pos = string.find(uri, "/", start_pos)
    local cache_prefix = string.sub(uri, start_pos, end_pos - 1)   -- 截取第三个和第四个斜杠之间的子串
    local key = cache_prefix .. ":" .. id

    local result = get_from_redis(key)

    if result == nil or result == ngx.null or result == "" then
        -- Redis 未命中,将返回 MISS
        ngx.log(ngx.ERR, "not hit cache, key = ", key)
    else
        -- Redis 命中,返回结果
        ngx.log(ngx.ERR, "hit cache, key = ", key)
        -- 在获取数据时指定 GBK 编码格式
        --local result = cjson.decode(result, {charset="GBK"})
        ngx.say(result)
        ngx.exit(ngx.HTTP_OK)
    end
end

get_cache_data()
4.3 修改nginx.conf (路径 /usr/local/openresty/nginx/conf/nginx.conf)
#user  nobody;
worker_processes  1;

#error_log  logs/error.log;
#error_log  logs/error.log  notice;
#error_log  logs/error.log  info;

#pid        logs/nginx.pid;


events {
    worker_connections  1024;
}


http {
    include       mime.types;
    default_type  application/octet-stream;

    # 配置下编码,不然浏览器会乱码
    charset utf-8;

    #log_format  main  '$remote_addr - $remote_user [$time_local] "$request" '
    #                  '$status $body_bytes_sent "$http_referer" '
    #                  '"$http_user_agent" "$http_x_forwarded_for"';

    #access_log  logs/access.log  main;

    sendfile        on;
    #tcp_nopush     on;

    #keepalive_timeout  0;
    keepalive_timeout  65;

    #gzip  on;


    lua_code_cache on;

    # 配置lua文件扫描路径
    lua_package_path "$prefix/lualib/?.lua;;";
    lua_package_cpath "$prefix/lualib/?.so;;";

    # 配置反向代理到后端spring boot程序
    upstream backend {
      server 127.0.0.1:8080;
    }

    server {
        listen       80;
        server_name  localhost;
        location /api {
            default_type 'text/plain';
            if ($request_method = GET) {
                access_by_lua_file /usr/local/openresty/nginx/lua/cache.lua;
            }
            proxy_pass http://backend;
            proxy_set_header Host $http_host;
        }
    }
}
4.4 启动nginx
# 启动命令
/usr/local/openresty/nginx/sbin -c /usr/local/openresty/nginx/conf/nginx.conf

# 重启命令
/usr/local/openresty/nginx/sbin -c /usr/local/openresty/nginx/conf/nginx.conf -s reload
5. 测试链路
5.1 执行新增接口 /api/v1/product/add
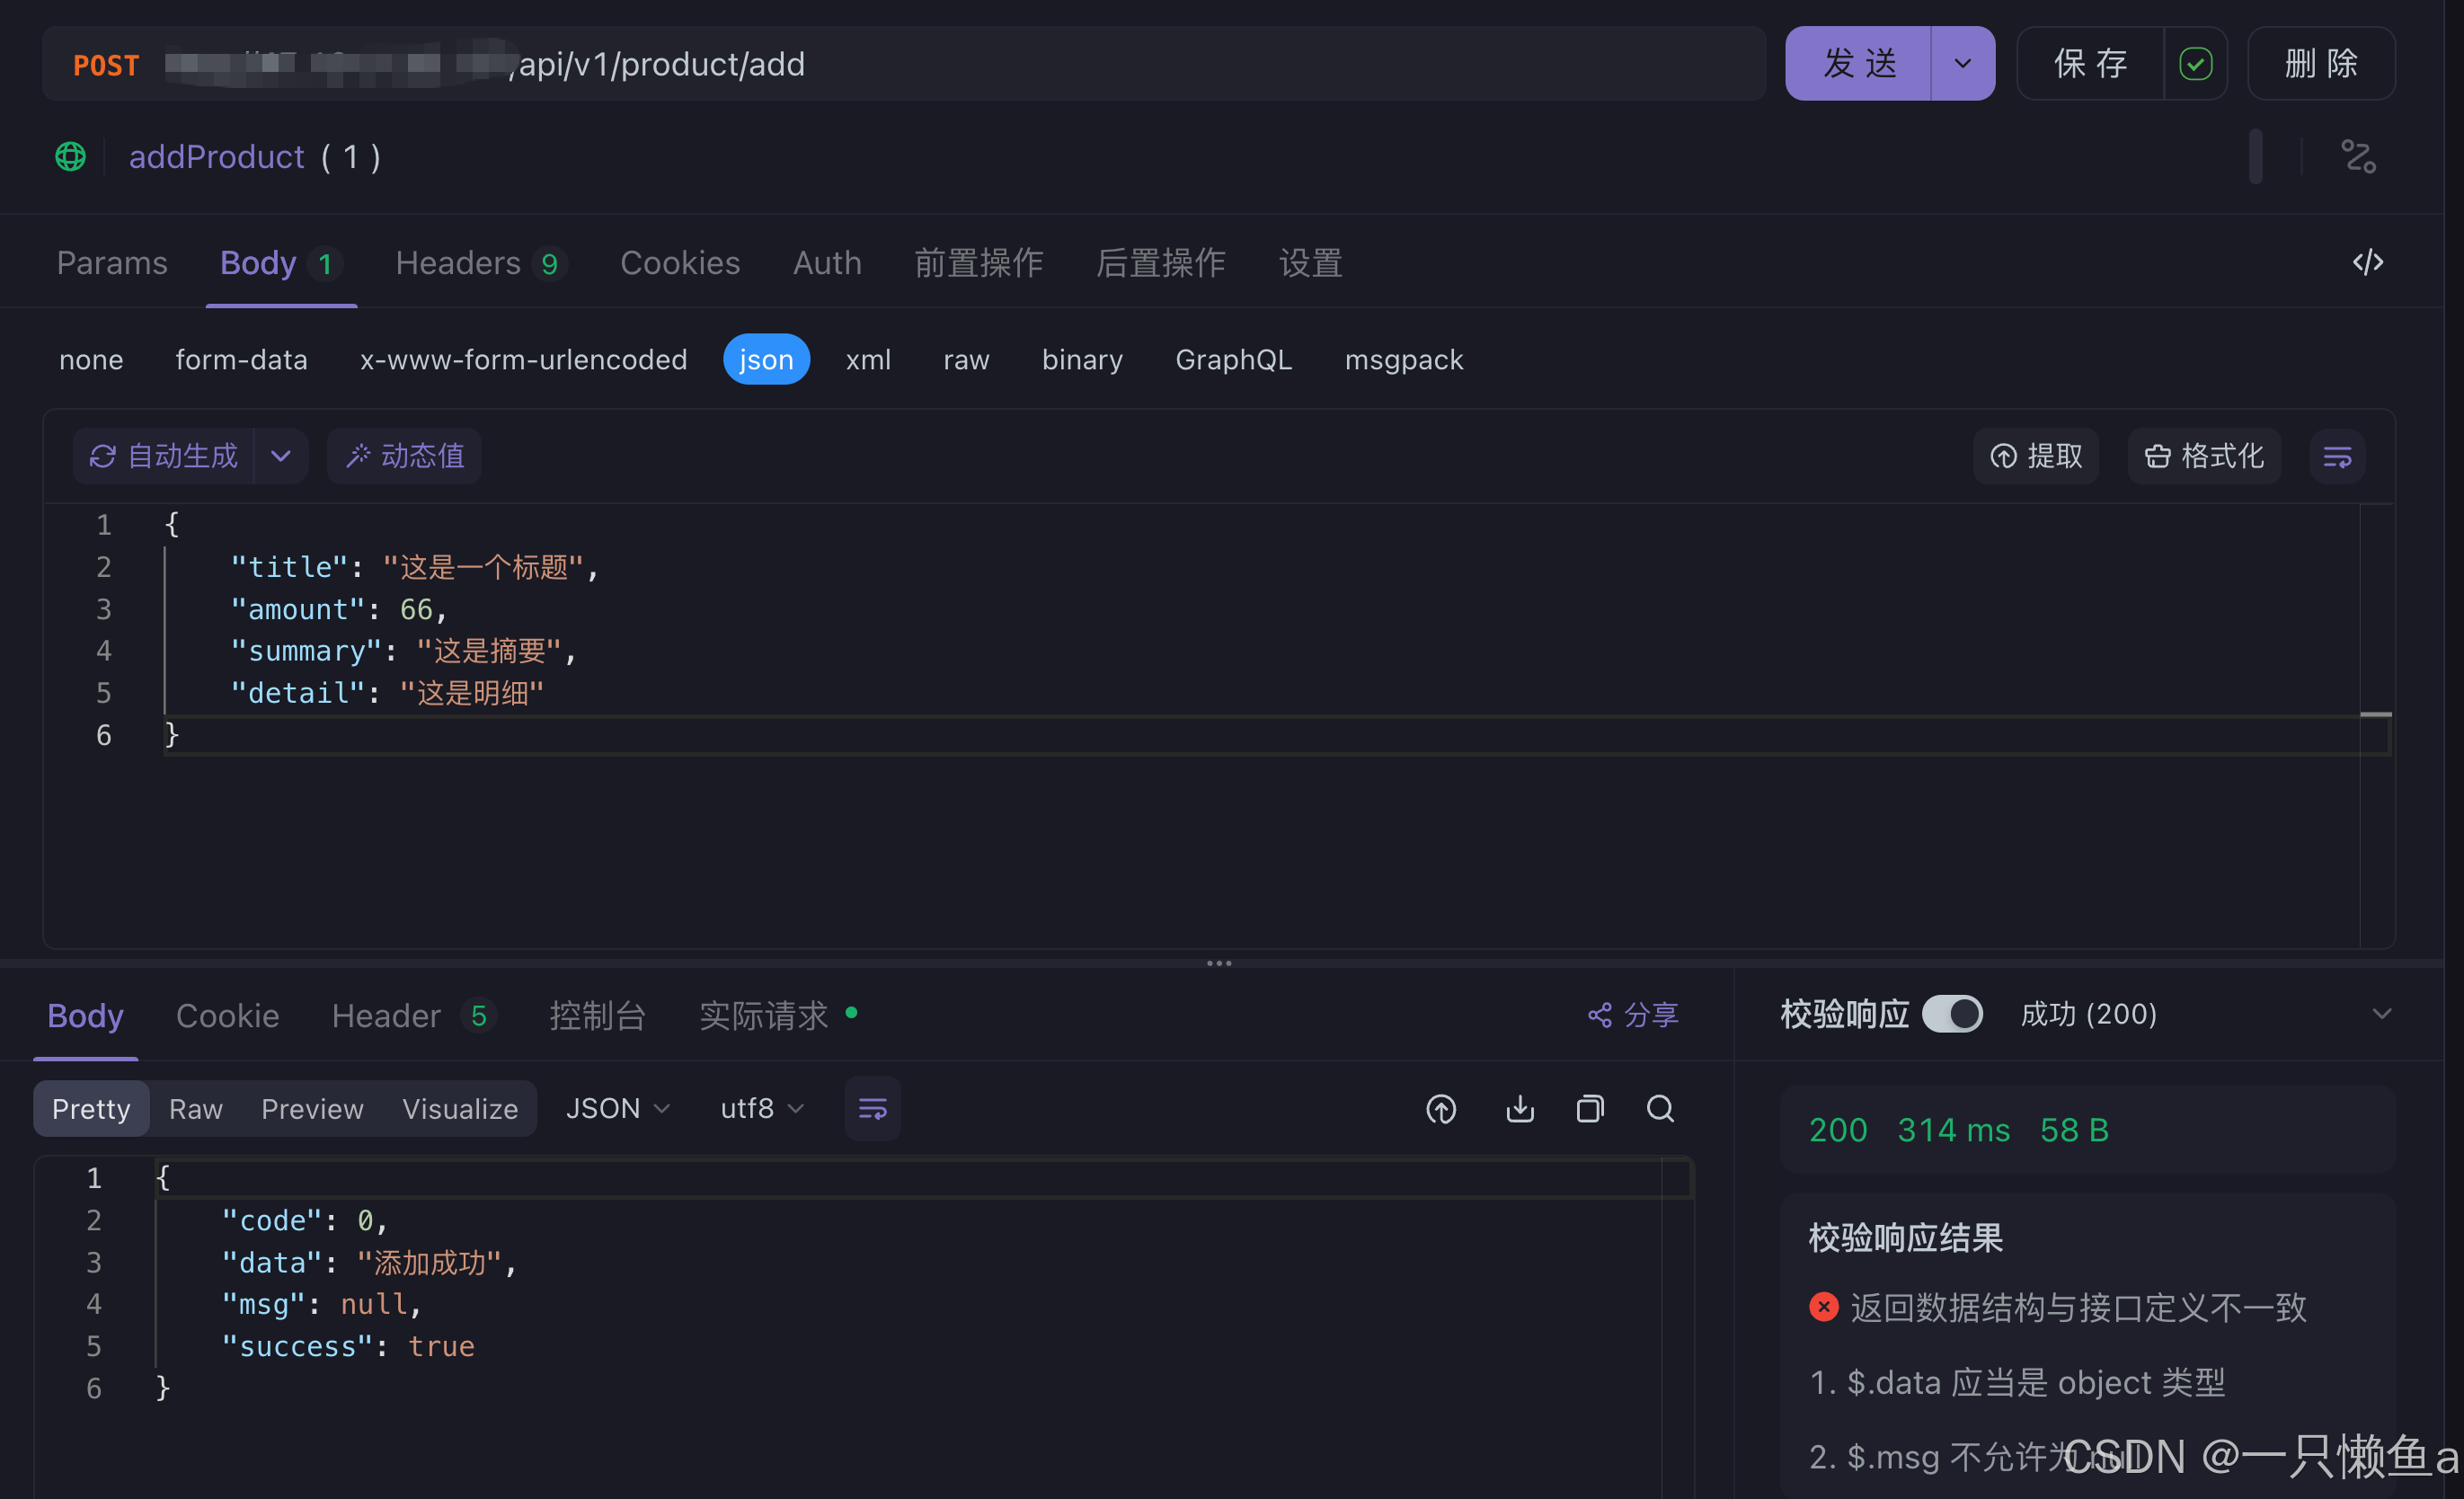

执行新增接口,会同步更新到redis
5.2 执行查询接口 /api/v1/product/findById
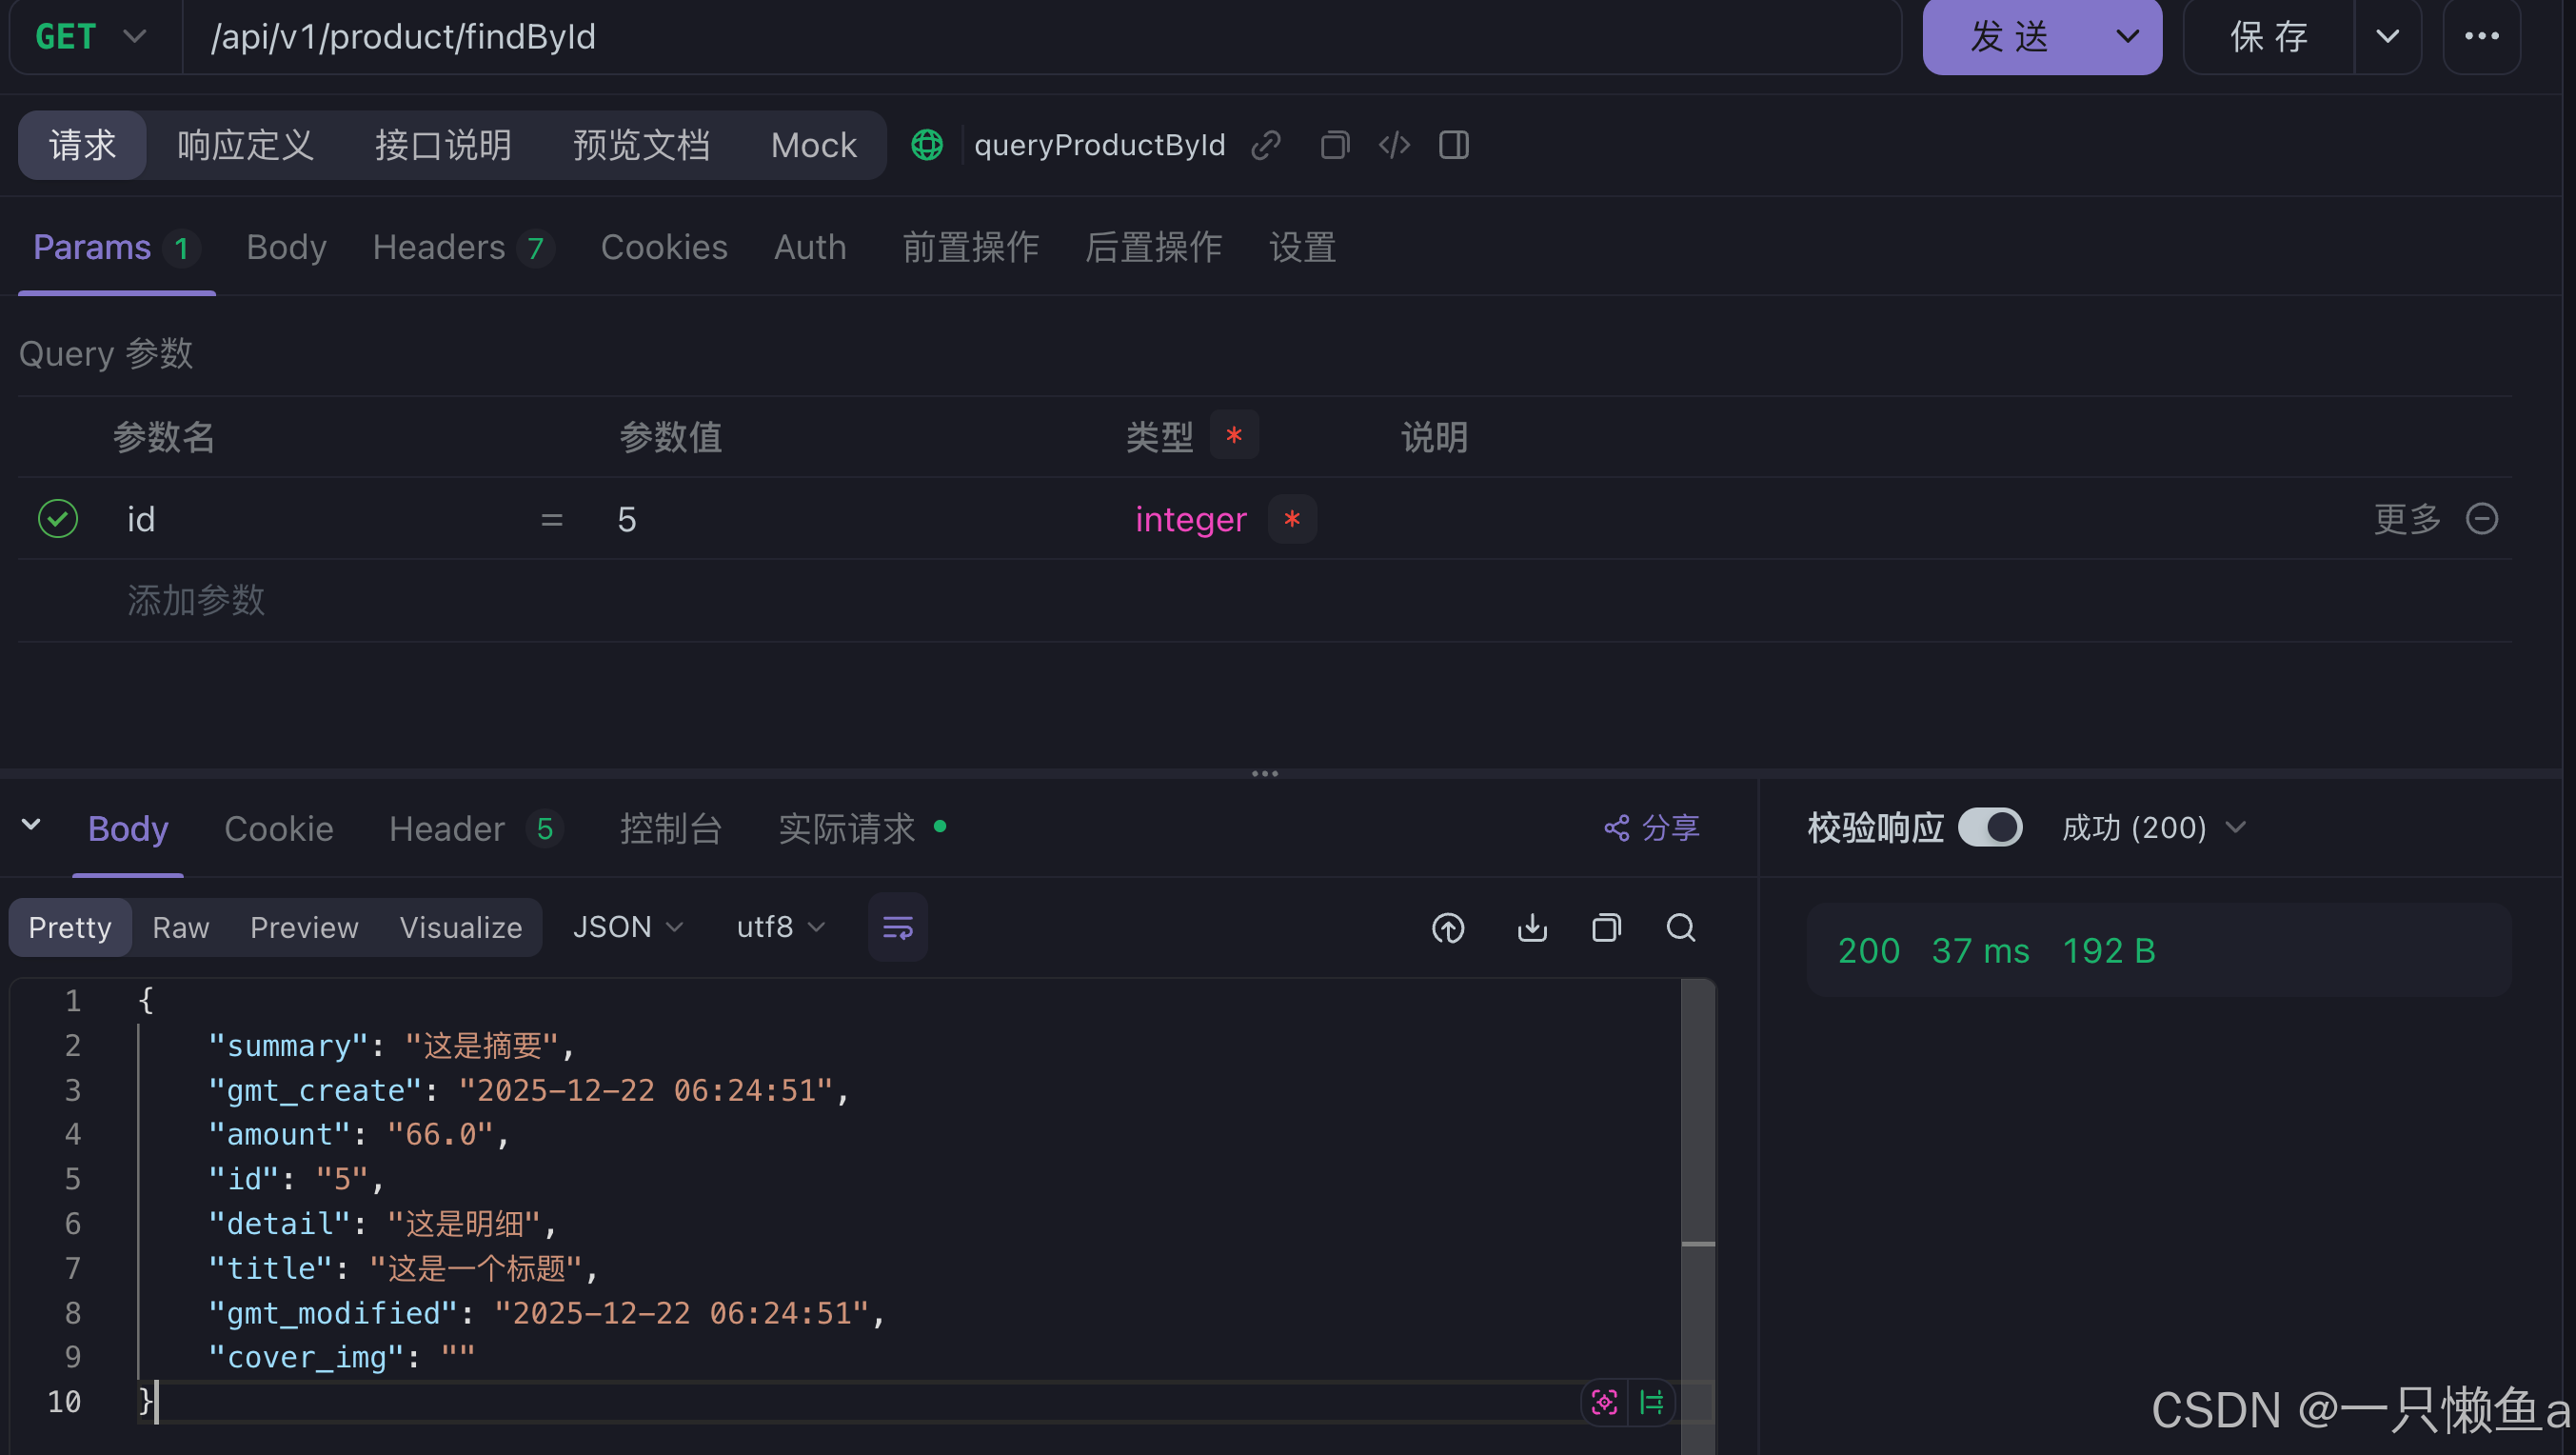
执行查询接口,经过nginx转发,会根据cache.lua直连redis,将数据处理返回,不需要经过后端服务,大大提升了效率