容器架构简要介绍
什么是容器?
容器是一种轻量级、可移植、自包含的软件打包技术,使应用程序可以在几乎任何地方以相同的方式运行。开发人员在自己笔记本上创建并测试好的容器,无需任何修改就能够在生产系统的虚拟机、物理服务器或公有云主机上运行。
容器与虚拟机
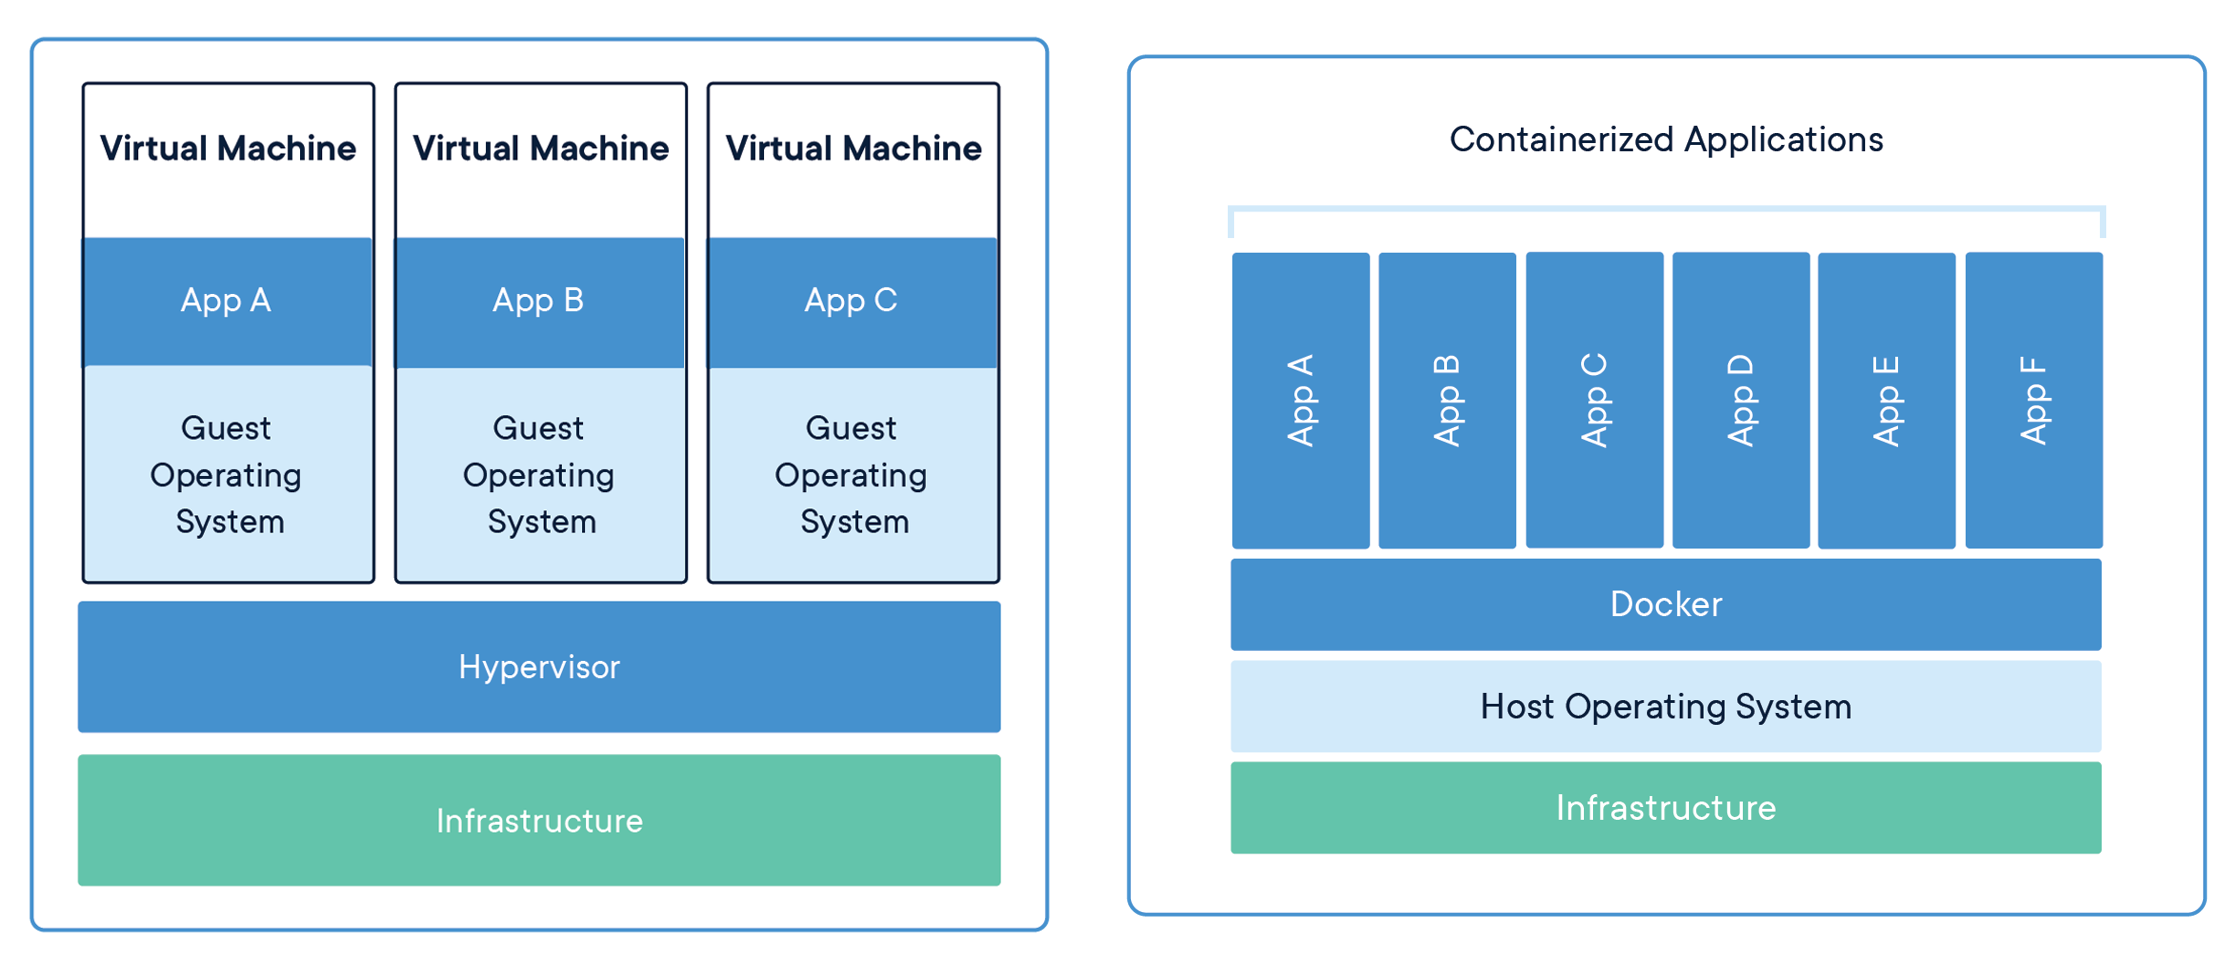
谈到容器,就不得不将它与虚拟机进行对比,因为两者都是为应用提供封装和隔离。
容器由两部分组成:
- 应用程序本身
- 依赖:比如应用程序需要的库或其他软件
容器在 Host 操作系统的用户空间中运行,与操作系统的其他进程隔离。这一点显著区别于的虚拟机。
传统的虚拟化技术,比如 VMWare, KVM, Xen,目标是创建完整的虚拟机。为了运行应用,除了部署应用本身及其依赖(通常几十 MB),还得安装整个操作系统(几十 GB)。
下图展示了二者的区别。
| 容器 | 虚拟机 | |
|---|---|---|
| 启动速度 | 秒甚至毫秒启动 | 数秒至数十秒 |
| 系统内核 | 共享内核 | 不共享内核 |
| 实现技术 | 利用Linux内核技术Namespace/Cgroup等实现。 | 依赖虚拟化技术实现,由Hypervisor层实现对资源的隔离 |
| 隔离效果 | 进程级别的隔离 | 系统资源级别的隔离 |
| 资源消耗(性能) | 容器中的应用只是宿主机上的一个普通进程 | 使用虚拟化技术,就会有额外的资源消耗和占用 |
| 资源调用 (敏捷性) | 应用进程直接由宿主机OS管理 | 应用进程需经过Hypervisor的拦截和处理,才能调用系统资源 |
| 运行数量 | 一台服务器上能启动1000+容器 | 一台服务器上一般不超过100台虚拟机 |
| 应用 | DevOps、微服务等 | 用于硬件资源划分 |
| 镜像 | 分层镜像 | 非分层镜像 |
如图所示,由于所有的容器共享同一个 Host OS,这使得容器在体积上要比虚拟机小很多。另外,启动容器不需要启动整个操作系统,所以容器部署和启动速度更快,开销更小,也更容易迁移。
为什么需要容器?
容器使软件具备了超强的可移植能力。
容器解决的问题:
如何让每种服务能够在所有的部署环境中顺利运行?
Docker 将集装箱思想运用到软件打包上,为代码提供了一个基于容器的标准化运输系统。Docker 可以将任何应用及其依赖打包成一个轻量级、可移植、自包含的容器。容器可以运行在几乎所有的操作系统上。
Docker 的特性
我们可以看看集装箱思想是如何与 Docker 各种特性相对应的。
| 特性 | 集装箱 | Docker |
|---|---|---|
| 打包对象 | 几乎任何货物 | 任何软件及其依赖 |
| 硬件依赖 | 标准形状和接口允许集装箱被装卸到各种交通工具,整个运输过程无需打开 | 容器无需修改便可运行在几乎所有的平台上 -- 虚拟机、物理机、公有云、私有云 |
| 隔离性 | 集装箱可以重叠起来一起运输,香蕉再也不会被铁桶压烂了 | 资源、网络、库都是隔离的,不会出现依赖问题 |
| 自动化 | 标准接口使集装箱很容易自动装卸和移动 | 提供 run, start, stop 等标准化操作,非常适合自动化 |
| 高效性 | 无需开箱,可在各种交通工具间快速搬运 | 轻量级,能够快速启动和迁移 |
| 职责分工 | 货主只需考虑把什么放到集装箱里;承运方只需关心怎样运输集装箱 | 开发人员只需考虑怎么写代码;运维人员只需关心如何配置基础环境 |
容器与虚拟机比较
容器由两部分组成:
- 应用程序本身
- 依赖:比如应用程序需要的库或其他软件
容器在 Host 操作系统的用户空间中运行,与操作系统的其他进程隔离。这一点显著区别于的虚拟机。
传统的虚拟化技术,比如 VMWare, KVM, Xen,目标是创建完整的虚拟机。为了运行应用,除了部署应用本身及其依赖(通常几十 MB),还得安装整个操作系统(几十 GB)。
而容器可以在核心CPU本地运行指令,不需要任何专门的解释机制。与虚拟化相比,这样既不需要指令级模拟,也不需要即时编译。
| 特性 | 容器 | 虚拟机 |
|---|---|---|
| 启动速度 | 秒级 | 分钟级 |
| 性能 | 接近原生 | 较弱 |
| 内存代价 | 很小 | 较多 |
| 硬盘使用 | 一般为MB | 一般为GB |
| 运行密度 | 单击支持上千个容器 | 一般几十个 |
| 隔离性 | 安全隔离 | 完全隔离 |
| 迁移性 | 优秀 | 一般 |
Docker介绍
Docker是基于Go语言实现的开源容器项目,诞生于2013年年初,最初发起者是dotCloud公司。Docker自开源后受到广泛的关注和讨论,逐渐形成了围绕Docker容器的生态体系。由于Docker在业界造成的影响力实在太大,dotCloud公司后来也直接改名为Docker Inc,并专注于 Docker相关技术和产品的开发。
Docker提供了各种容器管理工具 (如分发、版本、移植等),让用户无需关注底层的操作,可以更简单明了地管理和使用容器;其次,Docker引入分层文件系统构建和高效的镜像机制降低了迁移难度,极大地提升了用户体验。用户操作Docker容器就像操作应用自身一样简单。
简单地讲,可以将Docker容器理解为一种轻量级的沙盒(sandbox)。**每个容器内运行着一个应用,不同的容器相互隔离,容器之间也可以通过网络互相通信。**容器的创建和停止都十分快速,几乎跟创建和终止原生应用一致;另外,容器自身对系统资源的额外需求也十分有限,远远低于传统虚拟机。很多时候,甚至直接把容器当作应用本身也没有任何问题。
Docker 客户端
最常用的 Docker 客户端是 docker 命令。通过 docker 我们可以方便地在 Host 上构建和运行容器。
docker 支持很多操作(子命令),后面会逐步用到。
shell
[root@docker ~]# docker

Usage:  docker [OPTIONS] COMMAND

A self-sufficient runtime for containers

Common Commands:
  run         Create and run a new container from an image
  exec        Execute a command in a running container
  ps          List containers
  build       Build an image from a Dockerfile
  pull        Download an image from a registry
  push        Upload an image to a registry
  images      List images
  login       Log in to a registry
  logout      Log out from a registry
  search      Search Docker Hub for images
  version     Show the Docker version information
  info        Display system-wide information

Management Commands:
  builder     Manage builds
  buildx*     Docker Buildx
  compose*    Docker Compose
  container   Manage containers
  context     Manage contexts
  image       Manage images
  manifest    Manage Docker image manifests and manifest lists
  network     Manage networks
  plugin      Manage plugins
  system      Manage Docker
  trust       Manage trust on Docker images
  volume      Manage volumes

Swarm Commands:
  swarm       Manage Swarm

Commands:
  attach      Attach local standard input, output, and error streams to a running container
  commit      Create a new image from a container's changes
  cp          Copy files/folders between a container and the local filesystem
  create      Create a new container
  diff        Inspect changes to files or directories on a container's filesystem
  events      Get real time events from the server
  export      Export a container's filesystem as a tar archive
  history     Show the history of an image
  import      Import the contents from a tarball to create a filesystem image
  inspect     Return low-level information on Docker objects
  kill        Kill one or more running containers
  load        Load an image from a tar archive or STDIN
  logs        Fetch the logs of a container
  pause       Pause all processes within one or more containers
  port        List port mappings or a specific mapping for the container
  rename      Rename a container
  restart     Restart one or more containers
  rm          Remove one or more containers
  rmi         Remove one or more images
  save        Save one or more images to a tar archive (streamed to STDOUT by default)
  start       Start one or more stopped containers
  stats       Display a live stream of container(s) resource usage statistics
  stop        Stop one or more running containers
  tag         Create a tag TARGET_IMAGE that refers to SOURCE_IMAGE
  top         Display the running processes of a container
  unpause     Unpause all processes within one or more containers
  update      Update configuration of one or more containers
  wait        Block until one or more containers stop, then print their exit codes

Global Options:
      --config string      Location of client config files (default "/root/.docker")
  -c, --context string     Name of the context to use to connect to the daemon (overrides
                           DOCKER_HOST env var and default context set with "docker context use")
  -D, --debug              Enable debug mode
  -H, --host list          Daemon socket to connect to
  -l, --log-level string   Set the logging level ("debug", "info", "warn", "error", "fatal")
                           (default "info")
      --tls                Use TLS; implied by --tlsverify
      --tlscacert string   Trust certs signed only by this CA (default "/root/.docker/ca.pem")
      --tlscert string     Path to TLS certificate file (default "/root/.docker/cert.pem")
      --tlskey string      Path to TLS key file (default "/root/.docker/key.pem")
      --tlsverify          Use TLS and verify the remote
  -v, --version            Print version information and quit

Run 'docker COMMAND --help' for more information on a command.

For more help on how to use Docker, head to https://docs.docker.com/go/guides/
除了 docker 命令行工具,用户也可以通过 REST API 与服务器通信。
Docker 服务器
Docker daemon 是服务器组件,以 Linux 后台服务的方式运行。
shell
[root@docker ~]# systemctl status docker.service
● docker.service - Docker Application Container Engine
   Loaded: loaded (/usr/lib/systemd/system/docker.service; enabled; vendor preset: disabled)
   Active: active (running) since Mon 2024-09-09 21:40:20 CST; 24h ago
     Docs: https://docs.docker.com
 Main PID: 2309 (dockerd)
    Tasks: 10
   Memory: 136.0M
   CGroup: /system.slice/docker.service
           └─2309 /usr/bin/dockerd -H fd:// --containerd=/run/containerd/containerd.sock

Sep 09 21:40:16 docker systemd[1]: Starting Docker Application Container Engine...
Sep 09 21:40:17 docker dockerd[2309]: time="2024-09-09T21:40:17.800157335+08:00" level=info msg="Star>
Sep 09 21:40:18 docker dockerd[2309]: time="2024-09-09T21:40:18.196566715+08:00" level=info msg="[gra>
Sep 09 21:40:18 docker dockerd[2309]: time="2024-09-09T21:40:18.208666863+08:00" level=info msg="Load>
Sep 09 21:40:19 docker dockerd[2309]: time="2024-09-09T21:40:19.587647943+08:00" level=info msg="Defa>
Sep 09 21:40:19 docker dockerd[2309]: time="2024-09-09T21:40:19.881267095+08:00" level=info msg="Load>
Sep 09 21:40:19 docker dockerd[2309]: time="2024-09-09T21:40:19.956577565+08:00" level=info msg="Dock>
Sep 09 21:40:19 docker dockerd[2309]: time="2024-09-09T21:40:19.957045036+08:00" level=info msg="Daem>
Sep 09 21:40:20 docker dockerd[2309]: time="2024-09-09T21:40:20.014584201+08:00" level=info msg="API >
Sep 09 21:40:20 docker systemd[1]: Started Docker Application Container Engine.
Docker 镜像
可将 Docker 镜像看着只读模板,通过它可以创建 Docker 容器。
例如某个镜像可能包含一个 Ubuntu 操作系统、一个 Apache HTTP Server 以及用户开发的 Web 应用。
镜像有多种生成方法:
- 可以从无到有开始创建镜像
- 也可以下载并使用别人创建好的现成的镜像
- 还可以在现有镜像上创建新的镜像
可以将镜像的内容和创建步骤描述在一个文本文件中,这个文件被称作 Dockerfile,通过执行 docker build <docker-file> 命令可以构建出 Docker 镜像。
Docker 容器
Docker 容器就是 Docker 镜像的运行实例。
用户可以通过 CLI(docker)或是 API 启动、停止、移动或删除容器。可以这么认为,对于应用软件,镜像是软件生命周期的构建和打包阶段,而容器则是启动和运行阶段。
Registry
Registry 是存放 Docker 镜像的仓库,Registry 分私有和公有两种。
Docker Hub(https://hub.docker.com/) 是默认的 Registry,由 Docker 公司维护,上面有数以万计的镜像,用户可以自由下载和使用。
出于对速度或安全的考虑,用户也可以创建自己的私有 Registry。后面我们会学习如何搭建私有 Registry。
docker pull 命令可以从 Registry 下载镜像。
docker run 命令则是先下载镜像(如果本地没有),然后再启动容器。
Docker组件如何协作?
启动容器的过程如下:
- Docker 客户端执行
docker run命令。 - Docker daemon 发现本地没有 httpd 镜像。
- daemon 从 Docker Hub 下载镜像。
- 下载完成,镜像 httpd 被保存到本地。
- Docker daemon 启动容器。
使用 docker images 命令可以查看到 httpd 已经下载到本地。
shell
[root@docker ~]# docker images
REPOSITORY   TAG       IMAGE ID       CREATED       SIZE
httpd        latest    9cb0a2315602   7 weeks ago   148MB
docker ps 或者 docker container ls 命令会显示哪些容器正在运行。
安装docker
可以直接操作的环境:https://labs.play-with-docker.com/
1. 环境选择
容器需要管理工具、runtime 和操作系统,本次练习中选择如下:
- 管理工具 - Docker Engine,Docker 最流行使用最广泛的管理工具。
- runtime - runc,Docker 的默认 runtime
- 操作系统 - CentOS Stream8
2. 安装操作系统
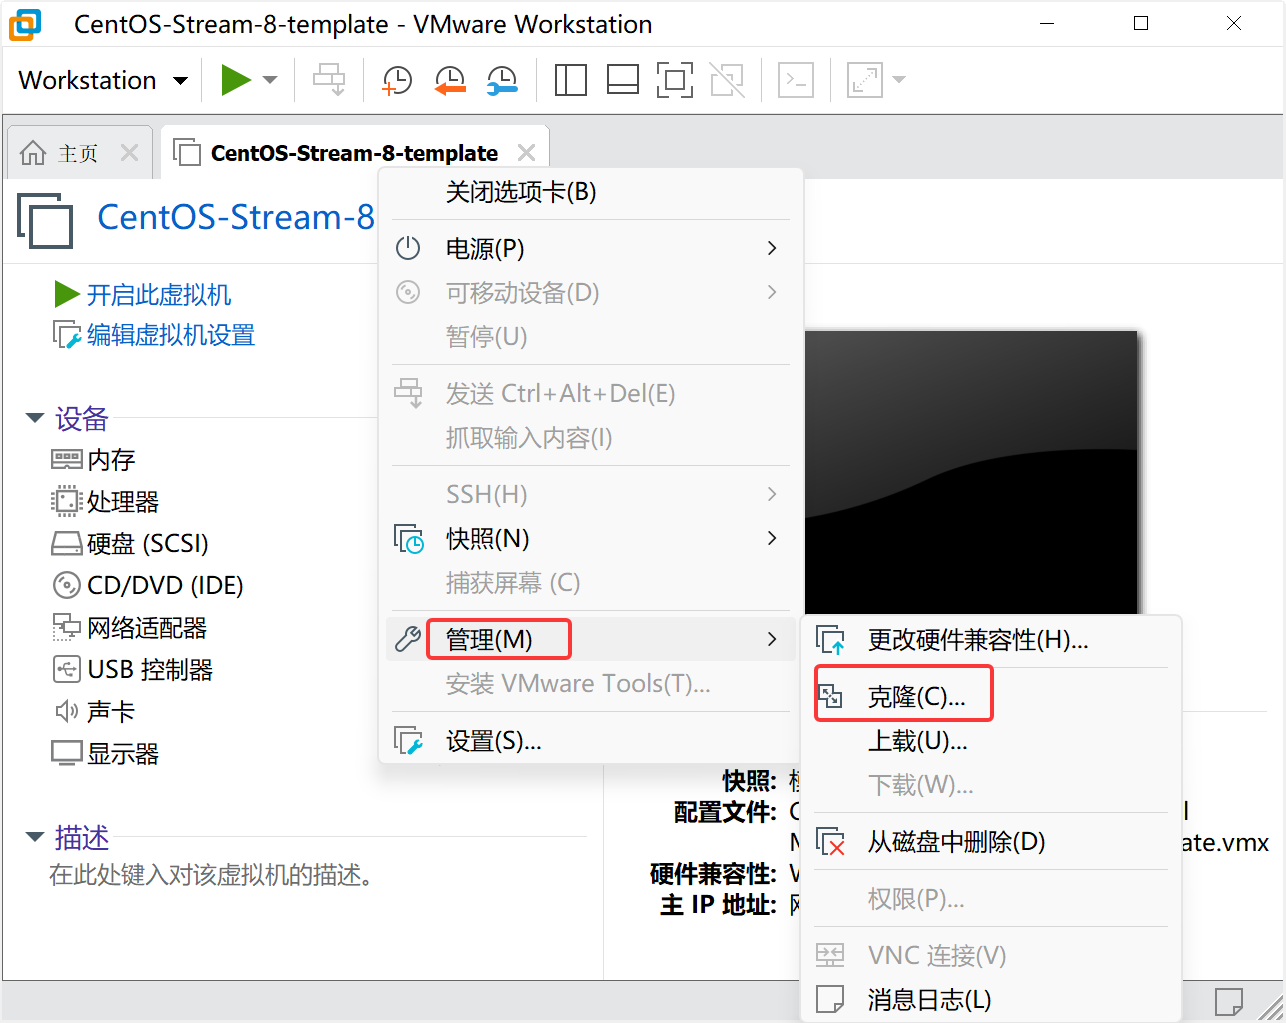
克隆一个CentOS8虚拟机,命名为docker
配置静态IP 192.168.108.30,主机名改为docker
bash
[root@localhost ~]# hostnamectl set-hostname docker
[root@localhost ~]# nmcli connection modify ens160 ipv4.method manual ipv4.addresses 192.168.108.30/24 ipv4.gateway 192.168.108.2 ipv4.dns 192.168.108.2 autoconnect yes
[root@localhost ~]# nmcli con up ens160
3. 安装 Docker
Docker 支持几乎所有的 Linux 发行版,也支持 Mac 和 Windows。各操作系统的安装方法可以访问:https://docs.docker.com/engine/installation/
卸载旧版本(如果已经安装过旧版本)
bash
[root@docker ~]# yum remove docker-ce安装必要工具
bash
# devicemapper 存储驱动已经在 docker 18.09 版本中被废弃,所以在后续的安Docker装中无需安装devicemapper支持。
[root@localhost ~]# yum install -y yum-utils device-mapper-persistent-data lvm2 vim
[root@localhost ~]# yum-config-manager --add-repo https://mirrors.aliyun.com/docker-ce/linux/centos/docker-ce.repo
Adding repo from: https://mirrors.aliyun.com/docker-ce/linux/centos/docker-ce.repo
[root@localhost ~]# yum makecache
Docker CE Stable - x86_64                                                                             57 kB/s |  66 kB     00:01
CentOS Stream 8 - BaseOS                                                                             8.3 kB/s | 3.9 kB     00:00
CentOS Stream 8 - AppStream                                                                          9.8 kB/s | 4.4 kB     00:00
Metadata cache created.
allinone部署
安装软件
bash
[root@docker ~]# yum install -y docker-ce配置服务
bash
[root@docker ~]# systemctl enable docker.service --now验证安装
查看docker版本
bash
[root@docker ~]# docker --version
Docker version 26.1.3, build b72abbb
验证docker状态
bash
[root@docker ~]# systemctl status docker
● docker.service - Docker Application Container Engine
Loaded: loaded (/usr/lib/systemd/system/docker.service; enabled; vendor preset: disabled)
Active: active (running) since Wed 2025-09-03 13:51:07 CST; 36s ago
Docs: https://docs.docker.com
Main PID: 1813 (dockerd)
Tasks: 10
Memory: 135.7M
CGroup: /system.slice/docker.service
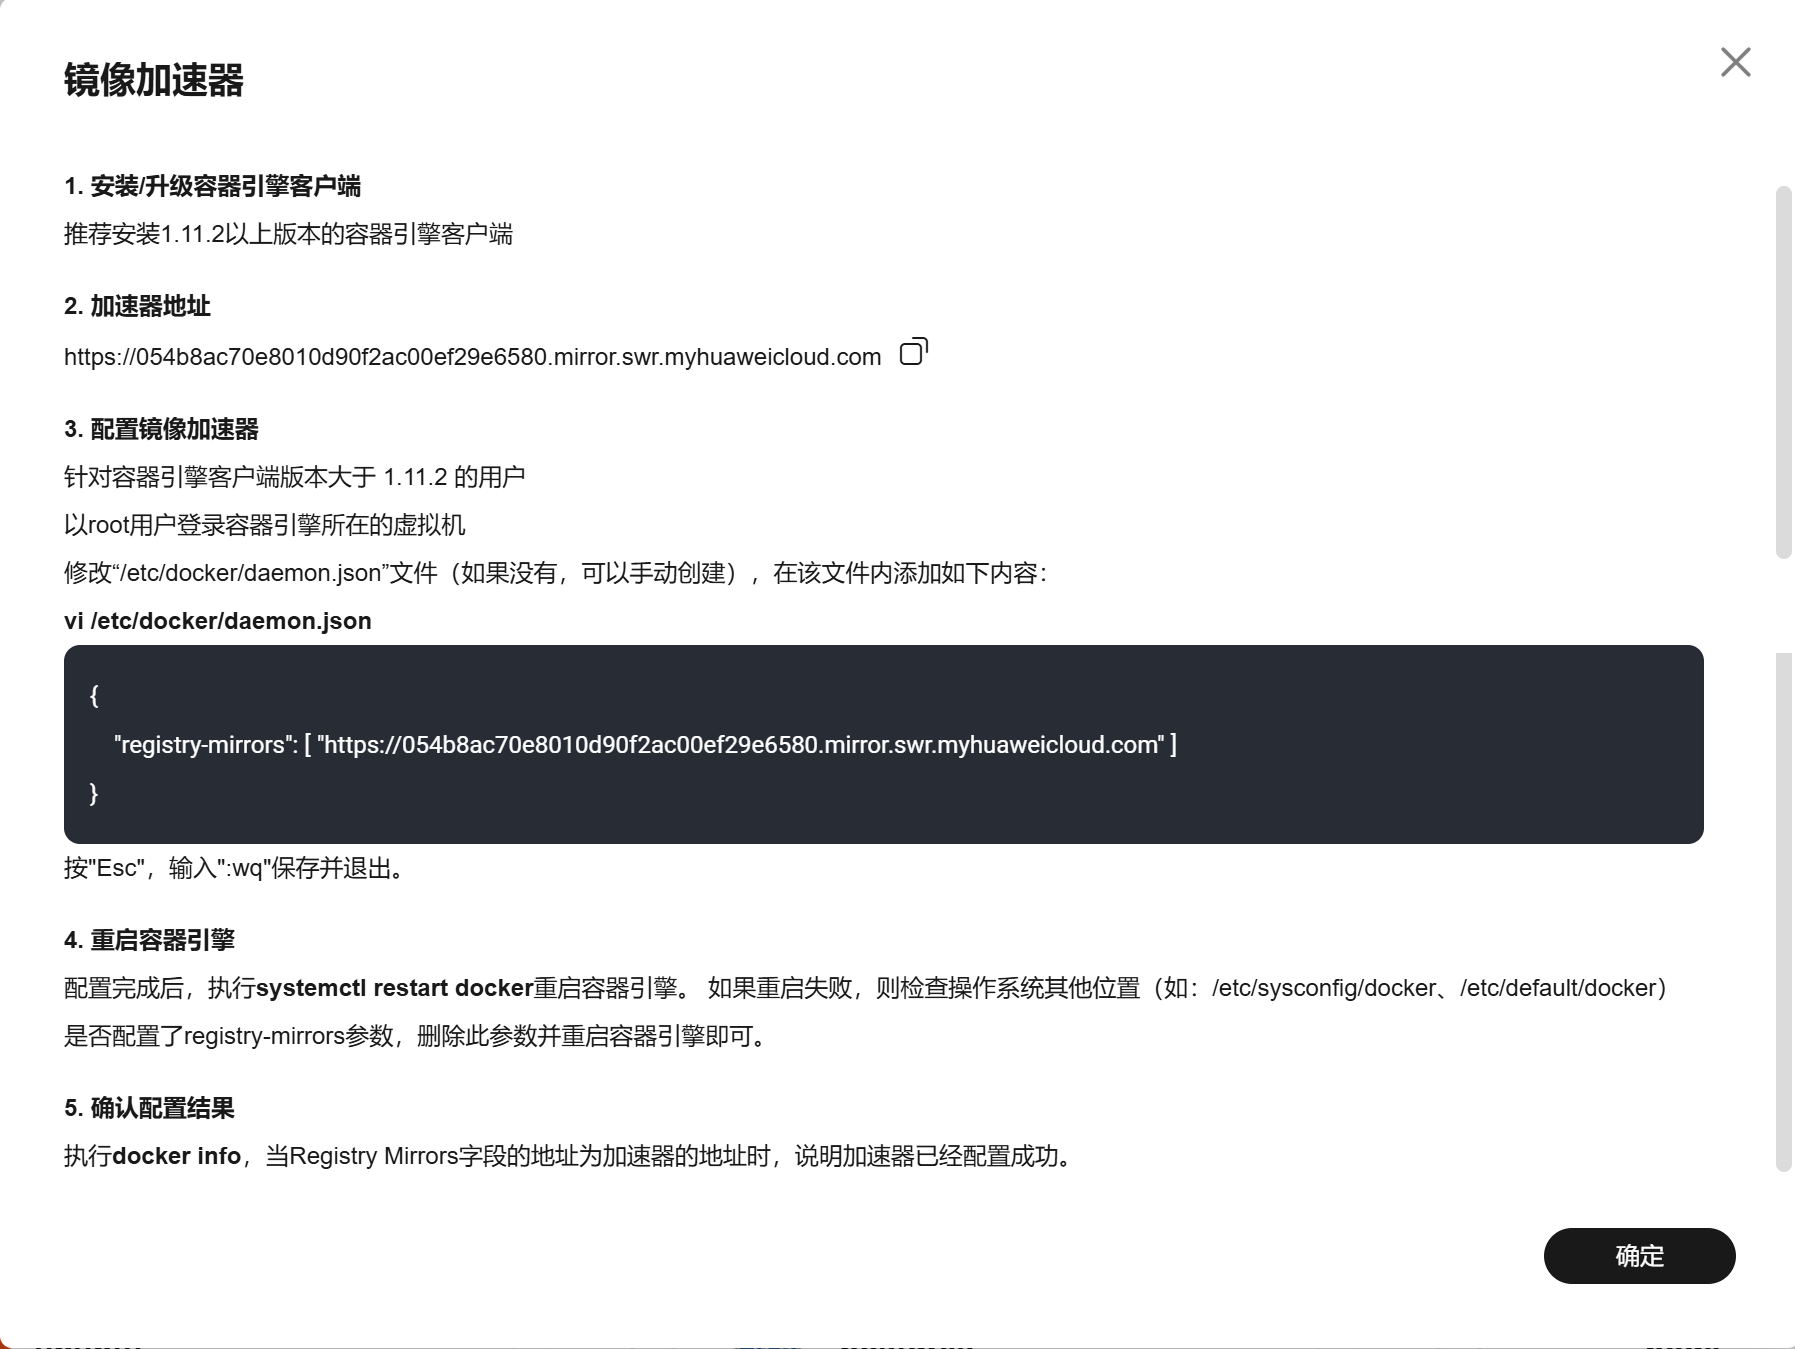
└─1813 /usr/bin/dockerd -H fd:// --containerd=/run/containerd/containerd.sock配置镜像加速器(华为云) 
查看镜像加速器如何使用:
bash
[root@docker ~]# vim /etc/docker/daemon.json
{
    "registry-mirrors": [ "https://054b8ac70e8010d90f2ac00ef29e6580.mirror.swr.myhuaweicloud.com" ]
}
# 此处输入镜像加速站提供的加速器地址
# 按"Esc",输入:wq保存并退出。

#重启容器引擎
[root@docker ~]# systemctl restart docker

#确认配置结果
[root@docker ~]# docker info
Client: Docker Engine - Community
 Version:    26.1.3
 Context:    default
 Debug Mode: false
 Plugins:
  buildx: Docker Buildx (Docker Inc.)
    Version:  v0.14.0
    Path:     /usr/libexec/docker/cli-plugins/docker-buildx
  compose: Docker Compose (Docker Inc.)
    Version:  v2.27.0
    Path:     /usr/libexec/docker/cli-plugins/docker-compose

Server:
 Containers: 0
  Running: 0
  Paused: 0
  Stopped: 0
 Images: 0
 Server Version: 26.1.3
 Storage Driver: overlay2
  Backing Filesystem: xfs
  Supports d_type: true
  Using metacopy: false
  Native Overlay Diff: true
  userxattr: false
 Logging Driver: json-file
 Cgroup Driver: cgroupfs
 Cgroup Version: 1
 Plugins:
  Volume: local
  Network: bridge host ipvlan macvlan null overlay
  Log: awslogs fluentd gcplogs gelf journald json-file local splunk syslog
 Swarm: inactive
 Runtimes: io.containerd.runc.v2 runc
 Default Runtime: runc
 Init Binary: docker-init
 containerd version: 8b3b7ca2e5ce38e8f31a34f35b2b68ceb8470d89
 runc version: v1.1.12-0-g51d5e94
 init version: de40ad0
 Security Options:
  seccomp
   Profile: builtin
 Kernel Version: 4.18.0-553.6.1.el8.x86_64
 Operating System: CentOS Stream 8
 OSType: linux
 Architecture: x86_64
 CPUs: 4
 Total Memory: 7.486GiB
 Name: docker
 ID: 96160847-9a97-40f4-997c-d12efaaef738
 Docker Root Dir: /var/lib/docker
 Debug Mode: false
 Experimental: false
 Insecure Registries:
  127.0.0.0/8
 Registry Mirrors:
  `https://054b8ac70e8010d90f2ac00ef29e6580.mirror.swr.myhuaweicloud.com/
 Live Restore Enabled: false
配置文件正确的情况下,加速站地址会在文件末尾显示。
运行第一个容器
环境就绪,马上运行第一个容器,执行命令:
bash
[root@docker ~]# docker run hello-world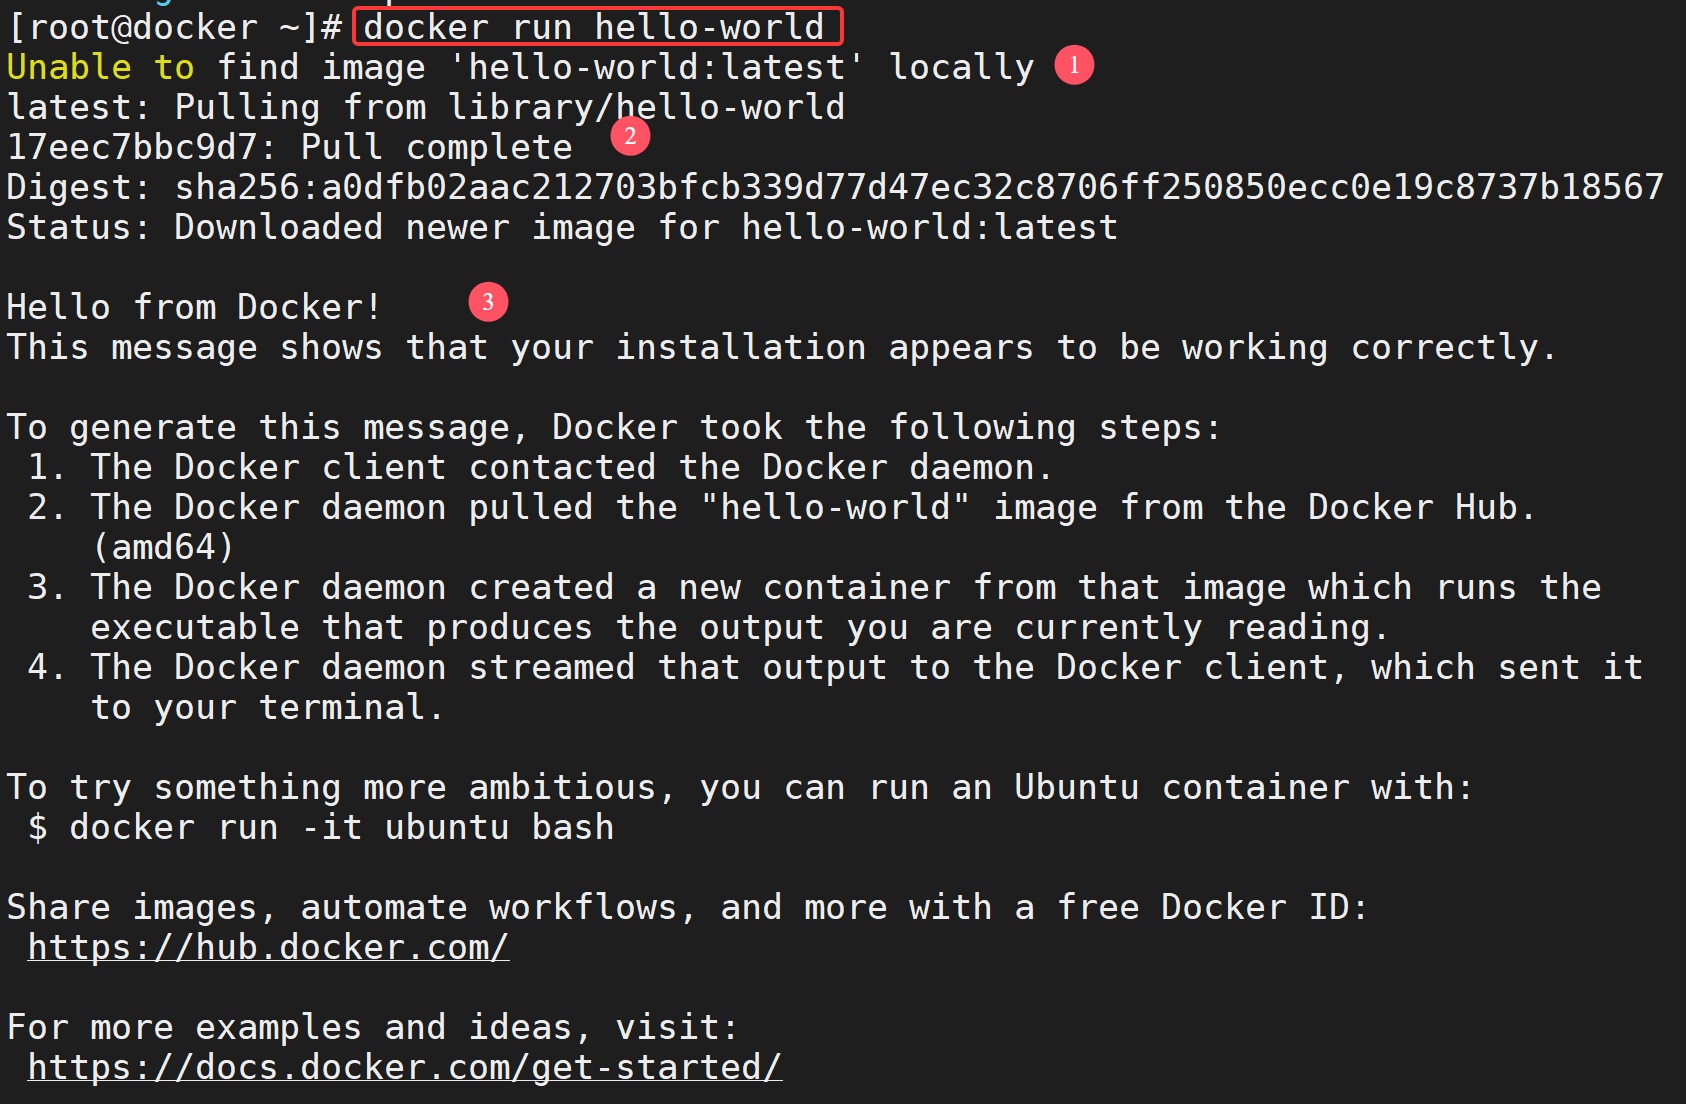
其过程可以简单描述为:
- 从本地查找hello-world镜像,没有该镜像
- 从 Docker Hub 下载hello-world镜像。
- 启动hello-world容器。
清空刚才的实验环境:
bash
[root@docker ~]# docker rm -f $(docker ps -aq)        #删除所有容器

[root@docker ~]# docker rmi -f hello-world           #删除镜像hello-world
关机拍摄快照
运行第二个容器
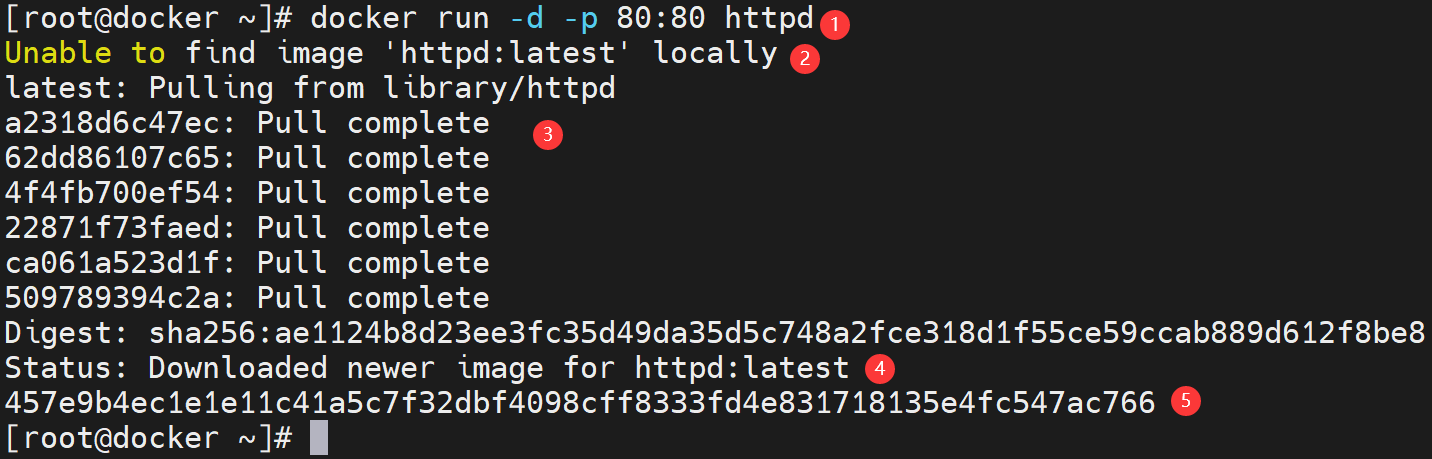
bash
[root@docker ~]# docker run -d -p 80:80 httpd
Unable to find image 'httpd:latest' locally
latest: Pulling from library/httpd
852e50cd189d: Pull complete
67d51c33d390: Pull complete
b0ad2a3b9567: Pull complete
136f1f71f30c: Pull complete
01f8ace29294: Pull complete
Digest: sha256:fddc534b7f6bb6197855be559244adb11907d569aae1283db8e6ce8bb8f6f456
Status: Downloaded newer image for httpd:latest
817f24cca3514568f9b7a7cac6f183734077fb74caf4c62502acd2a4d0d29520
其过程可以简单描述为:
- 从 Docker Hub 下载 httpd 镜像。镜像中已经安装好了 Apache HTTP Server。
- 启动 httpd 容器,并将容器的 80 端口映射到 host 的 80 端口。
下面我们可以通过浏览器验证容器是否正常工作。在浏览器中输入 http://your host os IP
bash
[root@docker ~]# curl 192.168.108.30
<html><body><h1>It works!</h1></body></html>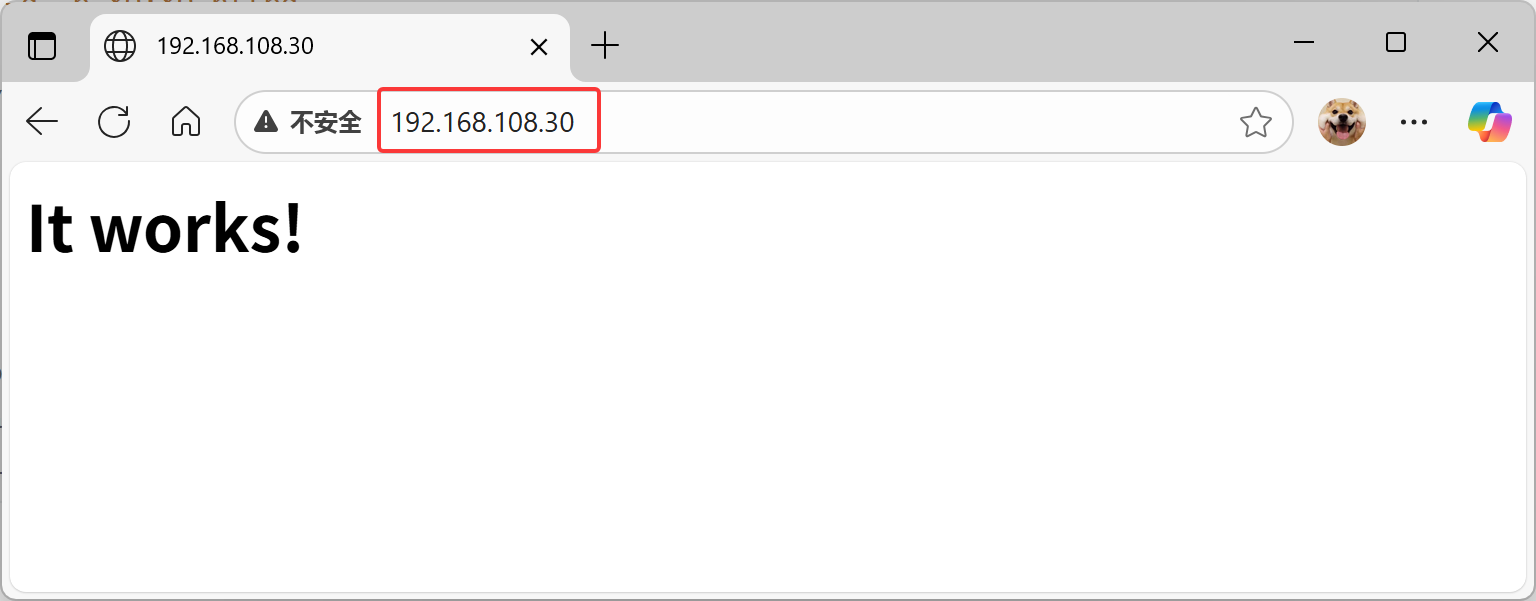
容器的 http 服务运行成功,我们搭建了一个WEB服务器。
docker Client/Server分离部署
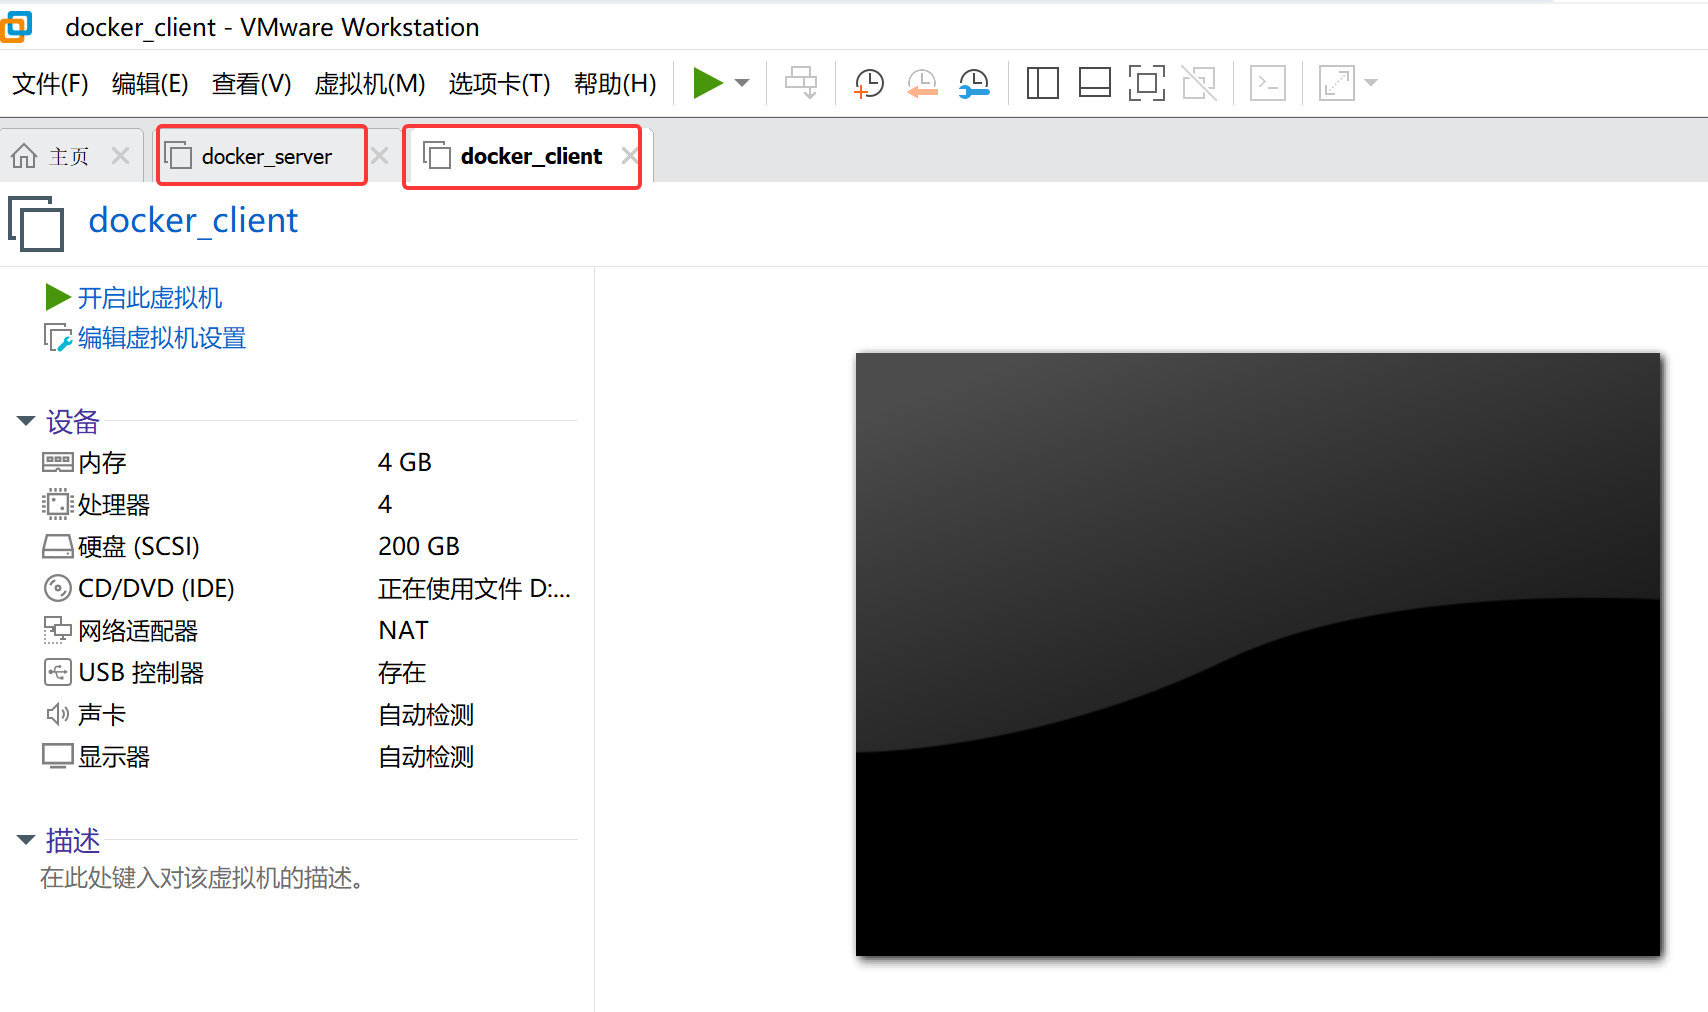
克隆两个CentOS8虚拟机,命名为docker_client和docker_server
docker server端配置
配置ip 192.168.108.30
配置hostname docker_server
bash
[root@localhost ~]# hostnamectl set-hostname docker_server
[root@localhost ~]# nmcli connection modify ens160 ipv4.method manual ipv4.addresses 192.168.108.30/24 ipv4.gateway 192.168.108.2 ipv4.dns 192.168.108.2 autoconnect yes
[root@localhost ~]# nmcli con up ens160
安装软件
bash
[root@docker_server ~]# yum install -y yum-utils device-mapper-persistent-data lvm2 vim
[root@localhost ~]# yum-config-manager --add-repo https://mirrors.aliyun.com/docker-ce/linux/centos/docker-ce.repo
Adding repo from: https://mirrors.aliyun.com/docker-ce/linux/centos/docker-ce.repo
[root@docker_server ~]# yum makecache
[root@docker_server ~]# yum install -y docker-ce
[root@docker_server ~]# systemctl enable docker.service --now
[root@docker_server ~]# vi /etc/docker/daemon.json
{
    "registry-mirrors": [ "https://054b8ac70e8010d90f2ac00ef29e6580.mirror.swr.myhuaweicloud.com" ]
}
# 按"Esc",输入:wq保存并退出。

#重启容器引擎
[root@docker_server ~]# systemctl restart docker
配置服务
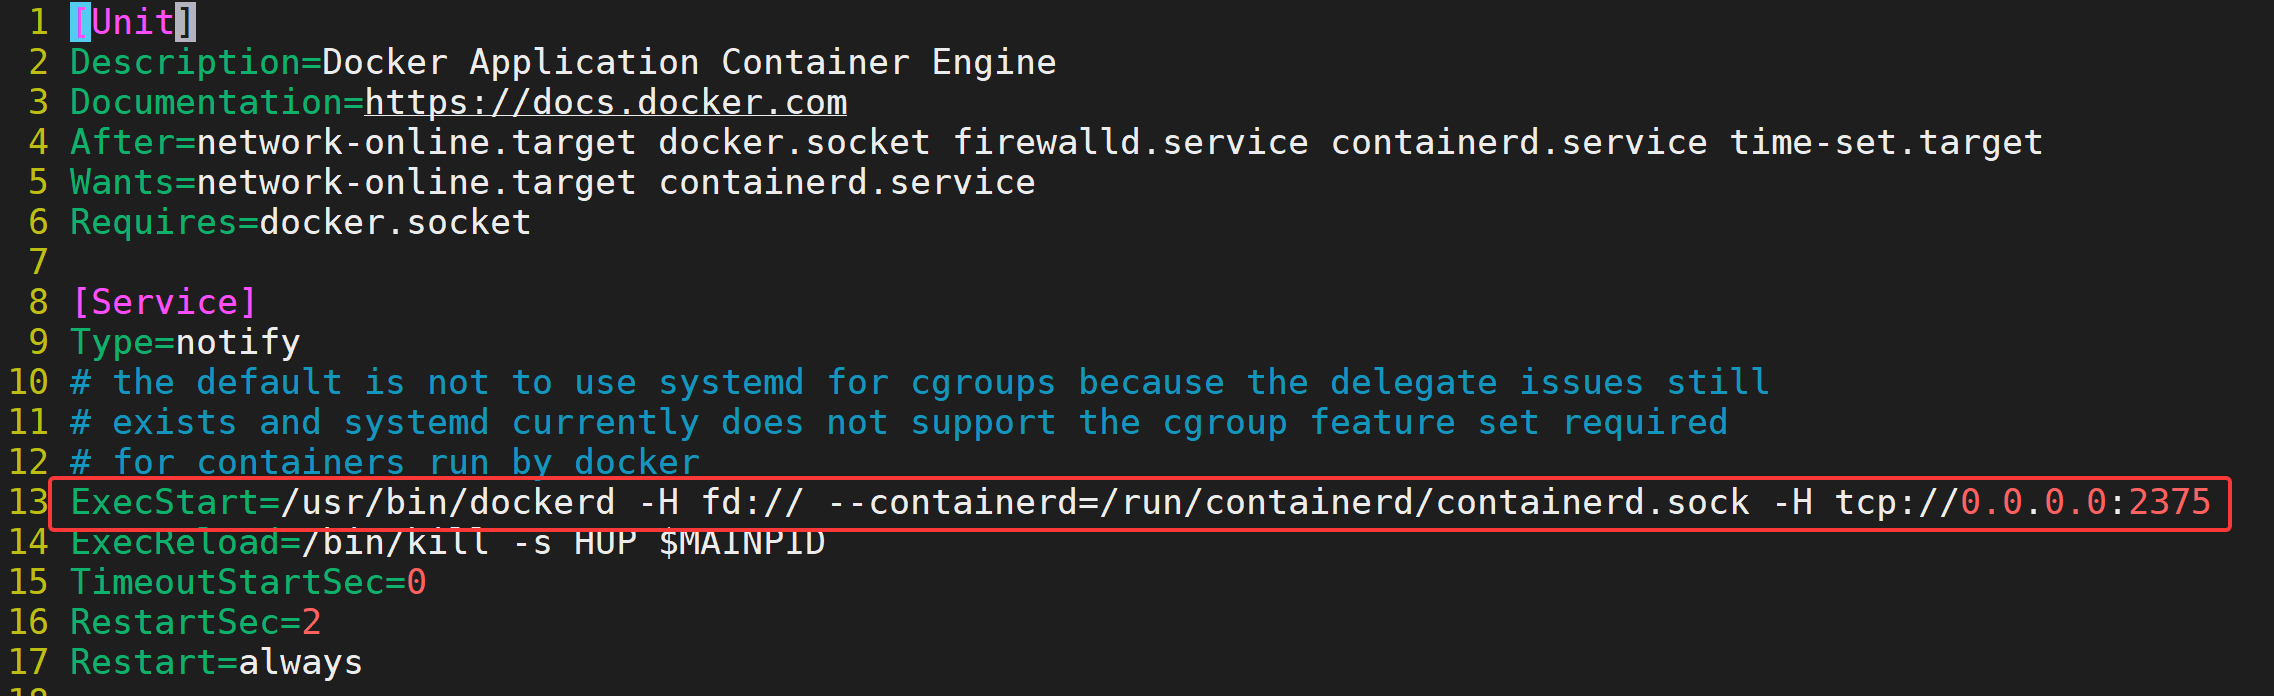
bash
[root@docker_server ~]# vim /usr/lib/systemd/system/docker.service
# 在ExecStart参数中最后添加 -H tcp://0.0.0.0:2375,docker默认监听2375
ExecStart=/usr/bin/dockerd -H fd:// --containerd=/run/containerd/containerd.sock -H tcp://0.0.0.0:2375
[root@docker_server ~]# systemctl daemon-reload
[root@docker_server ~]# systemctl restart docker.service
[root@docker_server ~]# systemctl stop firewalld
配置效果如下
验证
bash
[root@docker_server ~]# yum install lsof

[root@docker_server ~]# lsof -i :2375
COMMAND  PID USER   FD   TYPE DEVICE SIZE/OFF NODE NAME
dockerd 5440 root    3u  IPv6  44991      0t0  TCP *:docker (LISTEN)
docker_client端
配置ip 192.168.108.31
bash
[root@localhost ~]# hostnamectl set-hostname docker_client
[root@localhost ~]# nmcli connection modify ens160 ipv4.method manual ipv4.addresses 192.168.108.31/24 ipv4.gateway 192.168.108.2 ipv4.dns 192.168.108.2 autoconnect yes
[root@localhost ~]# nmcli con up ens160
只安装docker客户端
bash
[root@docker-client ~]# yum install -y yum-utils device-mapper-persistent-data lvm2 vim
[root@docker-client ~]# yum-config-manager --add-repo https://mirrors.aliyun.com/docker-ce/linux/centos/docker-ce.repo
Adding repo from: https://mirrors.aliyun.com/docker-ce/linux/centos/docker-ce.repo
[root@docker-client ~]# yum makecache
[root@docker-client ~]# yum install -y docker-ce-cli
验证
bash
[root@docker_client ~]# docker run hello-world          #client直接执行报错,没有装服务端
docker: Cannot connect to the Docker daemon at unix:///var/run/docker.sock. Is the docker daemon running?.
See 'docker run --help'.

# client端连接server端执行命令
[root@docker-client ~]# docker -H 192.168.108.30 run hello-world

Hello from Docker!
This message shows that your installation appears to be working correctly.

To generate this message, Docker took the following steps:
 1. The Docker client contacted the Docker daemon.
 2. The Docker daemon pulled the "hello-world" image from the Docker Hub.
    (amd64)
 3. The Docker daemon created a new container from that image which runs the
    executable that produces the output you are currently reading.
 4. The Docker daemon streamed that output to the Docker client, which sent it
    to your terminal.

To try something more ambitious, you can run an Ubuntu container with:
 $ docker run -it ubuntu bash

Share images, automate workflows, and more with a free Docker ID:
 https://hub.docker.com/

For more examples and ideas, visit:
 https://docs.docker.com/get-started/

[root@docker-client ~]# docker -H 192.168.108.30 images
REPOSITORY    TAG       IMAGE ID       CREATED         SIZE
hello-world   latest    d2c94e258dcb   17 months ago   13.3kB
#这里也可以切换到Server端查看现象
分离部署作用:client端只做管理,image和container存储在server端。