本文主要讨论使用c语言实现链表。
什么是链表?
前面我们学习了顺序表。顺序表就和数组一样,元素是按照顺序摆放的,并且可以通过下标快速查找到任意一个元素,但顺序表的缺点是插入和删除元素会导致后面的元素全部进行改变,效率不高。
而链表的特点和顺序表相反,链表中数据的修改插入和删除十分方便,但查找会相对困难。那么,链表到底是什么原理呢?
链表就是用一条线将珠子串起来。
我们知道在顺序表中的逻辑上相邻的元素实际存放的物理地址也是相邻的;但在链表之中,元素的存放位置不一定相邻。元素与元素之间通过指针串联起来,前一个元素中存放有指向下一个元素的指针,这样就将不同的元素之间一个个地串联起来,这就是链表。我们只能从第一个元素一个一个往后查找,而不能像顺序表一样随意访问任意元素。
链表的实现
链表有多种类别,其中最容易实现的为单向链表。本文主要讨论单向链表的实现方式。
从上面的说明中,我们知道链表中的一个元素需要包括它本身的数据和指向下一个元素的指针,我们这里创建出一个"珠子",也就是节点,节点需要包括数据和下一个节点的地址。
同样地,我们需要一个头文件,一个源文件以及测试文件。先来看头文件:
头文件
首先我们要定义一个节点的结构。
cpp
#pragma once
#include <stdio.h>
#include <stdlib.h>
#include <assert.h>

typedef int ListType;

//节点结构体
struct Node
{
	ListType data;
	struct Node* next;
};
这里说明一下next指针,其数据类型肯定要是节点的类型,即Node*;不过,为什么还要在前面加上struct呢?
因为我们将next定义在了Node结构体内部,而此时程序运行到next时,我们的node结构体创建还未完成,所以这里不能直接写成 Node* next 。
不过这样我们只是创建除了一个节点。链表和顺序表不同,链表不是将元素按照顺序排列的。所以,更规范化的操作是,我们还需要为链表创建一个入口:
cpp
#pragma once
#include <stdio.h>
#include <stdlib.h>
#include <assert.h>

typedef int ListType;

//节点结构体
struct Node
{
	ListType data;
	struct Node* next;
};

struct SList
{
	Node* _head;
};
下面创建的_head指针就相当于链表的入口,它将存放第一个有效节点的地址。
这次我们直接从源文件开写功能讲解:
源文件
1、初始化
所有数据结构都要进行初始化操作。初始化很简单,我们只需要创建一个空链表,实现如下:
cpp
void InitList(SList* p)
{
	assert(p);
	p->_head = NULL;
}
2、创建节点
之后,如果我们需要增加节点时,都需要进行新节点的创建。因此我们需要实现下面的函数:
cpp
Node* BuyNewNode(ListType x)
{
	Node* newnode = (Node*)malloc(sizeof(Node));
	assert(newnode);
	newnode->data = x;
	newnode->next = NULL;
	return newnode;
}
和前面的顺序表malloc部分原理相通,这里就不做详细讲解了。
3、打印
下面我们先实现一个简单的功能:打印链表的所有元素值。
cpp
void Print(const SList* p)
{
	assert(p);
	Node* cur = p->_head;
	while (cur)
	{
		printf("%d->", cur->data);
		cur = cur->next;
	}
	printf("\n");
}
这里我们利用cur从头遍历整个链表。
4、销毁
有初始化也有销毁。先看代码:
cpp
void Destroy(SList* p)
{
	assert(p);
	Node* cur = p->_head;
	while (cur)
	{
		Node* next = cur->next;
		free(cur);
		cur = next;
	}
	p->_head = NULL;
}
由于我们节点都是我们后面创建的,所以要遍历将所有节点释放。这里要先保存next,再free当前节点。最后再对_head指针做处理,防止变成野指针。
5、头插
下面我们讨论从头部插入节点。先看代码:
cpp
void HeadInsert(SList* p, ListType x)
{
	assert(p);
	Node* newnode = BuyNewNode(x);
	newnode->next = p->_head;
	p->_head = newnode;
}
将新节点指向head原来的位置,再更新头指针为新节点。这样就实现了从头插入。
6、头删
在删除之前,我们需要判断是否为空链表,如果为空链表则直接返回。
cpp
void HeadDelete(SList* p)
{
	assert(p);

	//如果是空链表则直接返回
	if (p->_head == NULL)
		return;

	Node* next = p->_head->next;
	free(p->_head);
	p->_head = next;
}
7、尾插
下面我们来讨论尾插。尾插时我们需要找到最后一个节点。
为了提高效率,如果链表为空链表,就不用遍历查找,直接将_head指向新节点。
cpp
void TailInsert(SList* p, ListType x)
{
	assert(p);
	Node* tail = p->_head;
	Node* newnode = BuyNewNode(x);
	if (p->_head == NULL)
	{
		p->_head = newnode;//新节点成为头节点
		return;
	}
	else
	{
		while (tail->next)
		{
			tail = tail->next;
		}
		tail->next = newnode;
	}
}
8、尾删
同样的道理,我们来进行尾删:
cpp
void TailDelete(SList* p)
{
	assert(p);

	//空链表直接返回
	if (p->_head == NULL)
		return;

	//如果只有一个节点
	if (p->_head->next == NULL)
	{
		free(p->_head);
		p->_head = NULL;
		return;
	}

	Node* tail = p->_head;
	Node* prev = NULL;
	while (tail->next)
	{
		prev = tail;
		tail = tail->next;
	}
	prev->next = NULL;
	free(tail);
}
这里我们使用了prev来标记前一个节点来完成最后的释放操作,将结尾前一个节点的指针置空。不过,如果只有一个有效节点的情况时不会进入循环,prev仍为空。所以还需要单独讨论一个节点的情况。
9、查找对应值的元素
还是先看代码:
cpp
Node* ListFind(SList* p, ListType x)
{
	assert(p);
	if (p->_head == NULL)
	{
		printf("链表为空!\n");
		return NULL;
	}
	Node* cur = p->_head;
	while(cur)
	{
		if(cur->data == x)
		    return cur;
		cur = cur->next;
	}
	printf("未找到对应值的节点!\n");
	return NULL;
}
这里由于返回值为指针,在未找到的情况时要返回空指针表示未找到。
在while循环中判断的条件为cur,当cur本身为空时则跳出循环。
这基本上就是单向链表的基础功能了。最后我们将头文件补充完整:
cpp
#pragma once
#include <stdio.h>
#include <stdlib.h>
#include <assert.h>

typedef int ListType;

//节点结构体
struct Node
{
	ListType data;
	struct Node* next;
};

struct SList
{
	Node* _head;
};

void InitList(SList* p);
Node* BuyNewNode(ListType x);
void Print(SList* p);
void Destroy(SList* p);
void HeadInsert(SList* p, ListType x);
void TailInsert(SList* p, ListType x);
void HeadDelete(SList* p);
void TailDelete(SList* p);
void Print(SList* p);
Node* ListFind(SList* p, ListType x);
测试使用
下面我们在main函数中使用链表。
首先要创建一个链表,我们再添加四个元素看看;
cpp
#include "List.h"

int main()
{
	SList sl;
	InitList(&sl);
	HeadInsert(&sl, 1);
	TailInsert(&sl, 2);
	TailInsert(&sl, 3);
	HeadInsert(&sl, 3);
	Print(&sl);

	return 0;
}
运行后如下:
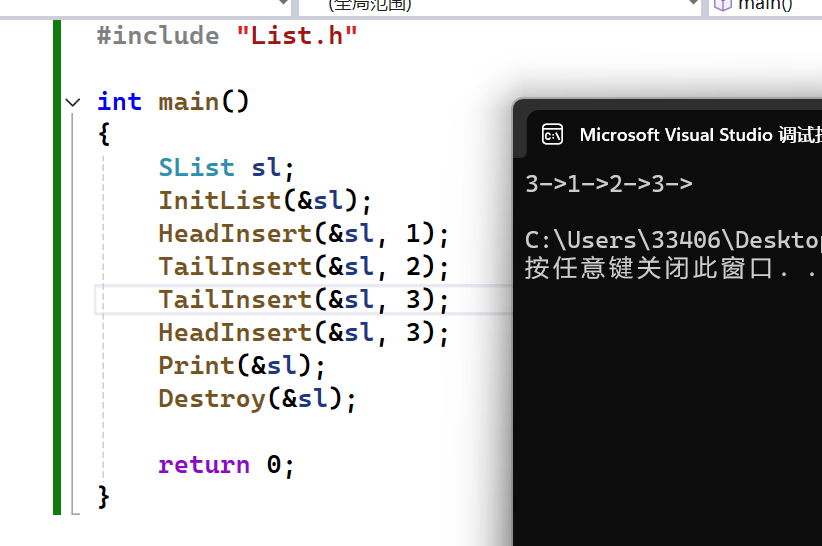
可以看到数据添加成功。我们再删除元素看看:
cpp
	TailDelete(&sl);
	TailDelete(&sl);
	HeadDelete(&sl);
	Print(&sl);
	HeadDelete(&sl);
	Print(&sl);
	ListFind(&sl,1);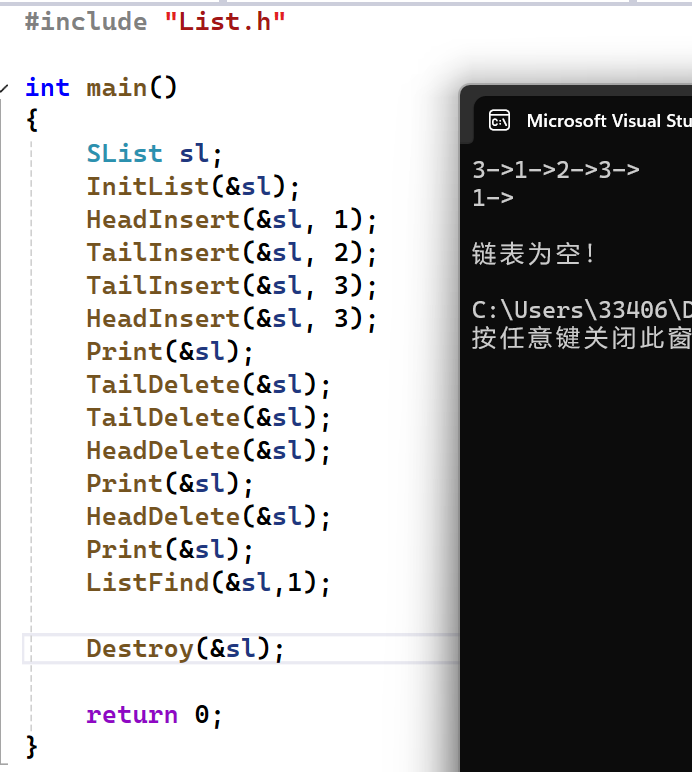
运行成功。这样我们就成功实现了单向链表。
完整代码
最后给出单向链表的三个文件完整代码:
1、头文件(List.h)
cpp
#pragma once
#include <stdio.h>
#include <stdlib.h>
#include <assert.h>

typedef int ListType;

//节点结构体
struct Node
{
	ListType data;
	struct Node* next;
};

struct SList
{
	Node* _head;
};

void InitList(SList* p);
Node* BuyNewNode(ListType x);
void Print(SList* p);
void Destroy(SList* p);
void HeadInsert(SList* p, ListType x);
void TailInsert(SList* p, ListType x);
void HeadDelete(SList* p);
void TailDelete(SList* p);
void Print(SList* p);
Node* ListFind(SList* p, ListType x);
2、源文件(List.c)
cpp
#include "List.h"

void InitList(SList* p)
{
	assert(p);
	p->_head = NULL;
}

Node* BuyNewNode(ListType x)
{
	Node* newnode = (Node*)malloc(sizeof(Node));
	assert(newnode);
	newnode->data = x;
	newnode->next = NULL;
	return newnode;
}

void Print(SList* p)
{
	assert(p);
	Node* cur = p->_head;
	while (cur)
	{
		printf("%d->", cur->data);
		cur = cur->next;
	}
	printf("\n");
}

void Destroy(SList* p)
{
	assert(p);
	Node* cur = p->_head;
	while (cur)
	{
		Node* next = cur->next;
		free(cur);
		cur = next;
	}
	p->_head = NULL;
}

void HeadInsert(SList* p, ListType x)
{
	assert(p);
	Node* newnode = BuyNewNode(x);
	newnode->next = p->_head;
	p->_head = newnode;
}

void HeadDelete(SList* p)
{
	assert(p);

	//如果是空链表则直接返回
	if (p->_head == NULL)
		return;

	Node* next = p->_head->next;
	free(p->_head);
	p->_head = next;
}

void TailInsert(SList* p, ListType x)
{
	assert(p);
	Node* tail = p->_head;
	Node* newnode = BuyNewNode(x);
	if (p->_head == NULL)
	{
		p->_head = newnode;//新节点成为头节点
		return;
	}
	else
	{
		while (tail->next)
		{
			tail = tail->next;
		}
		tail->next = newnode;
	}
}

void TailDelete(SList* p)
{
	assert(p);

	//空链表直接返回
	if (p->_head == NULL)
		return;

	//如果只有一个节点
	if (p->_head->next == NULL)
	{
		free(p->_head);
		p->_head = NULL;
		return;
	}

	Node* tail = p->_head;
	Node* prev = NULL;
	while (tail->next)
	{
		prev = tail;
		tail = tail->next;
	}
	prev->next = NULL;
	free(tail);
}

Node* ListFind(SList* p, ListType x)
{
	assert(p);
	if (p->_head == NULL)
	{
		printf("链表为空!\n");
		return NULL;
	}
	Node* cur = p->_head;
	while(cur)
	{
		if(cur->data == x)
		    return cur;
		cur = cur->next;
	}
	printf("未找到对应值的节点!\n");
	return NULL;
}
3、测试文件
cpp
#include "List.h"

int main()
{
	SList sl;
	InitList(&sl);
	HeadInsert(&sl, 1);
	TailInsert(&sl, 2);
	TailInsert(&sl, 3);
	HeadInsert(&sl, 3);
	Print(&sl);
	TailDelete(&sl);
	TailDelete(&sl);
	HeadDelete(&sl);
	Print(&sl);
	HeadDelete(&sl);
	Print(&sl);
	Node* tmp = ListFind(&sl,1);
	if (tmp == NULL)
		printf("hello world!\n");

	Destroy(&sl);

	return 0;
}