Springboot和jdk的版本关系对应
- Spring Boot 2.x
要求 Java 8 或更高版本(最低 Java 8)
支持 Java 8、11、17、18、19
Spring Boot 2.7.x 是 2.x 的最后一个分支(维护到 2023年11月) - Spring Boot 3.x
要求 Java 17 或更高版本(最低 Java 17)
支持 Java 17、18、19、20、21
不兼容 Java 8、11
创建一个maven项目
-
项目结构:

-
默认生成的pom.xml
xml<?xml version="1.0" encoding="UTF-8"?> <project xmlns="http://maven.apache.org/POM/4.0.0" xmlns:xsi="http://www.w3.org/2001/XMLSchema-instance" xsi:schemaLocation="http://maven.apache.org/POM/4.0.0 http://maven.apache.org/xsd/maven-4.0.0.xsd"> <modelVersion>4.0.0</modelVersion> <groupId>com.qi</groupId> <artifactId>demo1</artifactId> <version>1.0</version> <properties> <maven.compiler.source>8</maven.compiler.source> <maven.compiler.target>8</maven.compiler.target> <project.build.sourceEncoding>UTF-8</project.build.sourceEncoding> </properties> </project>-
project标签:是我们的项目标签,即根标签
-
modelVersion:固定的。XML的模式版本,是 Maven 2 和 Maven 3 使用的标准版本。每个 Maven pom.xml 文件必须以此开头
-
groupId和artifactId:两个加起来,表示这个项目
-
version:项目版本号
-
properties:自定义变量区域
- maven.compiler.source:指定源代码使用 Java 8 语法
- maven.compiler.target:指定生成的字节码兼容 Java 8 JVM
-
如果是SpringBoot3.x,则最低jdk17
xml<?xml version="1.0" encoding="UTF-8"?> <project xmlns="http://maven.apache.org/POM/4.0.0" xmlns:xsi="http://www.w3.org/2001/XMLSchema-instance" xsi:schemaLocation="http://maven.apache.org/POM/4.0.0 http://maven.apache.org/xsd/maven-4.0.0.xsd"> <modelVersion>4.0.0</modelVersion> <properties> <maven.compiler.source>17</maven.compiler.source> <maven.compiler.target>17</maven.compiler.target> <project.build.sourceEncoding>UTF-8</project.build.sourceEncoding> </properties> </project>
-
引入SpringBoot
-
第一种方式,继承
直接设置Springboot为父项目,在pom.xml中直接写入
xml<!-- (project标签内) --> <parent> <groupId>org.springframework.boot</groupId> <artifactId>spring-boot-starter-parent</artifactId> <version>2.5.15</version> <relativePath /> </parent>此时这个项目就是一个Springboot项目了
-
如果是SpringBoot3.x
xml<parent> <groupId>org.springframework.boot</groupId> <artifactId>spring-boot-starter-parent</artifactId> <version>3.4.3</version> <relativePath/> </parent>
-
-
第二种方式,自行管理
xml<!-- (project标签内) --> <dependencyManagement> <dependencies> <!-- 引入 Spring Boot BOM --> <dependency> <groupId>org.springframework.boot</groupId> <artifactId>spring-boot-dependencies</artifactId> <version>2.5.15</version> <type>pom</type> <scope>import</scope> </dependency> </dependencies> </dependencyManagement>dependencyManagement:依赖管理。仅仅声明依赖及其版本,但不实际引入
-
SpringBoot3.x也一样,替换版本号即可
xml<dependencyManagement> <dependencies> <!-- 引入 Spring Boot BOM --> <dependency> <groupId>org.springframework.boot</groupId> <artifactId>spring-boot-dependencies</artifactId> <version>3.4.3</version> <type>pom</type> <scope>import</scope> </dependency> </dependencies> </dependencyManagement>
-
-
不管用哪种方式成为Springboot项目,之后都必须引入Springboot核心依赖
xml<!-- (project标签内) --> <dependencies> <!-- SpringBoot 核心包 --> <dependency> <groupId>org.springframework.boot</groupId> <artifactId>spring-boot-starter</artifactId> </dependency> </dependencies>由于本身是Springboot项目,所有无需手动指定具体版本,有Springboot默认的稳定版本。
-
创建启动类:Application
javaimport org.springframework.boot.SpringApplication; import org.springframework.boot.autoconfigure.SpringBootApplication; @SpringBootApplication public class Application { public static void main(String[] args) { SpringApplication.run(Application.class, args); System.out.println("----------------项目启动成功----------------"); } }@SpringBootApplication详解//todo
-
此时便可执行main方法,得到结果
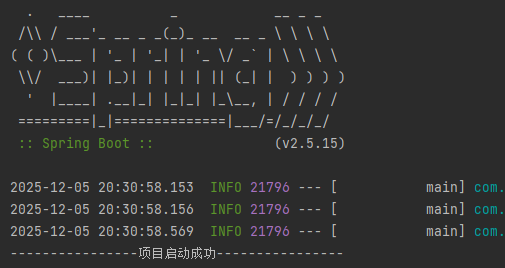
程序执行完成之后就会自动结束,那是因为主线程没有需要保持运行的程序。
可以为其添加需要持续运行的程序,例如:Web容器
SpringWeb容器
-
引入SpringWeb容器
xml<!-- SpringBoot Web容器 --> <dependency> <groupId>org.springframework.boot</groupId> <artifactId>spring-boot-starter-web</artifactId> </dependency> -
创建一个测试接口类
这个类我们取名叫做:DemoController
这个类所在的包,必须在主程序Application同级的目录下,这样才会自动扫描到:

-
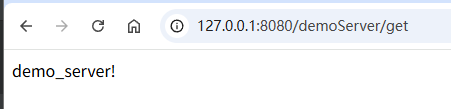
DemoController
javaimport org.springframework.web.bind.annotation.GetMapping; import org.springframework.web.bind.annotation.RequestMapping; import org.springframework.web.bind.annotation.RestController; @RequestMapping("/demoServer") @RestController public class DemoController { @GetMapping("/get") public String getDemo(){ return "demo_server!"; } }@RequestMapping详解//todo
@GetMapping详解//todo
-
此时启动项目,程序运行的默认端口为:8080
打开浏览器,输入:http://127.0.0.1:8080/demoServer/get
此时会调用我们刚才写的接口,并拿到结果: