文章目录
- [1. SVC 与系统调用介绍](#1. SVC 与系统调用介绍)
- [2. 应用源码分析:用指令操作文件的校验逻辑](#2. 应用源码分析:用指令操作文件的校验逻辑)
-
- [2.1 核心防绕特点:绕过用户态函数 hook](#2.1 核心防绕特点:绕过用户态函数 hook)
- [2.2 校验流程回顾](#2.2 校验流程回顾)
- [3. Hook 绕过:直接拦截系统调用指令](#3. Hook 绕过:直接拦截系统调用指令)
-
- [3.1 为何之前的方法失效?](#3.1 为何之前的方法失效?)
- [3.2 绕过思路:识别并 hook 系统调用指令](#3.2 绕过思路:识别并 hook 系统调用指令)
- [3.3 完整脚本与流程分析](#3.3 完整脚本与流程分析)
- [3.4 执行脚本与效果](#3.4 执行脚本与效果)
- [4. 章节总结](#4. 章节总结)
-
- [4.1 指令校验的意义](#4.1 指令校验的意义)
- [4.2 绕过核心思路](#4.2 绕过核心思路)
- [4.3 不同架构的适配](#4.3 不同架构的适配)
⚠️本博文所涉安全渗透测试技术、方法及案例,仅用于网络安全技术研究与合规性交流,旨在提升读者的安全防护意识与技术能力。任何个人或组织在使用相关内容前,必须获得目标网络 / 系统所有者的明确且书面授权,严禁用于未经授权的网络探测、漏洞利用、数据获取等非法行为。
1. SVC 与系统调用介绍
对于刚接触底层指令的同学来说,可能会疑惑「SVC」到底是什么?简单说,SVC 是 ARM 架构(包括手机常用的 ARM64 架构)中的一种「特殊指令」,全称是 Supervisor Call(管理程序调用)。它的核心作用是让程序从「用户态」切换到「内核态」------就像给操作系统内核发了一个「请求信号」,让内核帮忙执行一些敏感操作(比如打开文件、读取数据等)。
为什么要用 SVC 呢?因为手机(几乎都是 ARM64 架构)中的应用程序默认运行在「用户态」,没有权限直接操作硬件或核心资源,必须通过 SVC 指令触发「系统调用」,让内核代劳。比如我们想打开一个文件时,应用会通过 SVC 指令告诉内核「我要打开文件,路径是xxx」,内核执行后再把结果返回给应用。
这种方式的特殊之处在于:它绕开了用户态的库函数(比如 libc.so 中的 open 函数),直接通过汇编指令触发系统调用。这就导致之前通过 hook libc.so 中 open、read 等函数的绕过方法失效了------因为程序根本没调用这些函数,而是直接用指令和内核沟通。
本章为了方便演示(模拟器环境),使用的是 x86_64 架构的设备。在 x86_64 中,触发系统调用的指令不是 SVC,而是「syscall」,但核心原理完全一致:都是通过底层指令直接调用内核,避免用户态函数被 hook。
本章节使用的示例 APK、相关源码如下:
链接: https://pan.baidu.com/s/1CSzpLWr7DpY3oStWv5ZV_A?pwd=n2tp
提取码: n2tp
2. 应用源码分析:用指令操作文件的校验逻辑
从源码来看,本次检测 Frida 的核心逻辑和之前类似(检查线程名中的特征关键词),但关键差异在于文件操作的实现方式------通过底层指令直接调用系统调用,而非 libc 函数。
c++
#include <jni.h>
#include <string>
#include <sstream>
#include <dirent.h>
#include <unistd.h>
#include <cstring>
#include <fcntl.h>
#include <cstdint>
#include <algorithm>
#include <vector>
#include <android/log.h>
#include <cerrno>
#include <cstdlib>

#define LOG_TAG "FridaCheck"
#define LOGI(...) __android_log_print(ANDROID_LOG_INFO, LOG_TAG, __VA_ARGS__)
#define LOGE(...) __android_log_print(ANDROID_LOG_ERROR, LOG_TAG, __VA_ARGS__)
#define LOGW(...) __android_log_print(ANDROID_LOG_WARN, LOG_TAG, __VA_ARGS__)

#if defined(__aarch64__) // ARM64架构
// ARM64 syscall号(Android)
#define SYS_OPEN    56
#define SYS_READ    63
#define SYS_CLOSE   57

// SVC指令触发sys_open(内核态打开文件)
static int syscall_open(const char* path, int flags, mode_t mode) {
    int fd;
    __asm__ volatile (
        "mov x8, %1\n"    // x8 = 系统调用号
        "mov x0, %2\n"    // x0 = 文件路径
        "mov x1, %3\n"    // x1 = 打开标志
        "mov x2, %4\n"    // x2 = 文件权限
        "svc #0\n"        // 触发SVC指令,进入内核态
        "mov %0, x0\n"    // 保存返回值(文件描述符)
        : "=r"(fd)
        : "i"(SYS_OPEN), "r"(path), "r"(flags), "r"(mode)
        : "x0", "x1", "x2", "x8", "memory"
    );
    return fd;
}

// SVC指令触发sys_read(内核态读取文件内容)
static ssize_t syscall_read(int fd, void* buf, size_t count) {
    ssize_t ret;
    __asm__ volatile (
        "mov x8, %1\n"
        "mov x0, %2\n"
        "mov x1, %3\n"
        "mov x2, %4\n"
        "svc #0\n"
        "mov %0, x0\n"
        : "=r"(ret)
        : "i"(SYS_READ), "r"(fd), "r"(buf), "r"(count)
        : "x0", "x1", "x2", "x8", "memory"
    );
    return ret;
}

// SVC指令触发sys_close(内核态关闭文件)
static int syscall_close(int fd) {
    int ret;
    __asm__ volatile (
        "mov x8, %1\n"
        "mov x0, %2\n"
        "svc #0\n"
        "mov %0, x0\n"
        : "=r"(ret)
        : "i"(SYS_CLOSE), "r"(fd)
        : "x0", "x8", "memory"
    );
    return ret;
}

#elif defined(__x86_64__) // x86_64架构(模拟器/Android x86_64)
// x86_64 syscall号(Linux/Android)
#define SYS_OPEN    2
#define SYS_READ    0
#define SYS_CLOSE   3

// x86_64 syscall_open实现
static int syscall_open(const char* path, int flags, mode_t mode) {
    long fd;
    __asm__ volatile (
        "movq %1, %%rax\n"  // rax = 系统调用号
        "movq %2, %%rdi\n"  // rdi = 文件路径
        "movq %3, %%rsi\n"  // rsi = 打开标志
        "movq %4, %%rdx\n"  // rdx = 文件权限
        "syscall\n"         // 触发syscall
        "movq %%rax, %0\n"  // 保存返回值
        : "=r"(fd)
        : "i"(SYS_OPEN), "r"((long)path), "r"((long)flags), "r"((long)mode)
        : "rax", "rdi", "rsi", "rdx", "rcx", "r11", "memory"
    );
    // 检查错误返回值
    if (fd >= -4095 && fd < 0) {
        errno = -fd;
        return -1;
    }
    return (int)fd;
}

// x86_64 syscall_read实现
static ssize_t syscall_read(int fd, void* buf, size_t count) {
    long ret;
    __asm__ volatile (
        "movq %1, %%rax\n"  // rax = 系统调用号
        "movq %2, %%rdi\n"  // rdi = 文件描述符
        "movq %3, %%rsi\n"  // rsi = 缓冲区指针
        "movq %4, %%rdx\n"  // rdx = 读取长度
        "syscall\n"         // 触发syscall
        "movq %%rax, %0\n"  // 保存返回值
        : "=r"(ret)
        : "i"(SYS_READ), "r"((long)fd), "r"(buf), "r"((long)count)
        : "rax", "rdi", "rsi", "rdx", "rcx", "r11", "memory"
    );
    // 检查错误返回值
    if (ret >= -4095 && ret < 0) {
        errno = -ret;
        return -1;
    }
    return (ssize_t)ret;
}

// x86_64 syscall_close实现
static int syscall_close(int fd) {
    long ret;
    __asm__ volatile (
        "movq %1, %%rax\n"  // rax = 系统调用号
        "movq %2, %%rdi\n"  // rdi = 文件描述符
        "syscall\n"         // 触发syscall
        "movq %%rax, %0\n"  // 保存返回值
        : "=r"(ret)
        : "i"(SYS_CLOSE), "r"((long)fd)
        : "rax", "rdi", "rcx", "r11", "memory"
    );
    // 检查错误返回值
    if (ret >= -4095 && ret < 0) {
        errno = -ret;
        return -1;
    }
    return (int)ret;
}


#else
// 其他架构默认使用libc函数
#include <cstdio>
#define syscall_open(path, flags, mode) open(path, flags, mode)
#define syscall_read(fd, buf, count) read(fd, buf, count)
#define syscall_close(fd) close(fd)
#endif

// syscall读取(重试应对EAGAIN)
static bool read_file_by_syscall(const std::string& file_path, std::string& content) {
    char buf[4096] = {0};
    int fd = syscall_open(file_path.c_str(), O_RDONLY | O_NONBLOCK, 0); // 增加O_NONBLOCK避免阻塞
    if (fd < 0) {
        LOGE("Open file failed: %s, errno=%d (%s)", file_path.c_str(), errno, strerror(errno));
        return false;
    }

    ssize_t read_len = -1;
    int retry = 3; // 重试3次应对EAGAIN
    while (retry-- > 0 && read_len < 0) {
        read_len = syscall_read(fd, buf, sizeof(buf) - 1);
        if (read_len < 0) {
            if (errno == EAGAIN || errno == EINTR) {
                LOGW("Read retry (%d left) for %s, errno=%d (%s)", retry, file_path.c_str(), errno, strerror(errno));
                usleep(1000); // 休眠1ms重试
                continue;
            }
            break; // 其他错误直接退出
        }
    }

    if (read_len <= 0) {
        LOGE("Read file failed: %s, read_len=%zd, errno=%d (%s)", file_path.c_str(), read_len, errno, strerror(errno));
        syscall_close(fd);
        return false;
    }

    content = std::string(buf, read_len);
    syscall_close(fd);
    LOGI("Read file success: %s, len=%zd", file_path.c_str(), read_len);
    return true;
}

static bool checkFrida() {
    DIR* taskDir;
    struct dirent* entry;

    // Frida特征关键词
    static const std::vector<std::string> frida_keywords = {
            "gmain", "gdbus", "frida", "gum"
    };

    // 获取当前进程ID并构建task目录路径
    pid_t pid = getpid();
    std::string taskPath = "/proc/" + std::to_string(pid) + "/task";

    LOGI("Checking for Frida, PID: %d", pid);

    taskDir = opendir(taskPath.c_str());
    if (!taskDir) {
        LOGE("Open task directory failed: %s, errno=%d (%s)", taskPath.c_str(), errno, strerror(errno));
        return false;
    }

    // 遍历task目录中的每个线程
    while ((entry = readdir(taskDir)) != nullptr) {
        // 跳过.和..目录项
        if (strcmp(entry->d_name, ".") == 0 || strcmp(entry->d_name, "..") == 0) {
            continue;
        }

        LOGI("Processing thread: %s", entry->d_name);

        // 构建线程status文件路径
        std::string statusPath = taskPath + "/" + entry->d_name + "/status";
        std::string file_content;

        // 用syscall读取文件内容
        if (!read_file_by_syscall(statusPath, file_content)) {
            LOGW("Failed to read status file for thread: %s", entry->d_name);
            continue;
        }

        std::istringstream stream(file_content);
        std::string line;
        while (std::getline(stream, line)) {
            // 查找Name字段
            if (line.find("Name:") != std::string::npos) {
                size_t colonPos = line.find(':');
                if (colonPos != std::string::npos) {
                    std::string name = line.substr(colonPos + 1);
                    // 去除前导空格
                    name.erase(0, name.find_first_not_of(" \t"));

                    LOGI("Thread name: %s", name.c_str());

                    // 匹配Frida特征
                    for (const auto& kw : frida_keywords) {
                        if (name.find(kw) != std::string::npos) {
                            closedir(taskDir);
                            LOGI("Detected Frida in thread: %s (keyword: %s)", entry->d_name, kw.c_str());
                            return true;
                        }
                    }
                }
                break;
            }
        }
    }

    closedir(taskDir);
    LOGI("No Frida detected");
    return false;
}

extern "C" JNIEXPORT jstring JNICALL
Java_com_example_securitycheck_MainActivity_checkSecurity(JNIEnv *env, jobject thiz) {
    bool fridaDetected = checkFrida();

    if (fridaDetected) {
        return env->NewStringUTF("检测到frida");
    } else {
        return env->NewStringUTF("未检测到frida");
    }
}
2.1 核心防绕特点:绕过用户态函数 hook
源码中定义了 syscall_open、syscall_read、syscall_close 三个函数,内部通过汇编指令直接触发系统调用:
- 在 ARM64 架构中,用
svc #0指令触发,系统调用号存在 x8 寄存器(比如打开文件的调用号是 56); - 在 x86_64 架构中,用
syscall指令触发,系统调用号存在 rax 寄存器(比如打开文件的调用号是 2)。
这种方式完全避开了 libc.so 中的 open、read 等函数,因此之前通过 hook 这些函数来篡改文件路径或内容的方法(比如实战篇15)就失效了------程序根本不经过这些函数,自然无法被 hook 拦截。
2.2 校验流程回顾
检测逻辑依然是遍历当前进程的线程,读取每个线程的 /proc/[pid]/task/[tid]/status 文件,检查「Name」字段是否包含 Frida 特征关键词(gmain、frida、gum 等)。但由于文件读取通过底层指令实现,常规的函数 hook 无法干扰。
3. Hook 绕过:直接拦截系统调用指令
3.1 为何之前的方法失效?
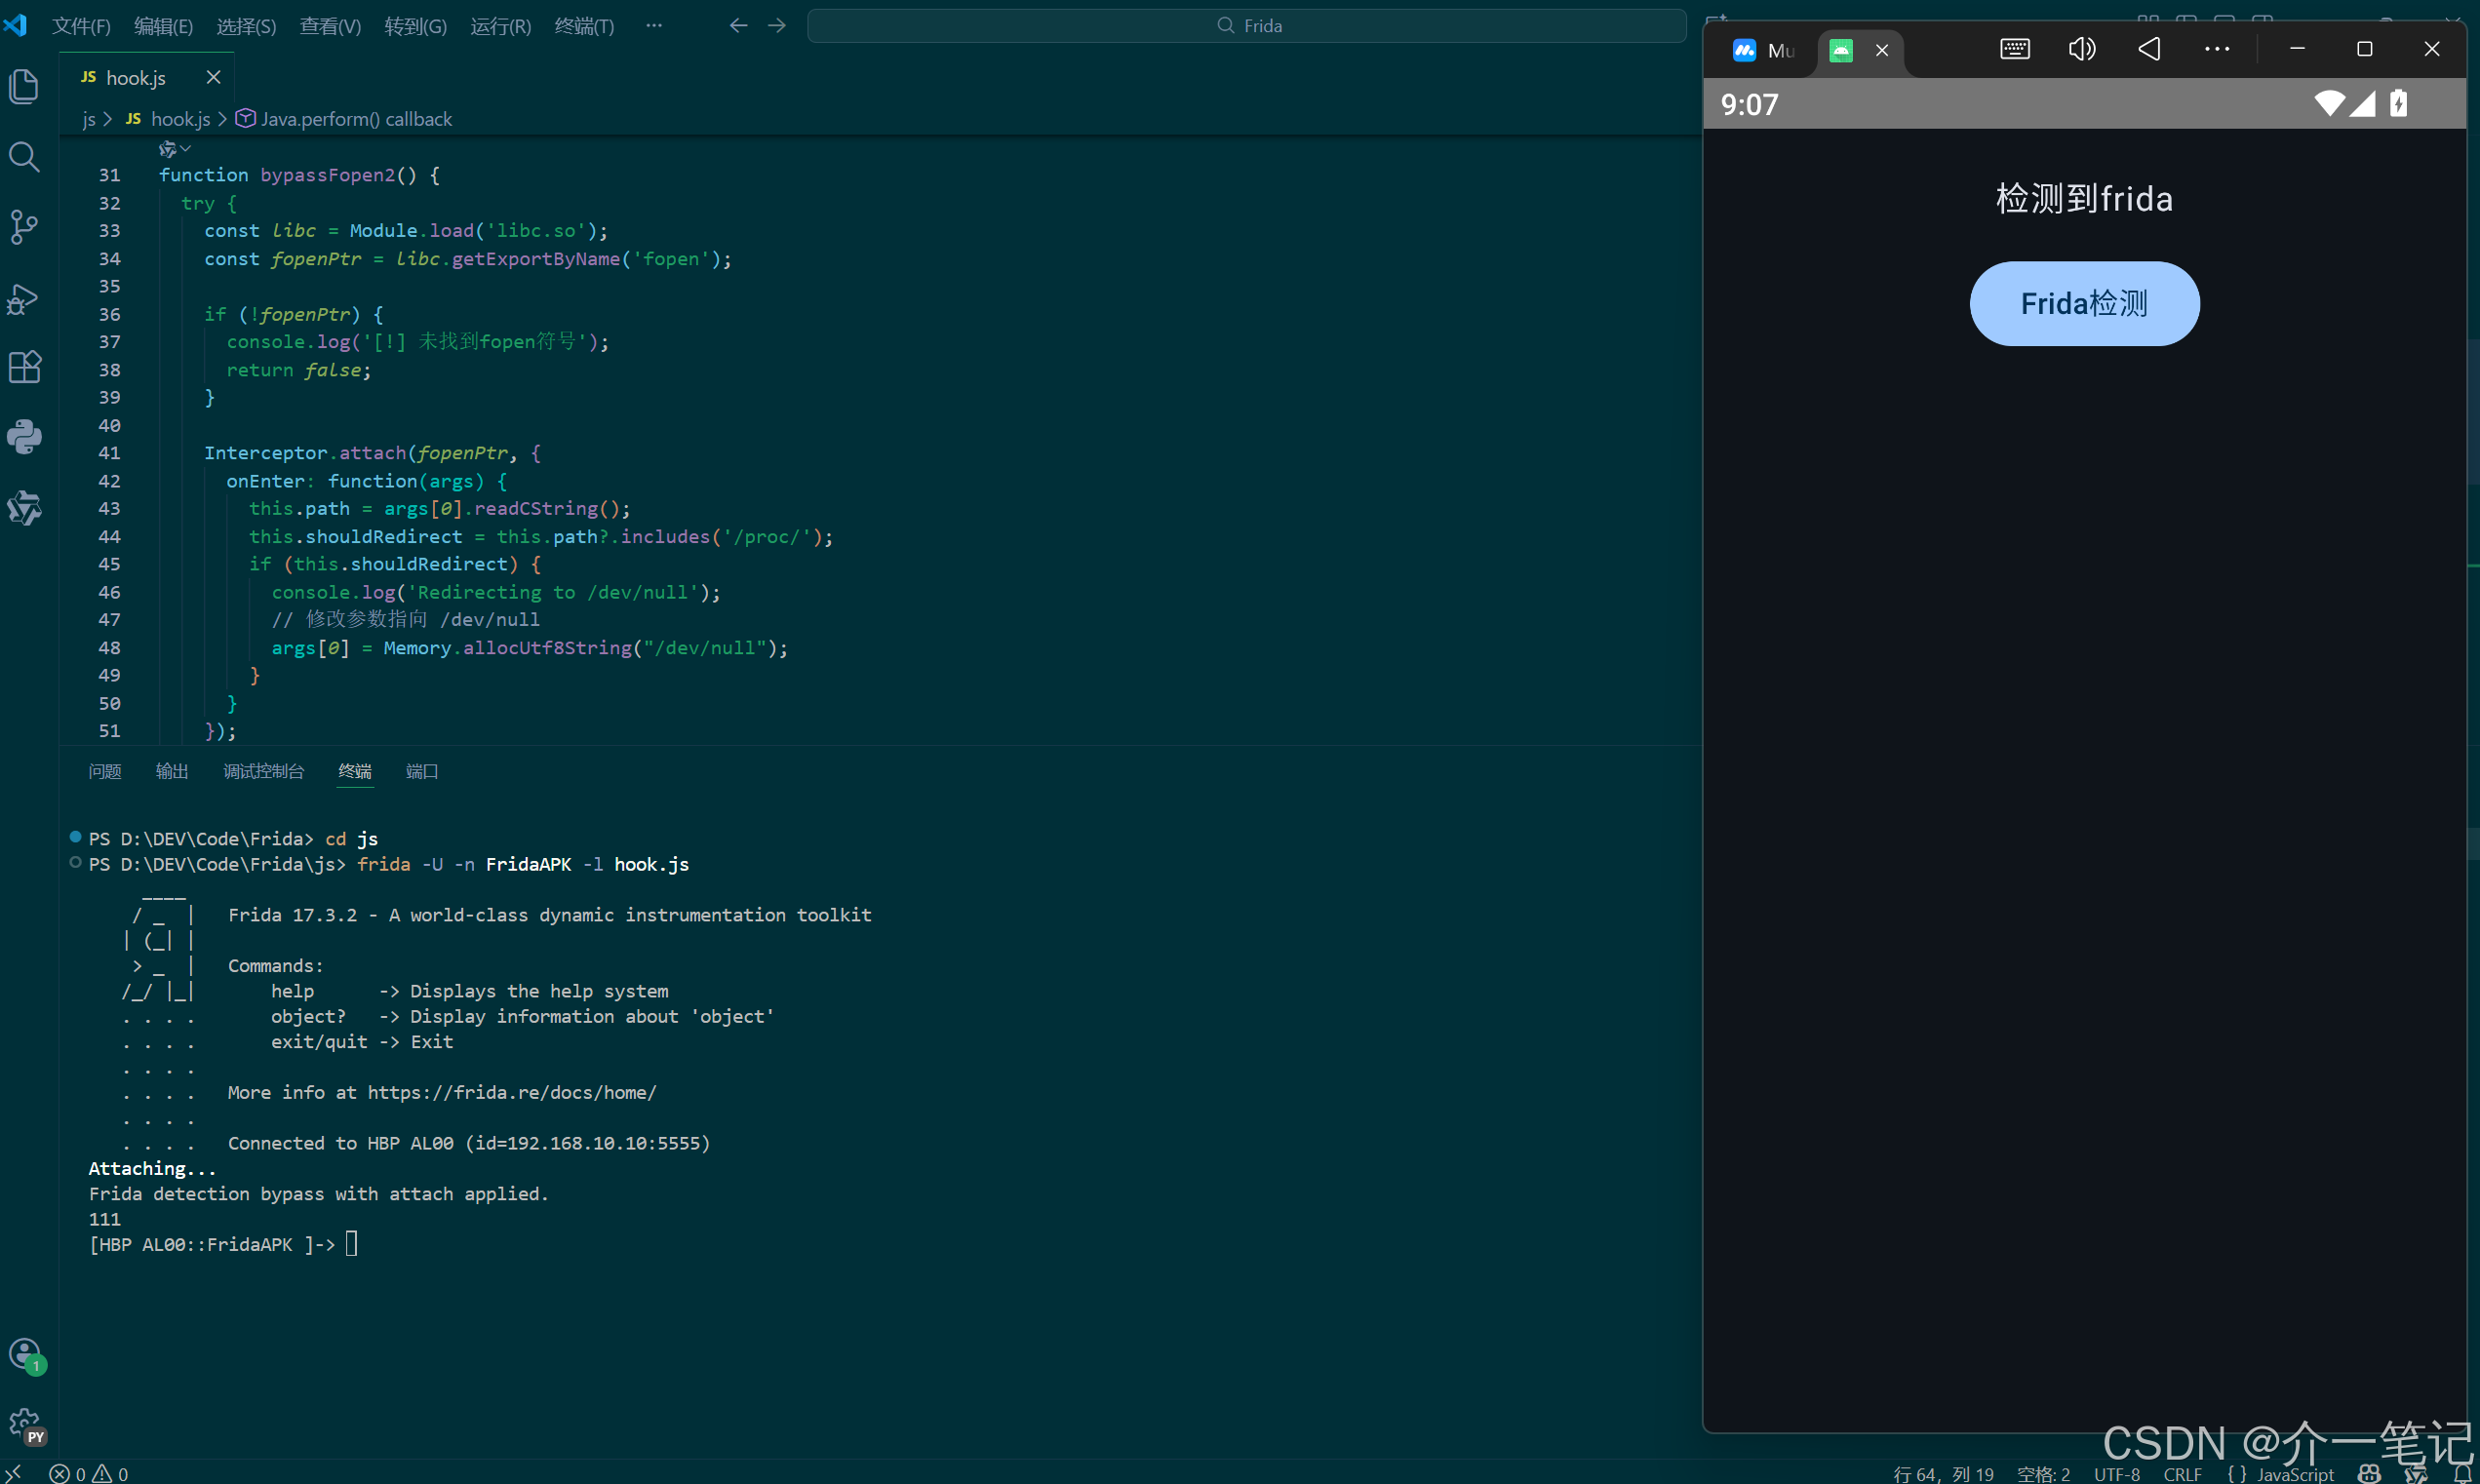
如前所述,由于程序通过 syscall 指令(x86_64)直接调用内核,而非 libc 函数,因此用之前章节 hook libc.so 的 open/fopen 等函数无法拦截文件操作。下图可以看到,即使 hook 了 fopen 也无法影响程序的文件读取:
3.2 绕过思路:识别并 hook 系统调用指令
既然程序用 syscall 指令触发系统调用,那我们就直接针对这些指令进行 hook。核心步骤是:
- 找到目标模块(本次是 libsecuritycheck.so)中的可执行代码段;
- 在代码段中搜索
syscall相关的指令特征(比如 x86_64 中打开文件的mov rax, 2后跟syscall); - 对找到的
syscall指令进行 hook,在执行前修改参数(比如把要读取的文件路径改成无关路径,如/dev/null)。
3.3 完整脚本与流程分析
以下是针对 x86_64 模拟器的绕过脚本,每一步都有详细注释:
javascript
function hookSyscall() {
  // 定位目标模块(libsecuritycheck.so,且位于/data/app路径下,确保是目标应用的模块)
  var targetModule = null;
  var modules = Process.enumerateModules();
  for (var i = 0; i < modules.length; i++) {
    var module = modules[i];
    if (module.name === "libsecuritycheck.so" && module.path.indexOf("/data/app/") !== -1) {
      targetModule = module;
      break;
    }
  }

  if (!targetModule) {
    console.log("[-] 未找到目标模块 libsecuritycheck.so");
    return;
  }
  console.log("[+] 找到目标模块: " + targetModule.name + ",基址: " + targetModule.base);

  // 筛选模块中的可执行段(只有可执行段才会包含指令)
  var execRegions = Process.enumerateRanges('r-x').filter(function (range) {
    return range.base >= targetModule.base && range.base < targetModule.base.add(targetModule.size);
  });
  console.log("[+] 找到可执行段数量: " + execRegions.length);

  // 搜索 open 系统调用的指令特征(x86_64中打开文件的调用号是2,对应指令是mov rax, 2)
  // mov rax, 2 的机器码是 48 c7 c0 02 00 00 00
  var openSyscallPattern = "48 c7 c0 02 00 00 00";
  var hookedCount = 0;

  // 遍历每个可执行段,扫描指令特征
  execRegions.forEach(function (region) {
    console.log("[+] 扫描可执行段: " + region.base + "(大小: 0x" + region.size.toString(16) + ")");
    try {
      // 找到所有匹配的指令位置(即mov rax, 2的位置)
      var matches = Memory.scanSync(region.base, region.size, openSyscallPattern);

      matches.forEach(function (match) {
        var movRaxAddr = match.address;
        console.log("[+] 找到 open 系统调用的准备指令: " + movRaxAddr);

        // 在mov rax, 2后面找syscall指令(通常在几条指令内)
        var currentAddr = movRaxAddr;
        var maxSearch = 5; // 最多往后查5条指令
        var found = false;

        for (var i = 0; i < maxSearch; i++) {
          try {
            var instruction = Instruction.parse(currentAddr);
            // 找到syscall指令后,对其进行hook
            if (instruction.toString().indexOf('syscall') !== -1) {
              Interceptor.attach(currentAddr, {
                onEnter: function (args) {
                  // 确认当前是open系统调用(rax寄存器的值应为2)
                  if (this.context.rax.toInt32() !== 2) {
                    return;
                  }
                  // 修改文件路径参数(rdi寄存器存储第一个参数,即路径)
                  var fakePath = Memory.allocUtf8String("/dev/null"); // 替换为无效路径
                  this.context.rdi = fakePath;
                  console.log("[+] 已将文件路径修改为 /dev/null");
                }
              });
              console.log("[+] 成功hook syscall指令: " + currentAddr);
              hookedCount++;
              found = true;
              break;
            }
            // 继续查找下一条指令
            currentAddr = currentAddr.add(instruction.size);
          } catch (e) {
            console.log("[-] 解析指令失败: " + e.message);
            break;
          }
        }
        if (!found) {
          console.log("[-] 在mov rax, 2附近未找到syscall指令");
        }
      });
    } catch (e) {
      console.log("[-] 扫描指令失败: " + e.message);
    }
  });

  console.log("[+] 共hook " + hookedCount + "个open系统调用指令,完成");
}

Java.perform(hookSyscall);
3.4 执行脚本与效果
操作步骤
- 先打开目标应用;
- 执行 frida 命令注入脚本:
shell
frida -U -n FridaAPK -l hook.js绕过效果
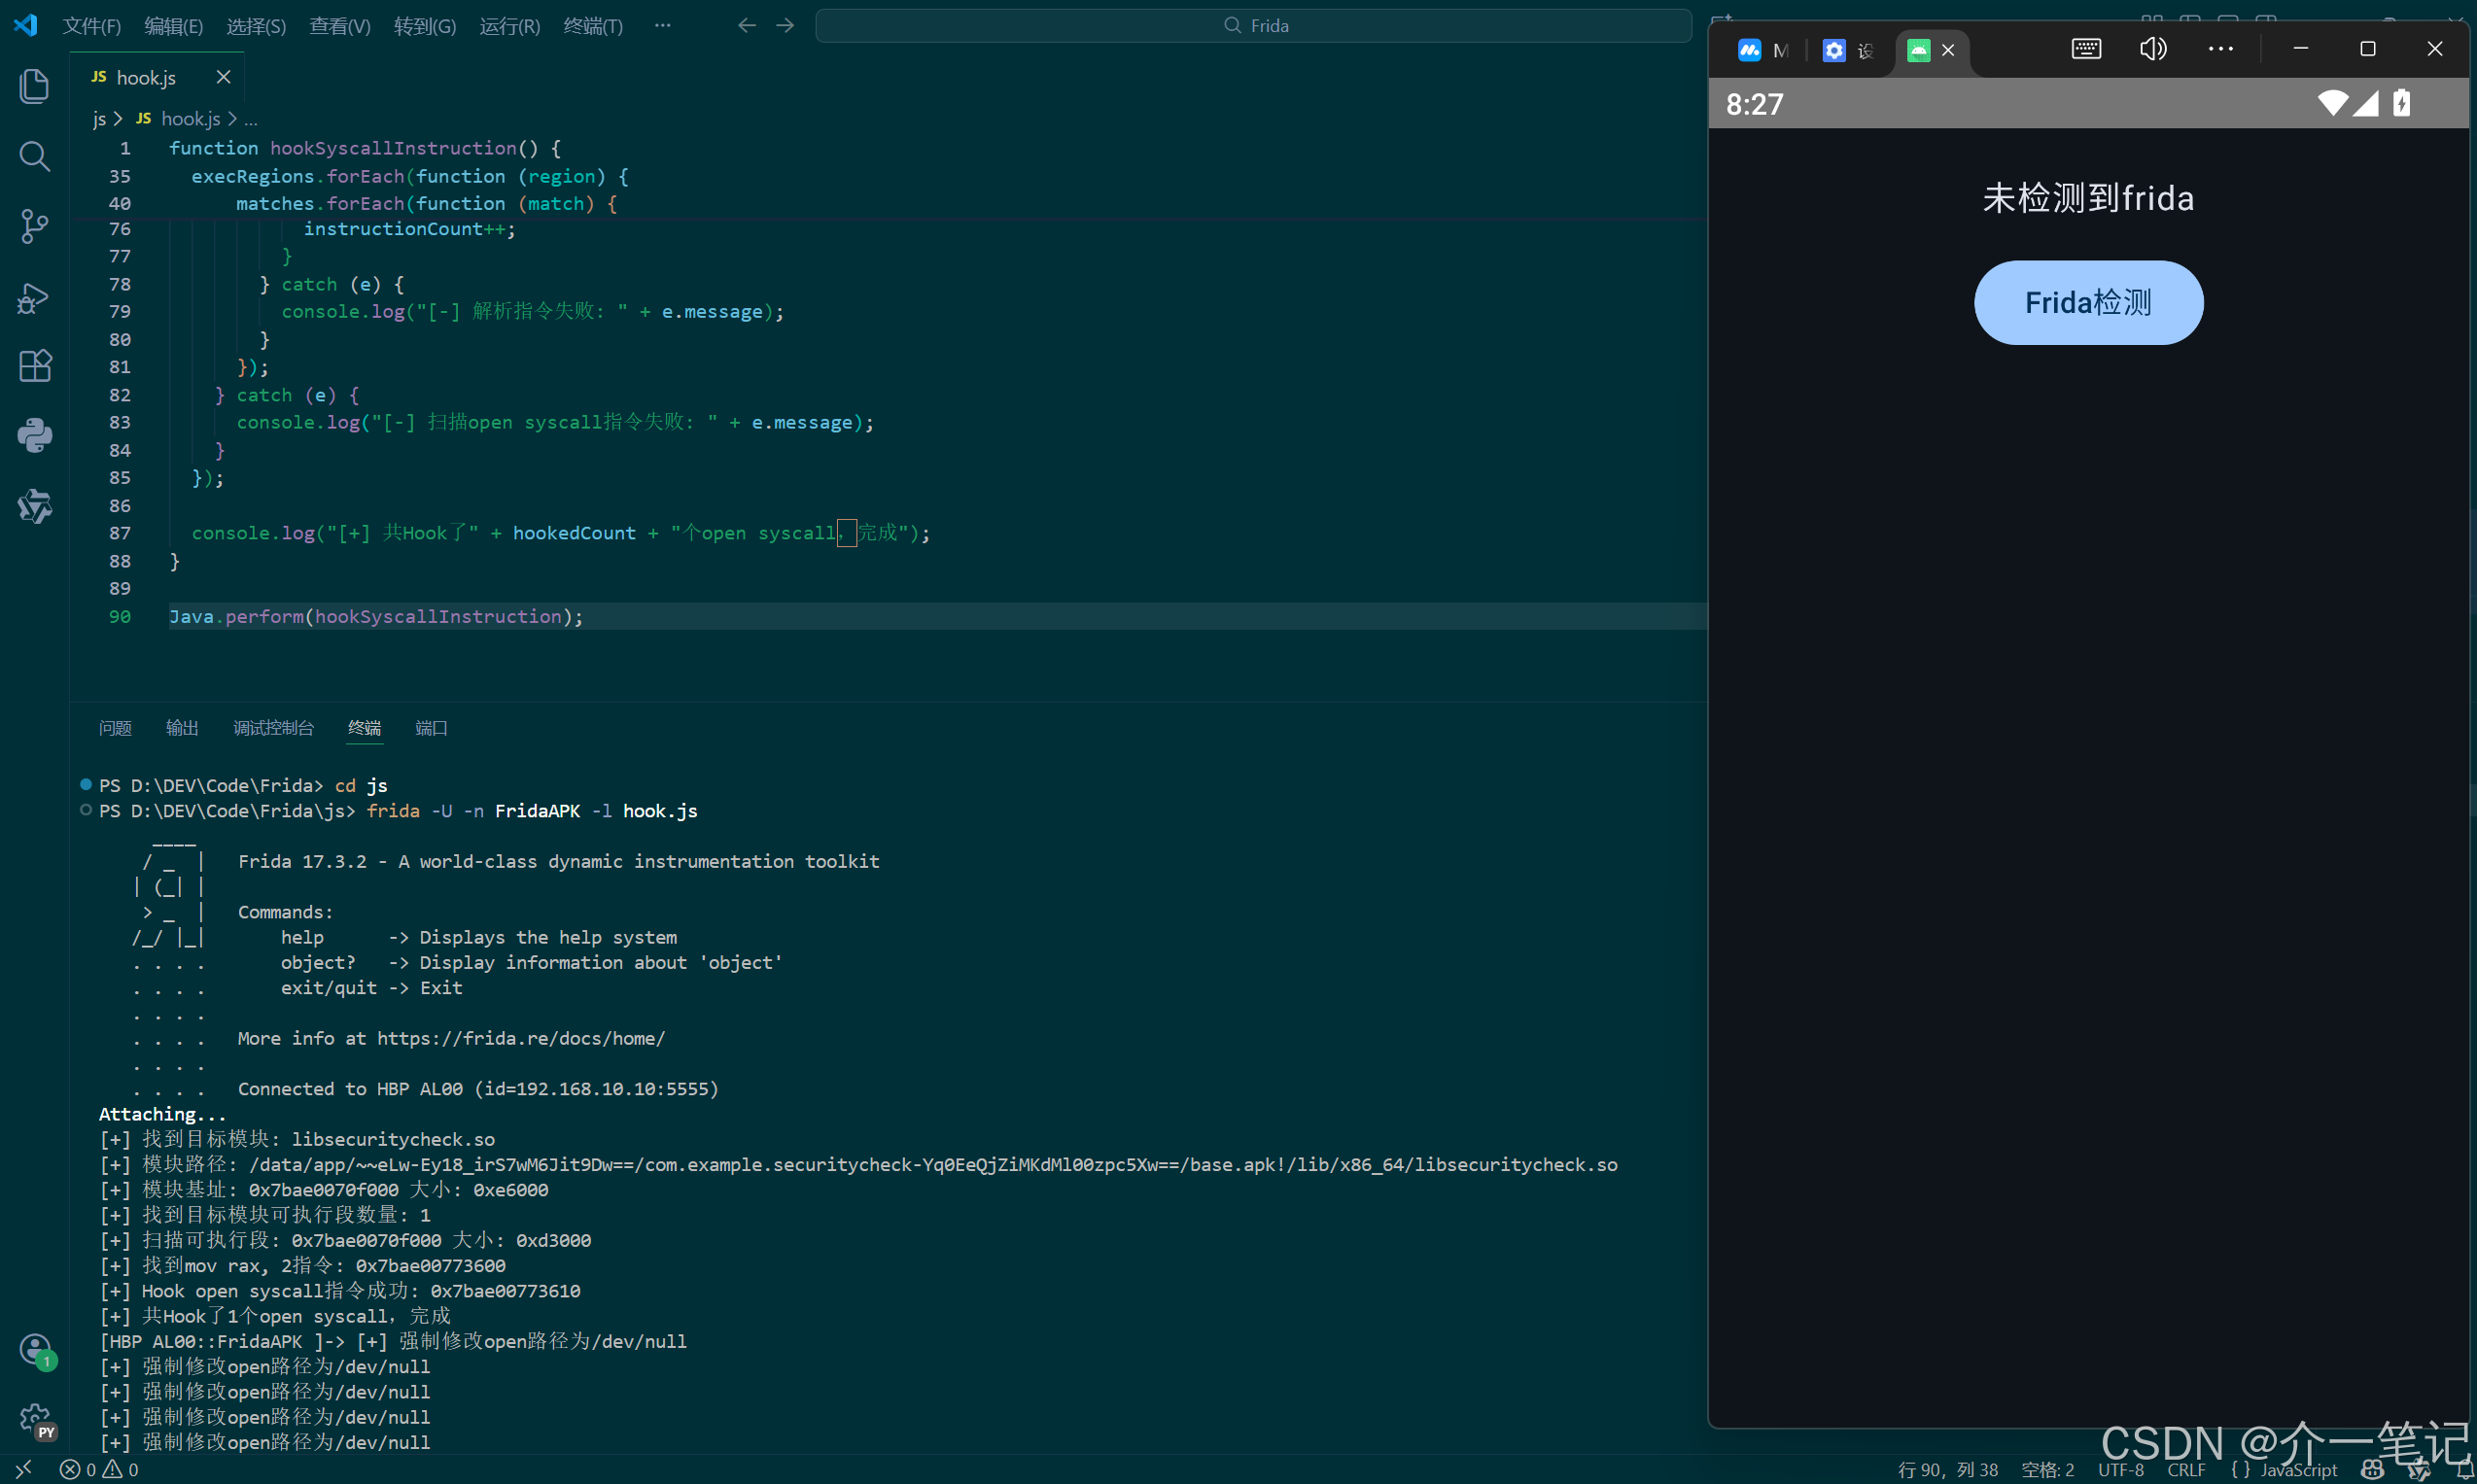
脚本成功 hook 了程序中的 syscall 指令,并将文件路径修改为 /dev/null(空设备),导致程序无法读取到真实的线程状态文件,从而无法检测到 Frida。效果如下:
这里注意,要退出 frida 控制台直接通过关闭应用,否则如果使用quit命令会卡。
4. 章节总结
4.1 指令校验的意义
通过 SVC(ARM64)或 syscall(x86_64)等底层指令直接触发系统调用,是一种常见的反调试/反 hook 手段。它绕开了用户态的库函数,让常规的函数 hook 方法失效,从而提升了检测逻辑的安全性。
4.2 绕过核心思路
无论架构如何,绕过的核心是识别并拦截系统调用指令:
- 找到目标模块中触发系统调用的指令(如 SVC 或 syscall);
- 分析指令对应的系统调用号(如 open 操作(openat)在 ARM64 中是 56,x86_64 中是 2);
- hook 这些指令,在执行前修改关键参数(如文件路径、读取长度等),让检测逻辑获取到虚假信息。
4.3 不同架构的适配
本文演示了 x86_64 架构的绕过方法,实际在 ARM64 真机上,需调整以下几点:
- 搜索的指令特征改为 SVC 相关(如
svc #0的机器码); - 系统调用号对应 ARM64 的定义(如 open操作(openat) 是 56);
- 寄存器参数调整为 ARM64 的规范(如路径存在 x0 寄存器,调用号存在 x8 寄存器)。
原理完全一致,只需根据架构的指令集和寄存器规则修改脚本即可。