ubuntu24.04运行3dgs记录
〇、服务器基本环境信息
1、系统信息
bash
(base) huangg@huangg-W40P:/data/ubuntu-code/python/colmap/build$ cat /etc/os-release
PRETTY_NAME="Ubuntu 24.04.3 LTS"
NAME="Ubuntu"
VERSION_ID="24.04"
VERSION="24.04.3 LTS (Noble Numbat)"
VERSION_CODENAME=noble
ID=ubuntu
ID_LIKE=debian
HOME_URL="https://www.ubuntu.com/"
SUPPORT_URL="https://help.ubuntu.com/"
BUG_REPORT_URL="https://bugs.launchpad.net/ubuntu/"
PRIVACY_POLICY_URL="https://www.ubuntu.com/legal/terms-and-policies/privacy-policy"
UBUNTU_CODENAME=noble
LOGO=ubuntu-logo
(base) huangg@huangg-W40P:/data/ubuntu-code/python/colmap/build$ uname -a
Linux huangg-W40P 6.14.0-37-generic #37~24.04.1-Ubuntu SMP PREEMPT_DYNAMIC Thu Nov 20 10:25:38 UTC 2 x86_64 x86_64 x86_64 GNU/Linux
(base) huangg@huangg-W40P:/data/ubuntu-code/python/colmap/build$
2、显卡和驱动信息
bash
(base) huangg@huangg-W40P:/data/ubuntu-code/python/colmap/build$ nvidia-smi
Fri Dec 26 12:58:08 2025
+-----------------------------------------------------------------------------------------+
| NVIDIA-SMI 580.95.05              Driver Version: 580.95.05      CUDA Version: 13.0     |
+-----------------------------------------+------------------------+----------------------+
| GPU  Name                 Persistence-M | Bus-Id          Disp.A | Volatile Uncorr. ECC |
| Fan  Temp   Perf          Pwr:Usage/Cap |           Memory-Usage | GPU-Util  Compute M. |
|                                         |                        |               MIG M. |
|=========================================+========================+======================|
|   0  NVIDIA RTX A4000               Off |   00000000:41:00.0  On |                  Off |
| 41%   37C    P8             15W /  140W |    3643MiB /  16376MiB |      1%      Default |
|                                         |                        |                  N/A |
+-----------------------------------------+------------------------+----------------------+

+-----------------------------------------------------------------------------------------+
| Processes:                                                                              |
|  GPU   GI   CI              PID   Type   Process name                        GPU Memory |
|        ID   ID                                                               Usage      |
|=========================================================================================|
|    0   N/A  N/A            2880      G   /usr/lib/xorg/Xorg                     1684MiB |
|    0   N/A  N/A            3185      G   /usr/bin/gnome-shell                    676MiB |
|    0   N/A  N/A            3804      G   ...exec/xdg-desktop-portal-gnome        135MiB |
|    0   N/A  N/A           12083      G   /usr/bin/nautilus                        39MiB |
|    0   N/A  N/A           18577      G   ...pycharm/13/jbr/lib/cef_server          3MiB |
|    0   N/A  N/A           18611      G   ...3/log/jcef_chromium_17123.log        279MiB |
|    0   N/A  N/A           22065      G   /usr/bin/gnome-control-center            10MiB |
|    0   N/A  N/A           31757      G   .../7559/usr/lib/firefox/firefox        386MiB |
|    0   N/A  N/A           41541      G   ...ns-seed-version --log-level=2         10MiB |
|    0   N/A  N/A           42140      G   /usr/share/typora/Typora                199MiB |
+-----------------------------------------------------------------------------------------+
(base) huangg@huangg-W40P:/data/ubuntu-code/python/colmap/build$
系统是新装的ubuntu24.04.03,安装时间是2025年12月20日左右,因此显卡驱动也安装的最新的
实际上,不应该安装这么高版本的显卡驱动,后面3dgs要求安装的cuda版本是11.8,版本差异太大,虽然cuda向下兼容,但是为了避免不必要的问题,建议驱动版本装550
一、拉代码仓库
bash
git clone https://github.com/graphdeco-inria/gaussian-splatting --recursive
cd gaussian-splatting
二、配置环境
1、conda 虚拟环境搭建
bashconda
create -n 3dgs python=3.10
conda activate 3dgs
2、安装依赖
(1)安装torch等第三方依赖
bash
pip install torch==2.1.1 torchvision==0.16.1 torchaudio==2.1.1 --index-url https://download.pytorch.org/whl/cu118 (2)安装C++环境
bash
sudo apt install build-essential
sudo apt-get install ninja-build
(3)安装cuda11.8
bash
wget https://developer.download.nvidia.com/compute/cuda/11.8.0/local_installers/cuda_11.8.0_520.61.05_linux.run
sudo sh cuda_11.8.0_520.61.05_linux.run
遇到几个问题:
-
GCC版本问题
bash(base) huangg@huangg-W40P:~/soft$ sudo sh cuda_11.8.0_520.61.05_linux.run [sudo] huangg 的密码: Failed to verify gcc version. See log at /var/log/cuda-installer.log for details. (base) huangg@huangg-W40P:~/soft$ cat /var/log/cuda-installer.log [INFO]: Driver installation detected by command: apt list --installed | grep -e nvidia-driver-[0-9][0-9][0-9] -e nvidia-[0-9][0-9][0-9] [INFO]: Cleaning up window [INFO]: Complete [INFO]: Checking compiler version... [INFO]: gcc location: /usr/bin/gcc [INFO]: gcc version: gcc version 13.3.0 (Ubuntu 13.3.0-6ubuntu2~24.04) [ERROR]: unsupported compiler version: 13.3.0. Use --override to override this check. (base) huangg@huangg-W40P:~/soft$需要降级gcc--和g++为11版本
操作如下:
bash# 安装 gcc-11 sudo apt update sudo apt install gcc-11 g++-11 # 查看当前gcc版本 gcc --version g++ --version # 如果gcc-11没有设为默认,可以设置软链接 sudo update-alternatives --install /usr/bin/gcc gcc /usr/bin/gcc-11 100 sudo update-alternatives --install /usr/bin/g++ g++ /usr/bin/g++-11 100 # 选择gcc版本 sudo update-alternatives --config gcc sudo update-alternatives --config g++ # 重新运行CUDA安装 sudo sh cuda_11.8.0_520.61.05_linux.run -
和驱动有冲突
报错如下:
bash(base) huangg@huangg-W40P:~/soft$ sudo sh cuda_11.8.0_520.61.05_linux.run Installation failed. See log at /var/log/cuda-installer.log for details. (base) huangg@huangg-W40P:~/soft$ cat /var/log/cuda-installer.log [INFO]: Driver installation detected by command: apt list --installed | grep -e nvidia-driver-[0-9][0-9][0-9] -e nvidia-[0-9][0-9][0-9] [INFO]: Cleaning up window [INFO]: Complete [INFO]: Checking compiler version... [INFO]: gcc location: /usr/bin/gcc [INFO]: gcc version: gcc version 11.5.0 (Ubuntu 11.5.0-1ubuntu1~24.04) [INFO]: Initializing menu [INFO]: nvidia-fs.setKOVersion(2.13.5) [INFO]: Setup complete [INFO]: Components to install: [INFO]: Driver [INFO]: 520.61.05 [INFO]: Executing NVIDIA-Linux-x86_64-520.61.05.run --ui=none --no-questions --accept-license --disable-nouveau --no-cc-version-check --install-libglvnd 2>&1 [INFO]: Finished with code: 256 [ERROR]: Install of driver component failed. Consult the driver log at /var/log/nvidia-installer.log for more details. [ERROR]: Install of 520.61.05 failed, quitting只安装CUDA Toolkit,跳过驱动安装
bash# 先检查已安装的驱动版本 nvidia-smi # 如果已安装驱动,只安装CUDA Toolkit sudo sh cuda_11.8.0_520.61.05_linux.run --toolkit --silent --override -
安装成功,但是nvcc --version还是没有输出
需要添加环境变量
bashvim ~/.bashrc在文件最后面添加如下内容
bash# CUDA export PATH=/usr/local/cuda/bin:$PATH export LD_LIBRARY_PATH=/usr/local/cuda/lib64:$LD_LIBRARY_PATH export CUDA_HOME=/usr/local/cuda需要重新加载配置
bashsource ~/.bashrc -
python代码显卡不可用
pythonimport torch import sys print("=" * 50) print("PyTorch 版本信息") print("=" * 50) print(f"PyTorch 版本: {torch.__version__}") print(f"PyTorch CUDA 版本: {torch.version.cuda}") print(f"CUDA 是否可用: {torch.cuda.is_available()}") print(f"CUDA 设备数量: {torch.cuda.device_count()}") print("\n" + "=" * 50) print("系统信息") print("=" * 50) print(f"Python 版本: {sys.version}") print(f"操作系统平台: {sys.platform}")如果执行print(f"CUDA 是否可用: {torch.cuda.is_available()}")得到的是false,大概率是装了驱动后没有重启系统,我在这里卡了大半天
(4) 安装子模块
安装 diff-gaussian-rasterization
bash
cd diff-gaussian-rasterization
pip install -e . && cd ..
不出意外,又要报错,这个报错是整个环境配置过程中最坑的地方,源码有误
报错的原因是
diff-gaussian-rasterization这个包有多个版本,使用git clone 下载的版本是缺失antialiasing参数的版本。
正确版本地址:GitHub - graphdeco-inria/diff-gaussian-rasterization at 9c5c2028f6fbee2be239bc4c9421ff894fe4fbe0
下载压缩包,千万不要使用git clone来拉去,直接download zip,下好后解压
然后删除原来的diff-gaussian-rasterization目录
把刚才解压的目录拷贝到submodules里去
在执行以下安装命令:
bash
cd submodules/diff-gaussian-rasterization

python setup.py install
安装simple-knn
bash
cd simple-knn
python setup.py install
# 验证安装
python -c "import simple_knn; print("ok")"
# 终端输出ok就是装好了
安装fused-ssim
bash
cd fused-ssim
python setup.py install
三、启动训练
1、准备数据
使用官方提供的提供的下载连接https://repo-sam.inria.fr/fungraph/3d-gaussian-splatting/datasets/input/tandt_db.zip
将数据拷贝至gaussian-splatting目录下手动创建的data目录下
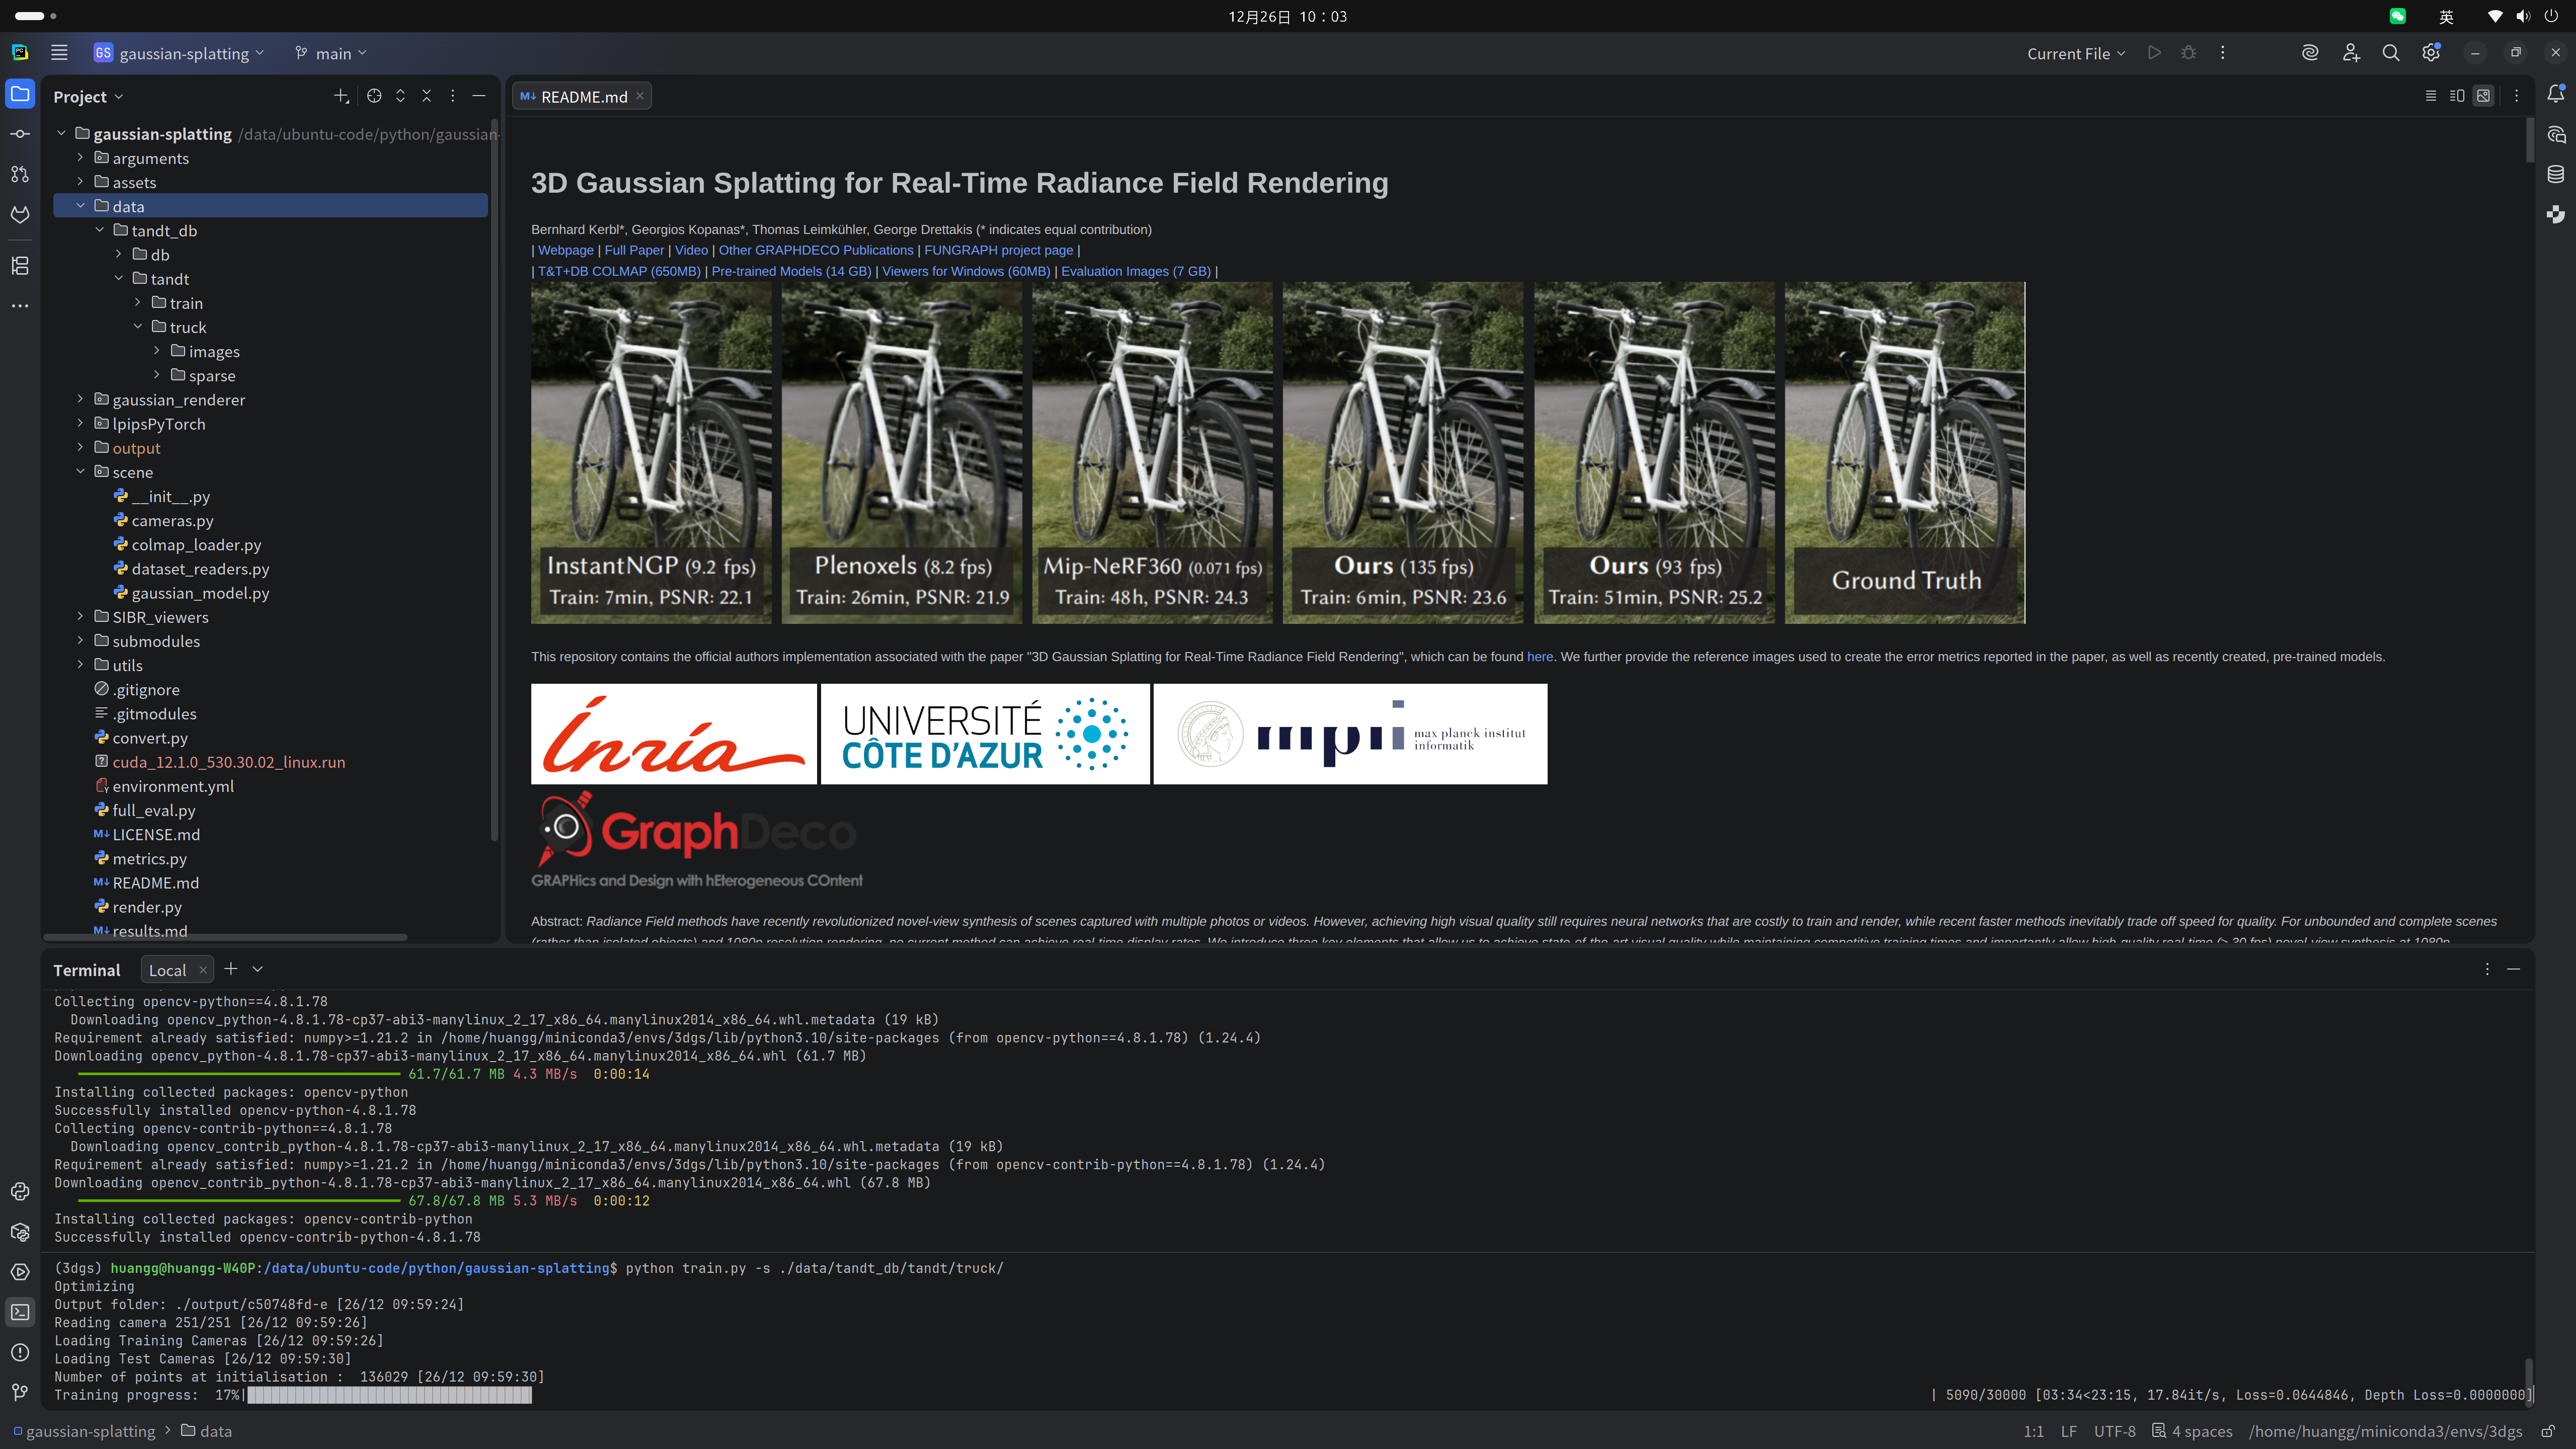
2、启动训练
终端启动训练代码
bash
python train.py -s gaussian-splatting/data/tandt_db/tandt/truck/运行时可能会报错需要安装一些依赖包,正常安装就行了,但是可能存在的问题是,opencv和numpy之间存在版本冲突的问题
建议使用如下组合
# 或者指定版本
pip install numpy==1.24.4
pip install opencv-python==4.8.1.78
pip install opencv-contrib-python==4.8.1.78
训练过程如下:
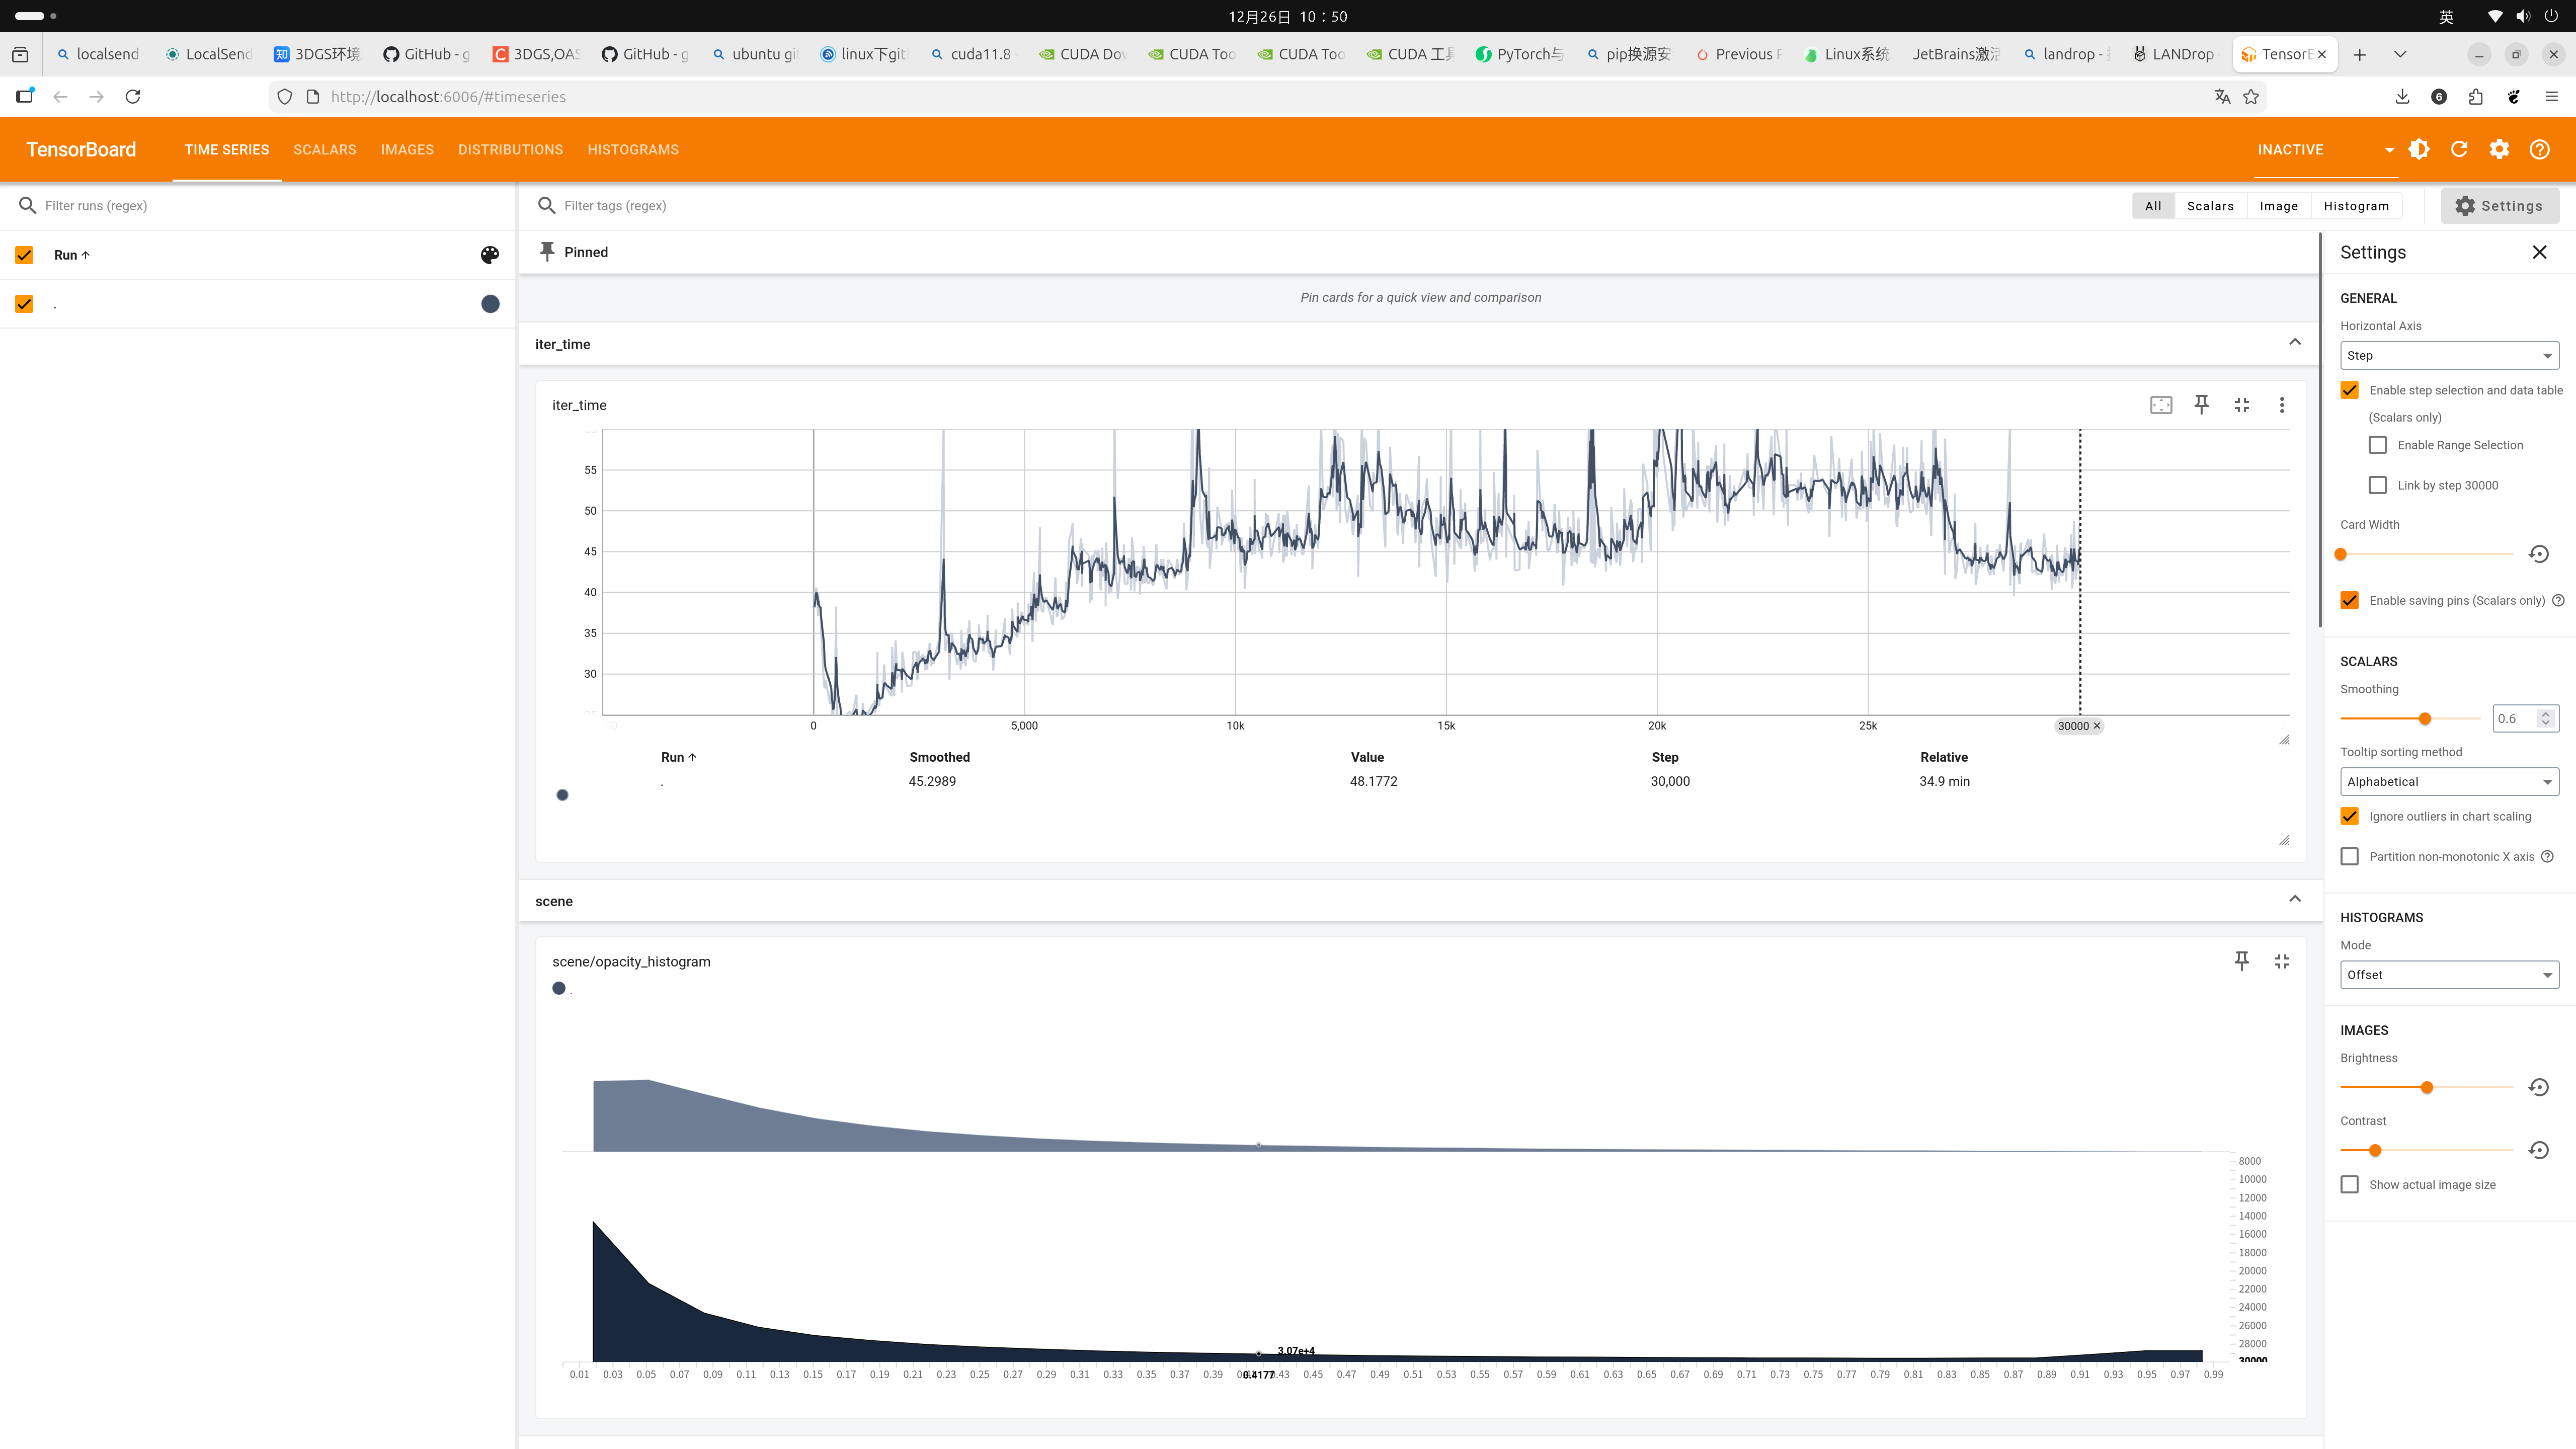
可以在tensorboard中查看训练信息,启动tensorboard命令是:
bash
tensorboard --logdir=./output/c50748fd-eoutput后面的目录就是终端显示的输出目录
四、colmap编译
上面过错是直接用已经生成的稀疏点云进行3dgs训练,跳过了点云生成的步骤
如果要从原始图片开始构建点云,需要colmap这一步,colmap需要额外编译,比较麻烦,要调用好多设备底层的东西
1、安装依赖
bash
sudo apt-get install \
    git \
    cmake \
    ninja-build \
    build-essential \
    libboost-program-options-dev \
    libboost-graph-dev \
    libboost-system-dev \
    libeigen3-dev \
    libfreeimage-dev \
    libmetis-dev \
    libgoogle-glog-dev \
    libgtest-dev \
    libgmock-dev \
    libsqlite3-dev \
    libglew-dev \
    qt6-base-dev \
    libqt6opengl6-dev \
    libqt6openglwidgets6 \
    libcgal-dev \
    libceres-dev \
    libcurl4-openssl-dev \
    libssl-dev \
    libmkl-full-dev
2、从github上拉取colmap
bash
git clone https://github.com/colmap/colmap.git3、编译
bash
cd colmap
mkdir build
cd build
cmake .. -GNinja -DBLA_VENDOR=86  # 需要注意的是,86是对应本机显卡nvidia rtx a4000的编号
需要注意的是,86是对应本机显卡nvidia rtx a4000的编号,需要在nvidia网站上找到自己对应显卡的型号
地址https://developer.nvidia.com/cuda/gpus,比较新的卡
地址https://developer.nvidia.com/cuda/gpus/legacy,比较老的卡
编号中间的点号要去掉
不出意外,会出意外...
编译过错中,报了一堆错误
(1)找不到OpenImageIO库
报错信息如下:
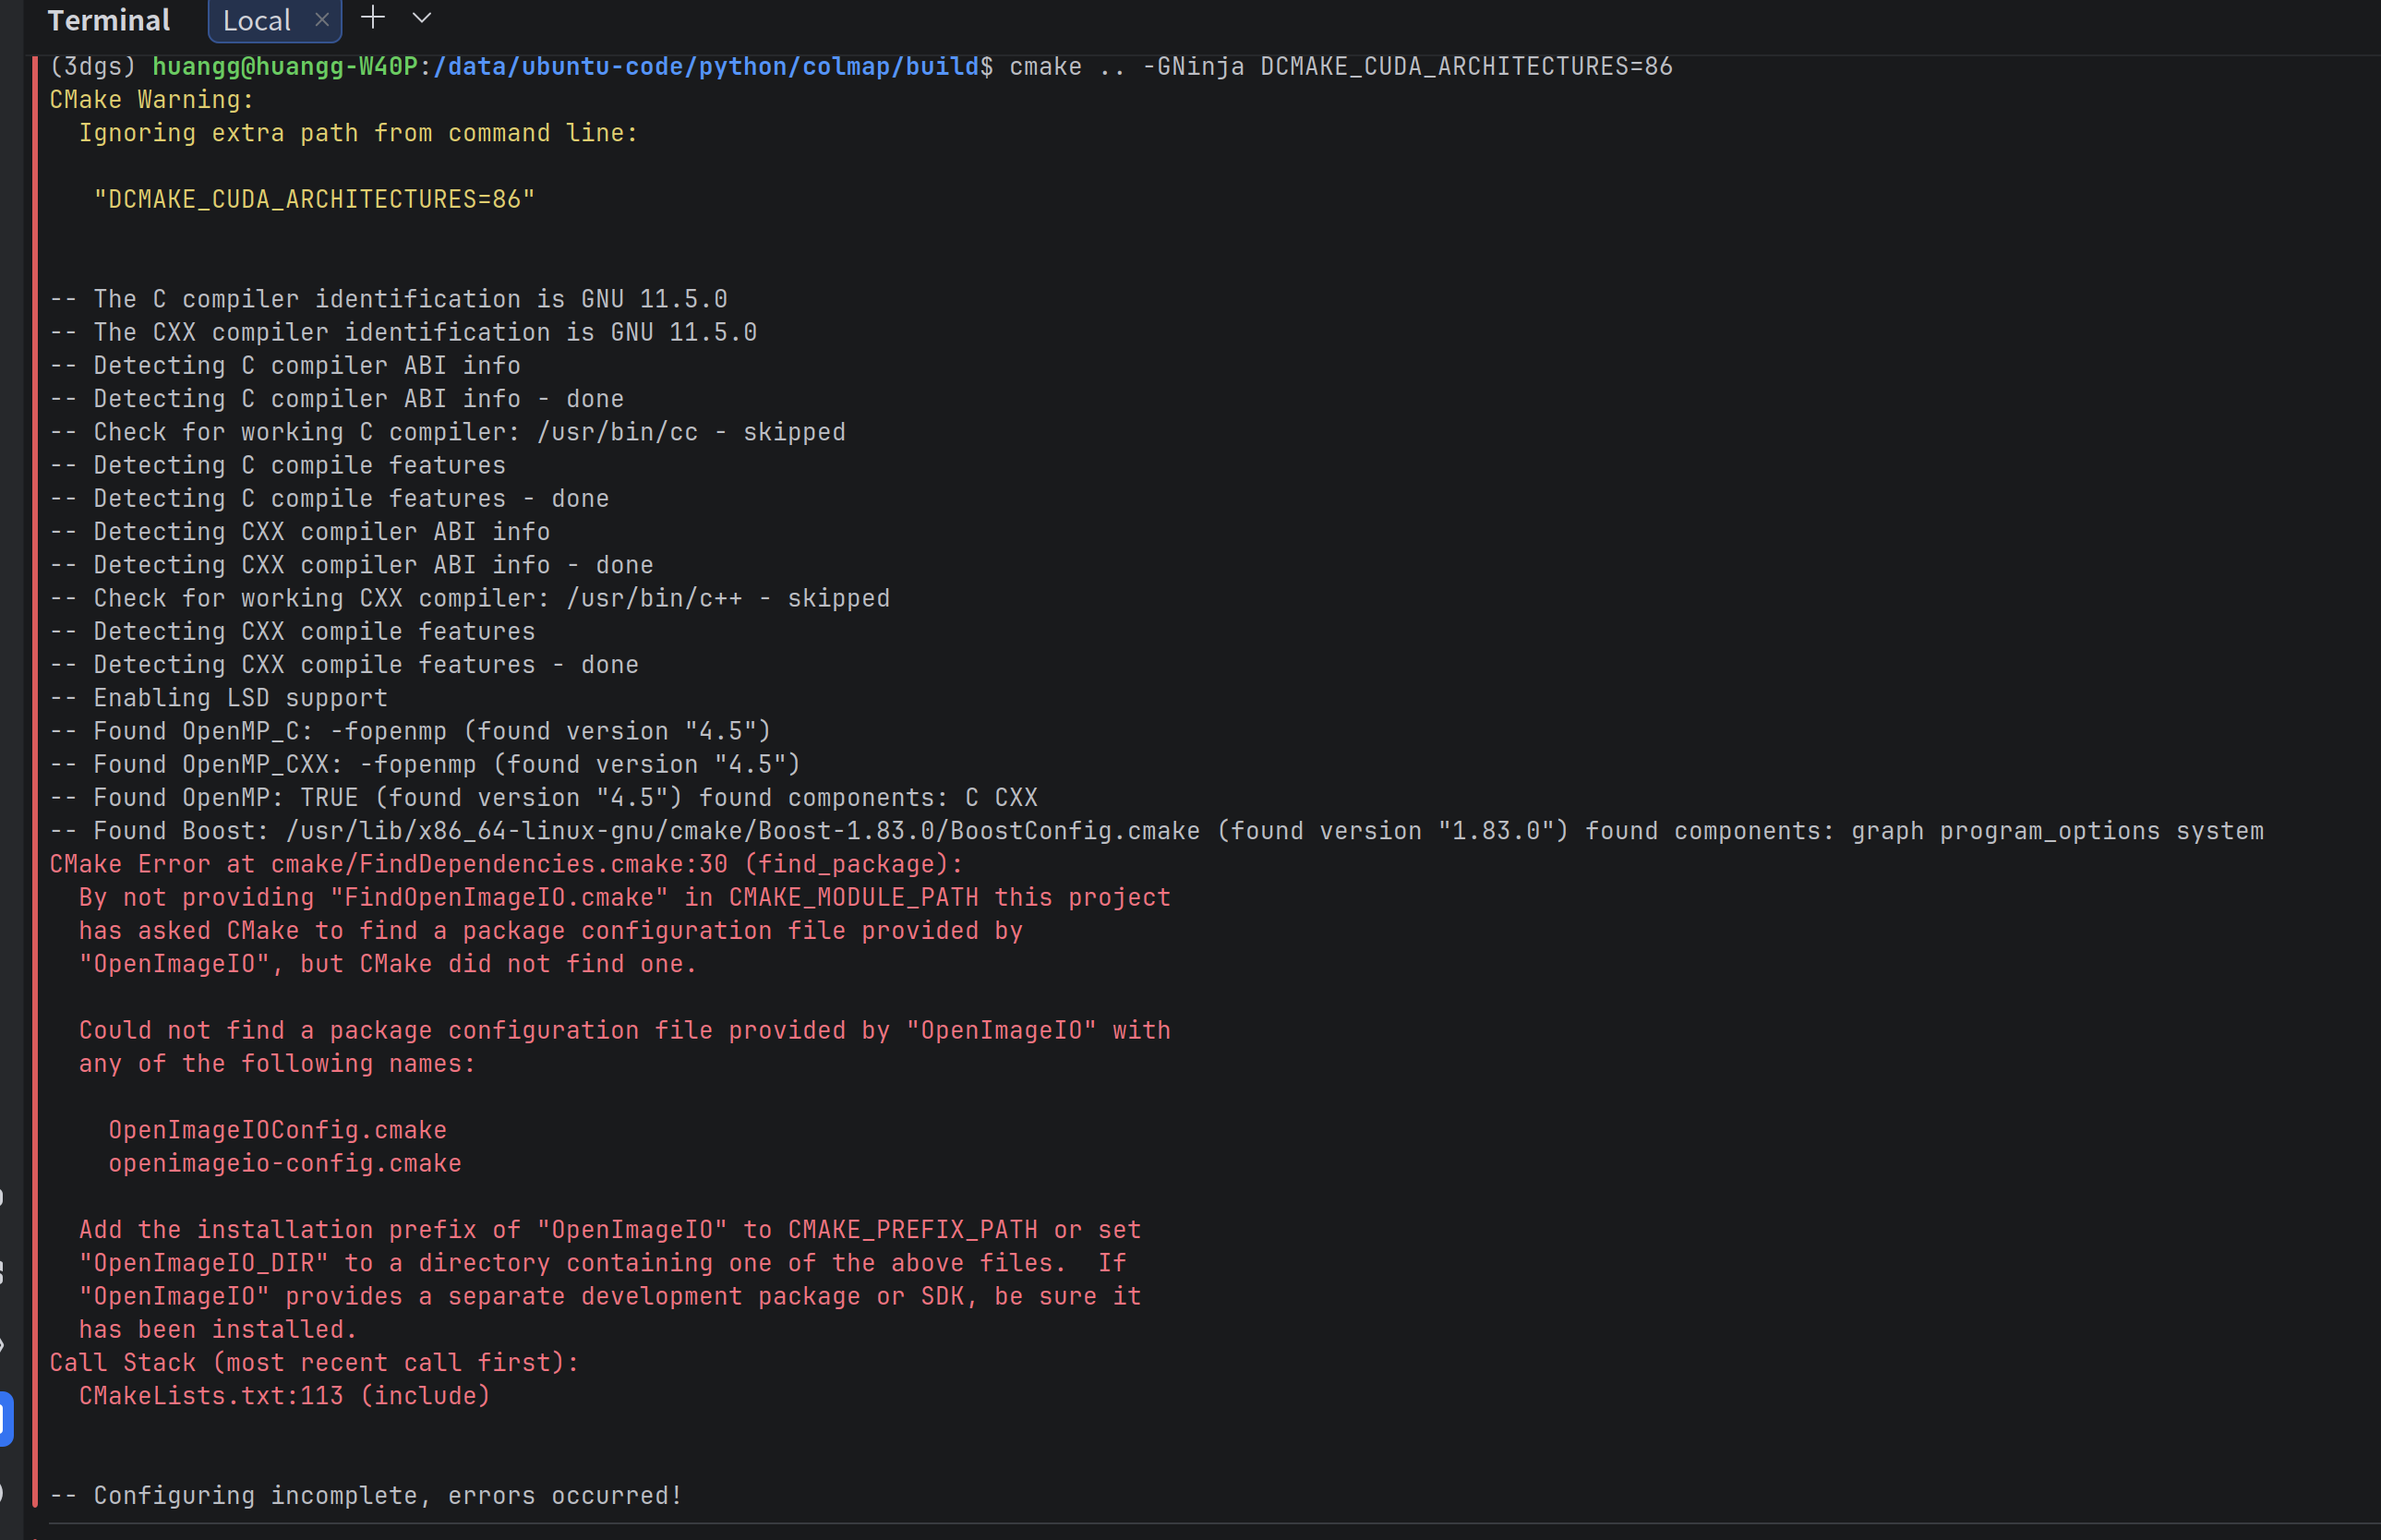
解决方案:
bash
sudo apt install libopenimageio-dev(2)显示 /usr/bin/iconvert文件不存在
报错如下:
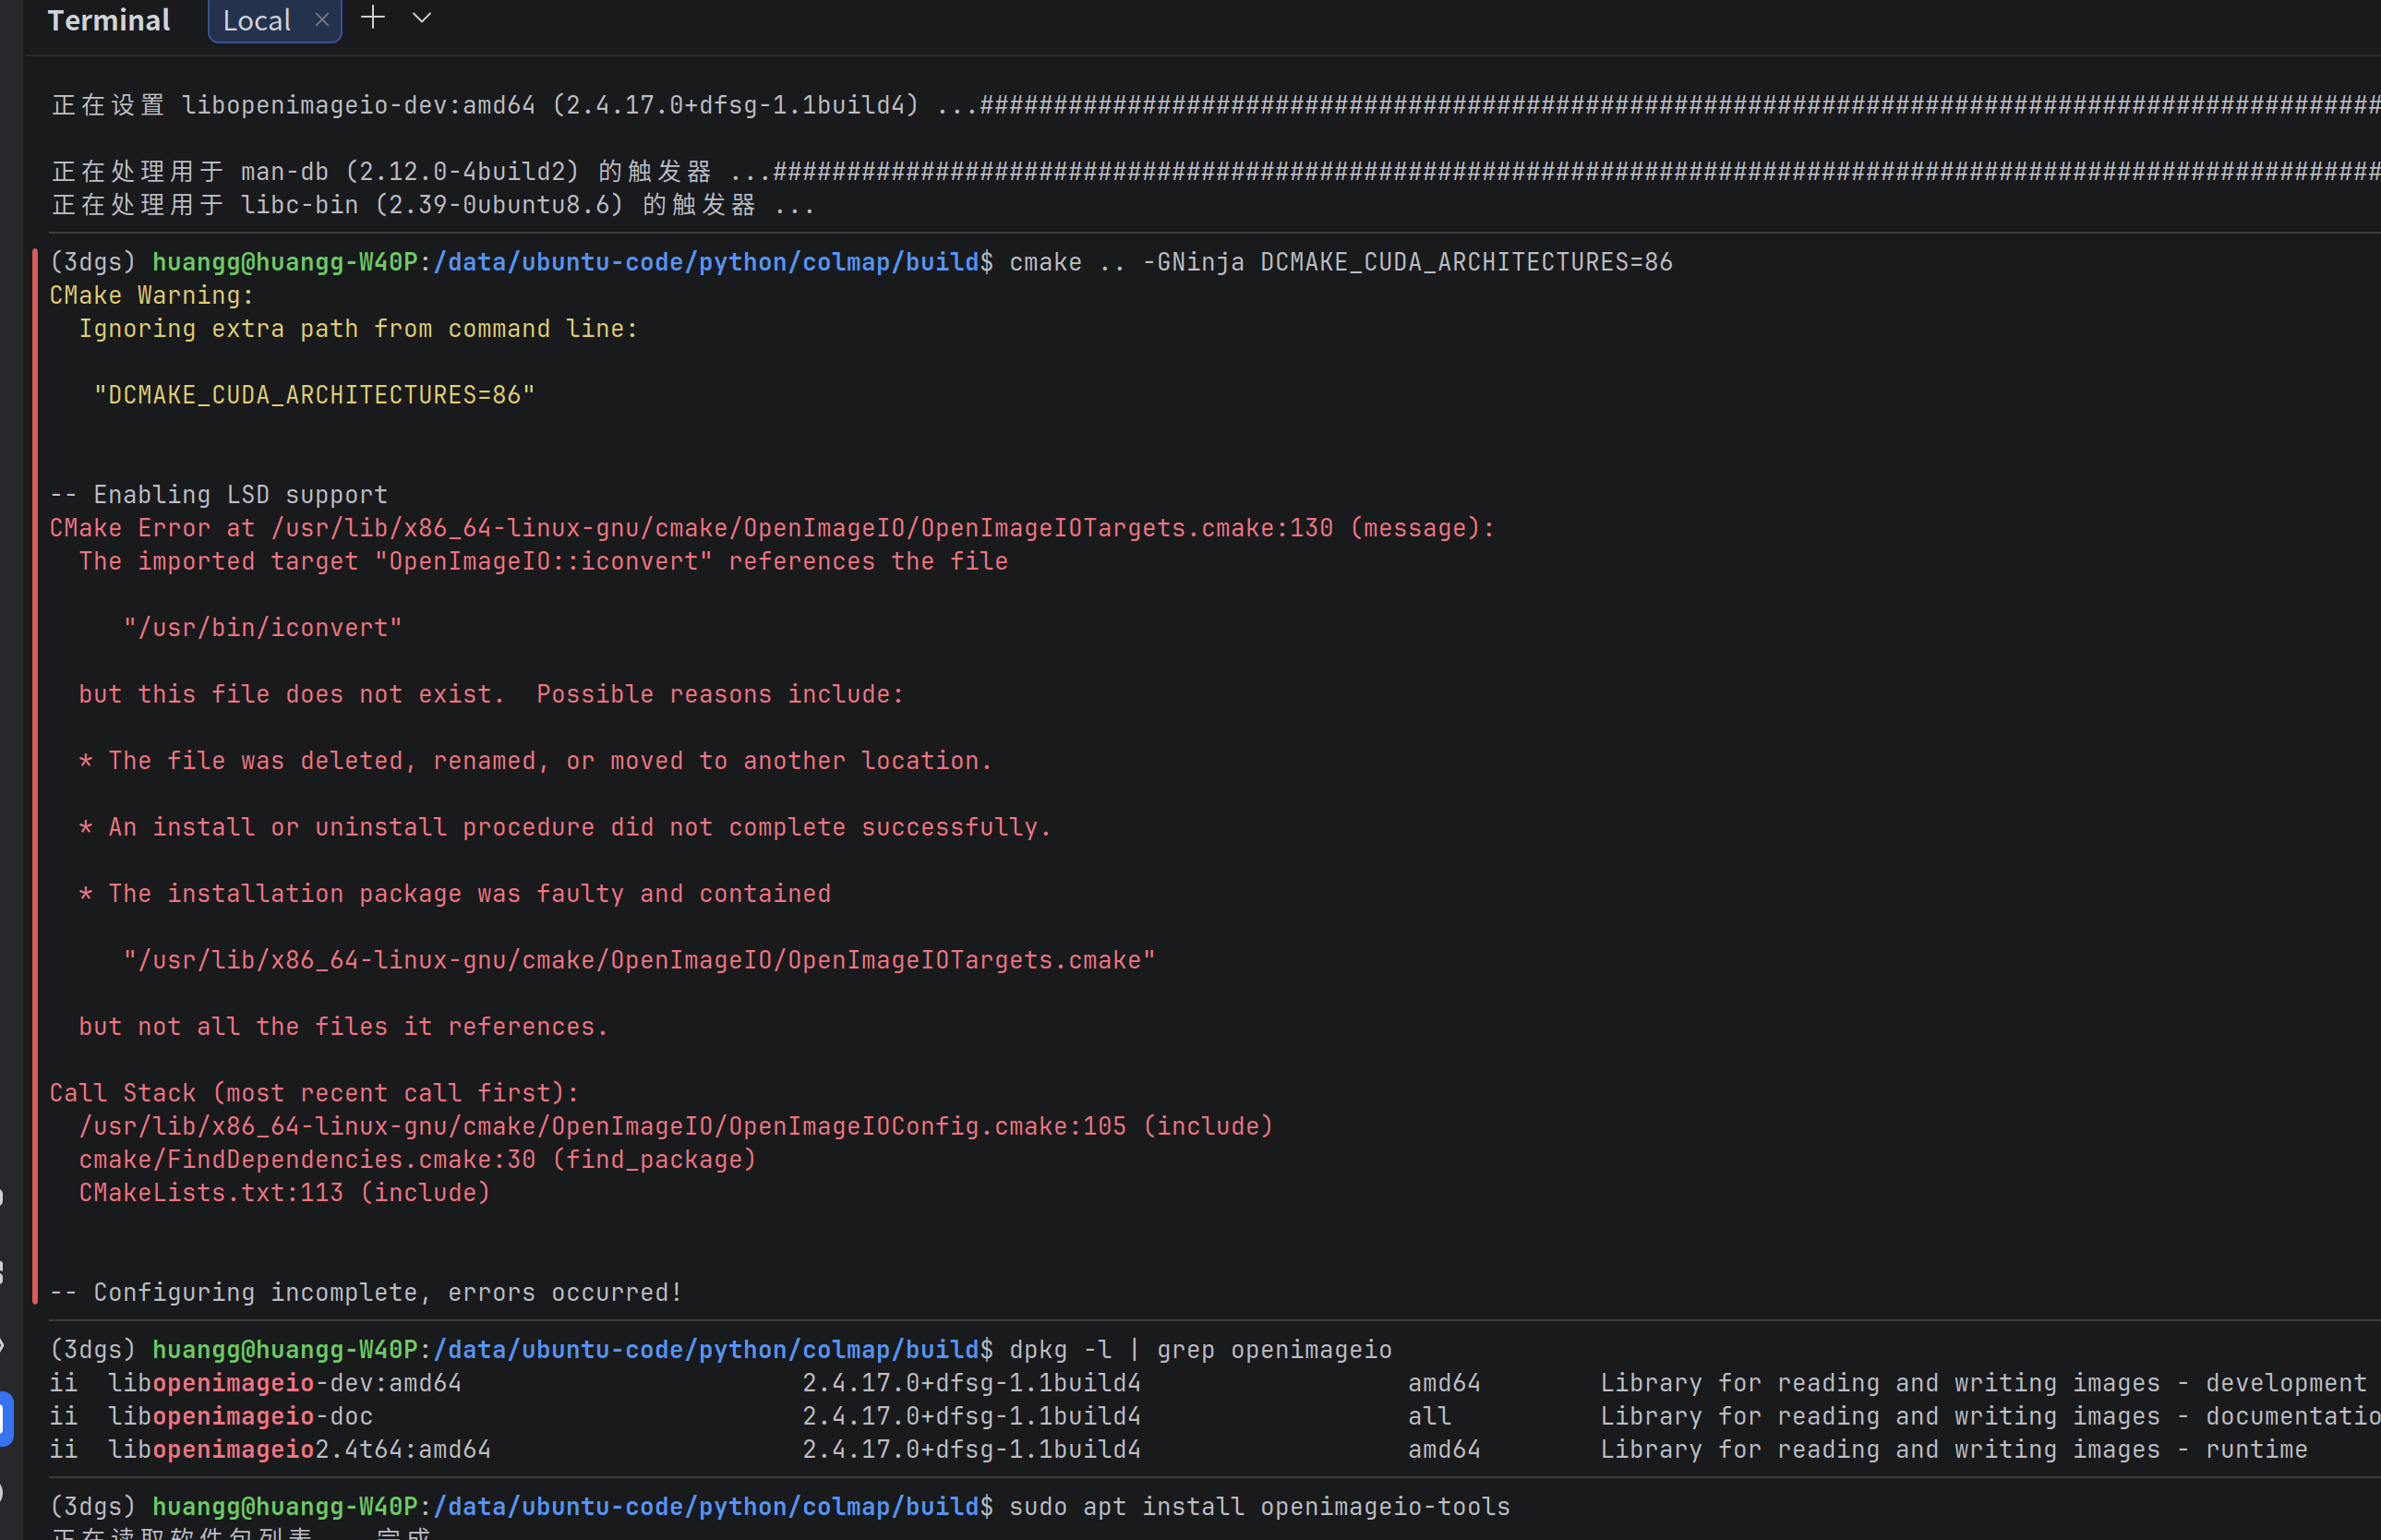
这是因为没有安装openimageio-tools
解决方案:
bash
sudo apt install openimageio-tools安装后再次执行编译命令,就进入了漫长的编译环节,控制台输出实时编译信息,部分信息如下:
bash
(3dgs) huangg@huangg-W40P:/data/ubuntu-code/python/colmap/build$ cmake .. -GNinja DCMAKE_CUDA_ARCHITECTURES=86
CMake Warning:
  Ignoring extra path from command line:

   "DCMAKE_CUDA_ARCHITECTURES=86"


-- Enabling LSD support
-- Found Metis
--   Includes : /usr/include
--   Libraries : /usr/lib/x86_64-linux-gnu/libmetis.so
-- Found Glog
--   Target : glog::glog
-- Found SQLite3: /usr/include (found version "3.45.1")
-- Found OpenGL: /usr/lib/x86_64-linux-gnu/libOpenGL.so
-- Found Glew
--   Includes : /usr/include
--   Libraries : /usr/lib/x86_64-linux-gnu/libGLEW.so
-- Found Git: /usr/bin/git (found version "2.43.0")
-- SuiteSparse_config version: 7.6.1
-- SuiteSparse_config include: /usr/include/suitesparse
-- SuiteSparse_config library: /usr/lib/x86_64-linux-gnu/libsuitesparseconfig.so.7.6.1
-- SuiteSparse_config static:  /usr/lib/x86_64-linux-gnu/libsuitesparseconfig.a
-- AMD version: 3.3.1
-- AMD include: /usr/include/suitesparse
-- AMD library: /usr/lib/x86_64-linux-gnu/libamd.so.3.3.1
-- AMD static:  /usr/lib/x86_64-linux-gnu/libamd.a
-- COLAMD version: 3.3.2
-- COLAMD include: /usr/include/suitesparse
-- COLAMD library: /usr/lib/x86_64-linux-gnu/libcolamd.so.3.3.2
-- COLAMD static:  /usr/lib/x86_64-linux-gnu/libcolamd.a
-- CAMD version: 3.3.1
-- CAMD include: /usr/include/suitesparse
-- CAMD library: /usr/lib/x86_64-linux-gnu/libcamd.so.3.3.1
-- CAMD static:  /usr/lib/x86_64-linux-gnu/libcamd.a
-- CCOLAMD version: 3.3.2
-- CCOLAMD include: /usr/include/suitesparse
-- CCOLAMD library: /usr/lib/x86_64-linux-gnu/libccolamd.so.3.3.2
-- CCOLAMD static:  /usr/lib/x86_64-linux-gnu/libccolamd.a
-- CHOLMOD version: 5.2.0
-- CHOLMOD include: /usr/include/suitesparse
-- CHOLMOD library: /usr/lib/x86_64-linux-gnu/libcholmod.so.5.2.0
-- CHOLMOD static:  /usr/lib/x86_64-linux-gnu/libcholmod.a
-- Found CHOLMOD
--   Includes : /usr/include
--   Libraries : /usr/lib/x86_64-linux-gnu/libcholmod.so.5.2.0
-- Performing Test CMAKE_HAVE_LIBC_PTHREAD
-- Performing Test CMAKE_HAVE_LIBC_PTHREAD - Success
-- Found Threads: TRUE
-- Found AMD headers in: /usr/include/suitesparse
-- Found AMD library: /usr/lib/x86_64-linux-gnu/libamd.so
-- Found CAMD headers in: /usr/include/suitesparse
-- Found CAMD library: /usr/lib/x86_64-linux-gnu/libcamd.so
-- Found CCOLAMD headers in: /usr/include/suitesparse
-- Found CCOLAMD library: /usr/lib/x86_64-linux-gnu/libccolamd.so
-- Found CHOLMOD headers in: /usr/include/suitesparse
-- Found CHOLMOD library: /usr/lib/x86_64-linux-gnu/libcholmod.so
-- Found COLAMD headers in: /usr/include/suitesparse
-- Found COLAMD library: /usr/lib/x86_64-linux-gnu/libcolamd.so
-- Found SPQR headers in: /usr/include/suitesparse
-- Found SPQR library: /usr/lib/x86_64-linux-gnu/libspqr.so
-- Found Config headers in: /usr/include/suitesparse
-- Found Config library: /usr/lib/x86_64-linux-gnu/libsuitesparseconfig.so
-- Did not find Intel TBB library, assuming SuiteSparseQR was not compiled with TBB.
-- Looking for shm_open in rt
-- Looking for shm_open in rt - found
-- Adding librt to SuiteSparse_config libraries (required on Linux & Unix [not OSX] if SuiteSparse is compiled with timing).
-- Found METIS: /usr/include (found version "5.1.0")
-- Looking for cholmod_metis
-- Looking for cholmod_metis - found
-- Found SuiteSparse: /usr/include/suitesparse (found suitable version "7.6.1", minimum required is "7.6.1") found components: AMD CAMD CCOLAMD CHOLMOD COLAMD SPQR Config
-- Found required Ceres dependency: Eigen version 3.4.0 in /usr/share/eigen3/cmake
-- Found required Ceres dependency: glog
-- Found required Ceres dependency: gflags
-- Found Ceres version: 2.2.0 installed in: /usr with components: [EigenSparse, SparseLinearAlgebraLibrary, LAPACK, SuiteSparse, SchurSpecializations]
-- Using header-only CGAL
-- Targeting Ninja
-- Using /usr/bin/c++ compiler.
-- Found GMP: /usr/lib/x86_64-linux-gnu/libgmp.so
-- Found MPFR: /usr/lib/x86_64-linux-gnu/libmpfr.so
-- Found Boost: /usr/lib/x86_64-linux-gnu/cmake/Boost-1.83.0/BoostConfig.cmake (found suitable version "1.83.0", minimum required is "1.66")
-- Boost include dirs: /usr/include
-- Boost libraries:
-- Using gcc version 4 or later. Adding -frounding-math
-- Found CGAL
--   Includes : /usr/include
--   Libraries : CGAL
-- Enabling download support
-- The CUDA compiler identification is NVIDIA 11.8.89
-- Detecting CUDA compiler ABI info
-- Detecting CUDA compiler ABI info - done
-- Check for working CUDA compiler: /usr/local/cuda/bin/nvcc - skipped
-- Detecting CUDA compile features
-- Detecting CUDA compile features - done
-- Enabling CUDA support (version: 11.8.89, archs: 86)
-- Found Qt
--   Module : /usr/lib/x86_64-linux-gnu/cmake/Qt5Core
--   Module : /usr/lib/x86_64-linux-gnu/cmake/Qt5OpenGL
--   Module : /usr/lib/x86_64-linux-gnu/cmake/Qt5Widgets
-- Enabling GUI support
-- Enabling OpenGL support
-- Enabling GPU support (OpenGL: ON, CUDA: ON)
-- Build type not specified, using Release
-- Enabling SIMD support
-- Disabling interprocedural optimization
-- Disabling ccache support
-- Disabling profiling support
-- Disabling tests
-- Disabling coverage support
-- Configuring PoseLib...
-- BUILD_SHARED_LIBS: OFF
-- CMAKE_BUILD_TYPE: Release
-- CMAKE_GENERATOR: Single-config
-- CMAKE_GENERATOR: Ninja
-- CMAKE_REGISTRY_FOLDER: OFF
-- Found Eigen3: /usr/include/eigen3 (found suitable version "3.4.0", minimum required is "3.1.0")
-- Configuring PoseLib... done
-- Configuring faiss...
20分钟后报错
(4)缺少opencv
上一步的报错信息如下
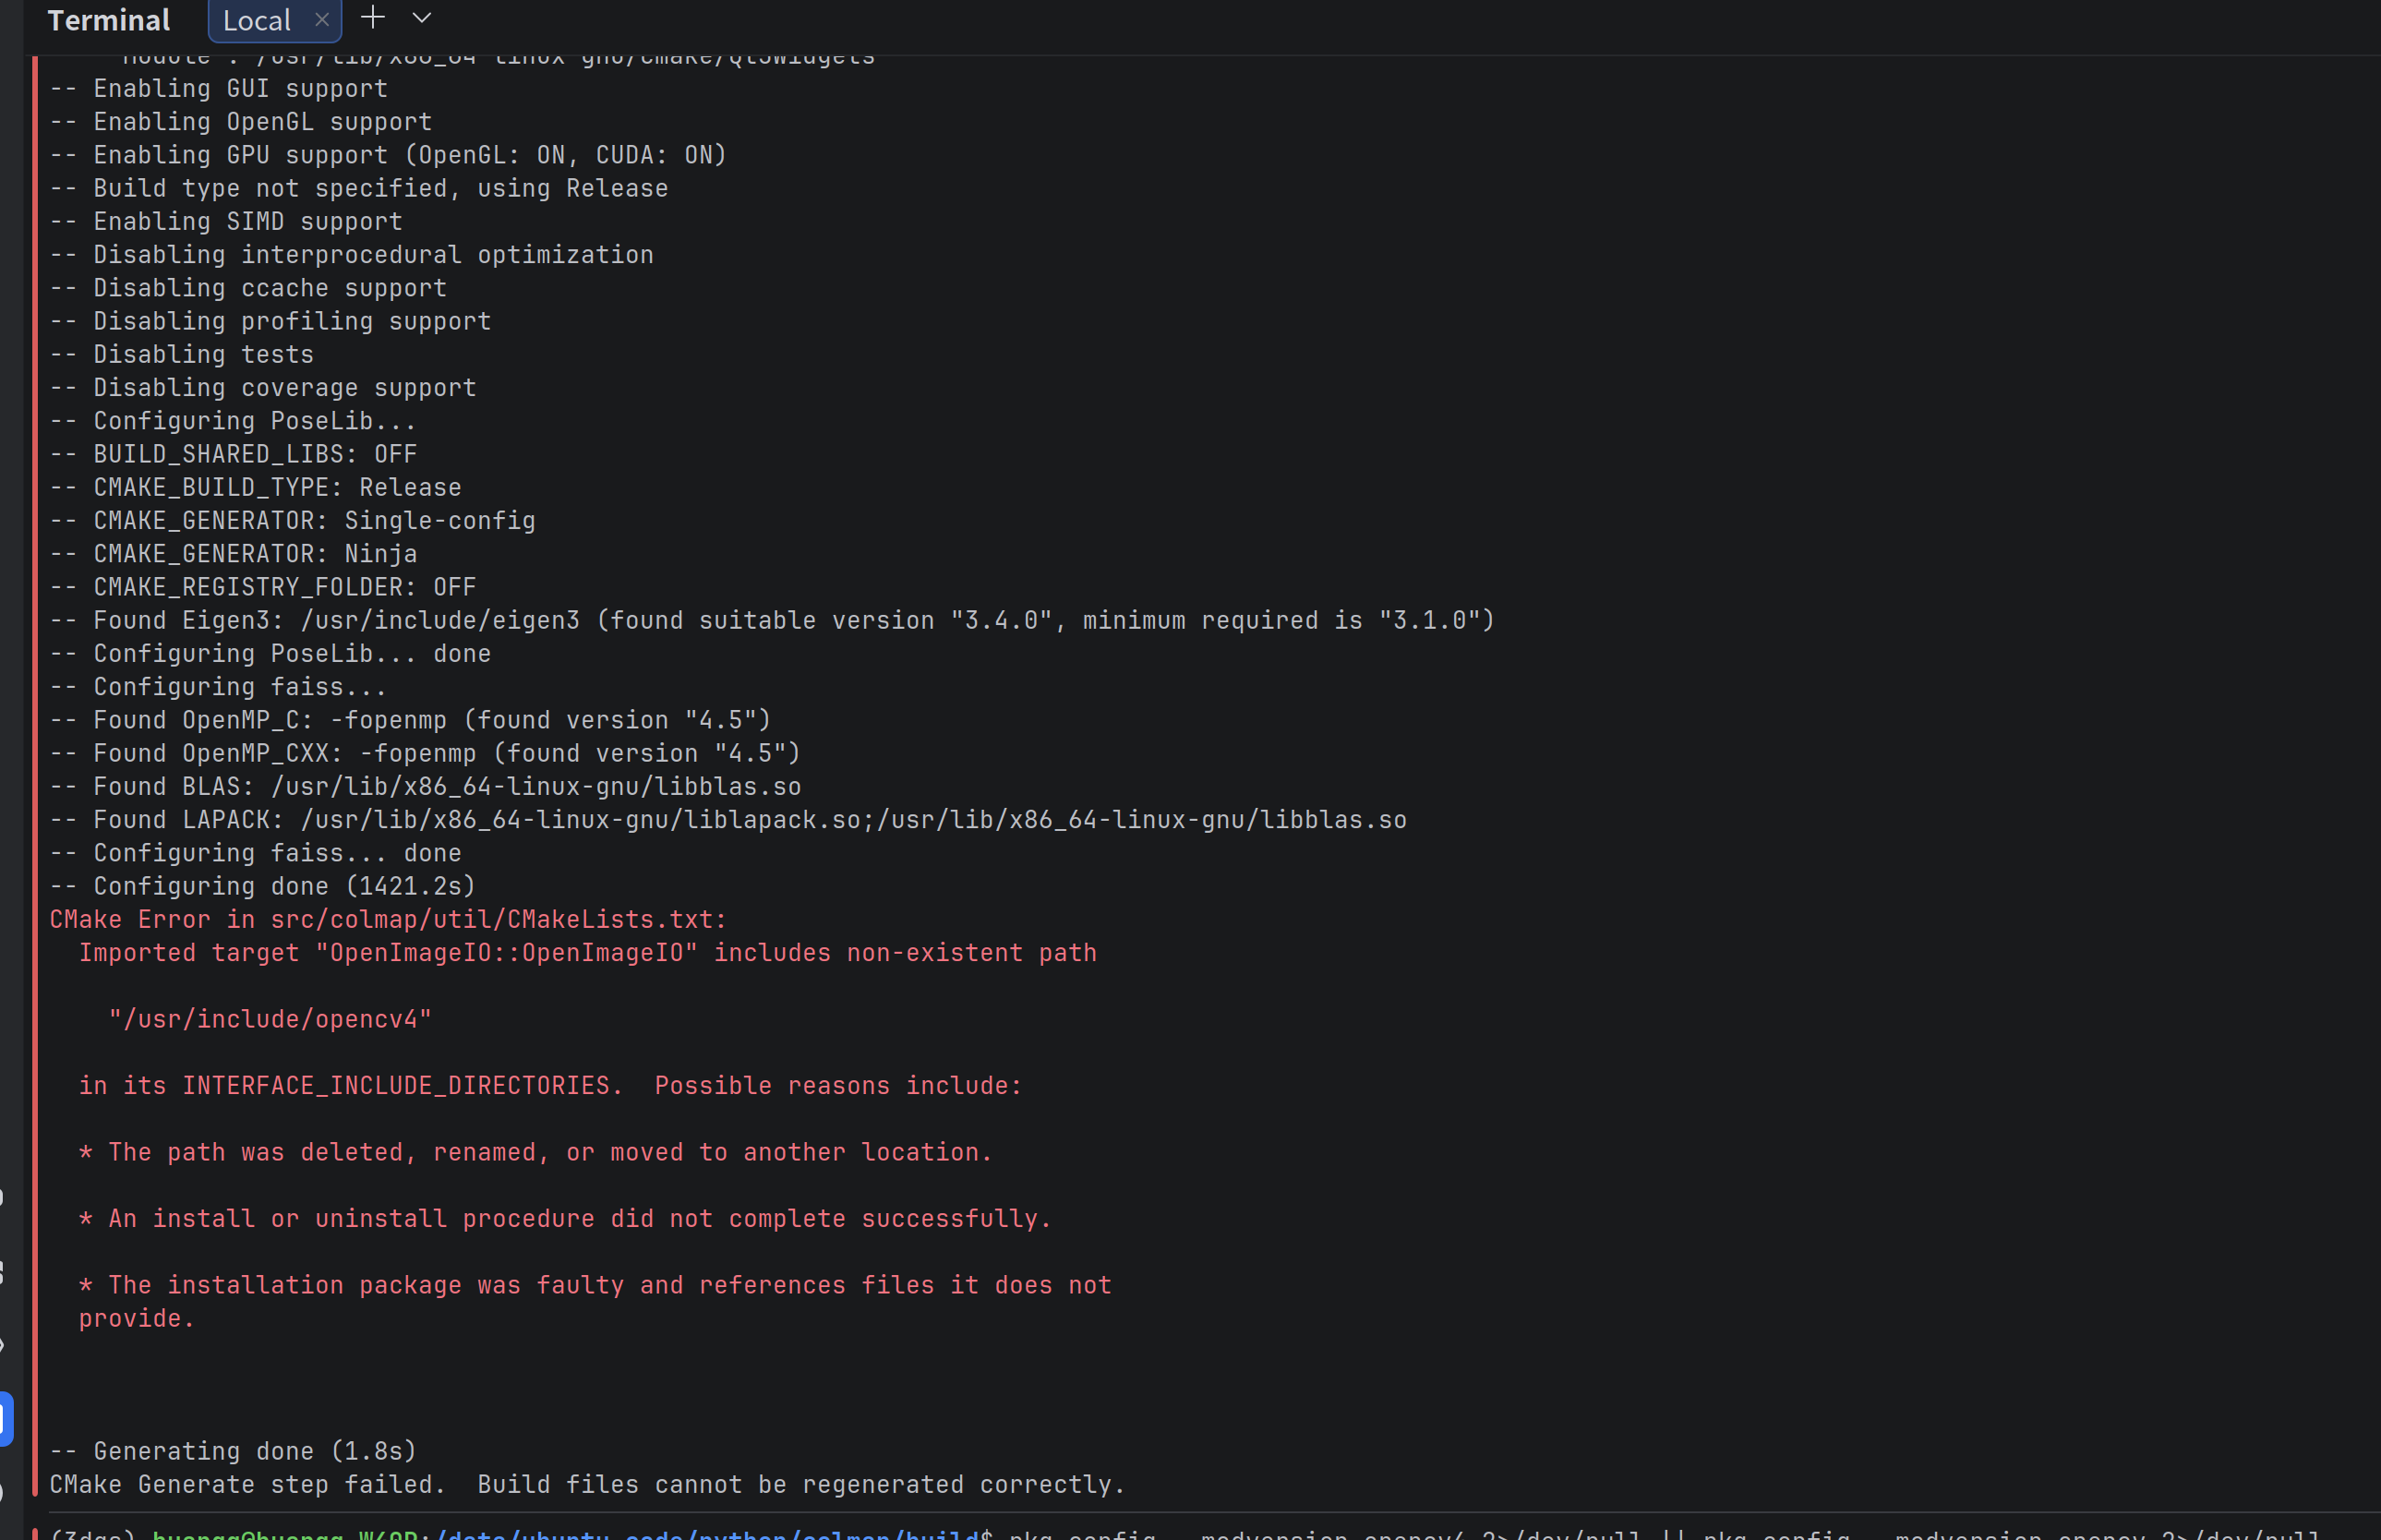
这个报错是说缺少opencv
解决方案:
bash
sudo apt install -y libopencv-dev再次cmake,终于没有报错了
4、配置
编译完成后,还需要执行以下两步
bash
ninja
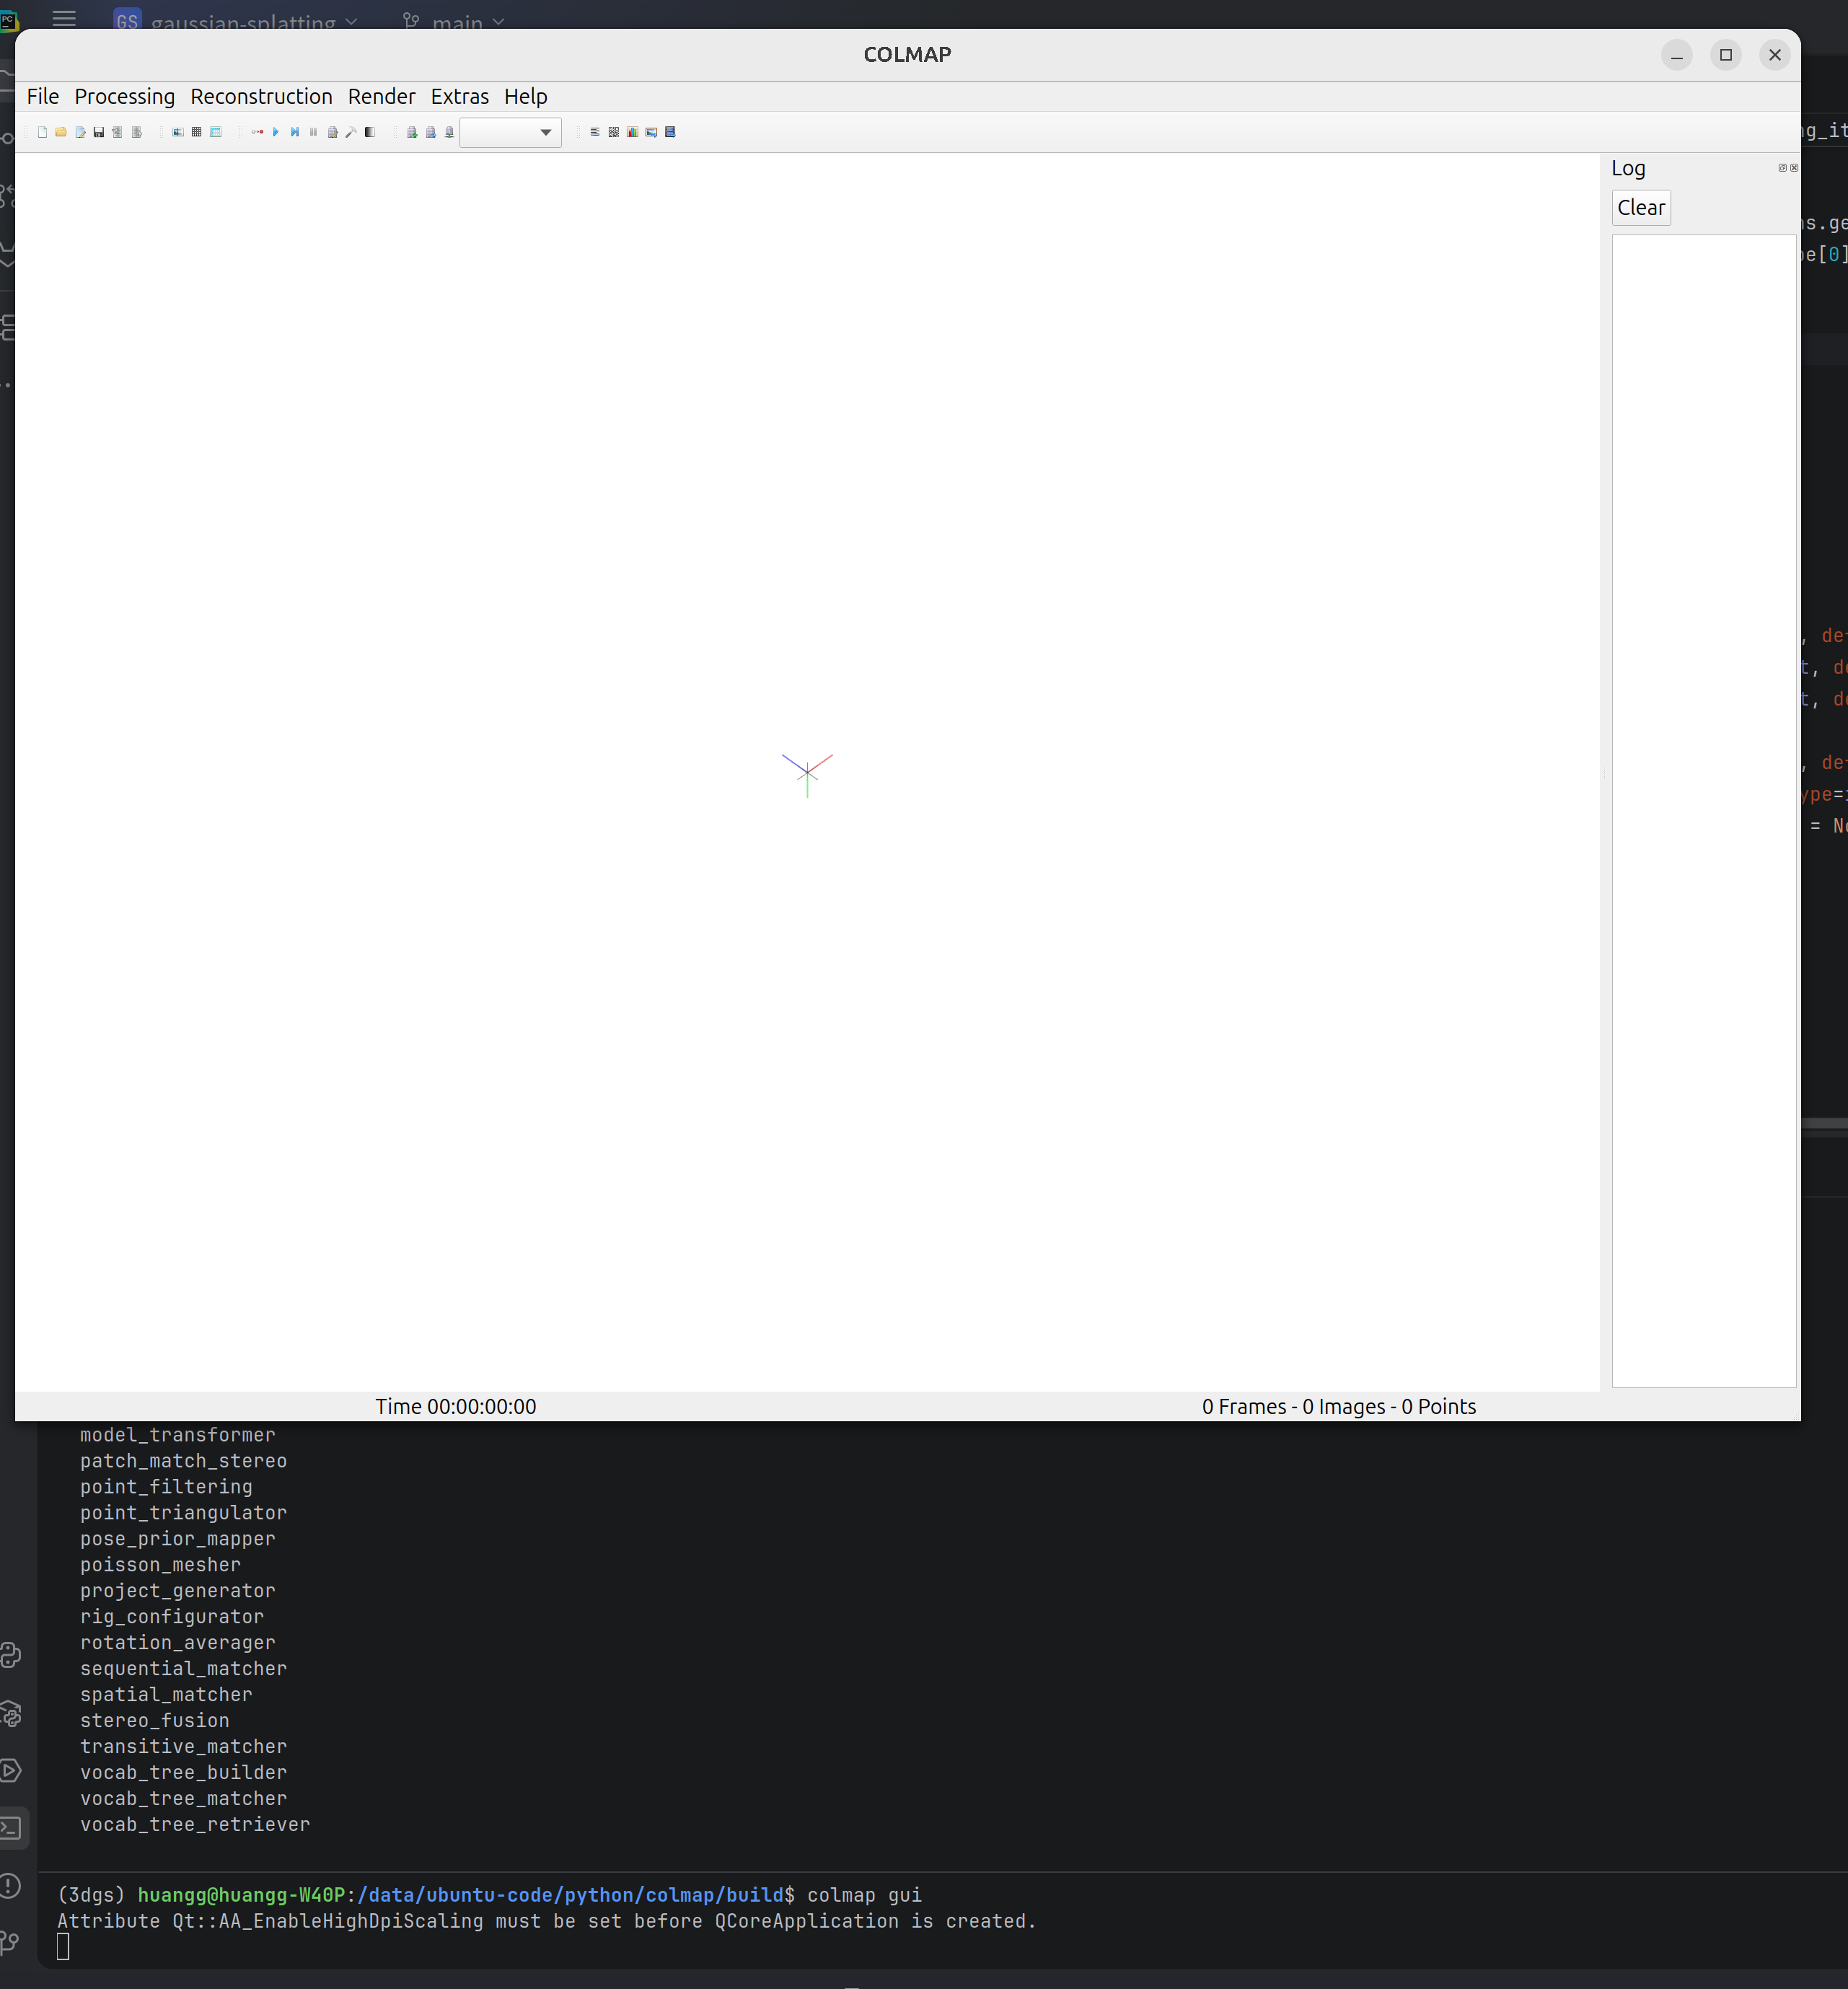
sudo ninja install如果没有报错,就算彻底成功了
colmap gui可以看到界面如下:
5、运行
把自己的建模图片放到data/VideoImages/input目录下
执行命令:
bash
huangg@huangg-W40P:/data/ubuntu-code/python/gaussian-splatting$ python convert.py -s data/VideoImages/注意目录层级
成功运行后,会在原始的VideoImages目录下生成colmap文件
6、训练
可以将colmap进行特征提取后的数据进行3dgs训练
命令如下:
bash
python train.py -s data/VideoImages/ --iterations 7000开始启动训练

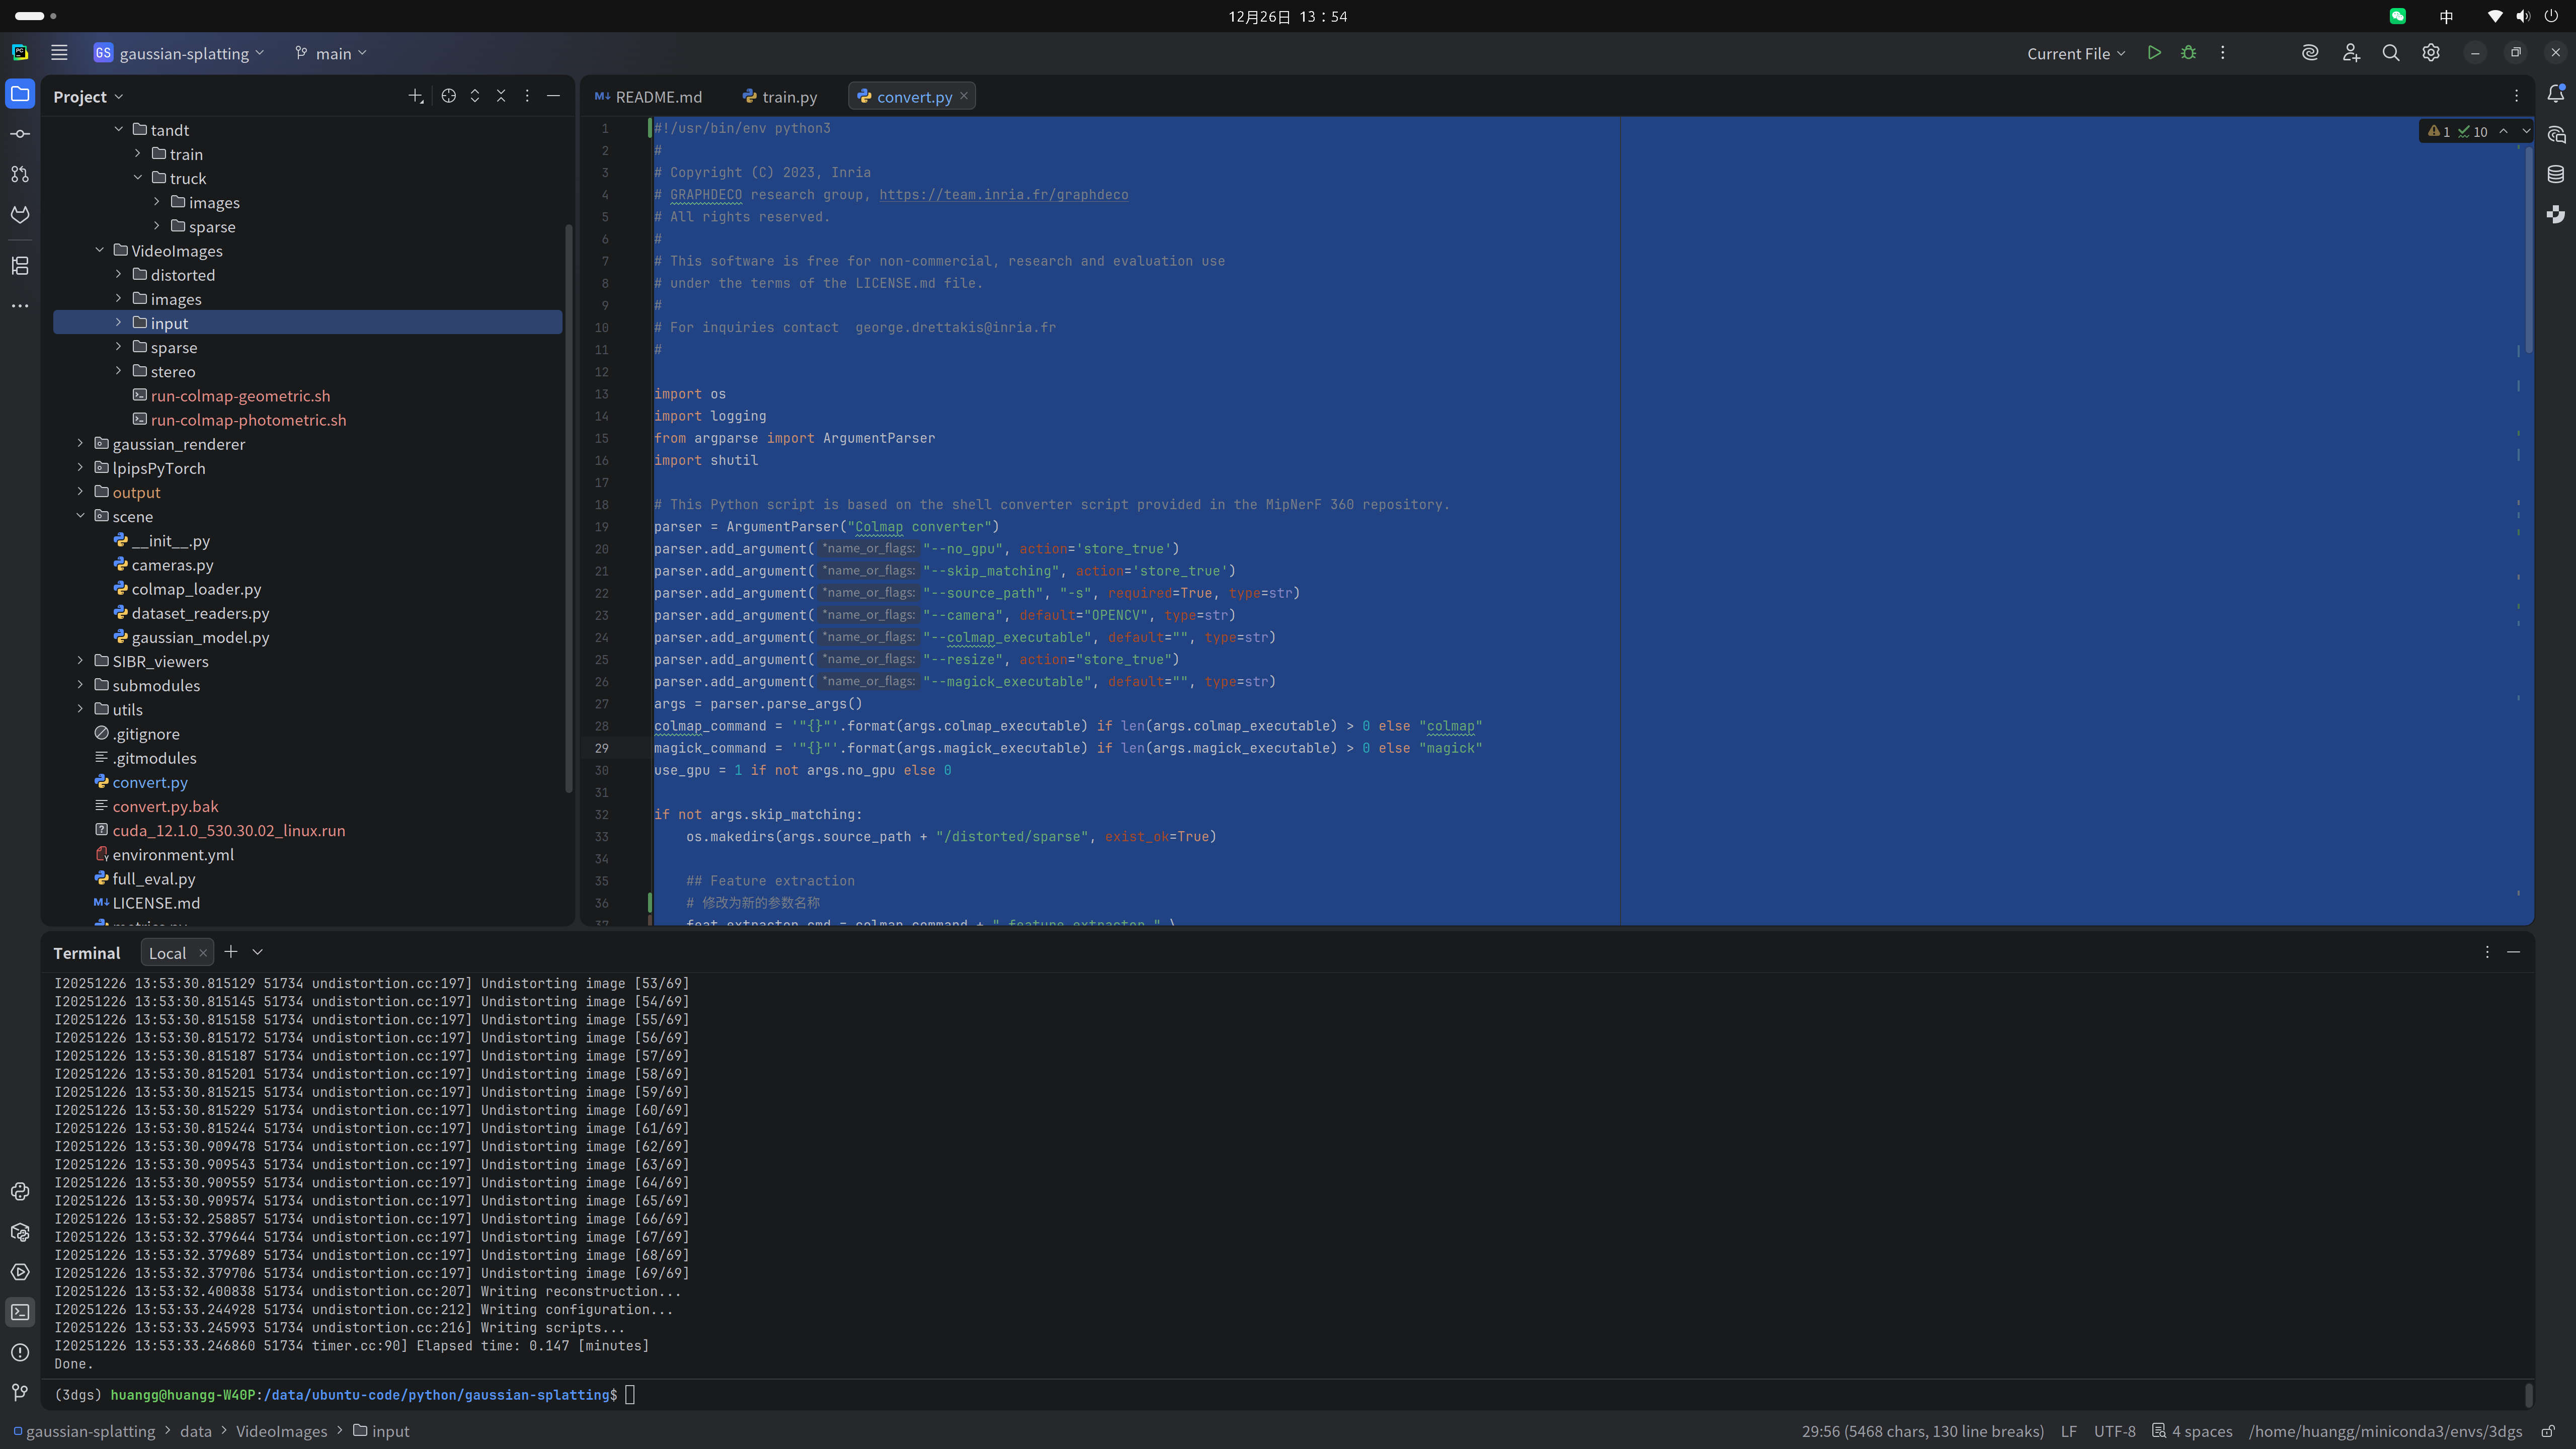
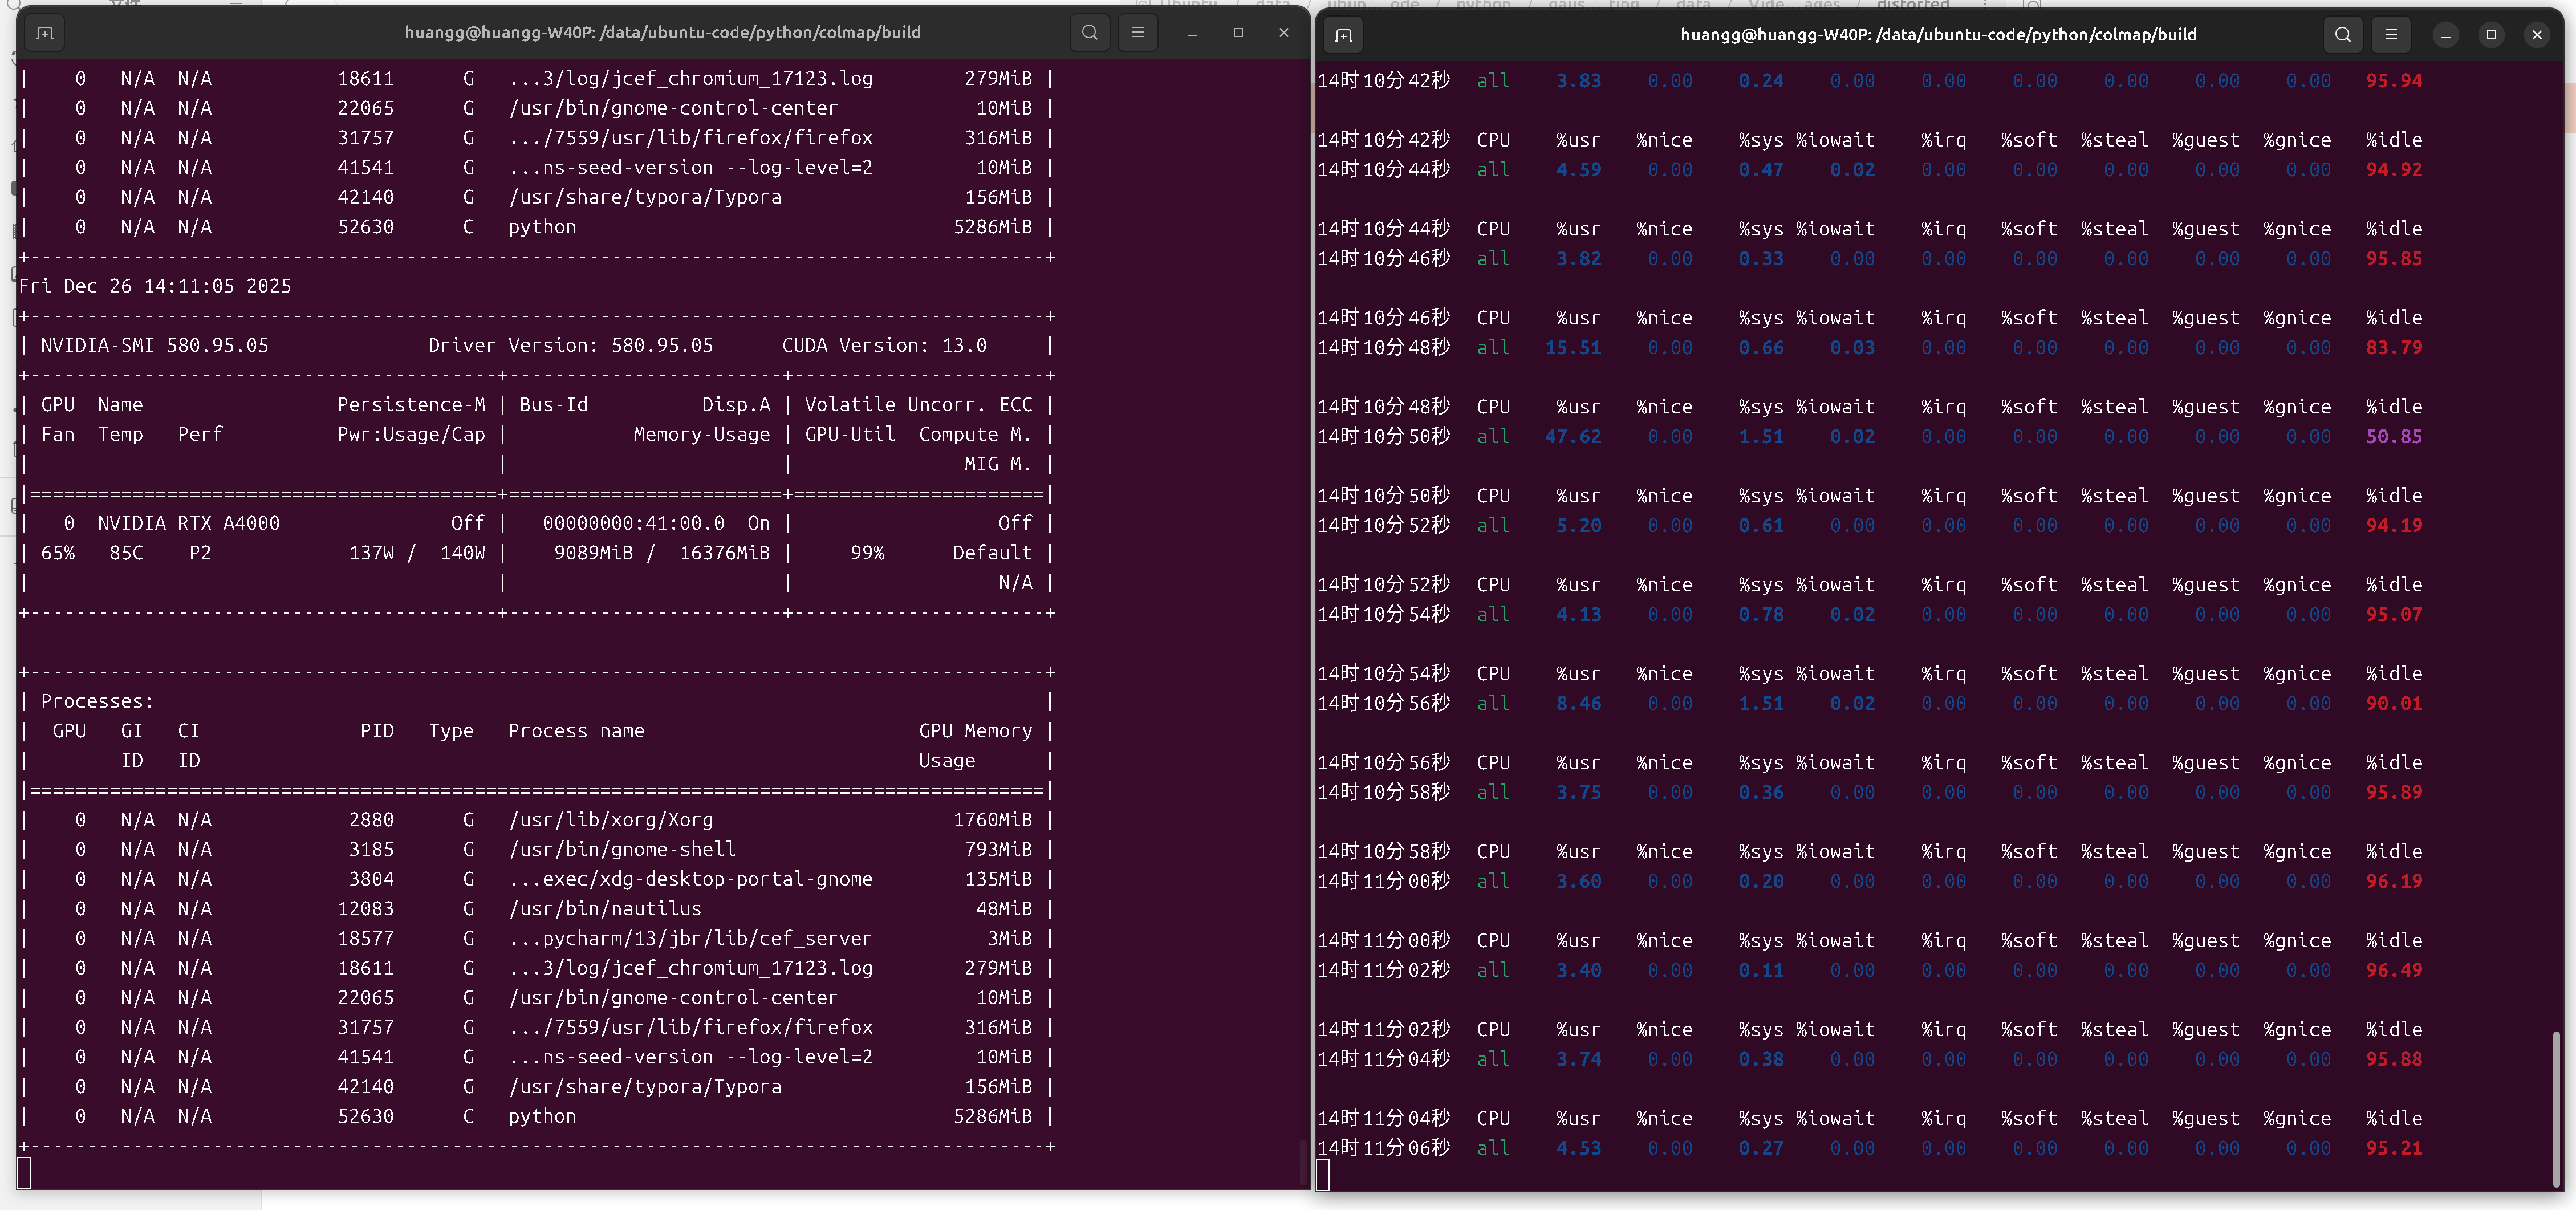
GPU和CPU运行的情况:
训练完成后,可以找一些开源的工具进行查看,我用的这个:https://superspl.at/editor
显示效果一般
但是sibr_viewers安装起来太繁琐了,我没再安装了
五、ffmpeg抽帧
以上是从图片开始建模,如果想从视频开始建模,需要前置一步,视频抽帧,3dgs推荐的工具是ffmpeg
1、安装
bash
sudo apt install ffmpeg2、抽帧
bash
ffmpeg -i data/videos/video.mp4 -vf fps=1 data/videos/images/frame_%04d.jpgdata/videos/video.mp4是视频文件相对当前目录的地址
images如果不存在的话,需要先创建,否则报错
抽帧完成后,就是colmap和3dgs了
3、colmap及3dgs训练
先后执行之前的命令
bash
# colmap
python convert.py -s data/videos/
# 3dgs
python train.py -s data/videos/ --iterations 7000
至此全部流程走完
189365)]
训练完成后,可以找一些开源的工具进行查看,我用的这个:https://superspl.at/editor
显示效果一般外链图片转存中...(img-uhu0mhjZ-1766741189366)
但是sibr_viewers安装起来太繁琐了,我没再安装了
五、ffmpeg抽帧
以上是从图片开始建模,如果想从视频开始建模,需要前置一步,视频抽帧,3dgs推荐的工具是ffmpeg
1、安装
bash
sudo apt install ffmpeg2、抽帧
bash
ffmpeg -i data/videos/video.mp4 -vf fps=1 data/videos/images/frame_%04d.jpgdata/videos/video.mp4是视频文件相对当前目录的地址
images如果不存在的话,需要先创建,否则报错
抽帧完成后,就是colmap和3dgs了
3、colmap及3dgs训练
先后执行之前的命令
bash
# colmap
python convert.py -s data/videos/
# 3dgs
python train.py -s data/videos/ --iterations 7000
至此全部流程走完