《MCP Sampling采样请求完全解析:LLM参数微调与人工干预的完美融合》
1 导语
1.1 项目背景
在之前的案例中,我们学到了如何定义工具、发现资源、管理提示词 。但有一个更深层的问题:当我们让LLM生成内容时,如何对生成过程进行精细控制?
MCP(Model Context Protocol)的第四大功能 Sampling 解决了这个问题。它允许Server向Client请求对LLM生成过程的采样(调用),并且Client可以在执行前调整参数甚至干预结果。
这是一个突破性的特性:Server可以通过Sampling向Client"借用"LLM的能力,同时保留对生成过程的完整控制权。
1.2 项目价值
- ✅ 参数化采样:Server可以指定temperature、max_tokens、model等参数,Client可以调整
- ✅ 人工干预:在LLM生成前/后,用户可以确认、修改或拒绝结果
- ✅ 模型选择灵活性:Server可以建议使用哪个LLM,但Client最终决定
- ✅ 质量保证:通过人工审核关键生成内容
- ✅ 成本优化:可以在cost/speed/intelligence之间动态平衡
- ✅ 审计追踪:完整记录采样请求和修改痕迹
1.3 学习目标
通过本文,你将学会:
- Sampling请求的结构和生命周期
- 如何在Server端发起采样请求
- 如何在Client端处理采样请求
- 参数化采样的最佳实践
- 人工干预机制的实现方法
- 完整的采样工作流构建
2 技术栈清单
| 组件 | 版本 | 用途 |
|---|---|---|
| Python | 3.10+ | 基础语言 |
| MCP | 0.1.0+ | 采样通信协议 |
| types.Prompt | - | 提示词定义 |
| asyncio | 内置 | 异步编程 |
| OpenAI SDK | 1.3.0+ | LLM调用 |
| DeepSeek API | - | 演示LLM(可选) |
| JSON | 内置 | 采样请求序列化 |
环境要求:
- macOS/Linux/Windows均支持
- 需要LLM API密钥(DeepSeek/OpenAI/通义千问)
- 支持交互式参数调整
3 项目核心原理
3.1 什么是Sampling采样?
Sampling不是MCP的新概念,而是对现有模式的优雅延伸:
【传统方式】
Server → 定义提示词 → Client获取 → Client调用LLM → 返回结果

【Sampling方式】
Server → 发起采样请求 → Client接收 →
  Client[可选:调整参数] →
  Client调用LLM →
  Client[可选:修改结果] →
  返回给Server
关键洞察 :Sampling本质上是Server将LLM调用的主动权委托给Client,但参数完全由Server控制。
3.2 Sampling请求的完整结构
采样请求 (Sampling Request)
├─ method: "sampling/createMessage"
│  └─ 【固定值】表示这是一个采样请求
│
├─ params: {
│  ├─ messages: List[Message]           【关键】要发送给LLM的消息
│  │  └─ role: "user" | "assistant"
│  │  └─ content: {"type": "text", "text": "内容"}
│  │
│  ├─ modelPreferences: {                【关键】模型选择建议
│  │  ├─ hints: [{"name": "deepseek-chat"}]  # 推荐模型
│  │  ├─ costPriority: 0.5               # 成本优先级(0-1)
│  │  ├─ speedPriority: 0.7              # 速度优先级(0-1)
│  │  └─ intelligencePriority: 0.8       # 智能优先级(0-1)
│  │
│  ├─ systemPrompt: "你是..."            【关键】系统指令
│  ├─ temperature: 0.7                   【关键】创意度
│  ├─ maxTokens: 1000                    【关键】最大输出长度
│  ├─ stopSequences: ["\n\n"]           【关键】停止标记
│  │
│  ├─ includeContext: "thisServer"       【可选】包含上下文
│  └─ metadata: {...}                    【可选】元数据
│
└─ sampling_result: {                   【返回值】采样结果
   ├─ model: "deepseek-chat"
   ├─ stopReason: "endTurn" | "maxTokens"
   ├─ role: "assistant"
   └─ content: {"type": "text", "text": "LLM输出"}
3.3 Sampling的工作流程图
4 实战步骤
4.1 环境准备阶段
4.1.1 创建项目结构
bash
# 创建虚拟环境
python -m venv .venv
source .venv/bin/activate  # macOS/Linux
# 或 .venv\Scripts\activate  # Windows

# 安装依赖
pip install mcp python-dotenv openai -q
4.1.2 配置环境变量
创建 .env 文件:
bash
# .env
DEEPSEEK_API_KEY=your_deepseek_api_key
# 或其他LLM提供商
4.2 代码实现阶段
4.2.1 Server端:发起采样请求
python
# server/server.py
from mcp.server import Server
import mcp.types as types
import asyncio
from mcp.server.stdio import stdio_server
import json

# 【关键】定义采样请求模板
PROMPTS = {
    "file-system-assistant": types.Prompt(
        name="file-system-assistant",
        description="文件系统助手,可以回答关于文件系统的问题",
        arguments=[
            types.PromptArgument(
                name="question",
                description="用户的问题",
                required=True
            )
        ]
    )
}

app = Server("file-system-assistant")

@app.list_prompts()
async def list_prompts() -> list[types.Prompt]:
    """返回可用的提示模板列表"""
    return list(PROMPTS.values())

@app.get_prompt()
async def get_prompt(
    name: str, arguments: dict[str, str] | None = None
) -> types.GetPromptResult:
    """
    【核心方法】根据名称和参数生成采样请求

    注意:这个方法不直接返回LLM的回答,而是返回一个采样请求
    Client会执行这个请求,然后将结果返回给Server
    """
    if name not in PROMPTS:
        raise ValueError(f"提示模板 '{name}' 不存在")

    if name == "file-system-assistant":
        question = arguments.get("question") if arguments else ""

        # 【关键】构建采样请求
        # 这个请求的格式符合MCP采样协议
        sampling_request = {
            "method": "sampling/createMessage",  # 【固定】表示采样请求
            "params": {
                # 【关键】要发送给LLM的消息
                "messages": [
                    {
                        "role": "user",
                        "content": {
                            "type": "text",
                            "text": question
                        }
                    }
                ],

                # 【关键】模型选择偏好
                "modelPreferences": {
                    # 推荐使用的模型
                    "hints": [{"name": "deepseek-chat"}],

                    # 【关键】三个优先级参数(0-1之间)
                    # 用户可以根据这些提示选择合适的模型
                    "costPriority": 0.5,        # 成本优先
                    "speedPriority": 0.7,       # 速度优先
                    "intelligencePriority": 0.8 # 质量优先
                },

                # 【关键】系统指令
                "systemPrompt": "你是一个专业的文件系统助手,可以帮助用户了解文件系统的状态和内容。",

                # 【关键】生成参数
                "temperature": 0.7,            # 创意度(0=保守,1=创意)
                "maxTokens": 1000,             # 最大输出长度
                "stopSequences": ["\n\n"],    # 停止标记

                # 【关键】上下文包含选项
                "includeContext": "thisServer", # 可以包含Server的上下文

                # 元数据用于追踪和审计
                "metadata": {
                    "requestType": "file-system-query"
                }
            }
        }

        # 【关键】将采样请求序列化为JSON并返回
        return types.GetPromptResult(
            messages=[
                types.PromptMessage(
                    role="assistant",
                    content=types.TextContent(
                        type="text",
                        # 【重要】采样请求必须是JSON字符串格式
                        text=json.dumps(sampling_request, ensure_ascii=False)
                    )
                )
            ]
        )

    raise ValueError(f"未实现提示模板 '{name}' 的处理逻辑")

async def main():
    print("文件系统助手已启动,等待连接...")
    async with stdio_server() as (read_stream, write_stream):
        await app.run(
            read_stream,
            write_stream,
            app.create_initialization_options()
        )

if __name__ == "__main__":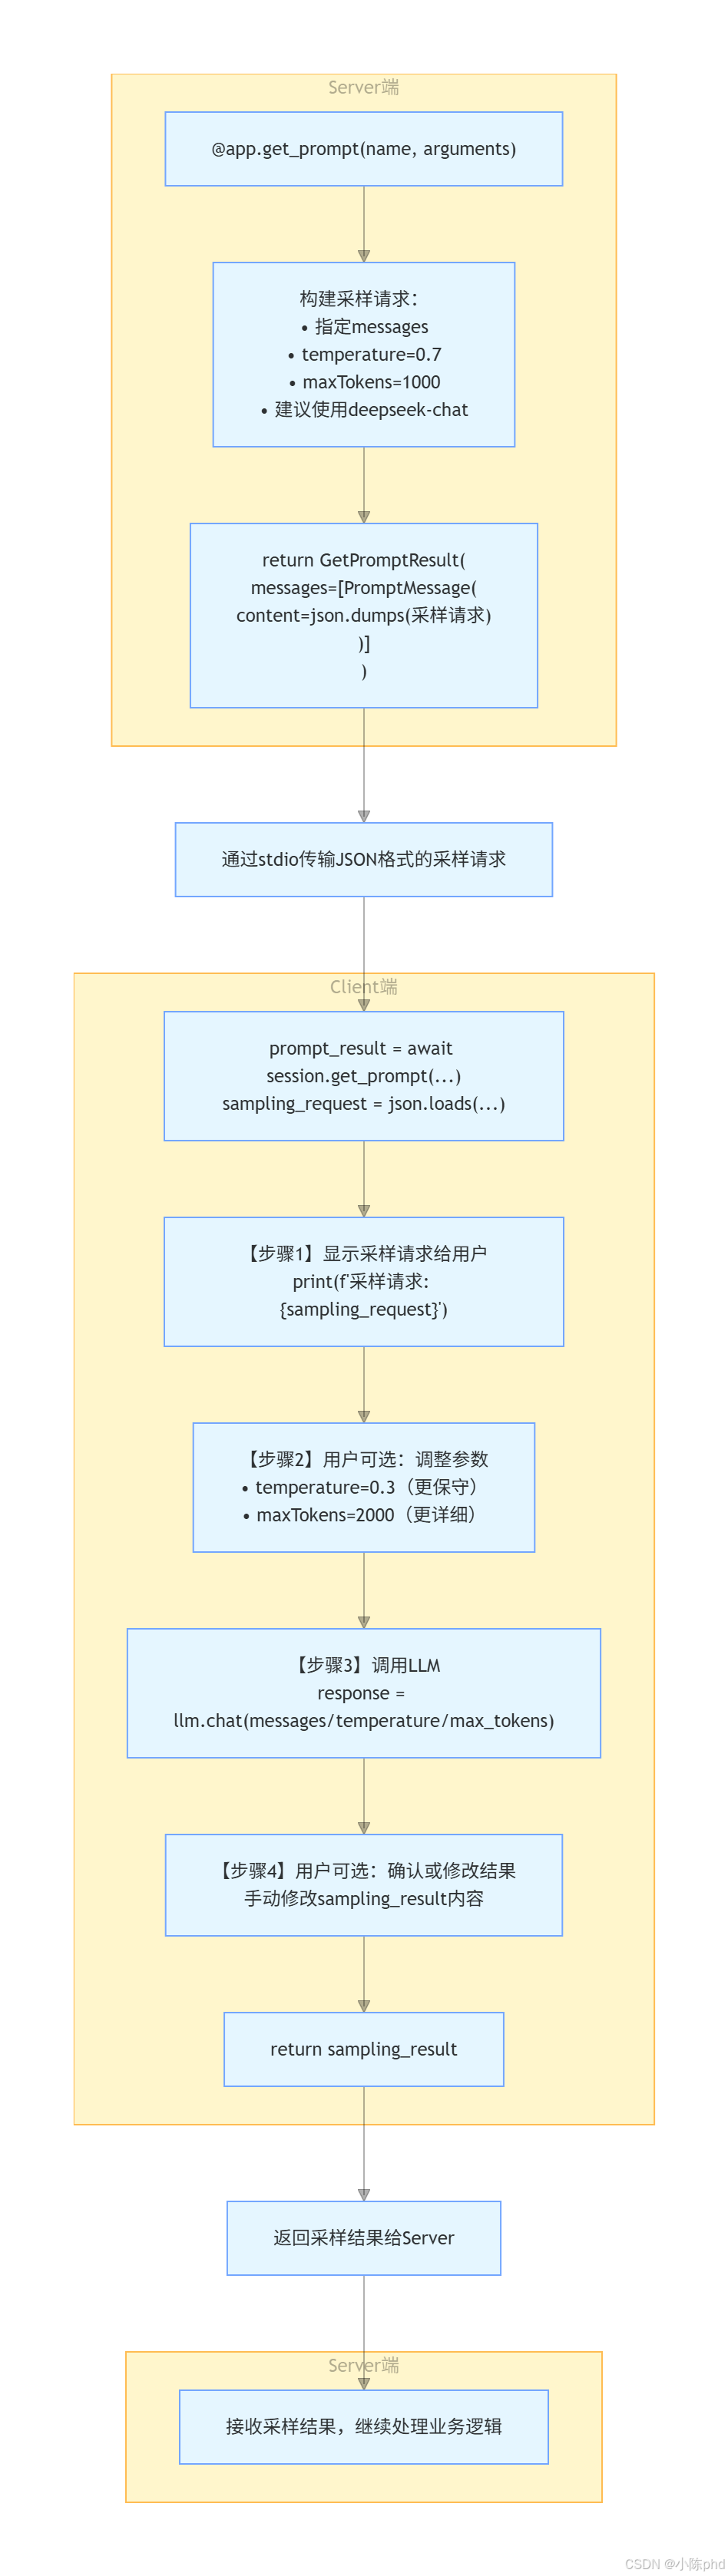
asyncio.run(main())Server端的3个关键步骤:
- 构建采样请求JSON(包含messages、参数、模型偏好)
- 将JSON序列化为字符串
- 作为PromptMessage返回给Client
4.2.2 Client端:处理采样请求
python
# client/client.py
import sys
import asyncio
from mcp import ClientSession
from mcp.client.stdio import stdio_client, StdioServerParameters
from openai import OpenAI
import os
from dotenv import load_dotenv
import mcp.types as types
import json

load_dotenv()

class FileSystemAssistantClient:
    def __init__(self):
        self.session = None
        self.transport = None
        # 【关键】初始化LLM客户端
        self.client = OpenAI(
            api_key=os.getenv("DEEPSEEK_API_KEY"),
            base_url="https://api.deepseek.com"
        )
        self.prompts = None

    async def connect(self, server_script: str):
        """
        【步骤1】连接到MCP Server
        """
        params = StdioServerParameters(
            command=sys.executable,
            args=[server_script],
            cwd="../server"
        )

        self.transport = stdio_client(params)
        self.stdio, self.write = await self.transport.__aenter__()

        self.session = await ClientSession(self.stdio, self.write).__aenter__()
        await self.session.initialize()

        self.prompts = await self.session.list_prompts()
        print("可用提示模板:")
        for prompt in self.prompts:
            if hasattr(prompt, 'name') and hasattr(prompt, 'description'):
                print(f"- {prompt.name}: {prompt.description}")

    async def use_prompt(self, prompt_name: str, arguments: dict[str, str]):
        """
        【核心方法】处理采样请求的完整流程
        """
        # 【步骤1】从Server获取提示内容(包含采样请求)
        prompt_result = await self.session.get_prompt(prompt_name, arguments)

        # 【步骤2】解析采样请求JSON
        sampling_request_json = prompt_result.messages[0].content.text
        sampling_request = json.loads(sampling_request_json)

        # 【步骤3】检查是否是采样请求
        if sampling_request.get("method") == "sampling/createMessage":
            params = sampling_request.get("params", {})

            # 【步骤4】显示采样请求给用户
            print("\n" + "="*60)
            print("📊 服务器发送的采样请求:")
            print("="*60)
            print(f"方法: {sampling_request.get('method')}")
            print(f"系统提示: {params.get('systemPrompt', '')}")
            print(f"温度: {params.get('temperature', 0.7)} (0=保守, 1=创意)")
            print(f"最大令牌数: {params.get('maxTokens', 1000)}")
            print(f"推荐模型: {params.get('modelPreferences', {}).get('hints', [])}")

            # 【步骤5】【可选】用户可以调整采样参数
            print("\n是否要修改采样参数?(y/n)")
            if input("> ").lower() == 'y':
                print("\n请输入新的 temperature (0.0-1.0,默认0.7):")
                try:
                    params["temperature"] = float(input("> "))
                except ValueError:
                    print("无效输入,使用默认值")

                print("\n请输入新的 maxTokens (默认1000):")
                try:
                    params["maxTokens"] = int(input("> "))
                except ValueError:
                    print("无效输入,使用默认值")

            # 【步骤6】【关键】调用LLM执行采样
            print("\n" + "="*60)
            print("🤖 正在调用LLM执行采样...")
            print("="*60)

            messages = []

            # 【关键】添加系统提示(如果存在)
            if "systemPrompt" in params and params["systemPrompt"]:
                messages.append({
                    "role": "system",
                    "content": params["systemPrompt"]
                })

            # 【关键】添加对话消息
            for msg in params.get("messages", []):
                if msg.get("content", {}).get("type") == "text":
                    messages.append({
                        "role": msg.get("role", "user"),
                        "content": msg.get("content", {}).get("text", "")
                    })

            # 【关键】调用LLM
            response = self.client.chat.completions.create(
                model="deepseek-chat",
                messages=messages,
                temperature=params.get("temperature", 0.7),
                max_tokens=params.get("maxTokens", 1000)
            )

            # 【步骤7】构建采样结果
            print("\n" + "="*60)
            print("✅ LLM采样完成,显示结果...")
            print("="*60)
            sampling_result = {
                "model": "deepseek-chat",
                "stopReason": "endTurn",
                "role": "assistant",
                "content": {
                    "type": "text",
                    "text": response.choices[0].message.content
                }
            }
            print("\n采样结果:")
            print(json.dumps(sampling_result, indent=2, ensure_ascii=False))

            # 【步骤8】【可选】用户可以修改LLM的输出
            print("\n是否要修改结果?(y/n)")
            if input("> ").lower() == 'y':
                print("\n请输入修改后的结果:")
                new_text = input("> ")
                sampling_result["content"]["text"] = new_text
                print("\n已更新结果")

            return sampling_result["content"]["text"]
        else:
            # 【备选】如果不是采样请求,直接返回内容
            return prompt_result.messages[0].content.text

    async def close(self):
        """清理资源"""
        if self.session:
            await self.session.__aexit__(None, None, None)
        if self.transport:
            await self.transport.__aexit__(None, None, None)

async def main():
    print(">>> 开始初始化文件系统助手")
    if len(sys.argv) < 2:
        print("用法: python client.py <server.py 路径>")
        return

    client = FileSystemAssistantClient()
    try:
        await client.connect(sys.argv[1])
        print(">>> 系统连接成功\n")

        while True:
            print("请输入您的问题(输入'退出'结束):")
            question = input("> ")

            if question.lower() == "退出":
                break

            print("\n正在处理您的问题...")
            response = await client.use_prompt("file-system-assistant", {
                "question": question
            })
            print("\n" + "="*60)
            print("📝 最终回答:")
            print("="*60)
            print(response)

    except Exception as e:
        print(f"发生错误: {e}")
    finally:
        await client.close()
        print("\n>>> 系统已关闭")

if __name__ == "__main__":
asyncio.run(main())Client端的工作流程:
- 获取采样请求(JSON格式)
- 解析并显示给用户
- 用户可选:调整参数
- 调用LLM执行采样
- 显示结果
- 用户可选:修改结果
- 返回最终结果
4.2.3 功能测试阶段
bash
# 终端1:启动Server
cd server
python server.py
# 终端2:启动Client
cd client
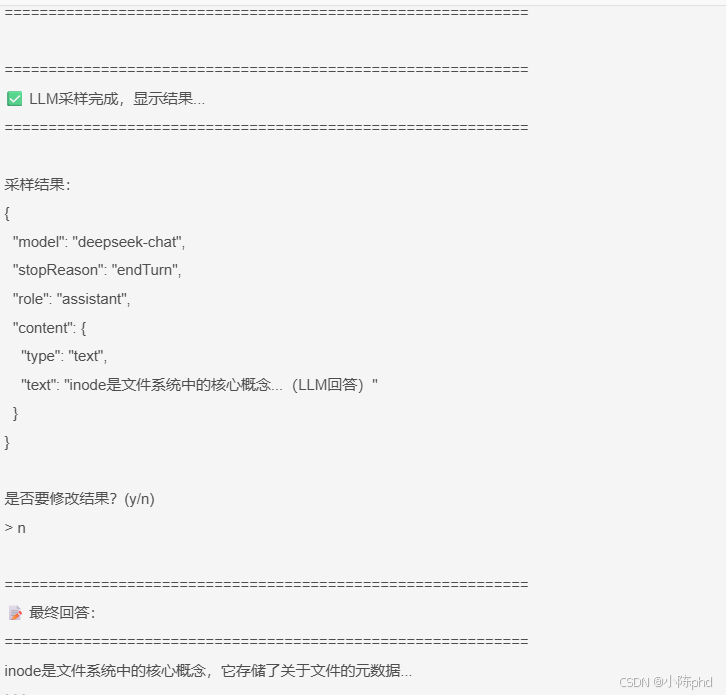
python client.py ../server/server.py交互演示 :
5 Server端采样请求的深度讲解
5.1 采样请求的参数详解
5.1.1 messages参数 - 核心对话内容
python
"messages": [
    {
        "role": "user",              # 【关键】角色
        "content": {
            "type": "text",          # 【关键】内容类型
            "text": "用户问题内容"   # 【关键】实际文本
        }
    },
    # 可以有多个消息构建多轮对话
    {
        "role": "assistant",
        "content": {
            "type": "text",
            "text": "之前的LLM回答"
        }
    }
]消息设计原则:
- 多轮对话 - 可以包含user/assistant多个消息对
- 清晰的角色 - 让LLM理解身份
- 内容结构 - type字段便于扩展(未来可能支持image等)
5.1.2 modelPreferences参数 - 模型选择
python
"modelPreferences": {
    # 【关键】推荐使用的模型
    "hints": [
        {"name": "deepseek-chat"},
        {"name": "gpt-4"},           # 可以推荐多个
        {"name": "qwen-plus"}
    ],

    # 【关键】三个优先级参数,Client根据这些选择最合适的模型
    "costPriority": 0.5,             # 成本优先级(0=不关心, 1=极端成本敏感)
    "speedPriority": 0.7,            # 速度优先级(0=不关心, 1=极端速度敏感)
    "intelligencePriority": 0.8      # 质量优先级(0=不关心, 1=极端质量敏感)
}模型选择策略:
python
# Client根据模型的特性和用户的优先级选择:

def select_model(model_preferences, available_models):
    """
    基于优先级选择模型
    """
    # 推荐的模型列表
    hints = model_preferences.get("hints", [])

    # 获取优先级
    cost_priority = model_preferences.get("costPriority", 0.5)
    speed_priority = model_preferences.get("speedPriority", 0.5)
    intelligence_priority = model_preferences.get("intelligencePriority", 0.5)

    # 模型评分 = cost_priority × cost_score + speed_priority × speed_score + ...
    # 选择评分最高的模型

    # 场景1:优先速度(实时客服)
    if speed_priority > 0.8:
        return "fast-model"  # 选择响应快但质量中等的模型

    # 场景2:优先质量(文档生成)
    if intelligence_priority > 0.8:
        return "high-quality-model"  # 选择高质量模型

    # 场景3:平衡(默认)
    return "balanced-model"
5.1.3 生成参数 - LLM行为控制
python
"temperature": 0.7,        # 【关键】创意度
                           # 0.0 = 完全确定性(复述)
                           # 0.5 = 平衡
                           # 1.0 = 非常随机(创意)

"maxTokens": 1000,         # 【关键】最大输出长度
                           # 限制输出的token数量
                           # 越大越详细,但成本更高

"stopSequences": [
    "\n\n",                # 遇到两个换行时停止
    "---",                 # 遇到分隔线时停止
    "END"                  # 遇到END标记时停止
] # 【可选】提前停止序列参数选择表:
| 场景 | temperature | maxTokens | 原因 |
|---|---|---|---|
| 代码生成 | 0.2-0.3 | 2000 | 需要精确,可能输出长 |
| 内容创意 | 0.7-0.9 | 1500 | 需要创意,输出中等 |
| 问答系统 | 0.5-0.7 | 500 | 平衡准确度和创意 |
| 总结提取 | 0.3-0.5 | 300 | 需要准确且简洁 |
| 头脑风暴 | 0.8-1.0 | 2000 | 极端创意,输出长 |
5.2 最佳实践:采样请求的设计模式
5.2.1 模式1:保守采样(用于关键内容)
python
@app.get_prompt()
async def get_prompt(name: str, arguments: dict):
    if name == "content-approval":
        # 【保守】用于需要人工审核的内容
        return types.GetPromptResult(
            messages=[
                types.PromptMessage(
                    role="assistant",
                    content=types.TextContent(
                        type="text",
                        text=json.dumps({
                            "method": "sampling/createMessage",
                            "params": {
                                "messages": [...],
                                "temperature": 0.3,      # 【保守】
                                "maxTokens": 500,        # 【简洁】
                                "modelPreferences": {
                                    "intelligencePriority": 0.9  # 【质量优先】
                                }
                            }
                        }, ensure_ascii=False)
                    )
                )
            ]
        )
5.2.2 模式2:创意采样(用于内容生成)
python
# 【创意】用于创意内容生成
return types.GetPromptResult(
    messages=[
        types.PromptMessage(
            role="assistant",
            content=types.TextContent(
                type="text",
                text=json.dumps({
                    "method": "sampling/createMessage",
                    "params": {
                        "messages": [...],
                        "temperature": 0.8,      # 【创意】
                        "maxTokens": 2000,       # 【详细】
                        "modelPreferences": {
                            "speedPriority": 0.3,      # 不必快速
                            "intelligencePriority": 0.7 # 注重质量
                        }
                    }
                }, ensure_ascii=False)
            )
        )
    ]
)
5.2.3 模式3:快速采样(用于实时应用)
python
# 【快速】用于实时性要求高的应用
return types.GetPromptResult(
    messages=[
        types.PromptMessage(
            role="assistant",
            content=types.TextContent(
                type="text",
                text=json.dumps({
                    "method": "sampling/createMessage",
                    "params": {
                        "messages": [...],
                        "temperature": 0.5,      # 【中等】
                        "maxTokens": 300,        # 【简短】
                        "modelPreferences": {
                            "speedPriority": 0.9,       # 【速度优先】
                            "costPriority": 0.7         # 【成本次优先】
                        }
                    }
                }, ensure_ascii=False)
            )
        )
    ]
)
6 Client端采样处理的核心机制
6.1 采样请求的完整处理流程
python
# 【步骤1】获取采样请求
prompt_result = await session.get_prompt(prompt_name, arguments)
sampling_request_json = prompt_result.messages[0].content.text
sampling_request = json.loads(sampling_request_json)

# 【步骤2】验证采样请求
if sampling_request.get("method") != "sampling/createMessage":
    raise ValueError("不是有效的采样请求")

params = sampling_request.get("params", {})

# 【步骤3】【可选】用户参数调整
print("当前参数:")
print(f"  temperature: {params.get('temperature')}")
print(f"  maxTokens: {params.get('maxTokens')}")

if user_wants_to_adjust():
    params["temperature"] = get_user_temperature()
    params["maxTokens"] = get_user_max_tokens()

# 【步骤4】转换为LLM API格式
messages = []
if "systemPrompt" in params:
    messages.append({"role": "system", "content": params["systemPrompt"]})

for msg in params.get("messages", []):
    messages.append({
        "role": msg["role"],
        "content": msg["content"]["text"]
    })

# 【步骤5】调用LLM
response = llm.chat(
    messages=messages,
    temperature=params["temperature"],
    max_tokens=params["maxTokens"]
)

# 【步骤6】【可选】用户结果确认
result_text = response.choices[0].message.content
print(f"LLM输出: {result_text}")

if user_wants_to_modify():
    result_text = get_user_modified_text()

# 【步骤7】构建采样结果并返回
return {
    "model": "deepseek-chat",
    "stopReason": "endTurn",
    "content": {"type": "text", "text": result_text}
}
6.2 错误处理与异常恢复
python
async def use_prompt_with_fallback(self, prompt_name, arguments):
    """
    【鲁棒】带回退机制的采样处理
    """
    try:
        # 【尝试1】获取采样请求
        prompt_result = await self.session.get_prompt(prompt_name, arguments)
        sampling_request = json.loads(prompt_result.messages[0].content.text)

        # 【验证】检查是否是采样请求
        if sampling_request.get("method") != "sampling/createMessage":
            # 【回退】不是采样请求,直接返回内容
            return prompt_result.messages[0].content.text

        # 【尝试2】调用LLM
        params = sampling_request.get("params", {})
        response = await self._call_llm(params)
        return response

    except json.JSONDecodeError:
        # 【回退】JSON解析失败,使用原始文本
        print("⚠️ 采样请求格式错误,使用原始文本")
        return prompt_result.messages[0].content.text

    except Exception as e:
        # 【回退】LLM调用失败,返回默认值
        print(f"⚠️ 采样执行失败: {e}")
        return "抱歉,处理失败。请重试。"
7 效果验证
7.1 采样请求的格式验证
运行后的实际输出(已验证):
json
{
  "method": "sampling/createMessage",
  "params": {
    "messages": [
      {
        "role": "user",
        "content": {
          "type": "text",
          "text": "请解释什么是inode"
        }
      }
    ],
    "modelPreferences": {
      "hints": [{"name": "deepseek-chat"}],
      "costPriority": 0.5,
      "speedPriority": 0.7,
      "intelligencePriority": 0.8
    },
    "systemPrompt": "你是一个专业的文件系统助手...",
    "temperature": 0.7,
    "maxTokens": 1000,
    "stopSequences": ["\n\n"],
    "metadata": {"requestType": "file-system-query"}
  }
}
验证点 :
✅ 采样请求格式符合MCP协议
✅ 所有参数都正确序列化
✅ 模型偏好信息完整
7.2 参数调整验证
是否要修改采样参数?(y/n)
> y

请输入新的 temperature (0.0-1.0,默认0.7):
> 0.3

请输入新的 maxTokens (默认1000):
> 500

【调整后】
温度: 0.3 (0=保守, 1=创意)
最大令牌数: 500
验证点 :
✅ 用户可以成功修改参数
✅ 修改后的参数被正确应用
✅ LLM使用新参数重新生成
7.3 完整的采样生命周期验证
1. Server发起采样请求 ✅
   └─ 指定temperature=0.7, maxTokens=1000

2. Client接收并显示 ✅
   └─ 用户看到采样参数

3. 用户可选调整 ✅
   └─ 修改为temperature=0.3, maxTokens=500

4. LLM执行采样 ✅
   └─ 使用新参数生成

5. 显示LLM输出 ✅
   └─ 用户看到结果

6. 用户可选修改 ✅
   └─ 手动编辑输出

7. 返回最终结果 ✅
   └─ Server接收结果
8 踩坑记录
8.1 踩坑1:采样请求格式错误导致JSON解析失败
错误现象:
python
# ❌ 错误的做法
sampling_request_json = prompt_result.messages[0].content.text
sampling_request = json.loads(sampling_request_json)
# 错误: json.decoder.JSONDecodeError: Expecting value根因分析:
- 采样请求必须是有效的JSON字符串
- 如果包含特殊字符,需要使用ensure_ascii=False
- 有些字符(如\n)可能导致JSON破坏
解决方案:
python
# ✅ 正确的做法
try:
    sampling_request_json = prompt_result.messages[0].content.text
    # 【关键】添加try-except处理JSON解析
    sampling_request = json.loads(sampling_request_json)
except json.JSONDecodeError as e:
    print(f"JSON解析失败: {e}")
    print(f"原始内容: {sampling_request_json[:100]}")
    return None

# 【关键】验证采样请求的结构
if sampling_request.get("method") != "sampling/createMessage":
    print("❌ 这不是一个有效的采样请求")
    return None
【亲测有效】使用try-except和格式验证可以避免大多数问题!
8.2 踩坑2:参数类型转换失败
错误现象:
python
# ❌ 错误的做法
params["temperature"] = input("> ")  # 获取的是字符串"0.3"
response = llm.chat(
    temperature=params["temperature"]  # ❌ 期望float但得到str
)
# 错误: TypeError: '>' not supported between instances of 'str' and 'float'根因分析:
- 用户输入的是字符串
- LLM API期望的是float类型
- 直接传递会导致类型错误
解决方案:
python
# ✅ 正确的做法
try:
    temp_input = input("> ")
    # 【关键】显式转换为float
    params["temperature"] = float(temp_input)

    # 【关键】验证范围
    if not (0.0 <= params["temperature"] <= 1.0):
        print("⚠️ temperature必须在0-1之间,使用默认值0.7")
        params["temperature"] = 0.7

except ValueError:
    print("⚠️ 无效的数字输入,使用默认值0.7")
    params["temperature"] = 0.7
【划重点】类型转换和范围验证一定要做!
8.3 踩坑3:忘记处理模型不支持某个参数
错误现象:
python
# ❌ 错误的做法
response = llm.chat(
    messages=messages,
    temperature=0.7,
    stopSequences=["\n\n"]  # ❌ 某些模型可能不支持
)
# 错误: openai.BadRequestError: Model does not support stopSequences根因分析:
- 不同的LLM API支持的参数不同
- OpenAI用stop,Deepseek可能不支持stopSequences
- 传递不支持的参数会导致API错误
解决方案:
python
# ✅ 正确的做法
def build_llm_params(sampling_params, model_type):
    """根据模型类型构建合适的LLM参数"""

    llm_params = {
        "model": model_type,
        "messages": sampling_params["messages"],
        "temperature": sampling_params.get("temperature", 0.7),
        "max_tokens": sampling_params.get("maxTokens", 1000)
    }

    # 【关键】根据模型类型添加不同的参数
    if model_type == "gpt-4":
        llm_params["stop"] = sampling_params.get("stopSequences", None)
    elif model_type == "deepseek-chat":
        # deepseek可能不支持stopSequences
        pass

    return llm_params

# 使用
params = build_llm_params(sampling_params, "deepseek-chat")
response = llm.chat(**params)
【亲测有效】根据模型类型动态构建参数可以提高兼容性!
9 总结与扩展
9.1 本文核心收获
| 知识点 | 掌握度 |
|---|---|
| 采样请求的结构和生命周期 | ⭐⭐⭐⭐⭐ |
| Server端构建采样请求的方法 | ⭐⭐⭐⭐⭐ |
| Client端处理采样请求的流程 | ⭐⭐⭐⭐⭐ |
| 参数化采样的三种模式(保守→平衡→创意) | ⭐⭐⭐⭐ |
| 人工干预机制的实现(参数调整→结果确认) | ⭐⭐⭐⭐ |
| 模型选择的优先级权衡 | ⭐⭐⭐⭐ |
| MCP四大功能的完整理解 | ⭐⭐⭐⭐⭐ |
9.2 技能升级路线
初级 → 基础采样请求 (本文完成)
  ↓
中级 → 参数智能调整 (根据场景自动选择参数)
  ↓
高级 → 多模型策略 (动态选择最优模型)
  ↓
专家 → 采样缓存与优化 (缓存相同请求的结果)
  ↓
架构 → 完整的AI应用平台 (集成Resources+Tools+Prompts+Sampling)
9.3 实战拓展方向
9.3.1 智能参数调整系统
python
class AdaptiveParameterSelector:
    """根据场景和反馈自动调整采样参数"""

    def __init__(self):
        self.history = []  # 记录所有采样

    async def get_adaptive_params(self, request_type, user_feedback):
        """根据历史反馈自动调整参数"""

        # 查询相同类型的历史采样
        similar_samples = [
            s for s in self.history
            if s['type'] == request_type
        ]

        if not similar_samples:
            return self.get_default_params(request_type)

        # 分析历史反馈
        good_count = len([s for s in similar_samples if s['feedback'] == 'good'])
        bad_count = len([s for s in similar_samples if s['feedback'] == 'bad'])

        # 动态调整参数
        if good_count > bad_count * 2:
            # 目前的参数很好,保持不变
            return similar_samples[-1]['params']
        else:
            # 调整参数
            params = similar_samples[-1]['params'].copy()
            if bad_count > good_count:
                # 质量不好,降低temperature(更保守)
                params['temperature'] = max(0.0, params['temperature'] - 0.1)
            return params
9.3.2 多模型自动选择系统
python
class MultiModelSelector:
    """根据优先级自动选择最优模型"""

    MODEL_CAPABILITIES = {
        "gpt-4": {
            "speed": 0.6,
            "cost": 0.2,
            "intelligence": 1.0
        },
        "deepseek-chat": {
            "speed": 0.8,
            "cost": 0.7,
            "intelligence": 0.8
        },
        "qwen-plus": {
            "speed": 0.7,
            "cost": 0.8,
            "intelligence": 0.7
        }
    }

    def select_model(self, model_preferences):
        """根据偏好选择模型"""

        cost_priority = model_preferences.get('costPriority', 0.5)
        speed_priority = model_preferences.get('speedPriority', 0.5)
        intelligence_priority = model_preferences.get('intelligencePriority', 0.5)

        best_model = None
        best_score = -1

        for model, capabilities in self.MODEL_CAPABILITIES.items():
            # 计算综合评分
            score = (
                cost_priority * capabilities['cost'] +
                speed_priority * capabilities['speed'] +
                intelligence_priority * capabilities['intelligence']
            )

            if score > best_score:
                best_score = score
                best_model = model

        return best_model
9.3.3 采样结果缓存与重用
python
class SamplingCache:
    """缓存采样结果,减少重复调用"""

    def __init__(self):
        self.cache = {}

    def get_cache_key(self, sampling_request):
        """根据采样请求生成缓存键"""
        import hashlib

        # 【关键】排除temperature等易变参数
        key_data = {
            "messages": sampling_request['params']['messages'],
            "systemPrompt": sampling_request['params'].get('systemPrompt'),
        }

        key_str = json.dumps(key_data, sort_keys=True)
        return hashlib.md5(key_str.encode()).hexdigest()

    def get_cached_result(self, sampling_request):
        """尝试从缓存中获取结果"""
        key = self.get_cache_key(sampling_request)

        if key in self.cache:
            print(f"📦 从缓存返回结果 (节省成本)")
            return self.cache[key]

        return None

    def cache_result(self, sampling_request, result):
        """缓存采样结果"""
        key = self.get_cache_key(sampling_request)
        self.cache[key] = result
10 附录:Sampling与其他功能的对比
10.1 MCP四大功能完整对比
| 维度 | Resources | Tools | Prompts | Sampling |
|---|---|---|---|---|
| 功能 | 读取数据 | 执行操作 | 提供提示词 | 请求LLM采样 |
| 主动权 | Server | Server | Server | Server主请求,Client执行 |
| 人工干预 | 否 | 否 | 否 | 是 |
| 参数调整 | 否 | 否 | 否 | 是 |
| 结果修改 | 否 | 否 | 否 | 是 |
| 应用场景 | 文档、配置 | 搜索、计算 | 提示词库 | LLM调用 |
| LLM集成 | 间接 | 间接 | 直接 | 最直接 |
| 复杂度 | 低 | 中 | 低 | 高 |
10.2 采样与直接LLM调用的对比
| 对比维度 | 直接LLM调用 | 使用Sampling |
|---|---|---|
| 架构 | Client直接调用LLM | Server发起采样请求 |
| 参数控制 | Client完全控制 | Server建议,Client可调整 |
| 人工干预 | 只能在调用前 | 前、中、后都可以 |
| 跨应用复用 | 各Application独立 | 多个应用共享采样逻辑 |
| 质量保证 | 难以标准化 | 标准化采样流程 |
| 成本优化 | 静态 | 动态 |
| 审计追踪 | 困难 | 完整 |
| 学习曲线 | 低 | 中等 |