引言
在计算机视觉领域,目标检测与图像分割是两大核心任务 ------ 前者聚焦于图像中目标的精准定位,后者则致力于对目标轮廓进行精细化勾勒。YOLO(YouOnly Look Once)凭借其卓越的实时性,成为目标检测领域的标杆模型;而 Meta 推出的 SAM(Segment AnythingModel),更是图像分割赛道的利器。二者的强强联合,能够让 "检测 + 分割" 的全流程效率实现质的飞跃。本文将从零拆解两者的融合逻辑,通过"YOLO 目标检测 + SAM 精准分割" 的技术路径,助力大家快速掌握这一高效实用的技术方案。
图片
一、YOLO 与 SAM 的组合优势何在?
在计算机视觉"检测+分割"一体化任务中,YOLO与SAM的组合堪称"黄金搭档",其核心优势在于实现了"高效定位"与"精准分割"的完美互补,大幅突破单一模型的能力边界。YOLO作为实时目标检测的标杆模型,最大亮点是极致的检测效率与目标定位精度,能够以毫秒级速度快速锁定图像中目标的位置、类别及置信度,为后续分割任务划定清晰的区域范围,解决了SAM模型直接处理全图时易出现的目标遗漏、定位模糊等问题。
而SAM作为通用图像分割神器,具备强大的像素级分割能力,可精准勾勒目标轮廓,但单独使用时需依赖人工提示(如点、框),且对全图遍历分割效率较低。两者联手后,YOLO输出的边界框可直接作为SAM的正向提示,无需人工干预即可明确分割区域,既规避了SAM的提示依赖短板,又借助SAM的分割能力弥补了YOLO无法实现像素级轮廓提取的不足。
从实际应用价值来看,该组合兼顾效率与精度,既能满足实时场景(如自动驾驶、监控抓拍)对处理速度的要求,又能达到工业质检、医疗影像分析等场景对分割精度的严苛标准。同时,两者均基于预训练模型,组合后无需大量额外标注数据,降低了应用门槛。相较于传统"检测+分割"分步方案,YOLO+SAM简化了流程链路,减少了中间数据损耗,在提升任务效率的同时,进一步保障了结果的一致性与可靠性,成为当前计算机视觉一体化任务的优选方案。
二、核心原理:YOLO与SAM的协同逻辑
整个融合流程的核心的是"检测提示→分割执行"的闭环,具体逻辑如下:
1. 数据预处理
-
准备待处理的图像数据集(支持单张图片、批量图片或视频帧抽帧)。
-
对图像进行统一尺寸缩放、格式转换(如 JPG 转 PNG),确保输入格式兼容 YOLO 模型要求。
2. YOLO 目标检测推理
-
加载预训练好的 YOLO 权重文件(如 YOLOv8、YOLOv9)。
-
将预处理后的图像输入 YOLO 模型,得到目标的边界框(Bounding Box) 坐标、目标类别及置信度。
-
过滤低置信度检测框(设置置信度阈值),保留有效目标区域。
3. 检测框格式转换与传递
-
提取 YOLO 输出的边界框坐标(x1, y1, x2, y2),转换成 SAM 模型支持的提示输入格式。
-
将目标边界框作为正向提示(Positive Prompt) 传入 SAM 模型,明确需要分割的区域范围。
4. SAM 图像分割推理
-
加载 SAM 预训练模型及编码器权重。
-
将原始图像与 YOLO 输出的边界框提示同时输入 SAM。
-
SAM 基于边界框提示,对目标区域进行像素级分割,生成二值掩码(Mask)。
5. 结果后处理与可视化
-
融合 YOLO 的检测框与 SAM 的分割掩码,得到 "目标定位 + 轮廓勾勒" 的最终结果。
-
对分割结果进行后处理(如掩码平滑、小区域去除),提升分割精度。
-
可视化输出:在原始图像上叠加检测框、类别标签和分割掩码,直观展示效果。
6. 批量推理与部署优化(可选)
-
针对批量数据,编写循环推理脚本,实现自动化 "检测 + 分割" 流程。
-
进行模型轻量化(如 ONNX 格式转换、量化),提升实时处理速度,适配部署需求。
-
简单来说,YOLO负责"找目标",SAM负责"描轮廓",两者分工明确,协同高效。
三、应用:从零实现YOLO+SAM的目标检测与分割
1. 环境配置(关键依赖)
首先需搭建适配的Python环境,核心依赖如下(建议使用conda创建独立环境):
-
Python 3.9+
-
PyTorch 1.17+(需支持CUDA,提升推理速度)
-
OpenCV(图像读取与预处理)
-
Ultralytics
-
segment-anything
-
Matplotlib(结果可视化)
安装命令示例:
pip install torch torchvision torchaudio --index-url https://download.pytorch.org/whl/cu118
pip install ultralytics opencv-python segment-anything matplotlib
2. 模型准备
-
YOLO模型:直接通过Ultralytics调用自己训练好的检测模型,或者直接使用官方预训练模型(如YOLOv8n、YOLOv8s,n版更轻量化,s版精度更高);
-
SAM模型:从官方仓库下载预训练权重(推荐vit_h版,精度最优),需注意模型权重较大(约2.5GB),建议提前预留存储空间。
3. 核心代码实现
(1)导入依赖库
importcv2, os
importtorch
importmatplotlib.pyplotasplt
importnumpyasnp
fromdatetimeimportdatetime
fromultralyticsimportYOLO
# 导入标准SAM库
try:
   importsegment_anythingassam
   fromsegment_anythingimportSamPredictor, sam_model_registry
   print("SAM library imported successfully")
exceptImportError:
   print("Error: segment-anything library not installed, please run: pip installsegment-anything")
    exit()
(2)执行检测
# 加载YOLO预训练模型
yolo_model = YOLO('weights/yolov8s.pt')
# 读取输入图像
image_path = "data/1.jpg"
image = cv2.imread(image_path)
# 检查图像是否成功读取
if image is None:
    print(f"Error: Cannot read image file {image_path}")
    exit()
image_rgb = cv2.cvtColor(image, cv2.COLOR_BGR2RGB)
h, w = image_rgb.shape[:2]
print(f"Image loaded successfully: {w}x{h}")
# 步骤1:YOLO目标检测
print("Starting YOLO object detection...")
results = yolo_model(image_rgb, conf=0.5)
detections = results[0].boxes
# 步骤2:处理检测框
if detections is not None and len(detections) > 0:
    boxes = detections.xyxy.cpu().numpy()
    labels = detections.cls.cpu().numpy()
    confidences = detections.conf.cpu().numpy()
    print(f"Detected {len(boxes)} objects")
    # 打印检测框详细信息
    for i, box in enumerate(boxes):
        x1, y1, x2, y2 = box
        area = (x2 - x1) * (y2 - y1)
        print(f"Object {i+1}: coordinates [{x1:.1f}, {y1:.1f}, {x2:.1f}, {y2:.1f}], area: {area:.1f}")
else:
    print("No objects detected!")
    exit()
# 将检测到的对象绘制在图像上保存
print("Drawing detection results and saving...")
# 创建输出目录
output_dir = "results"
os.makedirs(output_dir, exist_ok=True)
# 创建图像副本用于绘制
yolo_result_image = image_rgb.copy()
# 获取类别名称
class_names = yolo_model.names
# 绘制检测框和标签
for i, (box, label, conf) in enumerate(zip(boxes, labels, confidences)):
    x1, y1, x2, y2 = map(int, box)  # 转换为整数坐标
    # 绘制矩形框
    cv2.rectangle(yolo_result_image, (x1, y1), (x2, y2), (0, 255, 0), 2)
    # 获取类别名称
    class_name = class_names[int(label)] if int(label) < len(class_names) else f"Class {int(label)}"
    # 创建标签文本
    label_text = f"{class_name}: {conf:.2f}"
    # 计算文本尺寸
    (text_width, text_height), baseline = cv2.getTextSize(label_text, cv2.FONT_HERSHEY_SIMPLEX, 0.6, 1)
    # 绘制文本背景
    cv2.rectangle(yolo_result_image, (x1, y1 - text_height - baseline - 5),
                  (x1 + text_width, y1), (0, 255, 0), -1)
    # 绘制文本
    cv2.putText(yolo_result_image, label_text, (x1, y1 - baseline - 5),
                cv2.FONT_HERSHEY_SIMPLEX, 0.6, (0, 0, 0), 1, cv2.LINE_AA)
# 生成带时间戳的文件名
timestamp = datetime.now().strftime("%Y%m%d_%H%M%S")
yolo_output_path = os.path.join(output_dir, f"yolo_detection_{timestamp}.jpg")
# 保存结果图像
cv2.imwrite(yolo_output_path, cv2.cvtColor(yolo_result_image, cv2.COLOR_RGB2BGR))
print(f"YOLO detection results saved to: {yolo_output_path}")
(3)执行分割
# 步骤3:使用标准SAM进行分割
print("Starting SAM segmentation...")
# 处理所有检测到的目标
all_masks = []
all_scores = []
try:
    # 使用基础SAM模型
    print("Loading SAM model...")
    sam_checkpoint = "sam_vit_b_01ec64.pth"
    model_type = "vit_b"
    # 检查本地是否有SAM权重文件
    if not os.path.exists(sam_checkpoint):
        print(f"{sam_checkpoint} not found, downloading automatically...")
        sam_url = "https://dl.fbaipublicfiles.com/segment_anything/sam_vit_b_01ec64.pth"
        import urllib.request
        urllib.request.urlretrieve(sam_url, sam_checkpoint)
        print(f"SAM weights downloaded to {sam_checkpoint}")
    # 创建SAM模型
    sam_model = sam_model_registry[model_type](checkpoint=sam_checkpoint)
    sam_predictor = SamPredictor(sam_model)
    sam_predictor.set_image(image_rgb)
    print("SAM model loaded successfully")
    # 处理每个检测框
    for i, box in enumerate(boxes):
        try:
            # 将YOLO格式的框转换为SAM格式 (x1, y1, x2, y2)
            x1, y1, x2, y2 = box
            # 检查检测框的有效性
            if x2 <= x1 or y2 <= y1:
                print(f"Object {i+1}: invalid bounding box coordinates")
                continue
            # 检查检测框面积是否过小
            area = (x2 - x1) * (y2 - y1)
            if area < 100:  # 面积小于100像素的目标可能太小
                print(f"Object {i+1}: bounding box area too small ({area:.1f} pixels)")
                continue
            # 确保坐标在图像范围内
            x1 = max(0, min(x1, w-1))
            y1 = max(0, min(y1, h-1))
            x2 = max(0, min(x2, w-1))
            y2 = max(0, min(y2, h-1))
            print(f"Processing object {i+1}: corrected coordinates [{x1:.1f}, {y1:.1f}, {x2:.1f}, {y2:.1f}]")

            # 使用SAM进行分割
            sam_box = np.array([x1, y1, x2, y2])
            masks, scores, _ = sam_predictor.predict(
                box=sam_box,
                multimask_output=False
            )
            if len(masks) > 0:
                all_masks.append(masks[0])
                all_scores.append(scores[0])
                print(f"Object {i+1} segmentation completed, confidence: {scores[0]:.3f}")
            else:
                print(f"Object {i+1} segmentation failed, no mask output")

        except Exception as e:
            print(f"Object {i+1} segmentation failed: {e}")
            import traceback
            traceback.print_exc()
except Exception as e:
    print(f"SAM model loading or initialization failed: {e}")
    import traceback
    traceback.print_exc()
(4)结果可视化
if len(all_masks) == 0:
    print("Unable to perform segmentation, showing detection results...")
    # 至少显示检测结果
    plt.figure(figsize=(10, 5))
    plt.imshow(image_rgb)
    for i, box in enumerate(boxes):
        x1, y1, x2, y2 = box
        plt.plot([x1, x2, x2, x1, x1], [y1, y1, y2, y2, y1], 'r-', linewidth=2)
        plt.text(x1, y1-5, f'Obj {i+1}', color='red', fontsize=8)
    plt.title("YOLO Detection Results (Segmentation Failed)")
    plt.axis('off')
    plt.show()
    exit()
# 可视化结果
plt.figure(figsize=(15, 5))
# 原始图像
plt.subplot(1, 3, 1)
plt.imshow(image_rgb)
plt.title("Original Image")
plt.axis('off')
# 检测框结果
plt.subplot(1, 3, 2)
plt.imshow(image_rgb)
for i, box in enumerate(boxes):
    x1, y1, x2, y2 = box
    plt.plot([x1, x2, x2, x1, x1], [y1, y1, y2, y2, y1], 'r-', linewidth=2)
    plt.text(x1, y1-5, f'Obj {i+1}', color='red', fontsize=8)
plt.title("YOLO Detection Results")
plt.axis('off')
# 分割结果
plt.subplot(1, 3, 3)
plt.imshow(image_rgb)
for i, mask in enumerate(all_masks):
    plt.imshow(mask, alpha=0.5, cmap='jet')
    # 添加置信度信息
    if i < len(all_scores):
        plt.text(10, 20 + i*20, f'Mask {i+1}: {all_scores[i]:.3f}',
                 color='white', fontsize=8,
                 bbox=dict(facecolor='black', alpha=0.5))
plt.title("SAM Segmentation Results")
plt.axis('off')
plt.tight_layout()
# 保存组合结果图像
combined_output_path = os.path.join(output_dir, f"yolo_sam_combined_{timestamp}.jpg")
plt.savefig(combined_output_path, dpi=150, bbox_inches='tight')
print(f"YOLO+SAM combined results saved to: {combined_output_path}")
plt.show()
print("YOLO+SAM segmentation completed successfully!")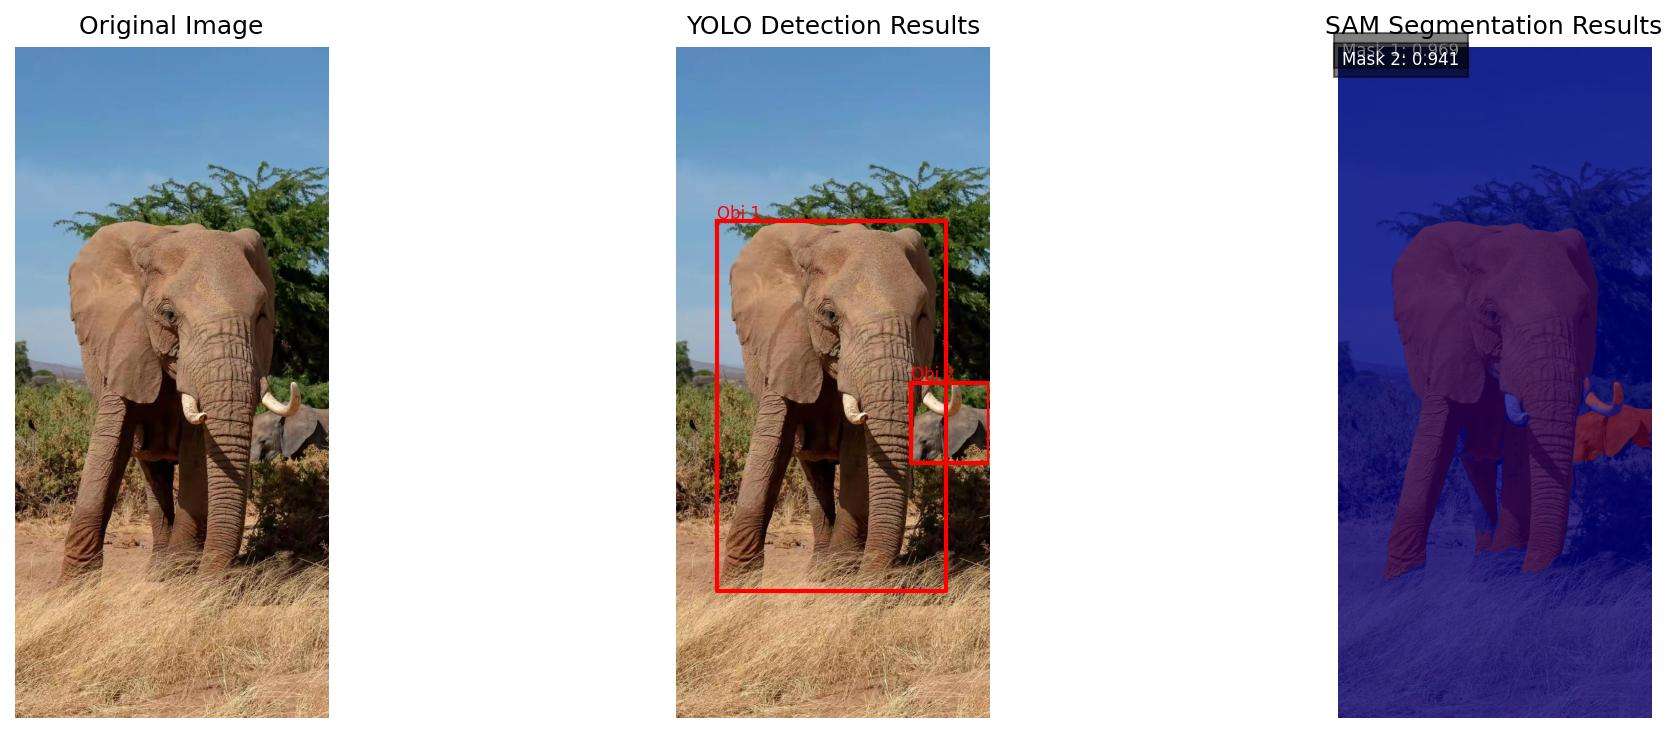
4. 关键参数说明
-
conf=0.5:YOLO的置信度阈值,可根据需求调整(如提高到0.7减少误检);
-
multimask_output=False:SAM是否输出多个候选掩码,False时直接输出最优结果;
-
alpha=0.5:掩码叠加透明度,建议0.4-0.6,既能看清轮廓又不遮挡原图。
四、应用场景与效果提升建议
1. 典型应用场景
-
工业质检:检测并分割产品表面缺陷(如划痕、污渍);
-
自动驾驶:定位并分割行人、车辆、路标等目标;
-
医疗影像:辅助病灶检测与轮廓勾勒(需微调模型适配医疗数据);
-
智能安防:识别并分割监控画面中的可疑目标。
2. 效果优化技巧
-
若分割精度不足:更换SAM的vit_h权重,或微调YOLO模型适配特定数据集;
-
若速度较慢:改用YOLOv8n轻量化模型,或降低SAM的输入图像分辨率;
-
处理多目标:通过循环遍历YOLO输出的所有检测框,实现批量分割。
五、总结
YOLO与SAM的融合,完美解决了"快速检测"与"精准分割"的协同问题,无需复杂的模型训练,仅通过简单的代码调用就能实现高效的端到端解决方案。无论是计算机视觉新手入门,还是工程师落地实际项目,这套组合都值得一试。
喜欢的小伙伴感谢给点个赞和关注,更多精彩内容持续更新~~ 关于本篇文章大家有任何建议或意见,欢迎在评论区留言交流!