Go 语言 Slice 实现原理深度解析
1. 前言
Go 中的 Slice 又称之为动态数组,依托数组实现,可以方便地进行扩容、传递等等。正因为灵活,如果不了解其中实现机制,在生产实际中避免不了出一些奇怪的 BUG。
2. Slice 实现原理
Slice 依托数组实现,底层对用户屏蔽,在底层数组容量不足时候,可以自动重分配并生成新的 Slice,源码中定义的结构如下:
go
type slice struct {
    array unsafe.Pointer       // 指向数组的指针
    len   int                  // 数组长度
    cap   int                  // 数组容量
}
3. Slice 的创建
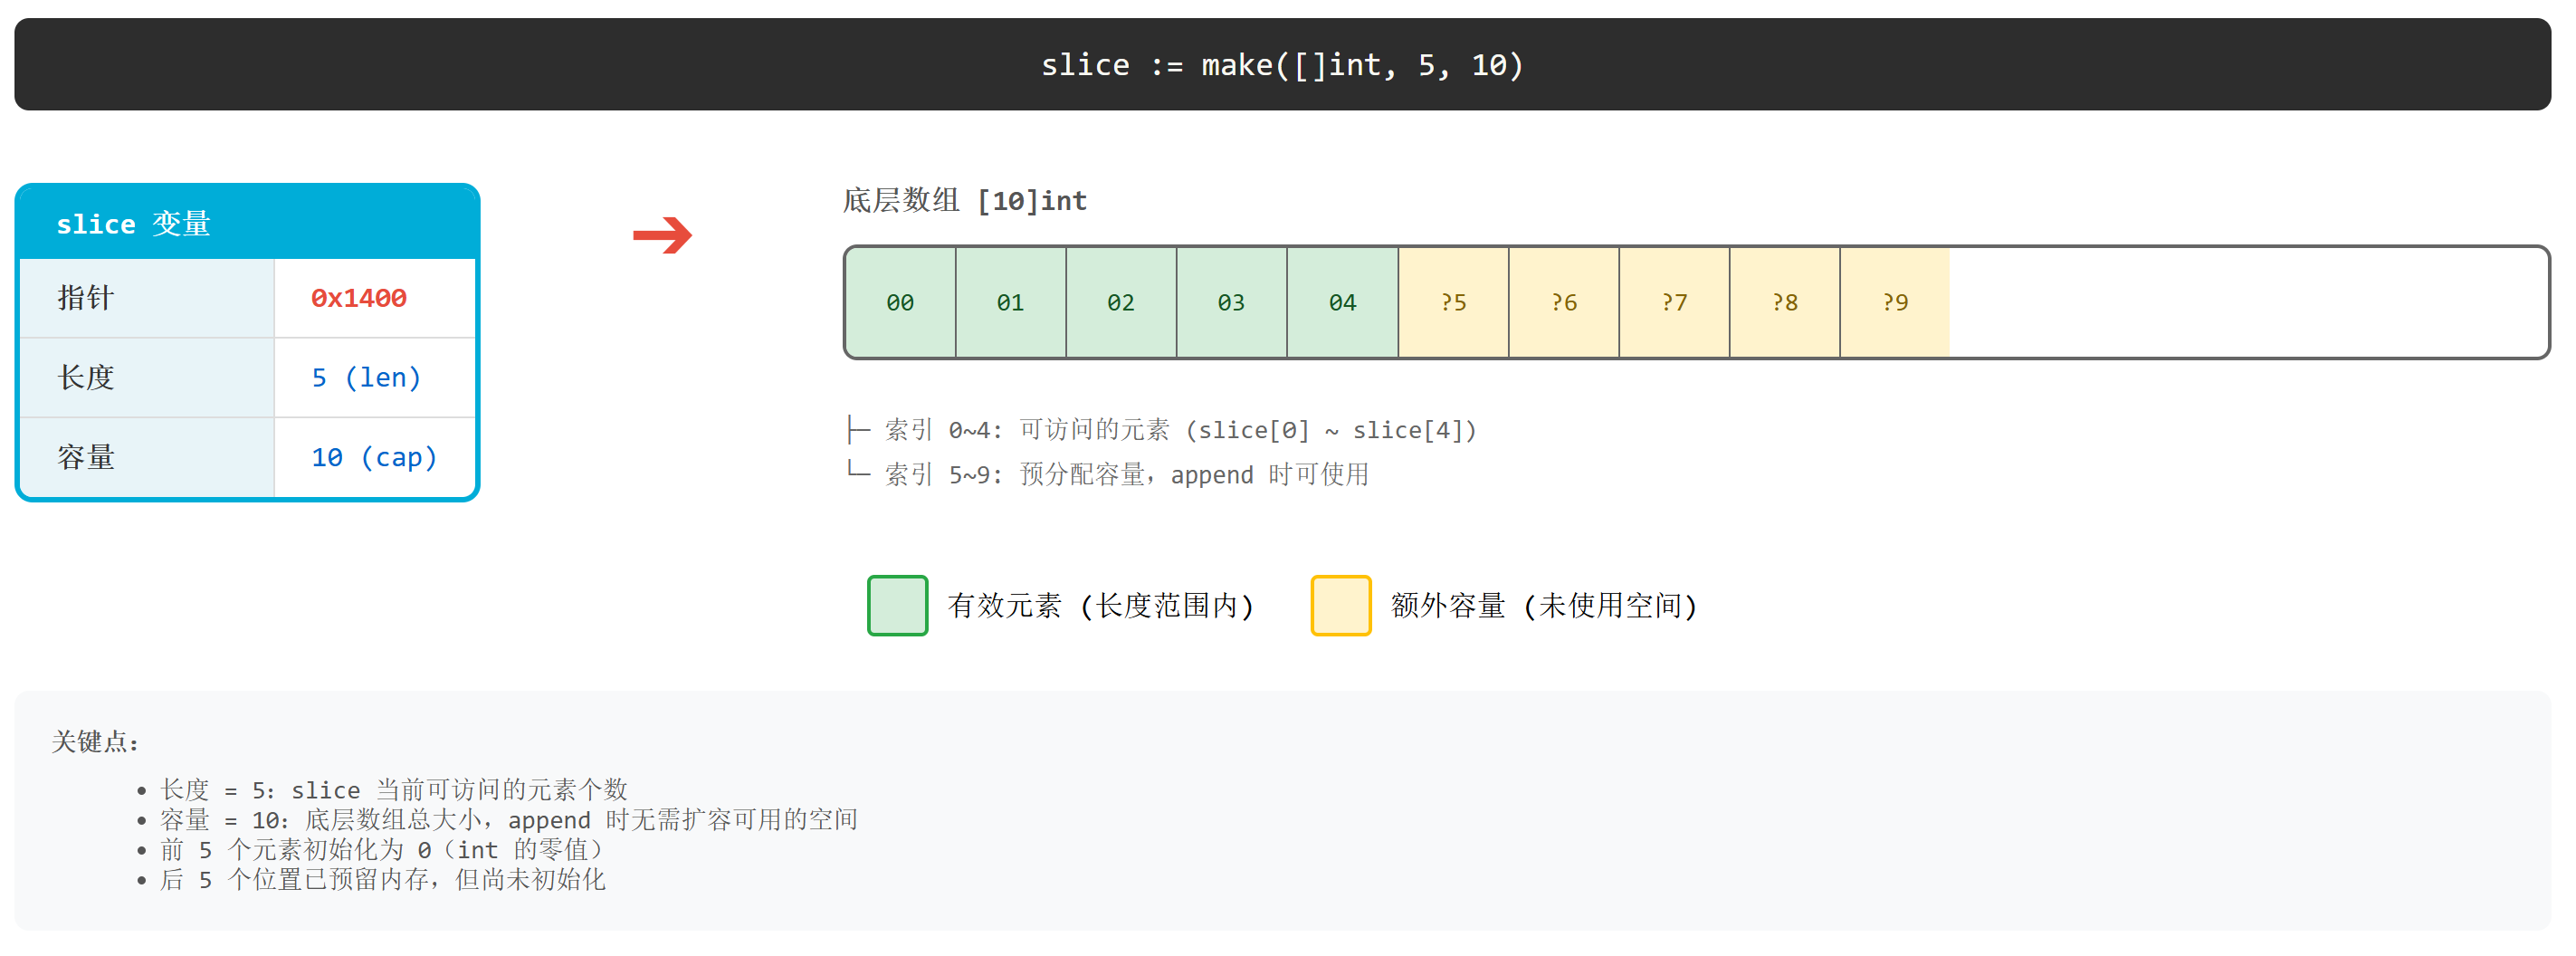
3.1 使用 make 创建 slice
使用 make 创建 slice 时,可以指定 slice 的长度与容量,也就是会创建一个底层数组,数组的长度即容量。
如下图所示,使用 make([]int, 5, 10) 创建 slice 的底层结构:
3.2 使用数组创建 slice
使用数组创建 slice 的话,slice 将与原数组共用一部分内存。
如下图所示,使用 array[5:7] 创建的 slice 结构:
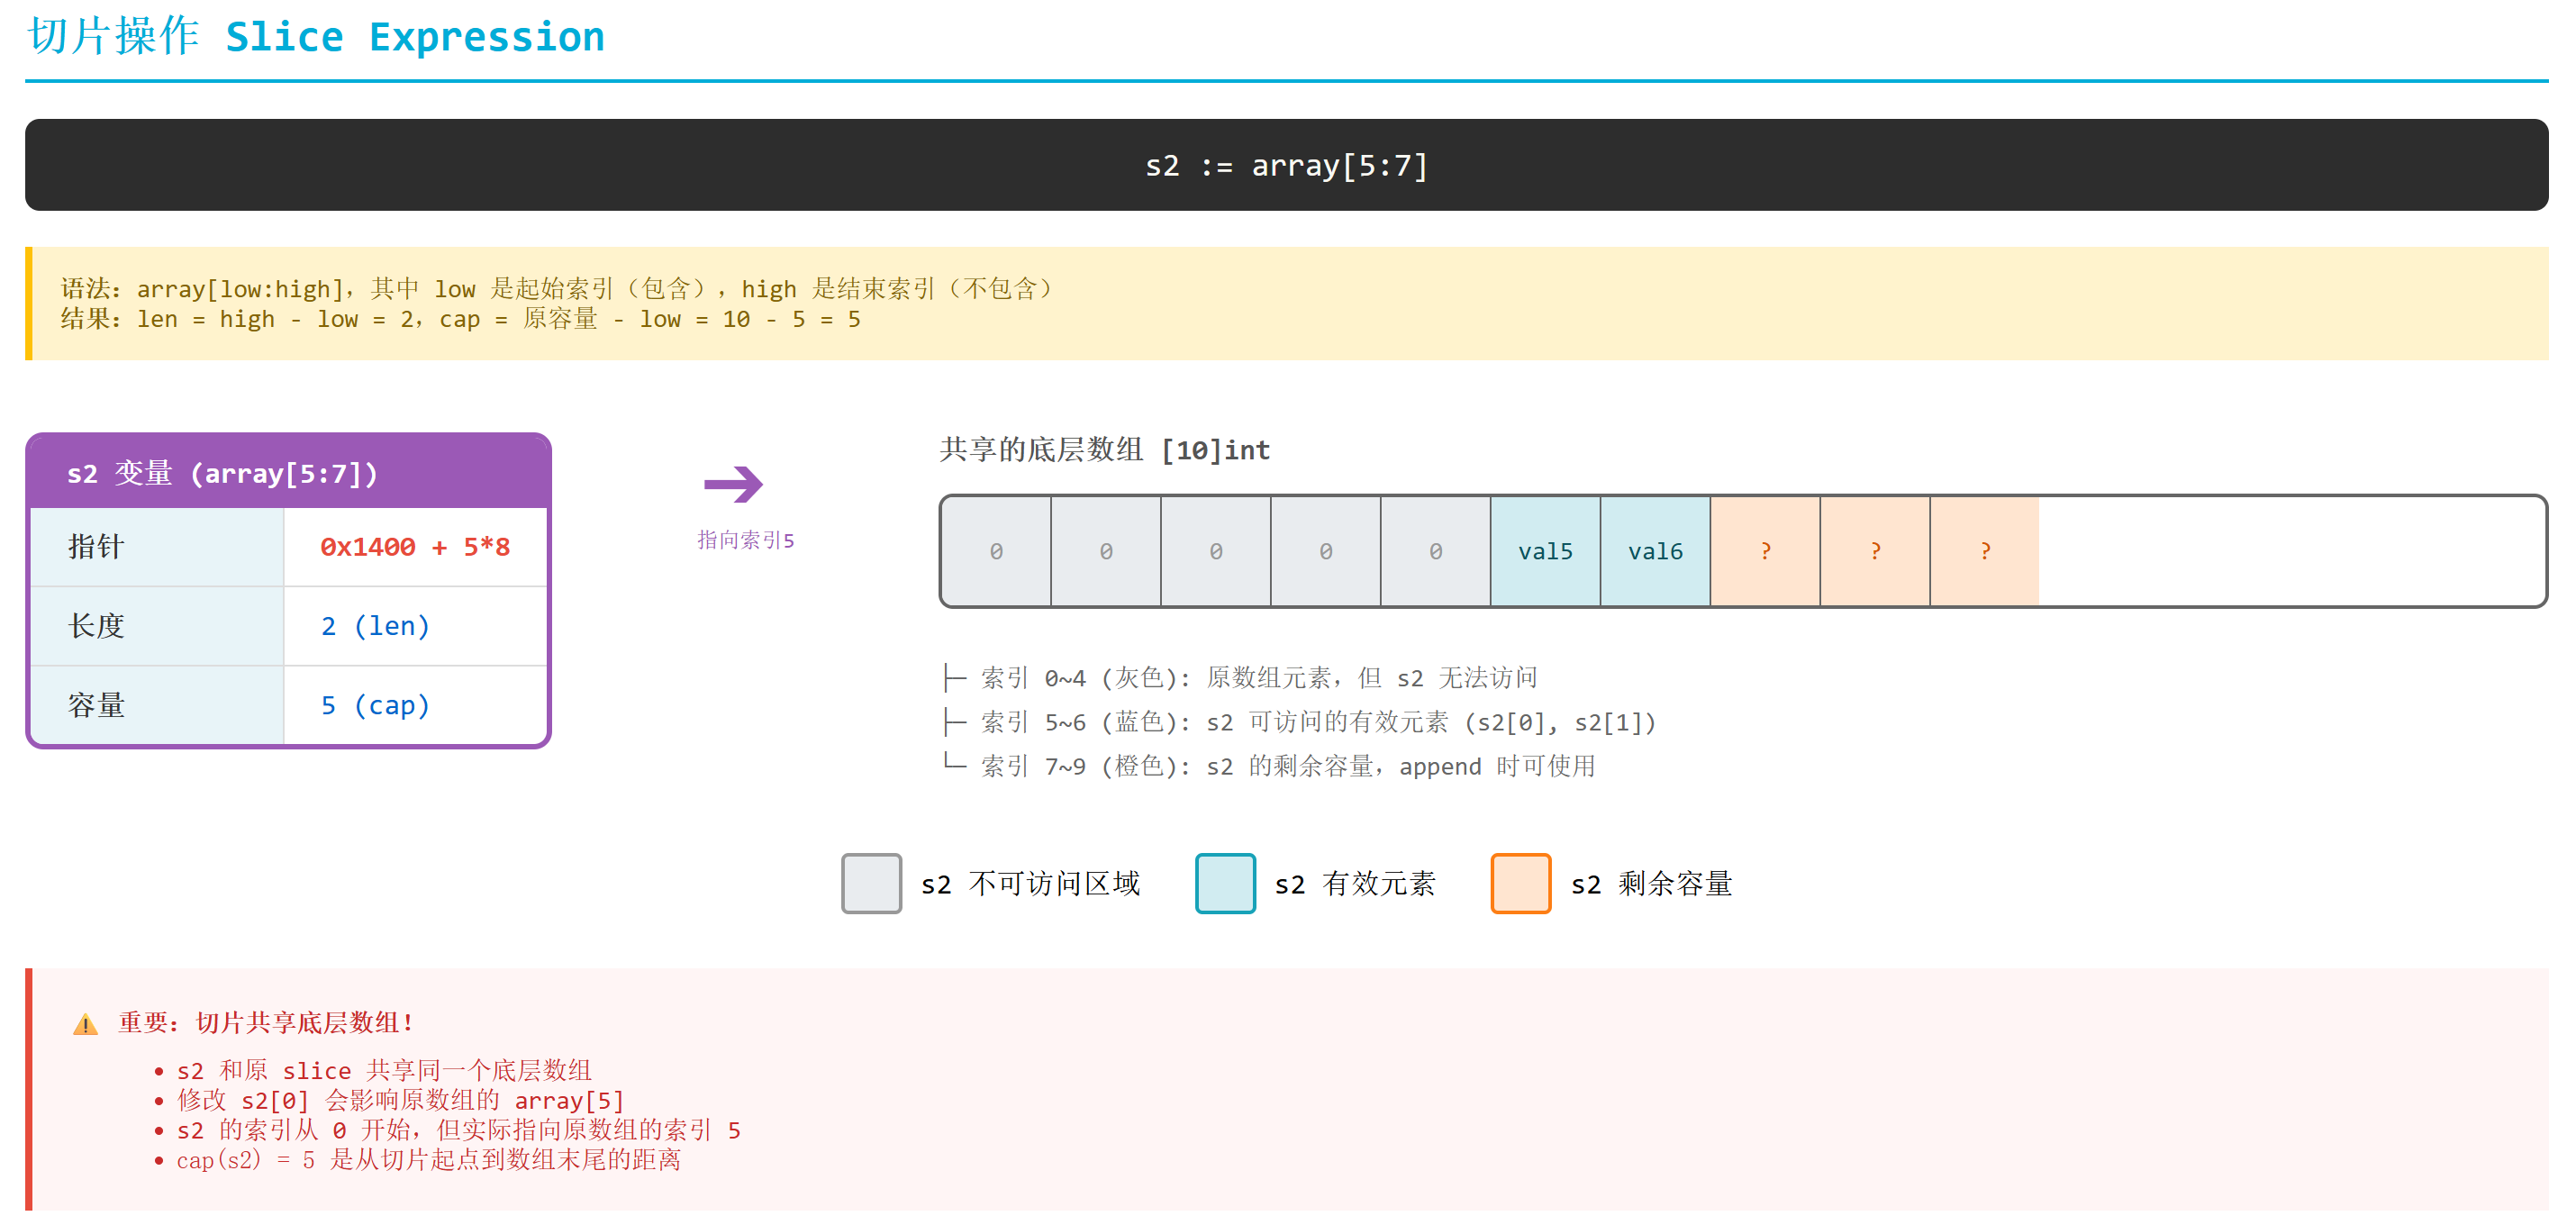
注意:切片与原来数组共享底层内存
4. Slice 的扩容
使用 append 向一个 slice 添加新的元素时候,避免不了原数组容量大小不够,此时会触发 slice 的扩容机制,重新分配一个更大内存的底层数组,将原来 slice 数据拷贝进新的数组,然后返回新的 slice,再次 append 数据。
源代码如下:
go
// oldPtr: 指向旧的数组指针
// newLen: 扩容后的需要长度
// oldCap: 旧的数组长度
// num: 新增元素的数量
// et: 元素类型信息
func growslice(oldPtr unsafe.Pointer, newLen, oldCap, num int, et *_type) slice {
    oldLen := newLen - num

    if newLen < 0 {
        panic(errorString("growslice: len out of range"))
    }

    if et.Size_ == 0 {
        // append should not create a slice with nil pointer but non-zero len.
        // We assume that append doesn't need to preserve oldPtr in this case.
        return slice{unsafe.Pointer(&zerobase), newLen, newLen}
    }
    // 分配新的容量
    newcap := nextslicecap(newLen, oldCap)

    ....... // 一些内存对齐的优化操作

    var p unsafe.Pointer
    // 判断元素类型是否包含指针
    if !et.Pointers() {
        // 分配新内存
        p = mallocgc(capmem, nil, false)
        // The append() that calls growslice is going to overwrite from oldLen to newLen.
        // Only clear the part that will not be overwritten.
        // The reflect_growslice() that calls growslice will manually clear
        // the region not cleared here.
        memclrNoHeapPointers(add(p, newlenmem), capmem-newlenmem)
    } else {
        // 分配新内存
        // Note: can't use rawmem (which avoids zeroing of memory), because then GC can scan uninitialized memory.
        p = mallocgc(capmem, et, true)
        // 此处开启了写屏障,避免旧的数组被提前回收
        if lenmem > 0 && writeBarrier.enabled {
            // Only shade the pointers in oldPtr since we know the destination slice p
            // only contains nil pointers because it has been cleared during alloc.
            //
            // It's safe to pass a type to this function as an optimization because
            // from and to only ever refer to memory representing whole values of
            // type et. See the comment on bulkBarrierPreWrite.
            bulkBarrierPreWriteSrcOnly(uintptr(p), uintptr(oldPtr), lenmem-et.Size_+et.PtrBytes, et)
        }
    }
    // 拷贝旧数据
    memmove(p, oldPtr, lenmem)
    // 返回新的slice
    return slice{p, newLen, newcap}
}
4.1 扩容容量计算
关于如何计算新的 slice 长度,源码中这样写道:
go
// nextslicecap computes the next appropriate slice length.
// newLen: 扩容后需要的最小数组长度
// oldCap: 扩容前的当前容量
func nextslicecap(newLen, oldCap int) int {
    newcap := oldCap
    doublecap := newcap + newcap
    // 如果一次性要分配的元素数量非常多,则按需分配
    if newLen > doublecap {
        return newLen
    }

    const threshold = 256
    // 小容量直接翻倍
    if oldCap < threshold {
        return doublecap
    }
    // 大容量渐进增长
    for {
        newcap += (newcap + 3*threshold) >> 2
        // 直到newCap >= newLen
        // 主要是为了防止过度分配,大对象尽量节省内存
        if uint(newcap) >= uint(newLen) {
            break
        }
    }

    // Set newcap to the requested cap when
    // the newcap calculation overflowed.
    // 溢出判断
    if newcap <= 0 {
        return newLen
    }
    return newcap
}
一个简单的图片示意图:

5. Slice 总结
- 每个切片都指向一个底层数组
- 每个切片都保存了当前切片的长度、底层数组可用容量
- 使用
len()计算切片长度时间复杂度为 O(1),不需要遍历切片 - 使用
cap()计算切片容量时间复杂度为 O(1),不需要遍历切片 - 通过函数传递切片时,不会拷贝整个切片,因为切片本身只是个结构体而已
- 使用
append()向切片追加元素时有可能触发扩容,扩容后将会生成新的切片