一、pytest
1.1Python 主流测试框架对比
| 模块名 | 含义 | 查看 / 配置方式 |
|---|---|---|
| TREND | 测试结果的 "趋势图" | 需多次执行用例后才有数据,首次执行为空 |
| ENVIRONMENT | 测试环境信息(系统版本、Python 版本、接口地址等) | 在allure-results目录下添加environment.properties文件即可填充内容;未配置时显示空 |
| CATEGORIES | 用例的 "失败分类"(如 "产品 bug""测试脚本 bug") | 仅当有用例失败时显示分类数据,全部通过则为空 |
| FEATURES BY STORIES | 按 "功能模块 / 用户故事" 分类的用例统计 | 代码中通过@allure.feature/@allure.story装饰器标记用例;未标记时点 "Show all" 仅能看到默认分类 |
| EXECUTORS | 执行测试的 "机器 / 执行人" 信息 | 默认为空,需通过 Allure 额外配置(如 Jenkins 集成时可自动填充) |
1.2pytest 的安装
-
版本要求 :
pytest 8.3.2需要 Python 3.8 及以上; -
安装命令 :
pip install pytest==8.3.2
安装前后的代码差异
- 未安装 pytest :需要写
main函数手动调用测试用例,运行时是普通 Python 脚本
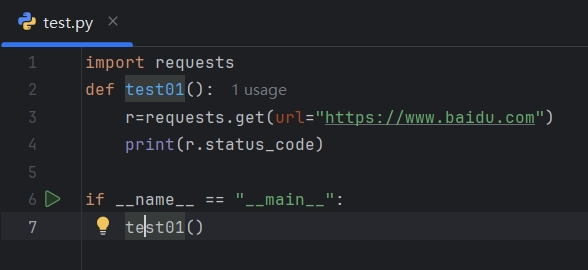
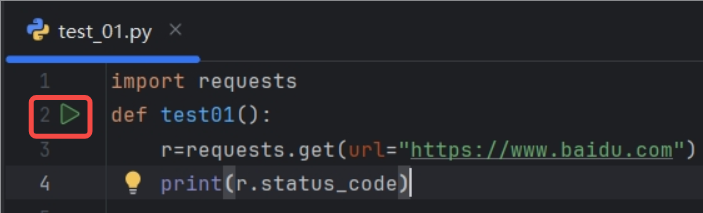
- 安装 pytest 后 :测试方法名(如
test01)前会出现 "运行标记",可直接点击运行,且运行后会显示测试结果(通过 / 失败)。
1.3⽤例运⾏规则
- ⽂件名必须以 test_ 开头或者 _test 结尾
- 测试类必须以 Test 开头,并且不能有 init ⽅法。
- 测试⽅法必须以 test 开头

注意:Python类中不可以添加init⽅法
class Test():
 def __init__(self):
 print("-----init-------")
 def test_a(self):
 print("-----test_a----")
1.4pytest命令参数
pytest 提供了丰富的命令⾏选项来控制测试的执⾏。以下是⼀些常⽤的pytest 命令⾏参数及其使⽤说明。
| 命令 | 描述 | 备注 |
|---|---|---|
| pytest | 在当前目录及其子目录中搜索并运行测试 | - |
| pytest -v | 增加输出的详细程度 | - |
| pytest -s | 显示测试中的 print 语句 | - |
| pytest test_module.py | 运行指定的测试模块 | - |
| pytest test_dir/ | 运行指定目录下的所有测试 | - |
| pytest -k | 只运行测试名包含指定关键字的测试 | - |
| pytest -m | 只运行标记为指定标记的测试 | - |
| pytest -q | 减少输出的详细程度 | - |
| pytest --html=report.html | 生成HTML格式的测试报告 | 需要安装 pytest-html 插件 |
| pytest --cov | 测量测试覆盖率 | 需要安装 pytest-cov 插件 |
示例1:运⾏符合运⾏规则的⽤例
pytest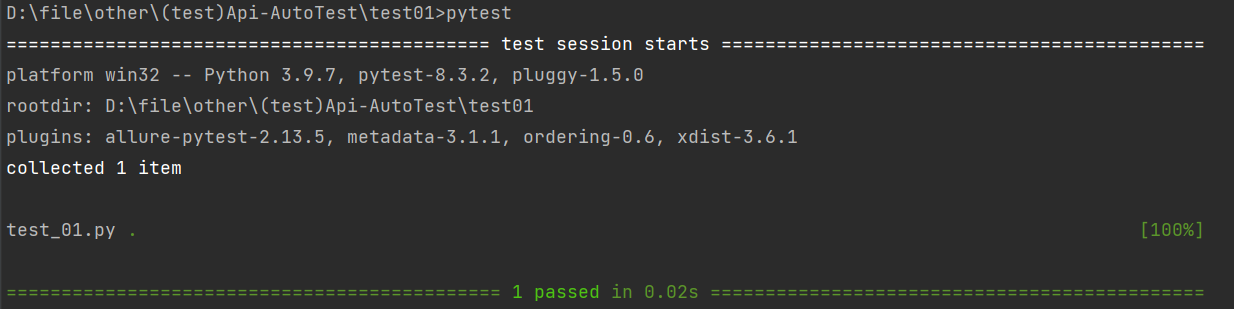
示例2:详细打印,并输⼊print内容
pytest -s -v 或者 pytest -sv (可以连写)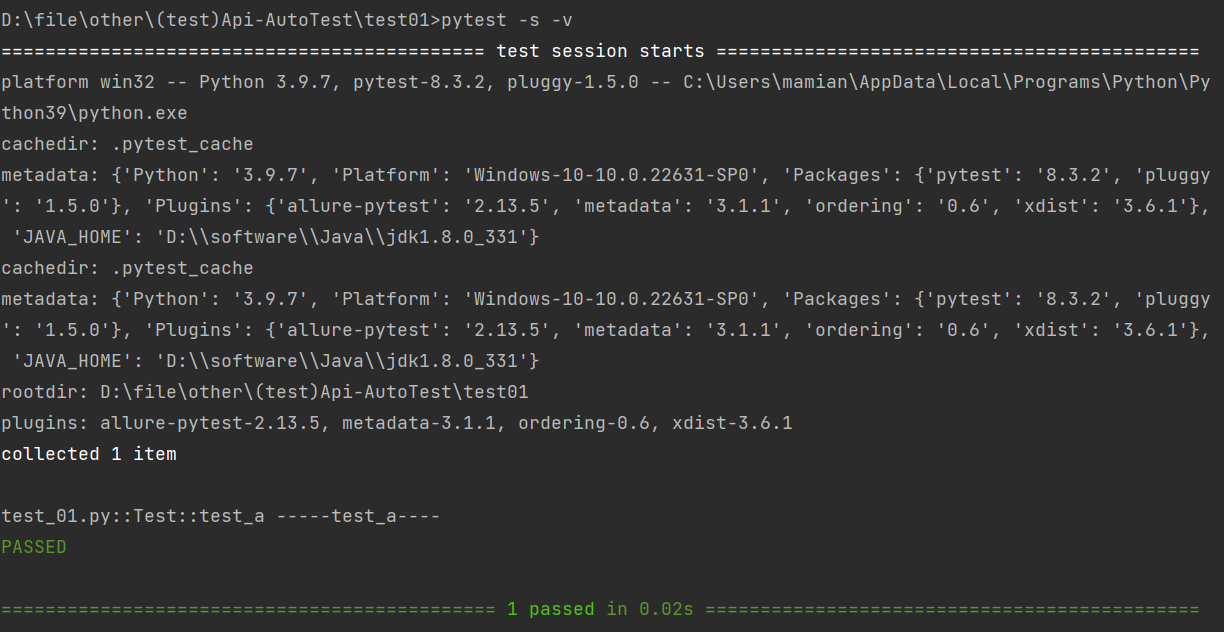
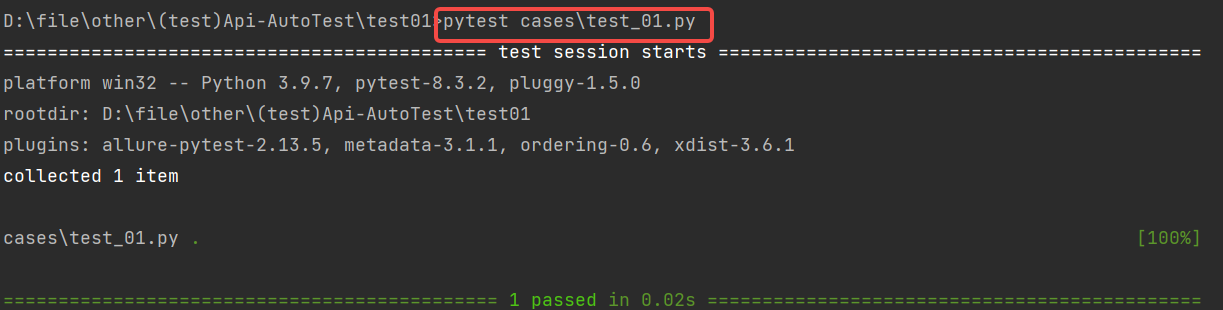
示例3:指定⽂件/测试⽤例
#指定⽂件:pytest 包名/⽂件名
pytest cases/test_01.py
#指定测试⽤例: pytest 包名/⽂件名::类名::⽅法名
pytest cases/test_01.py::Test::test_a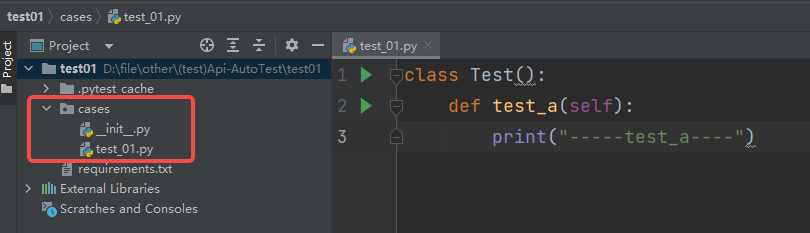
 1.5pytest配置⽂件
当我们既要详细输出,⼜要指定⽂件时,命令会⼜臭⼜⻓,⽽且每次运⾏都需要⼿动输⼊命 令,如何解决? 将需要的相关配置参数统⼀放到 pytest 配置⽂件中。
在当前项⽬下创建 pytest.ini ⽂件,该⽂件为 pytest 的配置⽂件,以下为常⻅的配置选项:
| 参数 | 解释 |
|---|---|
| addopts | 指定在命令行中默认包含的选项。 |
| testpaths | 指定搜索测试的目录。 |
| python_files | 指定发现测试模块时使用的文件匹配模式。 |
| python_classes | 指定发现测试类时使用的类名前缀或模式。 |
| python_functions | 指定发现测试函数和方法时使用的函数名前缀或模式。 |
| norecursedirs | 指定在搜索测试时应该避免递归进入的目录模式。 |
| markers | 定义测试标记,用于标记测试用例。 |
示例:详细输出 cases 包下⽂件名以 test_ 开头且⽅法名以 Test 开头的所有⽤例
[pytest]
addopts = -vs
testpaths = ./cases
python_files = test_*.py
python_classes = Test*
配置好 pytest.ini ⽂件后,命令⾏执⾏ pytest 命令即可,⽆需再额外指定其他参数:
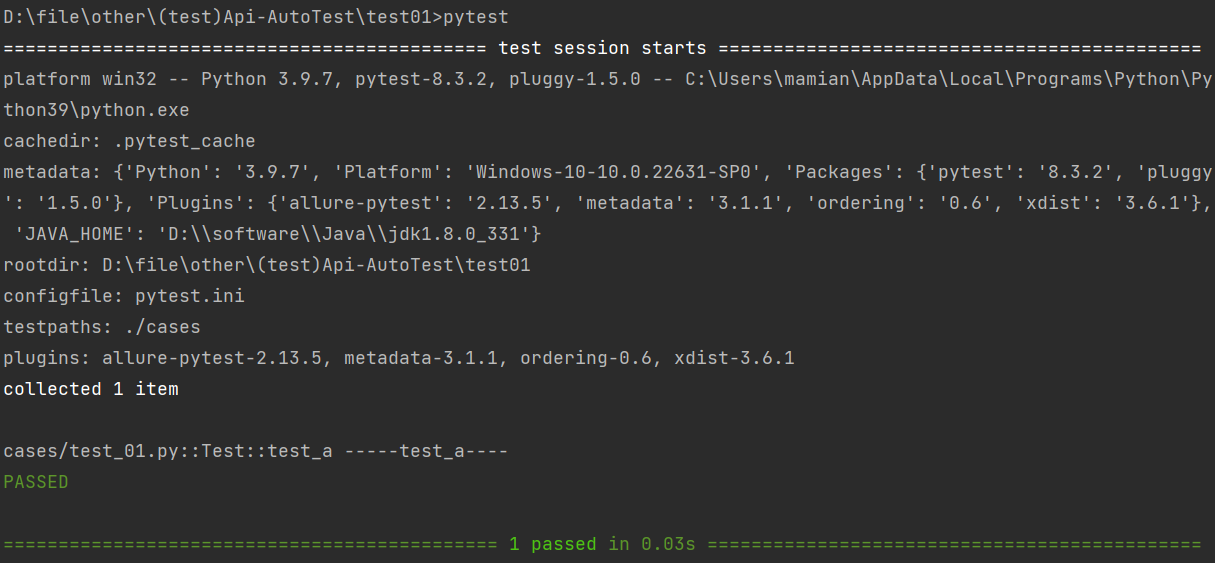
pytest.ini ⽂件 通常位于项⽬的根⽬录下 。通过在pytest.ini 中定义配置项,可以覆盖pytest的默认⾏为,以满⾜项⽬的需求。
1.6前后置
遗留问题:使⽤pytest框架,测试类中不可以添加init()⽅法,如何进⾏数据的初始化?
在测试框架中,前后置操作 是指在测试用例执行前、执行后分别运行的辅助操作,核心作用是配置测试环境、准备测试数据、清理测试资源,以此保障测试的可靠性和一致性。
pytest 框架提供三种实现前后置的方式:
- setup_method/teardown_method :作用于测试类内的每个测试方法,每个用例执行前后都会触发对应的操作。
- setup_class/teardown_class :作用于整个测试类,仅在类中所有用例执行前、执行后各触发一次。
- fixture:pytest 推荐的实现方案,支持函数、类、模块等多维度作用域,功能灵活且强大。
示例1: setup_method 和 teardown_method
import pytest
class TestExample:
   def setup_method(self):
       print("Setup: Before each test")
   def teardown_method(self):
       print("Teardown: After each test")
   def test_example1(self):
       print("Running test_example1")
   def test_example2(self):
       print("Running test_example2")
示例2:setup_class 和 teardown_class
class TestExample:
   def setup_class(self):
       print("Setup: Before all test")
   def teardown_class(self):
       print("Teardown: After all test")
   def test_example1(self):
       print("Running test_example1")
   def test_example2(self):
       print("Running test_example2")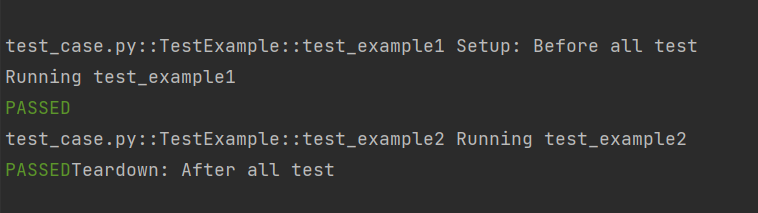
1.7断⾔
断言(assert)是 Python 的调试工具 ,通过校验程序状态是否符合预期来检测逻辑错误:条件为假时触发AssertionError异常。pytest 测试中可直接使用 Python 标准assert语句,验证测试结果是否符合预期。
assert 条件, 错误信息- 条件 :必须是⼀个布尔表达式。
- 错误信息 :当条件为假时显⽰的错误信息,可选。
示例1:基本数据类型的断⾔
#断⾔整数
a = 1
b = 2
assert a == b
#断⾔字符串
str = "hello"
assert "hello" == str
示例2:数据结构断⾔
def test():
 # 断⾔列表
 expect_list = [1, 'apple', 3.14]
 actual_list = [1, 'apple', 3.14]
 # 断⾔元组
 expect_tuple = (1, 'apple', 3.14)
 actual_tuple = (1, 'apple', 3.14)

 # 断⾔字典
 expect_dict = {'name': 'Alice', 'age': 25}
 actual_dict = {'name': 'Alice', 'age': 25}

 # 断⾔集合
 expect_set = {1, 2, 3, 'apple'}
 actual_set = {1, 2, 3, 'apple'}

 assert expect_list == actual_list
 assert expect_tuple == actual_tuple
 assert expect_dict == actual_dict
 assert expect_set == actual_set
示例3:函数断⾔
def divide(a, b):
 assert b != 0, "除数不能为0"
 return a / b

# 正常情况
print(divide(10, 2)) # 输出 5.0

# 触发断⾔
print(divide(10, 0)) # 抛出 AssertionError: 除数不能为0
1.8参数化
参数化设计是自动化测试的核心设计思路,能让测试过程更灵活可控 ;pytest 中可通过内置的pytest.mark.parametrize装饰器,实现测试函数的参数化配置。
示例1:在⽤例上使⽤参数化
import pytest
@pytest.mark.parametrize("test_input,expected", [("3+5", 8), ("2+4", 6),
("6*9", 42)])
def test_eval(test_input, expected):
    assert eval(test_input) == expected
这⾥, @parametrize 装饰器定义了三个不同的 (test_input,expected) 元组,以便 test_eval 函数将依次使⽤它们运⾏三次。 也可以在类或模块上使⽤ parametrize 标记,这将使⽤参数集调⽤多个函数
示例2:在类上使⽤参数化
import pytest
@pytest.mark.parametrize("n,expected", [(1, 2), (3, 4)])
class TestClass:
   def test_simple_case(self, n, expected):
       assert n + 1 == expected
   def test_weird_simple_case(self, n, expected):
       assert (n * 1) + 1 == expected
要对模块中的所有测试进⾏参数化,你可以将 pytestmark 全局变量赋值:
import pytest
pytestmark = pytest.mark.parametrize("n,expected", [(1, 2), (3, 4)])

class TestClass01:
   def test_simple_case(self, n, expected):
       assert n + 1 == expected
   def test_weird_simple_case(self, n, expected):
       assert (n * 1) + 1 == expected

class TestClass02:
   def test_simple_case(self, n, expected):
       assert n + 1 == expected
   def test_weird_simple_case(self, n, expected):
       assert (n * 1) + 1 == expected
除了使⽤ @parametrize 添加参数化外, pytest.fixture() 允许对 fixture 函数进⾏参数化。
示例3:⾃定义参数化数据源
def data_provider():
 return ["a", "b"]

# 定义⼀个测试函数,它依赖于上⾯函数的返回值
@pytest.mark.parametrize("data", data_provider())

def test_data(data):
 assert data != None
 print(f"Testing with data provider: {data}")
1.9fixture
pytest 中的fixture 是⼀种强⼤的机制,⽤于提供测试函数所需的资源或上下⽂。它可以⽤于设置测试环境、准备数据等。以下是fixture 的⼀些核⼼概念和使⽤场景.
1.基本使⽤
示例1:使⽤与不使⽤fixture标记
未标记fixture⽅法的调⽤:
def fixture_01():
     print("第⼀个fixture标记的⽅法")
def test_01():
     fixture_01()
     print("第⼀个测试⽤例")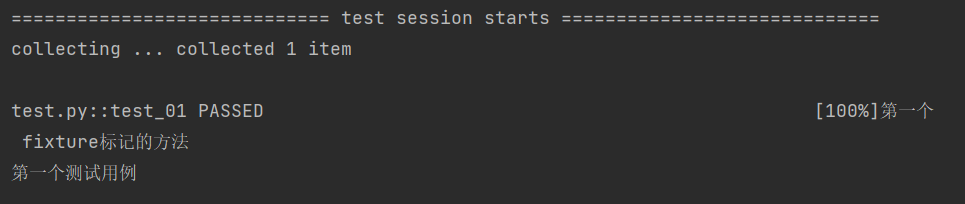
fixture标记的⽅法调⽤:
import pytest
@pytest.fixture
def fixture_01():
    print("第⼀个fixture标记的⽅法")
def test_01(fixture_01):
    print("第⼀个测试⽤例")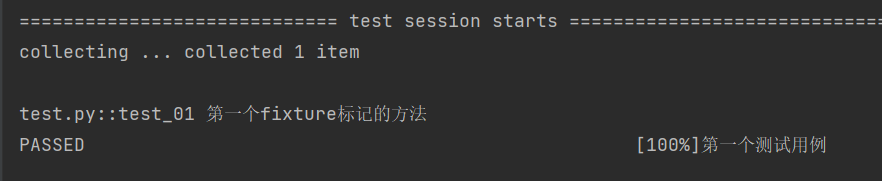
未标记 fixture ⽅法的调⽤与 fixture 标记的⽅法调⽤完全不⼀样,前者需要在⽅法体中调⽤ , ⽽后者可以将函数名作为参数进⾏调⽤ 。 测试脚本中存在的很多重复的代码、公共的数据对象 时,使**⽤ fixture 最为合适.**
示例2:访问列表⻚和详情⻚之前都需要执⾏登录操作
import pytest
@pytest.fixture
def login():
     print("---执⾏登陆操作-----")
def test_list(login):
     print("---访问列表⻚")
def test_detail(login):
     print("---访问详情⻚")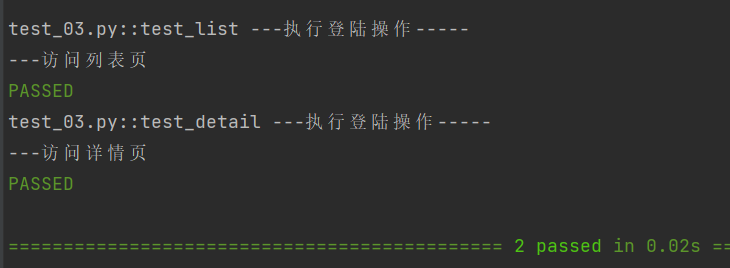
通过使⽤@pytest.fixture 装饰器来告诉pytest⼀个特定函数是⼀个fixture,通过运⾏结果可⻅,在执⾏列表⻚和详情⻚之前都会先执⾏ login ⽅法。
2.fixture嵌套
# test_append.py的内容
import pytest

@pytest.fixture
def first_entry():
     return "a"

@pytest.fixture
def order(first_entry):
     return [first_entry]


def test_string(order):
     order.append("b")
     assert order == ["a", "b"]
pytest 的 fixture 系统具备极高灵活性,是其核心优势之一:测试用例不仅可依赖任意数量的 fixture,fixture 之间也能相互依赖。借助这一特性,可将复杂的测试需求拆解为简洁、结构化的函数 ------ 只需让每个函数声明自身所需的依赖,就能高效实现测试逻辑的解耦与复用。
3.请求多个fixture
import pytest
class Fruit:
   def __init__(self, name):
      self.name = name
   def __eq__(self, other):
      return self.name == other.name

@pytest.fixture
def my_fruit():
     return Fruit("apple")

@pytest.fixture
def fruit_basket(my_fruit):
     return [Fruit("banana"), my_fruit]

def test_my_fruit_in_basket(my_fruit, fruit_basket):
     assert my_fruit in fruit_basket
测试和 fixture 不仅限于⼀次请求单个 fixture ,它们可以请求任意多个。
4.yieldfixture
测试需自行清理,避免干扰其他用例、堆积测试数据。pytest 的 Yield fixture 可实现这一需求:
- 用
yield替代return,yield 前写初始化逻辑并返回对象; - yield 后编写清理代码;
- 执行时先顺行跑 fixture 到 yield 处,测试完成后,再逆行执行 yield 后的清理代码。
示例1:
import pytest

@pytest.fixture
def open_close():
    print("前置操作,初始化.....")
    yield
    print("后置操作,清理数据.....")

def test_01(open_close):
    print("第⼀个测试⽤例")
示例2:创建⽂件句柄与关闭⽂件
import pytest

@pytest.fixture
def file_read():
     print("打开⽂件句柄")
     fo = open("test.txt", "r")
     yield fo
     print("关闭打开的⽂件")
     fo.close()

def file_write():
     print("打开⽂件句柄")
     fo = open("test.txt","w",encoding="utf-8")

     return fo
     # yield fo
     # print("关闭⽂件句柄")
     # fo.close()

def test_file(file_write, file_read):
     # 写⼊数据
     w = file_write
     w.write("测试数据")
     w.close() # 写⼊后关闭⽂件句柄,以便读取

     # 读取数据
     r = file_read
     str = r.read(10)
     print("⽂件内容:", str)
5.带参数的fixture
pytest.fixture(scope='', params='', autouse='', ids='', name='')pytest fixture 有 5 个核心参数,作用如下:
- scope :控制 fixture 的作用范围(决定生命周期),可选值包括:
- function(默认):每个测试函数调用一次;
- class:同一个测试类内共享;
- module:同一个测试文件内共享;
- session:整个测试会话中共享。
- autouse:默认 False,设为 True 时,所有测试函数会自动调用该 fixture,无需手动传入。
- params:实现 fixture 参数化,传列表形式的参数;每个参数值会让 fixture 执行一次(类似循环遍历)。
- ids:和 params 配合使用,给每个参数化的实例起一个可读的名称。
- name:给 fixture 设置别名;后续测试函数要通过这个别名来引用该 fixture。
示例1:scope 的使⽤
scope="function":
import pytest

@pytest.fixture(scope="function")
def fixture_01():
    print("初始化")
    yield
    print("清理")

class TestCase():
    def test_01(self, fixture_01):
        print("第一个测试用例")

    def test_02(self, fixture_01):
        print("第二个测试用例")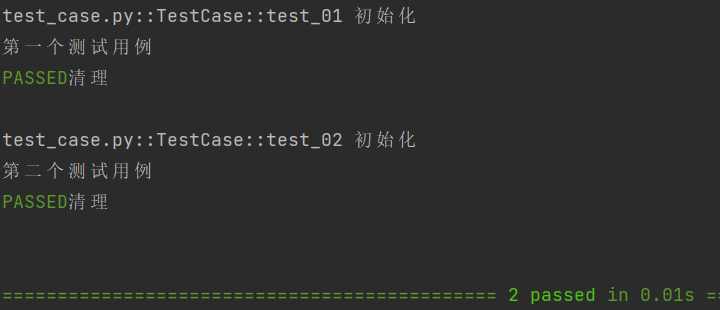
scope="class":
import pytest

@pytest.fixture(scope="class")
def fixture_01():
    print("初始化")
    yield
    print("清理")

class TestCase():
    def test_01(self, fixture_01):
        print("第一个测试用例")

    def test_02(self, fixture_01):
        print("第二个测试用例")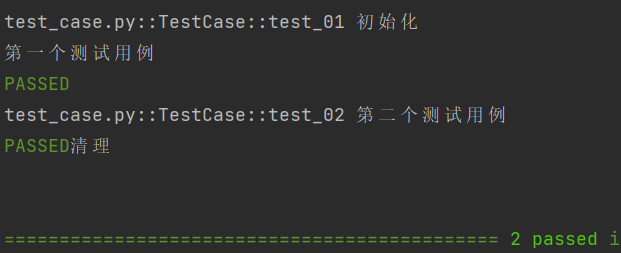
fixture 的 scope 参数核心规则
fixture 的 scope 参数用于控制其作用范围(生命周期):
- function(默认值):每个测试函数都会独立调用一次 fixture,执行流程为 "初始化→运行当前测试用例→清理",不同测试函数的 fixture 互不影响;
- class:同一测试类内所有测试用例共享该 fixture,仅在类中第一个测试用例执行前完成初始化,等类中最后一个测试用例执行完毕后再执行清理操作;
- module/session:可实现更大范围的全局前后置逻辑(需结合多文件场景和 conftest.py 使用)。
conftest.py 结合 fixture 实现全局前后置
- 核心作用:将多个测试文件共用的前后置逻辑(如环境初始化、数据清理)写在 conftest.py 中,无需重复编写,实现代码模块化复用;
- 关键规则:
- 文件名必须固定为
conftest.py,无法自定义; - 可在项目不同目录下创建多个 conftest.py,各自仅对所在目录及子目录的测试文件生效;
- 测试文件无需手动 import 该文件,可直接使用其中定义的 fixture。
- 文件名必须固定为
核心逻辑总结
scope 参数决定了 fixture 的生效范围,function 适用于单测试函数的独立前后置,class/module/session 可实现更大范围的共享前后置;而 conftest.py 是全局 fixture 的专属载体,能让通用的前后置逻辑跨测试文件复用,提升代码整洁度。
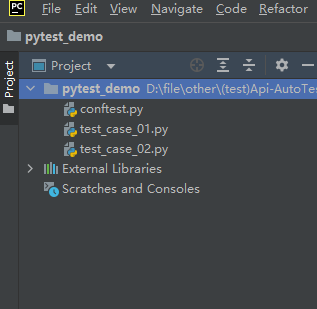
示例2:scope="moudle" 、 scope="session" 实现全局的前后置应⽤
项⽬结构:
import pytest
@pytest.fixture(scope="module", autouse=True)
def fixture_01():
    print("初始化")
    yield
    print("清理")
test_case_01.py:
def test_case01():
    print("单独放出来的测试用例01")

class TestCase01():
    def test_01(self):
        print("第一个测试用例")

    def test_02(self):
        print("第二个测试用例")
test_case_02.py:
def test_case02():
    print("单独放出来的测试用例02")

class TestCase02():
    def test_01(self):
        print("第一个测试用例")

    def test_02(self):
        self.print("第二个测试用例")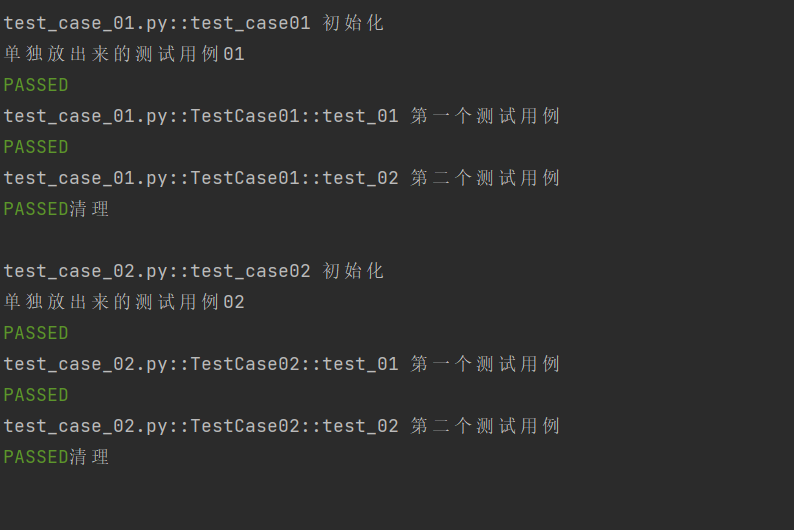
当 scope="session" 时:
test_case_01.py:
def test_case01():
    print("单独放出来的测试用例01")

class TestCase01():
    def test_01(self):
        print("第一个测试用例")

    def test_02(self):
        print("第二个测试用例")
test_case_02.py:
def test_case02():
    print("单独放出来的测试用例02")

class TestCase02():
    def test_01(self):
        print("第一个测试用例")

    def test_02(self):
        print("第二个测试用例")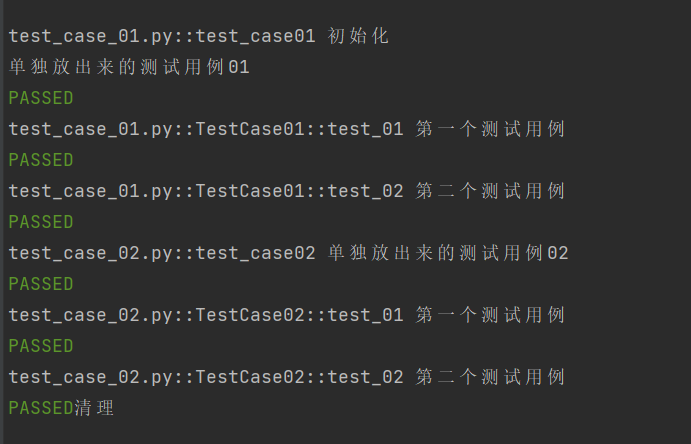
示例3:autouse 的使⽤
import pytest

@pytest.fixture(scope="class", autouse=True)
def fixture_01():
    print("初始化")
    yield
    print("清理")

class TestCase():
    def test_01(self):
        print("第一个测试用例")

    def test_02(self):
        print("第二个测试用例")
autouse 是 pytest fixture 的核心参数,默认值为 False:
- 当 autouse=False 时,该 fixture 需要在测试函数中手动显式引用(传参)才能生效,此前示例均采用这一默认方式;
- 当 autouse=True 时,无需测试函数显式引用,该 fixture 会自动在所有测试函数执行前运行。
示例4:通过 params 实现参数化
# 定义一个参数化的 fixture
import pytest

@pytest.fixture(params=["a", "b"])
def data_provider(request):
    return request.param

# 定义一个测试函数,它依赖于上面的参数化 fixture
def test_data(data_provider):
    assert data_provider != None
    print(f"Testing with data provider: {data_provider}")
pytest 中@pytest.mark.parametrize和 fixture 均可实现参数化,二者适用场景不同,选择核心看测试需求:
- 若仅需简单参数传递,无复杂资源管理(如数据库连接、文件操作等),优先用
parametrize------ 语法简洁直接,适配基础参数化场景; - 若测试需动态加载外部数据,或要管理复杂测试资源(如初始化 / 销毁数据库连接、文件读写等),优先用 fixture------ 支持资源的生命周期管控,适配复杂场景;
- 也可结合两者使用,兼顾
parametrize的简洁性和 fixture 的资源管理能力。
简言之,parametrize适配简单参数化场景,fixture 适配需动态数据、资源管理的复杂场景。
1.10指定⽤例执⾏顺序
在 pytest 测试中,若测试用例存在依赖关系、需要按特定顺序执行,可借助第三方插件pytest-order实现 ------ 因为 pytest 本身不支持通过配置修改用例默认执行顺序。
第一步:安装插件
pip install pytest-order==1.3.0核心使用逻辑
- 基础用法:通过
@pytest.mark.order(数字)标记用例,数字越小,用例执行优先级越高; - 适配场景:解决用例间的依赖问题(如先执行数据初始化用例,再执行业务验证用例);
- 优势:无需修改 pytest 核心配置,仅通过装饰器即可灵活控制执行顺序。
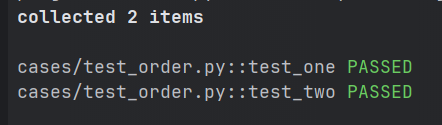
既可以⽤在测试类上,也可以⽤在测试⽅法上,以测试类为例:
@pytest.mark.order(1)
def test_one():
    assert True

@pytest.mark.order(2)
def test_two():
    assert True