目录
前言
SSH(Secure Shell)是客户端远程登陆服务器进行管理的工具,它建立再应用层和传输层基础上的安全协议,使用了加密算法,传递的数据包是密文。
OpenSSH是SSH(Secure Shell)协议的免费开源实现。SSH协议簇可以用来进行远程控制或在计算机系统之间传送文件。而实现此功能的传统方式,如telnet(终端仿真协议)、rcp ftp、rlogin、rsh都是相对不安全的,
并且它们会使用明文传送密码。OpenSSH提供了服务端后台程序和客户端工具,用来加密远程控件和文件传输过程中的数据,并以此来替代原来的类似服务。
OpenSSH工具获取的参考
- 现方案的主控板在正常运行期间,查看现有的rootfs是否已经集成OpenSSH工具,例如:
bash
# /usr/sbin/sshd -v
   unknown option -- v
   OpenSSH_8.1p1, OpenSSL 1.1.1d  10 Sep 2019 (能显示这些证明已经集成OpenSSH工具)
   usage: sshd [-46DdeiqTt] [-C connection_spec] [-c host_cert_file]
               [-E log_file] [-f config_file] [-g login_grace_time]
[-h host_key_file] [-o option] [-p port] [-u len]- 若现有的rootfs尚未集成OpenSSH工具,则切换到SDK的buildroot目录,例如:
bash
cd buildroot-2019.11/- 列出主控板对应的buildroot的defconfig,例如:
bash
buildroot-2019.11$ make list-defconfigs | grep "xxx"
      xxx_1_defconfig    - Build for xxx_1
      xxx_2_defconfig    - Build for xxx_2
      xxx_3_defconfig    - Build for xxx_3
xxx_4_defconfig - Build for xxx_4- 选择主控板对应的buildroot的defconfig,例如:
bash
make xxx_1_defconfig- 进入buildroot的图形化界面配置,例如:
bash
make menuconfig-
电脑键盘按下斜杆"/"键,进入`Search Configuration Parameter`界面,输入"BR2_PACKAGE_OPENSSH",按下键盘"Y"键选中openssh。
-
配置完后选择"< Save >"和"< Exit >"保存并退出图形化界面配置,同步保存对应的配置到方案对应的defconfig,例如:
bash
make savedefconfig-
make命令编译rootfs,如果发现编译过程中需要访问外网网址的话,则电脑需要联外网下载工具包。
-
rootfs编译成功后,查看并拷贝生成的rootfs压缩包,例如:
bash
 buildroot-2019.11$ ls -l output/images/
   total 41532
   -rw-r--r-- 1 8448000 Dec 25 10:28 rootfs.tar
   -rw-r--r-- 1 34078720 Dec 25 10:28 sysroot.tar

   buildroot-2019.11$ cp -rvf ./output/images/rootfs.tar ../device/xxx/boards/yyy/skeleton/rootfs-nor-uclibc.tar
   './output/images/rootfs.tar' -> '../device/xxx/boards/yyy/skeleton/rootfs-nor-uclibc.tar'
   buildroot-2019.11$ cp -rvf ./output/images/sysroot.tar ../device/xxx/boards/yyy/skeleton/sysroot-nor-uclibc.tar
   './output/images/sysroot.tar' -> '../device/xxx/boards/yyy/skeleton/sysroot-nor-uclibc.tar'
OpenSSH工具的配置参考
- passwd文件配置,例如:
bash
   root:x:0:0:root:/root:/bin/sh
   daemon:x:1:1:daemon:/usr/sbin:/bin/false
   bin:x:2:2:bin:/bin:/bin/false
   sys:x:3:3:sys:/dev:/bin/false
   sync:x:4:100:sync:/bin:/bin/sync
   mail:x:8:8:mail:/var/spool/mail:/bin/false
   www-data:x:33:33:www-data:/var/www:/bin/false
   operator:x:37:37:Operator:/var:/bin/false
   sshd:x:1001:1001:SSH drop priv user:/:/bin/false
   ssh:x:1003:1003:Linux User,,,:/home/xelssh:/bin/sh
nobody:x:65534:65534:nobody:/home:/bin/false- shadow文件配置,例如:
bash
   root:$5$b1uX.KhCY9csXbGq$Xpr5g0JaBk9ACmnXA8lkxQadk9lI2y9XVE4n6HnHPV2:10933:0:99999:7:::
   daemon:*:::::::
   bin:*:::::::
   sys:*:::::::
   sync:*:::::::
   mail:*:::::::
   www-data:*:::::::
   operator:*:::::::
   nobody:*:::::::
   sshd:*:::::::
ssh:GVFI4IcTNQXuU:15695:5:99999:7:5:20000:- sshd_config文件配置,例如
bash
   #服务端配置文件是让别人登陆时使用的。
   Port 22 #默认SSH端口号,为了其安全一般要改为其它端口,被注释时默认为22,1~65535,推荐1w以上随机端口
   AddressFamily any #说明要监听
   ListenAddress 0.0.0.0 # 监听的地址,即允许哪些网段来SSH登录,监听本机所有IPV4的IP
   ListenAddress :: #监听本机所有的IPV6的地址

   HostKey /data/etc/ssh/ssh_host_rsa_key #服务器端RSA密钥保存文件路径
   HostKey /data/etc/ssh/ssh_host_ecdsa_key #服务器端ESCDSA密钥保存文件路径
   HostKey /data/etc/ssh/ssh_host_ed25519_key #服务器端ED25519密钥保存文件路径

   # Ciphers and keying (密码和密钥)
   RekeyLimit default none #指定重新生成密钥的数据量限制,default表示使用默认值

   # Logging (日志记录)
   SyslogFacility AUTH #使用AUTH记录日志,即日志记录SSH登录情况
   LogLevel INFO #log日志级别,其中INFO表示记录信息级别的日志

   # Authentication: #认证相关
   LoginGraceTime 2m #登录宽限时长,默认2分钟不登录自动关闭
   PermitRootLogin yes #是否支持管理员直接登录,即是否允许root用户登入,默认是yes,建议改成no,因为若允许root登入,且要求使用密码,则密码可能被截获,若使用公钥和私钥的配对来登入,则可设定不使用密码(密码就不会被截获)
   StrictModes no #是否使用严格模式(严格检查用户的某些相关信息),主要检查用户目录和密钥文件的权限
   MaxAuthTries 6 #最大尝试次数(6次以后终端断开)
   MaxSessions 10 #最大并发允许链接数(超过将拒绝),即设置最大会话数

   PubkeyAuthentication yes #是否支持公钥认证登入

   # The default is to check both .ssh/authorized_keys and .ssh/authorized_keys2
   # but this is overridden so installations will only check .ssh/authorized_keys
   AuthorizedKeysFile    /data/ssh/authorized_keys #指定授权密钥文件到问题,默认保存口令的文件,即公钥保存位置

   AuthorizedPrincipalsFile none #指定授权主题的问题,none表示不使用

   AuthorizedKeysCommand none  #指定外部命令用于验证密钥,none表示不使用
   AuthorizedKeysCommandUser nobody #指定执行AuthorizedKeysCommand的用户

   # For this to work you will also need host keys in /etc/ssh/ssh_known_hosts
   HostbasedAuthentication no #禁止基于主机的认证
   # Change to yes if you don't trust ~/.ssh/known_hosts for
   # HostbasedAuthentication
   IgnoreUserKnownHosts no #是否忽略用户的known_hosts文件
   # Don't read the user's ~/.rhosts and ~/.shosts files
   IgnoreRhosts yes #忽略rhosts文件

   # To disable tunneled clear text passwords, change to no here!
   PasswordAuthentication yes #是否支持密码登录,配合密钥登录一起使用,即是否允许使用密码登入,设置了使用公钥验证后,建议改成no,防止密码被截获,在未设置公钥验证前,不要改为no,否则客户端无法登入。
   PermitEmptyPasswords no #是否支持空密码登录,即用户没有密码,建议为no。

   # Change to no to disable s/key passwords
   ChallengeResponseAuthentication no #是否禁止s/key密码认证

   # Kerberos options (身份验证选项)
   #KerberosAuthentication no #禁止Kerberos认证
   #KerberosOrLocalPasswd yes #允许Keyberos或本地密码认证
   #KerberosTicketCleanup yes #清理Keyberos票据
   #KerberosGetAFSToken no #不获取AFS令牌

   # GSSAPI options
   #GSSAPIAuthentication yes #GSSAPI认证,默认开启
   #GSSAPICleanupCredentials no #是否在会话结束时清理GSSAPI凭证

   # Set this to 'yes' to enable PAM authentication, account processing,
   # and session processing. If this is enabled, PAM authentication will
   # be allowed through the ChallengeResponseAuthentication and
   # PasswordAuthentication.  Depending on your PAM configuration,
   # PAM authentication via ChallengeResponseAuthentication may bypass
   # the setting of "PermitRootLogin without-password".
   # If you just want the PAM account and session checks to run without
   # PAM authentication, then enable this but set PasswordAuthentication
   # and ChallengeResponseAuthentication to 'no'.
   #UsePAM no #是否使用PAM认证(是一种统一认证框架),需要进行安全规划再选择是否关闭

   AllowAgentForwarding yes #是否允许SSH代理转发
   AllowTcpForwarding yes #是否允许TCP转发
   GatewayPorts no #网关端口,no表示仅监听环回接口
   X11Forwarding yes #是否允许X11转发,即是否转发图形界面请求(可以打开远程服务器图形界面)
   X11DisplayOffset 10 #设置X11显示偏移量
   X11UseLocalhost yes #是否允许使用本地主机进行X11转发
   PermitTTY yes #是否允许分配TTY
   PrintMotd no #是否显示motd消息
   #PrintLastLog yes #显示上次登录信息
   TCPKeepAlive yes #发送TCP保持活动包
   PermitUserEnvironment no #是否允许用户环境
   Compression delayed # 延迟压缩
   ClientAliveInterval 0 #设置客户端活动间隔
   ClientAliveCountMax 3 #设置客户端活动最大次数
   UseDNS no #是否允许DNS反解,比较浪费时间,一般更改为no
   PidFile /var/run/sshd.pid #指定PID文件路径
   MaxStartups 10:30:100 #最大启动数
   PermitTunnel no #是否允许隧道
   ChrootDirectory none #是否使用chroot目录
   VersionAddendum none #是否添加版本后缀

   # no default banner path
   Banner none #是否显示默认的banner

   # override default of no subsystems (覆盖没有子系统的默认值)
Subsystem sftp /usr/libexec/sftp-server #指定sftp子系统- S50sshd文件配置,例如:
bash
   #!/bin/sh
   #
   # sshd        Starts sshd.
   #

   # Make sure the ssh-keygen progam exists
   [ -f /usr/bin/ssh-keygen ] || exit 0

   umask 077

   start() {
      if [ -e /data/etc/ssh ]
      then
         echo "/data/etc/ssh has exist!"
      else
         mkdir -p /data/etc/ssh
      fi

   # Create any missing keys
      /usr/bin/ssh-keygen -A -f /data &

      printf "Starting sshd: "
      /usr/sbin/sshd -D &
      touch /var/lock/sshd
      echo "OK"
   }
   stop() {
      printf "Stopping sshd: "
      killall sshd
      rm -f /var/lock/sshd
      echo "OK"
   }
   restart() {
      stop
      start
   }

   case "$1" in
    start)
      start
      ;;
    stop)
      stop
      ;;
    restart|reload)
      restart
      ;;
    *)
      echo "Usage: $0 {start|stop|restart}"
      exit 1
   esac

exit $?- inittab文件配置
bash
   # Startup the system
   ::sysinit:/bin/mount -t proc proc /proc
   ::sysinit:/bin/mount -o remount,ro,noatime /
   ::sysinit:/bin/mount -t tmpfs tmpfs /dev
   ::sysinit:/bin/mkdir -p /dev/pts
   ::sysinit:/bin/mkdir -p /dev/shm
   ::sysinit:/bin/mount -a
   ::sysinit:/bin/hostname -F /etc/hostname
   # now run any rc scripts
   ::sysinit:/etc/init.d/rcS

   # Put a getty on the serial port
   #ttyS0::respawn:/sbin/getty -L -n -l /bin/autologin ttyS0 0 vt100 # GENERIC_SERIAL #无密码登录
   ::respawn:-/bin/login #有密码登录

   # Stuff to do for the 3-finger salute
   #::ctrlaltdel:/sbin/reboot

   # Stuff to do before rebooting
   ::shutdown:/etc/init.d/rcK
   ::shutdown:/sbin/swapoff -a
::shutdown:/bin/umount -a -r- 方案mk文件配置,例如:
bash
PRODUCT_FORCE_COPY_FILES += \
    device/xxx/boards/yyy/rootfs/etc/inittab:rootfs/etc/inittab \
    device/xxx/boards/yyy/rootfs/etc/passwd:rootfs/etc/passwd \
    device/xxx/boards/yyy/rootfs/etc/shadow:rootfs/etc/shadow \
    device/xxx/boards/yyy/rootfs/etc/init.d/S50sshd:rootfs/etc/init.d/S50sshd \
    device/xxx/boards/yyy/rootfs/etc/ssh/sshd_config:rootfs/etc/ssh/sshd_config
OpenSSH工具的验证测试参考
下面以主控板作SSH服务端,电脑作为SSH客户端为例。
- 编译并烧录固件,正常开机,查看主控板的密钥是否生成,例如:
bash
 # ls -l /data/etc/ssh
   total 9
   -rw-------  1 root  root 1369 Jun 14 00:00 ssh_host_dsa_key
   -rw-r--r--  1 root  root  600 Jun 14 00:00 ssh_host_dsa_key.pub
   -rw-------  1 root  root  505 Jun 14 00:00 ssh_host_ecdsa_key
   -rw-r--r--  1 root  root   172 Jun 14 00:00 ssh_host_ecdsa_key.pub
   -rw-------  1 root  root  399 Jun 14 00:00 ssh_host_ed25519_key
   -rw-r--r--  1 root  root   92 Jun 14 00:00 ssh_host_ed25519_key.pub
   -rw-------  1 root  root 2590 Jun 14 00:00 ssh_host_rsa_key
-rw-r--r-- 1 root root 564 Jun 14 00:00 ssh_host_rsa_key.pub- 若主控板的密钥没有生成,则手动在前台运行密钥生成工具,例如:
bash
 # /usr/bin/ssh-keygen -A -f /data
   ssh-keygen: generating new host keys: RSA DSA ECDSA ED25519

 # ls -l /data/etc/ssh
   total 9
   -rw-------  1 root  root  1369 Jun 14 17:02 ssh_host_dsa_key
   -rw-r--r--  1 root  root   600 Jun 14 17:02 ssh_host_dsa_key.pub
   -rw-------  1 root  root   505 Jun 14 17:02 ssh_host_ecdsa_key
   -rw-r--r--  1 root  root   172 Jun 14 17:02 ssh_host_ecdsa_key.pub
   -rw-------  1 root  root   399 Jun 14 17:02 ssh_host_ed25519_key
   -rw-r--r--  1 root  root    92 Jun 14 17:02 ssh_host_ed25519_key.pub
   -rw-------  1 root  root  2590 Jun 14 17:02 ssh_host_rsa_key
-rw-r--r-- 1 root root 564 Jun 14 17:02 ssh_host_rsa_key.pub- 主控板复位并重新正常开机,查看SSH服务是否已经正常开启,例如:
bash
  # netstat -anptl | grep "sshd"
    tcp  0  0 0.0.0.0:22  0.0.0.0:*   LISTEN  687/sshd

  # ps | grep "sshd"
    687 root      0:00 /usr/sbin/sshd -D
871 root 0:00 grep sshd- 若SSH服务未正常开启,则手动在前台运行SSH服务,例如:
bash
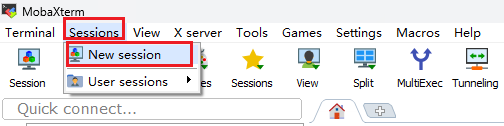
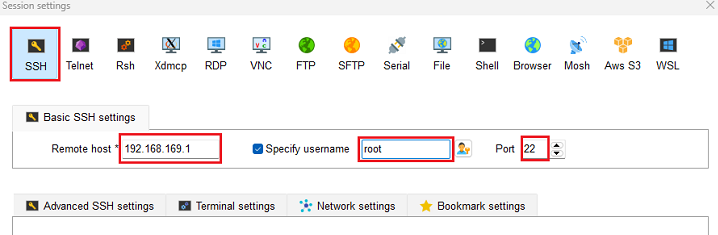
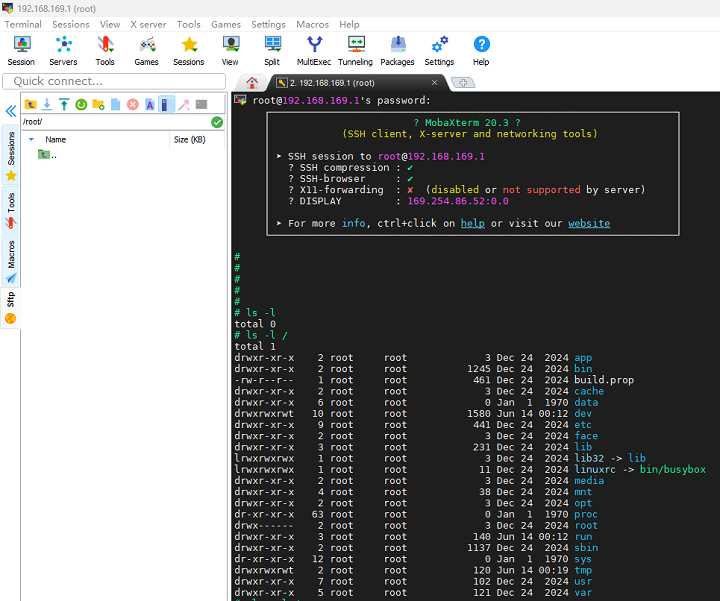
# /usr/sbin/sshd -D- 主控板的SSH服务正常开启后,确保主控板和PC电脑的网卡网络正常且都在同一个网段,在PC电脑运行SSH客户端(以MobaXterm工具为例),以主控端的登录账户名是root,登录密码是1234567890为例:
总结
SSH(Secure Shell)是一种安全的网络协议,通过加密机制确保远程登录和数据传输的安全性,广泛应用于Linux系统管理和其他网络服务中。
SSH的核心作用是提供安全的远程访问和数据传输。 它通过加密通道防止数据窃听或篡改,支持多种功能,包括:
- 远程登录:允许用户从本地机器安全登录到远程服务器,执行命令和管理系统。
- 文件传输:通过SCP或SFTP协议安全复制文件。
- 端口转发:在本地和远程系统间建立安全隧道,转发其他服务(如HTTP或数据库连接)。
- X11转发:支持在远程服务器上运行图形应用程序,并将界面显示在本地机器。
SSH的使用场景覆盖多个领域:
- 系统管理:管理员通过SSH远程登录服务器,执行维护任务(如软件安装、配置管理),避免物理接触设备。
- 开发与部署:开发人员使用SSH连接代码仓库或测试服务器,通过SCP/SFTP安全传输文件,并利用端口转发调试网络应用。
- 安全数据传输:在不安全网络(如公共Wi-Fi)中,SSH加密数据流,保护敏感信息(如数据库凭据)传输。
- 自动化运维:结合脚本和密钥认证,实现免密登录,简化批量服务器管理任务。
- 网络服务安全化:通过端口转发将非加密服务(如MySQL)封装在SSH隧道中,提升安全性。
SSH的工作原理基于客户端-服务器架构和加密技术。 客户端与服务器通过版本协商和密钥交换(如Diffie-Hellman算法)建立共享密钥,随后进行双向身份验证(基于密码或公钥),最终形成加密通道用于会话操作。公钥认证通过非对称加密实现免密登录,提高效率和安全性。