使用方法
场景内挂新建一个面片 挂上脚本 QuadTillingLine ( 源码在下面 )
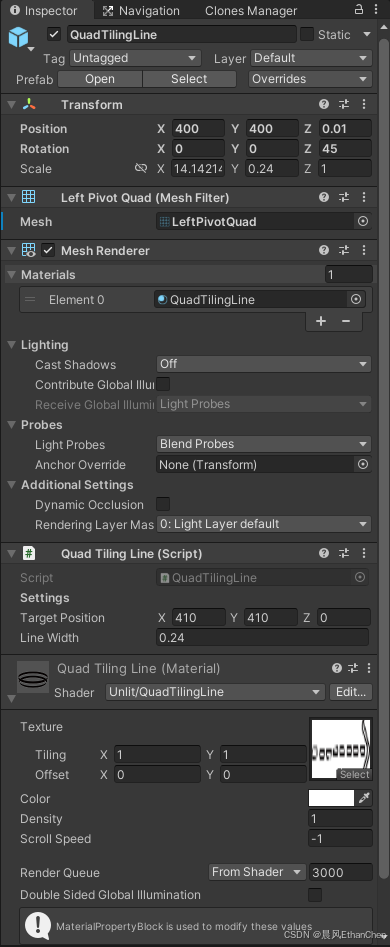
需要的时候 挂在玩家脚底下 并设置目标点
挂在玩家脚底下

设置目标位置
csharp
var diff = _currentTarget.Pos - m_Pos;
var dir = Mathf.Min( 12, diff.magnitude ) * diff.normalized;
var e = m_Pos + dir;
_lineDriver.SetTarget( e );
源码
C#脚本
csharp
using UnityEngine;

[ExecuteAlways]
[RequireComponent( typeof( MeshFilter ), typeof( MeshRenderer ) )]
public class QuadTilingLine : MonoBehaviour
{
    [Header( "Settings" )]
    public Vector3 targetPosition; // 目标点
    public float lineWidth = 0.5f;

    private Transform _t;
    private Renderer _ren;
    private MaterialPropertyBlock _block;
    private MeshFilter _mf;
    private static readonly int LengthId = Shader.PropertyToID( "_TotalLength" );

    private void Awake( )
    {
        Init( );
        GenerateLeftPivotMesh( );
    }

    private void Init( )
    {
        if ( _t == null ) _t = transform;
        if ( _ren == null ) _ren = GetComponent<Renderer>( );
        if ( _mf == null ) _mf = GetComponent<MeshFilter>( );
        if ( _block == null ) _block = new MaterialPropertyBlock( );
    }

    private void OnValidate( )
    {
        Init( );
        if ( _mf.sharedMesh == null || _mf.sharedMesh.name != "LeftPivotQuad" )
        {
            GenerateLeftPivotMesh( );
        }
        UpdateTransform( );
    }

    public void SetTarget( Vector3 targetPos )
    {
        targetPosition = targetPos;
        UpdateTransform( );
    }

    private void UpdateTransform( )
    {
        if ( _ren == null ) return;

        //1.计算向量
        Vector3 dir = targetPosition - _t.position;
        float dist = dir.magnitude;

        if ( dist < 0.001f )
        {
            _ren.enabled = false;
            return;
        }
        _ren.enabled = true;

        //2.旋转: Z轴指向目标
        float angle = Mathf.Atan2( dir.y, dir.x ) * Mathf.Rad2Deg;
        _t.rotation = Quaternion.Euler( 0, 0, angle );

        //3.缩放: X轴变长
        //因为mesh轴心在左边,所以它只向右长,不用修位置
        _t.localScale = new Vector3( dist, lineWidth, 1f );

        //4.set shader属性
        _ren.GetPropertyBlock( _block );
        _block.SetFloat( LengthId, dist );
        _ren.SetPropertyBlock( _block );
    }

    //生成左轴心Mesh挽歌
    private void GenerateLeftPivotMesh( )
    {
        Mesh mesh = new Mesh( );
        mesh.name = "LeftPivotQuad";

        //顶点:X从0到1 Y从-0.5到0.5
        Vector3[] vertices = new Vector3[]
        {
            new Vector3(0, -0.5f, 0),
            new Vector3(1, -0.5f, 0),
            new Vector3(0, 0.5f, 0),
            new Vector3(1, 0.5f, 0)
        };

        //UV
        Vector2[] uv = new Vector2[]
        {
            new Vector2(0, 0),
            new Vector2(1, 0),
            new Vector2(0, 1),
            new Vector2(1, 1)
        };

        //三角形索引
        int[] triangles = new int[] { 0, 2, 1, 2, 3, 1 };

        mesh.vertices = vertices;
        mesh.uv = uv;
        mesh.triangles = triangles;
        mesh.RecalculateBounds( );

        _mf.mesh = mesh;
    }
}
Shader脚本
c
Shader "Unlit/QuadTilingLine"
{
Properties
{
_MainTex ("Texture", 2D) = "white" {}
_Color ("Color", Color) = (1,1,1,1)
_Density ("Density", Float) = 1.0
_ScrollSpeed ("Scroll Speed", Float) = -1.0
}
SubShader
{
Tags { "Queue"="Transparent" "RenderType"="Transparent" }
Blend SrcAlpha OneMinusSrcAlpha
ZWrite Off
Cull Off
Pass
{
CGPROGRAM
#pragma vertex vert
#pragma fragment frag
#include "UnityCG.cginc"
struct appdata { float4 vertex : POSITION; float2 uv : TEXCOORD0; };
struct v2f { float2 uv : TEXCOORD0; float4 vertex : SV_POSITION; };
sampler2D _MainTex;
float4 _MainTex_ST;
float4 _Color;
float _Density;
float _TotalLength;
float _ScrollSpeed;
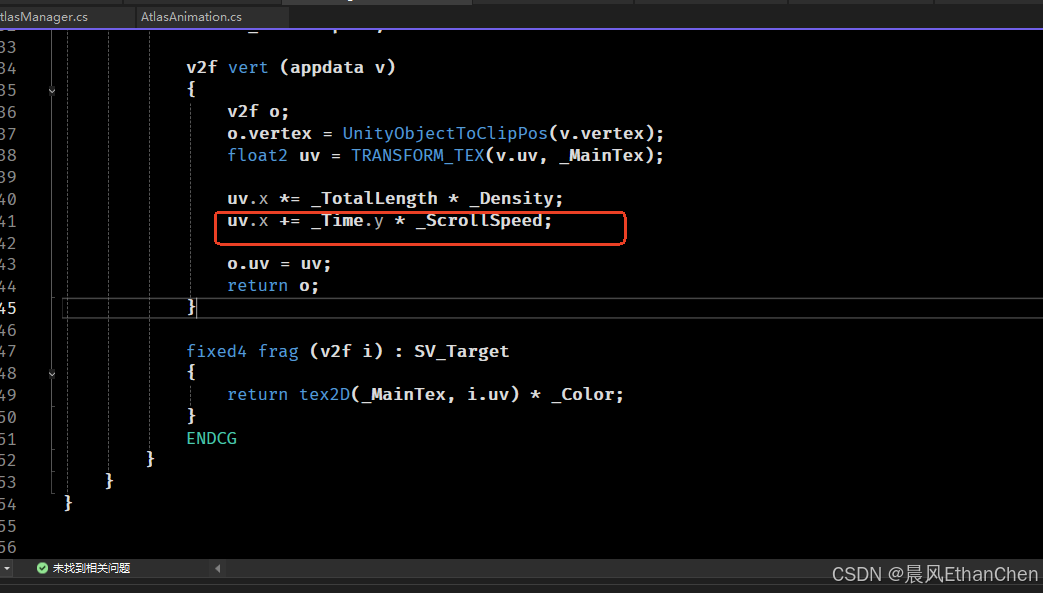
v2f vert (appdata v)
{
v2f o;
o.vertex = UnityObjectToClipPos(v.vertex);
float2 uv = TRANSFORM_TEX(v.uv, _MainTex);
uv.x *= _TotalLength * _Density;
uv.x += _Time.y * _ScrollSpeed;
o.uv = uv;
return o;
}
fixed4 frag (v2f i) : SV_Target
{
return tex2D(_MainTex, i.uv) * _Color;
}
ENDCG
}
}
}原理
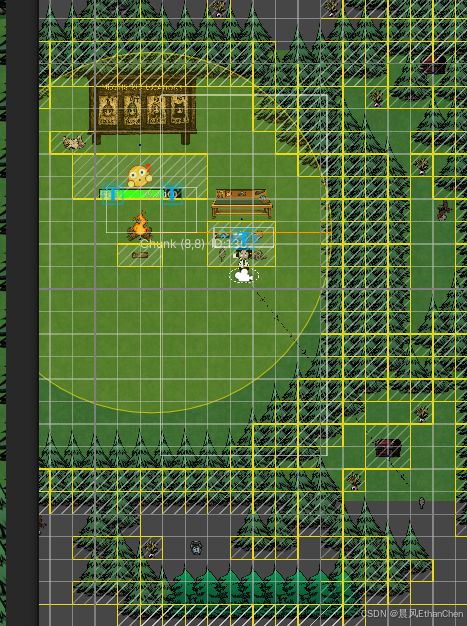
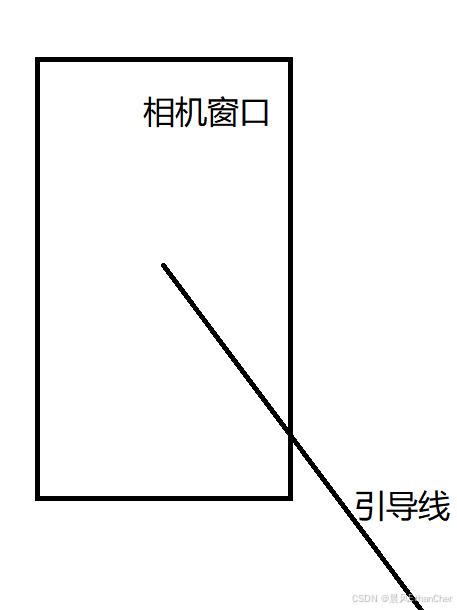
我们不需要真的从地图中心点拉一个 几百米甚至更长的引导路线到目标点, 我们需要通过目标点和自身位置计算一个超出屏幕的向量即可
引导路线如果只是固定的一条线 容易被忽略 所以我们需要让他动起来
在shader里只需要一句简单的滚uv就能让一张图片跑马灯
uv.x += _Time.y * _ScrollSpeed;