1. 构建docker环境
下载官方镜像
拉镜像
python
docker pull colmap/colmap生成容器
docker run -d --name colmap_container --gpus all -v /home/admin/colmap/code:/root/code -p 9000:22 colmap/colmap:latest tail -f /dev/null直接从dockerhub下载镜像,就可以使用colmap的内置命令对文件夹下的图像进行重建,但是实际操作发现这个镜像要求cuda版本是12.9,如果主机的cuda版本不匹配就会导致报错,查看了一下历史的镜像版本,都比较新,也没有说明各自对cuda版本的要求,干脆放弃官方镜像,自己构建镜像。
自己构建镜像
build_container.sh脚本
用docker-compose构建容器:
python
#/bin/bash
cd image/colmap
./build.sh
cd ../..
docker-compose up -d
docker-compose.yml
python
services:
  colmap_custom:
    container_name: colmap_container
    ports:
      - "8888:6666"
    build:
      context: .
    image: colmap_container:v1.0.0
    deploy:
        resources:
            reservations:
                devices:
                  - driver: "nvidia"
                    count: "all"
                    capabilities: ["gpu"]
    restart: always
    command: sh /root/code/run.sh
    volumes:
      - /etc/localtime:/etc/localtime:ro
      - /tmp/.X11-unix:/tmp/.X11-unix
      - /home/admin/colmap/code:/root/code
      - /etc/hosts:/etc/hosts
    environment:
      - DISPLAY
      - QT_X11_NO_MITSHM=1
      - TZ=Asia/Shanghai
      - CONTAINER_TIMEZONE=Asia/Shanghai
    tty: true
build.sh
python
#!/bin/bash
IMAGE_NAME="colmap_container"
IMAGE_TAG="v1.0.0"
DockerID=$(docker images -q $IMAGE_NAME:$IMAGE_TAG)
echo "Query Image ID:" $DockerID
IDcount=${#DockerID}
if [ $IDcount -gt 0 ]; then
    echo "镜像 $IMAGE_NAME:$IMAGE_TAG 存在。"
else
    echo "镜像 $IMAGE_NAME:$IMAGE_TAG 不存在,准备构建镜像。"
    docker build --no-cache -t $IMAGE_NAME:$IMAGE_TAG .
    echo "镜像 $IMAGE_NAME:$IMAGE_TAG 构建完成。"
fi
Dockerfile内容
python
# 使用 Ubuntu 22.04 作为基础镜像
FROM registry.cn-hangzhou.aliyuncs.com/acs/ubuntu:22.04
# FROM ubuntu:22.04

# 设置环境变量,避免交互式配置
ENV DEBIAN_FRONTEND=noninteractive

ENV TZ=Asia/Shanghai

# 更新软件源
RUN sed -i 's@archive.ubuntu.com@mirrors.aliyun.com@g' /etc/apt/sources.list
RUN sed -i 's@security.ubuntu.com@mirrors.aliyun.com@g' /etc/apt/sources.list

# 更新软件包列表并安装必要的依赖
RUN apt-get update
RUN apt-get install -y \
    git \
    vim \
    wget \
    tzdata\
    ntp\
    net-tools \
    sudo \
    ssh \
    python3.10 \
    python3-pip \
    && rm -rf /var/lib/apt/lists/*

RUN mkdir -p /root/dev

RUN pip config set global.index-url https://pypi.tuna.tsinghua.edu.cn/simple/
RUN pip install -i https://pypi.tuna.tsinghua.edu.cn/simple requests
RUN pip install -i https://pypi.tuna.tsinghua.edu.cn/simple flask
RUN pip install -i https://pypi.tuna.tsinghua.edu.cn/simple waitress
RUN ln -sf /usr/bin/python3 /usr/bin/python

# 安装前更新并固定版本
RUN wget https://developer.download.nvidia.com/compute/cuda/repos/ubuntu2204/x86_64/cuda-keyring_1.0-1_all.deb
RUN dpkg -i cuda-keyring_1.0-1_all.deb

RUN apt-get update && \
    apt-get install -y --no-install-recommends \
    cuda-toolkit-11-8=11.8.0-1 \
    libcudnn8=8.6.0.163-1+cuda11.8 \
    libcudnn8-dev=8.6.0.163-1+cuda11.8

ENV PATH="/usr/local/cuda/bin:${PATH}"
ENV LD_LIBRARY_PATH="/usr/local/cuda/lib64:${LD_LIBRARY_PATH}"
WORKDIR /root
# ssh服务配置
RUN mkdir /var/run/sshd
ARG USERNAME=root
ARG PASSWORD=123
RUN echo $USERNAME:$PASSWORD | chpasswd \
&& echo "$USERNAME ALL=(ALL) NOPASSWD:ALL" >> /etc/sudoers
RUN sed -i 's/#Port 22/Port 6666/' /etc/ssh/sshd_config
RUN sed -i 's/#PermitRootLogin prohibit-password/PermitRootLogin yes/' /etc/ssh/sshd_config
EXPOSE 6666
2. 源码编译
执行build_container.sh构建容器,然后进入容器。下载colmap-3.13.0版本代码,解压到code路径下。编译源代码的全部流程:
git clone https://github.com/colmap/colmap.git
cd colmap
mkdir build
cd build
cmake .. -GNinja -DBLA_VENDOR=Intel10_64lp
ninja
sudo ninja install在执行cmake .. -GNinja -DBLA_VENDOR=Intel10_64lp和ninja时可能会报下面的错误,如果遇到相同的错误按照提供的方法解决即可。
问题1
报freeimage错误
python
CMake Error in src/colmap/sensor/CMakeLists.txt:
  Imported target "freeimage::FreeImage" includes non-existent path

    "/root/code/colmap/FREEIMAGE_INCLUDE_DIRS-NOTFOUND"

  in its INTERFACE_INCLUDE_DIRECTORIES.  Possible reasons include:

  * The path was deleted, renamed, or moved to another location.

  * An install or uninstall procedure did not complete successfully.

  * The installation package was faulty and references files it does not
  provide.
解决方法:
python
sudo apt-get install libfreeimage-dev # Debian/Ubuntu问题2
报cuda错误
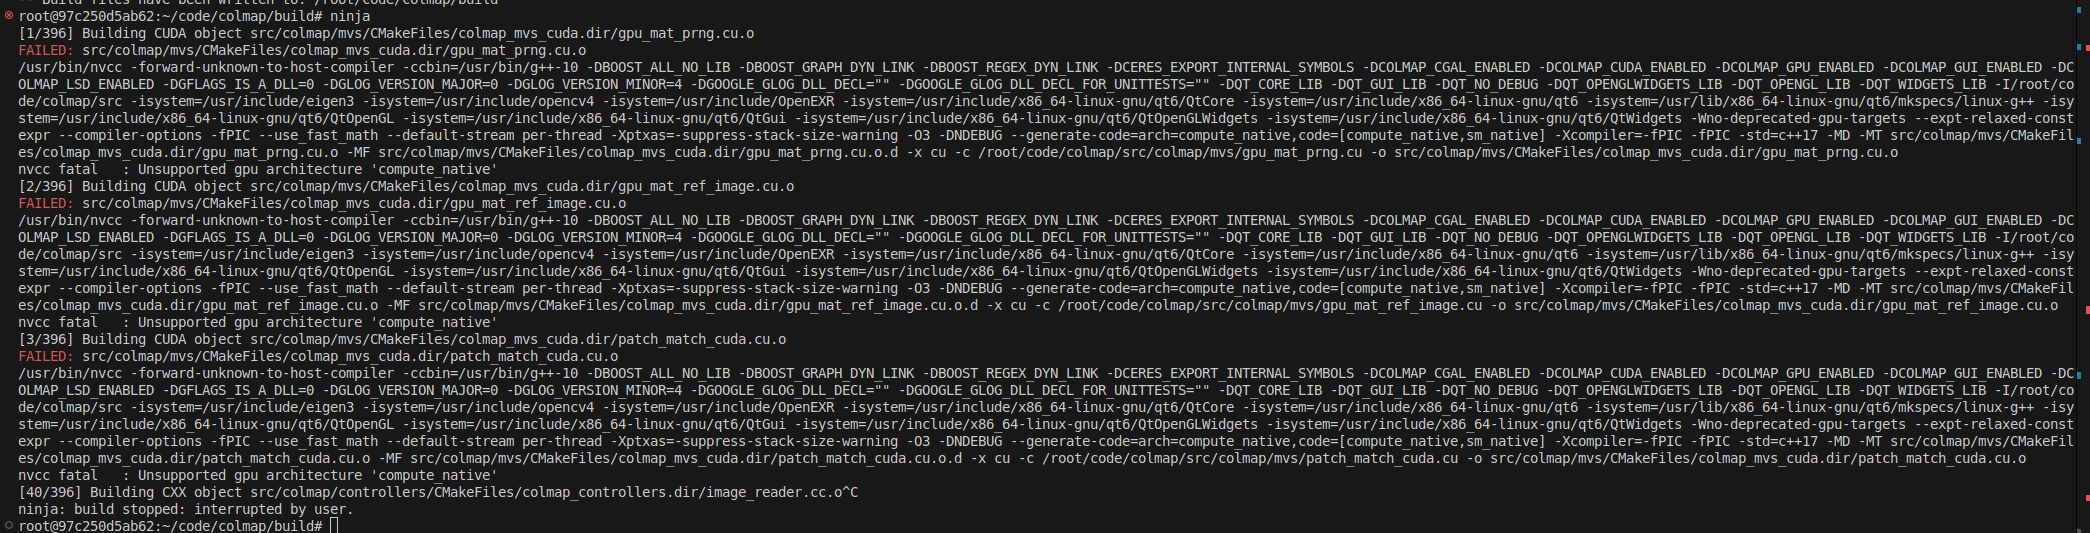
解决方法
python
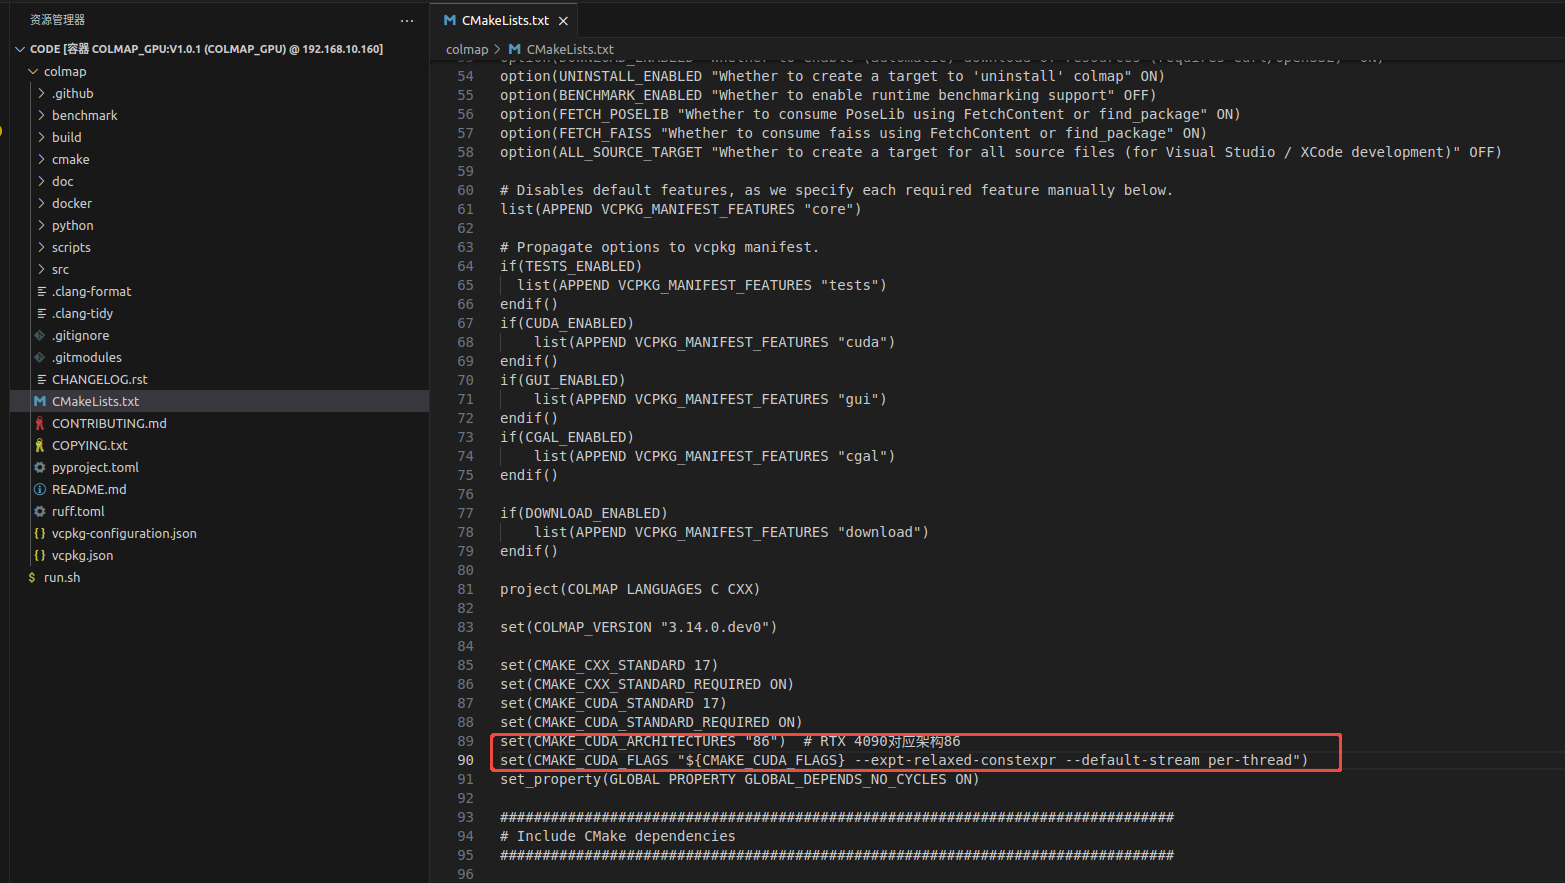
# 在CMakeLists.txt中添加显卡架构配置
set(CMAKE_CUDA_ARCHITECTURES "86")  # RTX 4090对应架构86
set(CMAKE_CUDA_FLAGS "${CMAKE_CUDA_FLAGS} --expt-relaxed-constexpr --default-stream per-thread")
注意:这里架构要根据实际显卡来配置
问题3
报openexr错误解决方法
如果openexr存在,需要先卸载再安装
python
apt purge -y libopenexr-dev libilmbase-dev
apt autoremove -y
apt clean
sudo apt-get install -y libopenexr-dev
问题4
报OpenImageIO错误解决方法
python
sudo apt-get install libopenimageio-dev问题5
报QT错误
python
CMake Error at cmake/FindDependencies.cmake:201 (find_package):
  Could not find a package configuration file provided by "QT" with any of
  the following names:

    Qt5Config.cmake
    qt5-config.cmake
    Qt6Config.cmake
    qt6-config.cmake

  Add the installation prefix of "QT" to CMAKE_PREFIX_PATH or set "QT_DIR" to
  a directory containing one of the above files.  If "QT" provides a separate
  development package or SDK, be sure it has been installed.
Call Stack (most recent call first):
  CMakeLists.txt:112 (include)
解决方法
python
sudo apt-get install \
    qt6-base-dev \
    libqt6opengl6-dev \
    libqt6openglwidgets6
安装完发现生成了新文件,编译的时候就可以找到相应的库了:
/usr/lib/x86_64-linux-gnu/cmake/Qt6/Qt6Config.cmake
验证安装是否成功
基础验证
python
colmap -h进阶验证
准备好images图像,执行下面指令
python
colmap feature_extractor \
  --database_path /root/code/colmap-test/database.db \
  --image_path /root/code/colmap-test/images

colmap exhaustive_matcher \
  --database_path /root/code/colmap-test/database.db

colmap mapper \
  --database_path /root/code/colmap-test/database.db \
  --image_path /root/code/colmap-test/images \
  --output_path /root/code/colmap-test/sparse

colmap image_undistorter \
  --image_path /root/code/colmap-test/images \
  --input_path /root/code/colmap-test/sparse/0 \
  --output_path /root/code/colmap-test/dense \
  --output_type COLMAP

colmap patch_match_stereo \
  --workspace_path /root/code/colmap-test//dense  \
  --workspace_format COLMAP \
  --PatchMatchStereo.geom_consistency true

colmap stereo_fusion \
  --workspace_path /root/code/colmap-test/dense  \
  --workspace_format COLMAP \
  --input_type geometric \
--output_path /root/code/colmap-test/dense/fused.ply到这里实际上已经可以用colmap进行三维重建了,只是无法单步调试源码。
3. 源码编译调试
VScode环境安装
在插件扩展中安装cmake、C++和gdb
配置CMake
按快捷键 Ctrl+Shift+P,输入 CMake: Configure,回车
选择你的编译器(比如 GCC 11.4.0 x86_64-linux-gnu),回车
打开CMakeLists.txt,然后点击Ctrl+S,检查.vscode文件夹下是否存在settings.json,如果没有可以手动创建,并按照下面内容将源码路径配置进去:
python
{
    "cmake.sourceDirectory": "/root/code/colmap-3.13.0"
}
配置launch.json
按快捷键 Ctrl+Shift+D 打开运行和调试面板;
点击 创建 launch.json 文件 → 选择 C++ (GDB/LLDB) → 选择 默认配置;
将自动生成的 launch.json 替换为以下内容(适配你的路径)
C++
{
    // 使用 IntelliSense 了解相关属性。
    // 悬停以查看现有属性的描述。
    // 欲了解更多信息,请访问: https://go.microsoft.com/fwlink/?linkid=830387
    "version": "0.2.0",
    "configurations": [
        {
            "name": "(gdb) 调试示例",
            "type": "cppdbg",
            "request": "launch",
            "program": "${workspaceFolder}/build/src/colmap/exe/colmap", // 你的可执行文件路径
            "args": ["feature_extractor", "--database_path", "/root/code/colmap-test/sh24/database.db", "--image_path", "/root/code/colmap-test/sh24/images"], // 调试时传入的参数,对应你的--message
            "stopAtEntry": false,
            "cwd": "${workspaceFolder}",
            "environment": [],
            "externalConsole": false,
            "MIMode": "gdb",
            "setupCommands": [
                {
                    "description": "为 gdb 启用整齐打印",
                    "text": "-enable-pretty-printing",
                    "ignoreFailures": true
                }
            ],
            "preLaunchTask": "build"
        }

    ]
}
配置tasks.json
在 VSCode 中,打开项目根目录(${workspaceFolder})。
按下 Ctrl+Shift+P打开命令面板。
输入 Tasks: Configure Task 并选择它,然后选择 Create tasks.json file from template。
在弹出的模板列表中,选择适合您项目的模板,例如 Others 来创建一个自定义任务。
在生成的 tasks.json 文件中,修改或添加一个"label"为"build"的任务。以下是一个编译 C++ 项目的示例:
C++
{
    "version": "2.0.0",
    "tasks": [
    {
    "label": "build",
    "type": "shell",
    "command": "cd build && cmake --build . -j22",
    "group": {
    "kind": "build",
    "isDefault": true
    },
    "presentation": {
    "echo": true,
    "reveal": "always",
    "focus": false,
    "panel": "shared"
    },
    "problemMatcher": [
    "$gcc"
    ]
    }
    ]
}然后按F5报错误:"Unable to determine path to debugger. Please specify the 'MIDebuggerPath' option"表明VS Code无法自动定位gdb调试器的安装路径。虽然您在launch.json中已经指定了"MIMode": "gdb",但缺少具体的调试器路径配置。
在终端中运行以下命令查找gdb路径:
python
which gdb如果没有输出,说明没有安装gdb,需要安装
python
sudo apt-get update
sudo apt-get install gdb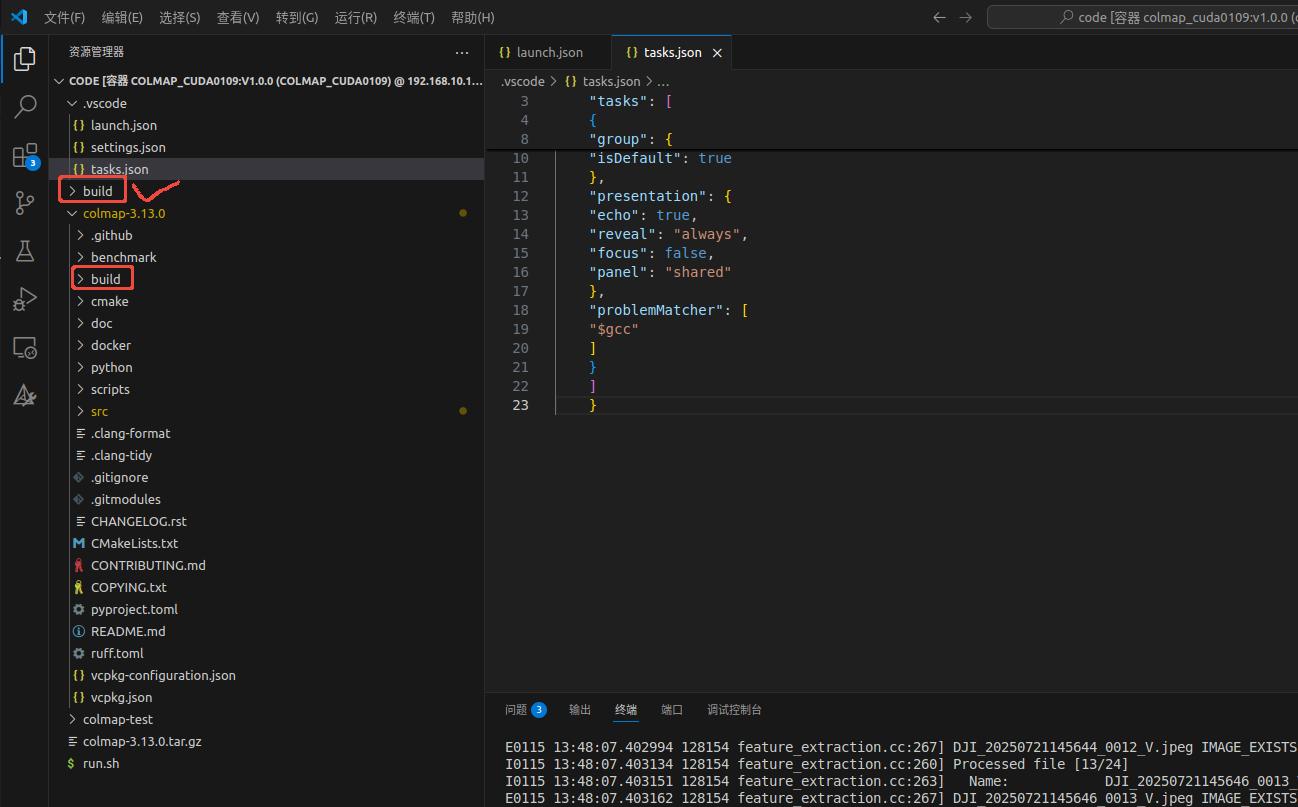
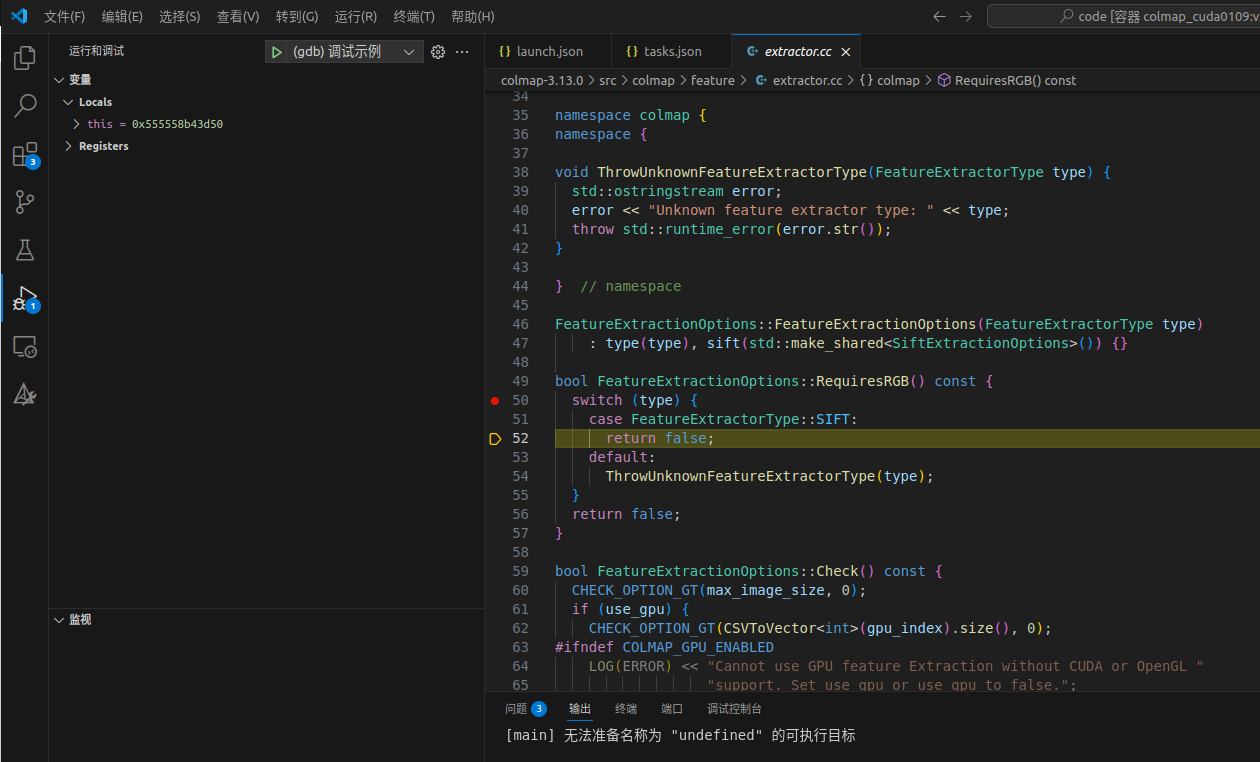
到这里按F5已经可以正常执行特征提取了,注意这里编译的都在根目录,而不是源码内部那个
打上断点后发现已经可以正常调试了,这样后面想要优化colmap就方便了