Qdrant (发音类似 "Quadrant") 是目前向量数据库领域增长最快、口碑最好的开源项目之一。
如果你正在寻找一个既有 Chroma 的易用性,又有 Milvus 的高性能,还原生支持混合检索的数据库,Qdrant 是不二之选。
核心定位
- 语言 :完全用 Rust 编写(这意味着:极快、内存安全、极其稳定)。
- 定位:面向生产环境的高性能向量搜索引擎。
- 核心算法:基于 HNSW (Hierarchical Navigable Small World) 算法,并进行了大量的工程优化。
核心优势
性能怪兽 (Rust Power)
相比于 Python 编写的 Chroma,Qdrant 的底层是用 Rust 写的。在高并发查询、大规模数据写入时,它的 CPU 利用率和内存控制非常出色。即使是单机运行 Docker,也能轻松处理千万级向量。
原生混合检索 (Hybrid Search)
这是 Qdrant 的杀手锏之一。
- 它不依赖 LlamaIndex 的外部拼接,而是在数据库内核层面支持 Dense Vector (语义) + Sparse Vector (关键词/BM25) 的融合。
- 只需要在查询时调整一个参数,就能同时享受语义搜索和关键词匹配的优势。
强大的过滤机制 (Payload Filtering)
在 Faiss 中,如果你想"只搜 2023 年的文件",通常很慢。
Qdrant 实现了带过滤的 HNSW。它会在搜索向量索引的同时,利用元数据索引进行过滤(Pre-filtering),速度几乎没有损失。
灵活的部署模式
这一点让它极具竞争力:
- 本地模式 (Local) :像 Chroma 一样,支持内存模式或单文件存储(
location=":memory:"),适合测试。 - Docker 模式:一个镜像就能跑,运维极简。
- 分布式模式:支持分片 (Sharding) 和 副本 (Replicas),可以水平扩展处理亿级数据。
- 云服务 (SaaS):提供托管云。
量化技术 (Quantization)
为了省钱(省内存),Qdrant 内置了向量压缩技术:
- Scalar Quantization (int8):将浮点数压缩 4 倍,精度损失极小。
- Binary Quantization:极致压缩,处理超大规模数据(如 OpenAI 的 3072 维向量)非常有效。
核心概念对比
如果用过关系型数据库或 Chroma,对应关系如下:
| 概念 | 关系型数据库 (MySQL) | Chroma | Qdrant |
|---|---|---|---|
| 库 | Database | Client | Cluster / Client |
| 表 | Table | Collection | Collection |
| 行 | Row | Document | Point |
| 列 | Column | Metadata | Payload |
| ID | Primary Key | ID (str) | ID (int/uuid) |
Point (点) 是 Qdrant 里的基本单元,它包含:
- Vector: 向量数据(可以是多个,如 dense + sparse)。
- Payload : JSON 格式的元数据(如
{"author": "老王", "year": 2045})。
部署与安装
前置准备:
- 第三方大模型 apikey,我用的是 closeai
- docker 部署,本地或者云服务器,我用的是阿里云
- conda 环境
创建 conda 环境并激活
conda create --name qdrant python=3.10安装库
bash
pip install qdrant-client方式一:Python 本地模式
不需要 Docker,代码:
python
from qdrant_client import QdrantClient
# 内存模式
client = QdrantClient(":memory:")
# 或者磁盘模式
# client = QdrantClient(path="./qdrant_db")
方式二:Docker
bash
docker run -p -d 6333:6333 qdrant/qdrantQdrant 启动极快,通常几秒钟就好。它自带一个非常漂亮的 Web UI 仪表盘(访问 http://localhost:6333/dashboard),可以查看集合状态和数据。
案例
入门案例
- 建立连接,创建客户端
- 选择 collection
- 插入数据
- 余弦相似度检索
python
from qdrant_client import QdrantClient
from qdrant_client.models import Distance, VectorParams, PointStruct
# 内存模式
# client = QdrantClient(":memory:")
# 磁盘模式
# client = QdrantClient(path="./qdrant_db")
# docker 部署
client = QdrantClient("8.148.xxx.xxx", port=6333)
# 创建一个集合 (Collection)
# 假设我们的向量维度是 4 (实际应用通常是 768 或 1536)
client.create_collection(
collection_name="test_qdrant",
vectors_config=VectorParams(size=4, distance=Distance.COSINE),
)
# 插入数据 (Vectors + Payload)
operation_info = client.upsert(
collection_name="test_qdrant",
wait=True,
points=[
PointStruct(id=1, vector=[0.05, 0.61, 0.76, 0.74], payload={"city": "哈利波特", "price": 10}),
PointStruct(id=2, vector=[0.19, 0.81, 0.75, 0.11], payload={"city": "白夜行", "price": 20}),
PointStruct(id=3, vector=[0.36, 0.55, 0.47, 0.94], payload={"city": "福尔摩斯", "price": 30}),
],
)
# 搜索相似向量
search_result = client.query_points(
collection_name="test_qdrant",
query=[0.2, 0.1, 0.9, 0.7],
limit=3,
).points
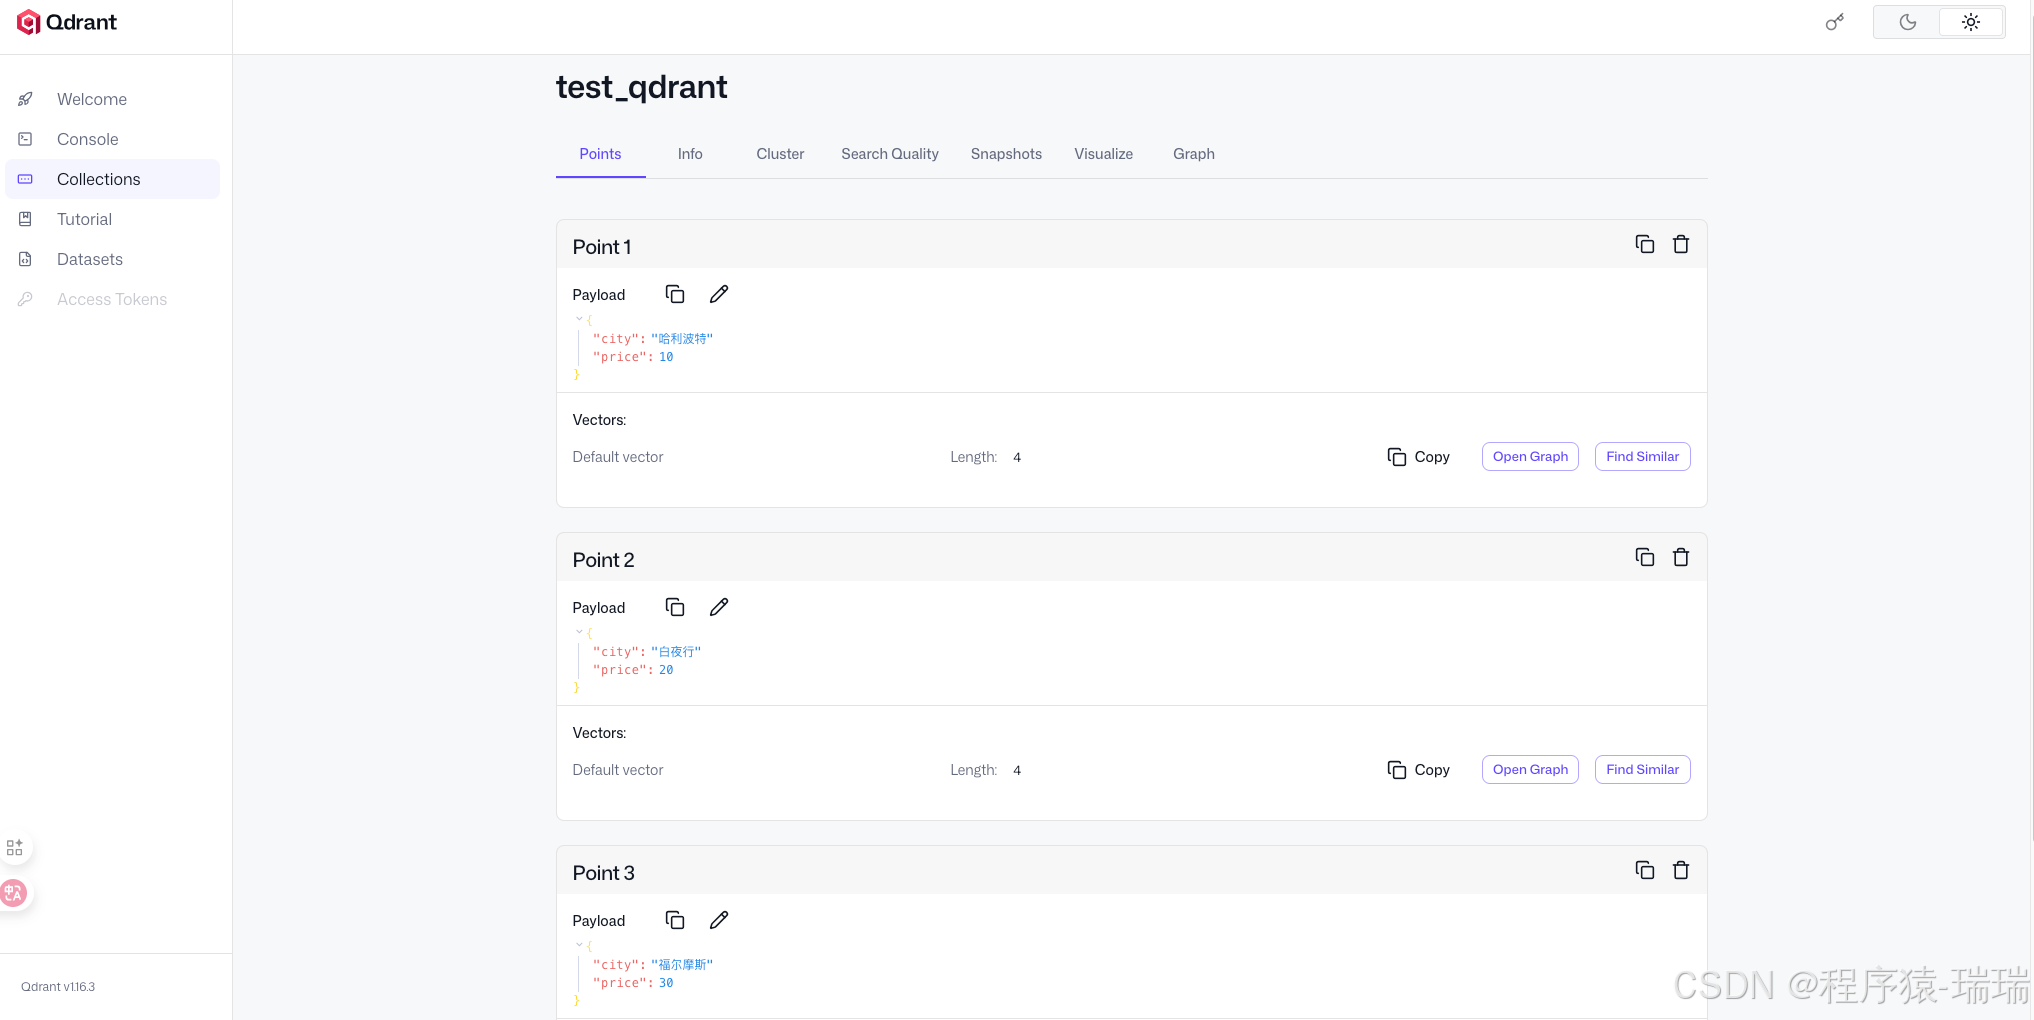
print(search_result)输出:
text
[ScoredPoint(id=1, version=1, score=0.89463294, payload={'city': '哈利波特', 'price': 10}, vector=None, shard_key=None, order_value=None), ScoredPoint(id=3, version=1, score=0.83872515, payload={'city': '福尔摩斯', 'price': 30}, vector=None, shard_key=None, order_value=None), ScoredPoint(id=2, version=1, score=0.66603535, payload={'city': '白夜行', 'price': 20}, vector=None, shard_key=None, order_value=None)]页面上查看数据(这点比 chroma 方便多了):
封装工具类
安装依赖
	pip install openai
	pip install fastembed
python
from openai import OpenAI
from qdrant_client import QdrantClient


def get_client():
    client = QdrantClient("8.148.xxx.xxx", port=6333)
    return client

def get_embedding(text):
    # 自己调用外部模型生成向量
    openai_client = OpenAI(
        base_url='https://api.openai-proxy.org/v1',
        api_key='sk-jadDA8KhkA0EQLuZebU1F8R90g......',
    )
    response = openai_client.embeddings.create(input=text, model="text-embedding-3-large")
    vector = response.data[0].embedding
    return vector
指定 embedding 模型
Qdrant 只负责存,不负责算。我们需要自己写代码调用模型,拿到向量后再然后存入 Qdrant。
FastEmbed
Qdrant 的 Python 客户端集成了一个轻量级库 FastEmbed。不需要调用 OpenAI 或 HuggingFace 的 API,只需在代码里告诉 Qdrant 客户端要用什么模型,它会自动下载模型并在本地 CPU 上运行。
代码:
python
from qdrant_client import QdrantClient
from qdrant_utils import get_client

client: QdrantClient = get_client()

# 指定模型名称
# Qdrant 默认使用 'BAAI/bge-small-en-v1.5',但也支持中文模型
# 这里我们指定一个支持中文的模型,例如 BAAI 的 bge-small-zh-v1.5
collection_name = "fast_embed"
client.set_model("BAAI/bge-small-zh-v1.5")

# 添加数据,这里直接传 documents 文本
# 客户端会自动在后台调用模型将这些文本转为向量
client.add(
    collection_name=collection_name,
    documents=[
        "Qdrant 是一个向量数据库",
        "人工智能正在改变世界",
        "今天天气真不错",
    ],
    metadata=[
        {"source": "doc1"},
        {"source": "doc2"},
        {"source": "doc3"},
    ]
)

# 搜索
results = client.query(
    collection_name=collection_name,
    query_text="什么是向量库?",
    limit=1
)

for r in results:
    print(f"找到文档: {r.document}, 分数: {r.score}")
输出:
找到文档: Qdrant 是一个向量数据库, 分数: 0.82362455注意:
add 和 query 已经过时了,官方推荐使用 upsert 和 query_points
自定义外部模型
用 OpenAI (text-embedding-3-large),或者本地部署的 Ollama,或者 GPU 加速的大型 PyTorch 模型生成的 embedding,Qdrant 不关心你用了什么模型,只要向量维度对得上就行。
- 封装方法专门将 text 调用模型转为 embedding
- 使用的是 closeai 的第三方api 服务
- 写在前面的工具类里
- 封装方法写入 Qdrant
- 封装方法查询 Qdrant
- 为什么要封装方法?
- 因为 Qdrant 只是个向量数据库,如果存入的向量不是同一个embedding 模型生成的,那么查询就牛头不对马嘴
- 所以必须使用同个 embedding 模型!
python
from qdrant_client import QdrantClient
from qdrant_client.conversions.common_types import PointStruct
from qdrant_client.http.models import VectorParams, Distance

from qdrant_utils import get_client, get_embedding


def insert_text(client, collection_name, text):
    # 生成 embedding
    vector = get_embedding(text)

    # 向量的维度
    vector_size = len(vector)
    print("embedding 维度大小:", vector_size)

    if not client.collection_exists(collection_name):
        # 创建 collection
        client.create_collection(
            collection_name=collection_name,
            vectors_config=VectorParams(size=vector_size, distance=Distance.COSINE),
        )

    # 存入 Qdrant
    client.upsert(
        collection_name=collection_name,
        points=[
            PointStruct(id=1, vector=vector, payload={"text": text})
        ]
    )


def search_text(client, collection_name, question):
    vector = get_embedding(question)

    # 搜索
    results = client.query_points(
        collection_name=collection_name,
        query=vector,
        limit=1
    ).points

    print(results)

    for r in results:
        print(f"找到文档: {r.payload}, 分数: {r.score}")


if __name__ == '__main__':
    # 获取客户端
    client: QdrantClient = get_client()

    # 定义 collection 名
    collection_name = "openai_embed"

    # 要写入的文本
    text = "Qdrant 性能很强"

    # 写入 Qdrant
    insert_text(client, collection_name, text)

    # 查询 Qdrant
    search_text(client, collection_name, "什么是向量库?")
输出:
text
embedding 维度大小: 3072
[ScoredPoint(id=1, version=2, score=0.17980154, payload={'text': 'Qdrant 性能很强'}, vector=None, shard_key=None, order_value=None)]
找到文档: {'text': 'Qdrant 性能很强'}, 分数: 0.17980154
页面操作
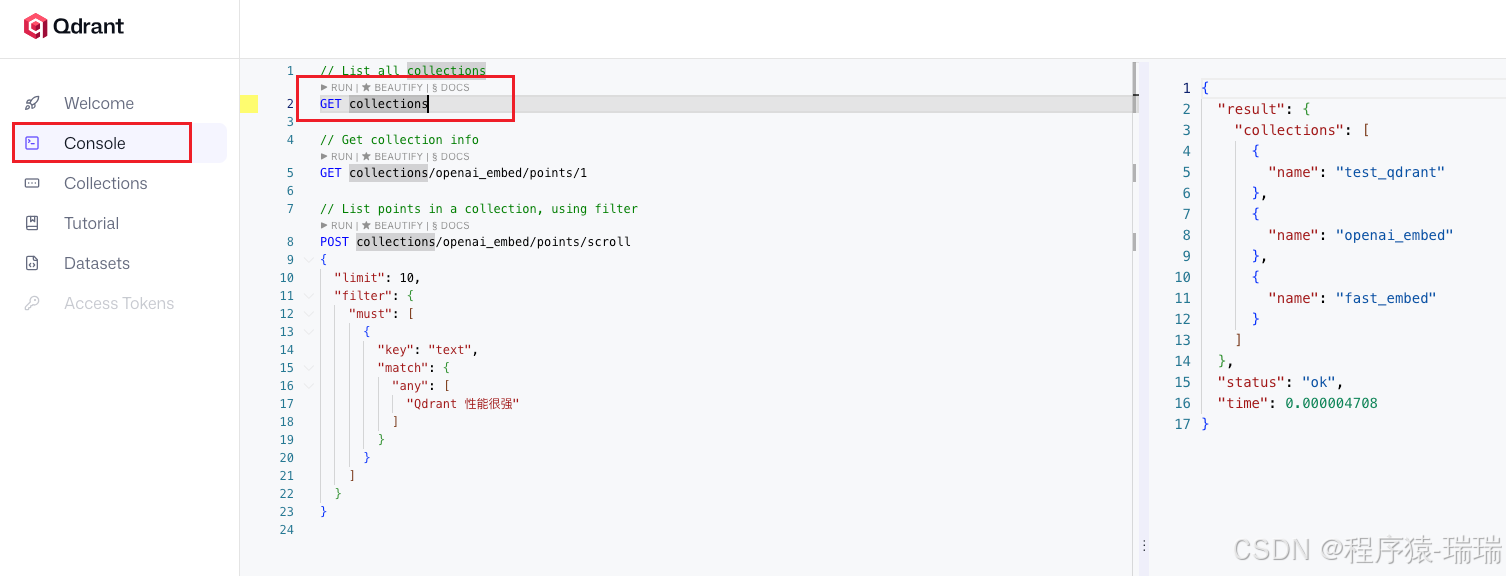
在 Qdrant 的后台页面上,可以直接编写 REST API 请求 。这个和 elasticsearch 很像
1、获取所有 collection
GET collections前面代码创建的 collection 在右边都能查询出来
2、创建 collection
创建一个名字叫star_charts的 collection
PUT collections/star_charts
{
  "vectors": {
    "size": 4,
    "distance": "Dot"
  }
}
3、插入数据
PUT collections/star_charts/points
{
  "points": [
    {
      "id": 1,
      "vector": [0.05, 0.61, 0.76, 0.74],
      "payload": {
        "colony": "Mars"
      }
    },
    {
      "id": 2,
      "vector": [0.19, 0.81, 0.75, 0.11],
      "payload": {
        "colony": "Jupiter"
      }
    },
    {
      "id": 3,
      "vector": [0.36, 0.55, 0.47, 0.94],
      "payload": {
        "colony": "Venus"
      }
    },
    {
      "id": 4,
      "vector": [0.18, 0.01, 0.85, 0.80],
      "payload": {
        "colony": "Moon"
      }
    },
    {
      "id": 5,
      "vector": [0.24, 0.18, 0.22, 0.44],
      "payload": {
        "colony": "Pluto"
      }
    }
  ]
}
4、查询数据
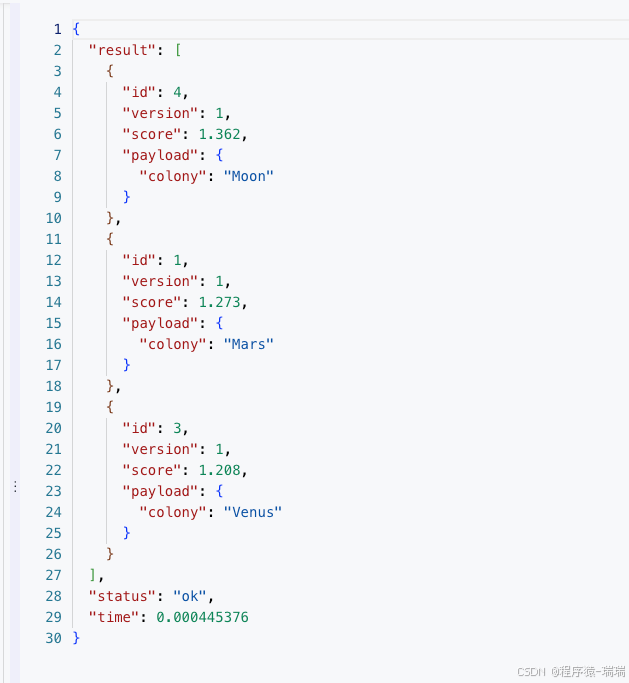
向量查询
POST collections/star_charts/points/search
{
  "vector": [0.2, 0.1, 0.9, 0.7],
  "limit": 3,
  "with_payload": true
}
结果:
分页查询全部
POST /collections/star_charts/points/scroll
{
  "limit": 10,
  "with_payload": true,
  "with_vector": false
}
5、删除 collection
DELETE collections/star_chartsAPI操作
前面的页面操作一般还是测试、开发阶段使用
- 创建 collection、查询、插入前面都已经有了,这里试一下删除
python
from qdrant_client.http.models import PointIdsList

from qdrant_utils import get_client

client = get_client()

"""
    删除 collection
"""
success = client.delete_collection("test_qdrant")
print("删除 collection 是否成功:", success)


"""
    删除 指定 id 的数据
    points_selector 接收一个 ID 列表
"""
client.delete(
    collection_name="openai_embed",
    points_selector=PointIdsList(
        points=[1]  # 要删除的 ID 列表
    ),
    wait=True  # True 表示等待服务器确认删除完成
)
print("ID 为 1 的数据已删除")
混合检索 (Hybrid Search)
场景 :单纯的向量搜索(Dense Vector)有时候不准,特别是搜索专有名词、序列号或完全匹配时。
解法 :结合 语义搜索 (Vectors) + 关键词匹配 (Sparse Vectors / BM25)。
Qdrant 支持在一个集合里同时存储"密集向量"(用于理解语义)和"稀疏向量"(用于关键词匹配),并在搜索时融合结果。
测试数据生成脚本
整体思路:
- 创建两个集合(collection),一个放语义+关键词,一个放语义(用于对比)
- 删除旧数据
- 自己模拟一批数据
- 写入两个 collection
- 打印collection 信息
write_to_qdrant方法
- 判断是只有语义还是有语义有关键词
- 只有语义
- 创建 collection,向量名:text-dense
- 调用 get_embedding 获取向量
- 写入
- 语义+关键词
- 创建 collection,语义向量名:text-dense,关键词向量名:text-sparse
- 调用 get_embedding 获取向量
- 调用
Qdrant/bm25生成稀疏向量 - 写入
- 只有语义
python
import qdrant_client.http.models as models
from fastembed import SparseTextEmbedding

from qdrant_utils import get_client, get_embedding


def write_to_qdrant(client, docs, collection_name, open_sparse=True):
    documents = []

    # 开启 稀疏向量
    if open_sparse:
        print("正在计算 BM25 向量...")
        sparse_model = SparseTextEmbedding(model_name="Qdrant/bm25")
        sparse_embeddings = list(sparse_model.embed(docs))

        for i, doc in enumerate(docs):
            # 获取刚刚算好的对应稀疏向量
            s_vec = sparse_embeddings[i]

            # 构造 Point
            point = models.PointStruct(
                id=i + 1,
                vector={
                    # Dense 部分
                    "text-dense": get_embedding(doc),

                    # Sparse 部分:构造 SparseVector 对象
                    # 注意:这里的 key "text-sparse" 必须和你 create_collection 里的配置一致
                    "text-sparse": models.SparseVector(
                        indices=s_vec.indices.tolist(),
                        values=s_vec.values.tolist()
                    )
                },
                payload={"text": doc}
            )
            documents.append(point)

        # 创建混合检索的 collection
        client.create_collection(
            collection_name=collection_name,
            vectors_config={
                "text-dense": models.VectorParams(size=3072, distance=models.Distance.COSINE),  # 语义向量
            },
            sparse_vectors_config={
                "text-sparse": models.SparseVectorParams(
                    index=models.SparseIndexParams(),
                    modifier=models.Modifier.IDF  # 开启 IDF 修正,对 BM25 很重要
                ),  # 关键词向量 (BM25)
            }
        )

    else:
        for i, doc in enumerate(docs):
            # 构造 Point
            point = models.PointStruct(
                id=i + 1,
                vector={
                    # Dense 部分
                    "text-dense": get_embedding(doc),
                },
                payload={"text": doc}
            )
            documents.append(point)

        # 创建只有语义的 collection,用于对比
        client.create_collection(
            collection_name=collection_name,
            vectors_config={
                "text-dense": models.VectorParams(size=3072, distance=models.Distance.COSINE),  # 语义向量
            }
        )

    # 存入 Qdrant
    client.upsert(
        collection_name=collection_name,
        points=documents
    )

    print(f"成功插入【{collection_name}】 {len(documents)} 条数据!")


def print_collection_info(collection_name):
    # 打印两个 collection 的信息
    info = client.get_collection(collection_name)
    print(f"=== {collection_name} 向量配置 ===")
    print(info.config.params.vectors)
    print("=== 稀疏向量配置 ===")
    print(info.config.params.sparse_vectors)

    print()


def delete_collections(client, collection_name):
    # 先删除旧数据
    success = client.delete_collection(collection_name)
    print(f"删除 {collection_name} 是否成功:", success)


if __name__ == '__main__':
    # 配置
    collection_name_1 = "hybrid_search_test_1"
    collection_name_2 = "hybrid_search_test_2"

    # 客户端
    client = get_client()

    # 删除旧数据
    delete_collections(client, collection_name_1)
    delete_collections(client, collection_name_2)

    # 用于精准测试的数据
    docs = [
        "老王的手机是一加14,他很喜欢",
        "老方不喜欢苹果手机",
        "医疗设备,Medical Device",
        "Python 高性能优化技巧",
        "Qdrant 常见问题及解决方案",
        "Django 入门级语法教程",
        "苹果 手机 性能优化技巧",
        "MySQL 与 Redis 性能对比",
        "Python 机器学习 实战",
        "Python 语法教程 机器学习工具安装"
    ]
    # 写入
    write_to_qdrant(client, docs, collection_name_1)
    write_to_qdrant(client, docs, collection_name_2, False)

    # 打印collection 信息
    print_collection_info(collection_name_1)
    print_collection_info(collection_name_2)
输出:
删除 hybrid_search_test_1 是否成功: True
删除 hybrid_search_test_2 是否成功: True
正在计算 BM25 向量...
成功插入【hybrid_search_test_1】 10 条数据!
成功插入【hybrid_search_test_2】 10 条数据!
=== hybrid_search_test_1 向量配置 ===
{'text-dense': VectorParams(size=3072, distance=<Distance.COSINE: 'Cosine'>, hnsw_config=None, quantization_config=None, on_disk=None, datatype=None, multivector_config=None)}
=== 稀疏向量配置 ===
{'text-sparse': SparseVectorParams(index=SparseIndexParams(full_scan_threshold=None, on_disk=None, datatype=None), modifier=<Modifier.IDF: 'idf'>)}

=== hybrid_search_test_2 向量配置 ===
{'text-dense': VectorParams(size=3072, distance=<Distance.COSINE: 'Cosine'>, hnsw_config=None, quantization_config=None, on_disk=None, datatype=None, multivector_config=None)}
=== 稀疏向量配置 ===
None
可以看到,hybrid_search_test_1有语义和关键词,而hybrid_search_test_2只有语义
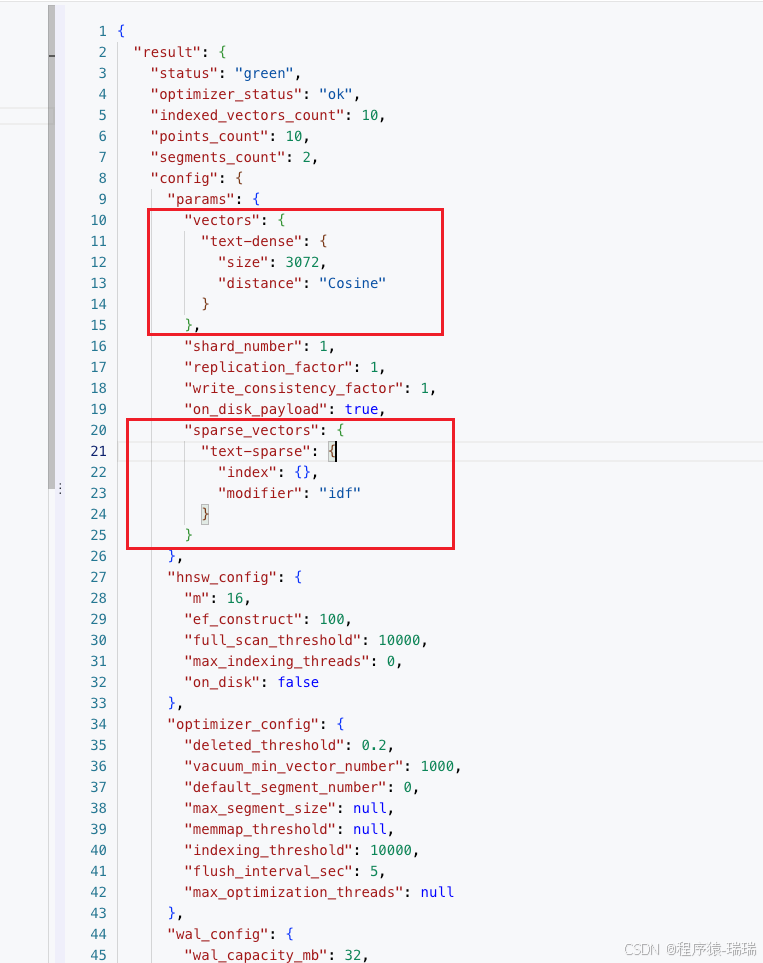
也可以在页面执行GET collections/hybrid_search_test_1验证是否开启了混合检索
有这两个即可:
注意:
- 这个案例用的 embedding 模型是第三方的,也可以用Qdrant 内置的模型
- 插入时,如果用 add(官方不推荐了),可以省去创建 collection,同时还会帮我们创建语义+关键词的 vector,但是只能用内置的embedding 模型
- 同理查询时,用 query(也是官方不推荐),会直接用语义+关键词查询,也是只能用内置的 embedding 模型
查询案例
python
from qdrant_client import models

from qdrant_utils import get_client, get_embedding

client = get_client()

collection_name_1 = "hybrid_search_test_1"
collection_name_2 = "hybrid_search_test_2"

dense_name = "text-dense"
sparse_name = "text-sparse"


def test_query_hybrid(query_text, embeddings, collection_name, query_mode):
    print(f"\n---【{collection_name}】{query_mode}: '{query_text}' ---")
    prefetch = []
    """
        不同查询情况
        hybrid = dense + sparse
        dense = dense
        sparse = sparse
    """
    if query_mode in ["hybrid", "dense"]:
        # --- Dense ---
        dense_query = models.Prefetch(
            query=embeddings,  # 这里直接传计算好的embedding
            using=dense_name,
        )
        prefetch.append(dense_query)
    if query_mode in ["hybrid", "sparse"]:
        # --- Sparse ---
        sparse_query = models.Prefetch(
            query=models.Document(text=query_text, model="Qdrant/bm25"),
            using=sparse_name,
        )
        prefetch.append(sparse_query)

    results = client.query_points(
        collection_name=collection_name,
        query=models.FusionQuery(
            fusion=models.Fusion.RRF  # 使用 RRF 混合检索
        ),
        prefetch=prefetch,
        limit=5,
    ).points

    for r in results:
        # 打印分数和文本
        print(f"[Score: {r.score:.4f}] {r.payload['text']}")


def test_query(text):
    embeddings = get_embedding(text)
    """
        collection_2 没有存储 sparse数据,查询会报错:
        b'{"status":{"error":"Wrong input: Not existing vector name error: text-sparse"},"time":0.000474709}'
    """
    # test_query_hybrid(text, embeddings, collection_name_2, "hybrid")

    test_query_hybrid(text, embeddings, collection_name_1, "hybrid")
    test_query_hybrid(text, embeddings, collection_name_1, "sparse")
    test_query_hybrid(text, embeddings, collection_name_2, "dense")


if __name__ == '__main__':
    test_query("Python 代码提速方法")
    test_query("如何解决 Qdrant 查询慢的问题")
    test_query("苹果为什么是甜的")
输出:
- hybrid查询的分数融合了两边(语义+关键词)的分数
- sparse的第三个问题的查询没有匹配到结果,但是用"苹果 为什么是甜的"就能匹配到,说明对中文好像还是切词没那么准
text
---【hybrid_search_test_1】hybrid: 'Python 代码提速方法' ---
[Score: 1.0000] Python 高性能优化技巧
[Score: 0.6667] Python 语法教程 机器学习工具安装
[Score: 0.5000] Python 机器学习 实战
[Score: 0.2000] 苹果 手机 性能优化技巧
[Score: 0.1667] Django 入门级语法教程

---【hybrid_search_test_1】sparse: 'Python 代码提速方法' ---
[Score: 0.5000] Python 高性能优化技巧
[Score: 0.3333] Python 语法教程 机器学习工具安装
[Score: 0.2500] Python 机器学习 实战

---【hybrid_search_test_2】dense: 'Python 代码提速方法' ---
[Score: 0.5000] Python 高性能优化技巧
[Score: 0.3333] Python 语法教程 机器学习工具安装
[Score: 0.2500] Python 机器学习 实战
[Score: 0.2000] 苹果 手机 性能优化技巧
[Score: 0.1667] Django 入门级语法教程

---【hybrid_search_test_1】hybrid: '如何解决 Qdrant 查询慢的问题' ---
[Score: 1.0000] Qdrant 常见问题及解决方案
[Score: 0.3333] MySQL 与 Redis 性能对比
[Score: 0.2500] Python 高性能优化技巧
[Score: 0.2000] 苹果 手机 性能优化技巧
[Score: 0.1667] Django 入门级语法教程

---【hybrid_search_test_1】sparse: '如何解决 Qdrant 查询慢的问题' ---
[Score: 0.5000] Qdrant 常见问题及解决方案

---【hybrid_search_test_2】dense: '如何解决 Qdrant 查询慢的问题' ---
[Score: 0.5000] Qdrant 常见问题及解决方案
[Score: 0.3333] MySQL 与 Redis 性能对比
[Score: 0.2500] Python 高性能优化技巧
[Score: 0.2000] 苹果 手机 性能优化技巧
[Score: 0.1667] Django 入门级语法教程

---【hybrid_search_test_1】hybrid: '苹果为什么是甜的' ---
[Score: 0.5000] 老方不喜欢苹果手机
[Score: 0.3333] 苹果 手机 性能优化技巧
[Score: 0.2500] 老王的手机是一加14,他很喜欢
[Score: 0.2000] Qdrant 常见问题及解决方案
[Score: 0.1667] Python 高性能优化技巧

---【hybrid_search_test_1】sparse: '苹果为什么是甜的' ---

---【hybrid_search_test_2】dense: '苹果为什么是甜的' ---
[Score: 0.5000] 老方不喜欢苹果手机
[Score: 0.3333] 苹果 手机 性能优化技巧
[Score: 0.2500] 老王的手机是一加14,他很喜欢
[Score: 0.2000] Qdrant 常见问题及解决方案
[Score: 0.1667] Python 高性能优化技巧
在 LlamaIndex 中使用 Qdrant
这是在 LlamaIndex 中启用 Qdrant 并开启混合检索的标准写法:
安装依赖:
bash
pip install llama-index
pip install llama-index-llms-openai-like
pip install llama-index-vector-stores-qdrant
完整代码:
python
from fastembed import SparseTextEmbedding
from llama_index.core import VectorStoreIndex, Settings, set_global_handler
from llama_index.embeddings.openai import OpenAIEmbedding
from llama_index.llms.openai_like import OpenAILike
from llama_index.vector_stores.qdrant import QdrantVectorStore

from qdrant_utils import get_client


def init_model():
    CLOSEAI_URL = "https://api.openai-proxy.org/v1"
    CLOSEAI_KEY = "sk-jadDA8KhkA0EQ......"

    # 设置 LLM
    Settings.llm = OpenAILike(
        model="o4-mini",
        api_base=CLOSEAI_URL,
        api_key=CLOSEAI_KEY,
        is_chat_model=True
    )

    # 设置 Embedding Model
    Settings.embed_model = OpenAIEmbedding(
        model="text-embedding-3-large",  # 保持一致
        api_base=CLOSEAI_URL,
        api_key=CLOSEAI_KEY
    )


_bm25_model = SparseTextEmbedding(model_name="Qdrant/bm25")


def custom_sparse_embedding_fn(texts):
    # fastembed 返回的是 generate 对象,需要转 list
    results = list(_bm25_model.embed(texts))
    indices = []
    values = []
    for s_vec in results:
        indices.append(s_vec.indices.tolist())
        values.append(s_vec.values.tolist())
    return indices, values


if __name__ == '__main__':
    # 让 LlamaIndex 把交互细节打印到控制台,会打印 message 和 response
    set_global_handler("simple")
    # 初始化模型
    init_model()

    # 初始化客户端
    client = get_client()

    # 定义 VectorStore
    # enable_hybrid=True 会自动为文档创建 Sparse Vector (用于关键词搜索)
    vector_store = QdrantVectorStore(
        client=client,
        collection_name="hybrid_search_test_1",
        enable_hybrid=True,  # 开启混合检索
        batch_size=5,

        # 源码中的默认名字就是这样,不用指定
        # dense_vector_name = "text-dense",
        # sparse_vector_name = "text-sparse",

        # fastembed_sparse_model="Qdrant/bm25", # 貌似不生效,有可能是 macbook 、环境的问题

        # fastembed_sparse_model 不生效,只能自己手动配置了
        sparse_doc_fn=custom_sparse_embedding_fn,
        sparse_query_fn=custom_sparse_embedding_fn
    )

    # 加载数据并构建索引
    index = VectorStoreIndex.from_vector_store(vector_store=vector_store)

    # 查询 (混合检索模式)
    # alpha=0.5 表示向量和关键词各占一半权重
    query_engine = index.as_query_engine(
        vector_store_query_mode="hybrid",
        similarity_top_k=5,
        alpha=0.5
    )

    response = query_engine.query("老王喜欢啥?")
    print(response)
输出:
text
** Messages: **
system: You are an expert Q&A system that is trusted around the world.
Always answer the query using the provided context information, and not prior knowledge.
Some rules to follow:
1. Never directly reference the given context in your answer.
2. Avoid statements like 'Based on the context, ...' or 'The context information ...' or anything along those lines.
user: Context information is below.
---------------------
老王的手机是一加14,他很喜欢

老方不喜欢苹果手机

苹果 手机 性能优化技巧

Qdrant 常见问题及解决方案

Python 机器学习 实战
---------------------
Given the context information and not prior knowledge, answer the query.
Query: 老王喜欢啥?
Answer:
**************************************************
** Response: **
assistant: 老王喜欢他的一加14手机。
**************************************************


老王喜欢他的一加14手机。
Qdrant vs. 其他数据库
| 对比维度 | Qdrant | Chroma | Milvus | Elasticsearch |
|---|---|---|---|---|
| 开发语言 | Rust | Python/C++ | Go | Java |
| 部署难度 | ⭐⭐ (Docker单容器) | ⭐ (pip install) | ⭐⭐⭐⭐⭐ (复杂微服务) | ⭐⭐⭐ (重) |
| 性能 | 极高 | 中等 | 极高 (分布式下) | 中等 (主要是慢) |
| 混合检索 | ✅ 原生 (Sparse+Dense) | ❌ (需插件) | ✅ (支持) | ✅ (老本行) |
| 资源占用 | 低 (Rust优势) | 中 | 高 | 极高 (JVM吃内存) |
| 适用场景 | 生产环境首选,兼顾性能与易用性 | 快速原型开发 | 十亿级超大规模 | 主要是文本搜索,附带向量 |