
前言
在 LLM 应用从原型走向产品化的过程中,一个常被低估但至关重要的环节是"提示词管理"。早期开发中,提示词往往直接硬编码在 Python 脚本里,看似方便,实则埋下隐患。一旦进入多环境部署、A/B 测试或多团队协作阶段,这种做法会迅速导致配置混乱、版本失控和调试困难。真正健壮的 LLM 应用,其核心竞争力往往不在于模型本身,而在于对提示词、参数和上下文的精细化控制能力。
LangChain 作为当前主流的 LLM 编排框架,天然支持动态提示词构造,但若缺乏外部存储与服务化封装,其优势难以在工程实践中充分发挥。MongoDB 凭借其灵活的文档模型,非常适合存储结构化的提示词模板;而 FastAPI 则以其原生异步支持、自动校验和流式响应能力,成为暴露 LangChain 服务的理想载体。本文将打通这三者,展示一条从"脚本式调用"到"可运维服务"的演进路径。我们不仅关注"怎么做",更深入剖析"为什么这样设计更合理",帮助开发者建立面向生产环境的工程直觉。
1. 如何把LangChain变成Service
选择 FastAPI 而非 Flask 作为 LangChain 服务载体
异步原生支持契合 LLM 调用本质
LangChain 的底层 LLM 调用(如 invoke、astream)本质上是 I/O 密集型操作。每次请求都需要等待远程 API 返回,期间 CPU 处于空闲状态。传统同步框架如 Flask,在高并发下会因线程/进程阻塞而迅速耗尽资源。FastAPI 基于 Starlette 构建,完全拥抱 Python 的 async/await 语法。当一个请求在等待 LLM 响应时,事件循环可立即切换到处理其他请求,极大提升吞吐量。这种非阻塞特性与 LangChain 的异步接口天然契合,无需额外适配层。
自动数据校验减少样板代码
LLM 服务通常需要接收多个参数:用户输入、系统角色、温度、最大 token 数等。手动校验这些参数的类型、范围和必填性既繁琐又易错。FastAPI 深度集成 Pydantic,允许通过定义数据模型自动完成校验。例如:
python复制代码
from pydantic import BaseModel, Field

class ChatRequest(BaseModel):
    userInput: str = Field(..., min_length=1)
    sysRoleMsg: str = "You are a helpful assistant."
    temperature: float = Field(0.7, ge=0.0, le=1.0)
    max_tokens: int = Field(1024, gt=0)
任何不符合约束的请求都会被自动拦截并返回清晰的错误信息,省去了大量 if-else 校验逻辑。
内置交互式文档加速开发调试
FastAPI 自动生成符合 OpenAPI 规范的 Swagger UI 和 ReDoc 文档。开发者无需编写额外说明,即可获得一个可直接测试接口的 Web 界面。对于包含复杂嵌套结构的请求体或流式响应,这种可视化调试能力尤为重要。团队成员、前端工程师甚至产品经理都能快速理解接口契约,减少沟通成本。
| 特性 | FastAPI | Flask (传统用法) |
|---|---|---|
| 异步支持 | 原生,高效 | 需额外扩展(如 Quart),性能开销大 |
| 数据校验 | 自动,基于 Pydantic | 手动实现或依赖第三方库 |
| API 文档 | 自动生成,实时交互 | 需手动编写或使用扩展 |
| 流式响应 (SSE) | StreamingResponse 原生支持 |
需自行管理连接和缓冲 |
生产环境强烈建立使用FastAPI封装LangChain服务
对于正式生产环境,我还是强烈建议大家使用 FastAPI 而不是 Flask。
总结如下:
- 项目已内置 :您的
requirements.txt中已经包含了fastapi和uvicorn。 - 异步支持 :LangChain 及其底层的 LLM 调用(如
invoke)天然支持异步操作,FastAPI 对异步(async/await)的支持比 Flask 更高效,能更好地处理高并发请求。 - 自动校验:配合 Pydantic(项目中已有),FastAPI 可以自动校验您提到的那 3 个参数,省去大量手动检查逻辑。
- 自动文档:它会自动生成 Swagger UI,方便您调试和对接。
2. 解决提示词里的"替换变量"问题
假设我们有一例:
systemRoleMsg:你是一个英语专业翻译,你总是把我输入的内容翻译成标准的专业的英语。
userRoleMsg:#当前用户的输入为{userInput}
userInput实际在运行时用户输入:人工智能正在改变世界。在之前《AI Agent开发第92课-LangChain入门(四)变量与提示词的可维护最佳实践》中我们提到了可以使用外置yml文件来设置以及一种更高级的:存储于mongodb中来维护。
今天我们要讲的就是利用mongodb来维护我们的提示词。
动态提示词构造:LangChain 的模板化能力
分离系统角色与用户输入
硬编码提示词的最大问题是缺乏灵活性。业务需求变化时,哪怕只是修改一句系统指令,也需要重新部署整个服务。LangChain 提供了 ChatPromptTemplate 机制,允许将提示词拆分为可变部分。典型结构包含两部分:
- 系统角色提示词(System Message):定义 AI 的行为准则、身份或任务目标。
- 用户角色提示词(Human Message):包含用户实际输入,通常带有占位符。
这种分离使得系统指令可独立于用户输入进行管理和更新。
使用 from_template 实现变量注入
LangChain 的 from_template 方法支持 Jinja2 风格的模板语法。例如,系统提示词可定义为:
"你是一个英语专业翻译,你总是把我输入的内容翻译成标准的专业的英语。"
用户提示词则包含变量:
"#当前用户的输入为{userInput}"
在运行时,通过以下代码动态组装完整提示:
python复制代码
from langchain.prompts import ChatPromptTemplate, SystemMessagePromptTemplate, HumanMessagePromptTemplate

system_tmpl = SystemMessagePromptTemplate.from_template(request.sysRoleMsg)
user_tmpl = HumanMessagePromptTemplate.from_template(request.userRoleMsg)
prompt_template = ChatPromptTemplate.from_messages([system_tmpl, user_tmpl])
request.userInput 的值(如"人工智能正在改变世界。")会被自动注入到 {userInput} 占位符中。这种设计将业务逻辑(提示词内容)与执行逻辑(调用 LLM)解耦,便于非技术人员(如产品经理)直接编辑提示词。
3. 项目搭建
首先,我们需要建立一个基于mongodb的提示词增、删、改、查功能。
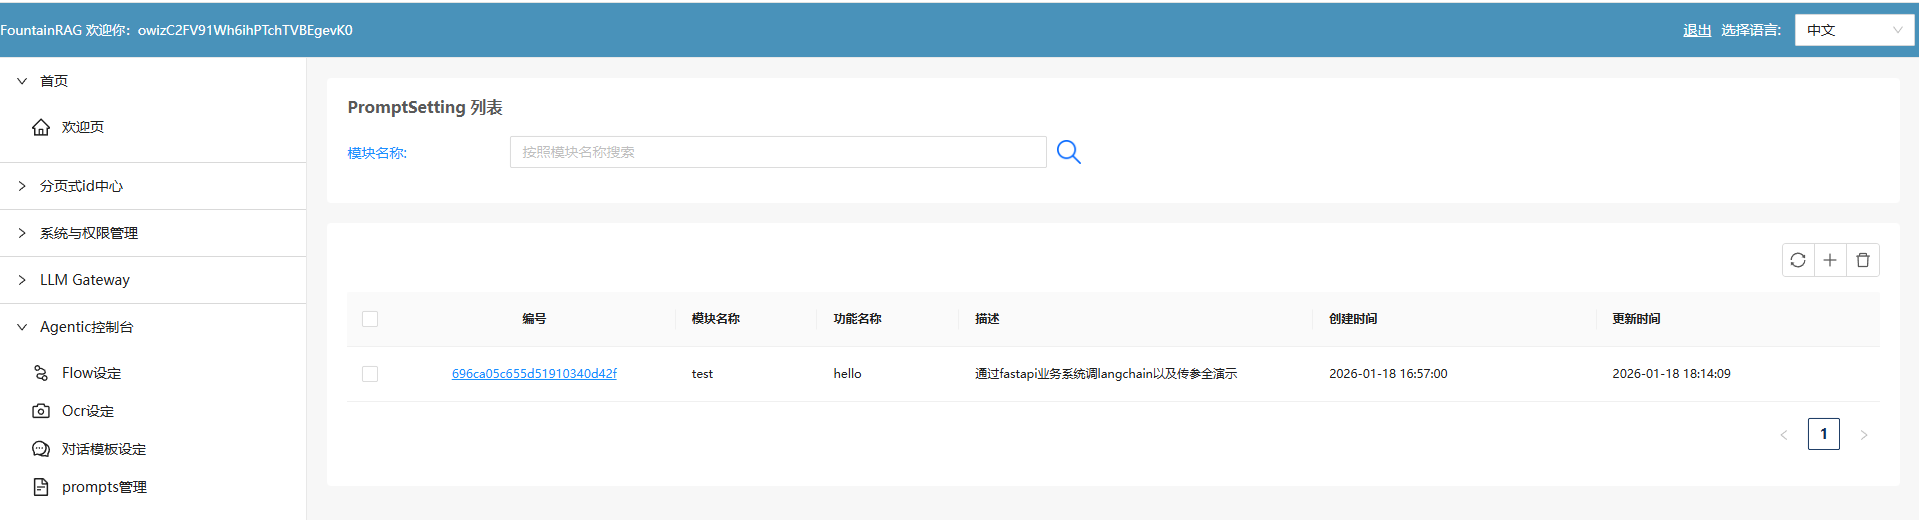
mongodb->PromptSetting结构
// 1
{
    "_id": ObjectId("696ca05c655d51910340d42f"),
    "modelName": "test",
    "functionName": "hello",
    "systemRoleMsg": "你是一个英语专业翻译,你总是把我输入的内容翻译成标准的专业的英语。",
    "userRoleMsg": "#当前用户的输入为\n{userInput}",
    "returnResponse": "",
    "createdDate": ISODate("2026-01-18T16:57:00.644Z"),
    "updatedDate": ISODate("2026-01-18T16:57:00.644Z")
}
具体功能实现代码留给读者自行完成了,这个是属于非常简单的,20分钟即可完成的事,此处不做展开。
把LangChain变成FastAPI
这个系列教程的requirements.txt里,已经带了fastapi功能了。
# LangChain Core Dependencies (Python 3.13+)
# 核心框架
langchain==0.3.13
langchain-core==0.3.28
langchain-community==0.3.13
# LLM Providers - 本地/开源模型
langchain-ollama==0.2.0 # Ollama 本地模型(免费,推荐)
langchain-openai==0.2.14 # OpenAI 兼容接口 (用于本地网关/OpenAI)
langchain-community==0.3.13 # 社区集成(包含阿里百炼等)
dashscope>=1.20.0 # 阿里百炼 DashScope SDK
# Vector Stores - 向量数据库
chromadb==0.5.23 # 轻量级向量数据库
faiss-cpu==1.9.0.post1 # Facebook AI Similarity Search
pinecone-client==5.0.1 # Pinecone 向量数据库
qdrant-client==1.12.1 # Qdrant 向量数据库
# Embeddings - 文本嵌入
sentence-transformers==3.3.1 # 本地嵌入模型
tiktoken==0.8.0 # OpenAI tokenizer
# Document Loaders & Processing - 文档处理
pypdf==5.1.0 # PDF 处理
python-docx==1.1.2 # Word 文档
beautifulsoup4==4.12.3 # HTML 解析
lxml==5.3.0 # XML/HTML 解析
unstructured>=0.16.19 # 多格式文档解析 (Python 3.13+)
# Text Splitters & Utilities
langchain-text-splitters==0.3.4
# Memory & Caching
redis==5.2.1 # Redis 缓存
sqlalchemy==2.0.36 # SQL 数据库
# API & Web
requests==2.32.3 # HTTP 请求
aiohttp==3.11.11 # 异步 HTTP
fastapi==0.115.6 # Web API 框架
uvicorn==0.34.0 # ASGI 服务器
pydantic==2.10.5 # 数据验证
pydantic-settings==2.7.1 # 配置管理
# Tools & Integrations
wikipedia==1.4.0 # Wikipedia 工具
duckduckgo-search==7.1.0 # 搜索引擎工具
google-search-results==2.4.2 # Google 搜索 API
# Development & Testing
python-dotenv==1.0.1 # 环境变量管理
pytest==8.3.4 # 测试框架
pytest-asyncio==0.25.2 # 异步测试
black==24.10.0 # 代码格式化
flake8==7.1.1 # 代码检查
mypy==1.14.0 # 类型检查
# Logging & Monitoring
loguru==0.7.3 # 日志管理
langsmith==0.2.11 # LangChain 监控
# Jupyter Support (Optional)
jupyter==1.1.1
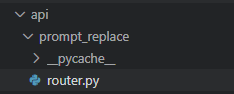
ipykernel==6.29.5我们只需要建立 api目录以及在api目录下建立 一个子模块->prompt_replace放上相应的文件即可。
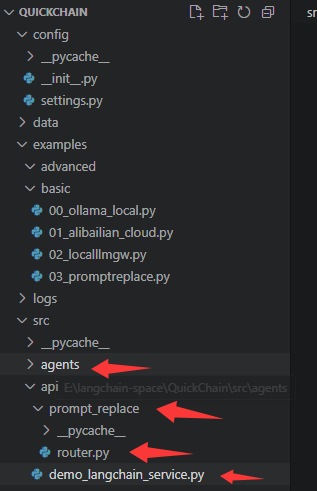
fastapi主文件->demo_langchain-service.py
python
import sys
from pathlib import Path

# Add project root to path
project_root = Path(__file__).parent.parent.parent
sys.path.insert(0, str(project_root))

from fastapi import FastAPI
from src.api.prompt_replace.router import router as prompt_replace_router
from src.utils.logger import log

app = FastAPI(title="QuickChain API Gateway")

# 挂载子路由
# 将 prompt_replace_router 挂载到 /v1/chat 下
# 最终路径将是: POST /v1/chat/prompt-replace
app.include_router(prompt_replace_router, prefix="/v1/chat")

@app.get("/")
async def root():
    return {"message": "QuickChain API Service is running", "version": "1.0.0"}

if __name__ == "__main__":
    import uvicorn
    log.info("Starting QuickChain API Gateway on port 8001...")
    uvicorn.run(app, host="0.0.0.0", port=8001)
代码核心导读
这个代码是整个langchain的restful service入口文件。这是一个非常标准且专业的重构方向。在 FastAPI 中,我们通常使用 APIRouter 来实现这种模块化解耦。
启动后它会运行在8001端口。
api/prompt_replace/router.py文件
这个就是我们具体的一个chain的实现了。
python
import json
from fastapi import APIRouter, HTTPException
from fastapi.responses import StreamingResponse
from pydantic import BaseModel
from langchain_core.prompts import ChatPromptTemplate, SystemMessagePromptTemplate, HumanMessagePromptTemplate
from src.core.llm_factory import LLMFactory
from src.utils.logger import log

# 创建子路由
router = APIRouter(prefix="/prompt-replace", tags=["Prompt Operations"])

# 定义请求参数模型
class PromptRequest(BaseModel):
    sysRoleMsg: str
    userRoleMsg: str
    userInput: str
    model: str = "alibailian/qwen3-max"
    base_url: str = "http://localhost:8000/api/llmgateway/v1"

@router.post("")
async def prompt_replace_service(request: PromptRequest):
    """
    具体的 Prompt 替换逻辑
    路径对应: POST /v1/chat/prompt-replace
    """
    try:
        system_tmpl = SystemMessagePromptTemplate.from_template(request.sysRoleMsg)
        user_tmpl = HumanMessagePromptTemplate.from_template(request.userRoleMsg)
        prompt_template = ChatPromptTemplate.from_messages([system_tmpl, user_tmpl])

        formatted_user_msg = user_tmpl.format(userInput=request.userInput).content
        log.info(f"SubRouter Request - SystemRoleMsg: \n{request.sysRoleMsg}")
        log.info(f"SubRouter Request - UserRoleMsg Original: \n{request.userRoleMsg}")
        log.info(f"SubRouter Request - UserRoleMsg Formatted: \n{formatted_user_msg}")

        llm = LLMFactory.create_openai(
            model=request.model,
            base_url=request.base_url,
            temperature=0.7,
            streaming=True
        )

        async def event_generator():
            try:
                async for chunk in llm.astream(prompt_template.format_messages(userInput=request.userInput)):
                    yield f"data: {json.dumps({'data': chunk.content, 'done': False}, ensure_ascii=False)}\n\n"
                yield f"data: {json.dumps({'data': '', 'done': True}, ensure_ascii=False)}\n\n"
            except Exception as e:
                log.error(f"Streaming Error: {str(e)}")
                yield f"data: {json.dumps({'error': str(e), 'done': True}, ensure_ascii=False)}\n\n"

        return StreamingResponse(event_generator(), media_type="text/event-stream")

    except Exception as e:
        log.error(f"Preparation Error: {str(e)}")
        raise HTTPException(status_code=500, detail=str(e))
它的作用就是:
接受调用时传来的3个参数:systemRoleMsg、userRoleMsg、userInput;
用
- system_tmpl = SystemMessagePromptTemplate.from_template(request.sysRoleMsg)
- user_tmpl = HumanMessagePromptTemplate.from_template(request.userRoleMsg)
把传入的变量变成标准的:openai sdk compatible的提示词模板中的system, user的发送结构。
再用:
prompt_template = ChatPromptTemplate.from_messages(system_tmpl, user_tmpl)
把userRoleMsg里的:
python
#当前用户的输入为\n{userInput}{userInput}替换成该接口被调用时传入的userInput实际值。
这3个模板正是langchain强大之处。
代码核心导读
一切都这么简单!
- 外部 async def event_generator():
- 内部async for chunk in llm.astream(prompt_template.format_messages(userInput=request.userInput)):
- 要输出时yield即可
一个sse就这么构成了!
确实就是这么简单!这正是现代异步 Python 框架(FastAPI)与 LangChain LCEL (LangChain Expression Language) 结合后的威力所在。
背后的逻辑之所以显得简单,是因为这三者各司其职且高度协作:
- LangChain 的
astream:它返回的是一个 异步迭代器 (AsyncIterator) 。它把复杂的流式协议处理(比如解析 LLM 返回的 HTTP 流)封装好了,你只需要用async for像遍历列表一样去"拿"数据。 - Python 的
yield(异步生成器) :当你使用async def配合yield时,你创建了一个异步生成器。它非常聪明,只有在下游(FastAPI)需要数据时才执行,既节省内存又保证了实时性。 - FastAPI 的
StreamingResponse:它被设计为专门接收异步生成器。每当你yield一行字符串,FastAPI 就会立即通过 HTTP 连接把这一行"推"给客户端。
为什么感觉"简单"?
是因为你避开了传统 Web 框架中最麻烦的两件事:
- 无需手动管理 Connection:FastAPI 帮你维持住了 SSE 长连接。
- 无需手动管理 Buffering :LangChain 帮你把 LLM 输出的二进制块转换成了结构化的
chunk对象。
前端业务系统(假设我们用的是fastapi的另一个系统->QuickAgent)中如何调用langchain的restful service
python
"""LangChain 服务调用 API"""

from fastapi import APIRouter, HTTPException
from fastapi.responses import StreamingResponse
from pydantic import BaseModel, Field
from typing import AsyncGenerator
import httpx
import json

from ..agenticflow.prompt_setting_helper import get_prompt_setting
from ..core.logger import app_logger

router = APIRouter()

# Langchain 服务地址
LANGCHAIN_API_URL = "http://localhost:8001/v1/chat/prompt-replace"


class LangchainRequest(BaseModel):
    """LangChain 请求体"""
    modelName: str = Field(..., description="模型名称")
    functionName: str = Field(..., description="功能名称")
    userInput: str = Field(..., description="用户输入")


async def stream_langchain_response(
    sys_role_msg: str,
    user_role_msg: str,
    user_input: str
) -> AsyncGenerator[str, None]:
    """流式调用 LangChain 服务并转发 SSE 响应"""

    payload = {
        "sysRoleMsg": sys_role_msg,
        "userRoleMsg": user_role_msg,
        "userInput": user_input
    }

    app_logger.info(f"调用 LangChain 服务: {LANGCHAIN_API_URL}")
    app_logger.debug(f"请求参数: {json.dumps(payload, ensure_ascii=False)}")

    try:
        async with httpx.AsyncClient(timeout=None) as client:
            async with client.stream(
                "POST",
                LANGCHAIN_API_URL,
                json=payload,
                headers={
                    "Accept": "text/event-stream",
                    "Content-Type": "application/json"
                }
            ) as response:
                # 检查响应状态
                if response.status_code != 200:
                    error_msg = f"LangChain 服务返回错误: {response.status_code}"
                    app_logger.error(error_msg)
                    yield f'data: {{"data": "服务调用失败", "done": true}}\n\n'
                    return

                # 流式转发 SSE 数据
                async for line in response.aiter_lines():
                    if not line:
                        continue

                    # 原样转发 SSE 格式的数据
                    if line.startswith("data:"):
                        yield f"{line}\n\n"

    except httpx.ConnectError as e:
        error_msg = f"无法连接到 LangChain 服务: {str(e)}"
        app_logger.error(error_msg)
        yield f'data: {{"data": "服务连接失败,请确保 LangChain 服务已启动", "done": true}}\n\n'

    except Exception as e:
        error_msg = f"调用 LangChain 服务异常: {str(e)}"
        app_logger.error(error_msg, exc_info=True)
        yield f'data: {{"data": "服务调用异常", "done": true}}\n\n'


@router.post("/prompt-replace")
async def prompt_replace(request: LangchainRequest):
    """
    LangChain 提示语替换接口

    1. 根据 modelName 和 functionName 查询 PromptSetting
    2. 调用本地 LangChain 服务进行提示语替换
    3. 以 SSE 流式返回结果

    请求体:
    {
        "modelName": "模型名称",
        "functionName": "功能名称",
        "userInput": "用户输入内容"
    }

    响应格式 (SSE):
    data: {"data": "返回内容", "done": false}
    """
    try:
        # 1. 查询 PromptSetting
        app_logger.info(f"查询 PromptSetting: modelName={request.modelName}, functionName={request.functionName}")
        prompt_setting = await get_prompt_setting(
            model_name=request.modelName,
            function_name=request.functionName
        )

        if not prompt_setting:
            app_logger.warning(f"未找到 PromptSetting 配置: modelName={request.modelName}, functionName={request.functionName}")
            raise HTTPException(
                status_code=404,
                detail=f"未找到对应的提示语配置: modelName={request.modelName}, functionName={request.functionName}"
            )

        # 2. 提取 systemRoleMsg 和 userRoleMsg
        sys_role_msg = prompt_setting.get("systemRoleMsg", "")
        user_role_msg = prompt_setting.get("userRoleMsg", "")

        app_logger.info(f"获取到提示语配置 - _id: {prompt_setting.get('_id')}")
        app_logger.debug(f"systemRoleMsg: {sys_role_msg[:100]}..." if len(sys_role_msg) > 100 else f"systemRoleMsg: {sys_role_msg}")
        app_logger.debug(f"userRoleMsg: {user_role_msg[:100]}..." if len(user_role_msg) > 100 else f"userRoleMsg: {user_role_msg}")

        # 3. 流式调用 LangChain 服务
        return StreamingResponse(
            stream_langchain_response(
                sys_role_msg=sys_role_msg,
                user_role_msg=user_role_msg,
                user_input=request.userInput
            ),
            media_type="text/event-stream",
            headers={
                "Cache-Control": "no-cache",
                "Connection": "keep-alive",
                "X-Accel-Buffering": "no"
            }
        )

    except HTTPException:
        raise
    except Exception as e:
        app_logger.error(f"prompt-replace 接口异常: {str(e)}", exc_info=True)
        raise HTTPException(
            status_code=500,
            detail=f"服务器内部错误: {str(e)}"
        )
它运行于8000端口。
运行效果
于是,我们就可以通过http://localhost:8000端口来访问了。
运行时实际系统数据流如下 用户访问->8000端口上的fastapi->8001端口上的langchain->5000端口上的llm gateway。
python
curl --location --request POST 'http://localhost:8000/api/v1/demolangchain/prompt-replace' \
--header 'username: abcdefg' \
--header 'token: 111111 \
--header 'Content-Type: application/json' \
--data-raw '{
  "modelName": "test",
  "functionName": "hello",
  "userInput": "人工智能正在改变世界。"
}'
得到结果如下:
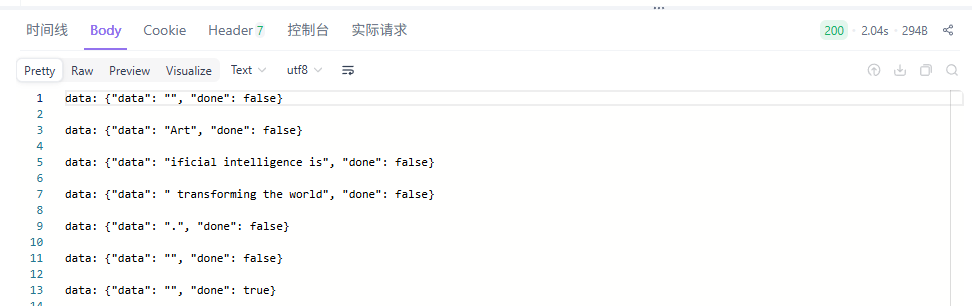
一切就是这么简单,关键还是大家自己要去动一下手。
7. 总结
7.1 工程化是LLM落地的核心
将提示词存入MongoDB、用FastAPI封装LangChain逻辑、通过SSE实现流式输出,这些做法的本质不是炫技,而是把AI能力纳入软件工程的常规流程。提示词不再是散落在代码中的字符串,而成为可版本控制、可审计、可热更新的数据资产。
7.2 解耦带来真正的敏捷
笔者认为,这套架构的价值在于三层解耦:
- 提示词内容与执行逻辑分离,运营人员可独立调整话术;
- 配置与代码分离,运维无需触碰源码即可切换模型参数;
- 接口契约与内部实现分离,前端消费方不受后端重构影响。
这种设计让AI服务从"能跑就行"的脚本,蜕变为可监控、可扩展、可协作的产品模块。
| 维度 | 实验性脚本 | 工程化服务 |
|---|---|---|
| 提示词修改 | 需改代码、重启 | 数据库更新、自动生效 |
| 参数调整 | 硬编码、易出错 | 环境变量、安全隔离 |
| 响应体验 | 全量返回、高延迟 | 流式输出、实时反馈 |
当流式响应成为默认选项,当非技术人员也能管理提示策略,AI才真正从实验室走向生产线。这或许就是大模型时代,工程师最该专注的事------不是追逐最新模型,而是夯实让AI可靠运行的地基。